Packet Tracer – 配置静态 NAT
目标
第 1 部分:测试不使用 NAT 的访问
第 2 部分:配置静态 NAT
第 3 部分:测试使用 NAT 的访问
拓扑图

场景
在 IPv4 配置网络中,客户端和服务器使用专用编址。 然后,在含专用编址的数据包通过互联网前,需将其转换成公共编址。 对于从组织外部访问的服务器,通常既分配公共静态 IP 地址,又分配专用静态 IP 地址。 在该练习中,您将配置静态 NAT,使外部设备可访问其公共地址上的内部服务器。
第 1 部分: 测试不使用 NAT 的访问
步骤 1: 使用模拟模式尝试连接至 Server1。
- 从 PC1 或 L1,尝试连接至位于 172.16.16.1 的 Server1 网页。 使用 Web 浏览器浏览 172.16.16.1 上的Server1。 尝试会失败。

- 从 PC1,ping R1 S0/0/0 接口。 ping 命令应该会成功。
步骤 2: 查看 R1 路由表和运行配置。
- 查看 R1 运行配置。 请注意,无提及 NAT 的命令。
R1#show running-config
Building configuration...
Current configuration : 837 bytes
!
version 15.1
no service timestamps log datetime msec
no service timestamps debug datetime msec
no service password-encryption
!
hostname R1
!
!
!
!
!
!
!
!
ip cef
no ipv6 cef
!
!
!
!
license udi pid CISCO2911/K9 sn FTX1524L1C1
!
!
!
!
!
!
!
!
!
!
!
spanning-tree mode pvst
!
!
!
!
!
!
interface GigabitEthernet0/0
ip address 172.16.16.14 255.255.255.240
duplex auto
speed auto
!
interface GigabitEthernet0/1
no ip address
duplex auto
speed auto
shutdown
!
interface GigabitEthernet0/2
no ip address
duplex auto
speed auto
shutdown
!
interface Serial0/0/0
ip address 209.165.128.130 255.255.255.248
!
interface Serial0/0/1
no ip address
clock rate 2000000
shutdown
!
interface Vlan1
no ip address
shutdown
!
ip classless
!
ip flow-export version 9
!
!
!
!
!
!
!
line con 0
!
line aux 0
!
line vty 0 4
login
!
!
!
end
R1#
- 验证该路由表不含提及 PC1 和 L1 所使用 IP 地址的条目。
R1#show ip route
Codes: L - local, C - connected, S - static, R - RIP, M - mobile, B - BGP
D - EIGRP, EX - EIGRP external, O - OSPF, IA - OSPF inter area
N1 - OSPF NSSA external type 1, N2 - OSPF NSSA external type 2
E1 - OSPF external type 1, E2 - OSPF external type 2, E - EGP
i - IS-IS, L1 - IS-IS level-1, L2 - IS-IS level-2, ia - IS-IS inter area
* - candidate default, U - per-user static route, o - ODR
P - periodic downloaded static route
Gateway of last resort is not set
172.16.0.0/16 is variably subnetted, 2 subnets, 2 masks
C 172.16.16.0/28 is directly connected, GigabitEthernet0/0
L 172.16.16.14/32 is directly connected, GigabitEthernet0/0
209.165.128.0/24 is variably subnetted, 2 subnets, 2 masks
C 209.165.128.128/29 is directly connected, Serial0/0/0
L 209.165.128.130/32 is directly connected, Serial0/0/0
R1#
c. 验证 NAT 并未正由 R1 使用。
R1# show ip nat translations
第 2 部分: 配置静态 NAT
步骤 1: 配置静态 NAT 语句。
请参考拓扑结构。 创建静态 NAT 转换以将 Server1 内部地址映射至其外部地址。
R1(config)# ip nat inside source static 172.16.16.1 64.100.50.1
步骤 2: 配置接口。
配置正确的内部和外部接口。
R1(config)#interface g0/0
R1(config-if)#ip nat inside
R1(config-if)#interface s0/0/0
R1(config-if)#ip nat outside
第 3 部分: 测试使用 NAT 的访问
步骤 1: 验证 Server1 网页连接。
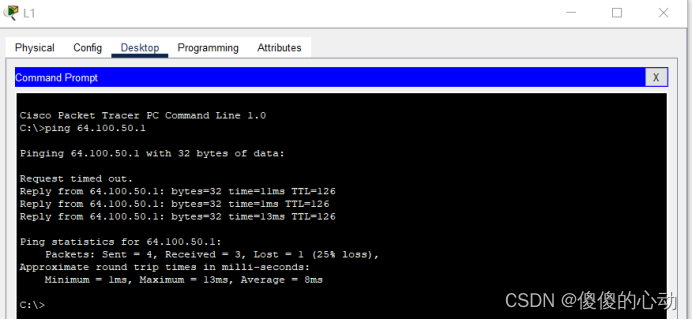
- 打开 PC1 或 L1 上的命令提示符,试图 ping Server1 的公共地址。 Ping 应该成功。

- 验证 PC1 和 L1 现在是否均可访问 Server1 网页。

步骤 2: 查看 NAT 转换。
使用如下命令验证静态 NAT 配置:
show running-config
show ip nat translations
show ip nat statistics
R1#show ip nat translations
Pro Inside global Inside local Outside local Outside global
tcp 64.100.50.1:80 172.16.16.1:80 209.165.128.129:1027209.165.128.129:1027
--- 64.100.50.1 172.16.16.1 --- ---
R1#show ip nat statistics
Total translations: 2 (1 static, 1 dynamic, 1 extended)
Outside Interfaces: Serial0/0/0
Inside Interfaces: GigabitEthernet0/0
Hits: 10 Misses: 5
Expired translations: 4
Dynamic mappings:
R1#
【实验步骤】
R1>enable
R1#conf t
Enter configuration commands, one per line. End with CNTL/Z.
R1(config)# ip nat inside source static 172.16.16.1 64.100.50.1
R1(config)#interface g0/0
R1(config-if)#ip nat inside
R1(config-if)#interface s0/0/0
R1(config-if)#ip nat outside
R1(config-if)#end
R1#
%SYS-5-CONFIG_I: Configured from console by console
R1#write
Building configuration...
[OK]
R1#
【实验脚本】
enable

conf t

ip nat inside source static 172.16.16.1 64.100.50.1

interface g0/0

ip nat inside

interface s0/0/0

ip nat outside

end

write
【实验链接】
链接:https://pan.baidu.com/s/1yf7L-fgJVvEhqFG8YNupAQ?pwd=9114
提取码:9114
--来自百度网盘超级会员V3的分享


![[软件工具]姓氏谐音梗随机生成工具使用教程](https://i0.hdslb.com/bfs/archive/1373a7c71fa54b2707f9b430c59a36d597059301.jpg@100w_100h_1c.png@57w_57h_1c.png)


