ChatGPT在自然语言处理领域的表现让人振奋,开启了大模型在通用人工智能领域的大门。
许多工作随之跟进,并开源,凭借相对小的参数量达到近似GPT的效果,包括LLama,alpace等。
其中LLama训练语料主要选择英语,而且数据清洗时,非英文都被过滤掉,它对中文的支持能力相当有限,国内清华大学针对这个问题,扩充中文token,采用自建的中文语料库进行训练,生成ChatGLM2模型,目前的测试,在中文的表现上优于Chatgpt。
项目网址:GitHub - THUDM/ChatGLM2-6B: ChatGLM2-6B: An Open Bilingual Chat LLM | 开源双语对话语言模型
系统ubuntu18.04LTS
九天毕昇云服务8核CPU内存32G
内核:Linux dl-2307071824141la-pod-jupyter-5c6ccb995c-sfk68 4.19.90-2107.6.0.0100.oe1.bclinux.x86_64 #1 SMP Wed Dec 1 19:59:44 CST 2021 x86_64 x86_64 x86_64 GNU/Linux
2023年7月
下载:
github上分享的源码
GitHub - THUDM/ChatGLM2-6B: ChatGLM2-6B: An Open Bilingual Chat LLM | 开源双语对话语言模型
模型文件
THUDM/chatglm2-6b at main 6b-FP16
THUDM/chatglm2-6b-int4 at main 6b-int4

一、搭建环境
conda create -n ChatGLM2 python=3.10.10 -y参数:-n 后面ChatGLM2为创建的虚拟环境名称,python=之后输入自己想要的python版本,-y表示后面的请求全部为yes,这样就不用自己每次手动输入yes了。
安装完虚拟环境后,我们需要进入虚拟环境。
conda activate ChatGLM2创建ChatGLM2项目的虚拟环境
python -m venv venv
 激激活虚拟环境venv
source ./venv/bin/activate![]()
Linux系统使用source ./venv/bin/activate命令即可,
Windows则直接双击./venv/Scripts/activate.bat或者运行./venv/Scripts/activate命令、
ChatGLM2-6B安装详解(Windows/Linux)及遇到的问题解决办法_星辰同学wwq的博客-CSDN博客
二、安装软件包
cd ChatGLM2-6B-main
pip install -r requirements.txt -i https://pypi.douban.com/simple
进入下载好的源码目录ChatGLM2-6B-main,执行requirements.txt安装依赖包,
参数:-r 是read的意思,可以把要安装的文件统一写在一个txt中,批量下载
参数:-i 后面是下载的网址,这里使用的是豆瓣源,下载安装大概十几分钟

requirements.txt内容,我是新建requirements.txt,复制粘过去,再执行的文件
protobuf
transformers==4.30.2
cpm_kernels
torch>=2.0
gradio
mdtex2html
sentencepiece
accelerate
sse-starlette
安装完成后,查看安装的包和版本
pip list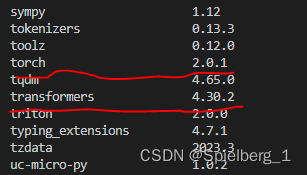
官方建议:transformers 库版本推荐为 4.30.2,torch 推荐使用 2.0 及以上的版本,以获得最佳的推理性能
三、修改启动文件
进入ChatGLM2-6B-main目录,包含下列文件
cd ChatGLM2-6B-main
ls

修改cli_demo.py文件
tokenizer = AutoTokenizer.from_pretrained("/root/chatglm2-6b", trust_remote_code=True)
model = AutoModel.from_pretrained("/root/chatglm2-6b", trust_remote_code=True).float()
参数:/root/chatglm2-6b修改为ChatGLM2-6b模型路径,注意包含tokenizer.model文件。
参数:model = AutoModel.from_pretrained("/root/chatglm2-6b", trust_remote_code=True).float()
在 CPU 上进行推理,需要大概 32GB 内存
model = AutoModel.from_pretrained("/root/chatglm2-6b", trust_remote_code=True, device='cuda'),在 GPU 上进行推理,需要大概 13GB 显存
如果你的 GPU 显存有限,可以尝试以量化方式加载模型,使用方法如下:
# 按需修改,目前只支持 4/8 bit 量化
model = AutoModel.from_pretrained("/root/chatglm2-6b", trust_remote_code=True).quantize(8).cuda()
模型量化会带来一定的性能损失,经过测试,ChatGLM2-6B 在 4-bit 量化下仍然能够进行自然流畅的生成。
如果你的内存不足,可以直接加载量化后的模型:
model = AutoModel.from_pretrained("/root/chatglm2-6b-int4",trust_remote_code=True).cuda()
cli_demo.py文件内容如下:
import os
import platform
import signal
from transformers import AutoTokenizer, AutoModel
import readline

tokenizer = AutoTokenizer.from_pretrained("/root/chatglm2-6b", trust_remote_code=True)
model = AutoModel.from_pretrained("/root/chatglm2-6b", trust_remote_code=True).float()
# 多显卡支持,使用下面两行代替上面一行,将num_gpus改为你实际的显卡数量
# from utils import load_model_on_gpus
# model = load_model_on_gpus("THUDM/chatglm2-6b", num_gpus=2)
model = model.eval()

os_name = platform.system()
clear_command = 'cls' if os_name == 'Windows' else 'clear'
stop_stream = False


def build_prompt(history):
    prompt = "欢迎使用 ChatGLM2-6B 模型,输入内容即可进行对话,clear 清空对话历史,stop 终止程序"
    for query, response in history:
        prompt += f"\n\n用户:{query}"
        prompt += f"\n\nChatGLM2-6B:{response}"
    return prompt


def signal_handler(signal, frame):
    global stop_stream
    stop_stream = True


def main():
    past_key_values, history = None, []
    global stop_stream
    print("欢迎使用 ChatGLM2-6B 模型,输入内容即可进行对话,clear 清空对话历史,stop 终止程序")
    while True:
        query = input("\n用户:")
        if query.strip() == "stop":
            break
        if query.strip() == "clear":
            past_key_values, history = None, []
            os.system(clear_command)
            print("欢迎使用 ChatGLM2-6B 模型,输入内容即可进行对话,clear 清空对话历史,stop 终止程序")
            continue
        print("\nChatGLM:", end="")
        current_length = 0
        for response, history, past_key_values in model.stream_chat(tokenizer, query, history=history,
                                                                    past_key_values=past_key_values,
                                                                    return_past_key_values=True):
            if stop_stream:
                stop_stream = False
                break
            else:
                print(response[current_length:], end="", flush=True)
                current_length = len(response)
        print("")


if __name__ == "__main__":
    main()
四、测试推理
测试命令行,执行cli_demo.py文件
python cli_demo.py参数:python执行cli_demo.py文件,命令行输出,加载模型大概几分钟
(venv) (ChatGLM2) root@dl-2307071824141la-pod-jupyter-7d677494c4-7jz2f:~/ChatGLM2-6B-main# python cli_demo.py
Loading checkpoint shards: 100%|███████████████████████████████████████████████████████████████████████████████████████████████████████| 7/7 [02:33<00:00, 21.96s/it]
欢迎使用 ChatGLM2-6B 模型,输入内容即可进行对话,clear 清空对话历史,stop 终止程序
用户:你好
ChatGLM:你好👋!我是人工智能助手 ChatGLM2-6B,很高兴见到你,欢迎问我任何问题。
测试API
安装额外的依赖包
pip install fastapi uvicorn
修改api.py文件
tokenizer = AutoTokenizer.from_pretrained("/root/chatglm2-6b", trust_remote_code=True)
model = AutoModel.from_pretrained("/root/chatglm2-6b", trust_remote_code=True).float()
参数:/root/chatglm2-6b修改为ChatGLM2-6b模型路径,注意包含tokenizer.model文件。
这里是在CPU上运行,需要大概30G的内存
运行api.py
python api.py
五、未来的工作:
进行网页版测试
优化内存占用,提高反应速度,更方便的体验chatglm2-6b
几次对话就会退出,探究是系统硬件资源有限,还是代码的限制,进一步优化
遇到的错误:
(1)conda create -n ChatGLM2 python=3.10.10 -y
Collecting package metadata (current_repodata.json): failed
ProxyError: Conda cannot proceed due to an error in your proxy configuration.
Check for typos and other configuration errors in any '.netrc' file in your home directory,
any environment variables ending in '_PROXY', and any other system-wide proxy
configuration settings.

更新源文件,修改源,重启都不行,休息会,再来弄,就好了
(2)OSError: root/chatglm2-6b is not a local folder and is not a valid model identifier listed on 'https://huggingface.co/models'
没有找到root/chatglm2-6b目录,路径错了,默认路径THUDM/chatglm-6b,我按照这个格式,把THUDM修改成我的路径root,运行报错,加个【/】号,改成 /root/chatglm2-6b,开始加载模型。请仔细核对路径。
(3)urllib3.exceptions.SSLError: [SSL: UNEXPECTED_EOF_WHILE_READING] EOF occurred in violation of protocol (_ssl.c:1007)

解决方案:
pip install urllib3==1.25.11urllib3版本的问题,如果换用 1.25.11或者其他低版本,就不会产生上面所述的错
python开代理后访问网站报ssl.SSLEOFError: EOF occurred in violation of protocol错_低版本urllib3_kaims的博客-CSDN博客
(4) -bash: lspci: command not found
分析:lspci 命令位于 pciutils 包的附加包 libpci3 中,因此需要安装这个包才能使用 lspci 命令
apt-get update
apt install pciutils
ubuntu指令积累:
locate+文件名 显示出文件路径
sudo find / -name g2o 显示出搜索路径下所有匹配文件名的路径
dpkg -l 查看安装的所有软件
whereis openmpi 查看软件安装的路径
python -c "import torch; print(torch.cuda.is_available());"
查看 cuda 是否可用, -c 就是 command 的意思,简单来说, 就是 python -c 可以在命令行中执行 python 代码, 跟把代码放置在 .py 文件中然后运行这个文件比无明显差别
python -c 的学习使用_岳来的博客-CSDN博客
touch xxl.py 创建xxl.py文件
cat xxx.py 在命令行输出xxx.py文内容
vim xxx.py 使用vim打开xxx.py
git clone https://github.com/huggingface/transformers 克隆git源码到当前目录
sudo dpkg --list | grep nvidia-* 查看驱动版本
nvidia-smi GPU列表信息
nvidia-settings 显示你的显卡信息
lshw -c video 查看显卡型号
lspci | grep -i nvidia 得到NVIDIA显卡的信息
sudo apt-get update 更新系统
ps aux | grep streamlit 查看streamlit进程服务运行状态
启动一个单卡V100(CPU 8核、内存32G、V100 1个-32G显存),再看v100就灰色
参考:
https://www.bilibili.com/video/BV1414y1m7m
ChatGLM2-6B本地部署_爱学习的小黑的博客-CSDN博客
在个人电脑上部署ChatGLM2-6B中文对话大模型 - 程序员小屋(寒舍)
ChatGLM2-6B安装详解(Windows/Linux)及遇到的问题解决办法_星辰同学wwq的博客-CSDN博客
ChatGLM2-6B安装详解(Windows/Linux)及遇到的问题解决办法_星辰同学wwq的博客-CSDN博客
本地安装部署运行 ChatGLM-6B 的常见问题解答以及后续优化 — 秋风于渭水
