文章目录
- ICC1 workshop lab guide
- 2.5 Create P/G Rings Around Macro Groups
- 2.6 Power Network Synthesis
- 2.7 Check the Timing
- 2.8 Write Out the DEF Floorplan File
- 2.9 Create 2nd Pass Design Ready for Placement
ICC1 workshop lab guide
2.5 Create P/G Rings Around Macro Groups
In the task following this one you will use “Power Network Synthesis” (PNS) to
automate the creation of power/ground core and individual macro rings, as well as
vertical and horizontal straps. If you want to create rings around groups of macros,
that is done prior to PNS, which is what this task will accomplish.
在接下来的任务中,你将使用电源网络综合去自动地创建P/G核心和单个宏环,以及垂直和水平绑带。
如果你想在宏组周围创建环,则需要在PNS之前完成,这就是这次要完成的任务。
- We have created a script to create P/G rings around six groups of macros. Take a look at the file located at ./scripts/macro_pg_rings.tcl. The P/G rings are created by:
我们已经创建了一个脚本来在六组宏周围创建P/G环。看./scripts/macro_pg_rings.tcl这个文件。这个P/G环被创建为:
- Defining a rough “region” that encompasses a group of macros
定义围绕一组宏的粗糙区域 - Defining the block ring layers, widths and offsets
定义块环的层数、宽度和偏移量 - Creating (committing) the metal routes
创建金属绕线
- Execute the script:
source ./scripts/macro_pg_rings.tcl
- Take a look at the rings that have been created.
Notice that the “PLL” macro in the upper-left corner is the only macro that
does not have a P/G ring around it - this will be done by PNS.
Notice also that, in addition to the rings around the macro groups, there are
vertical/horizontal straps in between the macros. This is nice feature of the
create_fp_group_block__ring command. It can be disabled with the
-skip_strap option, if preferred.
请注意,左上角的“PLL”宏是唯一一个没有P/G环的宏——这将由PNS完成。
还要注意,除了宏组周围的环之外,宏之间还有垂直/水平带。这是create_fp_group_block__ring命令的一个很好的特性。如果愿意,可以使用-skip_strap选项禁用它。
2.6 Power Network Synthesis
实际上是做power plan
The power “grid” needs to be completed. You could create P/G straps that feed the
center of the core, a core ring, as well as rings around individual macros “manually”
(similar to the way the macro group rings were created in the previous task), but to
do so would require you to guess the appropriate number and width of the straps, as
well as the width of the core ring to achieve acceptably low IR drop. Instead, you
will use IC Compiler’s Power Network Synthesis (PNS) capability to automatically
determine the number and width of straps, as well as the core ring width, based on a
target IR drop. You can experiment with different goals, and when acceptable
results are achieved you then “commit” or physically implement the power grid.
电力“网格”需要被完成。您可以创建P/G带,围绕core的中心、核心环以及单个宏周围的环提供“手动”(类似于在前面的任务中创建宏组环的方式),但要这样做,您需要猜测带的适当数量和宽度,以及核心环的宽度,以实现可接受的低IR下降。
相反,您将使用IC编译器的电源网络综合(PNS)功能来自动确定带的数量和宽度,以及核心环宽度,基于目标IR下降。您可以尝试不同的目标,当获得可接受的结果时,您就可以“提交”或实际实现电网。
2.7 Check the Timing
Now that the power plan is done,you have to perform a few more steps to complete the placement and to verify max-delay(setup)timing.
现在电源规划已经做好了,你需要去执行一些步骤来完成布局并验证最大时延时序。
1.If you are not able to see the standard cells in the LayoutWindow,go to the “Visibility” panel in the left margin of the LayoutWindow,expand the “Cell” listing by selecting the “+” sign,and make sure that “Standard” is checked.
如果你在LayoutWindow中看不到标准单元,在LayoutWindow左侧边缘的”可视化“面板中,通过”+”号展开Cell,确保“Standard"被选中。
2.PNS created many straps on METAL4 and METAL5,which were placed over the standard cells.It can be advantageous to prevent standard cell placement under the straps——this reduces the likelihood of congestion along the straps,and reduces crosstalk effects on the power nets.Apply a “complete” power net(pnet) blockage on the straps,then run the virtual flat placement again to take pnet setting into account:
PNS用METAL 4和5创建了许多放在标准单元上的电源条带。阻止标准单元布局在条带下是有利的——这减少了条带上阻塞的可能,并且减少了在电源网线上的串扰效应。应用"complete"电源网络障碍在条带上,然后再次运行vfp来讲pnet设置生效:
set_pnet_options -complete "METAL4 METAL5"
create_fp_placement -timing_driven -no_hierarchy_gravity
Verify that there are no longer any standard cells under the straps
验证不再有标准单元在straps下面
3.Since we are about to check timing,perform actual global routing by running the following command:
在我们要去做时序检测时,执行全局routing通过下面的命令:
route_zrt_global
4.Bring up the global route congestion map(no need to “reload”).There should not be any congestion issues.Close the panel(click on small “x”).
打开全局布线阻塞图。应该不会有任何阻塞提醒。关闭面板(点击小x)
5.Generate a maximum-delay(setup) timing report using the “view” procedure (it will take a few seconds to update the timing and generate the report):
使用view工具生成最大延时(setup)timing report
v report_timing
Use the search machanism to highlight or tag the word “slack”:
使用搜索机制去高亮或点击”slack“
RE Search-> type in “slack” -> Tag.
Scroll up/down.You should see the words slack(MET) followed by a positive number at the end of each of the 8 clock group paths.This design meets setup timing.Click on Close Search then Close Window.
上下滚动。你会在每8个时钟组路径后看到一个正数slack(MET)。
这个设计满足setup timing。点击关闭搜索窗口。
6.To fix any timing violations(and design rule violations),if there were any,you would invoke the following command and repeat global route.Feel free to do so,if you have the time,otherwise skip to the “Save the cell” step:
为了修复可能存在的时序违例(和设计规则违例),你需要调用下面的命令并重复全局布线。如果有时间就做一下,没时间就跳过。
optimize_fp_timing -fix_design_rule
7.Save the cell as floorplan_complete
将cell保存为floorplan_complete
2.8 Write Out the DEF Floorplan File
1.Remove all the placed standard cells then write out the floorplan file in DEF format.The DEF floorplan file will be used by Design Compiler Topographical to re-synthesize the design using the floorplan you just designed,and will again be used by IC Compiler to re-create the floorplan when reading in the re-synthesized netlist(next Task):
移除所有已布局的标准单元,然后将floorplan文件写出到DEF格式中。DEF格式的floorpaln文件会被DCT使用来用你刚刚的floorplan重新综合设计,并且将被ICC在读入重新综合的网表时再次创建floorplan:
remove_placement -object_type standard_cell
write_def -verison 5.6 -placed -all_vias -blockages -routed_nets -rows_tracks_gcells -specialnets -output design_data/ORCA.def
2.Verify that the DEF file has been created in the design_data directory.
验证DEF文件是否被创建在design_data目录中
3.Close the design library without saving the design in momory.
不保存内存中的设计,关闭设计库。
2.9 Create 2nd Pass Design Ready for Placement
We will now pretend that this design was re-synthesized from RTL code using Design Compiler Topographical mode,along with the floorplan description captured in the DEF file generated in the previous task.You have been given a 2nd pass netlist,ORCA_2.v,along with an updated constraints file ,ORCA_2.sdc.
我们现在要假设这个设计是由DCT工具由RTL代码重新综合出来的,带有先前任务中被DEF文件记录的floorplan信息。你被给出了第二版netlist,ORCA_2.v,以及一个更新的约束文件,ORCA_2.sdc
1.Perform data setup using the new ORCA netlist and constraints:
source scripts/2nd_pass_setup.tcl
This script executes the following standard data setup steps:
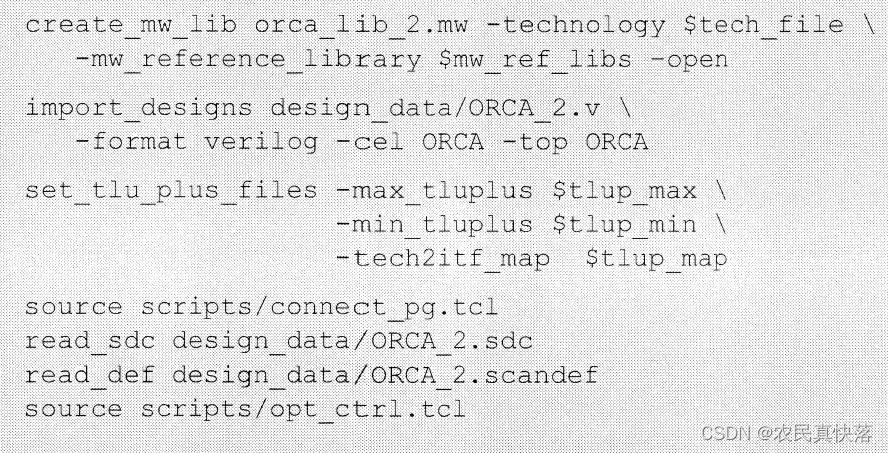
2.Read the DEF file that was written out in the previous task:
读入刚刚写入的DEF文件
read_def design_data/ORCA.def
3.Re-apply the pnet options that you applied after Power Network Synthesis in Task 6,step 1.These settings are not captured in the DEF file:
重新应用以下命令,这个命令之前执行过,DEF没记录。
set_pnet_options -complete "METAL4 METAL5"
4.Save the cell as ready_for_placement.
保存这个cell为ready_for_placement
5.Exit IC Compiler.
退出ICC
