
目录
MongoDB应用实战
多键索引
多键索引用于为数组中的元素创建索引
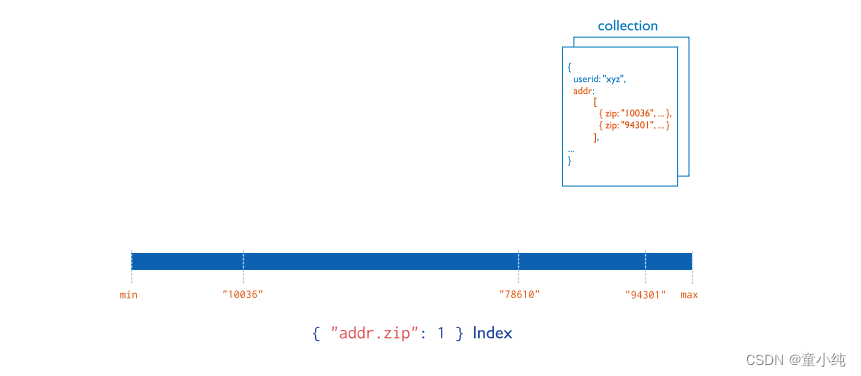
先创建集合inventory,使用下面的数据来创建多键索引
[{ _id: 5, type: "food", item: "aaa", ratings:[ 5, 8, 9 ] },
{ _id: 6, type: "food", item: "bbb", ratings: [ 5, 9 ] },
{ _id: 7, type: "food", item: "ccc", ratings: [ 9, 5, 8 ] },
{ _id: 8, type: "food", item: "ddd", ratings: [ 9, 5 ] },
{ _id: 9, type: "food", item: "eee", ratings: [ 5, 9, 5 ] }]
db.inventory.createIndex( { ratings: 1 } )MongoDB使用多键索引查找在“ratings”数组中有“5”的文档,然 后,MongoDB检索这些文档并筛选“ratings”数组等于查询数组 “[5,9]”的文档。
db.inventory.find( { ratings: [ 5, 9 ] } )
地理空间索引
针对地理空间坐标数据创建索引。2dsphere索引用于存储和查找球 面上的点,2d索引用于存储和查找平面上的点。
db.company.insert(
 {
  loc : { type: "Point", coordinates: [ 116.502451, 40.014176 ] },
  name: "军博地铁",
  category : "Parks"
 }
)
db.company.createIndex( { loc : "2dsphere" } )
db.company.find({
"loc" : {
   "$geoWithin" : {
    "$center":[[116.482451,39.914176],0.05]
   }
 }
})
db.places.insert({"name":"aa","addr":[32,32]})
db.places.insert({"name":"bb","addr":[30,22]})
db.places.insert({"name":"cc","addr":[28,21]})
db.places.insert({"name":"dd","addr":[34,26]})
db.places.insert({"name":"ee","addr":[34,27]})
db.places.insert({"name":"ff","addr":[39,28]})
db.places.find({})
db.places.createIndex({"addr":"2d"})
db.places.find({"addr":{"$within":{"$box": [[0,0],[30,30]]}}})全文索引
MongoDB提供了针对string内容的文本查询,Text Index支持任意 属性值为string或string数组元素的索引查询。注意:一个集合仅支 持最多一个Text Index,中文分词不理想推荐ES
db.fullText.insert({name:"aa",description:"nopains,no gains"})
db.fullText.insert({name:"ab",description:"paypains,get gains"})
db.fullText.insert({name:"ac",description:"afriend in need,a friend in deed"})
创建索引并指定语言
db.fullText.createIndex(
   { description : "text" },
   { default_language: "english" }
)
db.fullText.find({"$text": {"$search":"pains"}})全文索引名称
db.collection.createIndex(
   {
     content: "text",
     "users.comments": "text",
     "users.profiles": "text"
   }
)
生成的默认索引名:
content_text_users.comments_text_users.profiles_text指定名称
db.collection.createIndex(
   {
     content: "text",
     "users.comments": "text",
     "users.profiles": "text"
   },
   {
     name: "MyTextIndex"
   }
)
使用指定名称删除索引
db.collection.dropIndex("MyTextIndex")
哈希索引
针对属性的哈希值进行索引查询,当要使用Hashed index时, MongoDB能够自动的计算hash值,无需程序计算hash值。注: hash index仅支持等于查询,不支持范围查询。
db.collection.createIndex({"field": "hashed"})创建复合hash索引,4.4以后的版本
db.collection.createIndex( { "fieldA" : 1,"fieldB" : "hashed", "fieldC" : -1 } )索引管理
获取针对某个集合的索引
db.collection.getIndexes()索引的大小
db.collection.totalIndexSize()索引的重建
db.collection.reIndex()索引的删除,注意: _id 对应的索引是删除不了的
db.collection.dropIndex("INDEX-NAME")
db.collection.dropIndexes()
1.MongoDB的索引种类有?
A 单键索引
B 多键索引
C 文本索引
D 以上者是
MongoDB应用实战
Java访问MongoDB
连接MongoDB
<dependency>
  <groupId>org.mongodb</groupId>
  <artifactId>mongo-java-driver</artifactId>
  <version>3.12.11</version>
</dependency>
import org.bson.BsonDocument;
import org.bson.BsonInt64;
import org.bson.Document;
import org.bson.conversions.Bson;
import com.mongodb.MongoClientSettings;
import com.mongodb.MongoException;
import com.mongodb.client.MongoClient;
import com.mongodb.client.MongoClients;
import com.mongodb.client.MongoDatabase;
public class MongoClientConnectionExample {
public static void main(String[] args) {
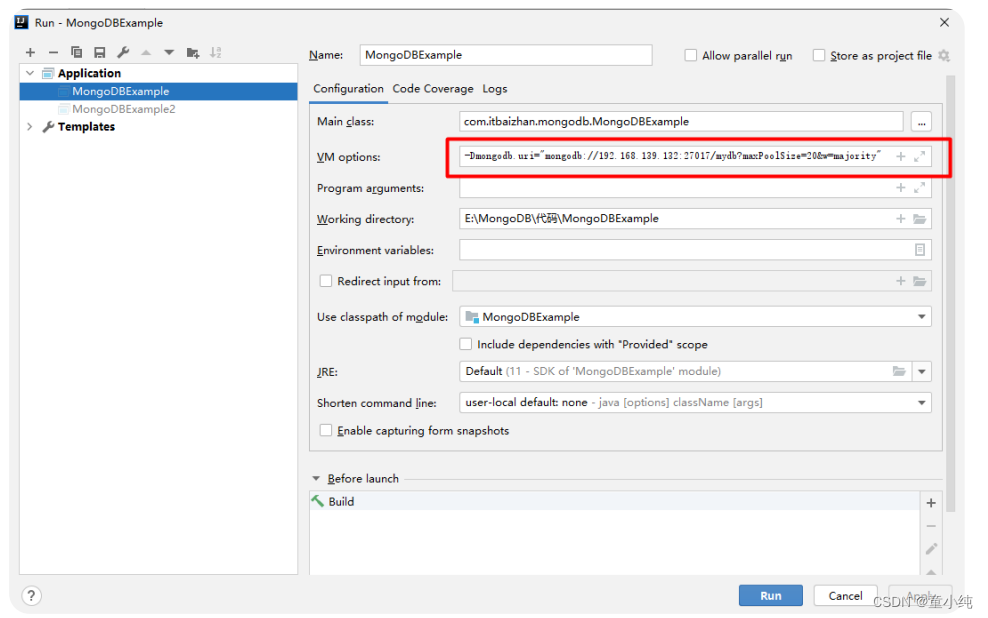
String connectionString = System.getProperty("mongodb.uri");
try (MongoClient mongoClient = MongoClients.create(connectionString)) {
List<Document> databases = mongoClient.listDatabases().into(new ArrayList<>());
databases.forEach(db -> System.out.println(db.toJson()));
}
}
}
创建集合
database.createCollection("exampleCollection");文档添加
MongoClient mongoClient = new MongoClient("192.168.139.132", 37017);
MongoDatabase database = mongoClient.getDatabase("mydb");
MongoCollection<Document> collection = database.getCollection("exampleCollection");
Document document = Document.parse("{name:'lisi',city:'bj',birth_day:new ISODate('2001-08-
01'),expectSalary:18000}");
collection.insertOne(document );
mongoClient.close();
文档查询
MongoClient mongoClient = new MongoClient("192.168.139.132", 27017);
MongoDatabase database = mongoClient.getDatabase("mydb");
MongoCollection<Document> collection = database.getCollection("exampleCollection");
Document sdoc=new Document();
//按expectSalary倒序
sdoc.append("expectSalary", -1);
FindIterable<Document> findIterable = collection.find().sort(sdoc);
for (Document document : findIterable) {
 System.out.println(document);
 }
//按指定的属性值查询
FindIterable<Document> documents = collection.find(new Document("expectSalary", new Document("$eq", 12000)));
for (Document document4 : documents) {
    System.out.println(document4);
}
mongoClient.close();
文档查询过滤
MongoClient mongoClient = new MongoClient("192.168.139.132", 27017);
MongoDatabase database = mongoClient.getDatabase("mydb");
MongoCollection<Document> collection = database.getCollection("exampleCollection");
Document sdoc=new Document();
//按expectSalary倒序
sdoc.append("expectSalary", -1);
FindIterable<Document> findIterable = collection.find(Filters.gt("expectSalary",21000)).sort(sdoc);
for (Document document : findIterable) {
 System.out.println(document);
}
mongoClient.close();
1.Java直连MongoDB需引入哪个包
A spring-data-mongodb
B spring-boot-starter-mongodb
C mongo-java-driver
D mysql-connector-java
复习:
FastDFS集成Nginx_环境搭建

下载Fastdfs的Nginx模块包
cd /usr/local
wget https://github.com/happyfish100/fastdfs-nginx-module/archive/V1.22.tar.gz
tar -zxvf V1.22.tar.gz
安装Nginx依赖文件
yum install -y gcc gcc-c++ zlib zlib-devel
openssl openssl-devel pcre pcre-devel gd-devel epel-release
下载Nginx软件包
get https://nginx.org/download/nginx1.19.2.tar.gz

cd nginx-1.19.2/
配置Nginx服务器
#建立Makefile文件,检查Linux系统环境以及相关的关键属性。
./configure --add-module=/usr/local/fastdfsnginx-module-1.22/src/
#编译项目,主要将gcc源代码编译成可执行的目标文件
make
#根据上一步骤编译完成的数据安装到预定的目录中。
make install
注意:
–add-module:为nginx添加一个fastdfs-nginx-module模块,值为该模块在当前系统的路径
–prefix:指定nginx安装位置
将Fastdfs软件包里面的http.conf和mime.types拷贝到/etc/fdfs 目录下
cp /usr/local/src/fastdfs6.06/conf/mime.types /etc/fdfs/

cp /usr/local/src/fastdfs-6.06/conf/http.conf /etc/fdfs/
配置Nginx的fastdfs模块,并编辑文件
#拷贝文件
[root@localhost opt]cp /usr/local/fastdfsnginx-module-1.22/src/mod_fastdfs.conf
/etc/fdfs/
[root@localhost fdfs] vim mod_fastdfs.conf
#保存日志目录
base_path=/data/fastdfs/storage
#tracker 服务器的 IP 地址以及端口号
tracker_server=192.168.66.100:22122
#文件url中是否有group 名
url_have_group_name = true
#存储路径
store_path0=/data/fastdfs/storage
group_count = 1                     #设置组的个数
#然后在末尾添加分组信息,目前只有一个分组,就只写一个
[group1]
group_name=group1
storage_server_port=23000
store_path_count=1
store_path0=/data/fastdfs/storage
配置Nginx
server {
    listen       80;
    server_name localhost;

    location ~ /group[1-3]/M00 {
        alias /data/fastdfs/storage/data;
       ngx_fastdfs_module;
   }
    # 根目录下返回403
    location = / {
         return 403;
     }
    # log file
    access_log logs/img_access.log access;
}
启动Ningx服务
# 进入sbin目录
[root@tracker nginx]# cd sbin/
# 启动服务 -c:指定配置文件
[root@tracker sbin]# ./nginx -c
/usr/local/nginx/conf/nginx.conf
查看服务启动情况
[root@tracker sbin]# ps -ef | grep nginx
启动追踪服务与存储节点服务
[root@tracker sbin]# fdfs_trackerd
/etc/fdfs/tracker.conf start
[root@tracker sbin]# fdfs_storaged
/etc/fdfs/storage.conf start
上传图片测试
将图片上传至linux系统后,使用指令上传至分布式文件系统
[root@tracker fdfs]# fdfs_upload_file
/etc/fdfs/client.conf /root/xxxxx.png
group1/M00/00/00/wKhyj1wrIUWAL5ASAAAfA8PiO7Y493.png
通过浏览器远程访问
http://192.168.66.100/group1/M00/00/00/wKhyj1wrIfqAD3NFAAn1fNRE8_M976.png


