使用pyaudio内录声卡声音及相关问题解决
目录
- 使用pyaudio内录声卡声音及相关问题解决
- 1 实现代码
- 1.1 Recorder类:
- 1.2 调用方法
- 2 问题一:选择设备实现内录/外录(解决报错:OSError: [Errno -9999] Unanticipated host error)
- 3 问题二:运行内录代码时,必须要扬声器外放才能录到声音,插入耳机则没有声音
1 实现代码
主要参考:https://blog.csdn.net/littlezhuhui/article/details/101025305
使用上述连接中的Recorder类可以在其他声音生成程序中同步开启一个线程,并同步记录声音,自由控制录音时间
1.1 Recorder类:
import os
import pyaudio
import threading
import wave
import time
from datetime import datetime

#录音类
class Recorder():
    def __init__(self, chunk=1024, channels=2, rate=44100):
        self.CHUNK = chunk
        self.FORMAT = pyaudio.paInt16
        self.CHANNELS = channels
        self.RATE = rate
        self._running = True
        self._frames = []

    #获取内录设备序号,在windows操作系统上测试通过,hostAPI = 0 表明是MME设备
    def findInternalRecordingDevice(self,p):
        #要找查的设备名称中的关键字
        target = '立体声混音'
        #逐一查找声音设备
        for i in range(p.get_device_count()):
            devInfo = p.get_device_info_by_index(i)
            if devInfo['name'].find(target)>=0 and devInfo['hostApi'] == 0 :
                #print('已找到内录设备,序号是 ',i)
                return i
        print('无法找到内录设备!')
        return -1

    #开始录音,开启一个新线程进行录音操作
    def start(self):
        threading._start_new_thread(self.__record, ())

    #执行录音的线程函数
    def __record(self):
        self._running = True
        self._frames = []

        p = pyaudio.PyAudio()
        #查找内录设备
        dev_idx = self.findInternalRecordingDevice(p)
        if dev_idx < 0 :
            return
        #在打开输入流时指定输入设备
        stream = p.open(input_device_index=dev_idx,
                        format=self.FORMAT,
                        channels=self.CHANNELS,
                        rate=self.RATE,
                        input=True,
                        frames_per_buffer=self.CHUNK)
        #循环读取输入流
        while(self._running):
            data = stream.read(self.CHUNK)
            self._frames.append(data)

        #停止读取输入流
        stream.stop_stream()
        #关闭输入流
        stream.close()
        #结束pyaudio
        p.terminate()
        return

    #停止录音
    def stop(self):
        self._running = False

    #保存到文件
    def save(self, fileName):
        #创建pyAudio对象
        p = pyaudio.PyAudio()
        #打开用于保存数据的文件
        wf = wave.open(fileName, 'wb')
        #设置音频参数
        wf.setnchannels(self.CHANNELS)
        wf.setsampwidth(p.get_sample_size(self.FORMAT))
        wf.setframerate(self.RATE)
        #写入数据
        wf.writeframes(b''.join(self._frames))
        #关闭文件
        wf.close()
        #结束pyaudio
        p.terminate()
1.2 调用方法
import Recorder # 建议新建文件做成一个模块

# 建立录音对象
rec = Recorder()
rec.start()

# 运行生成产生程序
	# 可以是播放某个视频的指令,也可以是生成声音的代码

# 停止录音,保存文件
rec.stop()
rec.save("output.wav")
2 问题一:选择设备实现内录/外录(解决报错:OSError: [Errno -9999] Unanticipated host error)
上述代码中选择录音设备对象的代码为:
    #获取内录设备序号,在windows操作系统上测试通过,hostAPI = 0 表明是MME设备
    def findInternalRecordingDevice(self,p):
        #要找查的设备名称中的关键字
        target = '立体声混音'
        #逐一查找声音设备
        for i in range(p.get_device_count()):
            devInfo = p.get_device_info_by_index(i)
            if devInfo['name'].find(target)>=0 and devInfo['hostApi'] == 0 :
                #print('已找到内录设备,序号是 ',i)
                return i
        print('无法找到内录设备!')
        return -1
如果出现报错OSError: [Errno -9999] Unanticipated host error,可以先单独新建文件夹,运行一下代码,打印当前电脑的所有设备号:
import pyaudio

audio = pyaudio.PyAudio()

# get device count
device_count = audio.get_device_count()
print(f"device count: {device_count}")

# get device info
for i in range(device_count):
    device_info = audio.get_device_info_by_index(i)
    print(f"device {i}: {device_info}")
我的电脑打印信息如下
device count: 31
device 0: {'index': 0, 'structVersion': 2, 'name': 'Microsoft 声音映射器 - Input', 'hostApi': 0, 'maxInputChannels': 2, 'maxOutputChannels': 0, 'defaultLowInputLatency': 0.09, 'defaultLowOutputLatency': 0.09, 'defaultHighInputLatency': 0.18, 'defaultHighOutputLatency': 0.18, 'defaultSampleRate': 44100.0}
device 1: {'index': 1, 'structVersion': 2, 'name': '麦克风 (Realtek(R) Audio)', 'hostApi': 0, 'maxInputChannels': 2, 'maxOutputChannels': 0, 'defaultLowInputLatency': 0.09, 'defaultLowOutputLatency': 0.09, 'defaultHighInputLatency': 0.18, 'defaultHighOutputLatency': 0.18, 'defaultSampleRate': 44100.0}
device 2: {'index': 2, 'structVersion': 2, 'name': 'Microsoft 声音映射器 - Output', 'hostApi': 0, 'maxInputChannels': 0, 'maxOutputChannels': 2, 'defaultLowInputLatency': 0.09, 'defaultLowOutputLatency': 0.09, 'defaultHighInputLatency': 0.18, 'defaultHighOutputLatency': 0.18, 'defaultSampleRate': 44100.0}
device 3: {'index': 3, 'structVersion': 2, 'name': '扬声器 (Realtek(R) Audio)', 'hostApi': 0, 'maxInputChannels': 0, 'maxOutputChannels': 2, 'defaultLowInputLatency': 0.09, 'defaultLowOutputLatency': 0.09, 'defaultHighInputLatency': 0.18, 'defaultHighOutputLatency': 0.18, 'defaultSampleRate': 44100.0}
device 4: {'index': 4, 'structVersion': 2, 'name': 'PHL 245S1 (NVIDIA High Definiti', 'hostApi': 0, 'maxInputChannels': 0, 'maxOutputChannels': 2, 'defaultLowInputLatency': 0.09, 'defaultLowOutputLatency': 0.09, 'defaultHighInputLatency': 0.18, 'defaultHighOutputLatency': 0.18, 'defaultSampleRate': 44100.0}
device 5: {'index': 5, 'structVersion': 2, 'name': 'LG HDR 4K (NVIDIA High Definiti', 'hostApi': 0, 'maxInputChannels': 0, 'maxOutputChannels': 2, 'defaultLowInputLatency': 0.09, 'defaultLowOutputLatency': 0.09, 'defaultHighInputLatency': 0.18, 'defaultHighOutputLatency': 0.18, 'defaultSampleRate': 44100.0}
device 6: {'index': 6, 'structVersion': 2, 'name': '主声音捕获驱动程序', 'hostApi': 1, 'maxInputChannels': 2, 'maxOutputChannels': 0, 'defaultLowInputLatency': 0.12, 'defaultLowOutputLatency': 0.0, 'defaultHighInputLatency': 0.24, 'defaultHighOutputLatency': 0.0, 'defaultSampleRate': 44100.0}
device 7: {'index': 7, 'structVersion': 2, 'name': '麦克风 (Realtek(R) Audio)', 'hostApi': 1, 'maxInputChannels': 2, 'maxOutputChannels': 0, 'defaultLowInputLatency': 0.12, 'defaultLowOutputLatency': 0.0, 'defaultHighInputLatency': 0.24, 'defaultHighOutputLatency': 0.0, 'defaultSampleRate': 44100.0}
device 8: {'index': 8, 'structVersion': 2, 'name': '主声音驱动程序', 'hostApi': 1, 'maxInputChannels': 0, 'maxOutputChannels': 2, 'defaultLowInputLatency': 0.0, 'defaultLowOutputLatency': 0.12, 'defaultHighInputLatency': 0.0, 'defaultHighOutputLatency': 0.24, 'defaultSampleRate': 44100.0}
device 9: {'index': 9, 'structVersion': 2, 'name': '扬声器 (Realtek(R) Audio)', 'hostApi': 1, 'maxInputChannels': 0, 'maxOutputChannels': 2, 'defaultLowInputLatency': 0.0, 'defaultLowOutputLatency': 0.12, 'defaultHighInputLatency': 0.0, 'defaultHighOutputLatency': 0.24, 'defaultSampleRate': 44100.0}
device 10: {'index': 10, 'structVersion': 2, 'name': 'PHL 245S1 (NVIDIA High Definition Audio)', 'hostApi': 1, 'maxInputChannels': 0, 'maxOutputChannels': 2, 'defaultLowInputLatency': 0.0, 'defaultLowOutputLatency': 0.12, 'defaultHighInputLatency': 0.0, 'defaultHighOutputLatency': 0.24, 'defaultSampleRate': 44100.0}
device 11: {'index': 11, 'structVersion': 2, 'name': 'LG HDR 4K (NVIDIA High Definition Audio)', 'hostApi': 1, 'maxInputChannels': 0, 'maxOutputChannels': 2, 'defaultLowInputLatency': 0.0, 'defaultLowOutputLatency': 0.12, 'defaultHighInputLatency': 0.0, 'defaultHighOutputLatency': 0.24, 'defaultSampleRate': 44100.0}
device 12: {'index': 12, 'structVersion': 2, 'name': 'PHL 245S1 (NVIDIA High Definition Audio)', 'hostApi': 2, 'maxInputChannels': 0, 'maxOutputChannels': 2, 'defaultLowInputLatency': 0.0, 'defaultLowOutputLatency': 0.003, 'defaultHighInputLatency': 0.0, 'defaultHighOutputLatency': 0.01, 'defaultSampleRate': 48000.0}
device 13: {'index': 13, 'structVersion': 2, 'name': '扬声器 (Realtek(R) Audio)', 'hostApi': 2, 'maxInputChannels': 0, 'maxOutputChannels': 2, 'defaultLowInputLatency': 0.0, 'defaultLowOutputLatency': 0.003, 'defaultHighInputLatency': 0.0, 'defaultHighOutputLatency': 0.0106667, 'defaultSampleRate': 48000.0}
device 14: {'index': 14, 'structVersion': 2, 'name': 'LG HDR 4K (NVIDIA High Definition Audio)', 'hostApi': 2, 'maxInputChannels': 0, 'maxOutputChannels': 2, 'defaultLowInputLatency': 0.0, 'defaultLowOutputLatency': 0.003, 'defaultHighInputLatency': 0.0, 'defaultHighOutputLatency': 0.01, 'defaultSampleRate': 48000.0}
device 15: {'index': 15, 'structVersion': 2, 'name': '麦克风 (Realtek(R) Audio)', 'hostApi': 2, 'maxInputChannels': 2, 'maxOutputChannels': 0, 'defaultLowInputLatency': 0.003, 'defaultLowOutputLatency': 0.0, 'defaultHighInputLatency': 0.01, 'defaultHighOutputLatency': 0.0, 'defaultSampleRate': 48000.0}
device 16: {'index': 16, 'structVersion': 2, 'name': '麦克风 (Realtek HD Audio Mic input)', 'hostApi': 3, 'maxInputChannels': 2, 'maxOutputChannels': 0, 'defaultLowInputLatency': 0.01, 'defaultLowOutputLatency': 0.01, 'defaultHighInputLatency': 0.04, 'defaultHighOutputLatency': 0.04, 'defaultSampleRate': 44100.0}
device 17: {'index': 17, 'structVersion': 2, 'name': 'Speakers 1 (Realtek HD Audio output with HAP)', 'hostApi': 3, 'maxInputChannels': 0, 'maxOutputChannels': 2, 'defaultLowInputLatency': 0.01, 'defaultLowOutputLatency': 0.01, 'defaultHighInputLatency': 0.04, 'defaultHighOutputLatency': 0.04, 'defaultSampleRate': 48000.0}
device 18: {'index': 18, 'structVersion': 2, 'name': 'Speakers 2 (Realtek HD Audio output with HAP)', 'hostApi': 3, 'maxInputChannels': 0, 'maxOutputChannels': 2, 'defaultLowInputLatency': 0.01, 'defaultLowOutputLatency': 0.01, 'defaultHighInputLatency': 0.04, 'defaultHighOutputLatency': 0.04, 'defaultSampleRate': 44100.0}
device 19: {'index': 19, 'structVersion': 2, 'name': '电脑扬声器 (Realtek HD Audio output with HAP)', 'hostApi': 3, 'maxInputChannels': 2, 'maxOutputChannels': 0, 'defaultLowInputLatency': 0.01, 'defaultLowOutputLatency': 0.01, 'defaultHighInputLatency': 0.04, 'defaultHighOutputLatency': 0.04, 'defaultSampleRate': 48000.0}
device 20: {'index': 20, 'structVersion': 2, 'name': '立体声混音 (Realtek HD Audio Stereo input)', 'hostApi': 3, 'maxInputChannels': 2, 'maxOutputChannels': 0, 'defaultLowInputLatency': 0.01, 'defaultLowOutputLatency': 0.01, 'defaultHighInputLatency': 0.04, 'defaultHighOutputLatency': 0.04, 'defaultSampleRate': 48000.0}
device 21: {'index': 21, 'structVersion': 2, 'name': 'Output (NVIDIA High Definition Audio)', 'hostApi': 3, 'maxInputChannels': 0, 'maxOutputChannels': 2, 'defaultLowInputLatency': 0.01, 'defaultLowOutputLatency': 0.01, 'defaultHighInputLatency': 0.04, 'defaultHighOutputLatency': 0.04, 'defaultSampleRate': 48000.0}
device 22: {'index': 22, 'structVersion': 2, 'name': 'Output (NVIDIA High Definition Audio)', 'hostApi': 3, 'maxInputChannels': 0, 'maxOutputChannels': 2, 'defaultLowInputLatency': 0.01, 'defaultLowOutputLatency': 0.01, 'defaultHighInputLatency': 0.04, 'defaultHighOutputLatency': 0.04, 'defaultSampleRate': 48000.0}
因为我的笔记本外界了显示器,显示器有音频输入输出功能,所以设备比较多,当我们想要实现内录,即录制电脑声卡产生的声音时,应该用的时上表中的第20个设备,“立体声混音”。可以看到用第一部分的代码是可以找到该设备的,但是这里的hostApi为3(不是代码中的0),强行修改代码使代码能运行后,依然会出现报错:OSError: [Errno -9999] Unanticipated host error
问题原因:电脑中的立体声混音的权限没有开启
解决办法:电脑设置-系统-声音-所有声音设备-立体声混音-允许
下图是权限开启后的界面:
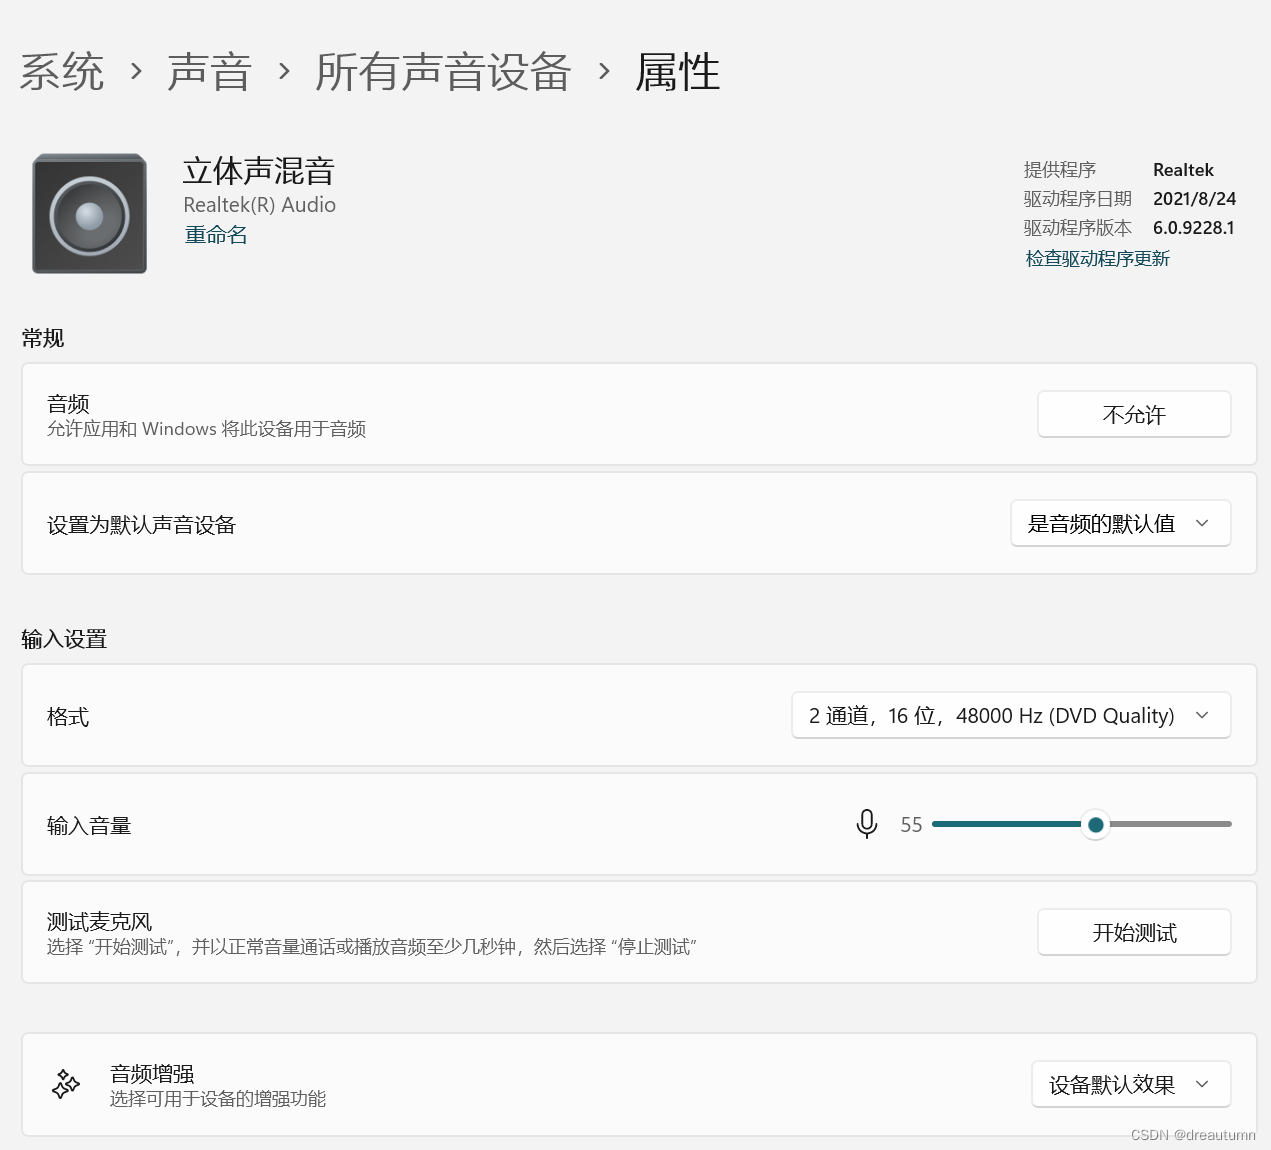
此时再次运行设备打印代码,结果如下:
device count: 34
device 0: {'index': 0, 'structVersion': 2, 'name': 'Microsoft 声音映射器 - Input', 'hostApi': 0, 'maxInputChannels': 2, 'maxOutputChannels': 0, 'defaultLowInputLatency': 0.09, 'defaultLowOutputLatency': 0.09, 'defaultHighInputLatency': 0.18, 'defaultHighOutputLatency': 0.18, 'defaultSampleRate': 44100.0}
device 1: {'index': 1, 'structVersion': 2, 'name': '立体声混音 (Realtek(R) Audio)', 'hostApi': 0, 'maxInputChannels': 2, 'maxOutputChannels': 0, 'defaultLowInputLatency': 0.09, 'defaultLowOutputLatency': 0.09, 'defaultHighInputLatency': 0.18, 'defaultHighOutputLatency': 0.18, 'defaultSampleRate': 44100.0}
device 2: {'index': 2, 'structVersion': 2, 'name': '麦克风 (Realtek(R) Audio)', 'hostApi': 0, 'maxInputChannels': 2, 'maxOutputChannels': 0, 'defaultLowInputLatency': 0.09, 'defaultLowOutputLatency': 0.09, 'defaultHighInputLatency': 0.18, 'defaultHighOutputLatency': 0.18, 'defaultSampleRate': 44100.0}
device 3: {'index': 3, 'structVersion': 2, 'name': 'Microsoft 声音映射器 - Output', 'hostApi': 0, 'maxInputChannels': 0, 'maxOutputChannels': 2, 'defaultLowInputLatency': 0.09, 'defaultLowOutputLatency': 0.09, 'defaultHighInputLatency': 0.18, 'defaultHighOutputLatency': 0.18, 'defaultSampleRate': 44100.0}
device 4: {'index': 4, 'structVersion': 2, 'name': '扬声器 (Realtek(R) Audio)', 'hostApi': 0, 'maxInputChannels': 0, 'maxOutputChannels': 2, 'defaultLowInputLatency': 0.09, 'defaultLowOutputLatency': 0.09, 'defaultHighInputLatency': 0.18, 'defaultHighOutputLatency': 0.18, 'defaultSampleRate': 44100.0}
后面设备很多不再列举,可以看到此时device1立体声混音的hostApi已经变成了0,此时运行内录代码就不会再报错
3 问题二:运行内录代码时,必须要扬声器外放才能录到声音,插入耳机则没有声音
解决办法:
电脑开始界面搜索
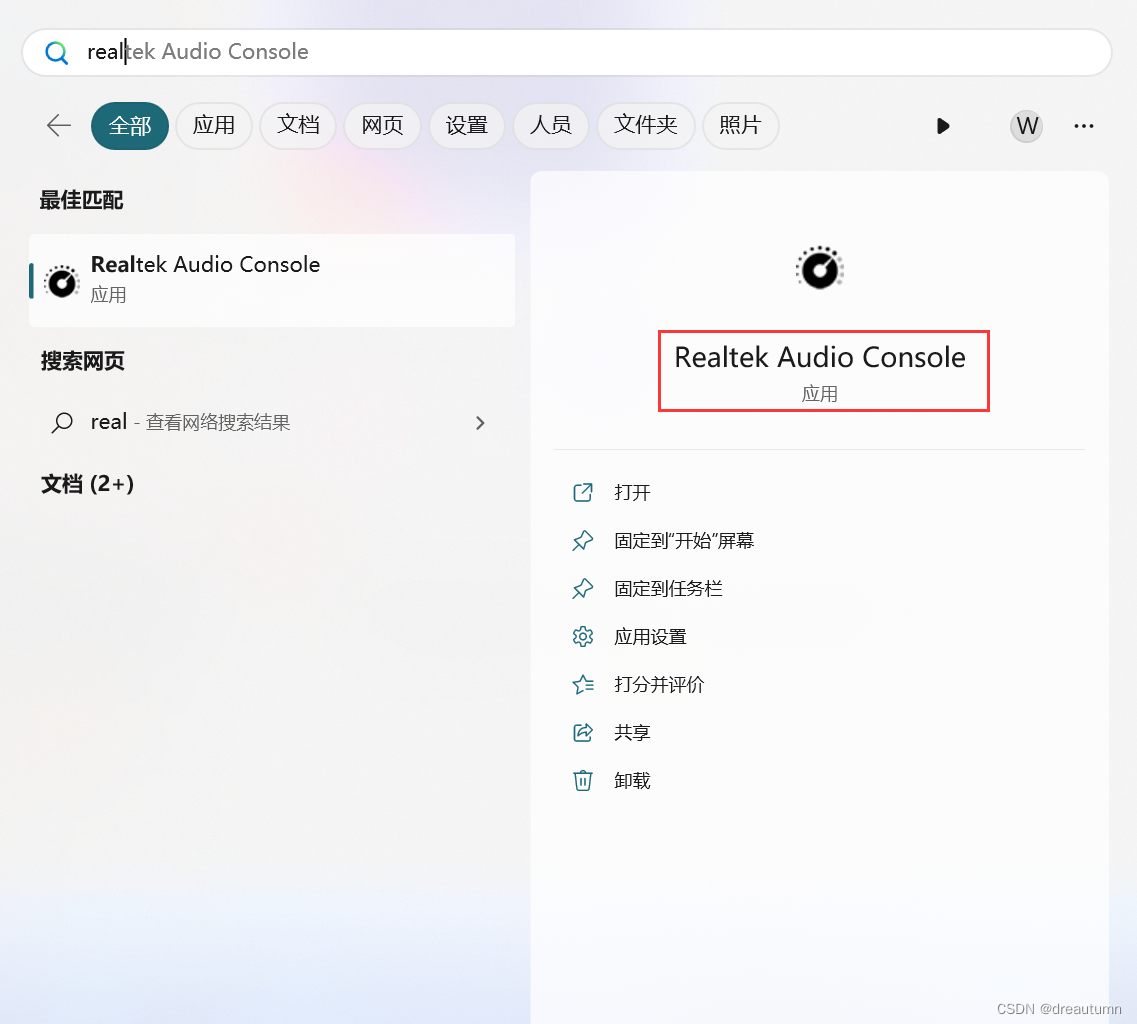
打开后选择“设备高级设置”
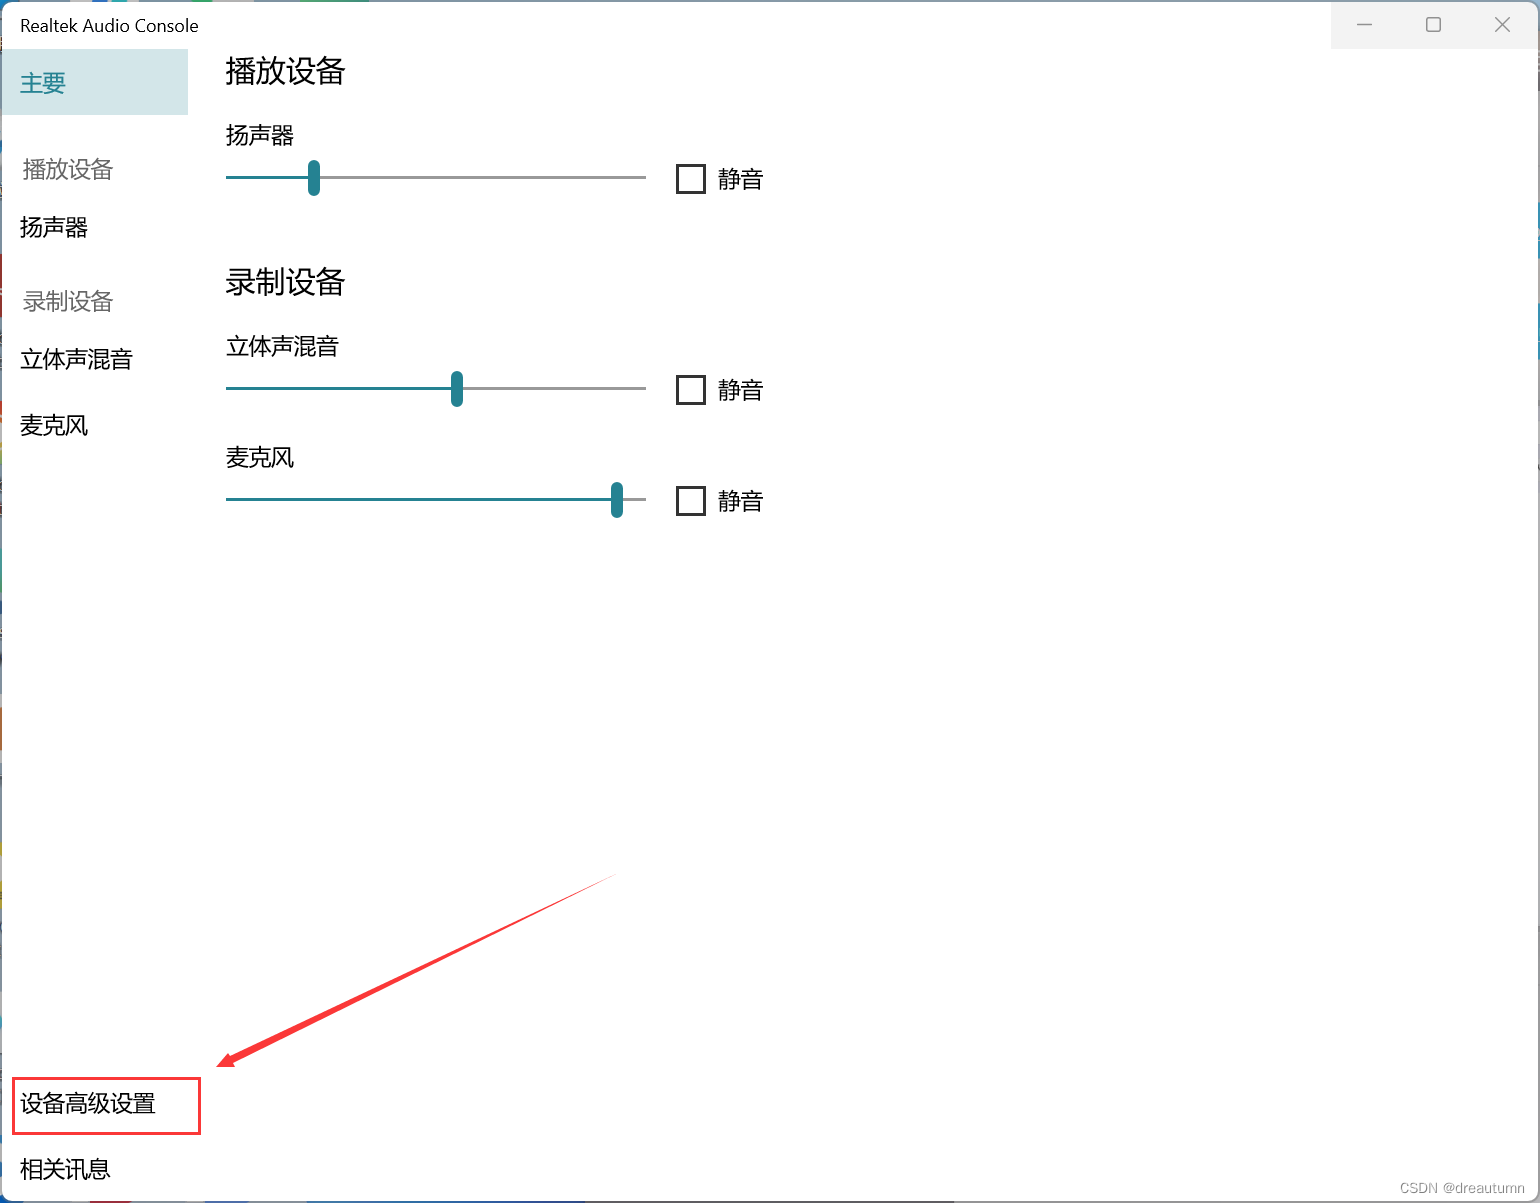
选择“经典模式”
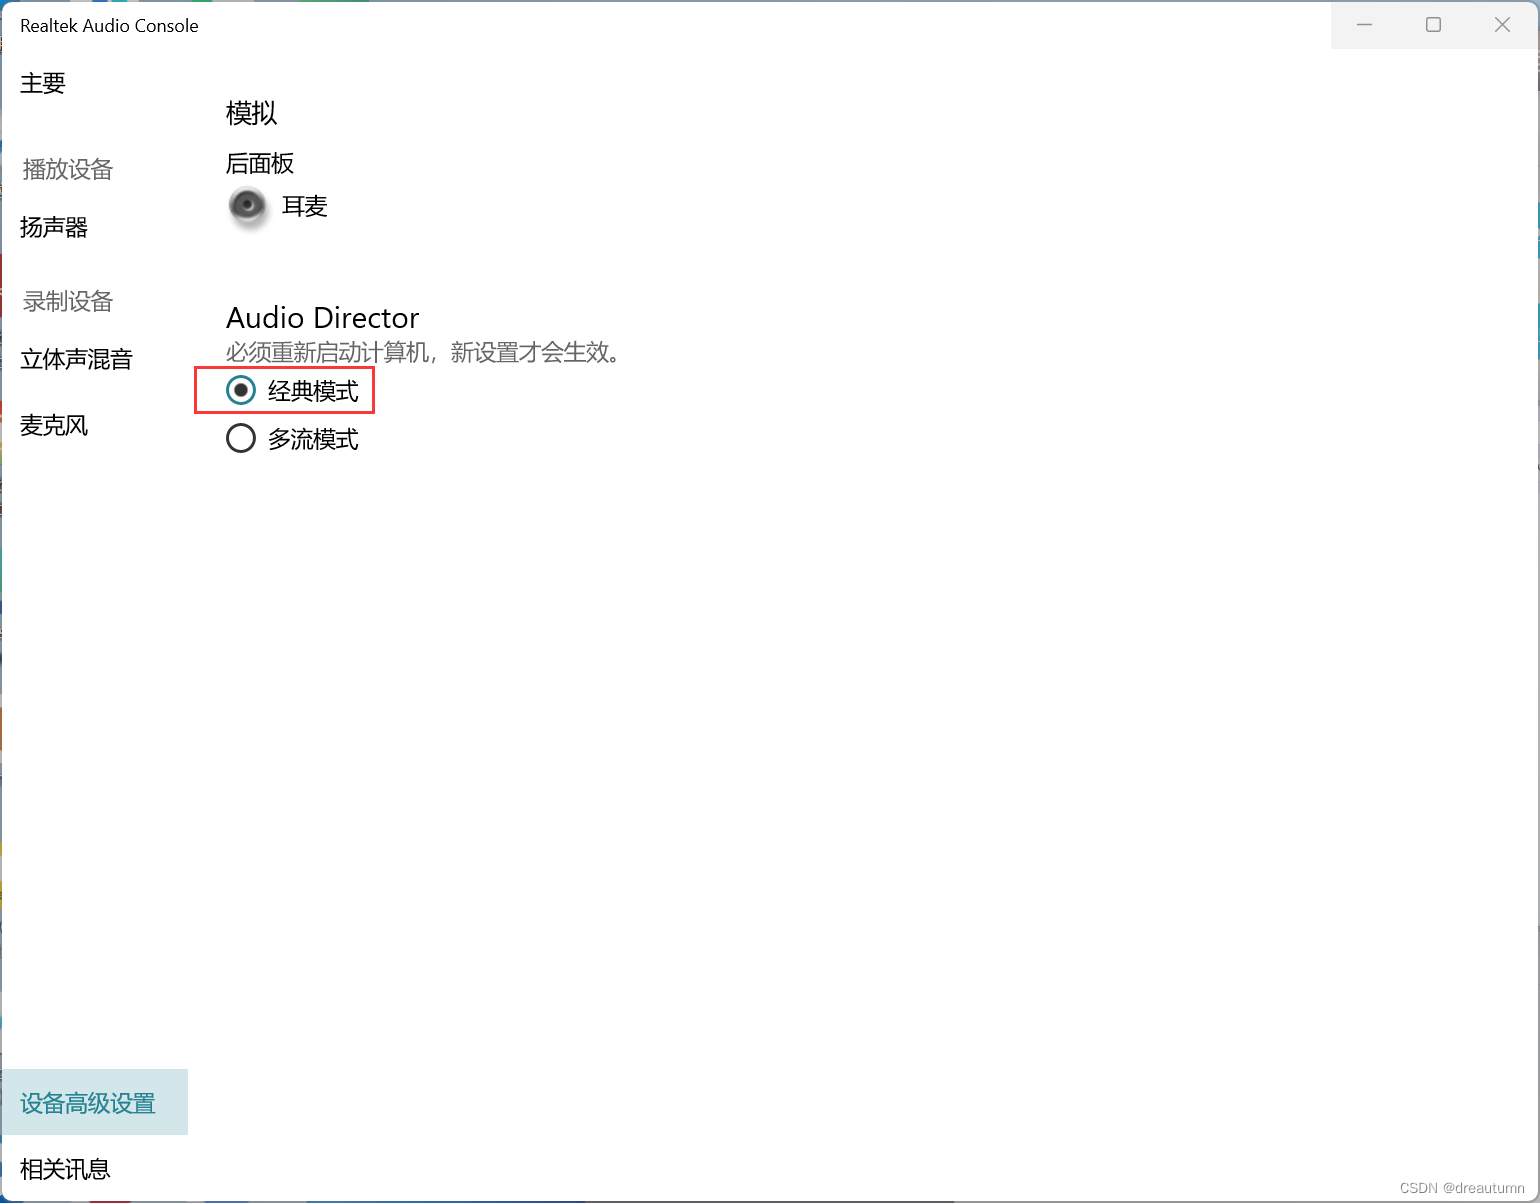
重启计算机之后解决
上述设置之后插着耳机就不能再选择用电脑的扬声器播放了,只能拔了二级才能外放。但是此时插着耳机内录是可以录到声音的。


