博主介绍:✌全网粉丝3W+,全栈开发工程师,从事多年软件开发,在大厂呆过。持有软件中级、六级等证书。可提供微服务项目搭建与毕业项目实战,博主也曾写过优秀论文,查重率极低,在这方面有丰富的经验✌
博主作品:《Java项目案例》主要基于SpringBoot+MyBatis/MyBatis-plus+MySQL+Vue等前后端分离项目,可以在左边的分类专栏找到更多项目。《Uniapp项目案例》有几个有uniapp教程,企业实战开发。《微服务实战》专栏是本人的实战经验总结,《Spring家族及微服务系列》专注Spring、SpringMVC、SpringBoot、SpringCloud系列、Nacos等源码解读、热门面试题、架构设计等。除此之外还有不少文章等你来细细品味,更多惊喜等着你哦
🍅开源项目免费哦(有vue2与vue3版本):点击这里克隆或者下载 🍅
🍅文末获取联系🍅精彩专栏推荐订阅👇🏻👇🏻 不然下次找不到哟
Java项目案例《100套》
https://blog.csdn.net/qq_57756904/category_12173599.html
uniapp小程序《100套》https://blog.csdn.net/qq_57756904/category_12199600.html
目录
一、前言
二、安装 confd 插件
三、confd 结合 Nacos 实现 nginx 配置管理示例
总结
💖微服务实战
一、前言
为什么要支持 confd,老的应用配置管理模式是启动时读取配置文件,然后重新读取配置文件需要应用重启。一般的配置管理系统都是代码侵入性的,应用接入配置管理系统都需要使用对应的 SDK 来查询和监听数据的变更。对于一些已经成熟的系统来说,接入 SDK 来实现动态配置管理是很难实现的,Nacos 通过引入配置管理工具 confd 可以实现系统的配置变更做到无代码侵入性。
confd 是一个轻量级的配置管理工具,可以通过查询后端存储系统来实现第三方系统的动态配置管理,如 nginx、tomcat、haproxy、docker 配置等。confd 目前支持的后端有 etcd、zookeeper 等,Nacos 1.1 版本通过对 confd 定制支持 Nacos 作为后端存储。
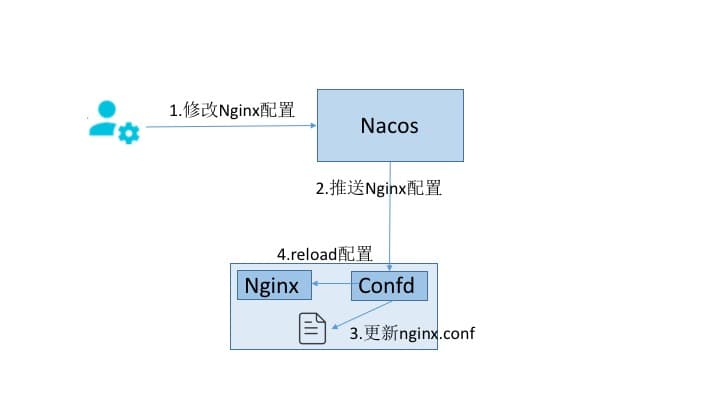
confd 能够查询和监听后端系统的数据变更,结合配置模版引擎动态更新本地配置文件,保持和后端系统的数据一致,并且能够执行命令或者脚本实现系统的 reload 或者重启。
二、安装 confd 插件
confd 的安装可以通过源码安装方式,confd 基于 go 语言编写,其编译安装依赖 go,首先需要确保本地安装了go,版本不低于 v1.10。
创建 confd 目录,下载 confd 源码,编译生成可执行文件。
mkdir -p $GOPATH/src/github.com/kelseyhightower
wget https://github.com/nacos-group/confd/archive/v0.18.0.tar.gz
tar -xvf v0.18.0.tar.gz
mv confd-0.18.0 confd
cd confd
make
复制 confd 文件到 bin 目录下,启动 confd。
sudo cp bin/confd /usr/local/bin
confd
三、confd 结合 Nacos 实现 nginx 配置管理示例
本文介绍使用 Nacos 结合 confd 实现 nginx 配置管理,为简单起见以 nginx 的黑名单功能为演示示例,Nacos使用官网部署的服务,域名为 console.nacos.io,nginx 的安装可以参考网上文章。
1.创建 confd 所需目录
confd 配置文件默认在 /etc/confd 中,可以通过参数 -confdir指定。目录中包含两个子目录,分别是:conf.d templates
mkdir -p /etc/confd/{conf.d,templates}2.创建 confd 配置文件
confd 会先读取 conf.d 目录中的配置文件( toml 格式),然后根据文件指定的模板路径去渲染模板。
vim /etc/confd/conf.d/nginx.toml内容为如下,其中 nginx.conf.tmpl 文件为 confd 的模版文件,keys 为模版渲染成配置文件所需的配置内容,/usr/local/nginx/conf/nginx.conf 为生成的配置文件。
[template]
src = " nginx.conf.tmpl"
dest = "/usr/local/nginx/conf/nginx.conf"
keys = [
"/nginx/conf",
]
check_cmd = "/usr/local/nginx/sbin/nginx -t -c {{.src}}"
reload_cmd = "/usr/local/nginx/sbin/nginx -s reload"
3.创建模版文件
拷贝 nginx 原始的配置,增加对应的渲染内容。
cp /usr/local/nginx/conf/nginx.conf /etc/confd/templates/nginx.conf.tmpl
vim /etc/confd/templates/nginx.conf.tmpl
增加内容为:
···
{{$data := json (getv "/nginx/conf")}}
{{range $data.blackList}}
  deny {{.}};
{{end}}
···
4.在 Nacos 上创建所需的配置文件
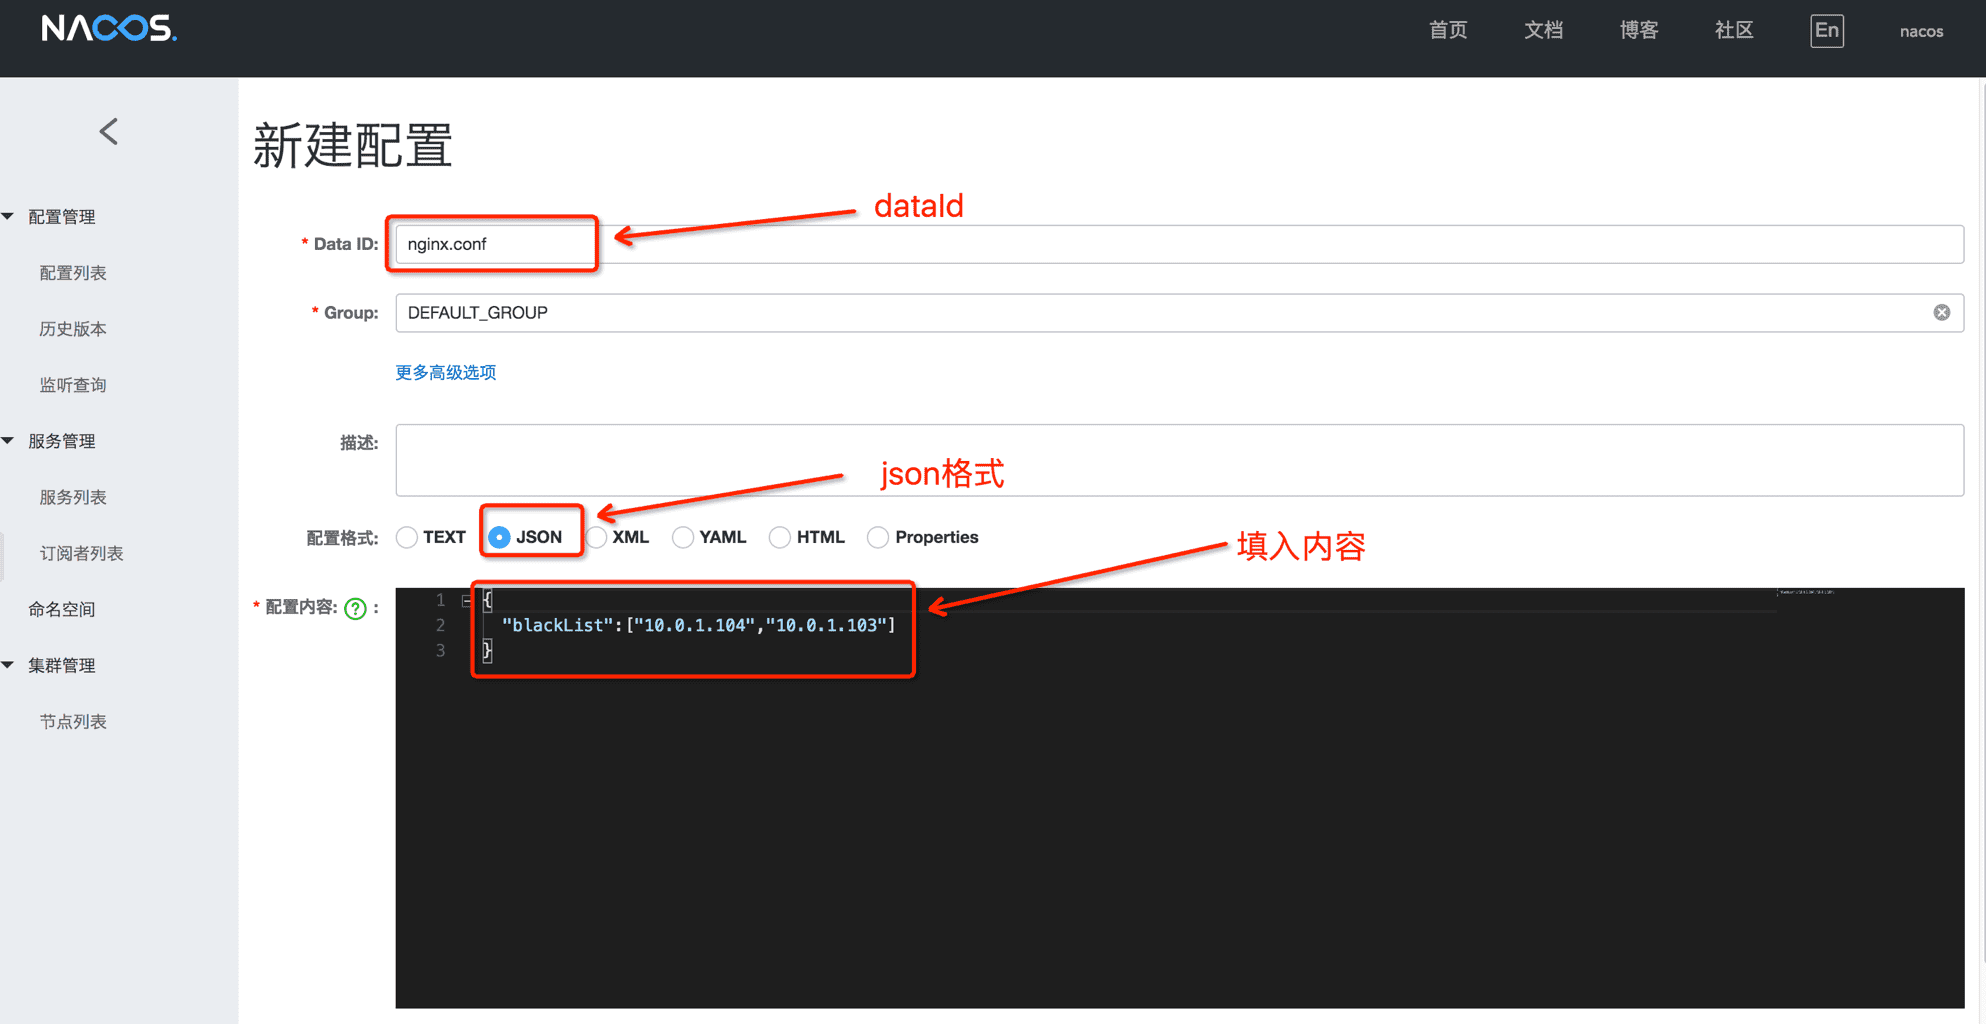
在 public 命名空间创建 dataId 为 nginx.conf 的配置文件,group 使用默认的 DEFAULT_GROUP 即可,配置内容为 json 格式。
{
  "blackList":["10.0.1.104","10.0.1.103"]
}
5.启动 confd
启动 confd,从 Nacos 获取配置文件,渲染 nginx 配置文件。backend 设置成 nacos,node 指定访问的Nacos 服务地址,watch 让 confd 支持动态监听。
confd -backend nacos -node http://console.nacos.io:80 -watch6.查看 nginx 配置文件,验证 nginx 启动
查看生成的 /usr/local/nginx/conf/nginx.conf 配置文件是否存在如下内容。
...
deny 10.0.1.104;

deny 10.0.1.103;
...
curl 命令访问 nginx,验证是否返回正常。http 响应状态码为 200 说明访问 nginx 正常。
curl http://$IP:8080/ -i
HTTP/1.1 200 OK
...
7.查看本机 ip,加到 nacos 配置文件黑名单中
假设本机的 ip 为 30.5.125.107,将本机的 ip 加入到 nginx 黑名单。
{
  "blackList":["10.0.1.104","10.0.1.103","30.5.125.107"]
}
8.查看 nginx 配置文件,验证黑名单是否生效
查看生成的 /usr/local/nginx/conf/nginx.conf 配置文件是否存在如下内容。
...
deny 10.0.1.104;

deny 10.0.1.103;

deny 30.5.125.107;
...
curl 命令访问 nginx,访问应该被拒绝,返回 403 。
curl http://$IP:8080/ -i
HTTP/1.1 403 Forbidden
...
总结
本文介绍了使用 Nacos 结合 confd 来做自动化管理,confd 作为轻量级的配置管理工具可以做到对第三方系统无代码侵入性。本文只是简单使用 nginx 的黑名单功能来演示 Nacos+confd 的使用方式,当然 nginx 还具有限流、反向代理等功能以及其他的系统比如 haproxy、tomcat、docker 等也同样可以使用 Nacos+confd 做管理。
💖微服务实战
✨【微服务】SpringCloud的OpenFeign与Ribbon配置
✨集Oauth2+Jwt实现单点登录
✨Spring Cloud Alibaba微服务第29章之Rancher
✨Spring Cloud Alibaba微服务第27章之Jenkins
✨Spring Cloud Alibaba微服务第24章之Docker部署
✨Spring Cloud Alibaba微服务第23章之Oauth2授权码模式
✨Spring Cloud Alibaba微服务第22章之Oauth2
✨Spring Cloud Alibaba微服务第21章之分布式事务
✨Spring Cloud Alibaba微服务第18章之消息服务
✨Spring Cloud Alibaba微服务第16章之服务容错
✨Spring Cloud Alibaba微服务第14章之分库分表
✨Spring Cloud Alibaba微服务第11章之MyBatis-plus
✨Spring Cloud Alibaba微服务第8章之OpenFeign
✨Spring Cloud Alibaba微服务第7章之负载均衡Ribbon
✨SpringCloud Alibaba微服务第6章之Gateway
✨SpringCloud Alibaba微服务第4章之Nacos
✨SpringCloud Alibaba微服务开篇
