小伙伴们好呀,最近在重新复习,整理自己的知识库,偶然看到这道面试题:三个线程按顺序打印 ABCABC,尝试着做一下,才发现自己对线程还有好多地方不懂,蓝瘦…… 🐷

思路
很明显,这里就涉及线程间相互通信的知识了。
而相互通信的难点就是要控制好,阻塞和唤醒的时机。
一. 这里就是 A 通知 B,B 通知 C , C 通知 A
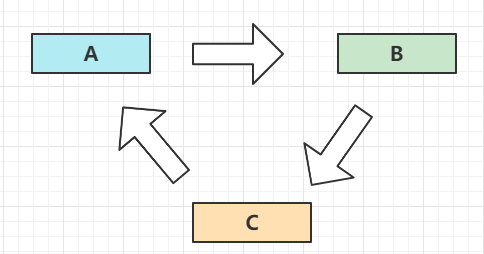
二. 三个线程在等待(阻塞)和唤醒(执行) 中不断切换。
三. 等待的方式大致分为两种
-
wait 方法 (Object native 方式 )
-
LockSupport.park 方式 ( Unsafe native 方式 )
四. 唤醒的方式
-
notify,notifyAll 方法 (Object native 方式 )
-
LockSupport.unPark 方式 ( Unsafe native 方式 )
五. 互斥条件
线程 A 先拿到资源 c,再拿资源 a ,[a 执行完后释放,并唤醒等待资源 a] 的 线程 B 线程 B 先拿到资源 a,再拿资源 b ,[b 执行完后释放,并唤醒等待资源 b] 的 线程 C 线程 C 先拿到资源 b,再拿资源 c ,[c 执行完后释放,并唤醒等待资源 c] 的 线程 A
所以得有 三个 共享资源 abc 来达到互斥条件
Synchronized 还是 ReentrantLock 都得建立 三个共享资源

六. 扩展
使用 LockSupport ,如果要像上面这样子的思路去解答,就得注意 线程相互引用行成的循环依赖问题,这里借用 Spring 的思路 用 Map 巧妙化解。
或者做法2 通过 外部的成员变量,不断地去判断,unpark 线程 a b c
Synchronized 方式
private static class MySynchronized {

    void printABC() throws InterruptedException {

        class MyRunable implements Runnable {

            private Object lock1;
            private Object lock2;
            private CountDownLatch countDownLatch;

            public MyRunable(Object lock1, Object lock2) {
                this.lock1 = lock1;
                this.lock2 = lock2;
            }

            public MyRunable(Object lock1, Object lock2, CountDownLatch countDownLatch) {
                this.lock1 = lock1;
                this.lock2 = lock2;
                this.countDownLatch = countDownLatch;
            }

            @Override
            public void run() {
                boolean running = false;

                int count = 2;
                while (count > 0) {
                    // C,A - > A  唤醒 B 线程
                    // A,B - > B  唤醒 C 线程
                    // B,C - > C  唤醒 A 线程 (最后一次执行时,唤醒 A 后,A 发现 count =0,就不执行了。
                    synchronized (lock1) {

                        synchronized (lock2) {
                            System.out.println(Thread.currentThread().getName());
                            count--;
                            // lock2 方法块执行结束前,唤醒其他线程。
                            lock2.notify();
                        }
                        // 线程执行完毕后
                        if (countDownLatch != null && !running) {
                            countDownLatch.countDown();
                            running = true;
                        }

                        try {
                            // 释放锁
                            lock1.wait();
                        } catch (InterruptedException e) {
                        }

                    }

                }
                System.out.println(Thread.currentThread().getName() + " over");
                synchronized (lock2) {
                    // 唤醒其他线程。
                    lock2.notify();
                }
            }
        }

        CountDownLatch countDownLatch = new CountDownLatch(1);
        CountDownLatch countDownLatch2 = new CountDownLatch(1);

        Object a = new Object();
        Object b = new Object();
        Object c = new Object();

        MyRunable ra = new MyRunable(c, a, countDownLatch);
        MyRunable rb = new MyRunable(a, b, countDownLatch2);
        MyRunable rc = new MyRunable(b, c);


        Thread a1 = new Thread(ra, "A");
        a1.start();

        countDownLatch.await();

        Thread b1 = new Thread(rb, "B");
        b1.start();

        countDownLatch2.await();

        Thread c1 = new Thread(rc, "C");
        c1.start();


    }
}
这里我借用 countDownLatch 去控制线程的启动流程,尽量不使用 Thread.sleep() 来实现,拿捏线程的执行,通信步骤。
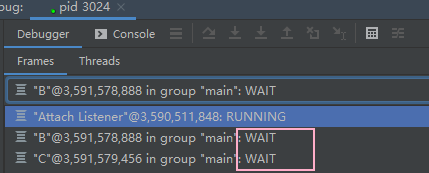
写这个的时候,除了一开始思路不清晰外,还出现一个小状况,就是 程序执行完卡住了。
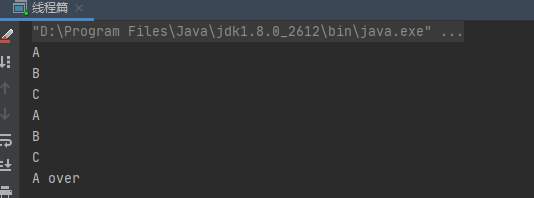
debug 发现线程 B C 还在 wait 状态,这是写时候容易疏忽的。
要记得在循环外再次唤醒其他线程,让他们走完方法。
ReentrantLock 方式
private static class MyReentrantLock {

    int number = 6;

    void printABC() {
        ReentrantLock lock = new ReentrantLock();

        Condition conditionA = lock.newCondition();
        Condition conditionB = lock.newCondition();
        Condition conditionC = lock.newCondition();


        class MyRunnable implements Runnable {

            ReentrantLock lock;
            Condition condition1;
            Condition condition2;


            public MyRunnable(ReentrantLock lock, Condition condition1, Condition condition2) {
                this.lock = lock;
                this.condition1 = condition1;
                this.condition2 = condition2;
            }

            @Override
            public void run() {
                int count = 2;
                while (count > 0) {
                    lock.lock();
                    try {
                        String name = Thread.currentThread().getName();

                        if (
                                number % 3 != 0 && "A".equals(name)
                                        || number % 3 != 2 && "B".equals(name)
                                        || number % 3 != 1 && "C".equals(name)
                        ) {
                            condition1.await();
                        }
                        System.out.println(name + " : " + number);
                        number--;
                        count--;
                        condition2.signal();

                    } catch (InterruptedException e) {
                        e.printStackTrace();
                    } finally {
                        lock.unlock();

                    }
                }

            }
        }


        new Thread(new MyRunnable(lock, conditionC, conditionA), "A").start();

        new Thread(new MyRunnable(lock, conditionA, conditionB), "B").start();

        new Thread(new MyRunnable(lock, conditionB, conditionC), "C").start();

    }
}
Synchronized 会了之后,这个也很简单了。
就是上锁的地方换成 lock.lock();,把三个共享资源换成 lock.newCondition();
然后思考一下阻塞条件 condition1.await() 。
毕竟 打印 和 唤醒 的操作总是在一起的。

Semaphore 我也写了,但是感觉不太适合,毕竟它的作用是用来控制并发线程数的,我直接创建三个 Semaphore 总觉得怪怪的。🐖
LockSupport 方式
这里我写了两种方法
   private static class MyLockSupport {
        volatile int number = 6;

        void printABC() throws InterruptedException {
            class MyRunnable implements Runnable {

                @Override
                public void run() {
                    int count = 2;
                    while (count > 0) {
                        LockSupport.park(this);
                        System.out.println(Thread.currentThread().getName());
                        count--;
                    }
                }
            }
            Thread a = new Thread(new MyRunnable(), "A");
            Thread b = new Thread(new MyRunnable(), "B");
            Thread c = new Thread(new MyRunnable(), "C");

            a.start();
            b.start();
            c.start();


            while (number > 0) {
                if (number % 3 == 0) {
                    LockSupport.unpark(a);
                } else if (number % 3 == 2) {
                    LockSupport.unpark(b);
                } else {
                    LockSupport.unpark(c);
                }
                number--;
                LockSupport.parkNanos(this, 200 * 1000);
//                LockSupport.parkUntil(this,System.currentTimeMillis()+3000L);
            }

        }

       // 用 map 解决线程循环依赖的问题
        void printABC2() throws InterruptedException {

            class MyRunnable implements Runnable {

                Map<String, Thread> map;

                public MyRunnable(Map<String, Thread> map) {
                    this.map = map;
                }

                @Override
                public void run() {
                    int count = 2;

                    String name = Thread.currentThread().getName();
                    String key = "A".equals(name) ? "B" : "B".equals(name) ? "C" : "A";

                    while (count > 0) {
                        if (
                                number % 3 == 0 && "A".equals(name)
                                        || number % 3 == 2 && "B".equals(name)
                                        || number % 3 == 1 && "C".equals(name)
                        ) {

                            System.out.println(name);
                            count--;
                            number--;
                            LockSupport.unpark(map.get(key));
                        }
                        LockSupport.park(this);
                    }

                    LockSupport.unpark(map.get(key));

                }

            }

            Map<String, Thread> map = new HashMap<>();


            Thread a = new Thread(new MyRunnable(map), "A");
            Thread b = new Thread(new MyRunnable(map), "B");
            Thread c = new Thread(new MyRunnable(map), "C");

            map.put("A", a);
            map.put("B", b);
            map.put("C", c);

            a.start();
            b.start();
            c.start();


        }
    }
LockSupport 我也是第一次用,它使用起来也很方便,就单纯的 阻塞和唤醒线程 ,对应 park 和 unPark 方法。
它不要求你像 wait 那样子,必须写在 Synchronized 代码块里,被 Monitor 监视才行。
但同时,也意味着你必须控制好这个 锁的范围 。
你可以自由阻塞代码,在具备某个条件时,唤醒特定的线程,让它继续执行。
实际上,上面 ReentrantLock 中的 Condition await 方法,底层就是调用 LockSupport 的 park 方法。
这也是我开头说的通信大致分为两种方式的原因。
方法一中,我是用 parkNanos 阻塞一段时间,然后就继续运行,也算是取巧不用 Thread.Sleep 了吧😝
方法二 我比较喜欢,思路也是同开头两种,打印完唤醒其他线程。



![[奶奶看了都会]ChatGPT保姆级注册教程](https://img-blog.csdnimg.cn/d6601310127a4e63bed0ddfe1c94cfc5.png#pic_center)
![[附源码]Python计算机毕业设计SSM基于微信平台的匿名电子投票系统(程序+LW)](https://img-blog.csdnimg.cn/119d82a98a734c5ea430ef8885be7914.png)
