目录
MyBatis基础
5.1需求描述
5.2数据库表的设计和准备数据
5.3实现步骤
第一步:引入相关依赖
第二步:引入相关配置文件,放到resources目录下(全部放到类的根路径下)
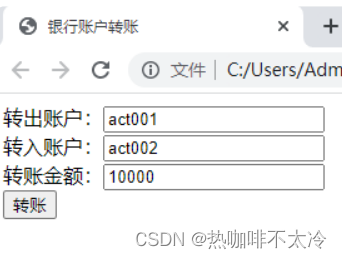
第三步:前端页面index.html
第四步:创建pojo包、service包、dao包、web包、utils包,引入utils类
第五步:定义pojo类:Account
第六步:编写AccountDao接口,以及AccountDaoImpl实现类
第七步:AccountDaoImpl中编写了mybatis代码,需要编写SQL映射文件
第八步:编写AccountService接口以及AccountServiceImpl
第九步:编写AccountServlet
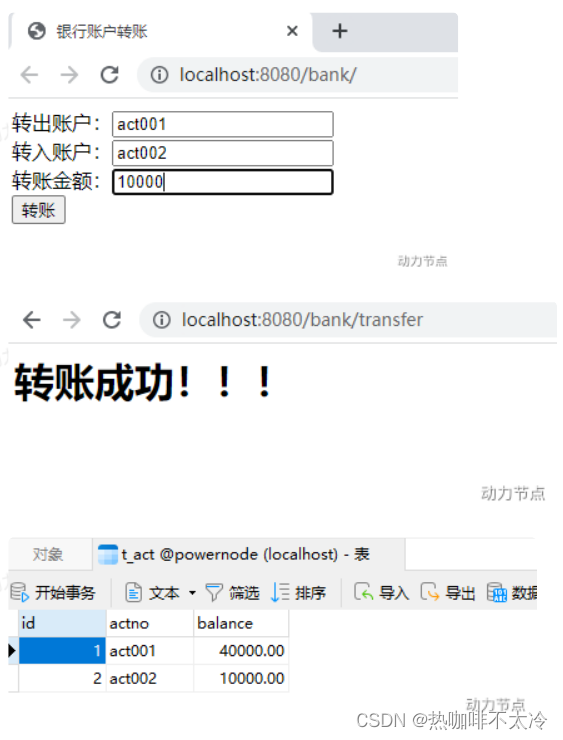
第十步:测试
5.4MyBatis核心对象的作用域
5.1需求描述
5.2数据库表的设计和准备数据

5.3实现步骤
第一步:引入相关依赖
<?xml version="1.0" encoding="UTF-8"?>
<project xmlns="http://maven.apache.org/POM/4.0.0" xmlns:xsi="http://www.w3.org/2001/XMLSchema-instance"
xsi:schemaLocation="http://maven.apache.org/POM/4.0.0 http://maven.apache.org/xsd/maven-4.0.0.xsd">
<modelVersion>4.0.0</modelVersion>
<groupId>com.hhb</groupId>
<artifactId>mybatis004-web</artifactId>
<version>1.0-SNAPSHOT</version>
<packaging>war</packaging>
<name>mybatis004-web Maven Webapp</name>
<!-- FIXME change it to the project's website -->
<url>http://www.example.com</url>
<properties>
<project.build.sourceEncoding>UTF-8</project.build.sourceEncoding>
<maven.compiler.source>1.7</maven.compiler.source>
<maven.compiler.target>1.7</maven.compiler.target>
</properties>
<dependencies>
<!--mybatis依赖-->
<dependency>
<groupId>org.mybatis</groupId>
<artifactId>mybatis</artifactId>
<version>3.5.11</version>
</dependency>
<!--mysql驱动依赖-->
<dependency>
<groupId>mysql</groupId>
<artifactId>mysql-connector-java</artifactId>
<version>8.0.29</version>
</dependency>
<!--logback依赖-->
<dependency>
<groupId>ch.qos.logback</groupId>
<artifactId>logback-classic</artifactId>
<version>1.2.3</version>
</dependency>
<!--servlet依赖-->
<dependency>
<groupId>javax.servlet</groupId>
<artifactId>javax.servlet-api</artifactId>
<version>4.0.1</version>
</dependency>
</dependencies>
<build>
<finalName>mybatis004-web</finalName>
<pluginManagement><!-- lock down plugins versions to avoid using Maven defaults (may be moved to parent pom) -->
<plugins>
<plugin>
<artifactId>maven-clean-plugin</artifactId>
<version>3.1.0</version>
</plugin>
<!-- see http://maven.apache.org/ref/current/maven-core/default-bindings.html#Plugin_bindings_for_war_packaging -->
<plugin>
<artifactId>maven-resources-plugin</artifactId>
<version>3.0.2</version>
</plugin>
<plugin>
<artifactId>maven-compiler-plugin</artifactId>
<version>3.8.0</version>
</plugin>
<plugin>
<artifactId>maven-surefire-plugin</artifactId>
<version>2.22.1</version>
</plugin>
<plugin>
<artifactId>maven-war-plugin</artifactId>
<version>3.2.2</version>
</plugin>
<plugin>
<artifactId>maven-install-plugin</artifactId>
<version>2.5.2</version>
</plugin>
<plugin>
<artifactId>maven-deploy-plugin</artifactId>
<version>2.8.2</version>
</plugin>
</plugins>
</pluginManagement>
</build>
</project>第二步:引入相关配置文件,放到resources目录下(全部放到类的根路径下)
jdbc.properties
jdbc.driver=com.mysql.cj.jdbc.Driver
jdbc.url=jdbc:mysql://localhost:3306/mybatis
jdbc.username=root
jdbc.password=root
mybatis-config.xml
<?xml version="1.0" encoding="UTF-8" ?>
<!DOCTYPE configuration
        PUBLIC "-//mybatis.org//DTD Config 3.0//EN"
        "http://mybatis.org/dtd/mybatis-3-config.dtd">
<configuration>
    <properties resource="jdbc.properties"/>
    <environments default="mybatis">
        <environment id="mybatis">
            <transactionManager type="JDBC"/>
            <dataSource type="POOLED">
                <property name="driver" value="${jdbc.driver}"/>
                <property name="url" value="${jdbc.url}"/>
                <property name="username" value="${jdbc.username}"/>
                <property name="password" value="${jdbc.password}"/>
            </dataSource>
        </environment>
    </environments>
    <mappers>
        <mapper resource="AccountMapper.xml"/>
    </mappers>
</configuration>
AccountMapper.xml
<?xml version="1.0" encoding="UTF-8" ?>
<!DOCTYPE mapper
 PUBLIC "-//mybatis.org//DTD Mapper 3.0//EN"
 "http://mybatis.org/dtd/mybatis-3-mapper.dtd">
<mapper namespace="account">
</mapper>
logback.xml
<?xml version="1.0" encoding="UTF-8"?>
<configuration debug="false">
<!-- 控制台输出 -->
<appender name="STDOUT" class="ch.qos.logback.core.ConsoleAppender">
<encoder class="ch.qos.logback.classic.encoder.PatternLayoutEncoder">
<!--格式化输出:%d表示日期,%thread表示线程名,%-5level:级别从左显示5个字符宽度%msg:日志消息,%n是换行符-->
<pattern>[%thread] %-5level %logger{50} - %msg%n</pattern>
</encoder>
</appender>
<!--mybatis log configure-->
<logger name="com.apache.ibatis" level="TRACE"/>
<logger name="java.sql.Connection" level="DEBUG"/>
<logger name="java.sql.Statement" level="DEBUG"/>
<logger name="java.sql.PreparedStatement" level="DEBUG"/>
<!-- 日志输出级别,logback日志级别包括五个:TRACE < DEBUG < INFO < WARN < ERROR -->
<root level="DEBUG">
<appender-ref ref="STDOUT"/>
<appender-ref ref="FILE"/>
</root>
</configuration>第三步:前端页面index.html
<!DOCTYPE html>
<html lang="en">
<head>
 <meta charset="UTF-8">
 <title>银⾏账户转账</title>
</head>
<body>
<!--/bank是应⽤的根,部署web应⽤到tomcat的时候⼀定要注意这个名字-->
<form action="/bank/transfer" method="post">
 转出账户:<input type="text" name="fromActno"/><br>
 转⼊账户:<input type="text" name="toActno"/><br>
 转账⾦额:<input type="text" name="money"/><br>
 <input type="submit" value="转账"/>
</form>
</body>
</html>
第四步:创建pojo包、service包、dao包、web包、utils包,引入utils类

SqlSessionUtil
package com.hhb.web;
import com.hhb.exceptions.MoneyNotEnoughException;
import com.hhb.exceptions.TransferException;
import com.hhb.service.AccountService;
import com.hhb.service.impl.AccountServiceImpl;
import javax.servlet.ServletException;
import javax.servlet.annotation.WebServlet;
import javax.servlet.http.HttpServlet;
import javax.servlet.http.HttpServletRequest;
import javax.servlet.http.HttpServletResponse;
import javax.xml.transform.TransformerException;
import java.io.IOException;
@WebServlet("/transfer")
public class AccountServlet extends HttpServlet {
private AccountService accountService = new AccountServiceImpl();
@Override
protected void doPost(HttpServletRequest request, HttpServletResponse response) throws ServletException, IOException {
String fromActno = request.getParameter("fromActno");
String toActno = request.getParameter("toActno");
String moneyStr = request.getParameter("money");
double money = Double.parseDouble(moneyStr);
try {
//调用service的转账方法完成转账
this.accountService.transfer(fromActno, toActno, money);
//调用view完成展示结果
response.sendRedirect(request.getContextPath() + "/success.html");
} catch (MoneyNotEnoughException e) {
response.sendRedirect(request.getContextPath() + "/error1.html");
} catch (TransferException e) {
response.sendRedirect(request.getContextPath() + "/error2.html");
} catch (Exception e){
response.sendRedirect(request.getContextPath() + "/error2.html");
}
}
}第五步:定义pojo类:Account
package com.hhb.pojo;
/**
* 账户类:封装账户数据
*/
public class Account {
private Long id;
private String actno;
private Double balance;
@Override
public String toString() {
return "Account{" +
"id=" + id +
", actno='" + actno + '\'' +
", balance=" + balance +
'}';
}
public Long getId() {
return id;
}
public void setId(Long id) {
this.id = id;
}
public String getActno() {
return actno;
}
public void setActno(String actno) {
this.actno = actno;
}
public Double getBalance() {
return balance;
}
public void setBalance(Double balance) {
this.balance = balance;
}
public Account(Long id, String actno, Double balance) {
this.id = id;
this.actno = actno;
this.balance = balance;
}
public Account() {
}
}
第六步:编写AccountDao接口,以及AccountDaoImpl实现类
AccountDao
package com.hhb.dao;
import com.hhb.pojo.Account;
/**
* 账户的DAO对象,负责t_act表中数据的CRUD
*/
public interface AccountDao {
/**
* 根据账号查询账户信息
*
* @param actno 账号
* @return 账户信息
*/
public Account selectByActno(String actno);
/**
* 更新账户信息
*
* @param account 被更新的账户对象
* @return 1表示更新成功,其它值表示更新失败
*/
public int updateByActno(Account account);
}AccountDaoImpl
package com.hhb.dao.impl;
import com.hhb.dao.AccountDao;
import com.hhb.pojo.Account;
import com.hhb.utils.SqlSessionUtil;
import org.apache.ibatis.session.SqlSession;
public class AccountDaoImpl implements AccountDao {
@Override
public Account selectByActno(String actno) {
SqlSession sqlSession = SqlSessionUtil.openSession();
Account account = (Account) sqlSession.selectOne("account.selectByActno", actno);
return account;
}
@Override
public int updateByActno(Account account) {
SqlSession sqlSession = SqlSessionUtil.openSession();
int count = sqlSession.update("account.updateByActno", account);
return count;
}
}第七步:AccountDaoImpl中编写了mybatis代码,需要编写SQL映射文件
AccountMapper.xml
<?xml version="1.0" encoding="UTF-8" ?>
<!DOCTYPE mapper
PUBLIC "-//mybatis.org//DTD Mapper 3.0//EN"
"http://mybatis.org/dtd/mybatis-3-mapper.dtd">
<mapper namespace="account">
<select id="selectByActno" resultType="com.hhb.pojo.Account">
select * from t_act where actno = #{actno}
</select>
<update id="updateByActno">
update t_act set balance = #{balance} where actno = #{actno}
</update>
</mapper>第八步:编写AccountService接口以及AccountServiceImpl
MoneyNotEnoughException
package com.hhb.exceptions;
public class MoneyNotEnoughException extends Throwable {
public MoneyNotEnoughException(){}
public MoneyNotEnoughException(String msg){
super(msg);
}
}TransferException
package com.hhb.exceptions;
/**
* 转账异常
*/
public class TransferException extends Throwable {
public TransferException(){}
public TransferException(String msg){
super(msg);
}
}
AccountService
package com.hhb.service;
import com.hhb.exceptions.MoneyNotEnoughException;
import com.hhb.exceptions.TransferException;
import javax.xml.transform.TransformerException;
/**
* 账户业务类
*/
public interface AccountService {
/**
* 账户转账业务
* @param fromActno 转出账号
* @param toActno 转入账号
* @param money 转账金额
*/
public void transfer(String fromActno,String toActno,double money) throws MoneyNotEnoughException, TransferException;
}AccountServiceImpl
package com.hhb.service.impl;
import com.hhb.dao.AccountDao;
import com.hhb.dao.impl.AccountDaoImpl;
import com.hhb.exceptions.MoneyNotEnoughException;
import com.hhb.exceptions.TransferException;
import com.hhb.pojo.Account;
import com.hhb.service.AccountService;
import com.hhb.utils.SqlSessionUtil;
import org.apache.ibatis.session.SqlSession;
public class AccountServiceImpl implements AccountService {
private AccountDao accountDao = new AccountDaoImpl();
@Override
public void transfer(String fromActno, String toActno, double money) throws MoneyNotEnoughException, TransferException {
//添加事务控制
SqlSession sqlSession = SqlSessionUtil.openSession();
//1.判断转出账户的余额是否充足(select)
Account fromAct = accountDao.selectByActno(fromActno);
if (fromAct.getBalance() < money) {
//2.如果转出账户余额不足,提示用户
throw new MoneyNotEnoughException("对不起,余额不足");
}
//3.如果转出账户余额充足,更新转出账户余额
//先更新内存中的java对象account余额
Account toAct = accountDao.selectByActno(toActno);
fromAct.setBalance(fromAct.getBalance() - money);
toAct.setBalance(toAct.getBalance() + money);
int count = accountDao.updateByActno(fromAct);
//模拟异常
//String s = null;
//s.toString();
//4.更新转入账户余额(update)
count += accountDao.updateByActno(toAct);
if (count != 2) {
throw new TransferException("转账异常");
}
// 提交事务
sqlSession.commit();
// 关闭事务
SqlSessionUtil.close(sqlSession);
}
}第九步:编写AccountServlet
package com.hhb.web;
import com.hhb.exceptions.MoneyNotEnoughException;
import com.hhb.exceptions.TransferException;
import com.hhb.service.AccountService;
import com.hhb.service.impl.AccountServiceImpl;
import javax.servlet.ServletException;
import javax.servlet.annotation.WebServlet;
import javax.servlet.http.HttpServlet;
import javax.servlet.http.HttpServletRequest;
import javax.servlet.http.HttpServletResponse;
import javax.xml.transform.TransformerException;
import java.io.IOException;
@WebServlet("/transfer")
public class AccountServlet extends HttpServlet {
private AccountService accountService = new AccountServiceImpl();
@Override
protected void doPost(HttpServletRequest request, HttpServletResponse response) throws ServletException, IOException {
String fromActno = request.getParameter("fromActno");
String toActno = request.getParameter("toActno");
String moneyStr = request.getParameter("money");
double money = Double.parseDouble(moneyStr);
try {
//调用service的转账方法完成转账
this.accountService.transfer(fromActno, toActno, money);
//调用view完成展示结果
response.sendRedirect(request.getContextPath() + "/success.html");
} catch (MoneyNotEnoughException e) {
response.sendRedirect(request.getContextPath() + "/error1.html");
} catch (TransferException e) {
response.sendRedirect(request.getContextPath() + "/error2.html");
} catch (Exception e){
response.sendRedirect(request.getContextPath() + "/error2.html");
}
}
}第十步:测试
-
启动服务器,打开浏览器,输⼊地址:http://localhost:8080/bank,测试:
-
a
5.4MyBatis核心对象的作用域
SqlSessionFactoryBuilder
这个类可以被实例化、使用和丢弃,一旦创建了SqlSessionFactory,就不再需要它了。
SqlSessionFactory
SqlSessionFactory一旦被创建就应该在应用的运行期间一直存在,没有任何理由丢弃他或重新创建另一个实例。使⽤ SqlSessionFactory 的最佳实践是在应⽤运⾏期间不要重复创建多次,多次重建 SqlSessionFactory被视为⼀种代码“坏习惯”。
SqlSession
每个线程都应该有它自己的SqlSession实例。SqlSession的实例不是线程安全的,因此是不能被共享的,所以它的最佳的作用域是请求或方法作用域。一般一个XxxxMapper.xml对应一个SqlSession对象。
