大家好,我是程序猿小张
前言
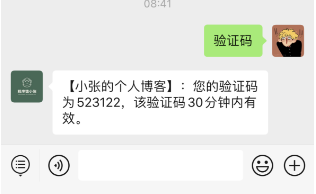
个人博客今天上线一个文章私密的功能,该功能需要通过关注公众号来获取验证码,通过正确的验证码才能来查阅文章,具体效果如下图。
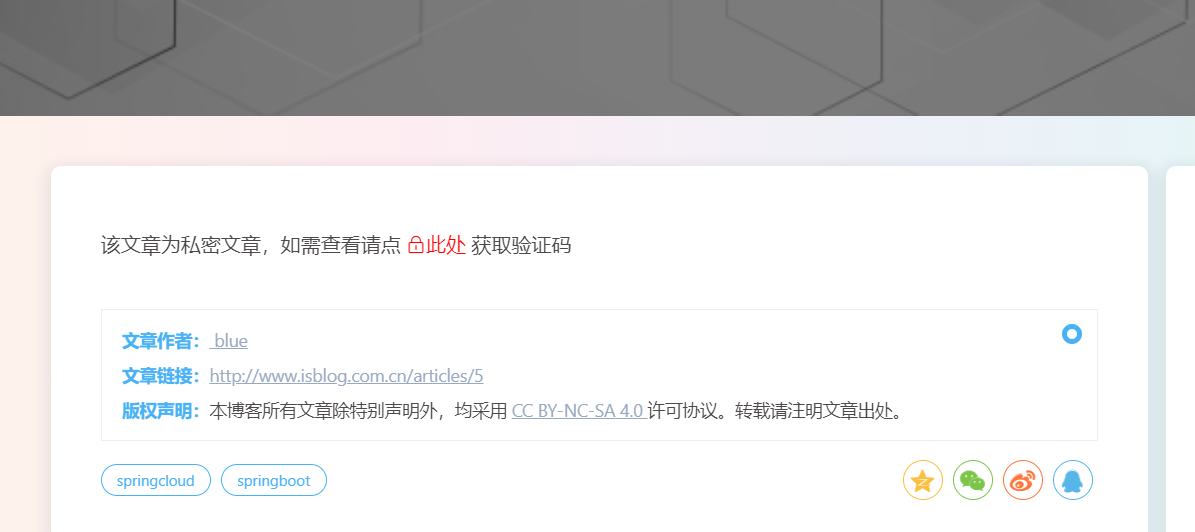

我感觉还蛮有意思的就决定把这个写出来,供大家去使用,下面来讲讲我的具体实现。
一、首先需要自行前往微信公众平台创建公众号(博主已经有公众号就不在进行讲解这一步了)
二、 在公众号平台选择基础配置进行服务器的配置,如下图
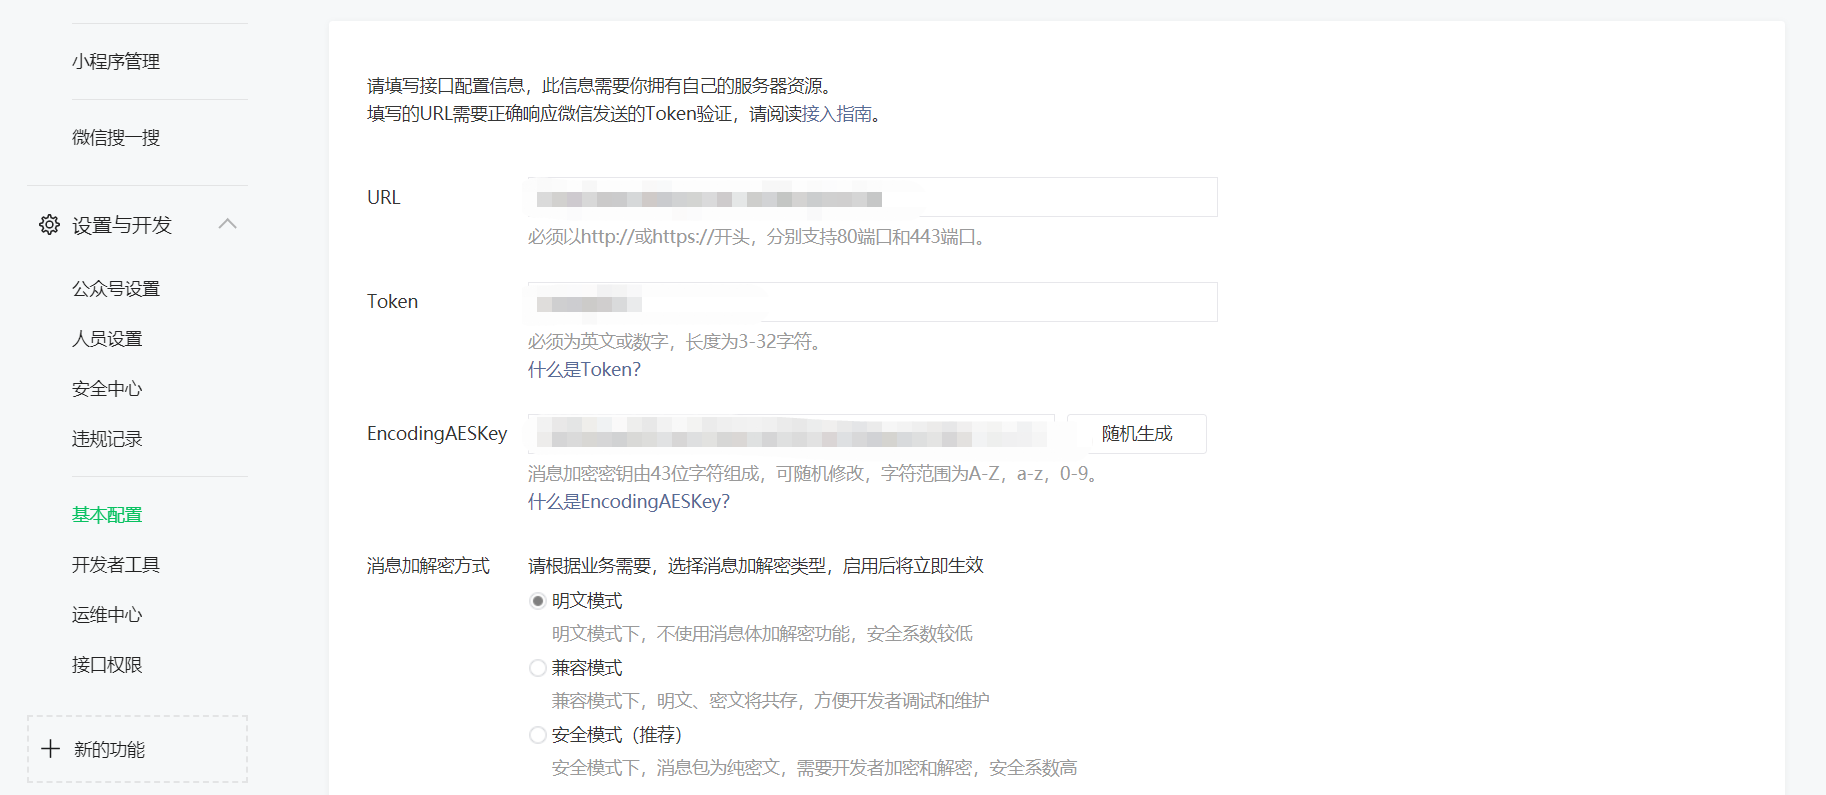
- url:填写你后端的接口地址,get请求
- token:自己随便定义一个
- EncodingAESKey:可以自己选择也可以随机生成
- 加解密方式:根据自己的实际情况来选择
三、controller层代码
 @ApiOperation("微信公众号服务器配置校验token")
    @RequestMapping(value = "/test",method = RequestMethod.GET)
    public void checkToken(HttpServletRequest request, HttpServletResponse response) {
        //token验证代码段
        try {
            log.info("请求已到达,开始校验token");
            if (StringUtils.isNotBlank(request.getParameter("signature"))) {
                String signature = request.getParameter("signature");
                String timestamp = request.getParameter("timestamp");
                String nonce = request.getParameter("nonce");
                String echostr = request.getParameter("echostr");
                log.info("signature[{}], timestamp[{}], nonce[{}], echostr[{}]", signature, timestamp, nonce, echostr);
                if (WeChatUtil.checkSignature(signature, timestamp, nonce)) {
                    log.info("数据源为微信后台,将echostr[{}]返回!", echostr);
                    BufferedOutputStream out = new BufferedOutputStream(response.getOutputStream());
                    out.write(echostr.getBytes());
                    out.flush();
                    out.close();
                }
            }
        } catch (IOException e) {
            log.error("校验出错");
            e.printStackTrace();
        }
    }
四、.WeChatUtil代码,需要注意此类里面的token需要与公众号平台填写的token一致
private static String token = "demo123456";

    private static final Logger LOGGER = LoggerFactory.getLogger(WeChatUtil.class);

    /**
     * 校验签名
     * @param signature 签名
     * @param timestamp 时间戳
     * @param nonce 随机数
     * @return 布尔值
     */
    public static boolean checkSignature(String signature,String timestamp,String nonce){
        String checktext = null;
        if (null != signature) {
            //对ToKen,timestamp,nonce 按字典排序
            String[] paramArr = new String[]{token,timestamp,nonce};
            Arrays.sort(paramArr);
            //将排序后的结果拼成一个字符串
            String content = paramArr[0].concat(paramArr[1]).concat(paramArr[2]);

            try {
                MessageDigest md = MessageDigest.getInstance("SHA-1");
                //对接后的字符串进行sha1加密
                byte[] digest = md.digest(content.getBytes());
                checktext = byteToStr(digest);
            } catch (NoSuchAlgorithmException e){
                e.printStackTrace();
            }
        }
        //将加密后的字符串与signature进行对比
        return checktext !=null ? checktext.equals(signature.toUpperCase()) : false;
    }

    /**
     * 将字节数组转化我16进制字符串
     * @param byteArrays 字符数组
     * @return 字符串
     */
    private static String byteToStr(byte[] byteArrays){
        String str = "";
        for (int i = 0; i < byteArrays.length; i++) {
            str += byteToHexStr(byteArrays[i]);
        }
        return str;
    }

    /**
     *  将字节转化为十六进制字符串
     * @param myByte 字节
     * @return 字符串
     */
    private static String byteToHexStr(byte myByte) {
        char[] Digit = {'0','1','2','3','4','5','6','7','8','9','A','B','C','D','E','F'};
        char[] tampArr = new char[2];
        tampArr[0] = Digit[(myByte >>> 4) & 0X0F];
        tampArr[1] = Digit[myByte & 0X0F];
        String str = new String(tampArr);
        return str;
    }
需要注意在公众号平台提交服务器配置时这些代码需要部署上线,否则会token失效。以上代码可直接复制,经过博主测试不会存在token失效问题。下面讲一下如何通过关键词来实现自动回复功能
五、pom.xml引入依赖
  		<dependency>
            <groupId>org.dom4j</groupId>
            <artifactId>dom4j</artifactId>
            <version>2.1.3</version>
        </dependency>
六、同样的是controller层添加如下代码
@ApiOperation("处理微信服务器的消息转发")
    @PostMapping(value = "test")
    public String  wechat(HttpServletRequest request) throws Exception {
        // 调用parseXml方法解析请求消息
        Map<String,String> requestMap = WeChatUtil.parseXml(request);
        // 消息类型
        String msgType = requestMap.get("MsgType");
        // xml格式的消息数据
        String respXml = null;
        String mes = requestMap.get("Content");
        // 文本消息
        if ("text".equals(msgType) && "验证码".equals(mes)) {
            String code = RanDomUtil.generationNumber(6);
            respXml=WeChatUtil.sendTextMsg(requestMap,code);
            redisCache.setCacheObject(RedisConstants.WECHAT_CODE+code,code,30, TimeUnit.MINUTES);
        }
        return respXml;
    }
此处需要注意 此接口和前面校验token的接口请求方式不同,这里是post请求,前面校验token是get请求,这里的接口地址不能乱写,需要和公众号平台填写的url相同,也就是前面校验token和这里接收请求的接口一致,只是请求方式不同
七、WeChatUtil添加如下代码
 /**
     * 解析微信发来的请求(xml)
     *
     * @param request
     * @return
     * @throws Exception
     */
    public static Map<String,String> parseXml(HttpServletRequest request) throws Exception {
        LOGGER.info("请求已到达,开始解析参数...");

        // 将解析结果存储在HashMap中
        Map<String,String> map = new HashMap<>();

        // 从request中取得输入流
        InputStream inputStream = request.getInputStream();
        // 读取输入流
        SAXReader reader = new SAXReader();
        Document document = reader.read(inputStream);
        // 得到xml根元素
        Element root = document.getRootElement();
        // 得到根元素的所有子节点
        List<Element> elementList = root.elements();
        // 遍历所有子节点
        for (Element e : elementList) {
            map.put(e.getName(), e.getText());
        }

        // 释放资源
        inputStream.close();
        LOGGER.info("参数解析完成。{}",map);
        return map;
    }
    /**
     * 回复文本消息
     * @param requestMap
     * @param content
     * @return
     */
    public static String sendTextMsg(Map<String,String> requestMap,String content){

        Map<String,Object> map= new HashMap<>();
        map.put("ToUserName", requestMap.get("FromUserName"));
        map.put("FromUserName",  requestMap.get("ToUserName"));
        map.put("MsgType", "text");
        map.put("CreateTime", new Date().getTime());
        map.put("Content", content);
        return  mapToXML(map);
    }
    public static String mapToXML(Map map) {
        StringBuffer sb = new StringBuffer();
        sb.append("<xml>");
        mapToXML2(map, sb);
        sb.append("</xml>");
        LOGGER.info("请求完成,返回参数:{}",sb);
        try {
            return sb.toString();
        } catch (Exception e) {
        }
        return null;
    }
    private static void mapToXML2(Map map, StringBuffer sb) {
        Set set = map.keySet();
        for (Iterator it = set.iterator(); it.hasNext();) {
            String key = (String) it.next();
            Object value = map.get(key);
            if (null == value)
                value = "";
            if (value.getClass().getName().equals("java.util.ArrayList")) {
                ArrayList list = (ArrayList) map.get(key);
                sb.append("<" + key + ">");
                for (int i = 0; i < list.size(); i++) {
                    HashMap hm = (HashMap) list.get(i);
                    mapToXML2(hm, sb);
                }
                sb.append("</" + key + ">");

            } else {
                if (value instanceof HashMap) {
                    sb.append("<" + key + ">");
                    mapToXML2((HashMap) value, sb);
                    sb.append("</" + key + ">");
                } else {
                    sb.append("<" + key + "><![CDATA[" + value + "]]></" + key + ">");
                }

            }

        }
    }
OK,大功告成,以上只是讲解了自动回复文本类型的功能,其他类型功能以后在进行讲解或可自行百度 最后献上完成的示例图
Bye~
