前言
关于为什么会有Promise以及Promise的一些用法和基本机制可以参考之前的文章JS中的异步与Promise使用整体来说,Promise可以帮助我们很好的解决异步的问题,号称是异步的终极解决方案。在浏览器中Promise是使用C++实现的,今天就使用js来实现一个JS版本的Promise。这样可以更深层次的帮助我们理解Promise
Promise的状态和值
定义
每一个Promise对象都有三种状态: pending 、resolve 和 reject
- PENDING : 进行中,Promise 对象的初始状态
- FULFILLED : 已成功
- REJECTED : 已失败
每一个 Promise 对象只能由 PENDING 状态变成 FULFILLED 或 REJECTED,且状态发生变化以后就能再改变了
一个 Promise 对象状态的变化并不由 Promise 对象本身来决定,而应该是由我们传入的异步任务完成情况来决定的,Promise 提供了resolve, reject两个用来改变状态的方法
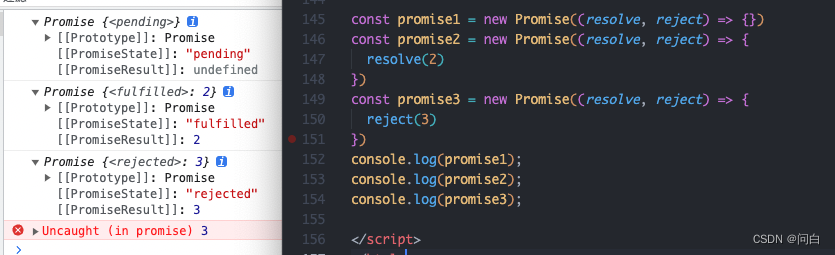
先看原生Promise的效果如下:
实现三个状态以及值的管理
那我们也要先解决我们自己xpromise的三个状态。可以在我们class中建立两个变量分别记录当前xpromise的状态和值代码如下:
// index.html
<script type="module">
  import XPromise from './xpromise.js'
  const xpromise1 = new XPromise((resolve, reject) => {})
  const xpromise2 = new XPromise((resolve, reject) => {
    resolve(2)
  })
  const xpromise3 = new XPromise((resolve, reject) => {
    reject(3)
  })
console.log(xpromise1);
console.log(xpromise2);
console.log(xpromise3);
</script>
// index.html同级目录 xpromise.js文件
class XPromise {
  constructor(handle) {
    // 用来记录当前XPromise的状态 pending | fulfilled | rejected
    this['[[PromiseState]]'] = 'pending'
    // 用来记录当前XPromise的值
    this['[[PromiseResult]]'] = undefined
  }

}

export default XPromise
执行的效果如下:
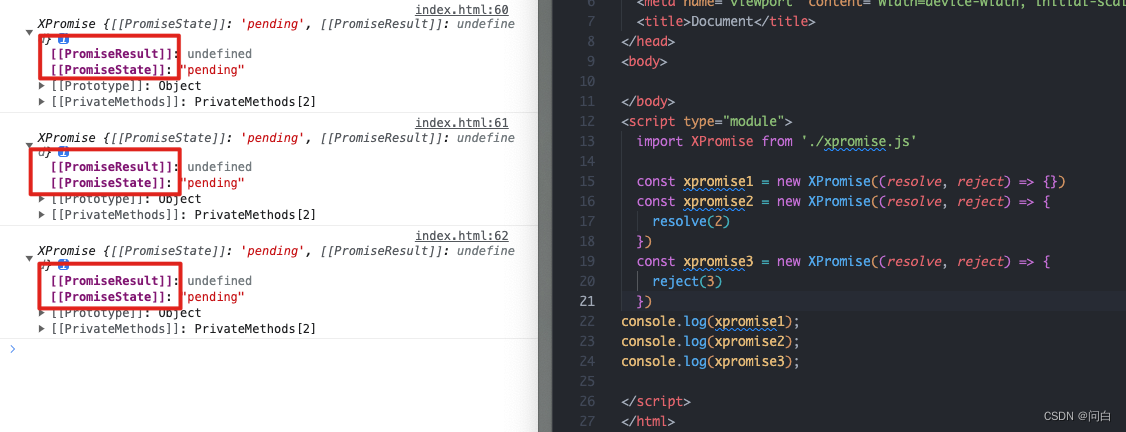
可以看到我们以及有了状态[[PromiseState]]和值[[PromiseResult]]。但我们在index.html中调用了resolve(2)和reject(3)的时候应该要修改对应的状态和值。所以在在xpromise.js中的代码修改如下:
class XPromise {
  constructor(handle) {
    // 用来记录当前XPromise的状态 pending | fulfilled | rejected
    this['[[PromiseState]]'] = 'pending'
    // 用来记录当前XPromise的值
    this['[[PromiseResult]]'] = undefined
    // 使用否箭头函数规避this问题, 否则就得这里bind一下
    // handle(this.#resolve.bind(this), this.#reject.bind(this))
    handle(this.#resolve, this.#reject)
  }

  // 对标promise中的resolve
  #resolve = (val) => {
    this['[[PromiseState]]'] = 'fulfilled'
    this['[[PromiseResult]]'] = val
  }

  // 对标promise中的reject
  #reject = (error) => {
    this['[[PromiseState]]'] = 'rejected'
    this['[[PromiseResult]]'] = error
  }

}
export default XPromise
这里注意的是,#resolve和#reject方法使用了箭头函数的写法规避了this指向的问题,如果不使用箭头函数,就需要在构造函数中bind一下this。否则在Promise构造函数中this是undefined,最终执行效果如下
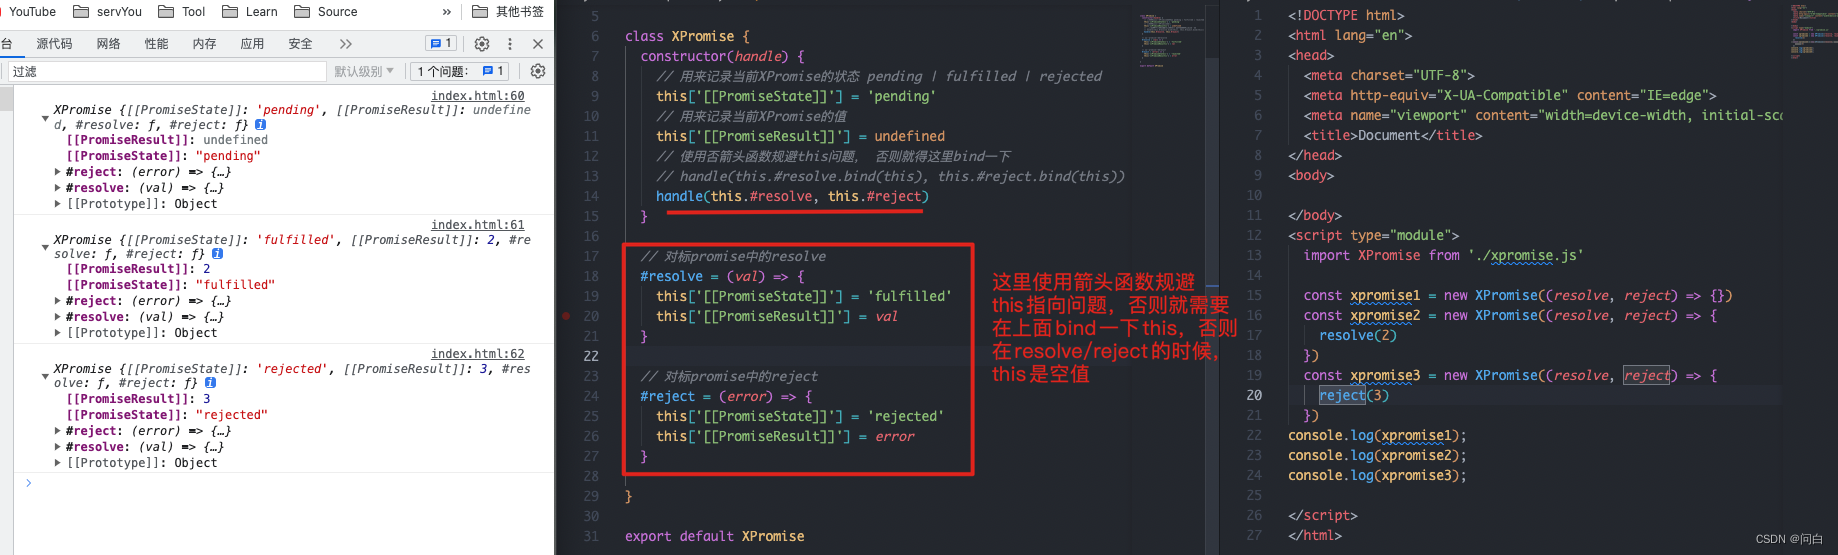
可以看到xpromise中已近发生了状态的改变,并且也已近有了值
then函数
定义
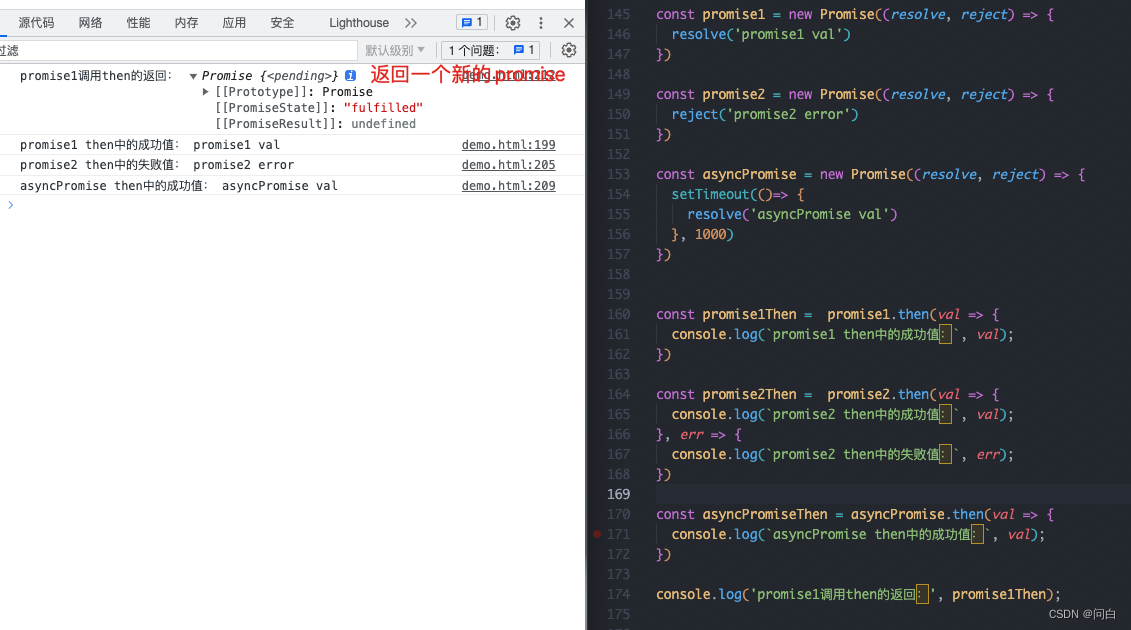
then() 方法返回一个 Promise (en-US)。它最多需要有两个参数:Promise 的成功和失败情况的回调函数。在成功回调函数中接受成功的值,失败情况的回调函数接受失败的值,比如看原生的promise使用then如下:
很明显,then的功能有下面几点
- 接受成功和失败两个回调函数作为参数
- 对应的成功失败回调函数接受resolve和reject的值
- 返回一个新的promise
下面我们自己也来实现这个效果,很明显,then函数是一个实例方法,也就是原型链上面的方法
实现promise示例执行then函数
先看同步的promise,我们只需要在then 函数中判断当前promise实例的状态,根据不同的状态去执行onResolve或onReject方法并传入当前promise的值即可
class XPromise {
  constructor(handle) {
    // 用来记录当前XPromise的状态 pending | fulfilled | rejected
    this['[[PromiseState]]'] = 'pending'
    // 用来记录当前XPromise的值
    this['[[PromiseResult]]'] = undefined
    // 使用否箭头函数规避this问题, 否则就得这里bind一下
    // handle(this.#resolve.bind(this), this.#reject.bind(this))
    handle(this.#resolve, this.#reject)
  }

  // 对标promise中的resolve
  #resolve = (val) => {
    this['[[PromiseState]]'] = 'fulfilled'
    this['[[PromiseResult]]'] = val
  }

  // 对标promise中的reject
  #reject = (error) => {
    this['[[PromiseState]]'] = 'rejected'
    this['[[PromiseResult]]'] = error
  }

  // xpromise实例方法
  then = (onResolved, onReject) => {
    const promiseState = this['[[PromiseState]]']
    const promiseResult = this['[[PromiseResult]]']
    if ( promiseState === 'fulfilled') {
      // 当前xpromise为成功状态
      onResolved && onResolved(promiseResult)
    } else if (promiseState === 'rejected') {
      // 当前xpromise为失败状态
      onReject && onReject(promiseResult)
    }
  }
}

export default XPromise
执行效果如下:

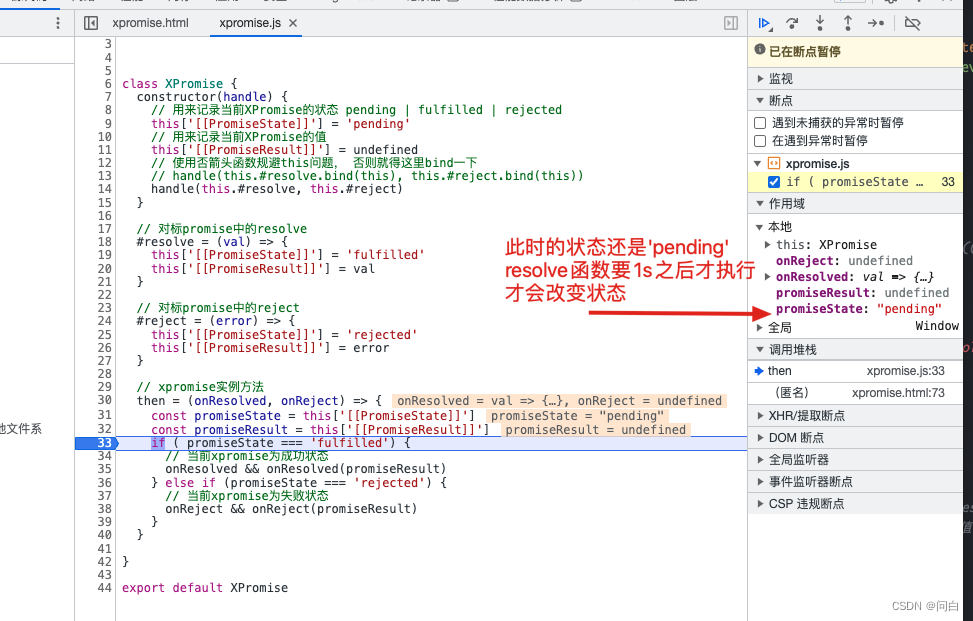
通过上面我们可以发现,之所以同步的xpromise执行是符合预期的,是因为在XPromise的构造函数中,立马就执行了resolve函数,那么对应的promiseResolve实例的状态就会变成fulfilled。但是异步的XPromise的构造函数中,resolve('asyncPromise val')要在1s之后才能执行,所以当代码执行到asyncPromise.then时,对应的asyncPromiseThen实例状态还是pending所以就不会触发onResolved或onReject函数了。也就不会执行then函数中传入的函数参数了。
实现异步Promise执行then函数功能
基于上述问题,所以我们需要改造一下,将传递给then函数中的两个函数(onResolve / onReject)参数要在resolve函数执行之后才会执行,所以我们进一步将代码进行如下改造:
class XPromise {
  constructor(handle) {
    // 用来记录当前XPromise的状态 pending | fulfilled | rejected
    this['[[PromiseState]]'] = 'pending'
    // 用来记录当前XPromise的值
    this['[[PromiseResult]]'] = undefined
    this.resolveFn = null
    this.rejectFn = null
    // 使用否箭头函数规避this问题, 否则就得这里bind一下
    // handle(this.#resolve.bind(this), this.#reject.bind(this))
    handle(this.#resolve, this.#reject)
  }

  // 对标promise中的resolve
  #resolve = (val) => {
    this['[[PromiseState]]'] = 'fulfilled'
    this['[[PromiseResult]]'] = val
    // 如果有resolveFn则运行并传入成功的值
    this.resolveFn && this.resolveFn(val)
  }

  // 对标promise中的reject
  #reject = (error) => {
    this['[[PromiseState]]'] = 'rejected'
    this['[[PromiseResult]]'] = error
    // 如果有rejectFn则运行,并传入失败的值
    this.rejectFn && this.rejectFn(error)
  }

  // xpromise实例方法
  then = (onResolved, onReject) => {
    // 将成功或失败的两个函数保存至当前xpromise实例
    this.resolveFn = onResolved
    this.rejectFn = onReject
  }
}

export default XPromise
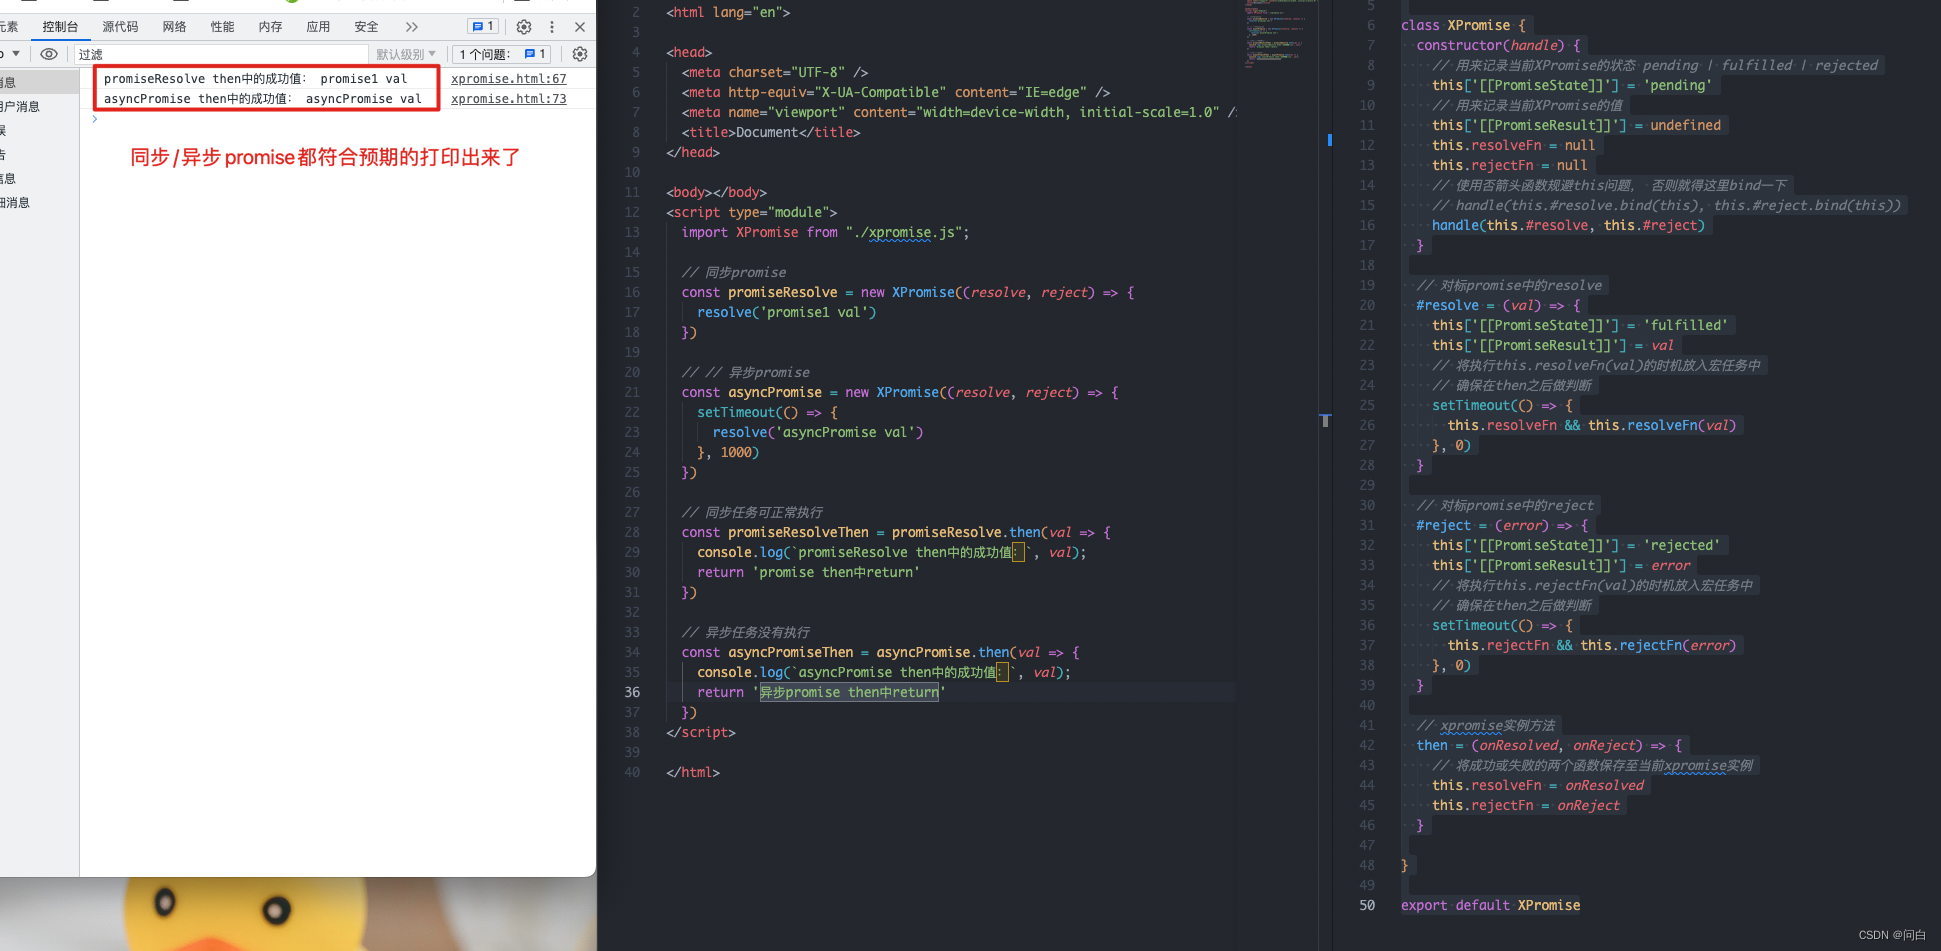
对应的执行效果如下:

我们发现,异步的promise符合预期的在延迟1s之后打印出来了,但是同步的promise却没有打印出来了。
实现同步&异步Promise执行then函数功能
是因为在同步的Promise实例中的执行resolve函数时,此时this.resolveFn还是null,所以就不会执行,而等到执行promiseResolve.then时,也只是将then函数的入参函数保存到this.resolveFn属性中,并没有执行。
所以要解决这个问题,就必须在执行resolev函数时,就已近把then函数传递的函数参数存入this.resolveFn中。而我们知道promise.then中的函数是微任务(现在还没实现是同步任务),但浏览器会先执行同步任务、微任务、宏任务。所以我们可以把resolve函数中的thie.resolveFn()执行时机放在宏任务重,这样就能保证在判断是否要执行this.resolveFn时就一定有该函数(或者this.rejectFn)。再次将代码做如下改造:
class XPromise {
  constructor(handle) {
    // 用来记录当前XPromise的状态 pending | fulfilled | rejected
    this['[[PromiseState]]'] = 'pending'
    // 用来记录当前XPromise的值
    this['[[PromiseResult]]'] = undefined
    this.resolveFn = null
    this.rejectFn = null
    // 使用否箭头函数规避this问题, 否则就得这里bind一下
    // handle(this.#resolve.bind(this), this.#reject.bind(this))
    handle(this.#resolve, this.#reject)
  }

  // 对标promise中的resolve
  #resolve = (val) => {
    this['[[PromiseState]]'] = 'fulfilled'
    this['[[PromiseResult]]'] = val
    // 将执行this.resolveFn(val)的时机放入宏任务中
    // 确保在then之后做判断
    setTimeout(() => {
      this.resolveFn && this.resolveFn(val)
    }, 0)
  }

  // 对标promise中的reject
  #reject = (error) => {
    this['[[PromiseState]]'] = 'rejected'
    this['[[PromiseResult]]'] = error
    // 将执行this.rejectFn(val)的时机放入宏任务中
    // 确保在then之后做判断
    setTimeout(() => {
      this.rejectFn && this.rejectFn(error)
    }, 0)
  }

  // xpromise实例方法
  then = (onResolved, onReject) => {
    // 将成功或失败的两个函数保存至当前xpromise实例
    this.resolveFn = onResolved
    this.rejectFn = onReject
  }

}

export default XPromise
执行效果如下:
实现并行调用then函数的功能
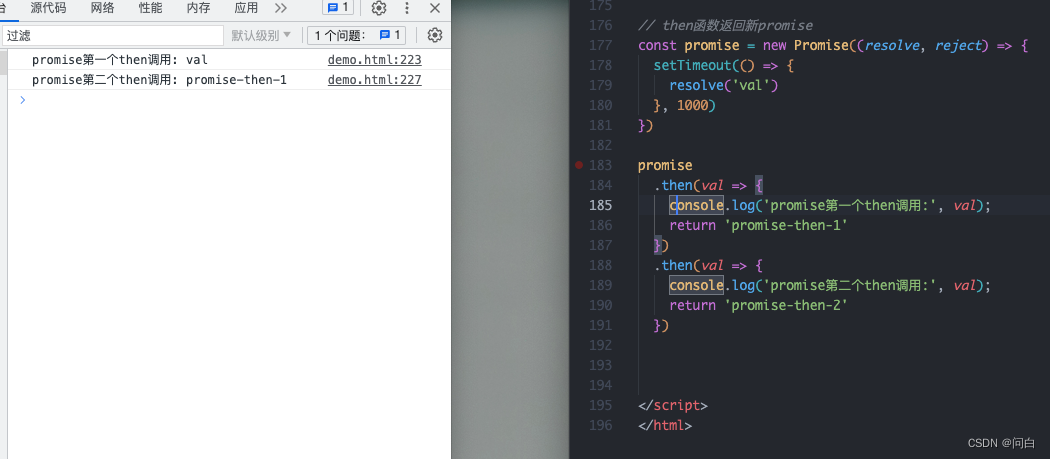
基于上面的代码,我们已近可以实现同步/异步Promise函数的问题。但原生的promise是可以多次并行调用的。
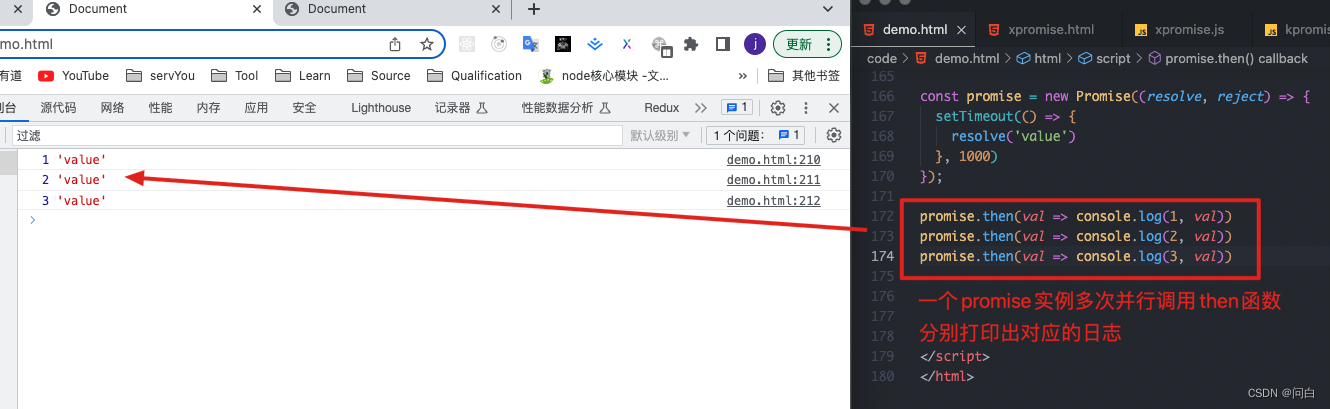
但我们现在的效果如下:
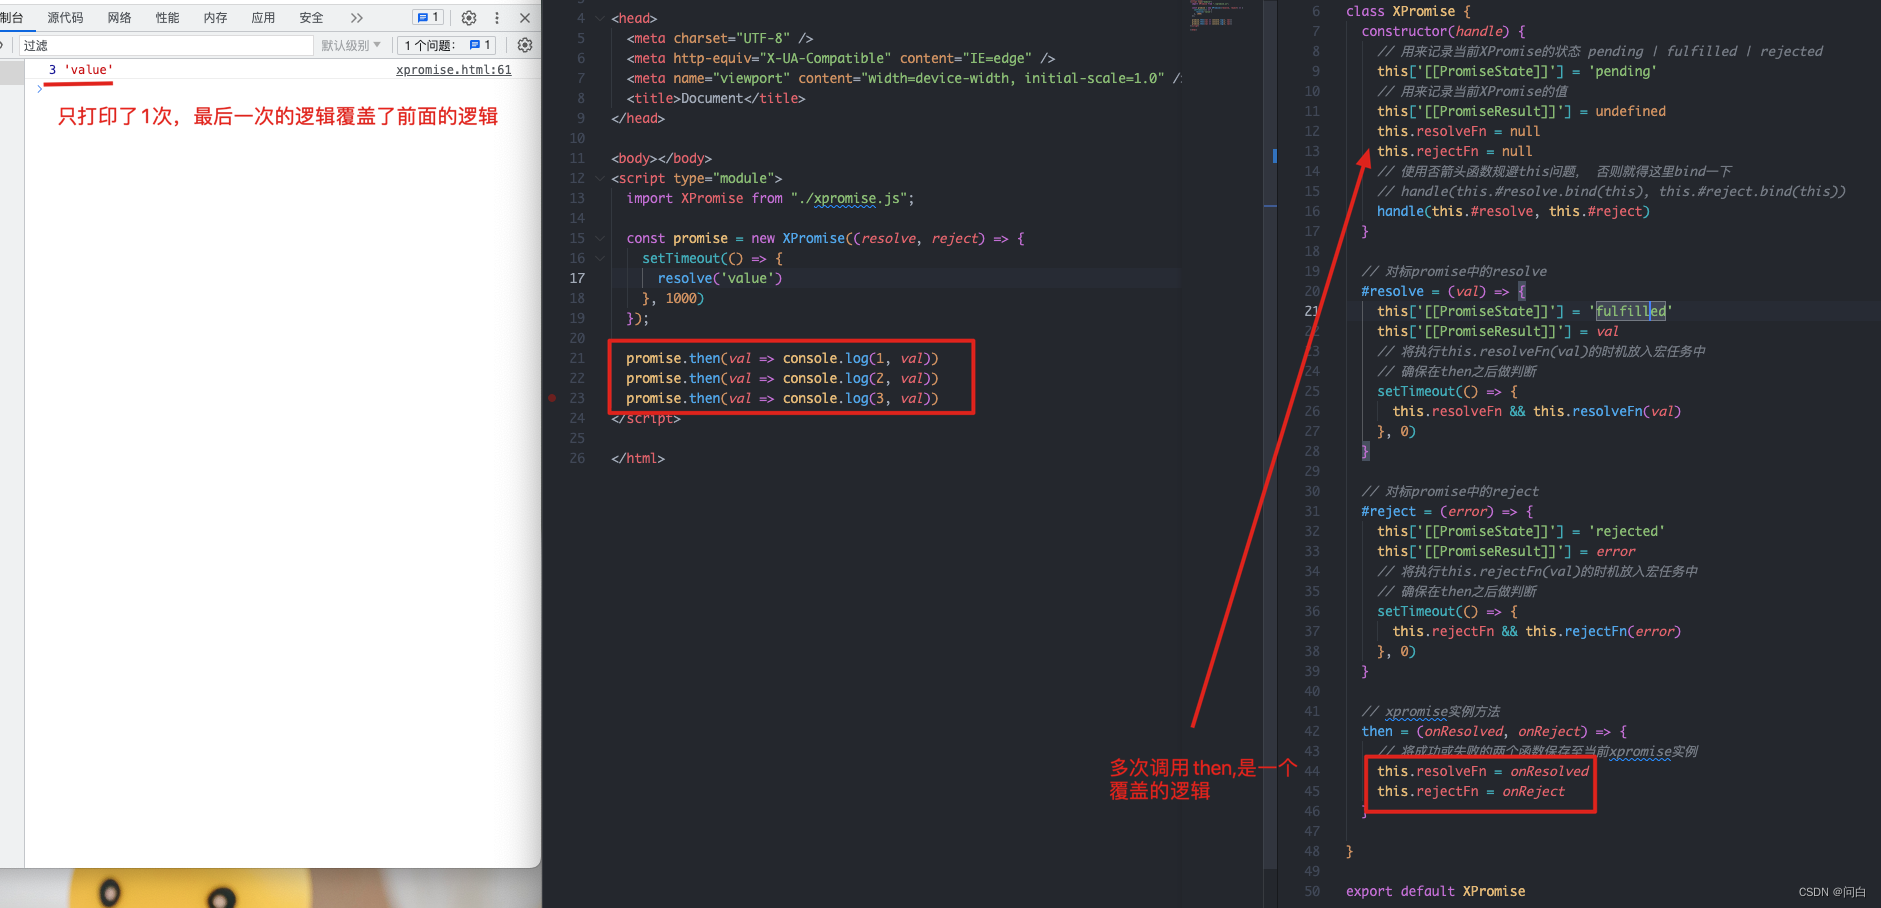
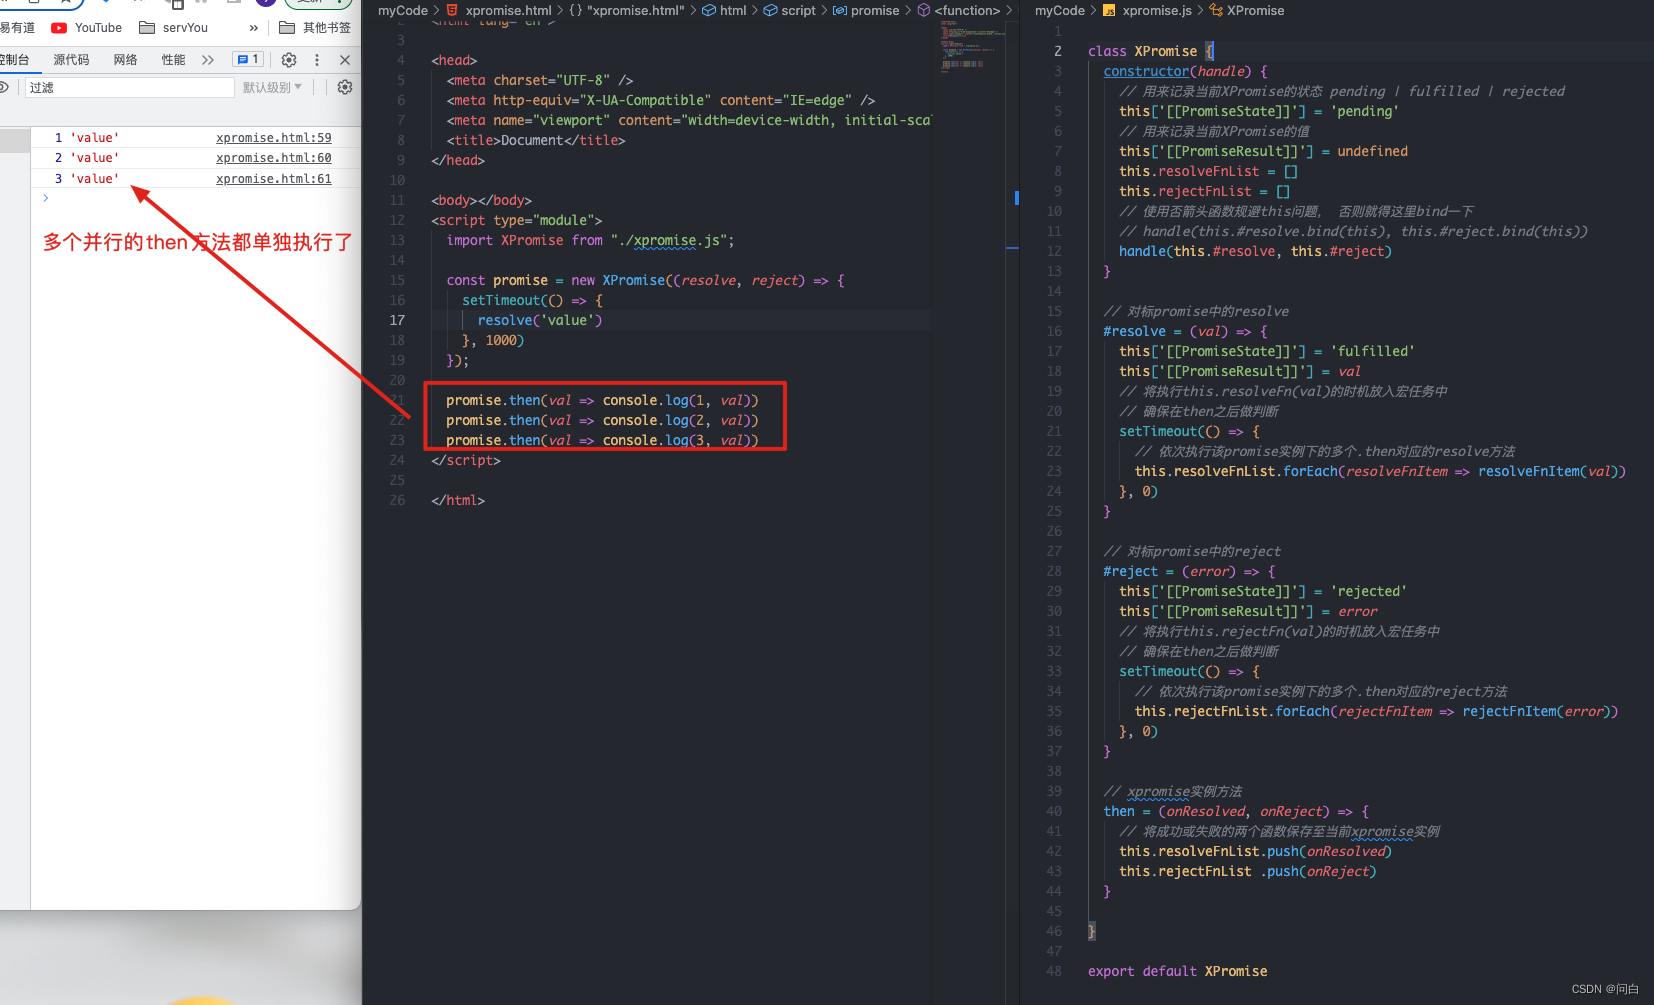
可以看到,原生promise并行调用的时候每个then函数里面的入参函数会分别执行而且互相独立。但我们resolve之后执行this.resolveFn这个函数,而在then函数之中是一个覆盖的逻辑,所以最后一次传入then函数的入参函数会将之前传入的函数全部覆盖,只会执行一次。所以我们需要将his.resolveFn和this.rejectFn改变为一个函数队列,然后等resolve函数执行后,依次执行队列中的所有注册函数即可。
代码改造如下:
class XPromise {
  constructor(handle) {
    // 用来记录当前XPromise的状态 pending | fulfilled | rejected
    this['[[PromiseState]]'] = 'pending'
    // 用来记录当前XPromise的值
    this['[[PromiseResult]]'] = undefined
    this.resolveFnList = []
    this.rejectFnList = []
    // 使用否箭头函数规避this问题, 否则就得这里bind一下
    // handle(this.#resolve.bind(this), this.#reject.bind(this))
    handle(this.#resolve, this.#reject)
  }

  // 对标promise中的resolve
  #resolve = (val) => {
    this['[[PromiseState]]'] = 'fulfilled'
    this['[[PromiseResult]]'] = val
    // 将执行this.resolveFn(val)的时机放入宏任务中
    // 确保在then之后做判断
    setTimeout(() => {
      // 依次执行该promise实例下的多个.then对应的resolve方法
      this.resolveFnList.forEach(resolveFnItem => resolveFnItem(val))
    }, 0)
  }

  // 对标promise中的reject
  #reject = (error) => {
    this['[[PromiseState]]'] = 'rejected'
    this['[[PromiseResult]]'] = error
    // 将执行this.rejectFn(val)的时机放入宏任务中
    // 确保在then之后做判断
    setTimeout(() => {
      // 依次执行该promise实例下的多个.then对应的reject方法
      this.rejectFnList.forEach(rejectFnItem => rejectFnItem(error))
    }, 0)
  }

  // xpromise实例方法
  then = (onResolved, onReject) => {
    // 将成功或失败的两个函数保存至当前xpromise实例
    this.resolveFnList.push(onResolved)
    this.rejectFnList .push(onReject)
  }

}

export default XPromise
执行效果如下图所示:
实现返回新XPromise功能
我们知道在原生promise对象中,调用then函数之后会返回一个新的Promise对象,所以可以实现链式调用。效果如下:
所以我们再XPromise中的then函数也需要返回一个新的xpromise对象,将代码改造如下:
class XPromise {
  constructor(handle) {
    // 用来记录当前XPromise的状态 pending | fulfilled | rejected
    this['[[PromiseState]]'] = 'pending'
    // 用来记录当前XPromise的值
    this['[[PromiseResult]]'] = undefined
    this.resolveFnList = []
    this.rejectFnList = []
    // 使用否箭头函数规避this问题, 否则就得这里bind一下
    // handle(this.#resolve.bind(this), this.#reject.bind(this))
    handle(this.#resolve, this.#reject)
  }

  // 对标promise中的resolve
  #resolve = (val) => {
    this['[[PromiseState]]'] = 'fulfilled'
    this['[[PromiseResult]]'] = val
    // 将执行this.resolveFn(val)的时机放入宏任务中
    // 确保在then之后做判断
    setTimeout(() => {
      // 依次执行该promise实例下的多个.then对应的resolve方法
      this.resolveFnList.forEach(resolveFnItem => resolveFnItem(val))
    }, 0)
  }

  // 对标promise中的reject
  #reject = (error) => {
    this['[[PromiseState]]'] = 'rejected'
    this['[[PromiseResult]]'] = error
    // 将执行this.rejectFn(val)的时机放入宏任务中
    // 确保在then之后做判断
    setTimeout(() => {
      // 依次执行该promise实例下的多个.then对应的reject方法
      this.rejectFnList.forEach(rejectFnItem => rejectFnItem(error))
    }, 0)
  }

  // xpromise实例方法
  then = (onResolved, onReject) => {
    // 将成功或失败的两个函数保存至当前xpromise实例
    return new XPromise((resolve, reject) => {
      // 在这里需要把当前这个promise的结果拿到
      // resolveFn是需要push到函数队列中的,接受当前promise实例的值
      const resolveFn = (val) => {
        const result = onResolved && onResolved(val)
        resolve(result)
      }
      this.resolveFnList.push(resolveFn)

      const rejectFn = (error) => {
        onReject && onReject(error)
        reject(error)
      }
      this.rejectFnList.push(rejectFn)
    })
  }
}

export default XPromise
运行效果如下所示:
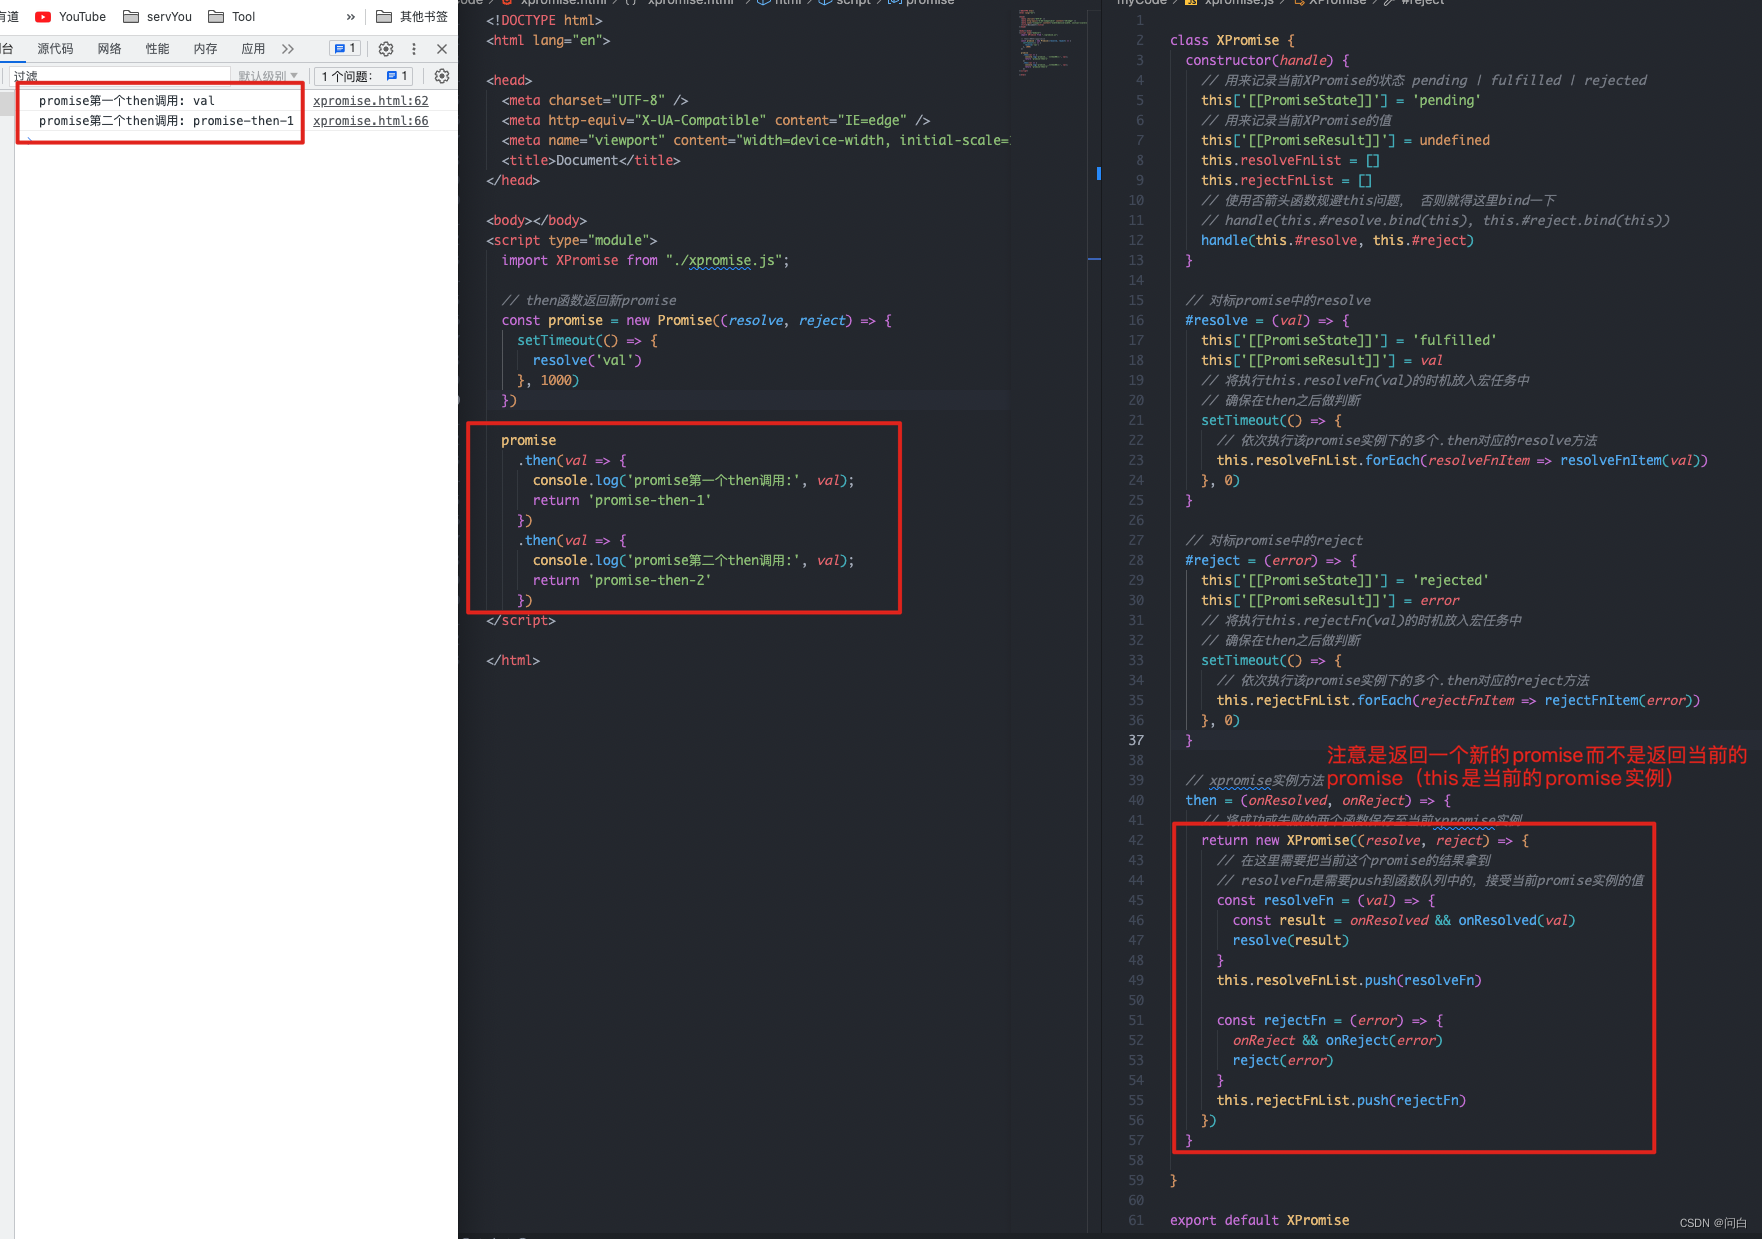
这里需要注意的是,.then方法返回的是一个新的xpromise实例而非当前的promise实例
then中返回promise处理
我们知道在原生promise中的返回可以是undefiend、非promise的值,和promise。对应的效果如下:
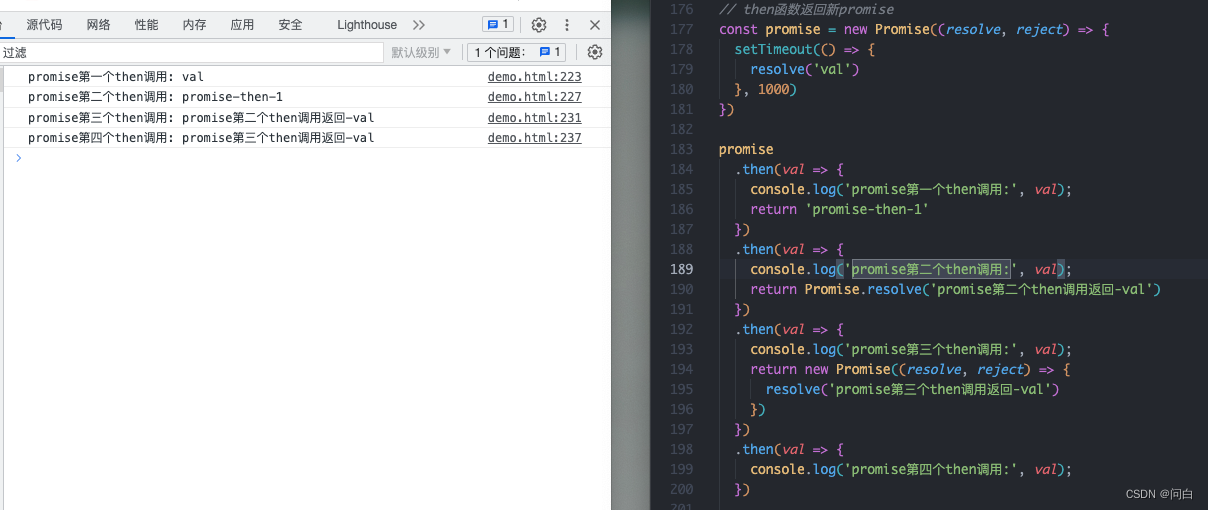
而这里写的xpromise中,在then函数体内未对resolveFn函数的执行结果做区分,如果是一个非xpromise的话直接resolve是可以的,但如果本身已近是xpromise的实例的话,需要拿到当前xpromise的结果再resolve
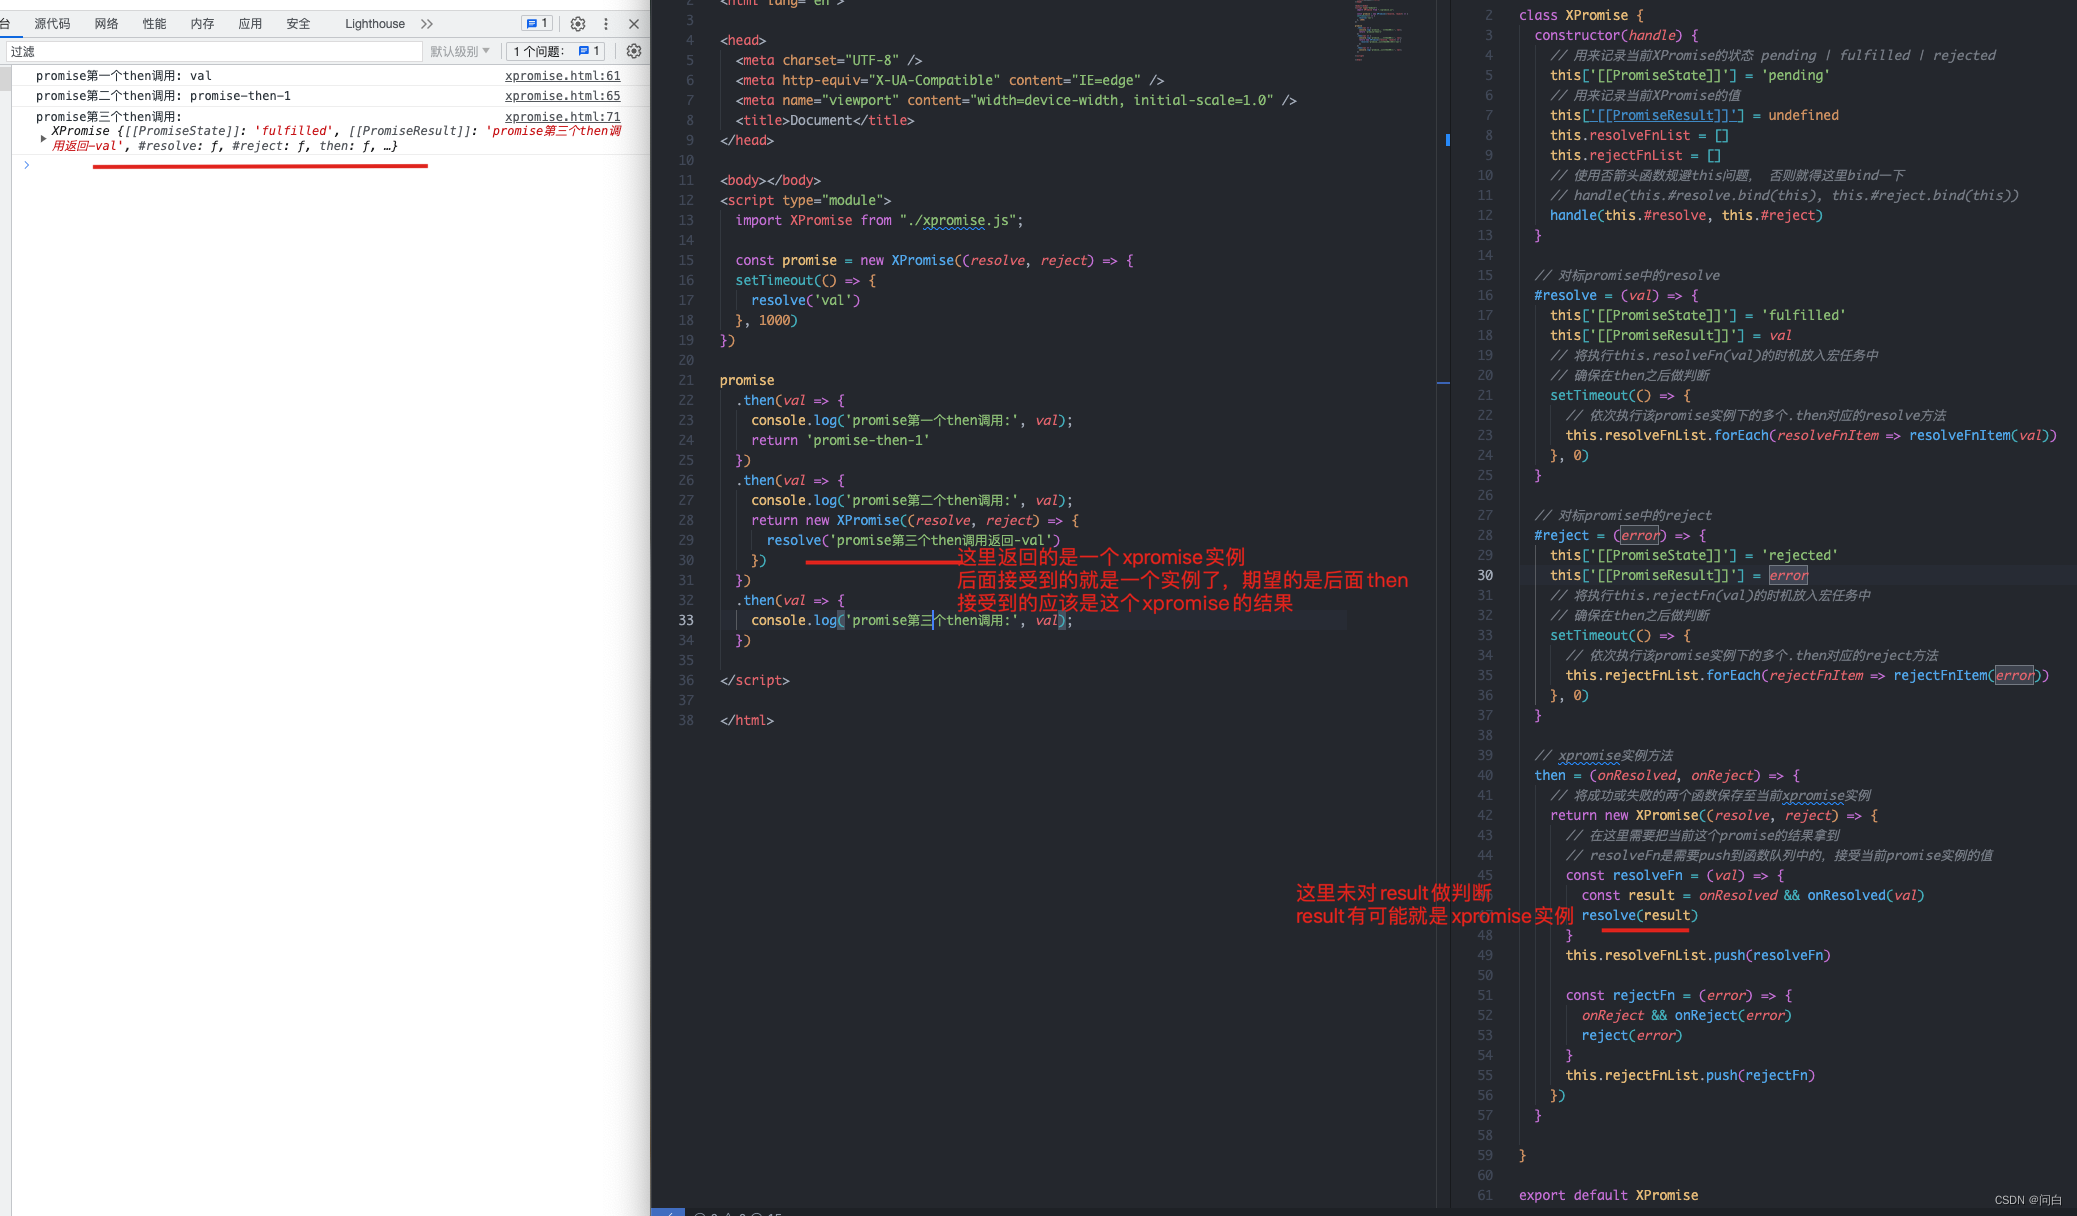
我们将代码进行如下改造:
class XPromise {
  constructor(handle) {
    // 用来记录当前XPromise的状态 pending | fulfilled | rejected
    this['[[PromiseState]]'] = 'pending'
    // 用来记录当前XPromise的值
    this['[[PromiseResult]]'] = undefined
    this.resolveFnList = []
    this.rejectFnList = []
    // 使用否箭头函数规避this问题, 否则就得这里bind一下
    // handle(this.#resolve.bind(this), this.#reject.bind(this))
    handle(this.#resolve, this.#reject)
  }

  // 对标promise中的resolve
  #resolve = (val) => {
    this['[[PromiseState]]'] = 'fulfilled'
    this['[[PromiseResult]]'] = val
    // 将执行this.resolveFn(val)的时机放入宏任务中
    // 确保在then之后做判断
    setTimeout(() => {
      // 依次执行该promise实例下的多个.then对应的resolve方法
      this.resolveFnList.forEach(resolveFnItem => resolveFnItem(val))
    }, 0)
  }

  // 对标promise中的reject
  #reject = (error) => {
    this['[[PromiseState]]'] = 'rejected'
    this['[[PromiseResult]]'] = error
    // 将执行this.rejectFn(val)的时机放入宏任务中
    // 确保在then之后做判断
    setTimeout(() => {
      // 依次执行该promise实例下的多个.then对应的reject方法
      this.rejectFnList.forEach(rejectFnItem => rejectFnItem(error))
    }, 0)
  }

  // xpromise实例方法
  then = (onResolved, onReject) => {
    // 将成功或失败的两个函数保存至当前xpromise实例
    return new XPromise((resolve, reject) => {
      // 在这里需要把当前这个promise的结果拿到
      // resolveFn是需要push到函数队列中的,接受当前promise实例的值
      const resolveFn = (val) => {
        const result = onResolved && onResolved(val)
        if (result instanceof XPromise) {
          // result 既然是xpromise实例
          // 那这个xpromise的结果就可以从.then中获取
          result.then(val => resolve(val))
        } else {
          resolve(result)
        }
      }
      this.resolveFnList.push(resolveFn)

      const rejectFn = (error) => {
        onReject && onReject(error)
        reject(error)
      }
      this.rejectFnList.push(rejectFn)
    })
  }
}
export default XPromise
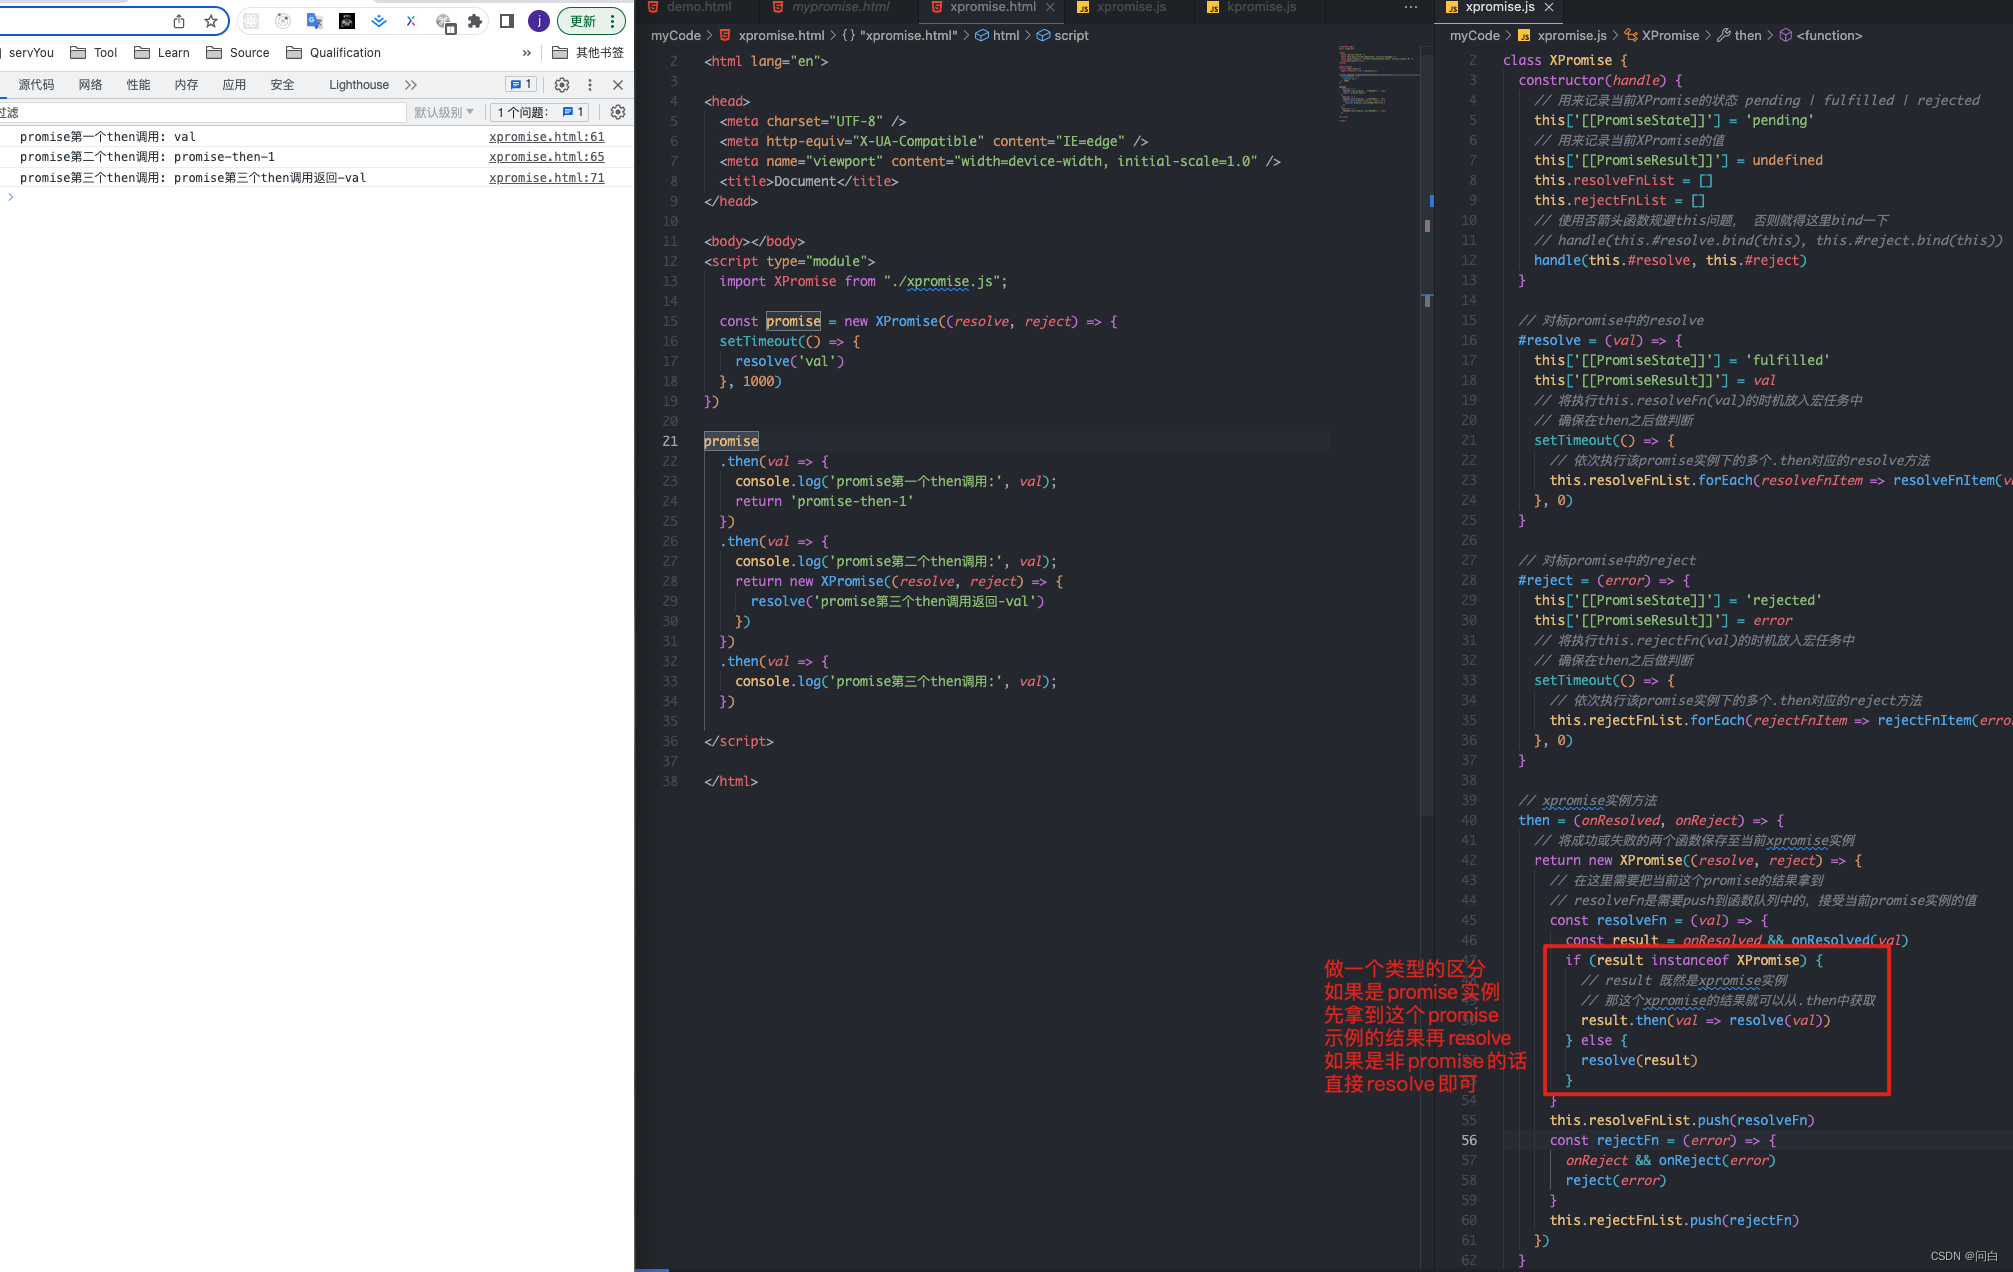
我们可以看到最红在浏览器中执行的结果也是符合预期的
总结
我们使用js来实现了promise中的状态、值以及promise中.then函数的使用。后续会再总计诶归纳promise中其他方法的实现