SpringBoot原理篇
自动配置
bean加载方式
xml方式声明bean
相关类:
domain域中的实体类:
public class Mouse {
}

public class Cat {
}

public class Dog {
}
测试:
public class App1 {
    public static void main(String[] args) {
        ClassPathXmlApplicationContext classPathXmlApplicationContext = new ClassPathXmlApplicationContext("applicationContext1.xml");
        Object cat = classPathXmlApplicationContext.getBean("cat");
        Dog bean = classPathXmlApplicationContext.getBean(Dog.class);
        System.out.println(cat);
        System.out.println(bean);
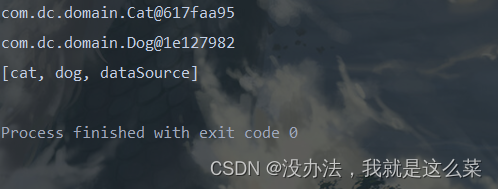
        String[] names = classPathXmlApplicationContext.getBeanDefinitionNames();
        System.out.println(Arrays.toString(names));

    }
}
配置文件:
<?xml version="1.0" encoding="UTF-8"?>
<beans xmlns="http://www.springframework.org/schema/beans"
       xmlns:xsi="http://www.w3.org/2001/XMLSchema-instance"
       xsi:schemaLocation="http://www.springframework.org/schema/beans http://www.springframework.org/schema/beans/spring-beans-2.0.xsd
                           http://www.springframework.org/schema/util http://www.springframework.org/schema/util/spring-util-2.0.xsd">

    <!--xml方式声明自己开发的bean-->
    <bean id="cat" class="com.dc.domain.Cat"/>

    <bean id="dog" class="com.dc.domain.Dog"/>

    <!--xml方式声明第三方开发的bean-->
    <bean id="dataSource" class="com.alibaba.druid.pool.DruidDataSource"/>
</beans>
结果:
xml+注解定义bean
domain域中的实体类
@Component(value = "cat")
public class Cat {
}

@Service("jerry")
public class Mouse {
}
配置类:
//@Component
//配置类注解
@Configuration
public class DBConfig {

    @Bean
    public DruidDataSource dataSource() {
        DruidDataSource ds = new DruidDataSource();
        return ds;
    }
}
@Configuration中使用@Conponent实现的,所以两个都可以实现bean注入,建议使用前者
配置类:
<?xml version="1.0" encoding="UTF-8"?>
<beans xmlns="http://www.springframework.org/schema/beans"
       xmlns:xsi="http://www.w3.org/2001/XMLSchema-instance"
       xmlns:context="http://www.springframework.org/schema/context"
       xsi:schemaLocation="http://www.springframework.org/schema/beans http://www.springframework.org/schema/beans/spring-beans-2.0.xsd
                           http://www.springframework.org/schema/util http://www.springframework.org/schema/util/spring-util-2.0.xsd http://www.springframework.org/schema/context https://www.springframework.org/schema/context/spring-context.xsd">

    <!--指定加载bena的位置,component-->
    <context:component-scan base-package="com.dc"/>
</beans>
结果:

注解方式
配置扫描类(value属性值为需要使用注解的包):
@ComponentScan(value = "com.dc")
public class SpringConfig3 {
}
测试类:
public class App3 {
    public static void main(String[] args) {
        AnnotationConfigApplicationContext annotationConfigApplicationContext = new AnnotationConfigApplicationContext(SpringConfig3.class);
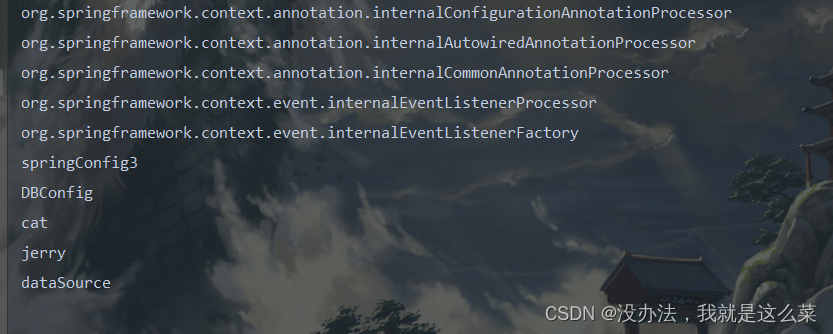
        String[] naems = annotationConfigApplicationContext.getBeanDefinitionNames();
        for (String name : naems) {
            System.out.println(name);
        }
    }
}
结果:
FactoryBean接口
配置类:
@ComponentScan(value = "com.dc")
public class SpringConfig3 {

    @Bean
    public Dog dog1() {
        return new Dog();
    }

    @Bean
    public DogFactoryBean dog(){
        return new DogFactoryBean();
    }
}
测试类:
public class App3 {
    public static void main(String[] args) {
        AnnotationConfigApplicationContext annotationConfigApplicationContext = new AnnotationConfigApplicationContext(SpringConfig3.class);
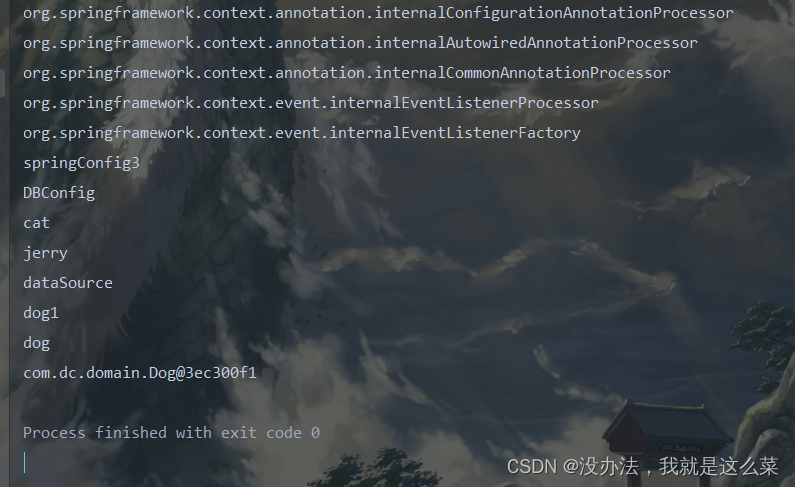
        String[] naems = annotationConfigApplicationContext.getBeanDefinitionNames();
        for (String name : naems) {
            System.out.println(name);
        }

        System.out.println(annotationConfigApplicationContext.getBean("dog"));
    }
}
结果:
加载配置类并加载配置文件(系统迁移)
@ImportResource("applicationContext1.xml")
public class SpringConfig32 {
}
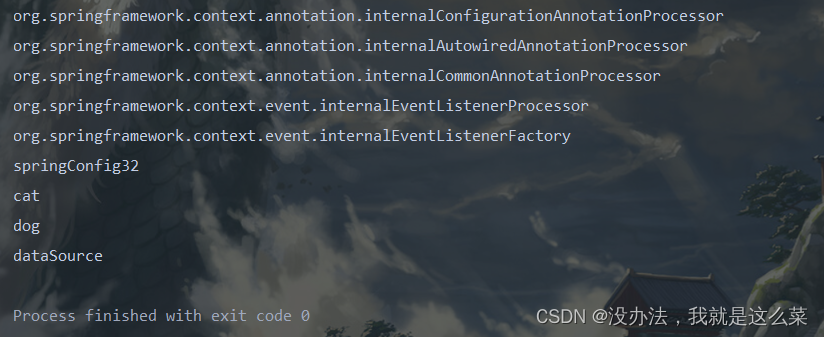
只需要@ImportResource注解就可以了
测试类
public class App32 {
    public static void main(String[] args) {
        AnnotationConfigApplicationContext annotationConfigApplicationContext = new AnnotationConfigApplicationContext(SpringConfig32.class);
        String[] naems = annotationConfigApplicationContext.getBeanDefinitionNames();
        for (String name : naems) {
            System.out.println(name);
        }
    }
}
结果:
@Import()注解导入要注入的bean对应的字节码
作用:能够有效的降低源代码与Spring技术的耦合度,在Spring技术底层及诸多框架的整合中大量使用。导入时是全路径类名
配置类:
@Import(Dog.class)
public class SpringConfig4 {

}
实体类:
public class Dog {
}
测试:
public class App4 {
    public static void main(String[] args) {
        AnnotationConfigApplicationContext annotationConfigApplicationContext = new AnnotationConfigApplicationContext(SpringConfig4.class);
        String[] naems = annotationConfigApplicationContext.getBeanDefinitionNames();
        for (String name : naems) {
            System.out.println(name);
        }
    }
}
结果:

使用registerBean方法注册bean对象
使用这个方法会以键值对的方式加载bean对象,如果要以同一个key记载bean对象时,会以最后一次导入的值覆盖原来的值
实体类:
public class Cat {

    private int age;
    public Cat() {
    }

    public Cat(int age) {
        this.age = age;
    }

    @Override
    public String toString() {
        return "Cat{" +
                "age=" + age +
                '}';
    }
}
测试类:
public class App4 {
    public static void main(String[] args) {
        AnnotationConfigApplicationContext annotationConfigApplicationContext = new AnnotationConfigApplicationContext(SpringConfig4.class);
        // 上下文容器对象已经初始化完毕后,手动加载bean
        annotationConfigApplicationContext.registerBean("tom", Cat.class, 0);
        annotationConfigApplicationContext.registerBean("tom", Cat.class, 1);
        annotationConfigApplicationContext.registerBean("tom", Cat.class, 3);
        String[] naems = annotationConfigApplicationContext.getBeanDefinitionNames();
        for (String name : naems) {
            System.out.println(name);
        }
        System.out.println(annotationConfigApplicationContext.getBean(Cat.class));
    }
}
结果:
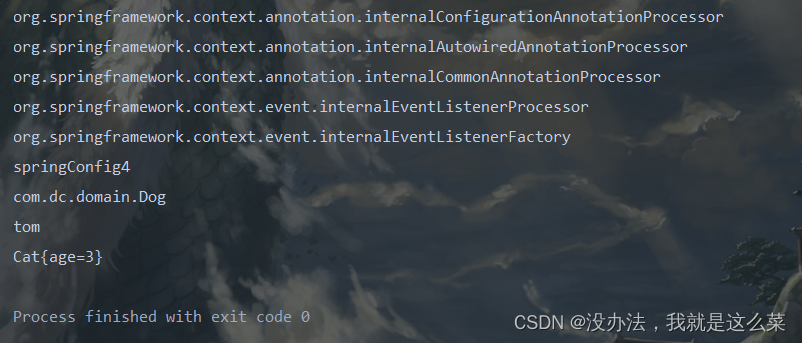
@Register注解bean对象的名字为类名首字母小写
ImportSelector接口
作用:各种条件判定,判定完毕后,决定是否加载指定的bean
MyimportSelector类:
public class MyImportSelector implements ImportSelector {
    @Override
    public String[] selectImports(AnnotationMetadata metadata) {
        boolean b = metadata.hasAnnotation("org.springframework.context.annotation.Configuration");
        if (b) {
            // 若SpringConfig6有@Configuration注解,就加载Dog的bean对象
            return new String[]{"com.dc.domain.Dog"};
        }
        // 否则就加载Cat的bean对象
        return new String[]{"com.dc.domain.Cat"};
    }
}
SpringConfig6:
//@Configuration
@Import(MyImportSelector.class)
public class SpringConfig6 {
}
测试:
public class App6 {
    public static void main(String[] args) {
        AnnotationConfigApplicationContext annotationConfigApplicationContext = new AnnotationConfigApplicationContext(SpringConfig6.class);
        String[] naems = annotationConfigApplicationContext.getBeanDefinitionNames();
        for (String name : naems) {
            System.out.println(name);
        }
    }
}
结果:

ImportBeanDefinitionRegistrar
导入实现了ImportBeanDefinitionRegistrar接口的类,通过BeanDefinition的注册器注册实名bean,实现对容器中bean的裁定。例如对现有bean的覆盖,进而达成不修改源代码的情况下更换实现的效果
MyRegistrar类:
public class MyRegistar implements ImportBeanDefinitionRegistrar {
    @Override
    public void registerBeanDefinitions(AnnotationMetadata importingClassMetadata, BeanDefinitionRegistry registry) {
        // 1、使用元数据进行判定
        // 2、注册相应的实名bean
        BeanDefinition beanDefinition = BeanDefinitionBuilder.rootBeanDefinition(Dog.class).getBeanDefinition();
        registry.registerBeanDefinition("yellow", beanDefinition);
    }
}
SpringConfig7:
@Import(MyRegistar.class)
public class SpringConfig7 {
}
测试:
public class App7 {
    public static void main(String[] args) {
        AnnotationConfigApplicationContext annotationConfigApplicationContext = new AnnotationConfigApplicationContext(SpringConfig7.class);
        String[] naems = annotationConfigApplicationContext.getBeanDefinitionNames();
        for (String name : naems) {
            System.out.println(name);
        }
    }
}
结果:

BeanDefinitionRegistryPostProcessor
导入实现BeanDefinitionRegistryPostProcessor接口的类,通过BeanDefinition的注册器注册实名的bean,实现对容器中bean的最终裁定
MyBeanProcessor类:
public class MyBeanProcessor implements BeanDefinitionRegistryPostProcessor {
    @Override
    public void postProcessBeanDefinitionRegistry(BeanDefinitionRegistry registry) throws BeansException {
        BeanDefinition beanDefinition = BeanDefinitionBuilder.rootBeanDefinition(BookServiceImpl4.class).getBeanDefinition();
        registry.registerBeanDefinition("bookService", beanDefinition);
    }

    @Override
    public void postProcessBeanFactory(ConfigurableListableBeanFactory beanFactory) throws BeansException {

    }
}
MyRegistar类:
public class MyRegistar implements ImportBeanDefinitionRegistrar {
    @Override
    public void registerBeanDefinitions(AnnotationMetadata importingClassMetadata, BeanDefinitionRegistry registry) {
        // 1使用元数据进行判定
        BeanDefinition beanDefinition = BeanDefinitionBuilder.rootBeanDefinition(BookServiceImpl2.class).getBeanDefinition();
        registry.registerBeanDefinition("bookService", beanDefinition);
    }
}
SpringConfig8:
@Import({BookServiceImpl1.class, MyRegistar.class, MyBeanProcessor.class})
public class SpringConfig8 {
}
BookServiceImpl
@Service("bookService")
public class BookServiceImpl1 implements BookService {
    @Override
    public void check() {
        System.out.println("book service1..");
    }
}
测试:
public class App8 {
    public static void main(String[] args) {
        AnnotationConfigApplicationContext annotationConfigApplicationContext = new AnnotationConfigApplicationContext(SpringConfig8.class);
        BookService bookService = annotationConfigApplicationContext.getBean("bookService", BookService.class);
        bookService.check();
    }
}
结果:
 !
!
bean加载控制
编程式
根据任意条件确认是否加载bean
MyImportSelector类:
public class MyImportSelector implements ImportSelector {
    @Override
    public String[] selectImports(AnnotationMetadata importingClassMetadata) {

        try {
            Class<?> clzz = Class.forName("com.dc.bean.Mouse");
            if (clzz !=null){
                return new String[]{"com.dc.bean.Cat"};
            }
        } catch (ClassNotFoundException e) {
            return new String[0];
        }
        return null;
    }
}
配置类:
@Import(MyImportSelector.class)
public class SpringConfig {
}
测试:
public class App {
    public static void main(String[] args) {
        ApplicationContext ctx = new AnnotationConfigApplicationContext(SpringConfig.class);
        String[] names = ctx.getBeanDefinitionNames();
        for (String name : names) {
            System.out.println(name);
        }
    }
}
结果:
如果mouse类不存在,容器中就没有bean对象
如果存在结果如下:

注解式
使用@Conditional注解的派生注解设置各种组合条件控制bean的加载(要在SpringBoot环境下)
匹配指定环境
//@Import(MyImportSelector.class)
@Import(Mouse.class)
public class SpringConfig {

    @Bean
    @ConditionalOnClass(name = "com.dc.bean.Cat") // 容器中有cat的bean对象就加载
    @ConditionalOnMissingClass("com.dc.bean.Mouse") // 容器中没有mouse的bean对象就不加载
    @ConditionalOnBean(Mouse.class) // 按类型匹配
    @ConditionalOnWebApplication // 是web文件就加载
    @ConditionalOnNotWebApplication // 不是web文件就加载
    public Cat tom() {
        return new Cat();
    }
}
bean依赖属性配置
将业务功能bean运行需要的资源抽取成独立的属性类,设置读取配置文件信息
实体类:
@Data
@AllArgsConstructor
@NoArgsConstructor
public class Mouse {

    private String name;
    private Integer age;
}

@Data
@NoArgsConstructor
@AllArgsConstructor
public class Cat {

    private String name;
    private Integer age;
}
CatAndMouse:
@Data
@EnableConfigurationProperties(CartoonProperties.class)// 当加载该类的时候用CartoonProperties字字节码
public class CatAndMouse {
    private Cat cat;
    private Mouse mouse;

    private CartoonProperties cartoonProperties;

    public CatAndMouse(CartoonProperties cartoonProperties){
        cat = new Cat();
        cat.setName(cartoonProperties.getCat() != null && StringUtils.hasText(cartoonProperties.getCat().getName()) ? "奥特曼" : cartoonProperties.getCat().getName());
        cat.setAge(cartoonProperties.getCat() != null && cartoonProperties.getCat().getAge() != null ? 2 : cartoonProperties.getCat().getAge());
        mouse = new Mouse();
        mouse.setName(cartoonProperties.getCat() != null && StringUtils.hasText(cartoonProperties.getMouse().getName()) ? "葫芦娃" : cartoonProperties.getMouse().getName());
        mouse.setAge(cartoonProperties.getCat() != null && cartoonProperties.getMouse().getAge() != null ? 4 : cartoonProperties.getMouse().getAge());

    }
    public void play() {
        System.out.println(cat.getAge() + "岁的" + cat.getName()
                + "和" + mouse.getAge() + "岁的" + mouse.getName() + "打起来了!!!");
    }
}
属性类:
@Data
@ConfigurationProperties(prefix = "cartoon")// 读取配置文件信息
public class CartoonProperties {
    private Cat cat;
    private Mouse mouse;
}
测试类:
@Import(CatAndMouse.class) //定义业务功能bean,解耦强制加载bean
@SpringBootApplication
public class App {
    public static void main(String[] args) {
        ConfigurableApplicationContext run = SpringApplication.run(App.class);
        CatAndMouse bean = run.getBean(CatAndMouse.class);
        bean.play();
    }
}
配置文件:
cartoon:
  cat:
    name: tom
    age: 3
  mouse:
    name: jerry
    age: 4
结果:

自动配置
思想
阶段一:准备阶段
- 收集Spring开发者的编程习惯,整理开发过程使用的常用技术列表–>(技术集A)
- 收集常用技术(技术集A)的使用参数,整理开发过程中每个技术常用设置列表–>(设计集B)
阶段二:加载阶段
- 初始化SpringBoot基础环境,加载用户自定义的bean和导入的其他坐标,形成初始化环境
- 将技术集A包含的所有技术在SpringBoot启动时默认全部加载,这时肯定加载的东西有一些是无效的,没有用的
- SpringBoot会对技术集A中每一个技术约定出启动这个技术对应的条件,并设置成按条件加载,由于开发者导入了一些bean和其他坐标,也就是初始化环境,这个时候就可以根据这个初始化环境与SpringBoot的技术集A进行比对,哪个匹配上记载哪个
- 因为有些技术不做配置就无法工作,所以SpringBoot开始对设置集B下手。他统计出各个国家各个行业的开发者使用某个技术时最长用的设置,然后把这些设置作为默认值直接设置好,并告诉开发者当前设置已经搞了一套,可以直接用,这样可以减少开发者配置参数的工作量
- 但是默认配置并不一定能解决问题,于是SpringBoot开发修改设置集B的接口,可以由开发者根据需要决定是否覆盖默认配置
代码展示
首先指定一个技术X,让技术X具备自动配置的功能,这个技术X可以是任意功能,这个技术隶属于上面描述的技术集A
@Data
@EnableConfigurationProperties(CartoonProperties.class)// 当加载该类的时候用CartoonProperties字字节码
public class CatAndMouse implements ApplicationContextAware {
    private Cat cat;
    private Mouse mouse;

    private CartoonProperties cartoonProperties;

    public CatAndMouse(CartoonProperties cartoonProperties){
        cat = new Cat();
        cat.setName(cartoonProperties.getCat() != null && StringUtils.hasText(cartoonProperties.getCat().getName()) ? "奥特曼" : cartoonProperties.getCat().getName());
        cat.setAge(cartoonProperties.getCat() != null && cartoonProperties.getCat().getAge() != null ? 2 : cartoonProperties.getCat().getAge());
        mouse = new Mouse();
        mouse.setName(cartoonProperties.getCat() != null && StringUtils.hasText(cartoonProperties.getMouse().getName()) ? "葫芦娃" : cartoonProperties.getMouse().getName());
        mouse.setAge(cartoonProperties.getCat() != null && cartoonProperties.getMouse().getAge() != null ? 4 : cartoonProperties.getMouse().getAge());

    }
    public void play() {
        System.out.println(cat.getAge() + "岁的" + cat.getName()
                + "和" + mouse.getAge() + "岁的" + mouse.getName() + "打起来了!!!");
    }

    @Override
    public void setApplicationContext(ApplicationContext applicationContext) throws BeansException {

    }
}
配置文件application.yml
cartoon:
  cat:
    name: "图多盖洛"
    age: 5
  mouse:
    name: "泰菲"
    age: 1
定义一个读取配置文件的类
@Data
@ConfigurationProperties(prefix = "cartoon")// 当加载该类的时候用CartoonProperties字字节码
public class CartoonProperties {
    private Cat cat;
    private Mouse mouse;
}
在配置目录resouurce下创建META-INF目录,并创建spring.factories文件,在其中添加配置,说明哪些类要启动自动配置即可
# Auto Configure
org.springframework.boot.autoconfigure.EnableAutoConfiguration=\
com.dc.bean.CatAndMouse
结果:

自动配置其实是一个小的生态
思想:
- 自动配置从根本上来说就是一个bean的加载
- 通过bean的加载条件的控制给开发者一种感觉,自动配置是自适应的,可以根据情况自己判定,但是实际上就是最普通的分支语句的应用
- 使用bean的时候,如果不设置属性,就有默认值。如果不想用默认值就可以自己设置,也就是可以修改部分或者全部参数,也是一种自适应的形式,其实还是需要使用分支语句来做判断的
- SpringBoot技术提前将大量开发者有可能使用的技术提前做好了,条件也写好了,用的时候导入一个坐标,对应的技术就可以使用了,其实就是提前把spring.factories文件写好
总结
- SpringBoot启动时先加载spring.factories文件中的org.springframework.boot.autoconfigure.EnableAutoConfiguration配置,将其中配置的所有的类都加载成bean
- 在加载的时候,bean对应的类定义上都设置有加载条件,因此又可能加载成功,也可能条件检测失败不加载bean
- 对于可以正常加载成bean的类,通常会通过@EnableConfigurationProperties注解初始化对应的配置属性类并加载对应的配置
- 配置属性类上通常会通过@ConfigurationProperties加载指定前缀的配置,当然这些配置会有默认值。如果没有默认值,就强制必须配置后使用
变更自动配置
方式一:通过yaml配置设置排除指定的自动配置类
spring:
  autoconfigure:
    exclude:
      - org.springframework.boot.autoconfigure.task.TaskExecutionAutoConfiguration
方式二:通过注解参数排除自动配置类
@EnableAutoConfiguration(excludeName = "",exclude = {})
@SpringBootApplication注解中已经包含@EnableAutoConfiguration注解,也可以直接使用@SpringBootApplication
@SpringBootApplication(excludeName = "org.springframework.boot.autoconfigure.transaction.TransactionAutoConfiguration")
方式三:排除坐标(应用面较窄)
如果当前自动配置中包含有更多的自动配置功能,也就是一个套娃的效果。此时可以通过检测条件的控制来管理自动配置是否启动。如web程序启动时会自动启动tomcat服务器,可以通过排除坐标的方式,让加载的tomcat服务器的条件失效。不过需要再加一种可以运行的服务器
<dependencies>
    <dependency>
        <groupId>org.springframework.boot</groupId>
        <artifactId>spring-boot-starter-web</artifactId>
        <!--web起步依赖环境中,排除Tomcat起步依赖,匹配自动配置条件-->
        <exclusions>
            <exclusion>
                <groupId>org.springframework.boot</groupId>
                <artifactId>spring-boot-starter-tomcat</artifactId>
            </exclusion>
        </exclusions>
    </dependency>
    <!--添加Jetty起步依赖,匹配自动配置条件-->
    <dependency>
        <groupId>org.springframework.boot</groupId>
        <artifactId>spring-boot-starter-jetty</artifactId>
    </dependency>
</dependencies>
总结
SpringBoot的自动配置并不是必然运行的,可以通过配置的形式干预是否启用对应的自动配置功能
自定义starter开发
案例:记录系统访客独立ip访问次数
本案例的功能是统计网站独立ip访问次数的功能,并将访问信息在后台持续输出。整体功能是在后台每10秒输出一次监控信息
具体分析:
-
数据记录在什么位置
最终记录的数据是一个字符串(IP地址)对应一个数字(访问次数),此处可以选择的数据存储模型可以使用map,也就是key-value的键值对模型,或者具有key-value键值对模型的存储技术,如redis
-
统计功能运行位置,因为每次web请求都需要进行统计,因此使用拦截器会是比较好的方案
-
为了提升统计数据展示的灵活度,为统计功能添加配置项。输出频度,输出的数据格式,统计数据的显示模式均可以通过配置实现调整
- 输出频度,默认10秒
- 数据特征:累计数据 / 阶段数据,默认累计数据
- 输出格式:详细模式 / 极简模式
Ip计数业务功能开发(自定义starter)
此功能最终实现的效果是在现有的项目中导入一个starter,对应的功能就添加上了,删除对应的starter,功能就消失了。要求功能要与原始项目完全解耦。因此需要开发一个独立的模块,制作对应功能
创建全新的模块,定义业务功能类
定义一个业务类,声明一个Map对象,用于记录ip访问次数,key是ip地址,value是访问次数
@Slf4j
public class IpCountService {

    private Map<String,Integer> ipCountMap = new HashMap<String, Integer>();

    @Autowired
    private HttpServletRequest httpServletRequest;

    public void count() {
        // 每次调用当前操作,就记录当前访问的IP,然后累加访问次数
        // 1、获取当前操作的Ip地址
        String ip = httpServletRequest.getRemoteAddr();
        log.info("ip地址为:{}", ip);
        // 2、根据ip地址从Map取值,并递增
        Integer count = ipCountMap.get(ip);
        if (count == null) {
            ipCountMap.put(ip, 1);
        } else {
            ipCountMap.put(ip, count + 1);
        }
        log.info("访问次数:{}", ipCountMap.get(ip));
    }
}
定义自动配置类
@Configuration
public class IpAutoConfiguration {

    @Bean
    public IpCountService ipCountService(){
        return new IpCountService();
    }
}
自动配置类需要在spring.factories文件中做配置方可自动运行
# Auto Configure
org.springframework.boot.autoconfigure.EnableAutoConfiguration=\
com.dc.service.IpAutoConfiguration
测试:
@RestController
@RequestMapping("/books")
public class BookController {

    @Autowired
    private IpCountService ipCountService;

    @GetMapping("/find")
    public String hello() {
        ipCountService.count();
        return "hello";
    }

}
定时任务报表开发
当前已经实现了在业务功能类中记录访问数据,但是还没有输出监控的信息到控制台。由于监控信息需要每10秒输出1次,因此需要使用定时器功能。可以选取第三方技术Quartz实现,也可以选择Spring内置的task来完成此功能
开启定时任务功能
定时任务功能开启需要在当前功能的总配置中设置,结合现有业务设定,比较合理的位置是设置在自动配置类上。加载自动配置类即启用定时任务功能。
@Configuration
@EnableScheduling
//@EnableConfigurationProperties(IpProperties.class)
@Import(IpProperties.class)
public class IpAutoConfiguration {

    @Bean
    public IpCountService ipCountService(){
        return new IpCountService();
    }
}
制作显示统计数据功能
定义显示统计功能的操作print(),并设置定时任务,当前设置每5秒运行一次统计数据
public class IpCountService {
    private Map<String,Integer> ipCountMap = new HashMap<String,Integer>();
    @Scheduled(cron = "0/5 * * * * ?")
    public void print(){
        System.out.println("         IP访问监控");
        System.out.println("+-----ip-address-----+--num--+");
        for (Map.Entry<String, Integer> entry : ipCountMap.entrySet()) {
            String key = entry.getKey();
            Integer value = entry.getValue();
            System.out.println(String.format("|%18s  |%5d  |",key,value));
        }
        System.out.println("+--------------------+-------+");
      }
}
其中关于统计报表的显示信息拼接可以使用各种形式进行
使用属性配置设置功能参数
由于当前报表显示的信息格式固定,为提高报表信息显示的灵活性,需要通过yml文件设置参数,控制报表的显示格式
定义参数格式
设置3个属性,分别用来控制显示周期(cycle),阶段数据是否清空(cycleReset),数据显示格式(model)
server:
  port:
    80
logging:
  charset:
    console: utf-8
tools:
  ip:
    cycle: 10
    cycleReset: false
    model: "detail"
为防止项目组定义的参数种类过多,产生冲突,通常设置属性前缀会至少使用两级属性作为前缀尽心区分
日志输出模式是在若干个类别选项中选择某一项,对于此种分类性数据建议制作枚举定义分类数据,当然使用字符串也可以
@ConfigurationProperties(prefix = "tools.ip")
@Component("ipProperties")
@Data
public class IpProperties {
    /**
     * 日志显示周期
     * @param
     * @return
     */
    private Long cycle = 5L;
    /**
     * 是否周期内重置数据
     * @param
     * @return
     */
    private Boolean cycleReset = false;
    /**
     * 日志输出模式 detail:详细模式 simple:极简模式
     * @param
     * @return
     */
    private String model = LogModel.DETAIL.value;
    public enum LogModel {
        DETAIL("detail"),
        SIMPLE("simple");
        public String value;
        LogModel(String value) {
            this.value = value;
        }

        public String getValue() {
            return value;
        }
    }
}
加载属性类
@EnableScheduling
@EnableConfigurationProperties(IpProperties.class)
public class IpAutoConfiguration {
    @Bean
    public IpCountService ipCountService(){
        return new IpCountService();
    }
}
应用配置属性
在应用配置属性的功能类中,使用自动装配加载对应的配置bean,然后使用配置信息做分支处理
注意
清除数据的功能一定要在输出后运行,否则每次查询的数据均为空白数据
public class IpCountService {
    private Map<String,Integer> ipCountMap = new HashMap<String,Integer>();
    @Autowired
    private IpProperties ipProperties;
    @Scheduled(cron = "0/5 * * * * ?")
    public void print(){
        if(ipProperties.getModel().equals(IpProperties.LogModel.DETAIL.getValue())){
            System.out.println("         IP访问监控");
            System.out.println("+-----ip-address-----+--num--+");
            for (Map.Entry<String, Integer> entry : ipCountMap.entrySet()) {
                String key = entry.getKey();
                Integer value = entry.getValue();
                System.out.println(String.format("|%18s  |%5d  |",key,value));
            }
            System.out.println("+--------------------+-------+");
        }else if(ipProperties.getModel().equals(IpProperties.LogModel.SIMPLE.getValue())){
            System.out.println("     IP访问监控");
            System.out.println("+-----ip-address-----+");
            for (String key: ipCountMap.keySet()) {
                System.out.println(String.format("|%18s  |",key));
            }
            System.out.println("+--------------------+");
        }
        //阶段内统计数据归零
        if(ipProperties.getCycleReset()){
            ipCountMap.clear();
        }
    }
}
使用属性配置设置定时器参数
@Scheduled注解使用#{}读取bean属性的值
此处读取bean名称为ipProperties的bean的cycle属性值
package com.dc.service;

import jakarta.servlet.http.HttpServlet;
import jakarta.servlet.http.HttpServletRequest;
import lombok.extern.slf4j.Slf4j;
import org.springframework.beans.factory.annotation.Autowired;
import org.springframework.scheduling.annotation.EnableScheduling;
import org.springframework.scheduling.annotation.Scheduled;
import org.springframework.stereotype.Component;

import java.util.HashMap;
import java.util.Map;

/**
 * -----在希望中绽放,在苦难中坚持------
 *
 * @author 暮辰
 */
@Slf4j
public class IpCountService {

    private Map<String,Integer> ipCountMap = new HashMap<String, Integer>();

    @Autowired
    private HttpServletRequest httpServletRequest;

    @Autowired
    private IpProperties ipProperties;

    public void count() {
        // 每次调用当前操作,就记录当前访问的IP,然后累加访问次数
        // 1、获取当前操作的Ip地址
        String ip = httpServletRequest.getRemoteAddr();
        log.info("ip地址为:{}", ip);
        // 2、根据ip地址从Map取值,并递增
        Integer count = ipCountMap.get(ip);
        if (count == null) {
            ipCountMap.put(ip, 1);
        } else {
            ipCountMap.put(ip, count + 1);
        }
        log.info("访问次数:{}", ipCountMap.get(ip));
    }

    @Scheduled(cron = "0/#{ipProperties.cycle} * * * * ?")
    public void print(){
       if (ipProperties.getModel().equals(IpProperties.LogModel.DETAIL.getValue())){
           System.out.println("IP访问监控");
           System.out.println("+-----ip-address-----+--num--+");
           for (Map.Entry<String, Integer> entry : ipCountMap.entrySet()) {
               String key = entry.getKey();
               Integer value = entry.getValue();
               System.out.println(String.format("|%18s  |%5d  |",key,value));
           }
           System.out.println("+--------------------+-------+");
       } else if(ipProperties.getModel().equals(IpProperties.LogModel.SIMPLE.getValue())){
           System.out.println("     IP访问监控");
           System.out.println("+-----ip-address-----+");
           for (String key: ipCountMap.keySet()) {
               System.out.println(String.format("|%18s  |",key));
           }
           System.out.println("+--------------------+");
       }

        //阶段内统计数据归零
        if(ipProperties.getCycleReset()){
            ipCountMap.clear();
        }
    }
}
导入bean的形式加载配置属性类
@EnableScheduling
//@EnableConfigurationProperties(IpProperties.class)
@Import(IpProperties.class)
public class IpAutoConfiguration {
    @Bean
    public IpCountService ipCountService(){
        return new IpCountService();
    }
}
拦截器开发
开发拦截器
使用自动装配加载统计功能的业务类,并在拦截器中调用对应的功能
public class IpCountInterceptor implements HandlerInterceptor {

    @Autowired
    private IpCountService ipCountService;

    @Override
    public boolean preHandle(HttpServletRequest request, HttpServletResponse response, Object handler) throws Exception {
        ipCountService.count();
        return true;
    }
}
配置拦截器
配置mvc拦截器,设置拦截对应的请求路径。此处拦截所有请求,用户可以根据使用需要设置要拦截的请求。甚至可以在此处加载IpCountProperties中的属性,通过配置设置拦截器拦截的要求
@Configuration
public class SpringMvcConfig implements WebMvcConfigurer {

    @Override
    public void addInterceptors(InterceptorRegistry registry) {
        registry.addInterceptor(ipCountInterceptor()).addPathPatterns("/**");
    }

    @Bean
    public IpCountInterceptor ipCountInterceptor(){
        return new IpCountInterceptor();
    }
}
开启yml提示功能
在使用SpringBoot的配置属性时,都可以看到提示,尤其是导入了对应的starter后,也会有对应的提示信息出现。SpringBoot提供有专用的工具实现此功能,仅需要导入下列坐标
<dependency>
    <groupId>org.springframework.boot</groupId>
    <artifactId>spring-boot-configuration-processor</artifactId>
    <optional>true</optional>
</dependency>
程序编译后会在taiget的META-INF中生成对应的提示文件
{
  "groups": [
    {
      "name": "tools.ip",
      "type": "com.dc.service.IpProperties",
      "sourceType": "com.dc.service.IpProperties"
    }
  ],
  "properties": [
    {
      "name": "tools.ip.cycle",
      "type": "java.lang.Long",
      "description": "日志显示周期 @param @return",
      "sourceType": "com.dc.service.IpProperties"
    },
    {
      "name": "tools.ip.cycle-reset",
      "type": "java.lang.Boolean",
      "description": "是否周期内重置数据 @param @return",
      "sourceType": "com.dc.service.IpProperties"
    },
    {
      "name": "tools.ip.model",
      "type": "java.lang.String",
      "description": "日志输出模式 detail:详细模式 simple:极简模式 @param @return",
      "sourceType": "com.dc.service.IpProperties"
    }
  ],
  "hints": []
}
总结
- 自定义starter其实就是做一个独立的功能模块,核心技术是利用自动配置的效果在加载模块后加载对应的功能
- 通常会为自定义starter的自动配置功能添加足够的条件控制,而不会卓成100%加载对应的starter
- 对于配置属性务必开启提示功能,否则使用者无法感知配置应该如何书写

