做
vscode二次开发有一段时间了,平时都是任务比较重,最近有时间做下总结,详细的讲解下vscode插件系统的运行机制,vscode做为最受欢迎的编辑器,有着庞大的插件市场。其插件系统确实很复杂,文章很长,但很详细!希望对有这方面需求的同学有帮助,另外有编辑器相关需求的问题欢迎探讨。
流程: 插件列表展示->插件下载->插件激活->插件和主体通讯
插件列表如何生成
我们来看下请求接口的地方
src/vs/workbench/contrib/extensions/browser/extensionsViews.ts
private async query(query: Query, options: IQueryOptions, token: CancellationToken): Promise<IQueryResult> {
   ...
    if (ids.length) {
        const model = await this.queryByIds(ids, options, token);
        return { model, disposables: new DisposableStore() };
    }
...
}
跳转到queryByIds 方法里面
const galleryResult = await this.extensionsWorkbenchService.getExtensions(galleryIds.map(id => ({ id })), { source: 'queryById' }, token);
            result.push(...galleryResult);
继续找 getExtensions方法
src/vs/workbench/contrib/extensions/browser/extensionsWorkbenchService.ts
const galleryExtensions = await this.galleryService.getExtensions(extensionInfos, arg1, arg2);
this.syncInstalledExtensionsWithGallery(galleryExtensions);
继续跳getExtensions方法
src/vs/platform/extensionManagement/common/extensionGalleryService.ts
const { extensions } = await this.queryGalleryExtensions(query, { targetPlatform: options.targetPlatform ?? CURRENT_TARGET_PLATFORM, includePreRelease: includePreReleases, versions, compatible: !!options.compatible }, token);
继续找 queryGalleryExtensions方法
const { galleryExtensions: rawGalleryExtensions, total } = await this.queryRawGalleryExtensions(query, token);
再跳进来,终于看到接口请求的地方了,兴奋🥰
private async queryRawGalleryExtensions(query: Query, token: CancellationToken): Promise<{ galleryExtensions: IRawGalleryExtension[]; total: number }> {
        if (!this.isEnabled()) {
            throw new Error('No extension gallery service configured.');
        }

        query = query
            /* Always exclude non validated extensions */
            .withFlags(query.flags, Flags.ExcludeNonValidated)
            .withFilter(FilterType.Target, 'Microsoft.VisualStudio.Code')
            /* Always exclude unpublished extensions */
            .withFilter(FilterType.ExcludeWithFlags, flagsToString(Flags.Unpublished));

        const commonHeaders = await this.commonHeadersPromise;
        const data = JSON.stringify(query.raw);
        const headers = {
            ...commonHeaders,
            'Content-Type': 'application/json',
            'Accept': 'application/json;api-version=3.0-preview.1',
            'Accept-Encoding': 'gzip',
            'Content-Length': String(data.length)
        };

        const startTime = new Date().getTime();
        let context: IRequestContext | undefined, error: any, total: number = 0;

        try {
            context = await this.requestService.request({
                type: 'POST',
                url: this.api('/extensionquery'),
                data,
                headers
            }, token);

            if (context.res.statusCode && context.res.statusCode >= 400 && context.res.statusCode < 500) {
                return { galleryExtensions: [], total };
            }

            const result = await asJson<IRawGalleryQueryResult>(context);
            if (result) {
                const r = result.results[0];
                const galleryExtensions = r.extensions;
                const resultCount = r.resultMetadata && r.resultMetadata.filter(m => m.metadataType === 'ResultCount')[0];
                total = resultCount && resultCount.metadataItems.filter(i => i.name === 'TotalCount')[0].count || 0;

                return { galleryExtensions, total };
            }
            return { galleryExtensions: [], total };
...
    }
打印 接口返回的内容
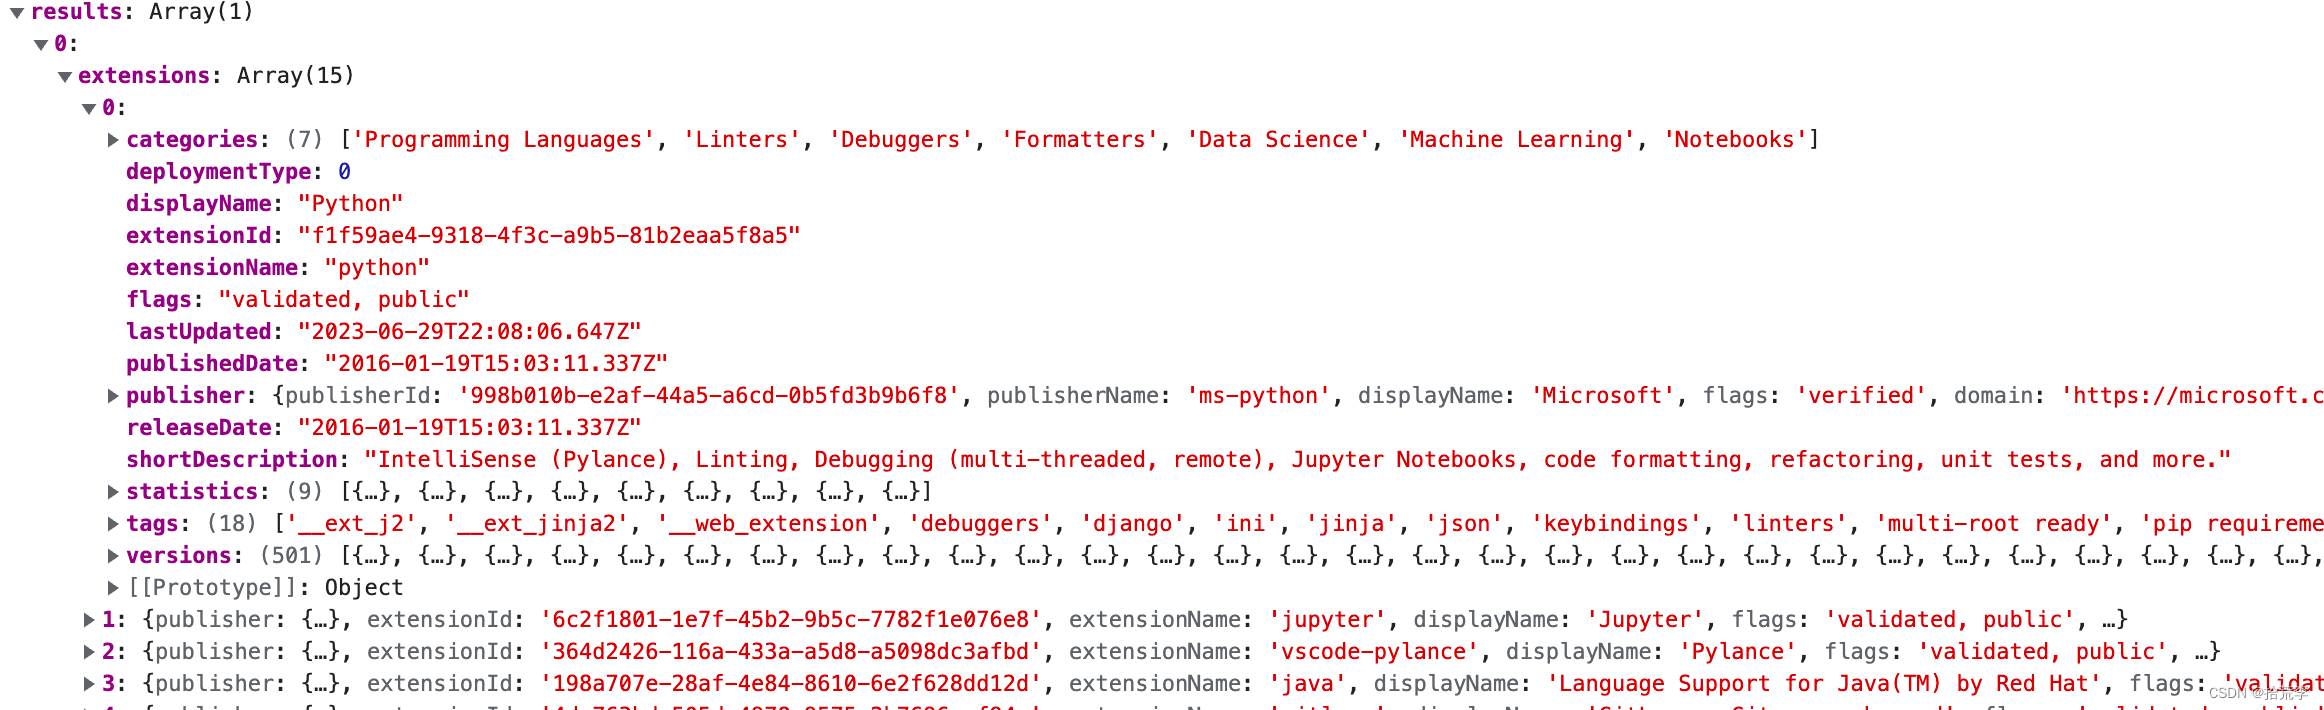
最后做数据列表展示 渲染页面
src/vs/workbench/contrib/extensions/browser/extensionsViews.ts
private getPagedModel(arg: IPager<IExtension> | IExtension[]): IPagedModel<IExtension> {
        if (Array.isArray(arg)) {
            return new PagedModel(arg);
        }
        const pager = {
            total: arg.total,
            pageSize: arg.pageSize,
            firstPage: arg.firstPage,
            getPage: (pageIndex: number, cancellationToken: CancellationToken) => arg.getPage(pageIndex, cancellationToken)
        };
        return new PagedModel(pager);
    }
经过处理后的最终数据格式
好到此页面已经渲染出来了
接下来是插件下载流程
插件下载按钮定义
src/vs/workbench/contrib/extensions/browser/extensionsActions.ts
export abstract class AbstractInstallAction extends ExtensionAction {

    static readonly Class = `${ExtensionAction.LABEL_ACTION_CLASS} prominent install`;

    protected _manifest: IExtensionManifest | null = null;
    set manifest(manifest: IExtensionManifest | null) {
        this._manifest = manifest;
        this.updateLabel();
    }

    private readonly updateThrottler = new Throttler();

    constructor(
        id: string, private readonly installPreReleaseVersion: boolean, cssClass: string,
        @IExtensionsWorkbenchService private readonly extensionsWorkbenchService: IExtensionsWorkbenchService,
        @IInstantiationService private readonly instantiationService: IInstantiationService,
        @IExtensionService private readonly runtimeExtensionService: IExtensionService,
        @IWorkbenchThemeService private readonly workbenchThemeService: IWorkbenchThemeService,
        @ILabelService private readonly labelService: ILabelService,
    ) {
        super(id, localize('install', "Install"), cssClass, false);
        this.update();
        this._register(this.labelService.onDidChangeFormatters(() => this.updateLabel(), this));
    }

    update(): void {
        this.updateThrottler.queue(() => this.computeAndUpdateEnablement());
    }
...

 // 点击执行事件
    override async run(): Promise<any> {
        if (!this.extension) {
            return;
        }
        this.extensionsWorkbenchService.open(this.extension, { showPreReleaseVersion: this.installPreReleaseVersion });

        alert(localize('installExtensionStart', "Installing extension {0} started. An editor is now open with more details on this extension", this.extension.displayName));
	// 这里下载
        const extension = await this.install(this.extension);

        if (extension?.local) {
            alert(localize('installExtensionComplete', "Installing extension {0} is completed.", this.extension.displayName));
            const runningExtension = await this.getRunningExtension(extension.local);
            if (runningExtension && !(runningExtension.activationEvents && runningExtension.activationEvents.some(activationEent => activationEent.startsWith('onLanguage')))) {
                const action = await this.getThemeAction(extension);
                if (action) {
                    action.extension = extension;
                    try {
                        return action.run({ showCurrentTheme: true, ignoreFocusLost: true });
                    } finally {
                        action.dispose();
                    }
                }
            }
        }
    }

  ...
    private async install(extension: IExtension): Promise<IExtension | undefined> {
        const installOptions = this.getInstallOptions();
        try {
            return await this.extensionsWorkbenchService.install(extension, installOptions);
        } catch (error) {
            await this.instantiationService.createInstance(PromptExtensionInstallFailureAction, extension, extension.latestVersion, InstallOperation.Install, installOptions, error).run();
            return undefined;
        }
    }

  ...
}
src/vs/workbench/contrib/extensions/browser/extensionsWorkbenchService.ts
install(extension: URI | IExtension, installOptions?: InstallOptions | InstallVSIXOptions): Promise<IExtension> {
        if (extension instanceof URI) {
            return this.installWithProgress(() => this.installFromVSIX(extension, installOptions));
        }

        if (extension.isMalicious) {
            return Promise.reject(new Error(nls.localize('malicious', "This extension is reported to be problematic.")));
        }

        const gallery = extension.gallery;

        if (!gallery) {
            return Promise.reject(new Error('Missing gallery'));
        }

        return this.installWithProgress(() => this.installFromGallery(extension, gallery, installOptions), gallery.displayName);
    }
...
await this.extensionManagementService.installFromGallery(gallery, installOptions);
...
继续跟进去
src/vs/workbench/services/extensionManagement/common/extensionManagementService.ts
async installFromGallery(gallery: IGalleryExtension, installOptions?: InstallOptions): Promise<ILocalExtension> {
    const manifest = await this.extensionGalleryService.getManifest(gallery, CancellationToken.None);
    ...
src/vs/platform/extensionManagement/common/extensionGalleryService.ts
这里主要作用是做插件信息展示
private async getAsset(asset: IGalleryExtensionAsset, options: IRequestOptions = {}, token: CancellationToken = CancellationToken.None): Promise<IRequestContext> {
        const commonHeaders = await this.commonHeadersPromise;
        const baseOptions = { type: 'GET' };
        const headers = { ...commonHeaders, ...(options.headers || {}) };
        options = { ...options, ...baseOptions, headers };

        const url = asset.uri;
        const fallbackUrl = asset.fallbackUri;
        const firstOptions = { ...options, url };

        try {
            const context = await this.requestService.request(firstOptions, token);
            if (context.res.statusCode === 200) {
                return context;
            }
            const message = await asText(context);
            throw new Error(`Expected 200, got back ${context.res.statusCode} instead.\n\n${message}`);
        } catch (err) {
            if (isCancellationError(err)) {
                throw err;
            }

            const message = getErrorMessage(err);
            type GalleryServiceCDNFallbackClassification = {
                url: { classification: 'SystemMetaData'; purpose: 'FeatureInsight' };
                message: { classification: 'SystemMetaData'; purpose: 'FeatureInsight' };
            };
            type GalleryServiceCDNFallbackEvent = {
                url: string;
                message: string;
            };
            this.telemetryService.publicLog2<GalleryServiceCDNFallbackEvent, GalleryServiceCDNFallbackClassification>('galleryService:cdnFallback', { url, message });

            const fallbackOptions = { ...options, url: fallbackUrl };
            return this.requestService.request(fallbackOptions, token);
        }
    }
展示插件信息的url (同步进行),例子仅供参考
https://angular.gallerycdn.azure.cn/extensions/angular/ng-template/16.0.0/1683140320423/Microsoft.VisualStudio.Code.Manifest
https://johnpapa.gallerycdn.azure.cn/extensions/johnpapa/angular2/16.0.1/1686880343716/Microsoft.VisualStudio.Services.Content.Details
下载插件的地方
src/vs/platform/extensionManagement/node/extensionManagementService.ts
this.logService.trace('Started downloading extension:', extension.identifier.id);
zipPath = (await this.extensionsDownloader.downloadExtension(extension, operation)).fsPath;
this.logService.info('Downloaded extension:', extension.identifier.id, zipPath);
下载插件的url 例子仅供参考
https://angular.gallery.vsassets.io/_apis/public/gallery/publisher/Angular/extension/ng-template/13.3.4/assetbyname/Microsoft.VisualStudio.Services.VSIXPackage?redirect=true&install=true
src/vs/platform/extensionManagement/common/extensionGalleryService.ts
插件写入本地
const context = await this.getAsset(downloadAsset);
await this.fileService.writeFile(location, context.stream);
log(new Date().getTime() - startTime);
到这里终于把插件市场里的插件下载下来了!
下载下来的是二进制的压缩包 需要解压使用
src/vs/platform/extensionManagement/node/extensionManagementService.ts
提取插件信息
let local = await this.extensionsScanner.extractUserExtension(key, zipPath, metadata, token);
this.logService.info('Extracting completed.', key.id);
解压插件到本地
src/vs/platform/extensionManagement/node/extensionsScanner.ts
async extractUserExtension(extensionKey: ExtensionKey, zipPath: string, metadata: Metadata | undefined, token: CancellationToken): Promise<ILocalExtension> {
        const folderName = extensionKey.toString();
        const tempPath = path.join(this.userExtensionsLocation.fsPath, `.${generateUuid()}`);
        const extensionPath = path.join(this.userExtensionsLocation.fsPath, folderName);

        try {
            await pfs.Promises.rm(extensionPath);
        } catch (error) {
            throw new ExtensionManagementError(localize('errorDeleting', "Unable to delete the existing folder '{0}' while installing the extension '{1}'. Please delete the folder manually and try again", extensionPath, extensionKey.id), ExtensionManagementErrorCode.Delete);
        }

        await this.extractAtLocation(extensionKey, zipPath, tempPath, token);
        let local = await this.scanExtension(URI.file(tempPath), ExtensionType.User);
        if (!local) {
            throw new Error(localize('cannot read', "Cannot read the extension from {0}", tempPath));
        }
        await this.storeMetadata(local, { ...metadata, installedTimestamp: Date.now() });
...
这时候 插件从下载到解压到本地已完成
接下来讲解插件如何被激活
每个插件里面都有 activate 函数,做为总入口
src/vs/workbench/api/common/extHostExtensionService.ts
private static _callActivateOptional(logService: ILogService, extensionId: ExtensionIdentifier, extensionModule: IExtensionModule, context: vscode.ExtensionContext, activationTimesBuilder: ExtensionActivationTimesBuilder): Promise<IExtensionAPI> {
        if (typeof extensionModule.activate === 'function') {
            try {
                activationTimesBuilder.activateCallStart();
                logService.trace(`ExtensionService#_callActivateOptional ${extensionId.value}`);
                const scope = typeof global === 'object' ? global : self; // `global` is nodejs while `self` is for workers
                // 这里激活
                const activateResult: Promise<IExtensionAPI> = extensionModule.activate.apply(scope, [context]);
                activationTimesBuilder.activateCallStop();

                activationTimesBuilder.activateResolveStart();
                return Promise.resolve(activateResult).then((value) => {
                    activationTimesBuilder.activateResolveStop();
                    return value;
                });
            } catch (err) {
                return Promise.reject(err);
            }
        } else {
            // No activate found => the module is the extension's exports
            return Promise.resolve<IExtensionAPI>(extensionModule);
        }
    }
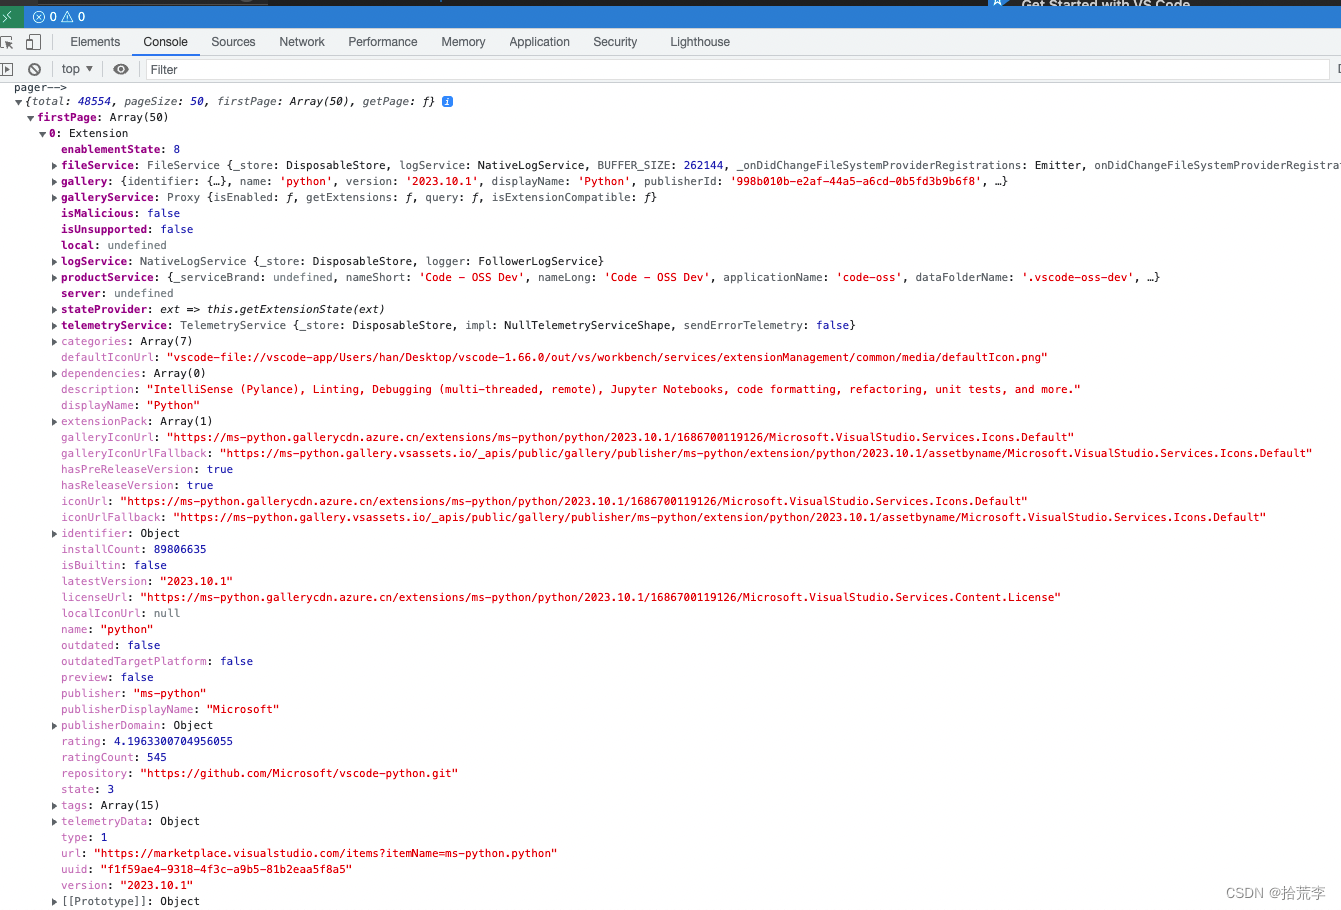
读取所有插件信息
src/vs/platform/extensionManagement/node/extensionsScanner.ts
private async readManifest(extensionPath: string): Promise<{ manifest: IExtensionManifest; metadata: Metadata | null }> {
    const promises = [
        pfs.Promises.readFile(path.join(extensionPath, 'package.json'), 'utf8')
            .then(raw => this.parseManifest(raw)),
        pfs.Promises.readFile(path.join(extensionPath, 'package.nls.json'), 'utf8')
            .then(undefined, err => err.code !== 'ENOENT' ? Promise.reject<string>(err) : '{}')
            .then(raw => JSON.parse(raw))
    ];

    const [{ manifest, metadata }, translations] = await Promise.all(promises);
    return {
        manifest: localizeManifest(manifest, translations),
        metadata
    };
}
vscode的插件分三类
- defaultSystemExtensions
- devSystemExtensions
- userExtensions
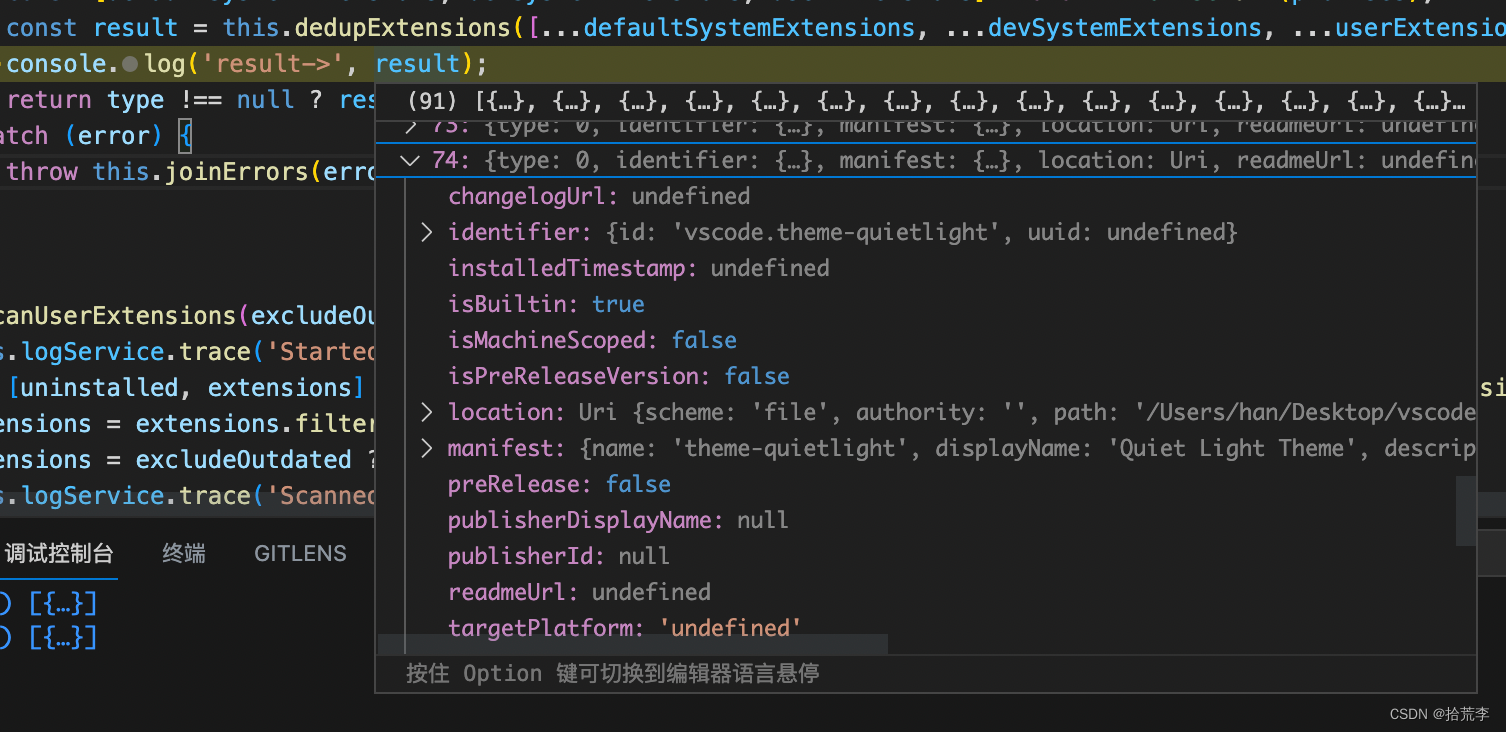
try {
    const [defaultSystemExtensions, devSystemExtensions, userExtensions] = await Promise.all(promises);
    const result = this.dedupExtensions([...defaultSystemExtensions, ...devSystemExtensions, ...userExtensions], await this.targetPlatform);
    return type !== null ? result.filter(r => r.type === type) : result;
} catch (error) {
    throw this.joinErrors(error);
}
打印result
每个插件都有一个active函数总入口,那么每个插件是如何被load加载的 以及 active如何被触发的呢?
src/vs/workbench/api/common/extHostExtensionService.ts
拿到所有插件数据之后 加载触发active
_loadCommonJSModule是重头戏
private _doActivateExtension(extensionDescription: IExtensionDescription, reason: ExtensionActivationReason): Promise<ActivatedExtension> {
// 读取package.json main字段
    const entryPoint = this._getEntryPoint(extensionDescription);
    ...
    return Promise.all([
    // 重头戏在这里
        this._loadCommonJSModule<IExtensionModule>(extensionDescription.identifier, joinPath(extensionDescription.extensionLocation, entryPoint), activationTimesBuilder),
        this._loadExtensionContext(extensionDescription)
    ]).then(values => {
        performance.mark(`code/extHost/willActivateExtension/${extensionDescription.identifier.value}`);
         // 激活插件
        return AbstractExtHostExtensionService._callActivate(this._logService, extensionDescription.identifier, values[0], values[1], activationTimesBuilder);
    }).then((activatedExtension) => {
        performance.mark(`code/extHost/didActivateExtension/${extensionDescription.identifier.value}`);
        return activatedExtension;
    });
}
this._getEntryPoint(extensionDescription); 读取package.json main字段
protected _getEntryPoint(extensionDescription: IExtensionDescription): string | undefined {
    return extensionDescription.main;
}
可以看出找的就是package.json里的mian字段,也就是每个插件的总入口
src/vs/workbench/api/node/extHostExtensionService.ts
protected _loadCommonJSModule<T>(extensionId: ExtensionIdentifier | null, module: URI, activationTimesBuilder: ExtensionActivationTimesBuilder): Promise<T> {
    if (module.scheme !== Schemas.file) {
        throw new Error(`Cannot load URI: '${module}', must be of file-scheme`);
    }
    let r: T | null = null;
    activationTimesBuilder.codeLoadingStart();
    this._logService.trace(`ExtensionService#loadCommonJSModule ${module.toString(true)}`);
    this._logService.flush();
    try {
        if (extensionId) {
            performance.mark(`code/extHost/willLoadExtensionCode/${extensionId.value}`);
        }
        r = require.__$__nodeRequire<T>(module.fsPath);
    } catch (e) {
        return Promise.reject(e);
    } finally {
        if (extensionId) {
            performance.mark(`code/extHost/didLoadExtensionCode/${extensionId.value}`);
        }
        activationTimesBuilder.codeLoadingStop();
    }
    return Promise.resolve(r);
}
插件总入口加载完毕后 出发active函数
return AbstractExtHostExtensionService._callActivate(this._logService, extensionDescription.identifier, values[0], values[1], activationTimesBuilder);
src/vs/workbench/api/common/extHostExtensionService.ts
可以看到这个active函数被触发了
private static _callActivateOptional(logService: ILogService, extensionId: ExtensionIdentifier, extensionModule: IExtensionModule, context: vscode.ExtensionContext, activationTimesBuilder: ExtensionActivationTimesBuilder): Promise<IExtensionAPI> {
        if (typeof extensionModule.activate === 'function') {
            try {
                activationTimesBuilder.activateCallStart();
                logService.trace(`ExtensionService#_callActivateOptional ${extensionId.value}`);
                const scope = typeof global === 'object' ? global : self; // `global` is nodejs while `self` is for workers
                const activateResult: Promise<IExtensionAPI> = extensionModule.activate.apply(scope, [context]);
                activationTimesBuilder.activateCallStop();

                activationTimesBuilder.activateResolveStart();
                return Promise.resolve(activateResult).then((value) => {
                    activationTimesBuilder.activateResolveStop();
                    return value;
                });
            } catch (err) {
                return Promise.reject(err);
            }
        } else {
            // No activate found => the module is the extension's exports
            return Promise.resolve<IExtensionAPI>(extensionModule);
        }
    }
插件进程是如何创建的
src/vs/platform/extensions/node/extensionHostStarterWorker.ts
start(opts: IExtensionHostProcessOptions): { pid: number } {
    if (platform.isCI) {
        this._host.logInfo(`Calling fork to start extension host...`);
    }
    const sw = StopWatch.create(false);
    this._process = fork(
        FileAccess.asFileUri('bootstrap-fork', require).fsPath,
        ['--type=extensionHost', '--skipWorkspaceStorageLock'],
        mixin({ cwd: cwd() }, opts),
    );
    const forkTime = sw.elapsed();
    const pid = this._process.pid!;

    this._host.logInfo(`Starting extension host with pid ${pid} (fork() took ${forkTime} ms).`);

    const stdoutDecoder = new StringDecoder('utf-8');
    this._process.stdout?.on('data', (chunk) => {
        const strChunk = typeof chunk === 'string' ? chunk : stdoutDecoder.write(chunk);
        this._onStdout.fire(strChunk);
    });

    const stderrDecoder = new StringDecoder('utf-8');
    this._process.stderr?.on('data', (chunk) => {
        const strChunk = typeof chunk === 'string' ? chunk : stderrDecoder.write(chunk);
        this._onStderr.fire(strChunk);
    });

    this._process.on('message', msg => {
        this._onMessage.fire(msg);
    });

    this._process.on('error', (err) => {
        this._onError.fire({ error: transformErrorForSerialization(err) });
    });

    this._process.on('exit', (code: number, signal: string) => {
        this._hasExited = true;
        this._onExit.fire({ pid, code, signal });
    });

    return { pid };
}
vscode一共对外扩展了300多个属性和方法。
想知道如何扩展vscode属性、方法 看我这篇博客
https://blog.csdn.net/woyebuzhidao321/article/details/131071724
如何创建一个插件看我这篇
https://blog.csdn.net/woyebuzhidao321/article/details/121603141
vscode打开速度如此快,它的懒加载机制占很大原因,没有用到的代码是不会一开始就加载进来。
在插件package.json里面 有activationEvents字段。
"activationEvents": [
    "onCustomEditor:Vs.Audio"
  ],
做为插件被加载的触发因素。满足以上事件时被触发
src/vs/workbench/api/common/extHostExtensionService.ts
public $activateByEvent(activationEvent: string, activationKind: ActivationKind): Promise<void> {
    if (activationKind === ActivationKind.Immediate) {
        return this._activateByEvent(activationEvent, false);
    }

    return (
        this._readyToRunExtensions.wait()
            .then(_ => this._activateByEvent(activationEvent, false))
    );
}
最后的激活插件的执行方法都在这
src/vs/workbench/api/common/extHostExtensionService.ts
private static _callActivateOptional(logService: ILogService, extensionId: ExtensionIdentifier, extensionModule: IExtensionModule, context: vscode.ExtensionContext, activationTimesBuilder: ExtensionActivationTimesBuilder): Promise<IExtensionAPI> {
        if (typeof extensionModule.activate === 'function') {
            try {
                activationTimesBuilder.activateCallStart();
                logService.trace(`ExtensionService#_callActivateOptional ${extensionId.value}`);
                const scope = typeof global === 'object' ? global : self; // `global` is nodejs while `self` is for workers
                const activateResult: Promise<IExtensionAPI> = extensionModule.activate.apply(scope, [context]);
                activationTimesBuilder.activateCallStop();

                activationTimesBuilder.activateResolveStart();
                return Promise.resolve(activateResult).then((value) => {
                    activationTimesBuilder.activateResolveStop();
                    return value;
                });
            } catch (err) {
                return Promise.reject(err);
            }
        } else {
            // No activate found => the module is the extension's exports
            return Promise.resolve<IExtensionAPI>(extensionModule);
        }
    }
插件中需要引入一个叫 vscode 的模
import * as vscode from 'vscode';
熟悉 TypeScript 的朋友都知道这实际上只是引入了一个 vscode.d.ts 类型声明文件而已,这个文件包含了所有插件可用的 API 及类型定义。
所有的API方法 都在这里
src/vs/workbench/api/common/extHost.api.impl.ts
export function createApiFactoryAndRegisterActors(accessor: ServicesAccessor): IExtensionApiFactory {
    ...
    return <typeof vscode>{
        version: initData.version,
        trash,
        // namespaces
        userAuthentication,
        authentication,
        commands,
        comments,
        env,
        ....
}
API注册到运行环境
src/vs/workbench/api/common/extHostRequireInterceptor.ts
public load(_request: string, parent: URI): any {

        // get extension id from filename and api for extension
        // 这里会为每一个插件生成一份独立的 API
        const ext = this._extensionPaths.findSubstr(parent);
        if (ext) {
            let apiImpl = this._extApiImpl.get(ExtensionIdentifier.toKey(ext.identifier));
            if (!apiImpl) {
                apiImpl = this._apiFactory(ext, this._extensionRegistry, this._configProvider);
                this._extApiImpl.set(ExtensionIdentifier.toKey(ext.identifier), apiImpl);
            }
            return apiImpl;
        }

        // fall back to a default implementation
        if (!this._defaultApiImpl) {
            let extensionPathsPretty = '';
            this._extensionPaths.forEach((value, index) => extensionPathsPretty += `\t${index} -> ${value.identifier.value}\n`);
            this._logService.warn(`Could not identify extension for 'vscode' require call from ${parent}. These are the extension path mappings: \n${extensionPathsPretty}`);
            this._defaultApiImpl = this._apiFactory(nullExtensionDescription, this._extensionRegistry, this._configProvider);
        }
        return this._defaultApiImpl;
    }

src/vs/workbench/api/node/extHostExtensionService.ts
protected _installInterceptor(): void {
        const that = this;
        const node_module = <any>require.__$__nodeRequire('module');
        const originalLoad = node_module._load;
        node_module._load = function load(request: string, parent: { filename: string }, isMain: boolean) {
            request = applyAlternatives(request);
            if (!that._factories.has(request)) {
                return originalLoad.apply(this, arguments);
            }
            return that._factories.get(request)!.load(
                request,
                URI.file(realpathSync(parent.filename)),
                request => originalLoad.apply(this, [request, parent, isMain])
            );
        };

        const originalLookup = node_module._resolveLookupPaths;
        node_module._resolveLookupPaths = (request: string, parent: unknown) => {
            return originalLookup.call(this, applyAlternatives(request), parent);
        };

        const applyAlternatives = (request: string) => {
            for (let alternativeModuleName of that._alternatives) {
                let alternative = alternativeModuleName(request);
                if (alternative) {
                    request = alternative;
                    break;
                }
            }
            return request;
        };
    }
这里在讲解在插件和vscode主体之间的消息通讯
首先我们在插件 activate 函数里面定义一个方法
export async function activate(context: vscode.ExtensionContext) {
    vscode.window.showInformationMessage('你好 世界!');
}
调用方法
src/vs/workbench/api/common/extHost.api.impl.ts
showInformationMessage(message: string, ...rest: Array<vscode.MessageOptions | string | vscode.MessageItem>) {
    return <Thenable<any>>extHostMessageService.showMessage(extension, Severity.Info, message, rest[0], <Array<string | vscode.MessageItem>>rest.slice(1));
},
找到对应service
src/vs/workbench/api/common/extHostMessageService.ts
return this._proxy.$showMessage(severity, message, options, commands).then(handle => {
    if (typeof handle === 'number') {
        return items[handle];
    }
    return undefined;
});
我们看到这里有一个 this._proxy 代理,跟进去
src/vs/workbench/services/extensions/common/rpcProtocol.ts
private _createProxy<T>(rpcId: number, debugName: string): T {
    let handler = {
        get: (target: any, name: PropertyKey) => {
            if (typeof name === 'string' && !target[name] && name.charCodeAt(0) === CharCode.DollarSign) {
                target[name] = (...myArgs: any[]) => {
                // 这里重点
                    return this._remoteCall(rpcId, name, myArgs);
                };
            }
            if (name === _RPCProxySymbol) {
                return debugName;
            }
            return target[name];
        }
    };
    return new Proxy(Object.create(null), handler);
}
this._remoteCall 方法里面有 ipc 通讯方法
src/vs/workbench/services/extensions/common/rpcProtocol.ts
 private _remoteCall(rpcId: number, methodName: string, args: any[]): Promise<any> {
        if (this._isDisposed) {
            return Promise.reject<any>(errors.canceled());
        }
        let cancellationToken: CancellationToken | null = null;
        if (args.length > 0 && CancellationToken.isCancellationToken(args[args.length - 1])) {
            cancellationToken = args.pop();
        }

        if (cancellationToken && cancellationToken.isCancellationRequested) {
            // No need to do anything...
            return Promise.reject<any>(errors.canceled());
        }

        const serializedRequestArguments = MessageIO.serializeRequestArguments(args, this._uriReplacer);

        const req = ++this._lastMessageId;
        const callId = String(req);
        const result = new LazyPromise();

        if (cancellationToken) {
            cancellationToken.onCancellationRequested(() => {
                const msg = MessageIO.serializeCancel(req);
                if (this._logger) {
                    this._logger.logOutgoing(msg.byteLength, req, RequestInitiator.LocalSide, `cancel`);
                }
                this._protocol.send(MessageIO.serializeCancel(req));
            });
        }

        this._pendingRPCReplies[callId] = result;
        this._onWillSendRequest(req);
        const msg = MessageIO.serializeRequest(req, rpcId, methodName, serializedRequestArguments, !!cancellationToken);
        if (this._logger) {
            this._logger.logOutgoing(msg.byteLength, req, RequestInitiator.LocalSide, `request: ${getStringIdentifierForProxy(rpcId)}.${methodName}(`, args);
        }
        // 重头戏
        this._protocol.send(msg);
        return result;
    }
his._protocol.send(msg); 重头戏
src/vs/base/parts/ipc/node/ipc.net.ts
这里面使用nodejs net模块 实现的ipc通讯
import { createConnection, createServer, Server as NetServer, Socket } from 'net';
对 nodejs net模块理解 看我这篇
https://blog.csdn.net/woyebuzhidao321/article/details/131494461
好了 再往下走 消息传到了主进程
src/vs/workbench/api/browser/mainThreadMessageService.ts
private async _showModalMessage(severity: Severity, message: string, detail: string | undefined, commands: { title: string; isCloseAffordance: boolean; handle: number }[], useCustom?: boolean): Promise<number | undefined> {
        let cancelId: number | undefined = undefined;

        const buttons = commands.map((command, index) => {
            if (command.isCloseAffordance === true) {
                cancelId = index;
            }

            return command.title;
        });

        if (cancelId === undefined) {
            if (buttons.length > 0) {
                buttons.push(nls.localize('cancel', "Cancel"));
            } else {
                buttons.push(nls.localize('ok', "OK"));
            }

            cancelId = buttons.length - 1;
        }

        const { choice } = await this._dialogService.show(severity, message, buttons, { cancelId, custom: useCustom, detail });
        return choice === commands.length ? undefined : commands[choice].handle;
    }
dialogService时vscode封装的主进程方法,看到这里流程就跑通了