静力触探数据智能预处理(1)
前言
数据处理方式已由手工1.0、计算机辅助2.0到人工智能3.0的趋势发展。现场采集的静力触探数据存在大量的异常数据,需要后期处理;但是目前还未见一个静力触探数据预处理的软件,数据预处理主要还是依靠在excel中人眼识别+手工剔除的方式。本博文尝试性的编写了静力触探数据预处理代码,并实现了静力触探数据的可视化,非专业编写,代码仅供参考。
文章目录
- 静力触探数据智能预处理(1)
- 前言
- 1、filloutliers检测并替换数据中的离群值
- 1.1、处理效果
- 1.2 处理后的曲线图
- 2、静力触探数据快速成图小软件
- 2.1 matlab代码
1、filloutliers检测并替换数据中的离群值
B = filloutliers(A,fillmethod,findmethod) 指定检测离群值的方法。例如,filloutliers(A,‘previous’,‘mean’) 将 A 中与均值相差超过三倍标准差的元素定义为离群值。
1.1、处理效果

图中黑色曲线为原始曲线,蓝色曲线为处理后的曲线。
1.2 处理后的曲线图
数据节选自某工地现场实测数据,成图效果如下:

2、静力触探数据快速成图小软件
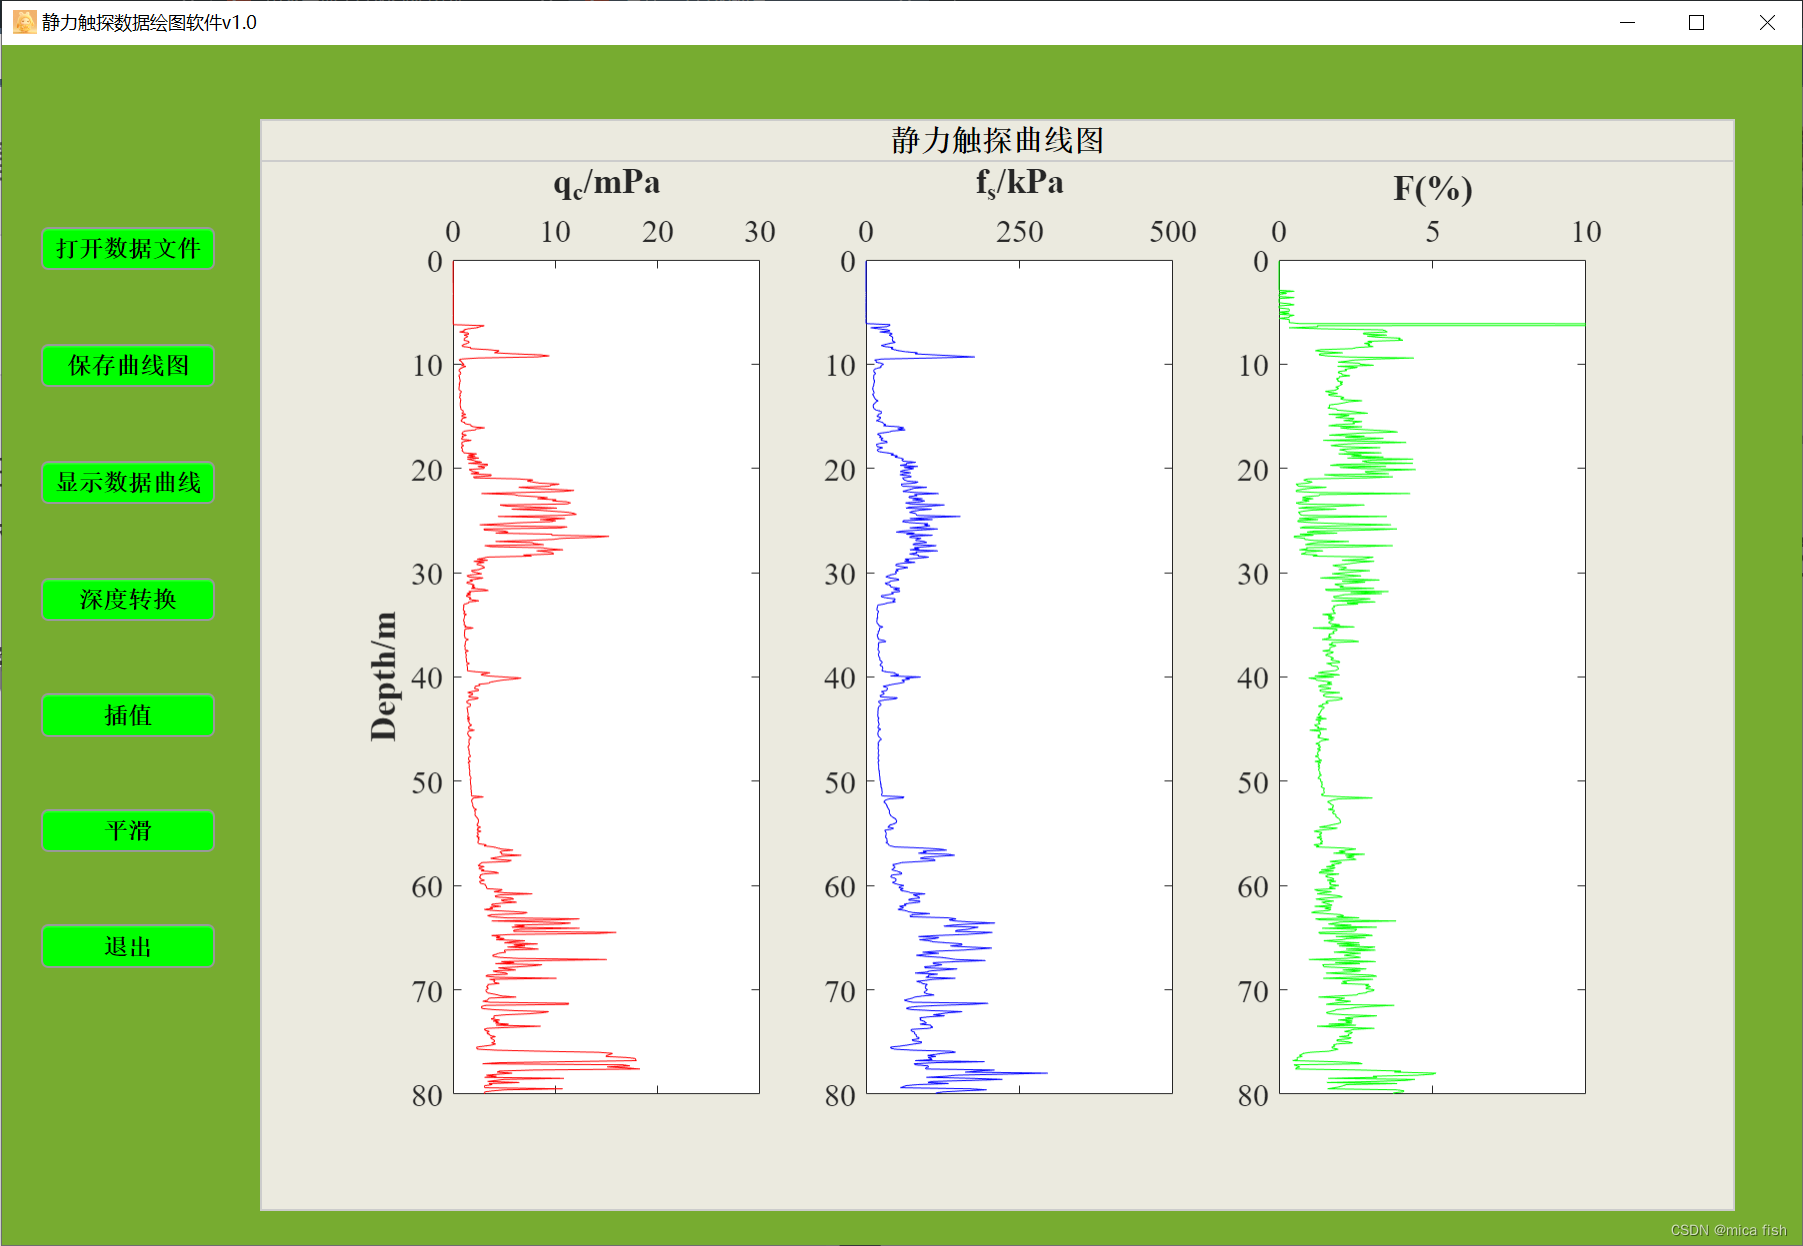
基于上述数据处理,在matlab中编辑了数据可视化软件,软件包含数据打开与关闭、曲线显示、曲线图保存、显示曲线、深度转换、插值与平滑的功能,可以对静力触探数据进行快速预处理。
软件界面如下:
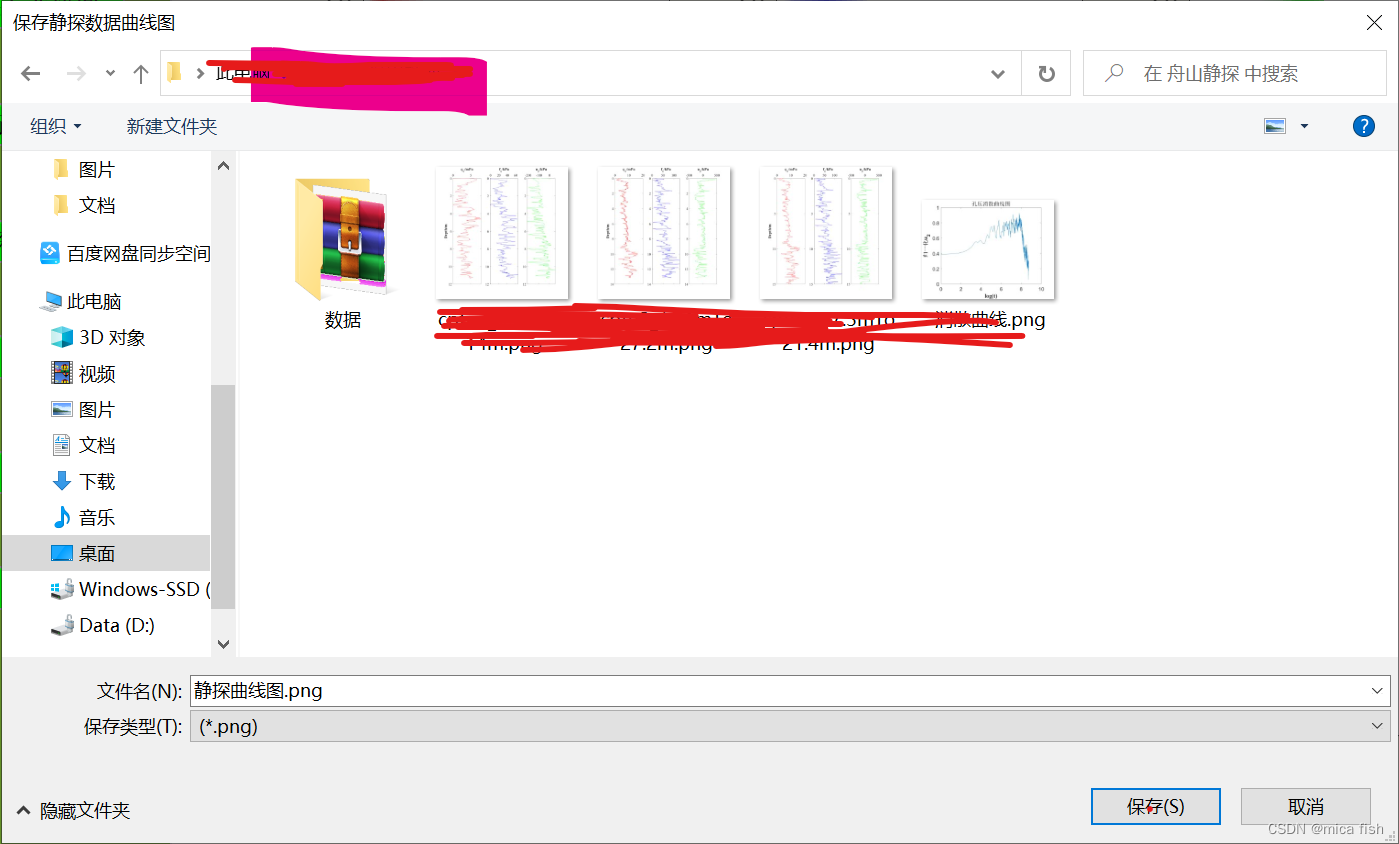
当点击每个功能按键时,会弹出小窗口,用于数据处理操作:
但是小软件还不适用于所有数据格式,小软件功能还不稳定,bug非常多
2.1 matlab代码
classdef app3 < matlab.apps.AppBase

    % Properties that correspond to app components
    properties (Access = public)
        v10UIFigure  matlab.ui.Figure
        Button       matlab.ui.control.Button
        Panel        matlab.ui.container.Panel
        Button_2     matlab.ui.control.Button
        Button_3     matlab.ui.control.Button
        Button_4     matlab.ui.control.Button
        Button_5     matlab.ui.control.Button
        Button_6     matlab.ui.control.Button
        Image        matlab.ui.control.Image
        Button_7     matlab.ui.control.Button
        ContextMenu  matlab.ui.container.ContextMenu
        Menu         matlab.ui.container.Menu
        Menu2        matlab.ui.container.Menu
    end

    % Callbacks that handle component events
    methods (Access = private)

        % Button pushed function: Button
        function ButtonPushed(app, event)
            [inFileName,PathName] = uigetfile('*.txt',...
               '选择静探数据文件','MultiSelect','on');
            if(isequal(inFileName,0)||isequal(PathName,0))
                return;
            else
                filename = strcat(PathName,inFileName);
            end
            data = importdata(filename);
            ax1 = subplot(1,3,1,'parent',app.Panel);
            plot(ax1,data(:,2),data(:,1),'r');
            ylim(ax1,[0 80]);
            xlim(ax1,[0 30]);
            set(ax1,'ydir','reverse');
            set(ax1,'xaxislocation','top');
            xlabel(ax1,'q_c/mPa','FontWeight','bold');
            ylabel(ax1,'Depth/m','FontWeight','bold');
            set(ax1,'fontname','times new roman','fontsize',16);

            ax2 = subplot(1,3,2,'parent',app.Panel);
            plot(ax2,data(:,3),data(:,1),'b');
            ylim(ax2,[0 80]);
            xlim(ax2,[0 500]);
            xticks(ax2,0:250:500);
            set(ax2,'ydir','reverse');
            set(ax2,'xaxislocation','top');
            xlabel(ax2,'f_s/kPa','FontWeight','bold');
            set(ax2,'fontname','times new roman','fontsize',16);

            ax3 = subplot(1,3,3,'parent',app.Panel);
            plot(ax3,data(:,4),data(:,1),'g');
            ylim(ax3,[0 80]);
            xlim(ax3,[0 10]);
            set(ax3,'ydir','reverse');
            set(ax3,'xaxislocation','top');
            xlabel(ax3,'F(%)','FontWeight','bold');
            set(ax3,'fontname','times new roman','fontsize',16);

        end

        % Button pushed function: Button_2
        function Button_2Pushed(app, event)
            [a,b] = uiputfile('*.png',...
               '保存静探数据曲线图','静探曲线图');
            if(isequal(a,0)||isequal(b,0))
                return;
            else
                c_filename = strcat(b,a);
            end
            exportgraphics(app.panel,c_filename);
        end

        % Image clicked function: Image
        function ImageClicked(app, event)
            pause(1);
            delete(app.Image)
        end
    end

    % Component initialization
    methods (Access = private)

        % Create UIFigure and components
        function createComponents(app)

            % Create v10UIFigure and hide until all components are created
            app.v10UIFigure = uifigure('Visible', 'off');
            app.v10UIFigure.Color = [0.4667 0.6745 0.1882];
            app.v10UIFigure.Position = [100 100 1200 800];
            app.v10UIFigure.Name = '静力触探数据绘图软件v1.0';
            app.v10UIFigure.Icon = '软件名.png';

            % Create Button
            app.Button = uibutton(app.v10UIFigure, 'push');
            app.Button.ButtonPushedFcn = createCallbackFcn(app, @ButtonPushed, true);
            app.Button.BackgroundColor = [0 1 0];
            app.Button.FontName = '宋体';
            app.Button.FontSize = 16;
            app.Button.FontWeight = 'bold';
            app.Button.Position = [27 651 116 29];
            app.Button.Text = '打开数据文件';

            % Create Panel
            app.Panel = uipanel(app.v10UIFigure);
            app.Panel.AutoResizeChildren = 'off';
            app.Panel.TitlePosition = 'centertop';
            app.Panel.Title = '静力触探曲线图';
            app.Panel.BackgroundColor = [0.9216 0.9176 0.8745];
            app.Panel.FontName = '宋体';
            app.Panel.FontWeight = 'bold';
            app.Panel.FontSize = 20;
            app.Panel.Position = [173 24 983 728];

            % Create Button_2
            app.Button_2 = uibutton(app.v10UIFigure, 'push');
            app.Button_2.ButtonPushedFcn = createCallbackFcn(app, @Button_2Pushed, true);
            app.Button_2.BackgroundColor = [0 1 0];
            app.Button_2.FontName = '宋体';
            app.Button_2.FontSize = 16;
            app.Button_2.FontWeight = 'bold';
            app.Button_2.Position = [27 573 116 29];
            app.Button_2.Text = '保存曲线图';

            % Create Button_3
            app.Button_3 = uibutton(app.v10UIFigure, 'push');
            app.Button_3.BackgroundColor = [0 1 0];
            app.Button_3.FontName = '宋体';
            app.Button_3.FontSize = 16;
            app.Button_3.FontWeight = 'bold';
            app.Button_3.Position = [27 186 116 29];
            app.Button_3.Text = '退出';

            % Create Button_4
            app.Button_4 = uibutton(app.v10UIFigure, 'push');
            app.Button_4.BackgroundColor = [0 1 0];
            app.Button_4.FontName = '宋体';
            app.Button_4.FontSize = 16;
            app.Button_4.FontWeight = 'bold';
            app.Button_4.Position = [27 495 116 29];
            app.Button_4.Text = '显示数据曲线';

            % Create Button_5
            app.Button_5 = uibutton(app.v10UIFigure, 'push');
            app.Button_5.BackgroundColor = [0 1 0];
            app.Button_5.FontName = '宋体';
            app.Button_5.FontSize = 16;
            app.Button_5.FontWeight = 'bold';
            app.Button_5.Position = [27 417 116 29];
            app.Button_5.Text = '深度转换';

            % Create Button_6
            app.Button_6 = uibutton(app.v10UIFigure, 'push');
            app.Button_6.BackgroundColor = [0 1 0];
            app.Button_6.FontName = '宋体';
            app.Button_6.FontSize = 16;
            app.Button_6.FontWeight = 'bold';
            app.Button_6.Position = [27 340 116 29];
            app.Button_6.Text = '插值';

            % Create Image
            app.Image = uiimage(app.v10UIFigure);
            app.Image.ImageClickedFcn = createCallbackFcn(app, @ImageClicked, true);
            app.Image.BackgroundColor = [0.8 0.8 0.8];
            app.Image.Tooltip = {'请点击软件界面,等待1秒,再开始使用软件!'};
            app.Image.Position = [1 1 1200 800];
            app.Image.ImageSource = '静探数据绘图软件封面01.png';

            % Create Button_7
            app.Button_7 = uibutton(app.v10UIFigure, 'push');
            app.Button_7.BackgroundColor = [0 1 0];
            app.Button_7.FontName = '宋体';
            app.Button_7.FontSize = 16;
            app.Button_7.FontWeight = 'bold';
            app.Button_7.Position = [27 263 116 29];
            app.Button_7.Text = '平滑';

            % Create ContextMenu
            app.ContextMenu = uicontextmenu(app.v10UIFigure);

            % Assign app.ContextMenu
            app.v10UIFigure.ContextMenu = app.ContextMenu;

            % Create Menu
            app.Menu = uimenu(app.ContextMenu);
            app.Menu.Text = '打开文件';

            % Create Menu2
            app.Menu2 = uimenu(app.ContextMenu);
            app.Menu2.Text = 'Menu2';

            % Show the figure after all components are created
            app.v10UIFigure.Visible = 'on';
        end
    end

    % App creation and deletion
    methods (Access = public)

        % Construct app
        function app = app3

            % Create UIFigure and components
            createComponents(app)

            % Register the app with App Designer
            registerApp(app, app.v10UIFigure)

            if nargout == 0
                clear app
            end
        end

        % Code that executes before app deletion
        function delete(app)

            % Delete UIFigure when app is deleted
            delete(app.v10UIFigure)
        end
    end
end
此软件只是一个半成品,欢迎批评建议。

