概述
最近在修改springboot架构的项目,项目之前配置的是Thymeleaf模板,
但是在我新加的功能中,我非常想用Freemarker模板来新加一些页面功能。
看到网上很多其他地方描述,要么用不同的文件后缀来区分(如html文件为Thymeleaf,ftl为Freemarker),要么放到不同的文件夹。
我不想这么做,因为会限制我后面的功能修改。
本人单独用一个类来转换Freemarker模板的html文件。
软件环境
eclipse:Version: 2021-06 (4.20.0)
jdk:1.8
项目已有的Thymeleaf
这里和大家习惯使用的一样,项目原来使用的简单描述一下,非常熟悉的就跳过Thymeleaf描述吧,
在application.properties中配置
spring.thymeleaf.enabled=true
spring.thymeleaf.cache=false
在pom.xml中加入依赖
<dependency>
	<groupId>org.springframework.boot</groupId>
	<artifactId>spring-boot-starter-thymeleaf</artifactId>
</dependency>
登录页面,后台java
	@GetMapping("/LogIn")
	public String LogIn(Model model, HttpServletRequest request, HttpServletResponse response) {
		KeyPairGenerator keyPairGen = null;
		KeyPair keyPair = null;
		String tmp = null;
		RSAPrivateKey prk = null;
		RSAPublicKey pubK = null;

		// System.out.println("AABBCCDDGGFFTTR112 = " +
		// PciVerify.PciMathCountHexChars("AABBCCDDGGFFTTR112"));
		request.getSession().setMaxInactiveInterval(GlobalConfig.mSessionSecondTimeout);

		if (GlobalConfig.mIsDebugMode) {
			model.addAttribute("DefaultUserName", "pci_test");
			model.addAttribute("DefaultPassword", "123456");
			model.addAttribute("DefaultVerifyCode", "123456");
		} else {
			model.addAttribute("DefaultUserName", "");
			model.addAttribute("DefaultPassword", "");
			model.addAttribute("DefaultVerifyCode", "");
		}
		model.addAttribute("UseDebugMode", GlobalConfig.mIsDebugMode);
		model.addAttribute("UseVerifyCode", GlobalConfig.mIsLoginUseVerifyCode);

		pubK = null;
		prk = null;
		tmp = null;
		tmp = (String) request.getSession().getAttribute("SessionKeyRsaPri");
		// System.out.println("SessionKeyRsaPri = " + tmp);
		if (tmp != null) {
			prk = Crypto.RsaPrikeyGetFromPkcs8Base64String(tmp);
		}
		if (prk != null) {
			pubK = Crypto.rsaGetPubKeyFromPriKey(prk);
		}
		// System.out.println("pubK = " + pubK);
		if (pubK == null) {
			try {
				keyPairGen = KeyPairGenerator.getInstance("RSA");
				keyPairGen.initialize(new RSAKeyGenParameterSpec(2048, BigInteger.valueOf(65537)));
				keyPair = keyPairGen.generateKeyPair();
				pubK = (RSAPublicKey) keyPair.getPublic();
			} catch (NoSuchAlgorithmException | InvalidAlgorithmParameterException e) {
				// TODO Auto-generated catch block
				e.printStackTrace();
			}
			tmp = Base64.getEncoder().encodeToString(keyPair.getPrivate().getEncoded());
			tmp = tmp.replace("\r", "");
			tmp = tmp.replace("\n", "");
			// System.out.println("setAttribute SessionKeyRsaPri = " + tmp);
			request.getSession().setAttribute("SessionKeyRsaPri", tmp);
		}

		tmp = Base64.getEncoder().encodeToString(pubK.getEncoded());
		tmp = tmp.replace("\r", "");
		tmp = tmp.replace("\n", "");
		model.addAttribute("RsaPub", tmp);

		response.setHeader("Etag", "\"11223344556677889900/login\"");

		return "main_login";
	}
前端xml
<!DOCTYPE html>
<html lang="en">
<head>
    <meta charset="UTF-8">
    <title>User Login</title>
    <link rel="stylesheet" type="text/css" href="/static/css/Login.css"/>
    <script type="text/javascript" src="/static/js/main_login.js"></script>
    <script type="text/javascript" src="/static/js/rsacrypto.js" ></script>
</head>
<body onload="onLoadLogIn()">
    <script type="text/javascript">onSetTranserRsaPub('{{session_rsa_pub}}');</script>
    <span id="idTmpRsaPub" style="display:none;" th:text="${RsaPub}"></span>
    <div id="login" style="top: 35%;">
    <center>
        <img  id="idImgLogo" style="align:center;max-width:160px;max-height:160px;" onclick="onGetUserNameLogo()">
    </center>
        <h1 class="title">用户登陆</h1>
        <form action="/login" method="post">
            <nobr><input id="id_username" type="text" required="required" placeholder="用户" name="username" onkeypress="return runScriptEnter(event)" th:value="${DefaultUserName}" onkeyup="onUserNameInputChange()" onchange="onUserNameInputChange()"></input></nobr>
            <nobr><input id="id_password" type="password" required="required" placeholder="密码" name="password" onkeypress="return runScriptEnter(event)"  th:value="${DefaultPassword}"></input></nobr>
            <nobr style="vertical-align:top;" th:if="${UseVerifyCode}">
                <input style="width:120px;height:24px" id="idInputVerifyCode" type="text" required="required" placeholder="验证码" name="verifycode" onkeypress="return runScriptEnter(event)"  th:value="${DefaultVerifyCode}"></input>
                <img  id="idImgVerifyCode" onclick="this.src='/main_login/code?'+ Math.random()"></nobr>
        </form>
        <span th:if="${UseVerifyCode}">
            <button id="idLogin" class="but" onclick="onClickLogIn('', 1)">登陆</button>
        </span>
        <span th:if="${not UseVerifyCode}">
            <button id="idLogin" class="but" onclick="onClickLogIn('', 0)">登陆</button>
        </span>
        <div id="show_status"><h5></h5></div>
    </div>
    <div class="bottom">
        <span class="style4">  </span>
        <span an class="style4">  </span>
        <span class="style4"></span> <br/>
    </div>
</body>

</html>
这里就不详细描述运行效果等,因为牵涉到其他变量,且功能不是本文说的重点。
Freemarker配置依赖
在pom.xml中加入依赖
<dependency>
    <groupId>org.freemarker</groupId>
    <artifactId>freemarker</artifactId>
    <version>2.3.23</version>
</dependency>
Freemarker处理的java类
这里是最重要最关键的
新建一个类FreemarkerConvert,html文件放在resource/templates目录下
package com.shenweihong.main;

import java.io.File;
import java.io.IOException;
import java.io.OutputStream;
import java.io.Writer;
import java.util.Map;

import org.springframework.util.ResourceUtils;

import com.shenweihong.global.GlobalSysParam;

import freemarker.core.ParseException;
import freemarker.template.Configuration;
import freemarker.template.MalformedTemplateNameException;
import freemarker.template.Template;
import freemarker.template.TemplateException;
import freemarker.template.TemplateExceptionHandler;
import freemarker.template.TemplateNotFoundException;

public class FreemarkerConvert {
	private static Configuration mConfig = null;

	public static void initConfig(Class cl) {
		if (mConfig != null) {
			return;
		}
		mConfig = new Configuration(Configuration.getVersion());
		try {
			if (GlobalSysParam.mIsJarRun) {
				mConfig.setClassForTemplateLoading(cl, "/templates");
			} else {
				mConfig.setDirectoryForTemplateLoading(ResourceUtils.getFile("classpath:templates"));
			}
			mConfig.setDefaultEncoding("UTF-8");
			mConfig.setTemplateExceptionHandler(TemplateExceptionHandler.RETHROW_HANDLER);
		} catch (IOException e) {
		    e.printStackTrace();
		}
	}

	public static void WriteToStream(String fileName, Map<String, Object> dataMap, OutputStream outStream) {
		Template template = null;
		FreemarkerWriter writer = null;
		try {
			writer = new FreemarkerWriter(outStream);
			template = mConfig.getTemplate(fileName);
			template.process(dataMap, writer);
		} catch (TemplateNotFoundException e) {
			// TODO Auto-generated catch block
			e.printStackTrace();
		} catch (MalformedTemplateNameException e) {
			// TODO Auto-generated catch block
			e.printStackTrace();
		} catch (ParseException e) {
			// TODO Auto-generated catch block
			e.printStackTrace();
		} catch (IOException e) {
			// TODO Auto-generated catch block
			e.printStackTrace();
		} catch (TemplateException e) {
			// TODO Auto-generated catch block
			e.printStackTrace();
		}
	}
}

class FreemarkerWriter extends Writer {
	private OutputStream mOutStream = null;

	FreemarkerWriter(OutputStream outStream) {
		mOutStream = outStream;
	}

	@Override
	public void write(char[] cbuf, int off, int len) throws IOException {
		// TODO Auto-generated method stub
		//System.out.println("write");
		//System.out.println(new String(cbuf, off, len));
		String str = new String(cbuf, off, len);
		mOutStream.write(str.getBytes("UTF8"));
	}

	@Override
	public void flush() throws IOException {
		// TODO Auto-generated method stub
		//System.out.println("Writer flush");
		mOutStream.flush();
	}

	@Override
	public void close() throws IOException {
		// TODO Auto-generated method stub
		//System.out.println("Writer close");
		//mOutStream.close();
	}

}
initConfig在启动的时候调用一次
依赖的一个外部boolean变量:GlobalSysParam.mIsJarRun
这是表示是否为jar包运行,还是java代码IDE调试运行,在main里面赋值的
if (MainStartApplication.class.getResource("").getProtocol().equals("jar") == false) {
	GlobalSysParam.mIsJarRun = false;
} else {
	GlobalSysParam.mIsJarRun = true;
}
main函数调用
@EnableAutoConfiguration(exclude = { DataSourceAutoConfiguration.class, FreeMarkerAutoConfiguration.class })
@SpringBootApplication
@ServletComponentScan
@ComponentScan("com.shenweihong.controller")
public class MainStartApplication {

	public static void main(String[] args) {
		if (MainStartApplication.class.getResource("").getProtocol().equals("jar") == false) {
			GlobalSysParam.mIsJarRun = false;
		} else {
			GlobalSysParam.mIsJarRun = true;
		}
		FreemarkerConvert.initConfig(MainStartApplication.class);

		SpringApplication.run(MainStartApplication.class, args);
	}
}
注意注解FreeMarkerAutoConfiguration.class ,如果不确定就全部拷贝类MainStartApplication 前面的注解,@ComponentScan(“com.shenweihong.controller”)除外。
Contoller里面调用
	@RequestMapping(value = "/Function/UserManageMent/AddUserShow", method = RequestMethod.GET)
	public void AddUserShow(HttpServletRequest request, HttpServletResponse response) {
		Map<String, Object> dataMap = new HashMap<String, Object>();
		int i = 0;
		String[] listPriviliges = null;

		listPriviliges = new String[GlobalConfig.mMapPriviliges.length / 2];
		for (i = 0; i < listPriviliges.length; i++) {
			listPriviliges[i] = GlobalConfig.mMapPriviliges[i * 2 + 1];
		}
		dataMap.put("list_privilleges", listPriviliges);
		dataMap.put("show_privilleges", true);

        response.setContentType("text/html; charset=utf-8");
		try {
			FreemarkerConvert.WriteToStream("fun_user_mgt_add.html", dataMap, response.getOutputStream());
		} catch (IOException e) {
			// TODO Auto-generated catch block
			e.printStackTrace();
		}
	}
用到的一个外部变量GlobalConfig.mMapPriviliges:
public static final String[] mMapPriviliges = {
			"1", "超级管理员",
			"100", "密钥超级管理A",
			"101", "密钥超级管理B",
			"1000", "密钥管理A",
			"1001", "密钥管理B",
			"1002", "银联认证测试验证",
			"1003", "银联认证测试验证管理",
			"1100", "悦泰管理员",
			"1101", "悦泰经销商",
			"1102", "悦泰工厂拆单员",
			"1103", "悦泰安装师傅",
			"1104", "悦泰售后师傅",
			"1105", "悦泰生产工人",
			"1106", "悦泰用户",
			"1200", "远程文件系统管理",
			"1201", "远程文件系统"};
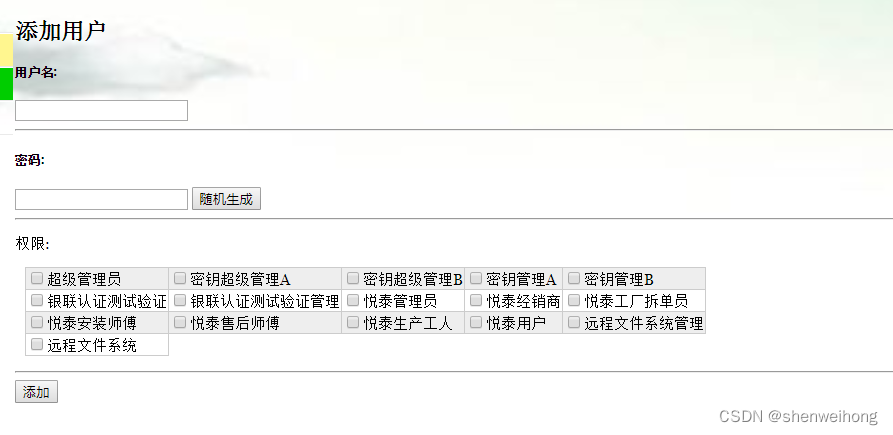
html显示
这是整个页面某一个局部(其他如导航栏,用户信息栏),所以没有标签html、head、body
<h2>添加用户</h2>
<h5>用户名:</h5>
<input id="idInputUserName"></input>
<hr>
<h5>密码:</h5>
<input id="idInputPassword"></input>
<button id="idAddUserGenPassword" onclick="UserManagementAddUserGenPassword()">随机生成</button>
<hr>
<#if show_privilleges>
<p><span class="span_account_label">权限:</span></p>
<p id="idAllUserPrivileges">
<#assign list_cnt=0>
<table class="clTableManageUserPrivillages" id="idTableManageUserPrivillages">
<#list list_privilleges as privilleges>
    <#if (list_cnt % 5)==0>
        <tr>
    </#if>
        <td style="vertical-align:middle; text-align:left;cursor:default;">
            <input type="checkbox" value="${privilleges}" unchecked>${privilleges}</input><span></span>
        </td>
    <#assign list_cnt=list_cnt+1>
    <#if (list_cnt % 5)==0>
        </tr>
    </#if>
</#list>
<#if (list_cnt % 5)!=0>
</tr>
</#if>
</table>
</p>
<hr>
</#if>
<#if show_privilleges>
<button id="idAddUser" onclick="UserManagementAddUser(1)">添加</button>
<#else>
<button id="idAddUser" onclick="UserManagementAddUser(0)">添加</button>
</#if>
<p id="idStShow" style="font-size:16px;color:blue;display:none"></p>
测试界面效果
