📝 学技术、更要掌握学习的方法,一起学习,让进步发生
👩🏻 作者:一只IT攻城狮 ,关注我,不迷路 。
💐学习建议:1、养成习惯,学习java的任何一个技术,都可以先去官网先看看,更准确、更专业。
💐学习建议:2、然后记住每个技术最关键的特性(通常一句话或者几个字),从主线入手,由浅入深学习。
❤️ 《SpringCloud入门实战系列》解锁SpringCloud主流组件入门应用及关键特性。带你了解SpringCloud主流组件,是如何一战解决微服务诸多难题的。
👉🏻 👉🏻 👉🏻 SpringCloud 入门实战系列不迷路 👈🏻 👈🏻👈🏻:
- SpringCloud 入门实战(一)什么是SpringCloud?
- SpringCloud 入门实战(二)-SpringCloud项目搭建
- SpringCloud 入门实战(三)-Eureka注册中心集成
- SpringCloud入门 实战(四)-Zookeeper、Consul注册中心集成
- SpringCloud入门实战(五)-Ribbon负载均衡集成
- SpringCloud入门实战(六)-OpenFeign服务调用集成
- SpringCloud入门实战(七)-Hystrix入门简介
- SpringCloud入门实战(七)-Hystrix服务降级
- SpringCloud入门实战(七)-Hystrix服务熔断
- SpringCloud入门实战(七)-Hystrix服务限流
- SpringCloud入门实战(七)-Hystrix Dashboard图形化监控
- SpringCloud入门实战(八)-Gateway服务网关集成
- SpringCloud入门实战(九)- Config配置中心

文章目录
- 一、SpringCloud Confg简介
- 1、SpringCloud Confg是什么?
- 2、为什么需要配置中心?
- 3、常见的配置有什么?
- 二、Config的作用
- 三、Config的核心
- 四、SpringCloud Config服务端配置
- 1、新建远程仓库
- 2、新建服务端应用
- 3、pom中添加Config服务端依赖:
- 4、配置文件application.yml
- 5、主启动类添加注解@EnableConfigServer
- 6、测试
- 五、SpringCloud Config客户端配置
- 1、新建客户端应用
- 2、pom文件添加client依赖
- 3、bootstrap.yml文件
- 4、启动类
- 5、对外接口
- 6、测试
- 六、分布式配置中心动态刷新
一、SpringCloud Confg简介
1、SpringCloud Confg是什么?
SpringCloud Confg官网中如下描述:
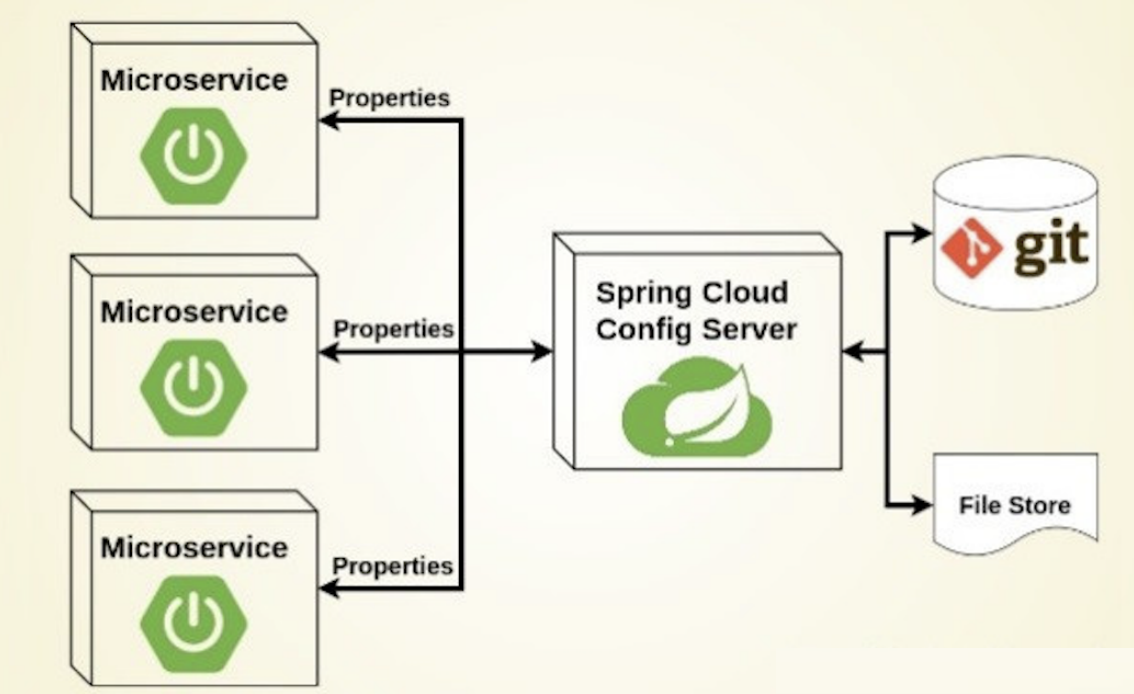
Spring Cloud Config为分布式系统中的外部化配置提供服务器端和客户端支持。使用Config Server,您可以在中心位置管理所有环境中应用程序的外部属性。客户端和服务器上的概念与Spring Environment和PropertySource抽象,因此它们非常适合Spring应用程序,但可以与以任何语言运行的任何应用程序一起使用。在应用程序从开发人员到测试人员再到生产人员的整个部署过程中,您可以管理这些环境之间的配置,并确保应用程序具有它们迁移时所需的一切。服务器存储后端的默认实现使用git,因此它可以轻松支持配置环境的标记版本,并且可以通过各种工具来访问这些内容来管理内容。添加替代实现并将其插入Spring配置很容易。
SpringCloud Confg中文手册
2、为什么需要配置中心?
微服务意味着要将单体应用中的业务拆分成一个个子服务,每个服务的粒度相对较小,因此系统中会出现大量的服务。由于每个服务都需要必要的配置信息才能运行,所以也面临了一些问题:
- 随着微服务工程的越来越多,每个工程都有一套配置文件,系统膨胀;
- 如果每个项目都有公共的比如数据库链接信息,没有统一的管理,想要修改则需要每个工程都要修改;
- 我们通常有很多系统环境:如prod(生产环境)、test(测试环境)、dev(预发布环境)
…
所以一套集中式的、动态的配置管理设施是必不可少的。
3、常见的配置有什么?
目前使用较多的三套配置:
- Config+Bus
- Nacos(后起之秀)
- 携程阿波罗(Apollo)
二、Config的作用
- 集中管理配置文件
- 不同环境不同配置,动态化的配置更新,分环境部署比如dev/test/prod/beta/release
- 运行期间动态调整配置,不再需要在每个服务部署的机器上编写配置文件,服务会向配置中心统一拉取配置自己的信息
- 当配置发生变动时,服务不需更重启即可感知到配置的变化,并应用新的配置
- 将配置信息以REST接口的形式暴露
三、Config的核心
SpringCloud Config分为服务端和客户端两部分。
服务端也称为分布式配置中心,它是一个独立的微服务应用,用来连接配置服务器并为客户端提供获取配置信息,加密/解密信息等访问接口。服务器为外部配置(名称值对或等效的YAML内容)提供了基于资源的HTTP。
定位资源的默认策略:Spring Cloud Config服务器从git存储库(必须提供)为远程客户端提供配置,例:
spring:
  cloud:
    config:
      server:
        git:
          uri: https://github.com/spring-cloud-samples/config-repo
HTTP服务具有以下格式的资源,也就是配置读取规则(url路径):
/{application}/{profile}[/{label}]
/{application}-{profile}.yml
/{label}/{application}-{profile}.yml
/{application}-{profile}.properties
/{label}/{application}-{profile}.properties
可见资源由三个变量参数化:
label: 分支(branch),是可选的git标签(默认为“master”)
name/application: 服务名
profiles:环境(dev/test/prod)
读取配置文件信息返回的是 json格式。不存在的配置访问结果为{} 空。
由于SpringCloud Config默认使用Git来存储配置文件(也有其他方式,比如SVN和本地文件),但最推荐使用的还是Git,而且使用的是http/https访问的形式。这样就有助于对环境配置进行版本管理,并且可以通过git客户端工具来方便的管理和访问配置内容。
客户端则是通过指定的配置中心来管理应用资源,以及与业务相关的配置内容,并在启动的时候从配置中心获取和加载配置信息。
四、SpringCloud Config服务端配置
1、新建远程仓库
远程仓库随便添加个配置文件测试

2、新建服务端应用

3、pom中添加Config服务端依赖:
   <dependency>
            <groupId>org.springframework.cloud</groupId>
            <artifactId>spring-cloud-config-server</artifactId>
  </dependency>
完整pom.xml
 <dependencies>
        <dependency>
            <groupId>org.springframework.cloud</groupId>
            <artifactId>spring-cloud-config-server</artifactId>
        </dependency>
        <dependency>
            <groupId>org.springframework.boot</groupId>
            <artifactId>spring-boot-starter-web</artifactId>
        </dependency>
        <dependency>
            <groupId>org.springframework.boot</groupId>
            <artifactId>spring-boot-starter-actuator</artifactId>
        </dependency>
        <dependency>
            <groupId>org.springframework.cloud</groupId>
            <artifactId>spring-cloud-starter-openfeign</artifactId>
            <version>3.1.3</version>
        </dependency>
        <dependency>
            <groupId>org.springframework.cloud</groupId>
            <artifactId>spring-cloud-starter-netflix-eureka-client</artifactId>
            <version>3.1.2</version>
        </dependency>

        <dependency>
            <groupId>org.projectlombok</groupId>
            <artifactId>lombok</artifactId>
        </dependency>
        <!--junit-->
        <dependency>
            <groupId>junit</groupId>
            <artifactId>junit</artifactId>
        </dependency>
        <!-- log4j -->
        <dependency>
            <groupId>log4j</groupId>
            <artifactId>log4j</artifactId>
        </dependency>
        <!-- devtools热部署 -->
        <dependency>
            <groupId>org.springframework.boot</groupId>
            <artifactId>spring-boot-devtools</artifactId>
            <scope>runtime</scope>
            <optional>true</optional>
        </dependency>
    </dependencies>
4、配置文件application.yml
server:
  port: 1234
spring:
  application:
    name: cloud-config #微服务应用的名字
  cloud:
    config:
      server:
        git:
          uri: https://gitlab.com/springcloud5521407/springcloud-config.git # git 码云的仓库地址
          search-paths:
            - config  # 搜索目录
      label: main  # 读取分支
eureka:
  client:
    service-url:
      defaultZone: http://localhost:7001/eureka
5、主启动类添加注解@EnableConfigServer
@SpringBootApplication(exclude = {DataSourceAutoConfiguration.class})
@EnableConfigServer
public class ConfigServerApplication {
    public static void main(String[] args) {
        SpringApplication.run(ConfigServerApplication.class,args);
    }
}
6、测试
启动注册中心和cloud-config微服务。
访问:http://localhost:1234/main/config-dev.yml输出了github配置文件内容

Config服务端已经成功访问远程github上内容。
五、SpringCloud Config客户端配置
1、新建客户端应用

2、pom文件添加client依赖
 <dependency>
        <groupId>org.springframework.cloud</groupId>
        <artifactId>spring-cloud-config-client</artifactId>
 </dependency>
3、bootstrap.yml文件
applicaiton.yml是用户级的资源配置项,bootstrap.yml是系统级的,优先级更加高
要将Client模块下的application.yml文件改为bootstrap.yml,这是很关键的。因为bootstrap.yml是比application.yml先加载的。
Spring Cloud会创建一个“Bootstrap Context”,作为Spring应用的Application Context的父上下文。初始化的时候,Bootstrap Context负责从外部源加载配置属性并解析配置。这两个上下文共享一个从外部获取的’Environment’。
Bootstrap属性有高优先级,默认情况下,它们不会被本地配置覆盖。Bootstarp context 和 Application Context 有着不同的约定,所以新增了一个bootstrap.yml文件,保证Bootstrap Context和Application Context配置的分离。
bootstrap.yml:
server:
  port: 1235
spring:
  application:
    name: cloud-config-client
  cloud:
    ## config 客户端配置
    config:
      ## 分支名称
      label: main
      ## 配置文件名称前部分
      name: config
      ## 配置文件名称后部分
      profile: dev
      ## 配置中心地址
      uri: http://localhost:1234

eureka:
  client:
    service-url:
      defaultZone: http://localhost:7001/eureka
4、启动类
@SpringBootApplication
@EnableEurekaClient
 public class ConfigClientApplication {
     public static void main(String[] args) {
         SpringApplication.run(ConfigClientApplication.class, args);
}
5、对外接口
 @RestController
 public class ConfigClientController {
     @Value("${config.info}")
     String configInfo;

     @GetMapping("configInfo")
     public String getConfigInfo() {
         return configInfo;
    }
 }
6、测试
如果启动报错:
14:57:15.781 [restartedMain] DEBUG org.springframework.boot.diagnostics.LoggingFailureAnalysisReporter - Application failed to start due to an exception
org.springframework.cloud.commons.ConfigDataMissingEnvironmentPostProcessor$ImportException: No spring.config.import set
	at org.springframework.cloud.commons.ConfigDataMissingEnvironmentPostProcessor.postProcessEnvironment(ConfigDataMissingEnvironmentPostProcessor.java:82)
	at org.springframework.boot.env.EnvironmentPostProcessorApplicationListener.onApplicationEnvironmentPreparedEvent(EnvironmentPostProcessorApplicationListener.java:102)
	at org.springframework.boot.env.EnvironmentPostProcessorApplicationListener.onApplicationEvent(EnvironmentPostProcessorApplicationListener.java:87)
则是因为Spring Cloud 新版本默认将 Bootstrap 禁用,需要将 spring-cloud-starter-bootstrap 依赖引入到工程中:
<dependency>
    <groupId>org.springframework.cloud</groupId>
    <artifactId>spring-cloud-starter-bootstrap</artifactId>
</dependency>
访问:http://localhost:1235/configInfo

六、分布式配置中心动态刷新
修改远程配置仓库中的配置,那config的服务端和客户端会立刻获得更新的内容吗?
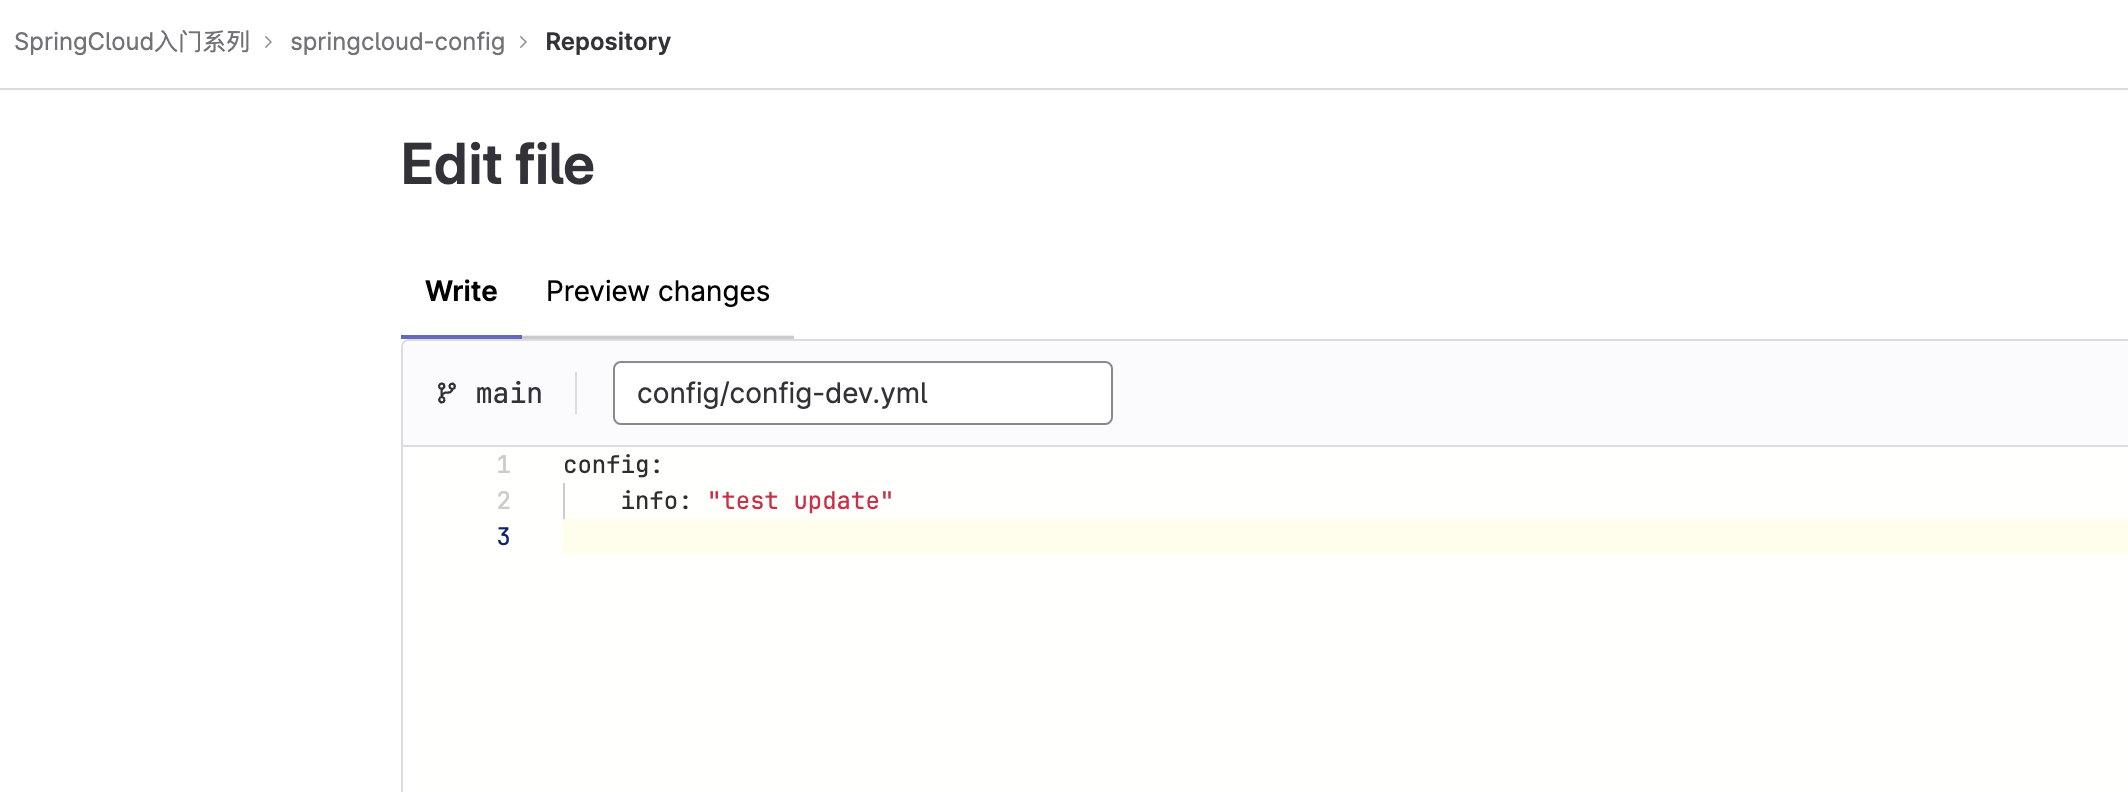
修改github内容,再次访问,查看是否读取到最新修改内容:
http://localhost:1234/main/config-dev.yml -->能(ConfigServer配置中心立刻响应)
http://localhost:1235/configInfo -->不能(ConfigClient客户端没有任何响应)–>需要重启或者重新加载
那如何能够修改配置,客户端不需要重启呢?
常用的配置刷新手段:
1.重启用户服务(不建议)
2.加入依赖 actuator,提供一个刷新配置的接口,通过POST请求进行动态更新
3.使用rabbitmq进行集群更新
我们这里先讲一下第二种手动刷新的方式:
1、确定是否有actuator依赖:
  <dependency>
      <groupId>org.springframework.boot</groupId>
      <artifactId>spring-boot-starter-actuator</artifactId>
  </dependency>
2、Controller类添加注解@RefreshScope
@RestController
@RefreshScope
public class ConfigClientController {
    @Value("${config.info}")
    String configInfo;

    @GetMapping("configInfo")
    public String getConfigInfo() {
        return configInfo;
    }
}
3、bootstrap.yml添加暴露监控断点配置
server:
  port: 1235
spring:
  application:
    name: cloud-config-client
  cloud:
    ## config 客户端配置
    config:
      ## 分支名称
      label: main
      ## 配置文件名称前部分
      name: config
      ## 配置文件名称后部分
      profile: dev
      ## 配置中心地址
      uri: http://localhost:1234

## 暴露监控断点
management:
  endpoints:
    web:
      exposure:
        include: "*"
  endpoint:
    health:
      show-details: always

eureka:
  client:
    service-url:
      defaultZone: http://localhost:7001/eureka
4、测试
执行一下: curl -X POST "http://localhost:1235/actuator/refresh"手动刷新一下

再去访问ConfigClient客户端: http://localhost:1235/configInfo 结果已经刷新。

每一次手动刷新太麻烦,那怎么动态刷新呢?结合消息总线bus下一次详细介绍。


