文章目录
- 前言
- 主启动类的配置
- 1、@SpringBootApplication注解
- 1.1、@SpringBootConfiguration注解
- 验证启动类是否被注入到spring容器中
- 1.2、@ComponentScan 注解
- @ComponentScan 注解解析与路径扫描
- 1.3、@EnableAutoConfiguration注解
- 1.3.1、@AutoConfigurationPackage注解
- 1.3.2、@Import(AutoConfigurationImportSelector.class)
- 问题解答
- 1.@AutoConfigurationPackage和@ComponentScan的作用是否冲突
- 起因
- 回答
- 2.为什么能实现自动加载
- 起因
- 回答
前言
本文主要讲解@SpringBootApplication注解使用和原理。
源码基于spring-boot-2.2.13.RELEASE进行讲解
主要是弄懂以下几个问题:
1.@SpringBootApplication注解主要做了什么事?
2.为什么能实现自动加载
3.SpringBoot怎么知道哪些java类应该当作Bean被注入到IOC容器中?
4.springboot默认扫描启动类同包及子包下面的组件,原理是什么?
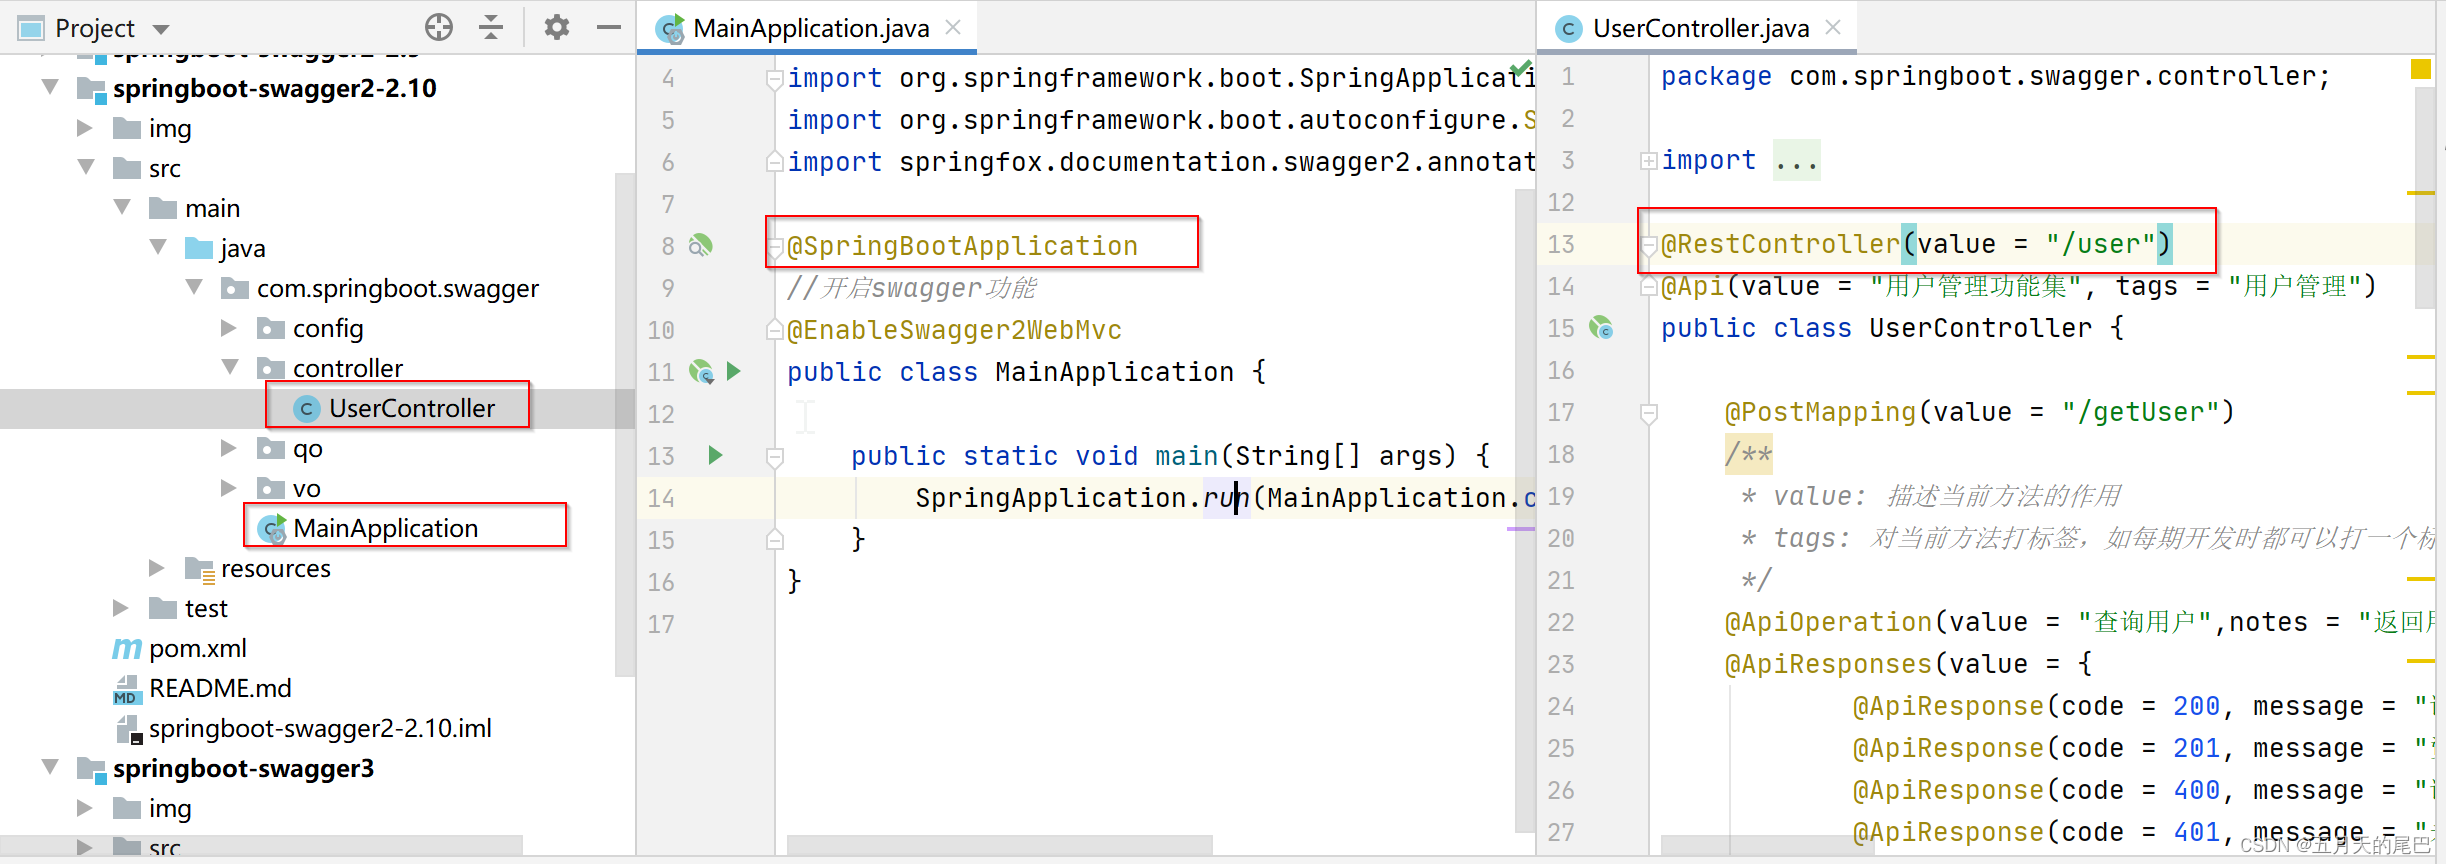
如图:为什么springboot能自动注入service, controller等注解到IOC容器中
主启动类的配置
package com.example.demo;

import org.springframework.boot.SpringApplication;
import org.springframework.boot.autoconfigure.SpringBootApplication;
import org.springframework.boot.autoconfigure.jdbc.DataSourceAutoConfiguration;
import org.springframework.context.ConfigurableApplicationContext;
import org.springframework.stereotype.Component;

//@SpringBootApplication 来标注一个主程序类
//说明这是一个Spring Boot应用
@SpringBootApplication
public class SpringbootApplication {
   public static void main(String[] args) {
     //以为是启动了一个方法,实际是启动了一个服务
      SpringApplication.run(SpringbootApplication.class, args);
   }
}
1、@SpringBootApplication注解
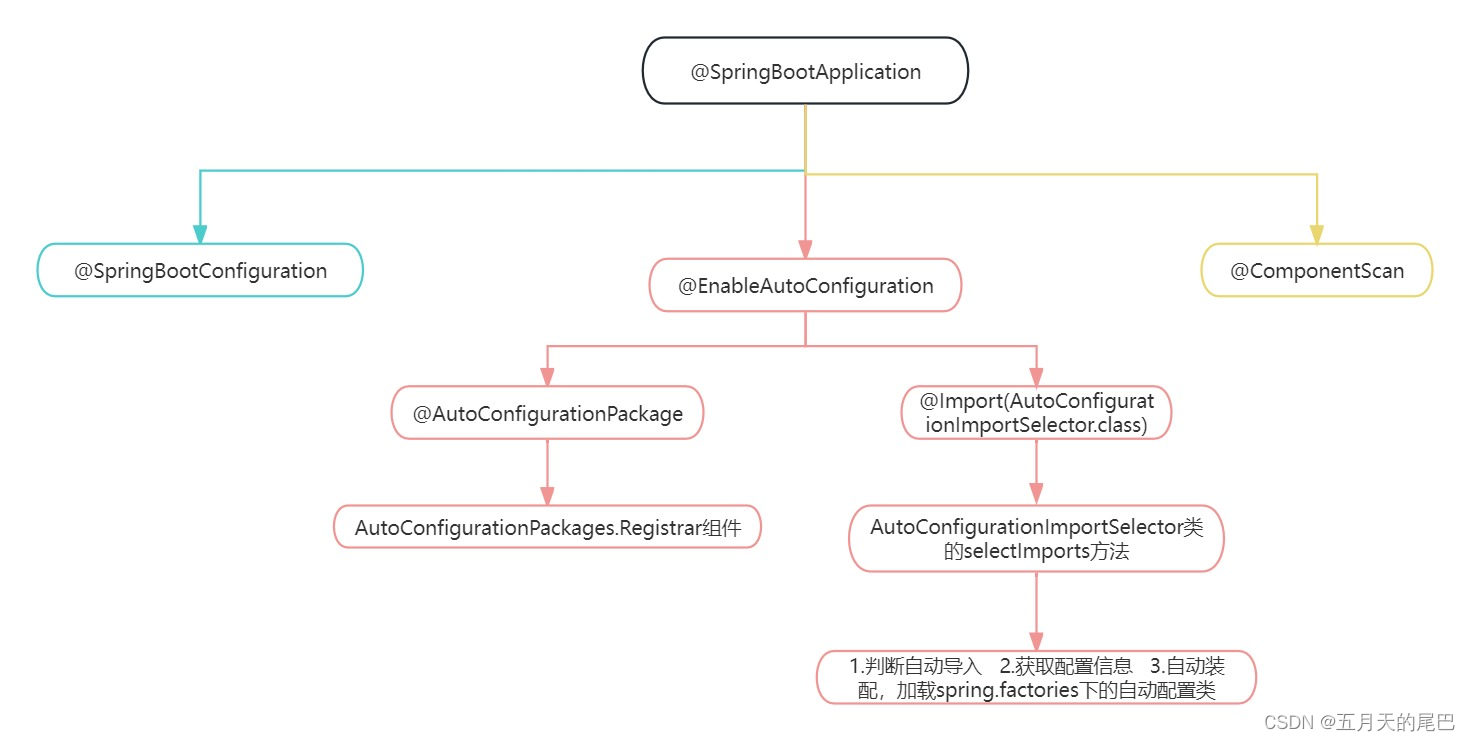
@SpringBootApplication内部的组成结构,如下图:
@Target(ElementType.TYPE)
@Retention(RetentionPolicy.RUNTIME)
@Documented
@Inherited
@SpringBootConfiguration
@EnableAutoConfiguration
@ComponentScan(excludeFilters = { @Filter(type = FilterType.CUSTOM, classes = TypeExcludeFilter.class),
		@Filter(type = FilterType.CUSTOM, classes = AutoConfigurationExcludeFilter.class) })
public @interface SpringBootApplication {
    ..........
}
@SpringBootApplication注解是Spring Boot的核心注解,它其实是一个组合注解主要是由@SpringBootConfiguration、@EnableAutoConfiguration、@ComponentScan三个注解合并而成。
@SpringBootConfiguration:
内部结构是@Configuration注解,标明当前类是一个配置类,项目启动时该类会被加载到spring容器中
@EnableAutoConfiguration
开启自动配置功能,实现自动装配的核心注解,内部包含两个注解:@AutoConfigurationPackage + @Import(AutoConfigurationImportSelector.class)。
@AutoConfigurationPackage:将主程序类所在包及所有子包下的组件到扫描到spring容器中。这里的组件主要是@Enitity、@Mapper等第三方依赖的注解
@Import(AutoConfigurationImportSelector.class):在该类中加载 META-INF/spring.factories 的配置信息。然后筛选出以 EnableAutoConfiguration 为 key 的数据,加载到 IOC 容器中,实现自动配置功能!
@ComponentScan
默认扫描@ComponentScan注解所在包及子包中标注了@Component注解的类以及衍生注解标注的类(如 @Repository or @Service or @Controller等等)
1.1、@SpringBootConfiguration注解
点进@SpringBootConfiguration内部,看其内部结构:
@Target(ElementType.TYPE)
@Retention(RetentionPolicy.RUNTIME)
@Documented
@Configuration
// 相当于@SpringBootConfiguration就是@Configuration
public @interface SpringBootConfiguration {
}
@Configuration是Spring的一个注解,标明该类为配置类,其修饰的类会加入Spring容器。这就说明SpringBoot的启动类会加入Spring容器。
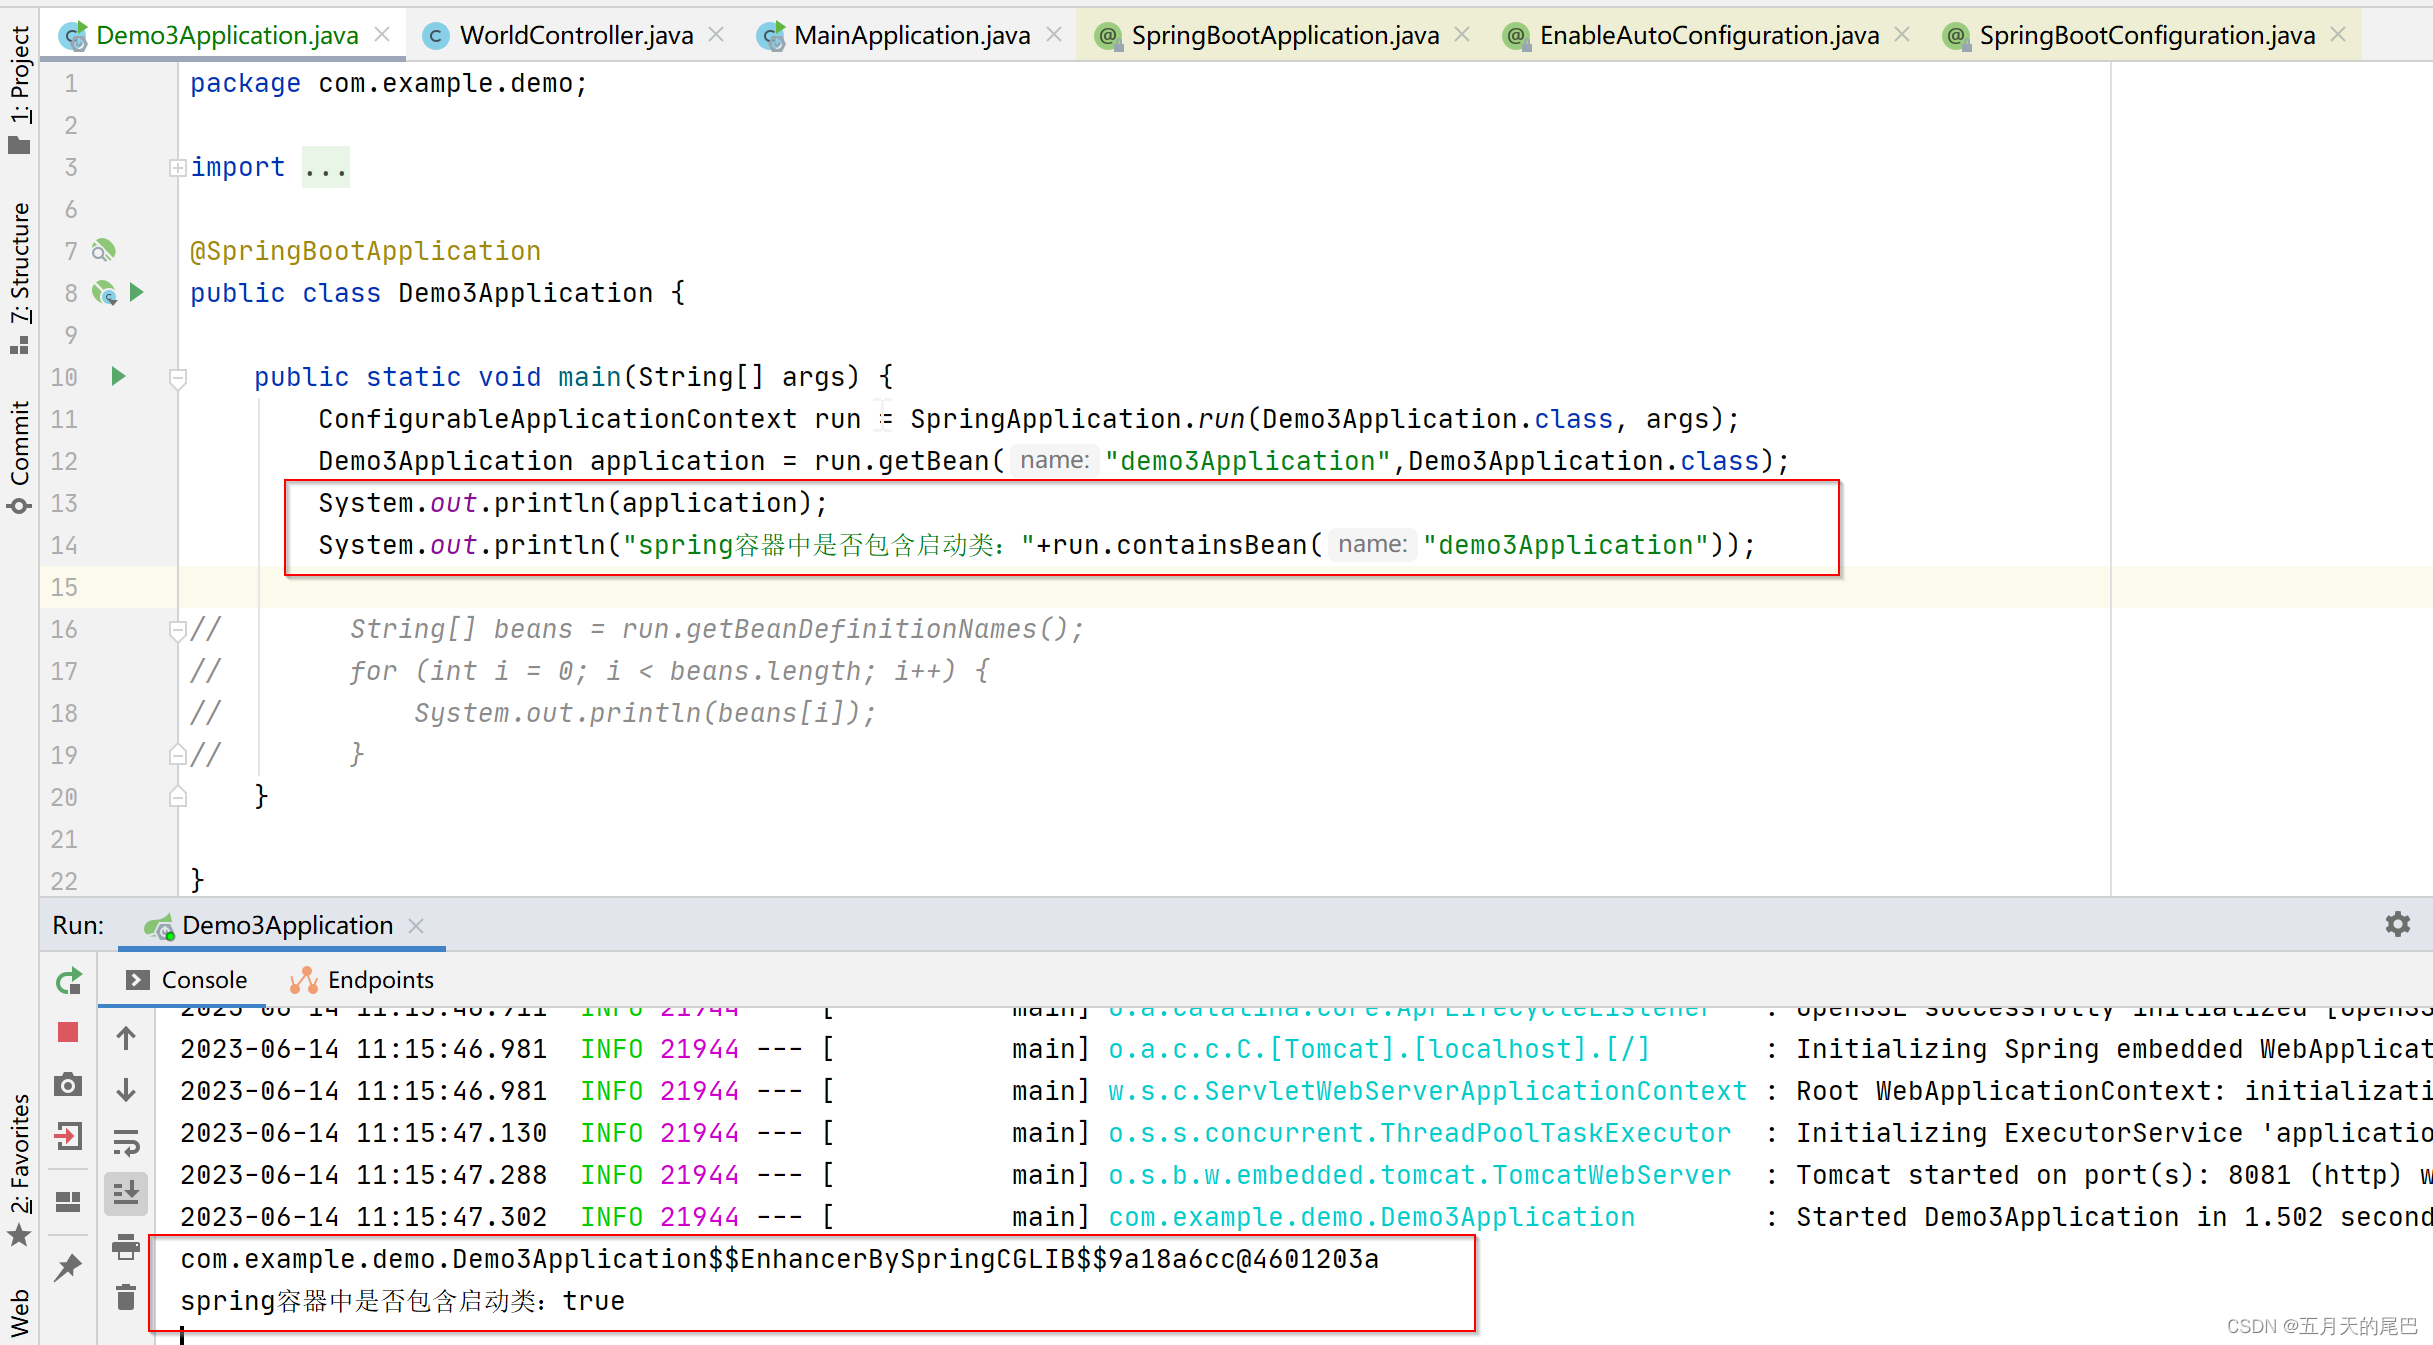
验证启动类是否被注入到spring容器中
@SpringBootApplication
public class Demo3Application {

    public static void main(String[] args) {
        ConfigurableApplicationContext run = SpringApplication.run(Demo3Application.class, args);
        Demo3Application application = run.getBean("demo3Application",Demo3Application.class);
        System.out.println(application);
        System.out.println("spring容器中是否包含启动类:"+run.containsBean("demo3Application"));
    }

}
可以看到以下执行结果中,确实将启动类加载到spring容器中了
1.2、@ComponentScan 注解
用于定义 Spring 的扫描路径,等价于在 xml 文件中配置 context:component-scan,假如不配置扫描路径,那么 Spring 就会默认扫描当前类所在的包及其子包中的所有标注了 @Component,@Service,@Controller 等注解的类。
@Retention(RetentionPolicy.RUNTIME)
@Target(ElementType.TYPE)
@Documented
@Repeatable(ComponentScans.class)//可重复注解
public @interface ComponentScan {

   @AliasFor("basePackages")
   String[] value() default {};//基础包名,等同于basePackages

   @AliasFor("value")
   String[] basePackages() default {};//要扫描的路径,如果为空,解析的时候会解析被@ComponentScan标注类的包路径

   Class<?>[] basePackageClasses() default {};//扫描的类,会扫描该类所在包及其子包的组件。与basePackages互斥

   Class<? extends BeanNameGenerator> nameGenerator() default BeanNameGenerator.class;//注册为BeanName生成策略 默认BeanNameGenerator,用于给扫描到的Bean生成BeanName,在解析注册BeanDefinition的时候用到

   Class<? extends ScopeMetadataResolver> scopeResolver() default AnnotationScopeMetadataResolver.class;//用于解析bean的scope的属性的解析器,默认是AnnotationScopeMetadataResolver,类定义上的@Scope注解解析器,如果没有该注解默认单例

   ScopedProxyMode scopedProxy() default ScopedProxyMode.DEFAULT;//scoped-proxy 用来配置代理方式 // no(默认值):如果有接口就使用JDK代理,如果没有接口就使用CGLib代理 interfaces: 接口代理(JDK代理) targetClass:类代理(CGLib代理)

   String resourcePattern() default ClassPathScanningCandidateComponentProvider.DEFAULT_RESOURCE_PATTERN;//配置要扫描的资源的正则表达式的,默认是"**/*.class",即配置类包下的所有class文件。

   boolean useDefaultFilters() default true;//useDefaultFilters默认是true,扫描@Component标注的类以及衍生注解标注的类(如@Component or @Repository or @Service or @Controller等等),如果为false则不扫描,需要自己指定includeFilters

   Filter[] includeFilters() default {};//自定义包含过滤器,如果@Component扫描不到或者不能满足,则可以使用自定义扫描过滤器

   Filter[] excludeFilters() default {};//自定义排除过滤器,和includeFilters作用相反

   boolean lazyInit() default false;//是否是懒加载

   @Retention(RetentionPolicy.RUNTIME)
   @Target({})
   @interface Filter {//过滤器注解

      FilterType type() default FilterType.ANNOTATION;//过滤判断类型

      @AliasFor("classes")
      Class<?>[] value() default {};//要过滤的类,等同于classes

      @AliasFor("value")
      Class<?>[] classes() default {};//要过滤的类,等同于value

      String[] pattern() default {};// 正则化匹配过滤

   }

}
@ComponentScan 注解解析与路径扫描
@ComponentScan注解的解析依旧在SpringApplication调用AbstractApplicationContext#refresh的时候触发调用ConfigurationClassPostProcessor#postProcessBeanDefinitionRegistry,然后通过ConfigurationClassParser#parse解析,委托给doProcessConfigurationClass方法处理:
具体原理可参考《@ComponentScan注解使用和原理》
1.3、@EnableAutoConfiguration注解
@EnableAutoConfiguration自动配置的关键,内部实际上就去加载 META-INF/spring.factories 文件的信息,然后筛选出以 EnableAutoConfiguration 为key的数据,加载到IOC容器中,实现自动配置功能
查看其内部结构
@Target(ElementType.TYPE)
@Retention(RetentionPolicy.RUNTIME)
@Documented
@Inherited
// 自动配置包
@AutoConfigurationPackage
// 使用@Import注解导入AutoConfigurationImportSelector类,实现了ImportSelector接口,重写了selectImports()方法,帮助我们返回所有需要被注册为bean的类全限定类名的数组集合
@Import(AutoConfigurationImportSelector.class)
public @interface EnableAutoConfiguration {

	String ENABLED_OVERRIDE_PROPERTY = "spring.boot.enableautoconfiguration";

	/**
	 * Exclude specific auto-configuration classes such that they will never be applied.
	 * @return the classes to exclude
	 */
	Class<?>[] exclude() default {};

	/**
	 * Exclude specific auto-configuration class names such that they will never be
	 * applied.
	 * @return the class names to exclude
	 * @since 1.3.0
	 */
	String[] excludeName() default {};

}
重点看@AutoConfigurationPackage注解和@Import(AutoConfigurationImportSelector.class)注解。
1.3.1、@AutoConfigurationPackage注解
@AutoConfigurationPackage作用:
将主程序类所在包及所有子包下的组件到扫描到spring容器中。这里的组件主要是@Enitity、@Mapper等第三方依赖的注解
@Target(ElementType.TYPE)
@Retention(RetentionPolicy.RUNTIME)
@Documented
@Inherited
@Import(AutoConfigurationPackages.Registrar.class)
public @interface AutoConfigurationPackage {

}
看其@Import进来的类AutoConfigurationPackages.Registrar类:
这是一个内部类,源码如下:
static class Registrar implements ImportBeanDefinitionRegistrar, DeterminableImports {

    // 注册bean定义
	@Override
	public void registerBeanDefinitions(AnnotationMetadata metadata, BeanDefinitionRegistry registry) {
		register(registry, new PackageImports(metadata).getPackageNames().toArray(new String[0]));
	}

   // 返回一组需要注入的对象
	@Override
	public Set<Object> determineImports(AnnotationMetadata metadata) {
		return Collections.singleton(new PackageImports(metadata));
	}
}

public static void register(BeanDefinitionRegistry registry, String... packageNames) {
    //如果这个bean已经注册了,就获取构造函数参数值,并add包名
    if (registry.containsBeanDefinition(BEAN)) {
        BeanDefinition beanDefinition = registry.getBeanDefinition(BEAN);
        ConstructorArgumentValues constructorArguments = beanDefinition
                .getConstructorArgumentValues();
        constructorArguments.addIndexedArgumentValue(0,
                addBasePackages(constructorArguments, packageNames));
    }
    //如果没有注册,就创建一个新的bean定义并注册
    else {
        GenericBeanDefinition beanDefinition = new GenericBeanDefinition();
        beanDefinition.setBeanClass(BasePackages.class);
        beanDefinition.getConstructorArgumentValues().addIndexedArgumentValue(0,
                packageNames);
        beanDefinition.setRole(BeanDefinition.ROLE_INFRASTRUCTURE);
        registry.registerBeanDefinition(BEAN, beanDefinition);
    }
}
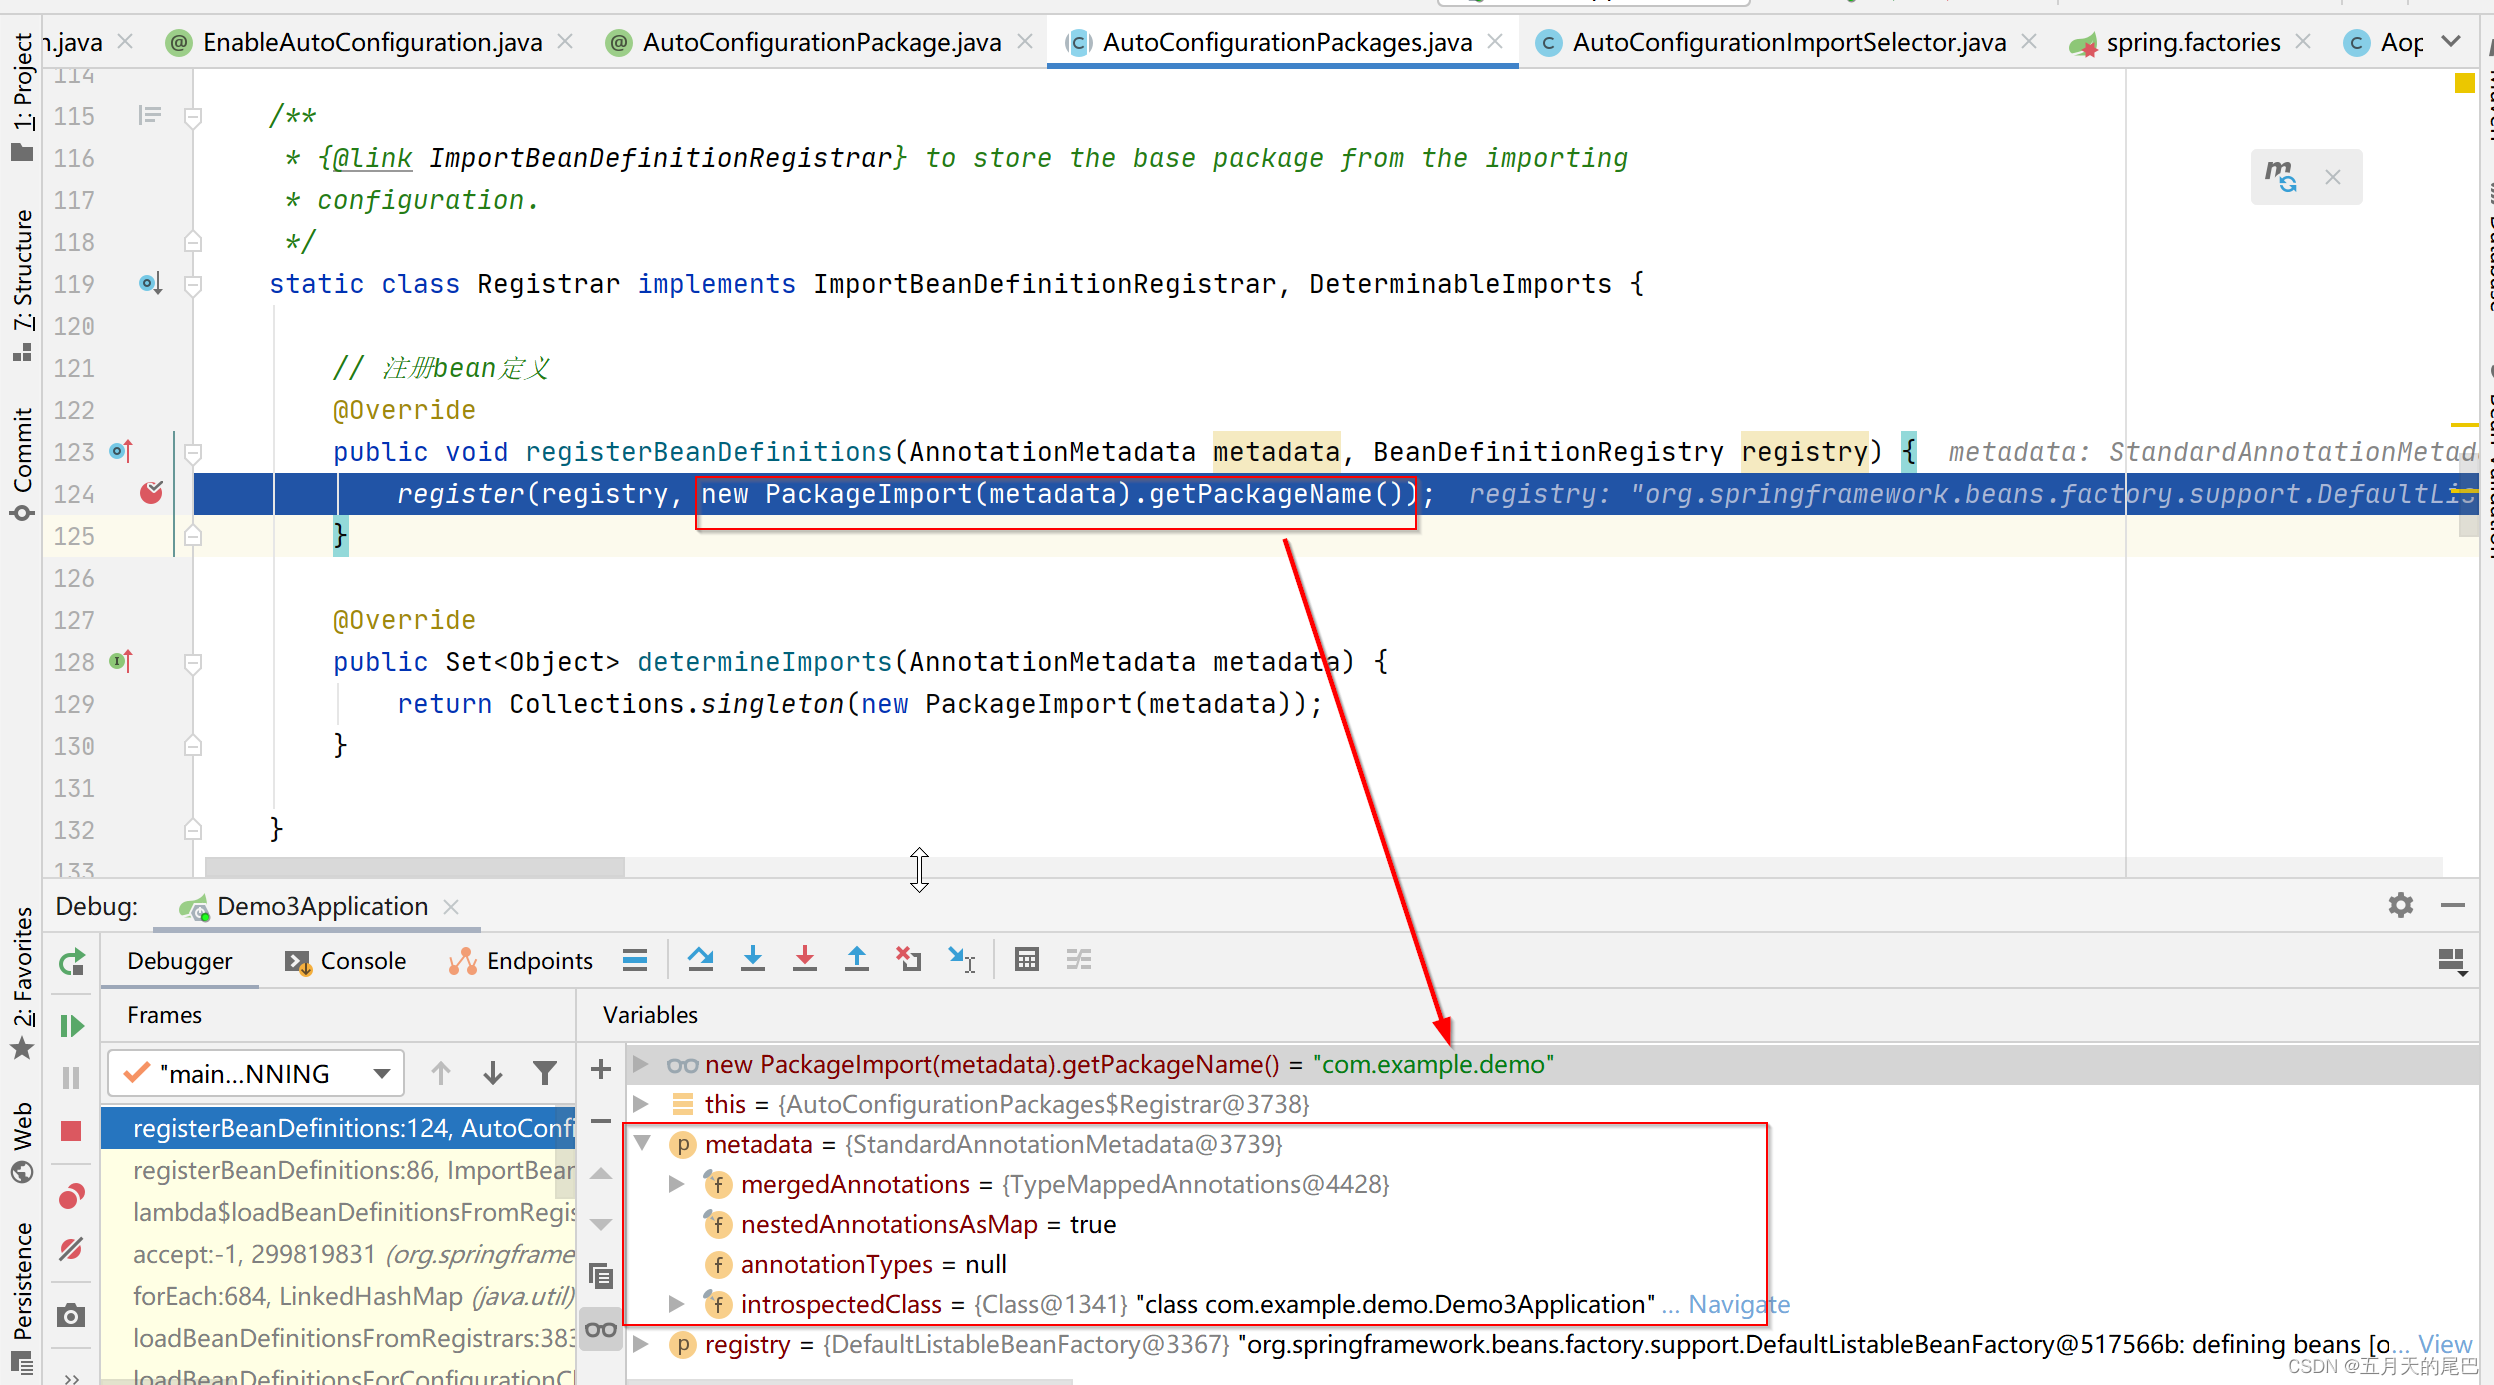
通过debug发现@AutoConfigurationPackage其实就是把主启动类的包名传进来,然后将主启动类同包及子包下的组件注册到容器中。
1.3.2、@Import(AutoConfigurationImportSelector.class)
@EnableAutoConfiguration注解通过@Import(AutoConfigurationImportSelector.class)向容器中导入了AutoConfigurationImportSelector组件,它实现了DeferredImportSelector,并间接实现了ImportSelector接口,重写了selectImports()方法,帮助我们返回所有需要被注册为bean的类全限定类名的数组集合。
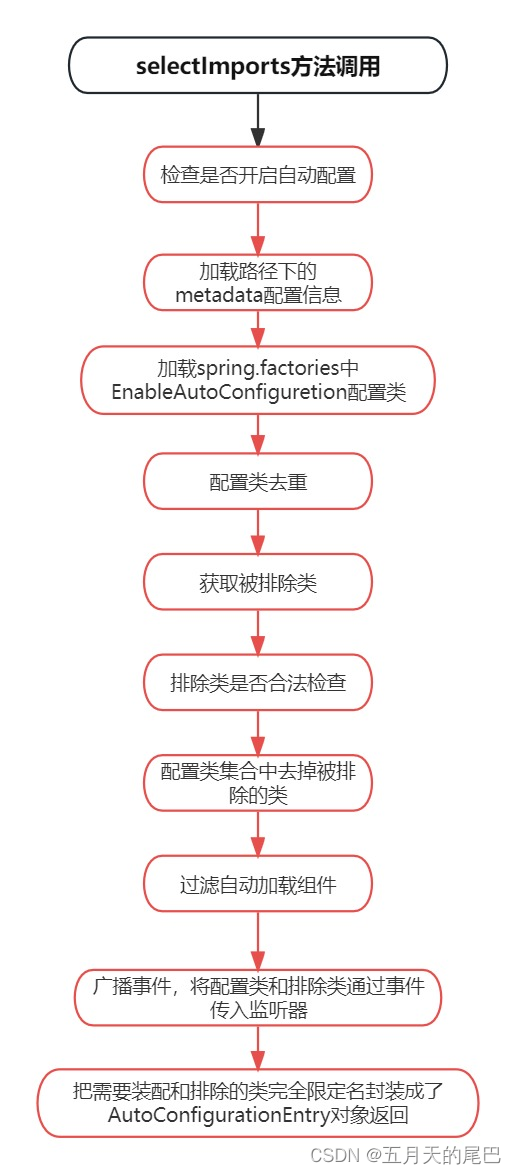
EnableAutoConfigurationImportSelector: 导入哪些组件的选择器,将所有需要导入的组件以全类名的方式返回,这些组件就会被添加到容器中。
public class AutoConfigurationImportSelector implements DeferredImportSelector, BeanClassLoaderAware,
		ResourceLoaderAware, BeanFactoryAware, EnvironmentAware, Ordered {
	//......省略其他代码

	/**
	 * 返回一个Class全路径的String数组,返回的Class被容器管理
	 *
	 */
	@Override
	public String[] selectImports(AnnotationMetadata annotationMetadata) {
		//①判断是否需要导入
		if (!isEnabled(annotationMetadata)) {
			return NO_IMPORTS;
		}
		//②获取metadata配置信息
		AutoConfigurationMetadata autoConfigurationMetadata = AutoConfigurationMetadataLoader
				.loadMetadata(this.beanClassLoader);
		//③自动装配
		AutoConfigurationEntry autoConfigurationEntry = getAutoConfigurationEntry(autoConfigurationMetadata,
				annotationMetadata);
		return StringUtils.toStringArray(autoConfigurationEntry.getConfigurations());
	}
//......
}

   /**
	 * ①判断自动配置是否开启
	 * 可以通过在配置文件中修改spring.boot.enableautoconfiguration为false来关闭自动配置。
	 */
	protected boolean isEnabled(AnnotationMetadata metadata) {
		if (getClass() == AutoConfigurationImportSelector.class) {
			return getEnvironment().getProperty(EnableAutoConfiguration.ENABLED_OVERRIDE_PROPERTY, Boolean.class, true);
		}
		return true;
	}

    /**
	 * ②加载metadata配置信息
	 * 返回AutoConfigurationMetadata给第③步
	 */
	static AutoConfigurationMetadata loadMetadata(ClassLoader classLoader) {
		return loadMetadata(classLoader, PATH);
	}

	static AutoConfigurationMetadata loadMetadata(ClassLoader classLoader, String path) {
		try {
			Enumeration<URL> urls = (classLoader != null) ? classLoader.getResources(path)
					: ClassLoader.getSystemResources(path);
			Properties properties = new Properties();
			while (urls.hasMoreElements()) {
				properties.putAll(PropertiesLoaderUtils.loadProperties(new UrlResource(urls.nextElement())));
			}
			return loadMetadata(properties);
		}
		catch (IOException ex) {
			throw new IllegalArgumentException("Unable to load @ConditionalOnClass location [" + path + "]", ex);
		}
	}

	static AutoConfigurationMetadata loadMetadata(Properties properties) {
		return new PropertiesAutoConfigurationMetadata(properties);
	}

   /**
	 * ③自动装配
	 * 返回AutoConfigurationEntry
	 */
	protected AutoConfigurationEntry getAutoConfigurationEntry(AutoConfigurationMetadata autoConfigurationMetadata,
			AnnotationMetadata annotationMetadata) {
		//检查是否自动装配
		if (!isEnabled(annotationMetadata)) {
			return EMPTY_ENTRY;
		}
		AnnotationAttributes attributes = getAttributes(annotationMetadata);
		//获取自动加载配置,spring.factories下的自动配置类
		List<String> configurations = getCandidateConfigurations(annotationMetadata, attributes);
		//配置类去重
		configurations = removeDuplicates(configurations);
		//获取被排除的类集合
		Set<String> exclusions = getExclusions(annotationMetadata, attributes);
		//检查排除类是否合法
		checkExcludedClasses(configurations, exclusions);
		//去除排除类
		configurations.removeAll(exclusions);
		//过滤自动加载组件
		configurations = filter(configurations, autoConfigurationMetadata);
		//将配置类和排除类通过事件传入监听器中
		fireAutoConfigurationImportEvents(configurations, exclusions);
		//返回自动配置类全限定名数组
		return new AutoConfigurationEntry(configurations, exclusions);
	}
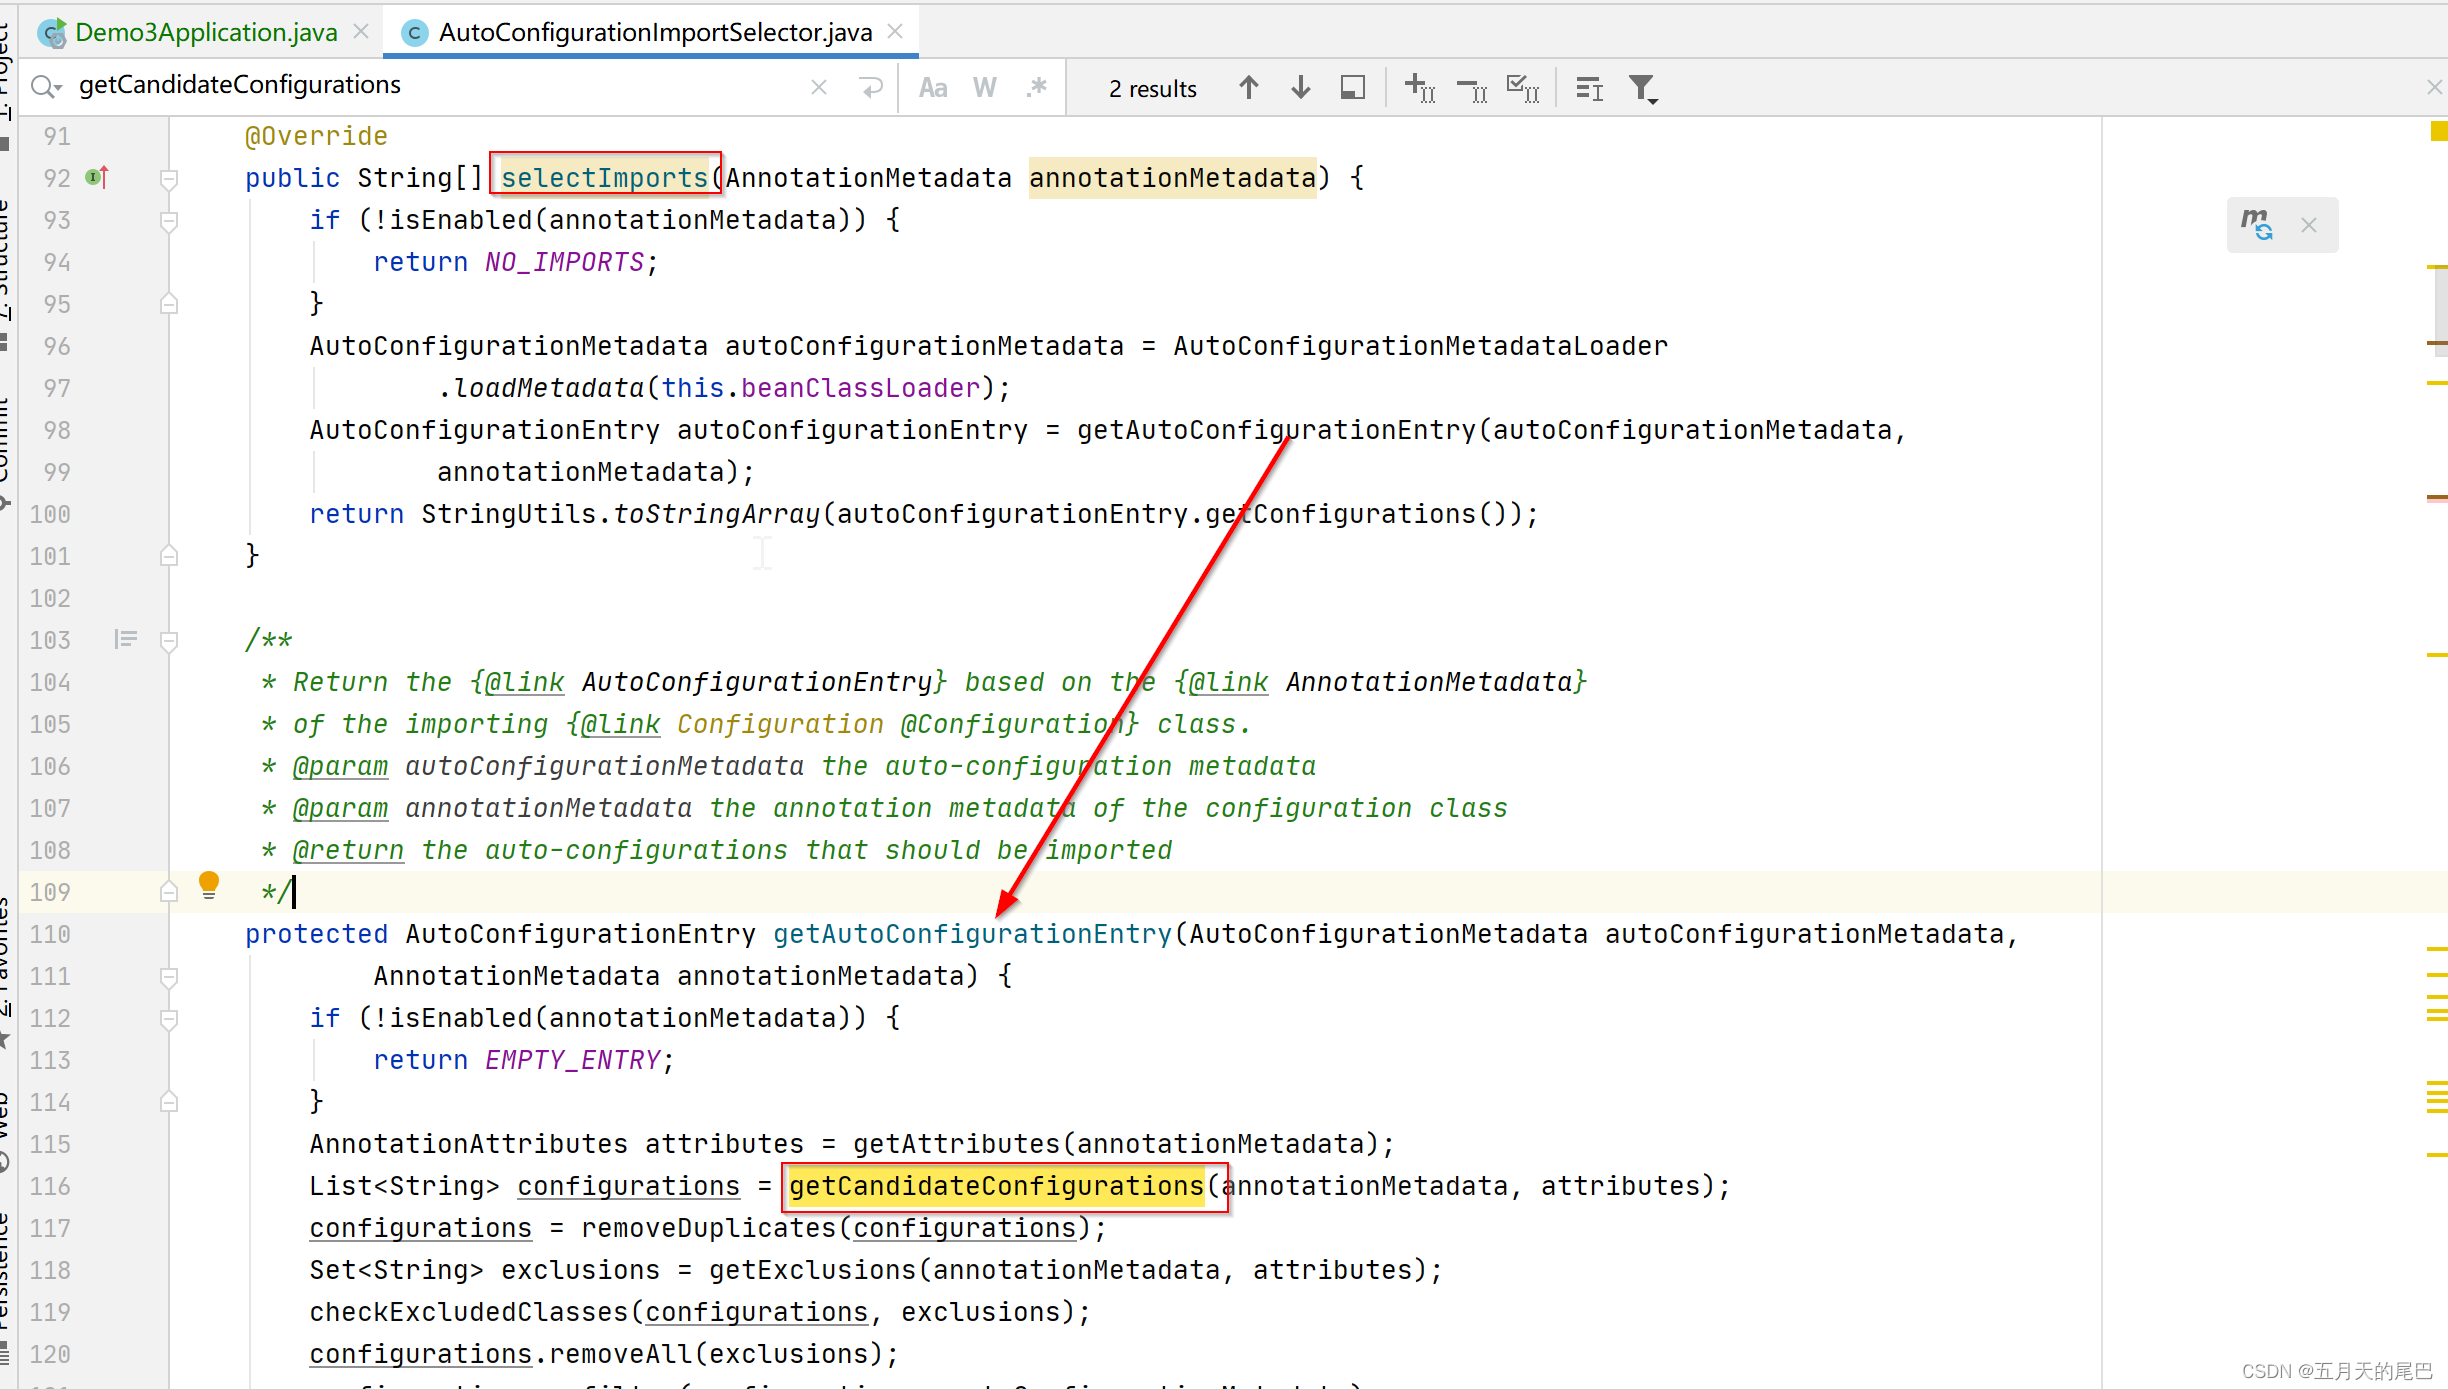
重点是 getCandidateConfigurations方法,会给容器中注入众多的自动配置类(xxxAutoConfiguration),就是给容器中导入这个场景需要的所有组件,并配置好这些组件。getCandidateConfigurations会到classpath下的读取META-INF/spring.factories文件的配置,并返回以 EnableAutoConfiguration 为 key 的字符串数组。
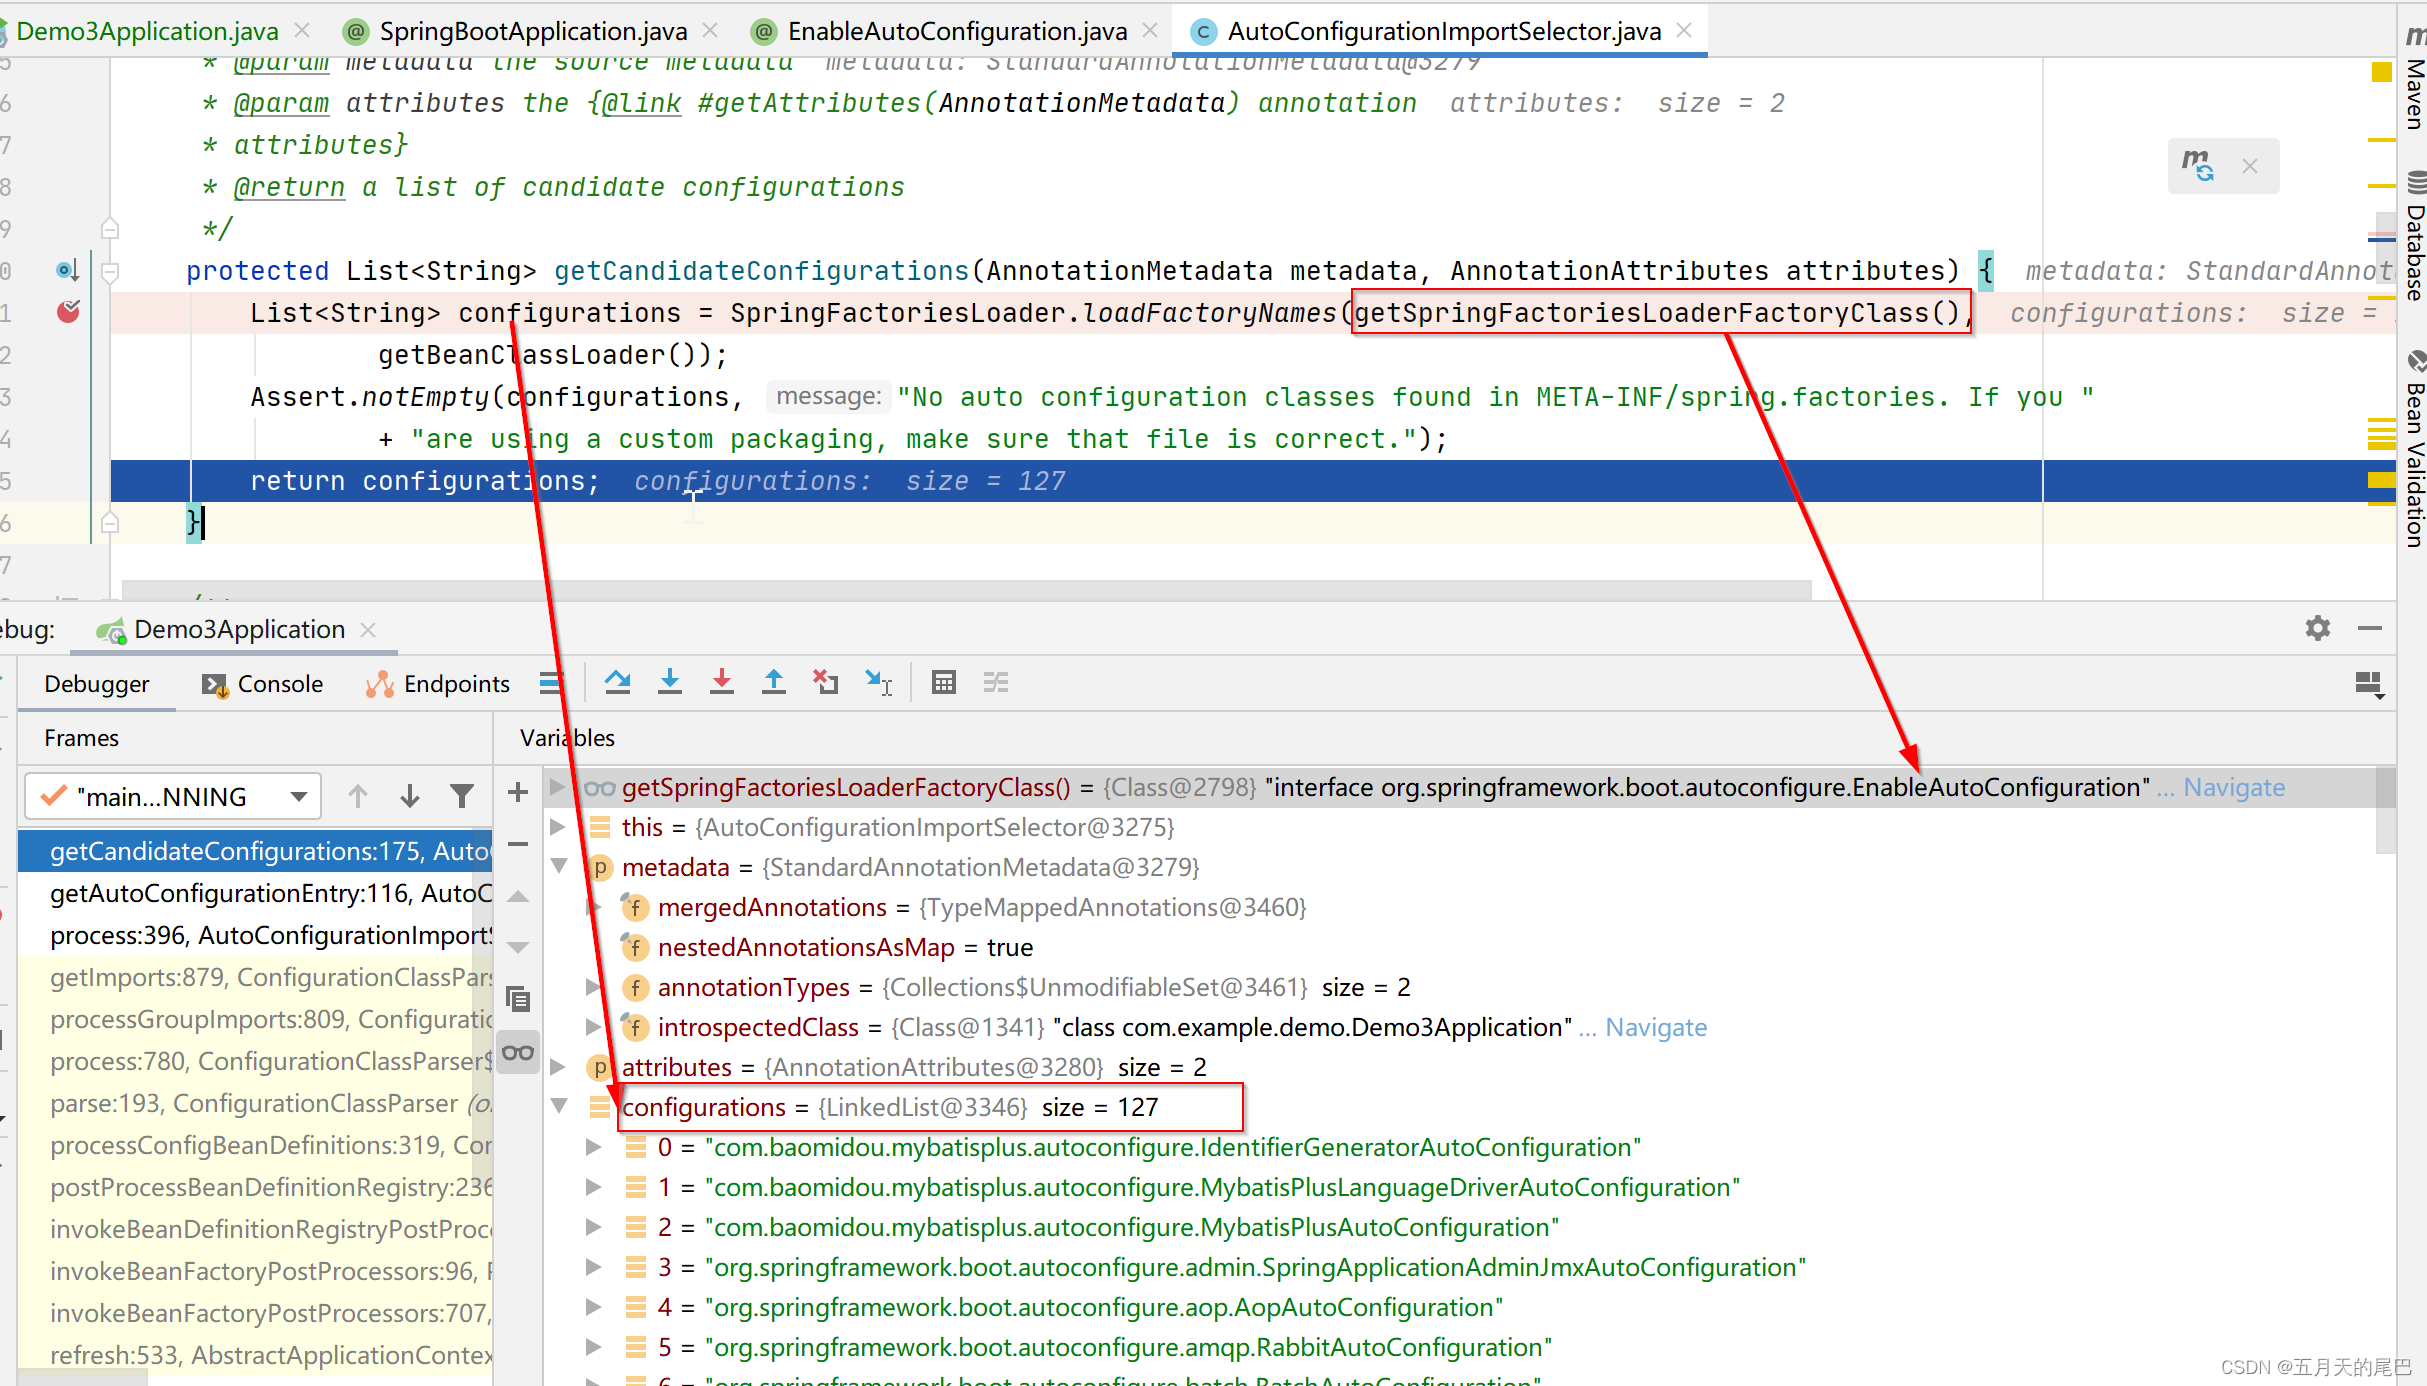
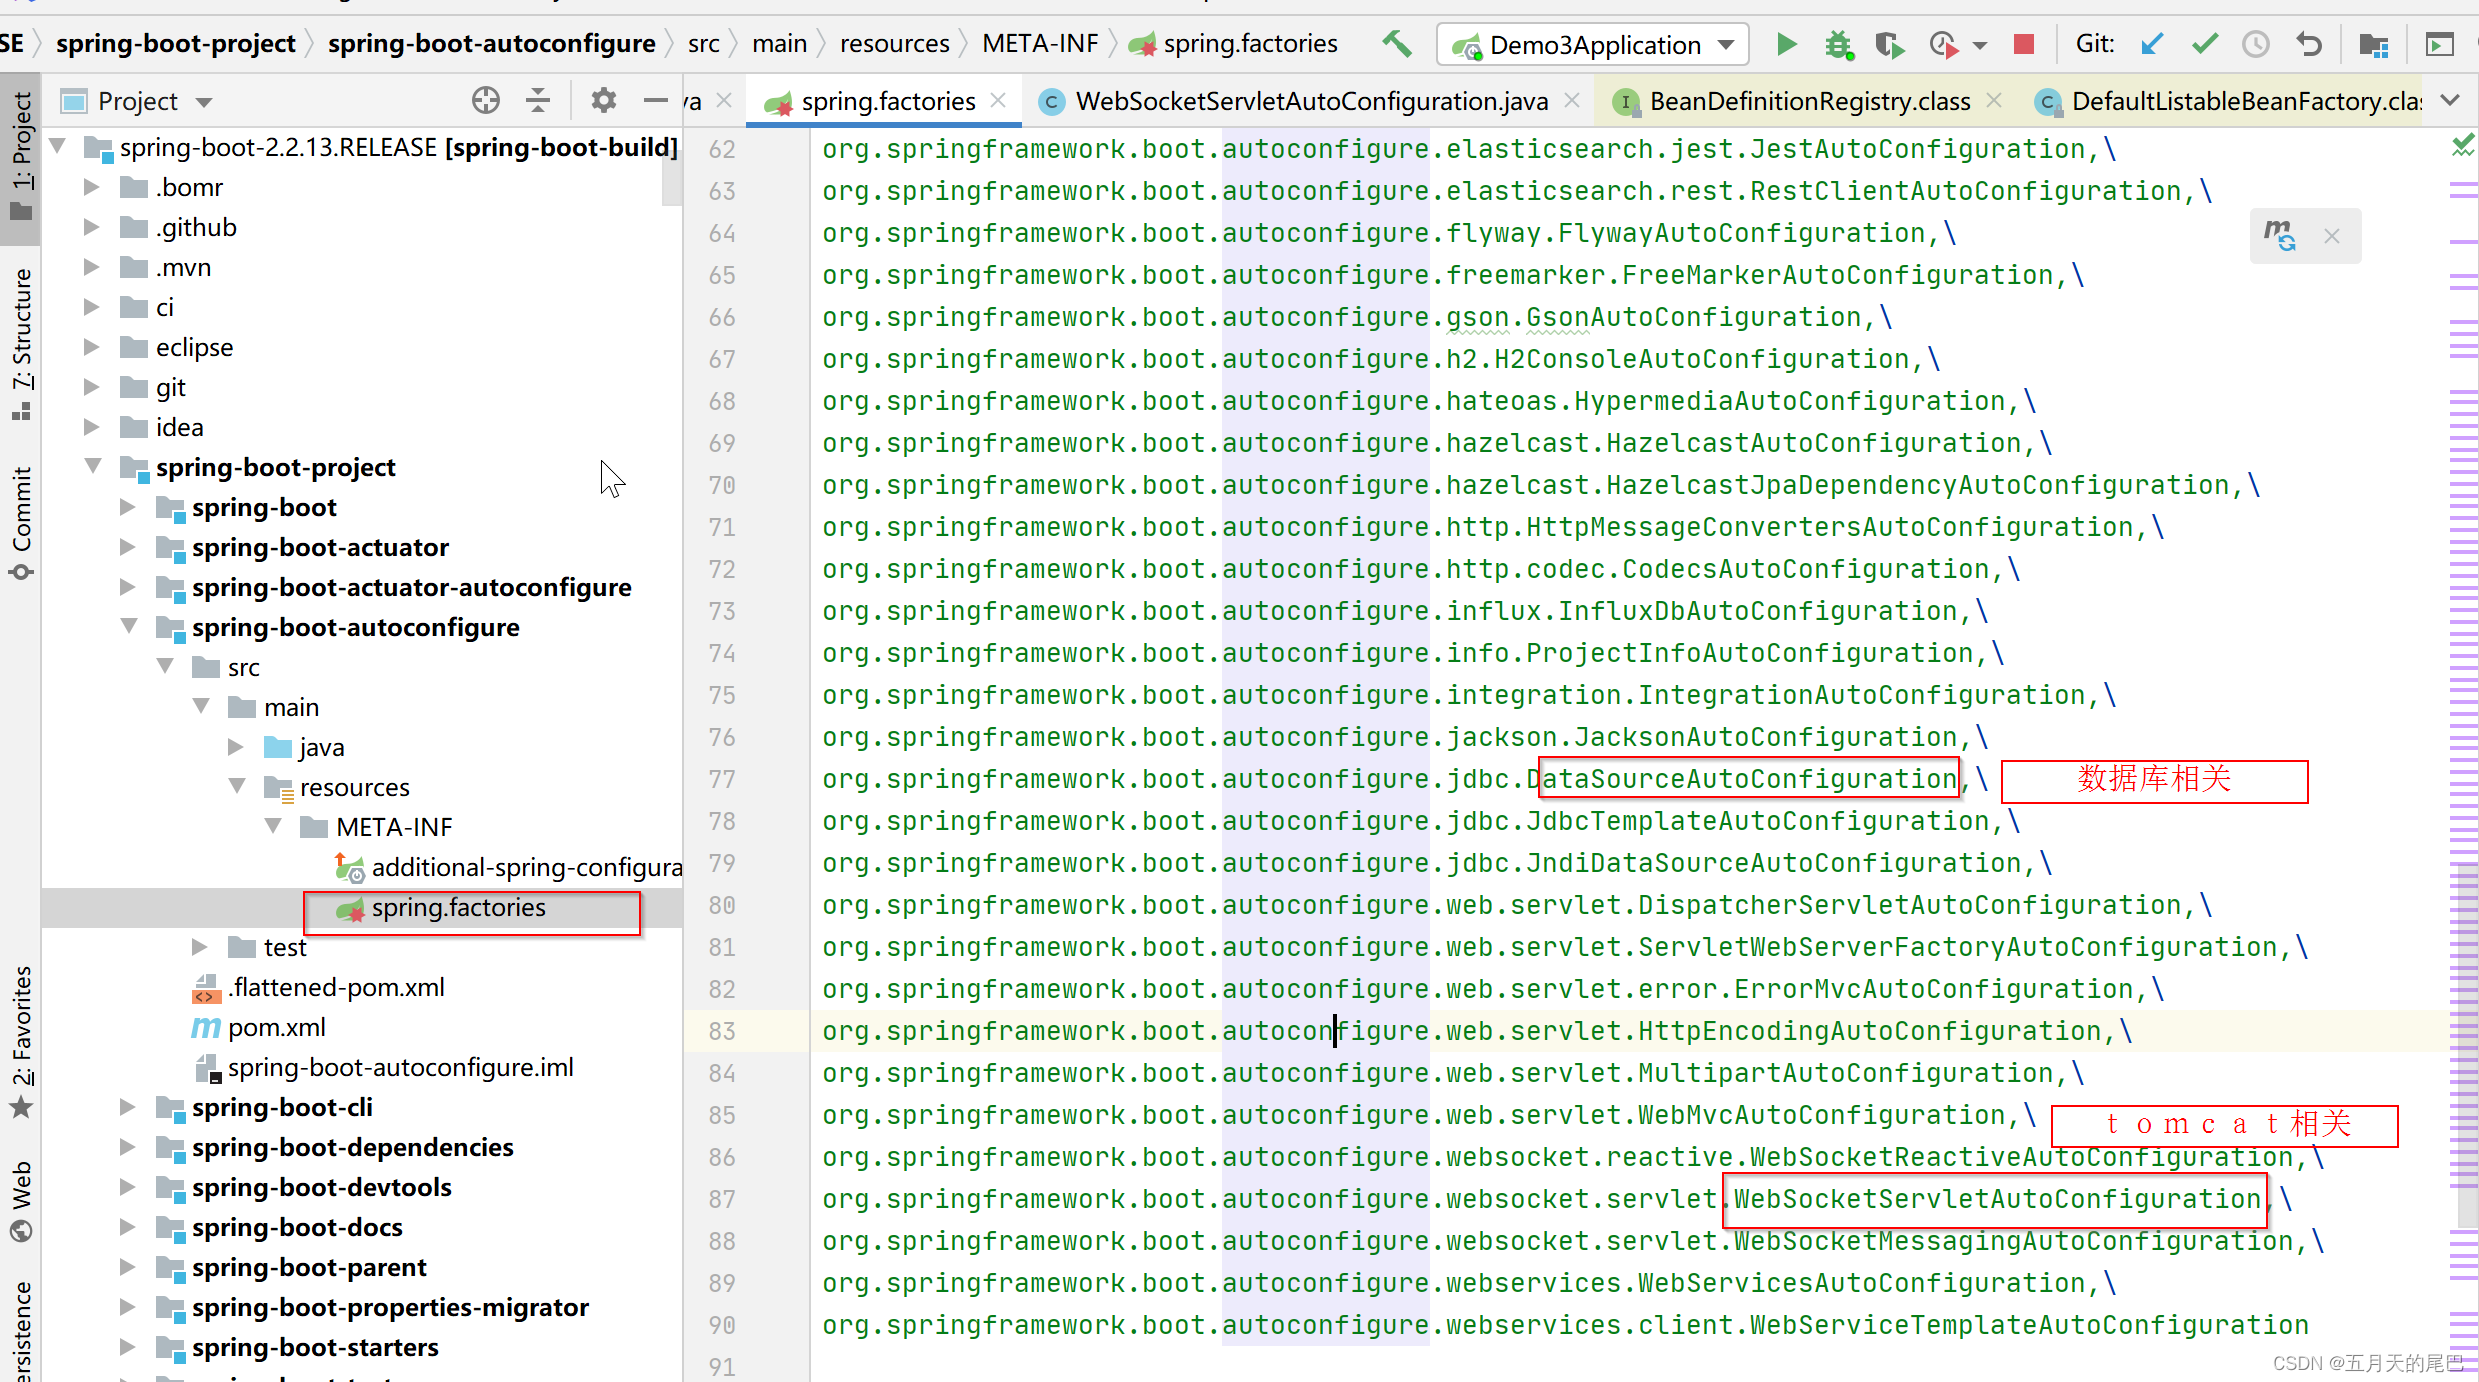
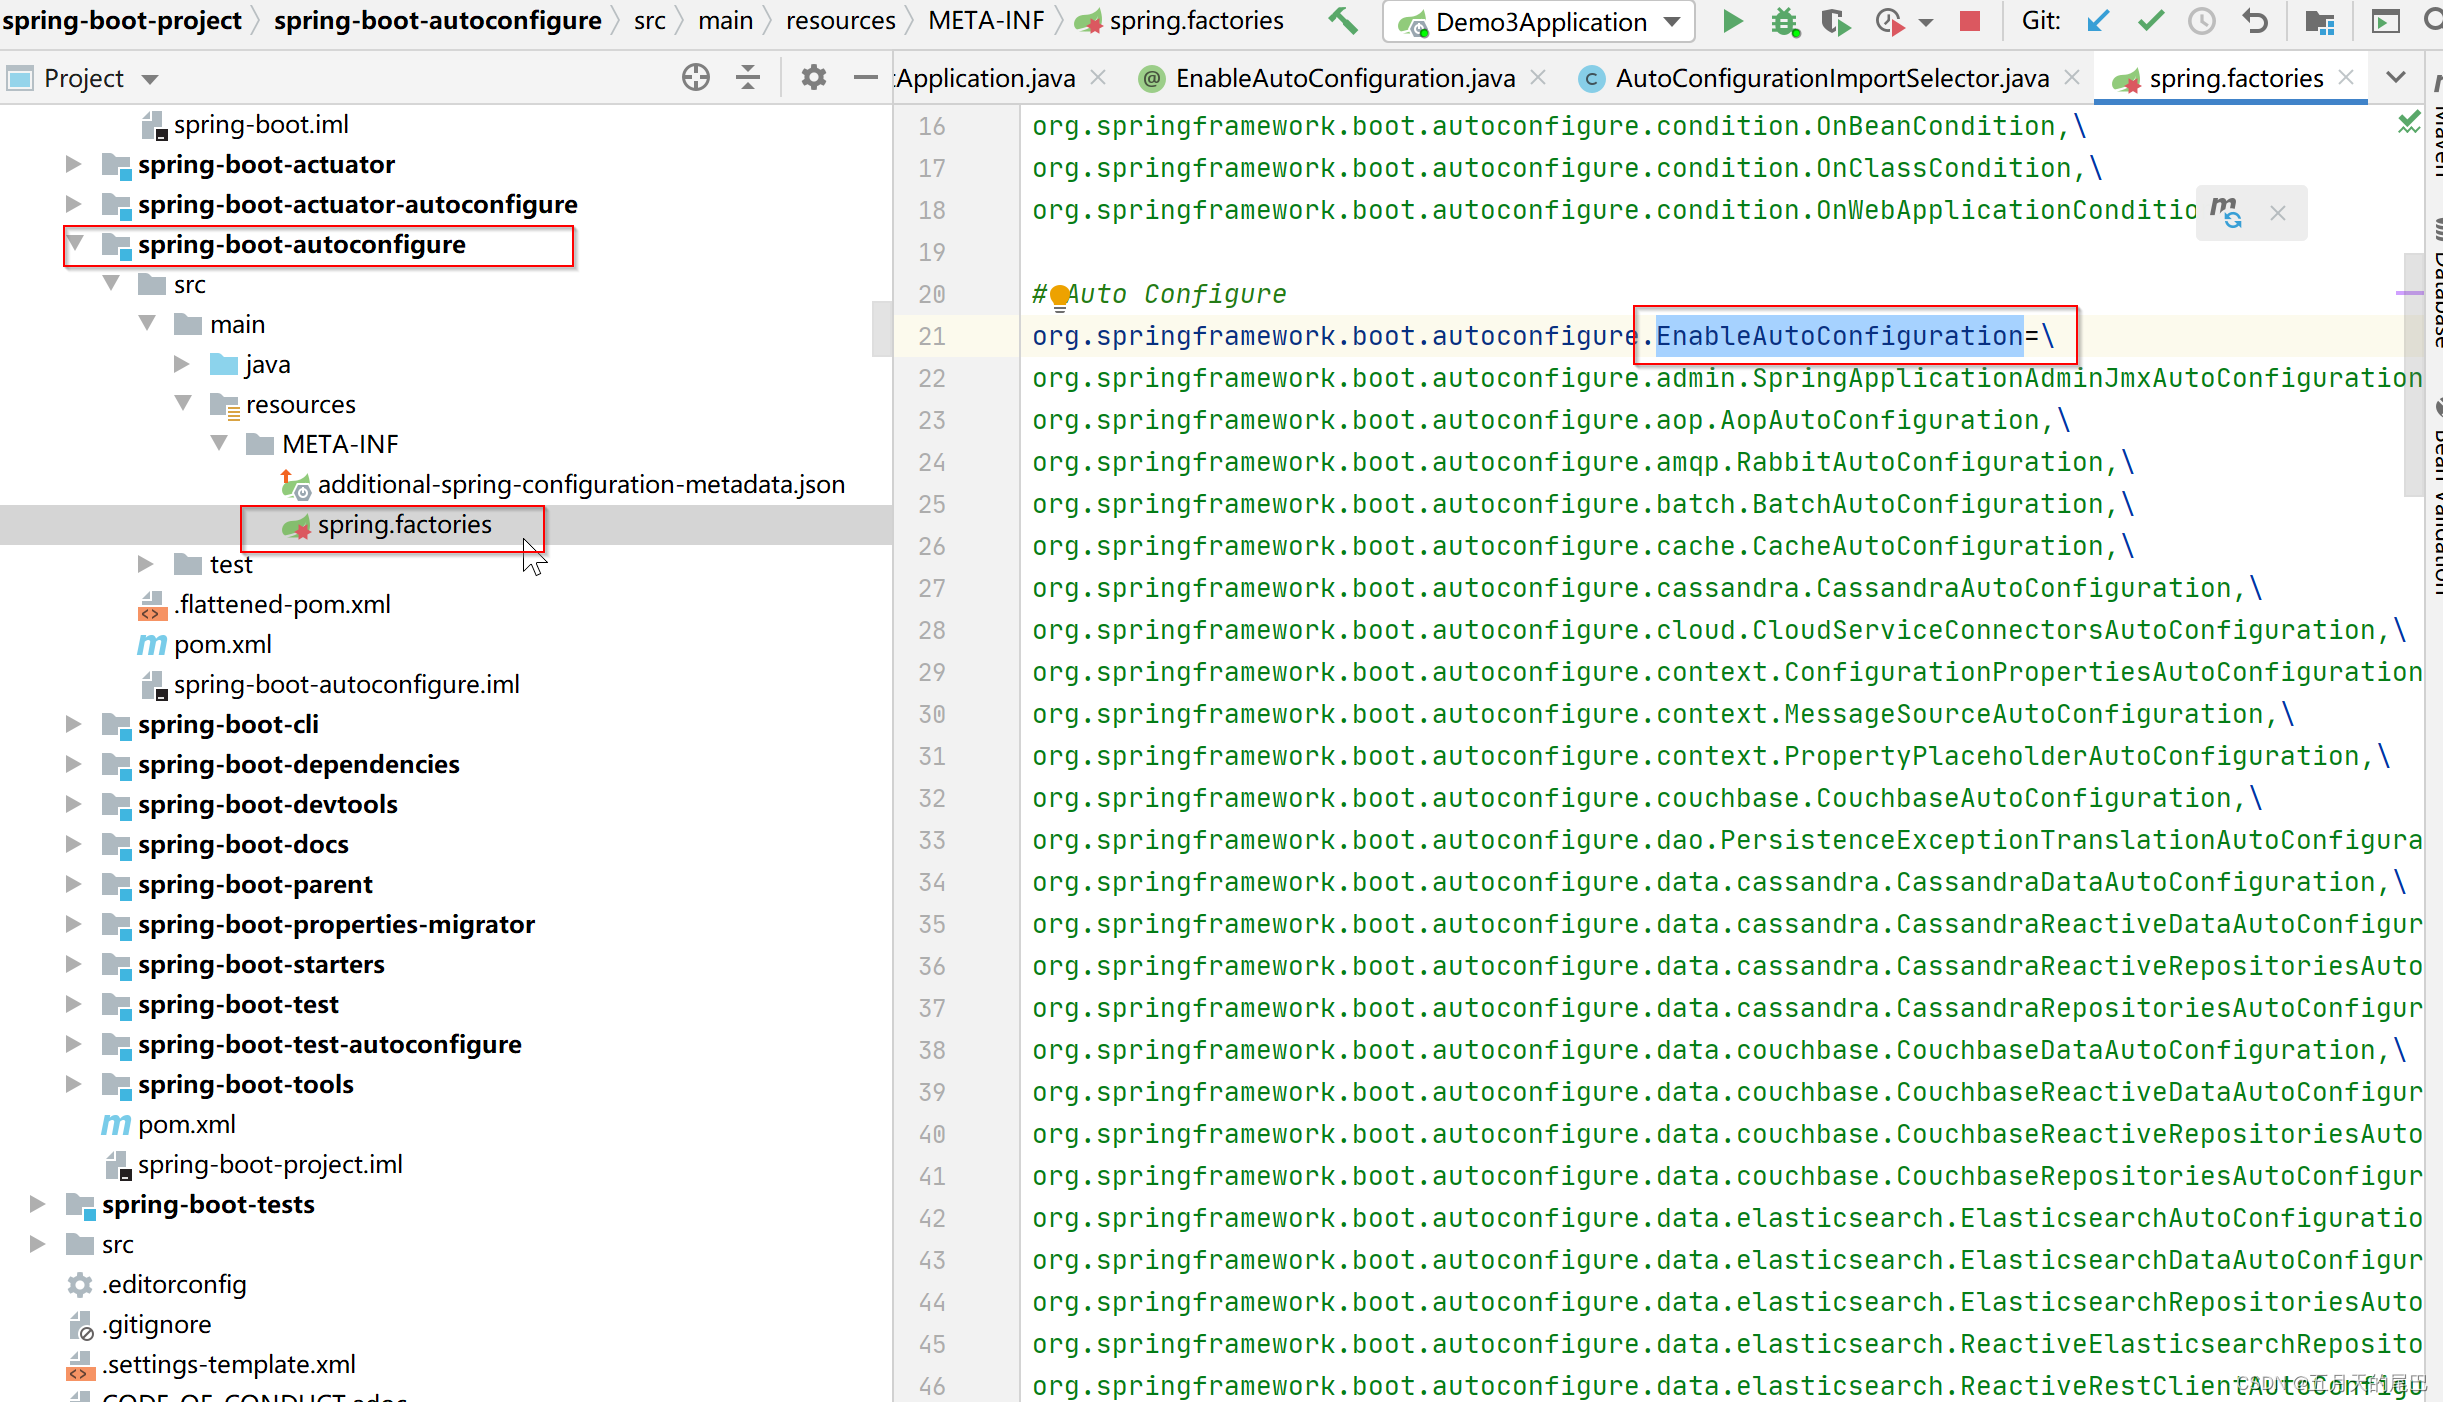
getCandidateConfigurations默认加载的是spring-boot-autoconfigure依赖包下的META-INF/spring.factories文件,我们可以看一个以EnableAutoConfiguration为key刚好127个
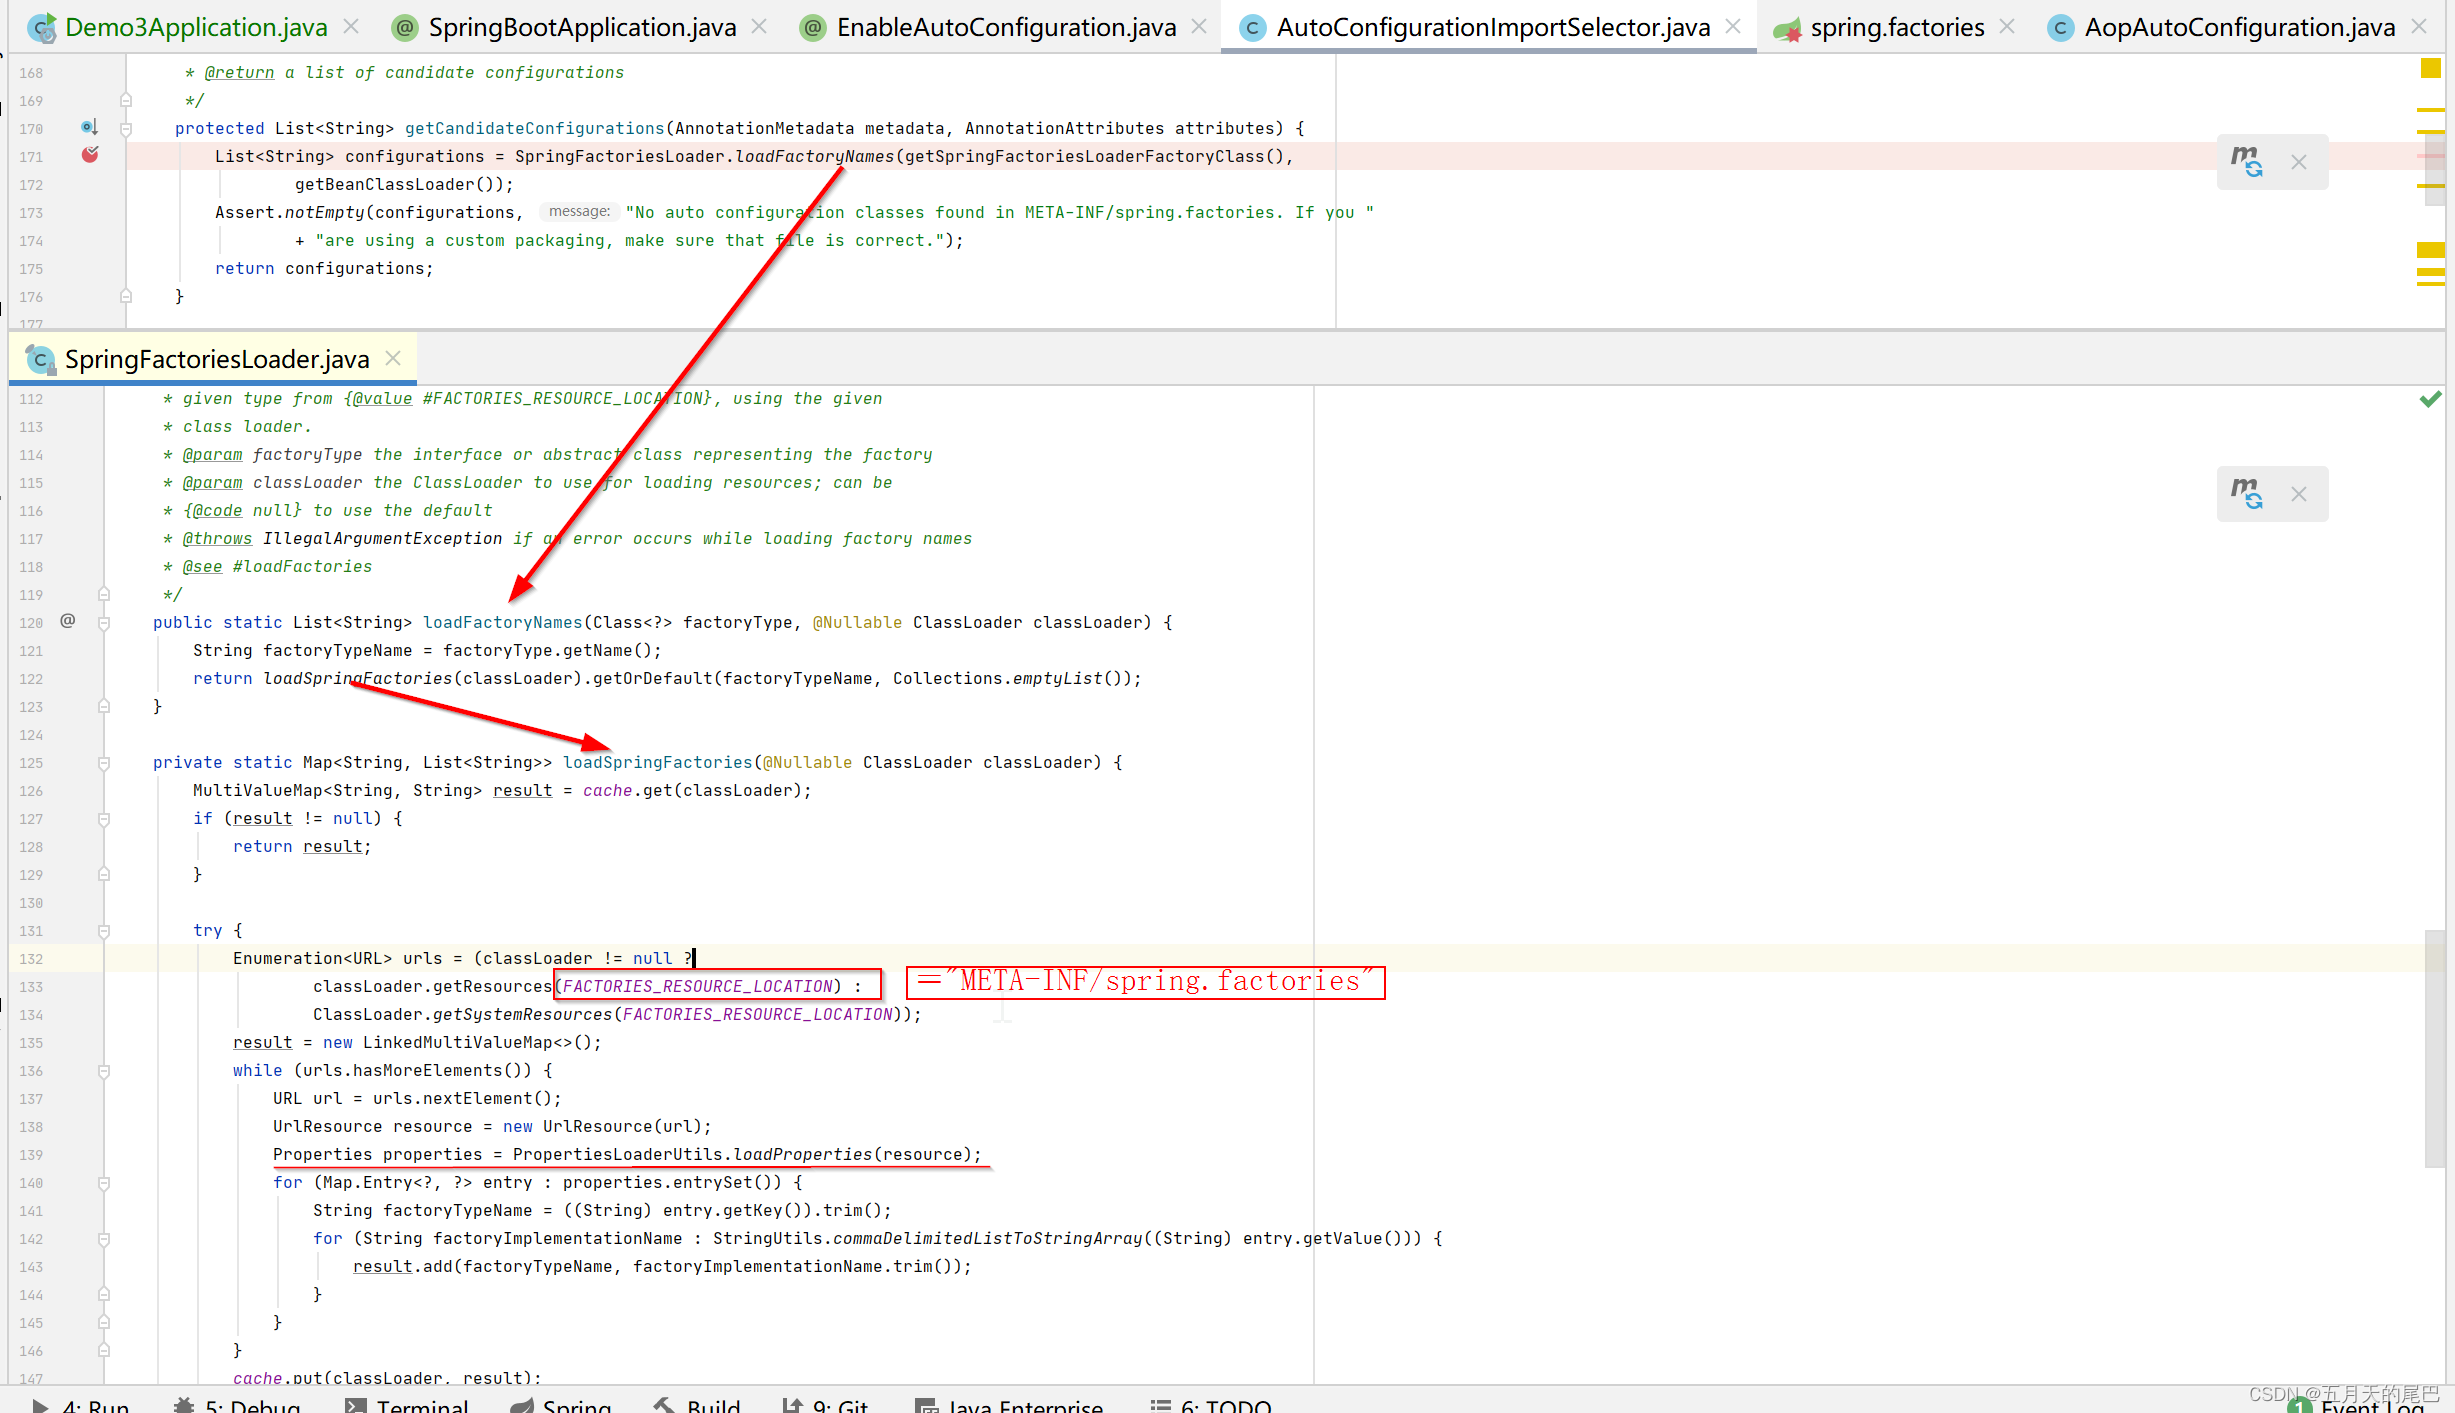
为什么getCandidateConfigurations读取的是classpath下的META-INF/spring.factories文件?我们可以看一下源码,如下图所示,源码中写明了要读取该文件。
简单梳理:
- FACTORIES_RESOURCE_LOCATION 的值是 META-INF/spring.factories
- Spring启动的时候会扫描所有jar路径下的 META-INF/spring.factories ,将其文件包装成Properties对象,从Properties对象获取到key值为 EnableAutoConfiguration 的数据,然后添加到容器里边。
问题解答
针对@SpringBootApplication注解使用和原理过程中有一些疑问点,特此解答
1.@AutoConfigurationPackage和@ComponentScan的作用是否冲突
起因
在研究springboot启动类时看到了两个意义相同的注解:@AutoConfigurationPackage和@ComponentScan,都是导入启动类同包及子包下的组件,于是疑惑为什么要重复使用?
回答
@AutoConfigurationPackage和@ComponentScan一样,都是将Spring Boot启动类所在的包及其子包里面的组件扫描到IOC容器中,但是区别是@AutoConfigurationPackage扫描@Enitity、@Mapper等第三方依赖的注解,@ComponentScan 注解主要是扫描 Spring 家族的各种 Bean,如 @Controller、@Service、@Component、@Repository 以及由此衍生出来的一些其他的 Bean。所以这两个注解扫描的对象是不一样的。当然这只是直观上的区别,更深层次说,@AutoConfigurationPackage是自动配置的提醒,是Spring Boot中注解,而@ComponentScan是Spring的注解
2.为什么能实现自动加载
起因
springboot为什么能够实现自动加载,如数据库,tomcat等默认不用配置什么东西就能加载进来。
回答
@EnableAutoConfiguration注解是自动配置的关键,内部实际上就去加载 META-INF/spring.factories 文件的信息,然后筛选出以 EnableAutoConfiguration 为key的数据,加载到IOC容器中,实现自动配置功能。
默认加载的是spring-boot-autoconfigure依赖包下的META-INF/spring.factories文件,我们可以看一个以EnableAutoConfiguration为key的元素
