云尚办公系统:微信公众号
B站直达【为尚硅谷点赞】:
https://www.bilibili.com/video/BV1Ya411S7aT
本博文以课程相关为主发布,并且融入了自己的一些看法以及对学习过程中遇见的问题给出相关的解决方法。一起学习一起进步!!!
这里导引一下。如果有域名的同学,可以直接使用域名,很快,没有的话本文将介绍很不错的技术------内网穿透和微信公众号开发。期待一下接下来的学习。
文章目录
- 云尚办公系统:微信公众号
- 一、功能说明
- 二、公众号菜单管理
- 1、菜单管理CRUD
- 1.1、mapper
- 1.2、service接口
- 1.3、service接口实现
- 1.4、controller接口
- 2、前端实现
- 2.1、定义api接口
- 2.2、页面实现
- 3、推送菜单
- 3.1、申请账号
- 3.2、添加配置
- 3.3、工具类方式
- 3.3.1、引入依赖
- 3.3.2、添加工具类和配置类
- 3.3.3、推送接口实现
- 3.3.4、controller接口
- 3.4 前端实现
- 3.4.1、api接口
- 3.4.2、菜单列表添加同步功能
- 4、删除推送菜单
- 4.1、删除接口
- 4.1.1、service接口
- 4.1.2、service接口实现
- 4.1.3、controller接口
- 4.2、前端实现
- 4.2.1、api接口
- 4.2.2、菜单列表添加同步功能
- 三、微信授权登录
- 1、服务器端接口开发
- 1.1、配置内网穿透(ngrok)
- 1.1.1、注册用户
- 1.1.2、实名认证
- 1.1.3、开通隧道
- 1.1.4、启动隧道
- 1.2、配置“授权回调页面域名”
- 1.3、配置授权回调获取用户信息接口地址
- 1.4、controller接口
- 1.5、排除拦截
- 2、移动端前端处理
- 2.1、添加api接口
- 2.2、绑定关系
- 2.3、添加微信js引用
- 2.4、调整request.js
- 2.5、测试
- 四、消息推送
- 1、配置微信模板消息
- 2、定义接口
- 3、service接口实现
- 4、推送调用
- 4.1、启动流程实例接口
- 4.2、审批接口
一、功能说明
员工端使用微信公众号完成审批操作,涉及到的功能包含:自定义菜单、授权登录、消息
1、微信公众号一级菜单为:审批列表、审批中心、我的
2、员工关注公众号,员工第一次登录微信公众号,通过微信授权登录进行员工账号绑定
3、员工通过微信公众号提交审批和审批信息,系统根据微信公众号推送审批信息,及时反馈审批过程
项目截图:
![[外链图片转存失败,源站可能有防盗链机制,建议将图片保存下来直接上传(img-s3g1g1wf-1688014614430)(assets/1671689364185.png)]](https://img-blog.csdnimg.cn/8f2f02c936014034b62d03ddd7aa0dd8.png)
二、公众号菜单管理
公众号一级菜单,数据库默认初始化(审批列表、审批中心、我的)
页面效果如下:
![[外链图片转存失败,源站可能有防盗链机制,建议将图片保存下来直接上传(img-MQRwGtld-1688014614432)(assets\image-20230216150123939.png)]](https://img-blog.csdnimg.cn/562aee67334b4bc2a0eb8c35e9ada115.png)
1、菜单管理CRUD
1.1、mapper
package com.atguigu.wechat.mapper;

import com.atguigu.model.wechat.Menu;
import com.baomidou.mybatisplus.core.mapper.BaseMapper;
import org.apache.ibatis.annotations.Mapper;

@Mapper
public interface MenuMapper extends BaseMapper<Menu> {

}
1.2、service接口
package com.atguigu.wechat.service;

import com.atguigu.model.wechat.Menu;
import com.atguigu.vo.wechat.MenuVo;
import com.baomidou.mybatisplus.extension.service.IService;
import java.util.List;

public interface MenuService extends IService<Menu> {

    List<MenuVo> findMenuInfo();

}
1.3、service接口实现
package com.atguigu.wechat.service.impl;

import com.atguigu.model.wechat.Menu;
import com.atguigu.vo.wechat.MenuVo;
import com.atguigu.wechat.mapper.MenuMapper;
import com.atguigu.wechat.service.MenuService;
import com.baomidou.mybatisplus.extension.service.impl.ServiceImpl;
import lombok.extern.slf4j.Slf4j;
import org.springframework.beans.BeanUtils;
import org.springframework.beans.factory.annotation.Autowired;
import org.springframework.stereotype.Service;
import java.util.ArrayList;
import java.util.Comparator;
import java.util.List;
import java.util.stream.Collectors;

@Service
public class MenuServiceImpl extends ServiceImpl<MenuMapper, Menu> implements MenuService {

    @Autowired
    private MenuMapper menuMapper;

    @Override
    public List<MenuVo> findMenuInfo() {
        List<MenuVo> list = new ArrayList<>();
        List<Menu> menuList = menuMapper.selectList(null);
        List<Menu> oneMenuList = menuList.stream().filter(menu -> menu.getParentId().longValue() == 0).collect(Collectors.toList());
        for (Menu oneMenu : oneMenuList) {
            MenuVo oneMenuVo = new MenuVo();
            BeanUtils.copyProperties(oneMenu, oneMenuVo);

            List<Menu> twoMenuList = menuList.stream()
                    .filter(menu -> menu.getParentId().longValue() == oneMenu.getId())
                    .sorted(Comparator.comparing(Menu::getSort))
                    .collect(Collectors.toList());
            List<MenuVo> children = new ArrayList<>();
            for (Menu twoMenu : twoMenuList) {
                MenuVo twoMenuVo = new MenuVo();
                BeanUtils.copyProperties(twoMenu, twoMenuVo);
                children.add(twoMenuVo);
            }
            oneMenuVo.setChildren(children);
            list.add(oneMenuVo);
        }
        return list;
    }
}
1.4、controller接口
package com.atguigu.wechat.controller;

import com.atguigu.common.result.Result;
import com.atguigu.model.wechat.Menu;
import com.atguigu.wechat.service.MenuService;
import io.swagger.annotations.ApiOperation;
import lombok.extern.slf4j.Slf4j;
import org.springframework.beans.factory.annotation.Autowired;
import org.springframework.security.access.prepost.PreAuthorize;
import org.springframework.web.bind.annotation.*;

@RestController
@RequestMapping("/admin/wechat/menu")
@Slf4j
public class MenuController {

    @Autowired
    private MenuService menuService;

    //@PreAuthorize("hasAuthority('bnt.menu.list')")
    @ApiOperation(value = "获取")
    @GetMapping("get/{id}")
    public Result get(@PathVariable Long id) {
        Menu menu = menuService.getById(id);
        return Result.ok(menu);
    }

    //@PreAuthorize("hasAuthority('bnt.menu.add')")
    @ApiOperation(value = "新增")
    @PostMapping("save")
    public Result save(@RequestBody Menu menu) {
        menuService.save(menu);
        return Result.ok();
    }

    //@PreAuthorize("hasAuthority('bnt.menu.update')")
    @ApiOperation(value = "修改")
    @PutMapping("update")
    public Result updateById(@RequestBody Menu menu) {
        menuService.updateById(menu);
        return Result.ok();
    }

    //@PreAuthorize("hasAuthority('bnt.menu.remove')")
    @ApiOperation(value = "删除")
    @DeleteMapping("remove/{id}")
    public Result remove(@PathVariable Long id) {
        menuService.removeById(id);
        return Result.ok();
    }

    //@PreAuthorize("hasAuthority('bnt.menu.list')")
    @ApiOperation(value = "获取全部菜单")
    @GetMapping("findMenuInfo")
    public Result findMenuInfo() {
        return Result.ok(menuService.findMenuInfo());
    }
}
2、前端实现
2.1、定义api接口
创建src/api/wechat/menu.js
import request from '@/utils/request'

const api_name = '/admin/wechat/menu'

export default {

  findMenuInfo() {
    return request({
      url: `${api_name}/findMenuInfo`,
      method: `get`
    })
  },

  save(menu) {
    return request({
      url: `${api_name}/save`,
      method: `post`,
      data: menu
    })
  },

  getById(id) {
    return request({
      url: `${api_name}/get/${id}`,
      method: `get`
    })
  },

  updateById(menu) {
    return request({
      url: `${api_name}/update`,
      method: `put`,
      data: menu
    })
  },

  removeById(id) {
    return request({
      url: `${api_name}/remove/${id}`,
      method: 'delete'
    })
  }
}
2.2、页面实现
创建views/wechat/menu/list.vue
<template>
  <div class="app-container">

    <!-- 工具条 -->
    <div class="tools-div">
      <el-button class="btn-add" size="mini" @click="add">添 加</el-button>
    </div>

    <el-table
      :data="list"
      style="width: 100%;margin-bottom: 20px;"
      row-key="id"
      border
      default-expand-all
      :tree-props="{children: 'children'}">

      <el-table-column label="名称" prop="name" width="350"></el-table-column>
      <el-table-column label="类型" width="100">
        <template slot-scope="scope">
          {{ scope.row.type == 'view' ? '链接' : scope.row.type == 'click' ? '事件' : '' }}
        </template>
      </el-table-column>
      <el-table-column label="菜单URL" prop="url" ></el-table-column>
      <el-table-column label="菜单KEY" prop="meunKey"  width="130"></el-table-column>
      <el-table-column label="排序号" prop="sort"  width="70"></el-table-column>
      <el-table-column label="操作" width="170" align="center">
        <template slot-scope="scope">
          <el-button v-if="scope.row.parentId > 0" type="text" size="mini" @click="edit(scope.row.id)">修改</el-button>
          <el-button v-if="scope.row.parentId > 0" type="text" size="mini" @click="removeDataById(scope.row.id)">删除</el-button>
        </template>
      </el-table-column>
    </el-table>

    <el-dialog title="添加/修改" :visible.sync="dialogVisible" width="40%" >
      <el-form ref="flashPromotionForm" label-width="150px" size="small" style="padding-right: 40px;">

        <el-form-item label="选择一级菜单">
          <el-select
            v-model="menu.parentId"
            placeholder="请选择">
            <el-option
              v-for="item in list"
              :key="item.id"
              :label="item.name"
              :value="item.id"/>
          </el-select>
        </el-form-item>
        <el-form-item label="菜单名称">
          <el-input v-model="menu.name"/>
        </el-form-item>
        <el-form-item label="菜单类型">
          <el-radio-group v-model="menu.type">
            <el-radio label="view">链接</el-radio>
            <el-radio label="click">事件</el-radio>
          </el-radio-group>
        </el-form-item>
        <el-form-item v-if="menu.type == 'view'" label="链接">
          <el-input v-model="menu.url"/>
        </el-form-item>
        <el-form-item v-if="menu.type == 'click'" label="菜单KEY">
          <el-input v-model="menu.meunKey"/>
        </el-form-item>
        <el-form-item label="排序">
          <el-input v-model="menu.sort"/>
        </el-form-item>
      </el-form>
      <span slot="footer" class="dialog-footer">
        <el-button @click="dialogVisible = false" size="small">取 消</el-button>
        <el-button type="primary" @click="saveOrUpdate()" size="small">确 定</el-button>
      </span>
    </el-dialog>
  </div>
</template>
<script>
import menuApi from '@/api/wechat/menu'
const defaultForm = {
  id: null,
  parentId: 1,
  name: '',
  nameId: null,
  sort: 1,
  type: 'view',
  meunKey: '',
  url: ''
}
export default {

  // 定义数据
  data() {
    return {
      list: [],
      dialogVisible: false,
      menu: defaultForm,
      saveBtnDisabled: false
    }
  },

  // 当页面加载时获取数据
  created() {
    this.fetchData()
  },

  methods: {
    // 调用api层获取数据库中的数据
    fetchData() {
      console.log('加载列表')
      menuApi.findMenuInfo().then(response => {
        this.list = response.data
        console.log(this.list)
      })
    },

    // 根据id删除数据
    removeDataById(id) {
      // debugger
      this.$confirm('此操作将永久删除该记录, 是否继续?', '提示', {
        confirmButtonText: '确定',
        cancelButtonText: '取消',
        type: 'warning'
      }).then(() => { // promise
        // 点击确定,远程调用ajax
        return menuApi.removeById(id)
      }).then((response) => {
        this.fetchData(this.page)
        this.$message.success(response.message || '删除成功')
      }).catch(() => {
        this.$message.info('取消删除')
      })
    },

    // -------------
    add() {
      this.dialogVisible = true
      this.menu = Object.assign({}, defaultForm)
    },

    edit(id) {
      this.dialogVisible = true
      this.fetchDataById(id)
    },

    fetchDataById(id) {
      menuApi.getById(id).then(response => {
        this.menu = response.data
      })
    },

    saveOrUpdate() {
      this.saveBtnDisabled = true // 防止表单重复提交

      if (!this.menu.id) {
        this.saveData()
      } else {
        this.updateData()
      }
    },

    // 新增
    saveData() {
      menuApi.save(this.menu).then(response => {
        this.$message.success(response.message || '操作成功')
        this.dialogVisible = false
        this.fetchData(this.page)
      })
    },

    // 根据id更新记录
    updateData() {
      menuApi.updateById(this.menu).then(response => {
        this.$message.success(response.message || '操作成功')
        this.dialogVisible = false
        this.fetchData(this.page)
      })
    }
  }
}
</script>
3、推送菜单
后台配置好菜单后,我们要推送到微信公众平台
3.1、申请账号
云尚办公系统没有微信支付等高级功能,因此无需使用服务号,使用测试账号即可完成测试。
我们使用“微信公众平台接口测试帐号”,申请地址:https://mp.weixin.qq.com/debug/cgi-bin/sandbox?t=sandbox/login,以后有了正式账号,直接一切换即可
![[外链图片转存失败,源站可能有防盗链机制,建议将图片保存下来直接上传(img-PtyVZOJq-1688014614435)(assets/1671602358397.png)]](https://img-blog.csdnimg.cn/85419e55cf7b4276b8983cc1854e133b.png)
扫描登录进入,获取测试号信息:appID与appsecret
![[外链图片转存失败,源站可能有防盗链机制,建议将图片保存下来直接上传(img-WD8LdEZW-1688014614437)(assets\image-20230216191450386.png)]](https://img-blog.csdnimg.cn/180ccddb4683455e9d4507721ec0c563.png)
查看“自定义菜单“api文档:
https://developers.weixin.qq.com/doc/offiaccount/Custom_Menus/Creating_Custom-Defined_Menu.html
推送菜单有两种实现方式:
1、完全按照接口文档http方式,但这种方式比较繁琐
2、使用weixin-java-mp工具,这个是封装好的工具,可以直接使用,方便快捷,后续我们使用这种方式开发
3.2、添加配置
在application-dev.yml添加配置
wechat:
  mpAppId: wx13db7dcf69bc1223
  mpAppSecret: de3d7888d30febf84b64d0e6571e4027
3.3、工具类方式
3.3.1、引入依赖
<dependency>
    <groupId>com.github.binarywang</groupId>
    <artifactId>weixin-java-mp</artifactId>
    <version>4.1.0</version>
</dependency>
3.3.2、添加工具类和配置类
工具类
package com.atguigu.wechat.config;

import lombok.Data;
import org.springframework.beans.factory.InitializingBean;
import org.springframework.beans.factory.annotation.Value;
import org.springframework.boot.context.properties.ConfigurationProperties;
import org.springframework.stereotype.Component;

@Data
@Component
@ConfigurationProperties(prefix = "wechat")
public class WechatAccountConfig {

    private String mpAppId;

    private String mpAppSecret;

}
配置类
package com.atguigu.wechat.config;

import me.chanjar.weixin.mp.api.WxMpService;
import me.chanjar.weixin.mp.api.impl.WxMpServiceImpl;
import me.chanjar.weixin.mp.config.WxMpConfigStorage;
import me.chanjar.weixin.mp.config.impl.WxMpDefaultConfigImpl;
import org.springframework.beans.factory.annotation.Autowired;
import org.springframework.context.annotation.Bean;
import org.springframework.stereotype.Component;

@Component
public class WeChatMpConfig {

    @Autowired
    private WechatAccountConfig wechatAccountConfig;

    @Bean
    public WxMpService wxMpService(){
        WxMpService wxMpService = new WxMpServiceImpl();
        wxMpService.setWxMpConfigStorage(wxMpConfigStorage());
        return wxMpService;
    }

    @Bean
    public WxMpConfigStorage wxMpConfigStorage(){
        WxMpDefaultConfigImpl wxMpConfigStorage = new WxMpDefaultConfigImpl();
        wxMpConfigStorage.setAppId(wechatAccountConfig.getMpAppId());
        wxMpConfigStorage.setSecret(wechatAccountConfig.getMpAppSecret());
        return wxMpConfigStorage;
    }
}
3.3.3、推送接口实现
操作类:MenuServiceImpl
@Autowired
private WxMpService wxMpService;

@Override
public void syncMenu() {
    List<MenuVo> menuVoList = this.findMenuInfo();
    //菜单
    JSONArray buttonList = new JSONArray();
    for(MenuVo oneMenuVo : menuVoList) {
        JSONObject one = new JSONObject();
        one.put("name", oneMenuVo.getName());
        if(CollectionUtils.isEmpty(oneMenuVo.getChildren())) {
            one.put("type", oneMenuVo.getType());
            one.put("url", "http://oa.atguigu.cn/#"+oneMenuVo.getUrl());
        } else {
            JSONArray subButton = new JSONArray();
            for(MenuVo twoMenuVo : oneMenuVo.getChildren()) {
                JSONObject view = new JSONObject();
                view.put("type", twoMenuVo.getType());
                if(twoMenuVo.getType().equals("view")) {
                    view.put("name", twoMenuVo.getName());
                    //H5页面地址
                    view.put("url", "http://oa.atguigu.cn#"+twoMenuVo.getUrl());
                } else {
                    view.put("name", twoMenuVo.getName());
                    view.put("key", twoMenuVo.getMeunKey());
                }
                subButton.add(view);
            }
            one.put("sub_button", subButton);
        }
        buttonList.add(one);
    }
    //菜单
    JSONObject button = new JSONObject();
    button.put("button", buttonList);
    try {
        wxMpService.getMenuService().menuCreate(button.toJSONString());
    } catch (WxErrorException e) {
        throw new RuntimeException(e);
    }
}
3.3.4、controller接口
//@PreAuthorize("hasAuthority('bnt.menu.syncMenu')")
@ApiOperation(value = "同步菜单")
@GetMapping("syncMenu")
public Result createMenu() {
    menuService.syncMenu();
    return Result.ok();
}
3.4 前端实现
3.4.1、api接口
在api/wechat/menu.js添加
syncMenu() {
  return request({
    url: `${api_name}/syncMenu`,
    method: `get`
  })
},
3.4.2、菜单列表添加同步功能
1、添加按钮
<el-button class="btn-add" size="mini" @click="syncMenu" >同步菜单</el-button>
2、添加方法
syncMenu() {
  this.$confirm('你确定上传菜单吗, 是否继续?', '提示', {
    confirmButtonText: '确定',
    cancelButtonText: '取消',
    type: 'warning'
  }).then(() => {
    return menuApi.syncMenu()
  }).then((response) => {
    this.$message.success(response.message)
  }).catch(error => {
    console.log('error', error)
    if (error === 'cancel') {
      this.$message.info('取消上传')
    }
  })
}
4、删除推送菜单
4.1、删除接口
4.1.1、service接口
void removeMenu();
4.1.2、service接口实现
@SneakyThrows
@Override
public void removeMenu() {
    wxMpService.getMenuService().menuDelete();
}
4.1.3、controller接口
@PreAuthorize("hasAuthority('bnt.menu.removeMenu')")
@ApiOperation(value = "删除菜单")
@DeleteMapping("removeMenu")
public Result removeMenu() {
    menuService.removeMenu();
    return Result.ok();
}
4.2、前端实现
4.2.1、api接口
在api/wechat/menu.js添加
removeMenu() {
    return request({
      url: `${api_name}/removeMenu`,
      method: `delete`
    })
  }
4.2.2、菜单列表添加同步功能
1、添加按钮
<el-button class="btn-add" size="mini" @click="removeMenu">删除菜单</el-button>
2、添加方法
removeMenu() {
  menuApi.removeMenu().then(response => {
    this.$message.success('菜单已删除')
  })
}
三、微信授权登录
当前后台员工账号与微信账号是没有关联的,因此在点击微信菜单时,要判断是否登录,如果是第一次访问则弹出关联层,建立微信账号与员工账号的绑定,即:通过员工手机号码与微信openId建立绑定,后续进入就知道用户身份了。
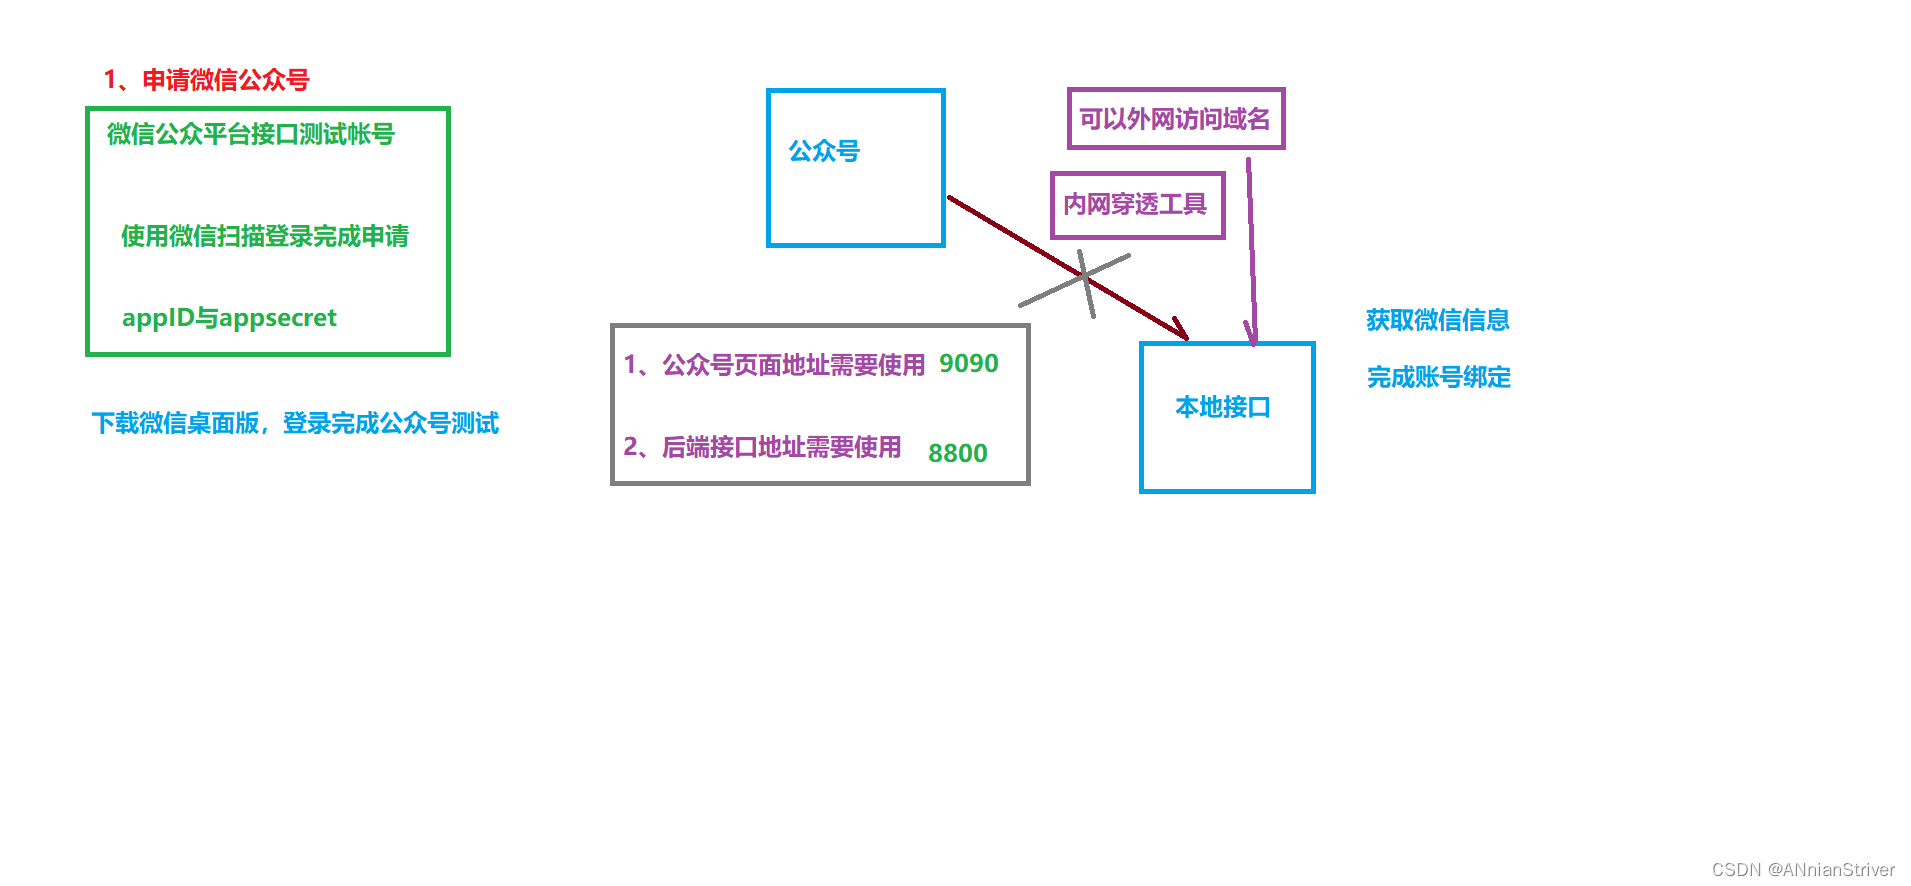
1、服务器端接口开发
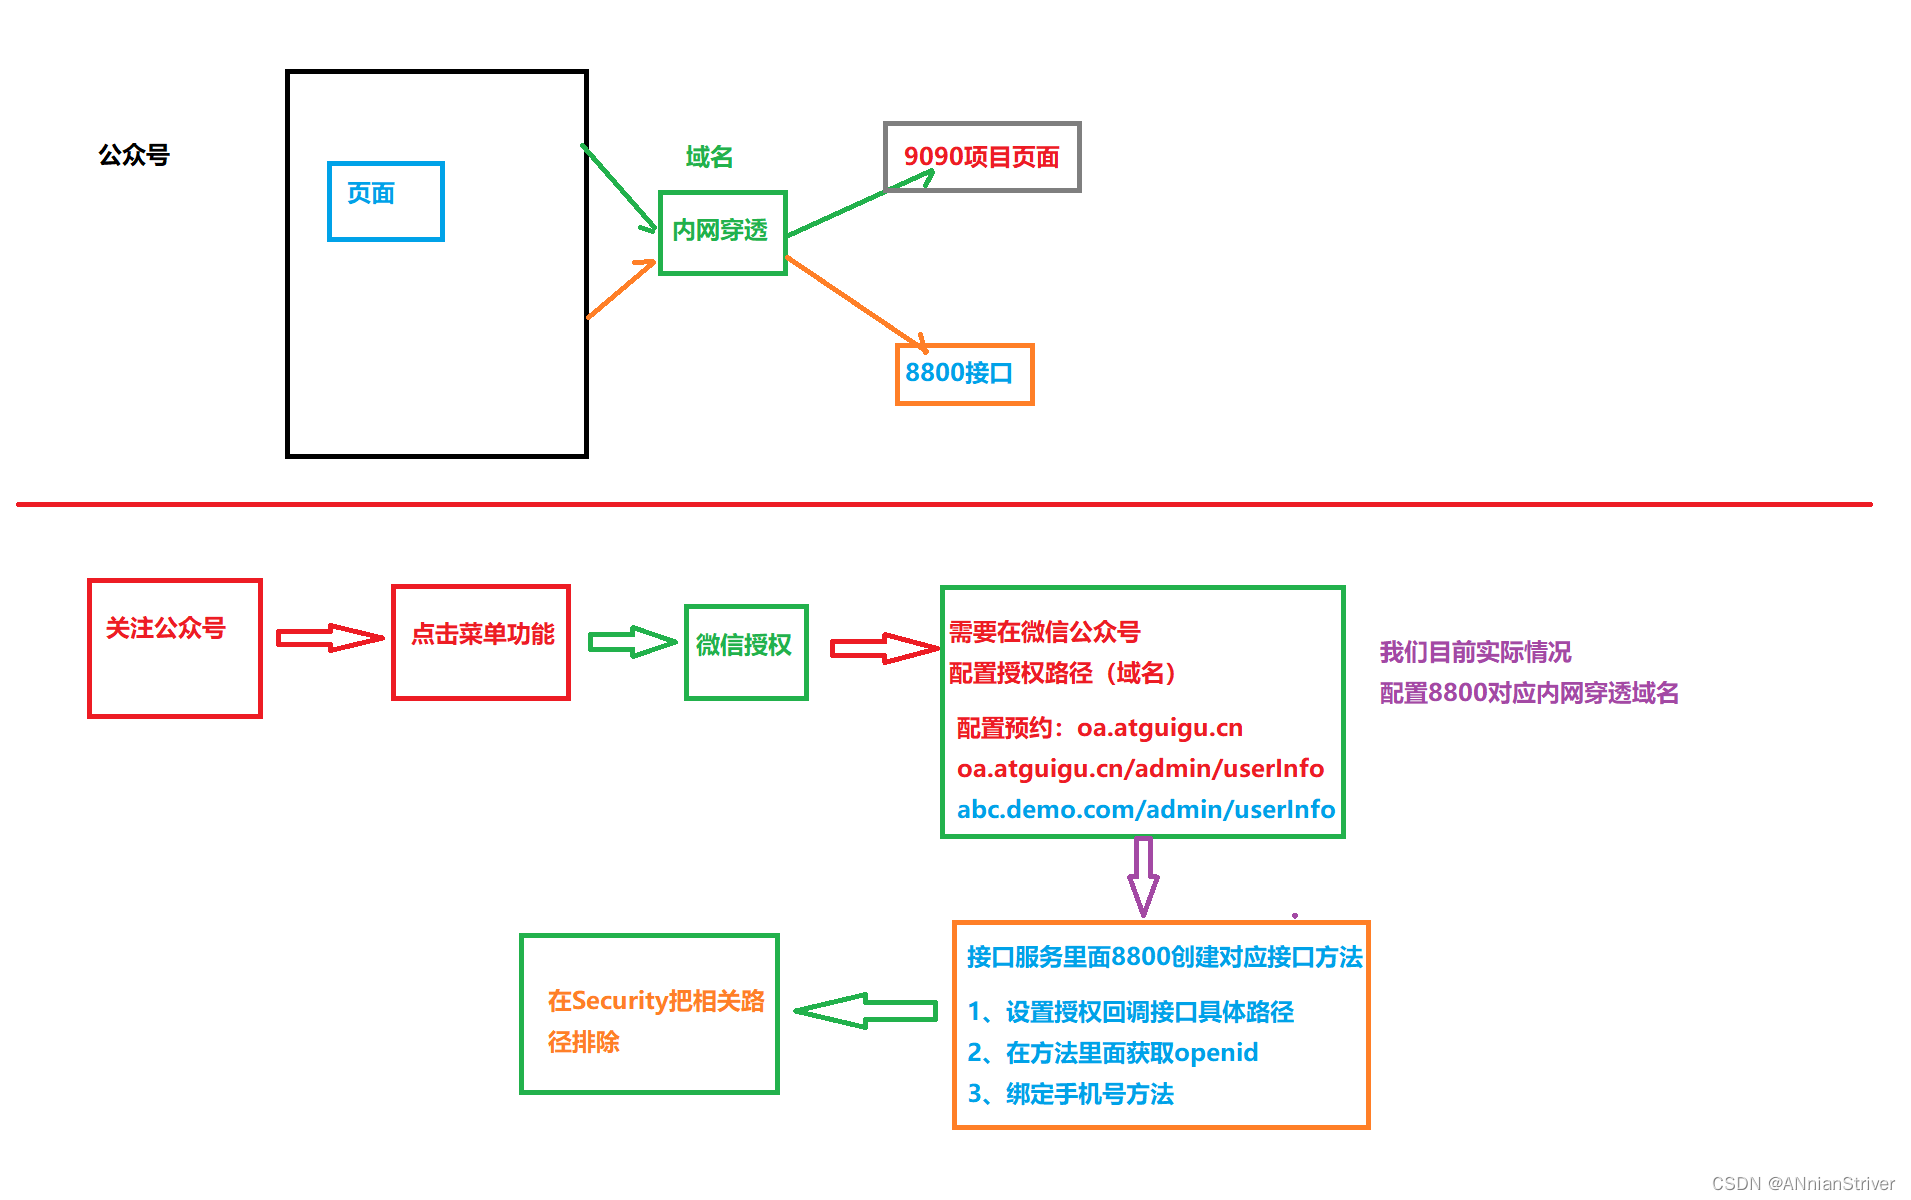
1.1、配置内网穿透(ngrok)
1.1.1、注册用户
网址:https://ngrok.cc/login/register
![[外链图片转存失败,源站可能有防盗链机制,建议将图片保存下来直接上传(img-TUUfTP9z-1688014614439)(assets\image-20220302155428572.png)]](https://img-blog.csdnimg.cn/0e6a14cb7f9b450e8e1d4b737fd56f77.png)
1.1.2、实名认证
(1)注册成功之后,登录系统,进行实名认证,认证费2元,认证通过后才能开通隧道
![[外链图片转存失败,源站可能有防盗链机制,建议将图片保存下来直接上传(img-6LN4fwsE-1688014614441)(assets\image-20220302155551084.png)]](https://img-blog.csdnimg.cn/4965c2b8443545938678dc1aa8e429d7.png)
1.1.3、开通隧道
(1)选择隧道管理 -> 开通隧道
最后一个是免费服务器,建议选择付费服务器,10元/月,因为免费服务器使用人数很多,经常掉线
![[外链图片转存失败,源站可能有防盗链机制,建议将图片保存下来直接上传(img-oAe9D89e-1688014614444)(assets\image-20220302155753120.png)]](https://img-blog.csdnimg.cn/073aece2206844a3a98c6974d12f8550.png)
(2)点击立即购买 -> 输入相关信息
![[外链图片转存失败,源站可能有防盗链机制,建议将图片保存下来直接上传(img-wtZVhQqw-1688014614446)(assets\image-20220302160247603.png)]](https://img-blog.csdnimg.cn/d7a4814228b74904a726776f068e7d7a.png)
(3)开通成功后,查看开通的隧道
这里开通了两个隧道,一个用于后端接口调用,一个用于公众号前端调用
![[外链图片转存失败,源站可能有防盗链机制,建议将图片保存下来直接上传(img-p4GNWZCr-1688014614448)(assets\image-20220307092222322.png)]](https://img-blog.csdnimg.cn/68e2698d27594e058480b104996488ed.png)
1.1.4、启动隧道
(1)下载客户端工具
![[外链图片转存失败,源站可能有防盗链机制,建议将图片保存下来直接上传(img-tlEWEmVi-1688014614450)(assets\image-20220302160737471.png)]](https://img-blog.csdnimg.cn/3b811a816bf34632a43fd50f3c737f10.png)
(2)选择windows版本
![[外链图片转存失败,源站可能有防盗链机制,建议将图片保存下来直接上传(img-qgCSD91r-1688014614451)(assets\image-20220302160834683.png)]](https://img-blog.csdnimg.cn/3758212481464441a0f6875941691129.png)
(3)解压,找到bat文件,双击启动
![[外链图片转存失败,源站可能有防盗链机制,建议将图片保存下来直接上传(img-3s0cMkiD-1688014614453)(assets\image-20220302160924245.png)]](https://img-blog.csdnimg.cn/ac51e258282b4712b0f0eda48b1684d5.png)
(4)输入隧道id,多个使用逗号隔开,最后回车就可以启动
![[外链图片转存失败,源站可能有防盗链机制,建议将图片保存下来直接上传(img-Hbrwf4Eh-1688014614456)(assets\image-20220307092329552.png)]](https://img-blog.csdnimg.cn/1a365d7ccd4e447ebaca68c6f8b079a1.png)
1.2、配置“授权回调页面域名”
请注意,按自己的ID和域名来完成,千万别用错了!!!!!
在“[网页授权获取用户基本信息]”后面,点击“修改”,添加“授权回调页面域名”(本地使用内网穿透地址)
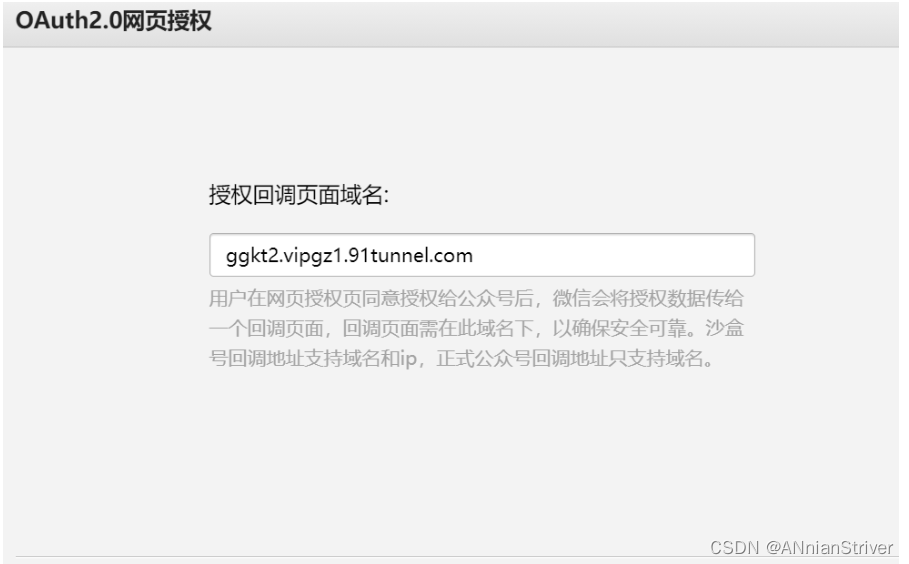
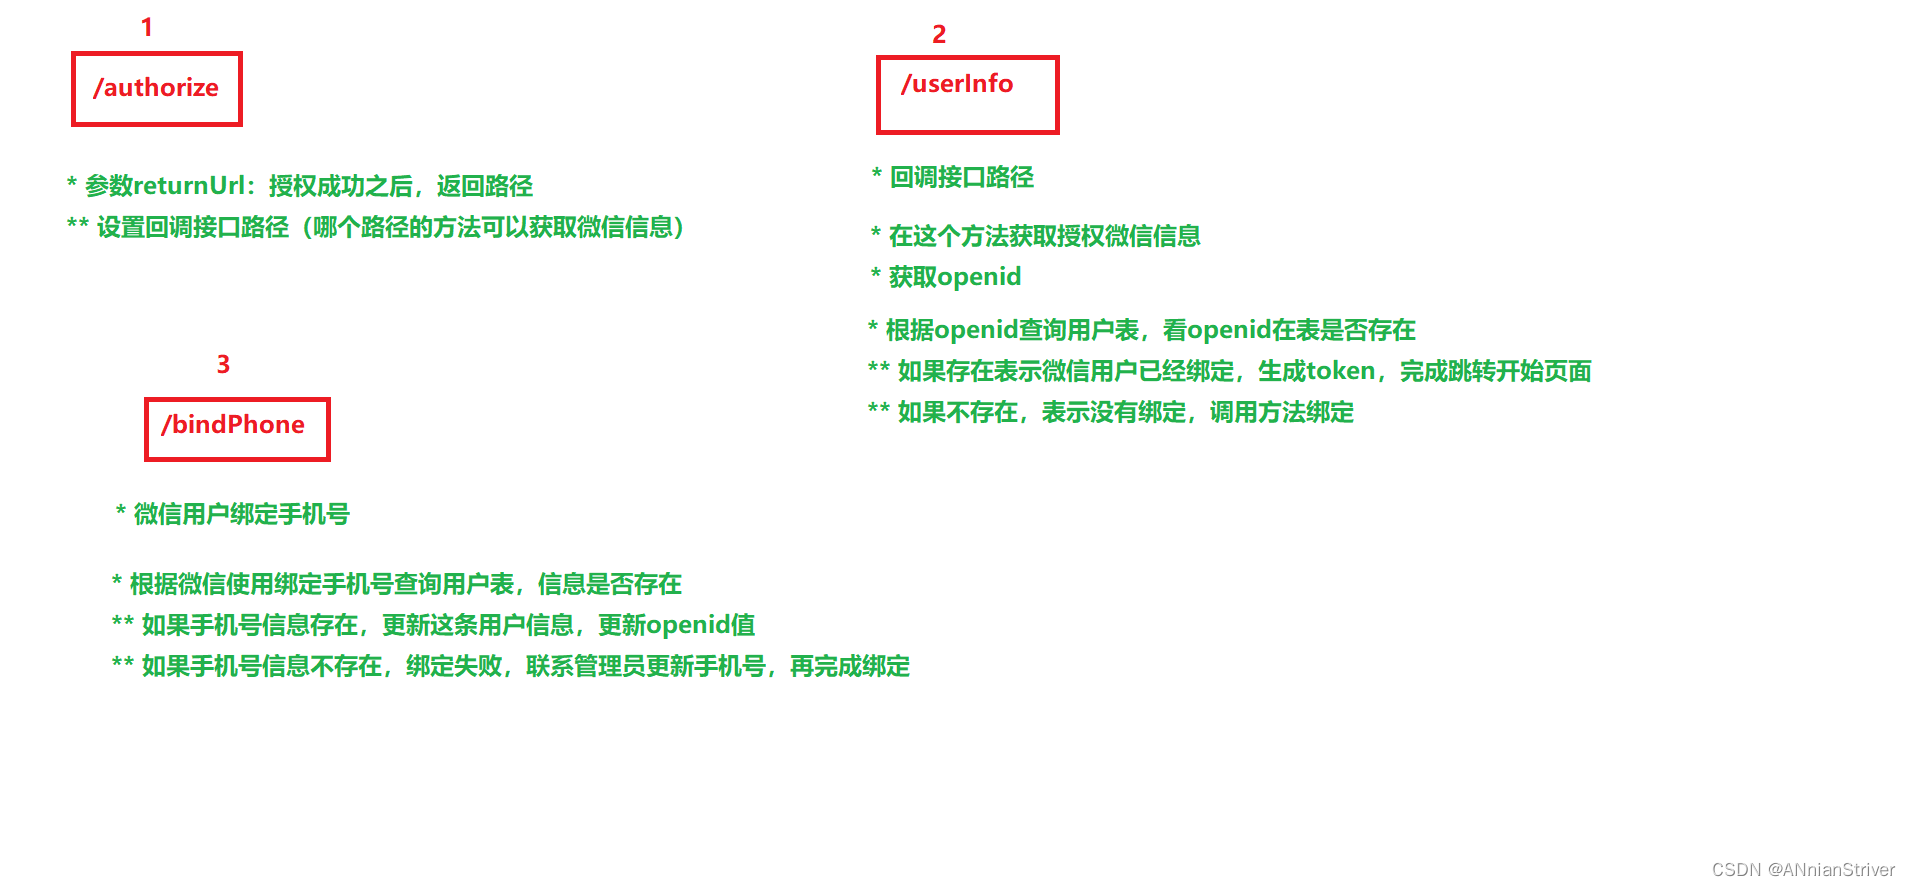
1.3、配置授权回调获取用户信息接口地址
wechat:
  mpAppId: wx13db7dcf69bq1233
  mpAppSecret: de3d7888d30febf84b64d041231e4027
  # 授权回调获取用户信息接口地址
  userInfoUrl: http://ggkt2.vipgz1.91tunnel.com/admin/wechat/userInfo
1.4、controller接口
package com.atguigu.wechat.controller;

import com.alibaba.fastjson.JSON;
import com.atguigu.common.jwt.JwtHelper;
import com.atguigu.common.result.Result;
import com.atguigu.model.system.SysUser;
import com.atguigu.system.service.SysUserService;
import com.atguigu.vo.wechat.BindPhoneVo;
import com.baomidou.mybatisplus.core.conditions.query.LambdaQueryWrapper;
import io.swagger.annotations.ApiOperation;
import lombok.extern.slf4j.Slf4j;
import me.chanjar.weixin.common.api.WxConsts;
import me.chanjar.weixin.common.bean.WxOAuth2UserInfo;
import me.chanjar.weixin.common.bean.oauth2.WxOAuth2AccessToken;
import me.chanjar.weixin.mp.api.WxMpService;
import org.springframework.beans.factory.annotation.Autowired;
import org.springframework.beans.factory.annotation.Value;
import org.springframework.stereotype.Controller;
import org.springframework.web.bind.annotation.*;

import javax.annotation.Resource;
import javax.servlet.http.HttpServletRequest;
import java.net.URLEncoder;

@Controller
@RequestMapping("/admin/wechat")
@Slf4j
public class WechatController {

    @Resource
    private SysUserService sysUserService;

    @Autowired
    private WxMpService wxMpService;

    @Value("${wechat.userInfoUrl}")
    private String userInfoUrl;

    @GetMapping("/authorize")
    public String authorize(@RequestParam("returnUrl") String returnUrl, HttpServletRequest request) {
        //由于授权回调成功后,要返回原地址路径,原地址路径带“#”号,当前returnUrl获取带“#”的url获取不全,因此前端把“#”号替换为“guiguoa”了,这里要还原一下
        String redirectURL = wxMpService.getOAuth2Service().buildAuthorizationUrl(userInfoUrl, WxConsts.OAuth2Scope.SNSAPI_USERINFO, URLEncoder.encode(returnUrl.replace("guiguoa", "#")));
        log.info("【微信网页授权】获取code,redirectURL={}", redirectURL);
        return "redirect:" + redirectURL;
    }

    @GetMapping("/userInfo")
    public String userInfo(@RequestParam("code") String code,
                           @RequestParam("state") String returnUrl) throws Exception {
        log.info("【微信网页授权】code={}", code);
        log.info("【微信网页授权】state={}", returnUrl);
        WxOAuth2AccessToken accessToken = wxMpService.getOAuth2Service().getAccessToken(code);
        String openId = accessToken.getOpenId();
        log.info("【微信网页授权】openId={}", openId);

        WxOAuth2UserInfo wxMpUser = wxMpService.getOAuth2Service().getUserInfo(accessToken, null);
        log.info("【微信网页授权】wxMpUser={}", JSON.toJSONString(wxMpUser));

        SysUser sysUser = sysUserService.getOne(new LambdaQueryWrapper<SysUser>().eq(SysUser::getOpenId, openId));
        String token = "";
        //null != sysUser 说明已经绑定,反之为建立账号绑定,去页面建立账号绑定
        if(null != sysUser) {
            token = JwtHelper.createToken(sysUser.getId(), sysUser.getUsername());
        }
        if(returnUrl.indexOf("?") == -1) {
            return "redirect:" + returnUrl + "?token=" + token + "&openId=" + openId;
        } else {
            return "redirect:" + returnUrl + "&token=" + token + "&openId=" + openId;
        }
    }

    @ApiOperation(value = "微信账号绑定手机")
    @PostMapping("bindPhone")
    @ResponseBody
    public Result bindPhone(@RequestBody BindPhoneVo bindPhoneVo) {
        SysUser sysUser = sysUserService.getOne(new LambdaQueryWrapper<SysUser>().eq(SysUser::getPhone, bindPhoneVo.getPhone()));
        if(null != sysUser) {
            sysUser.setOpenId(bindPhoneVo.getOpenId());
            sysUserService.updateById(sysUser);

            String token = JwtHelper.createToken(sysUser.getId(), sysUser.getUsername());
            return Result.ok(token);
        } else {
            return Result.fail("手机号码不存在,绑定失败");
        }
    }
}
1.5、排除拦截
在WebSecurityConfig类配置排除拦截
   /**
     * 配置哪些请求不拦截
     * 排除swagger相关请求
     * @param web
     * @throws Exception
     */
    @Override
    public void configure(WebSecurity web) throws Exception {
        web.ignoring().antMatchers("/admin/modeler/**","/diagram-viewer/**","/editor-app/**","/*.html",
                "/admin/processImage/**",
                "/admin/wechat/authorize","/admin/wechat/userInfo","/admin/wechat/bindPhone",
                "/favicon.ico","/swagger-resources/**", "/webjars/**", "/v2/**", "/swagger-ui.html/**", "/doc.html");
    }
2、移动端前端处理
2.1、添加api接口
在src/api/userInfo.js添加方法
bindPhone(bindPhoneVo) {
  return request({
    url: `/admin/wechat/bindPhone`,
    method: 'post',
    data: bindPhoneVo
  })
},
2.2、绑定关系
由于移动端所有页面都需要授权登录后在可以访问,因此我们把处理业务放到入口页面处理,scr/App.vue
<template>
  <div id="app">
    <router-view />

    <el-dialog title="绑定手机" :visible.sync="dialogVisible" width="80%" >
      <el-form ref="dataForm" :model="bindPhoneVo" size="small">
        <h4>绑定你的手机号,建立云尚办公系统关联关系</h4>
        <el-form-item label="手机号码">
          <el-input v-model="bindPhoneVo.phone"/>
        </el-form-item>
      </el-form>
      <span slot="footer" class="dialog-footer">
        <el-button type="primary" icon="el-icon-check" @click="saveBind()" size="small">确 定</el-button>
      </span>
    </el-dialog>
  </div>
</template>
<script>
import userInfoApi from '@/api/userInfo'
export default {
  data() {
    return {
      show: true,
      dialogVisible: false,
      bindPhoneVo: {
        openId: '',
        phone: ''
      }
    };
  },

  created() {
    // 处理微信授权登录
    this.wechatLogin();
  },

  methods: {
    wechatLogin() {
      // 处理微信授权登录
      let token = this.getQueryString('token') || '';
      let openId = this.getQueryString('openId') || '';
      // token === '' && openId != '' 只要这种情况,未绑定账号
      if(token === '' && openId != '') {
        // 绑定账号
        this.bindPhoneVo.openId = openId
        this.dialogVisible = true
      } else {
        // 如果绑定了,授权登录直接返回token
        if(token !== '') {
          window.localStorage.setItem('token', token);
        }
        token = window.localStorage.getItem('token') || '';
        if (token == '') {
          let url = window.location.href.replace('#', 'guiguoa')
          window.location = 'http://oa.atguigu.cn/admin/wechat/authorize?returnUrl=' + url
        }
      }
    },

    saveBind() {
      if(this.bindPhoneVo.phone.length != 11) {
        alert('手机号码格式不正确')
        return
      }
      userInfoApi.bindPhone(this.bindPhoneVo).then(response => {
        window.localStorage.setItem('token', response.data);
        this.dialogVisible = false
        window.location = 'http://oa.atguigu.cn'
      })
    },

    getQueryString (paramName) {
      if(window.location.href.indexOf('?') == -1) return '';

      let searchString = window.location.href.split('?')[1];
      let i, val, params = searchString.split("&");

      for (i=0;i<params.length;i++) {
        val = params[i].split("=");
        if (val[0] == paramName) {
          return val[1];
        }
      }
      return '';
    }
  }
};
</script>
<style lang="scss">
#app {
  font-family: Avenir, Helvetica, Arial, sans-serif;
  -webkit-font-smoothing: antialiased;
  -moz-osx-font-smoothing: grayscale;
  color: #2c3e50;
}
</style>
2.3、添加微信js引用
在public/index.html添加js引用
<script src="http://res.wx.qq.com/open/js/jweixin-1.4.0.js" type="text/javascript"></script>
2.4、调整request.js
import axios from "axios";

// 创建axios实例
const service = axios.create({
  baseURL: "http://oa.atguigu.cn", // api 的 base_url
  timeout: 30000 // 请求超时时间
});

// http request 拦截器
service.interceptors.request.use(config => {
    let token = window.localStorage.getItem("token") || "";
    if (token != "") {
      config.headers["token"] = token;
    }
    return config;
  },
  err => {
    return Promise.reject(err);
  });
// http response 拦截器
service.interceptors.response.use(response => {
    if (response.data.code == 208) {
      // debugger
      // 替换# 后台获取不到#后面的参数
      let url = window.location.href.replace('#', 'guiguoa')
      window.location = 'http://oa.atguigu.cn/admin/wechat/authorize?returnUrl=' + url
    } else {
      if (response.data.code == 200) {
        return response.data;
      } else {
        // 209没有权限 系统会自动跳转授权登录的,已在App.vue处理过,不需要提示
        if (response.data.code != 209) {
          alert(response.data.message || "error");
        }
        return Promise.reject(response);
      }
    }
  },
  error => {
    return Promise.reject(error.response);   // 返回接口返回的错误信息
  });

export default service;
2.5、测试
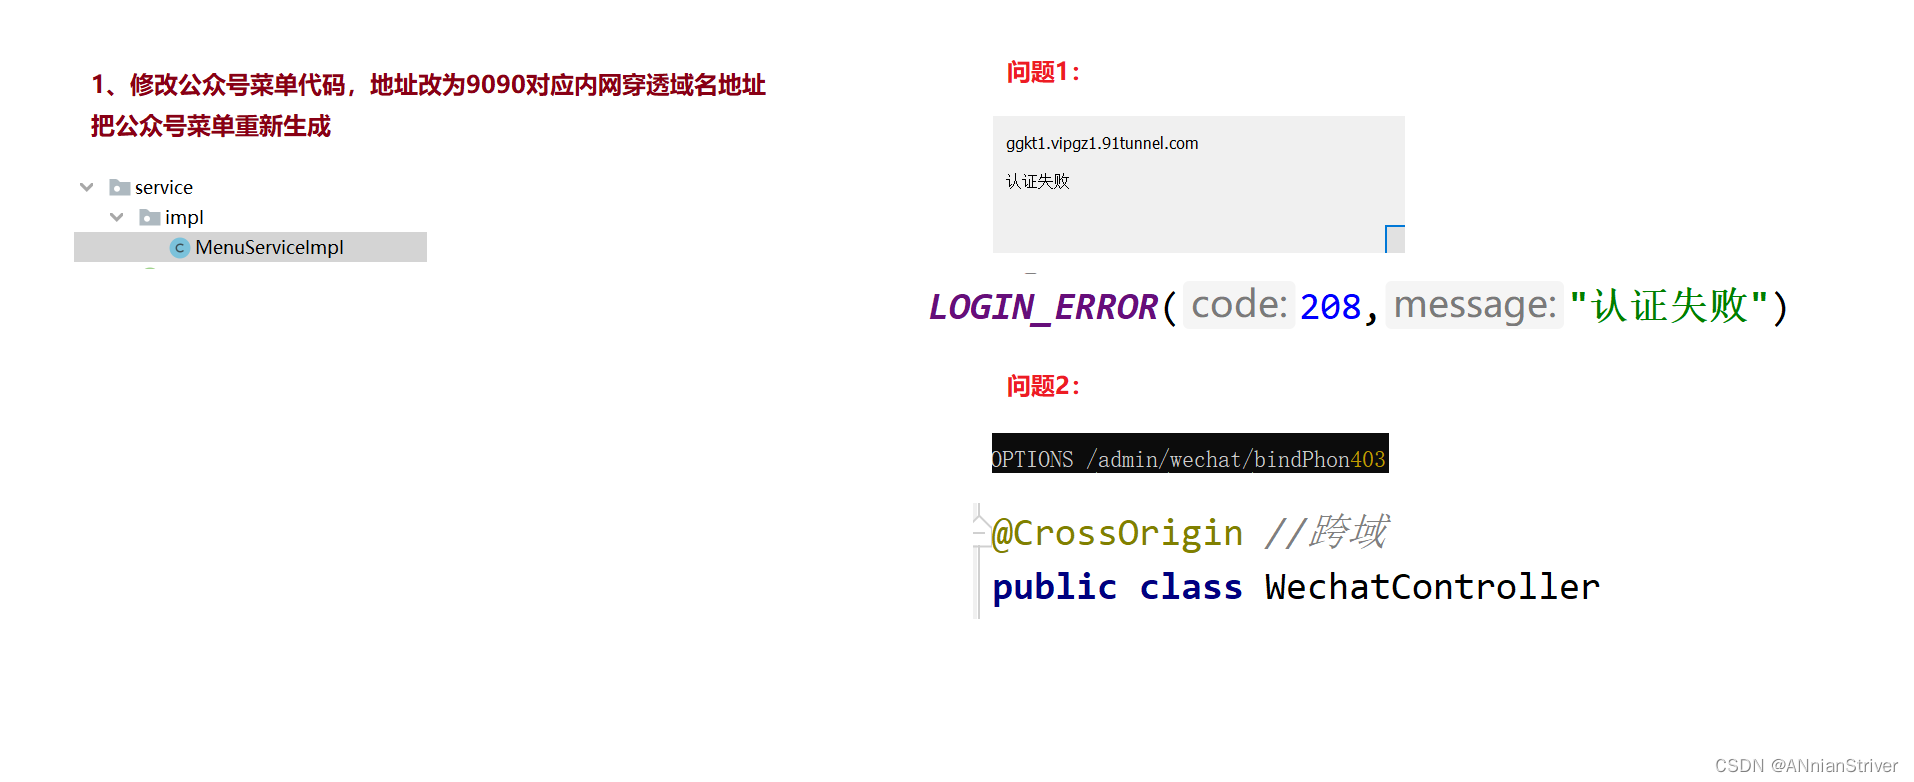
四、消息推送
有待审批消息,我们需要通知审批人审批信息,审批人审批过了,我们要通知提交申请人查看信息。
消息推送我们使用“微信模板消息”接口
1、配置微信模板消息
1、待处理审批:{{first.DATA}} 审批编号:{{keyword1.DATA}} 提交时间:{{keyword2.DATA}} {{content.DATA}}
2、审批已处理:{{first.DATA}} 审批编号:{{keyword1.DATA}} 提交时间:{{keyword2.DATA}} 当前审批人:{{keyword3.DATA}} 审批状态:{{keyword4.DATA}} {{content.DATA}}
![[外链图片转存失败,源站可能有防盗链机制,建议将图片保存下来直接上传(img-vAqaRaxM-1688014614461)(assets/1671609701750.png)]](https://img-blog.csdnimg.cn/76c6836ba59c407d94c426facab021d3.png)
2、定义接口
package com.atguigu.wechat.service;

public interface MessageService {

    /**
     * 推送待审批人员
     * @param processId
     * @param userId
     * @param taskId
     */
    void pushPendingMessage(Long processId, Long userId, String taskId);

    /**
     * 审批后推送提交审批人员
     * @param processId
     * @param userId
     * @param status
     */
    void pushProcessedMessage(Long processId, Long userId, Integer status);

}
3、service接口实现
package com.atguigu.wechat.service.impl;

import com.alibaba.fastjson.JSON;
import com.alibaba.fastjson.JSONObject;
import com.atguigu.model.process.Process;
import com.atguigu.model.process.ProcessTemplate;
import com.atguigu.model.system.SysUser;
import com.atguigu.process.service.ProcessService;
import com.atguigu.process.service.ProcessTemplateService;
import com.atguigu.security.custom.LoginUserInfoHelper;
import com.atguigu.system.service.SysUserService;
import com.atguigu.wechat.service.MessageService;
import lombok.SneakyThrows;
import lombok.extern.slf4j.Slf4j;
import me.chanjar.weixin.mp.api.WxMpService;
import me.chanjar.weixin.mp.bean.template.WxMpTemplateData;
import me.chanjar.weixin.mp.bean.template.WxMpTemplateMessage;
import org.joda.time.DateTime;
import org.springframework.stereotype.Service;
import org.springframework.util.StringUtils;

import javax.annotation.Resource;
import java.util.Map;

@Slf4j
@Service
public class MessageServiceImpl implements MessageService {

    @Resource
    private WxMpService wxMpService;

    @Resource
    private ProcessService processService;

    @Resource
    private ProcessTemplateService processTemplateService;

    @Resource
    private SysUserService sysUserService;

    @SneakyThrows
    @Override
    public void pushPendingMessage(Long processId, Long userId, String taskId) {
        Process process = processService.getById(processId);
        ProcessTemplate processTemplate = processTemplateService.getById(process.getProcessTemplateId());
        SysUser sysUser = sysUserService.getById(userId);
        SysUser submitSysUser = sysUserService.getById(process.getUserId());
        String openid = sysUser.getOpenId();
        //方便测试,给默认值(开发者本人的openId)
        if(StringUtils.isEmpty(openid)) {
            openid = "omwf25izKON9dktgoy0dogqvnGhk";
        }
        WxMpTemplateMessage templateMessage = WxMpTemplateMessage.builder()
        .toUser(openid)//要推送的用户openid
        .templateId("KvOVeW7jz4-DZgQ_WuXjMZO5I4pPA7L7fflVNwC_ZQg")//模板id
        .url("http://oa.atguigu.cn/#/show/"+processId+"/"+taskId)//点击模板消息要访问的网址
        .build();
        JSONObject jsonObject = JSON.parseObject(process.getFormValues());
        JSONObject formShowData = jsonObject.getJSONObject("formShowData");
        StringBuffer content = new StringBuffer();
        for (Map.Entry entry : formShowData.entrySet()) {
            content.append(entry.getKey()).append(":").append(entry.getValue()).append("\n ");
        }
        templateMessage.addData(new WxMpTemplateData("first", submitSysUser.getName()+"提交了"+processTemplate.getName()+"审批申请,请注意查看。", "#272727"));
        templateMessage.addData(new WxMpTemplateData("keyword1", process.getProcessCode(), "#272727"));
        templateMessage.addData(new WxMpTemplateData("keyword2", new DateTime(process.getCreateTime()).toString("yyyy-MM-dd HH:mm:ss"), "#272727"));
         templateMessage.addData(new WxMpTemplateData("content", content.toString(), "#272727"));
        String msg = wxMpService.getTemplateMsgService().sendTemplateMsg(templateMessage);
        log.info("推送消息返回:{}", msg);
    }

    @SneakyThrows
    @Override
    public void pushProcessedMessage(Long processId, Long userId, Integer status) {
        Process process = processService.getById(processId);
        ProcessTemplate processTemplate = processTemplateService.getById(process.getProcessTemplateId());
        SysUser sysUser = sysUserService.getById(userId);
        SysUser currentSysUser = sysUserService.getById(LoginUserInfoHelper.getUserId());
        String openid = sysUser.getOpenId();
        if(StringUtils.isEmpty(openid)) {
            openid = "omwf25izKON9dktgoy0dogqvnGhk";
        }
        WxMpTemplateMessage templateMessage = WxMpTemplateMessage.builder()
                .toUser(openid)//要推送的用户openid
                .templateId("I0kVeto7T0WIDP6tyoHh-hx83wa9_pe7Nx9eT93-6sc")//模板id
                .url("http://oa.atguigu.cn/#/show/"+processId+"/0")//点击模板消息要访问的网址
                .build();
        JSONObject jsonObject = JSON.parseObject(process.getFormValues());
        JSONObject formShowData = jsonObject.getJSONObject("formShowData");
        StringBuffer content = new StringBuffer();
        for (Map.Entry entry : formShowData.entrySet()) {
            content.append(entry.getKey()).append(":").append(entry.getValue()).append("\n ");
        }
        templateMessage.addData(new WxMpTemplateData("first", "你发起的"+processTemplate.getName()+"审批申请已经被处理了,请注意查看。", "#272727"));
        templateMessage.addData(new WxMpTemplateData("keyword1", process.getProcessCode(), "#272727"));
        templateMessage.addData(new WxMpTemplateData("keyword2", new DateTime(process.getCreateTime()).toString("yyyy-MM-dd HH:mm:ss"), "#272727"));
        templateMessage.addData(new WxMpTemplateData("keyword3", currentSysUser.getName(), "#272727"));
        templateMessage.addData(new WxMpTemplateData("keyword4", status == 1 ? "审批通过" : "审批拒绝", status == 1 ? "#009966" : "#FF0033"));
        templateMessage.addData(new WxMpTemplateData("content", content.toString(), "#272727"));
        String msg = wxMpService.getTemplateMsgService().sendTemplateMsg(templateMessage);
        log.info("推送消息返回:{}", msg);
    }

}
4、推送调用
4.1、启动流程实例接口
代码片段
@Autowired
private MessageService messageService;
@Transactional
public Process startUp(ProcessFormVo processFormVo) {
    ...

    //计算下一个审批人
    List<Task> taskList = this.getCurrentTaskList(processInstanceId);
    if (!CollectionUtils.isEmpty(taskList)) {
        List<String> assigneeList = new ArrayList<>();
        for(Task task : taskList) {
            SysUser sysUser = sysUserService.getByUsername(task.getAssignee());
            assigneeList.add(sysUser.getName());

            //推送消息给下一个审批人
            messageService.pushPendingMessage(process.getId(), sysUser.getId(), task.getId());
        }
        process.setDescription("等待" + StringUtils.join(assigneeList.toArray(), ",") + "审批");
    }

    processMapper.updateById(process);
    return process;
}
4.2、审批接口
代码片段
public void approve(ApprovalVo approvalVo) {
    ...

    //计算下一个审批人
    Process process = this.getById(approvalVo.getProcessId());
    List<Task> taskList = this.getCurrentTaskList(process.getProcessInstanceId());
    if (!CollectionUtils.isEmpty(taskList)) {
        List<String> assigneeList = new ArrayList<>();
        for(Task task : taskList) {
            SysUser sysUser = sysUserService.getByUsername(task.getAssignee());
            assigneeList.add(sysUser.getName());

            //推送消息给下一个审批人
            messageService.pushPendingMessage(process.getId(), sysUser.getId(), task.getId());
        }

        process.setDescription("等待" + StringUtils.join(assigneeList.toArray(), ",") + "审批");
        process.setStatus(1);
    } else {
        ...
    }
    //推送消息给申请人
    messageService.pushProcessedMessage(process.getId(), process.getUserId(), approvalVo.getStatus());
    this.updateById(process);
}

