AndroidTV开发14优雅地实现TV端超长巨图加载
1.前言
之前在Android和Vue端都实现过长图加载,虽然实现需求,但是有很多问题没有解决,效果也不尽人意今天就各种问题来分析一下:
- 图片加载时清晰度不是很好,会失真的情况?
- 图片超过屏幕限制咋解决?
- 如果是超长巨图加载怎么办?20M的图片?试过714*13987的图片吗?
- 图片缓存怎么做?如何保证每次加载速度?缓存的清理咋处理?
- 如何保证图片加载大图不崩溃且速度很快?
- 图片最多加载20000*20000?会崩溃吗?超过多少会崩溃?
为了解决以上问题本人找到了各种方案进行尝试,包含之前的例子,最终决定采用SubsamplingScaleImageView这个库,
首先此库有7.6k的star,使用过程中发现图片缓存和内存处理得非常好,当然此库是针对手机端开发的,TV端的大图库很少,搞明白原理其实不区分手机还是TV、盒子、投影等,我是在此库的基础上封装了一套适用于TV端的超长大图加载工具类,同时封装了一套适用于vue的图片加载库,不过是在腾讯的hippy基础之上封装的,本文先讲解TV端优雅地加载超长大图方案,下一篇讲解vue的封装和方案。
2.本库的功能简介
- 显示巨大的图像或长图,大图可以加载到内存中
- 在放大时显示高分辨率细节
- 目前测试过最多加载20,000x20,000像素的图片,但较大的图像加载速度较慢
3.SubsamplingScaleImageView简介:
- SubsamplingScaleImageView是一个适用于 Android 的自定义图像视图,专为照片库设计并显示没有 OutOfMemoryErrors 的大图像(例如地图和建筑计划)。包括手指缩放、平移、旋转和动画支持,并允许轻松扩展,以便您可以添加自己的覆盖和触摸事件检测。
- 该视图可选择使用子采样和图块来支持非常大的图像 - 加载低分辨率基础层,当您放大时,它会覆盖可见区域的较小高分辨率图块。这避免了在内存中保存过多的数据。它非常适合显示大图像,同时允许您放大到高分辨率细节。您可以为较小的图像和显示位图对象禁用平铺。禁用平铺有一些优点和缺点,因此要决定哪个最好,请参阅 wiki
4.SubsamplingScaleImageView的实现流程图如下:

5.SubsamplingScaleImageView的源码地址如下:
https://github.com/davemorrissey/subsampling-scale-image-view
6.主要的方法说明:
| 方法 | 描述 | 参数 |
|---|---|---|
| onReady() | 图片资源已准备 | |
| onImageLoaded() | 图片已加载 | |
| onPreviewLoadError() | 图片预览失败 | Exception(预览失败异常信息) |
| onImageLoadError() | 图片加载失败 | Exception(加载失败异常信息) |
| onTileLoadError() | 图片无法加载时调用 | Exception(加载失败异常信息) |
| onPreviewReleased() | 图片预览完成后回收位图 | |
| onScaleChanged(); | 图片缩放比例发生改变 | float newScale, int origin |
| onCenterChanged(); | 图片的中心点发生改变 | PointF newCenter, int origin |
| doubleTapZoom(); | 是否可以双指缩放 | PointF sCenter, PointF vFocus |
| setMinimumDpi(); | 允许设置的屏幕最小密度 | int dpi |
| setMaximumDpi(); | 允许设置的屏幕最大密度 | int dpi |
| setDoubleTapZoomDpi(); | 设置双指缩放的密度 | int dpi |
| setGestureDetector(); | 设置手势监听事件 | Context context |
| setOrientation(); | 设置图片方向 | int orientation |
7.主要的事件如下:
7.1 图片加载的事件接口监听:
public interface OnImageEventListener
- void onReady();
- void onImageLoaded();
- void onPreviewLoadError(Exception e);
- void onImageLoadError(Exception e);
- void onTileLoadError(Exception e);
- void onPreviewReleased();
public interface OnImageEventListener {

    void onReady();

    void onImageLoaded();

    void onPreviewLoadError(Exception e);

    void onImageLoadError(Exception e);

    void onTileLoadError(Exception e);

    void onPreviewReleased();
}
7.2.图片状态发生改变事件监听:
public interface OnStateChangedListener
- void onScaleChanged(float newScale, int origin);
- void onCenterChanged(PointF newCenter, int origin);
public interface OnStateChangedListener {
	/**
	 * 图片缩放比例发生改变
	 * @params newScale 新的缩放比例
	 * @params origin  事件的来源
	 */
    void onScaleChanged(float newScale, int origin);

    /**
	 * 图片的中心点发生改变
	 * @params newScale 新的中心点
	 * @params origin  事件的来源
	 */
    void onCenterChanged(PointF newCenter, int origin);

}
7.3 图片加载动画事件监听
OnAnimationEventListene
- void onComplete();
- void onInterruptedByUser();
- void onInterruptedByNewAnim();
public interface OnAnimationEventListener{
        /**
         * 动画已经完成
         */
        void onComplete();

        /**
         * 由于用户触摸了屏幕,动画在到达终点之前已中止。
         */
        void onInterruptedByUser();

        /**
         * 由于新的动画已开始,动画在到达终点之前已中止。
         */
        void onInterruptedByNewAnim();
}
8.主要属性说明如下:
| 参数 | 描述 | 类型 |
|---|---|---|
| PAN_LIMIT_INSIDE | 显示在图片内部 | int |
| PAN_LIMIT_OUTSIDE | 显示超出图片范围 | int |
| PAN_LIMIT_CENTER | 显示在屏幕中间 | int |
| SCALE_TYPE_CENTER_INSIDE | 缩放处于图片内部样式 | int |
| SCALE_TYPE_CENTER_CROP | 缩放裁剪样式 | int |
| SCALE_TYPE_CUSTOM | 自定义缩放样式 | int |
| SCALE_TYPE_START | 图片开始缩放位置样式 | int |
| ORIENTATION_USE_EXIF | 默认旋转角度 | int |
| ORIENTATION_0 | 旋转角度0 | int |
| ORIENTATION_90 | 旋转角度90 | int |
| ORIENTATION_180 | 旋转角度180 | int |
| ORIENTATION_270 | 旋转角度270 | int |
| bitmapIsPreview | 是否使用预览位图 | boolean |
| bitmapIsCached | 是否使用缓存 | boolean |
| orientation | 角度 | int |
| maxScale | 允许缩放的最大比例 | float |
| minScale | 允许缩放的最小比例 | float |
| minimumTileDpi | 允许的最小密度 | int |
| panLimit | 图片缩放样式 | int |
9.使用说明:
此库默认是支持本地图片的,如果可以拿到图片的资源id,assert或者文件路径,直接使用下面方式进行使用:
SubsamplingScaleImageView imageView = (SubsamplingScaleImageView)findViewById(id.imageView);
imageView.setImage(ImageSource.resource(R.drawable.monkey));
// ... or ...
imageView.setImage(ImageSource.asset("big1.png"))
// ... or ...
imageView.setImage(ImageSource.uri("/sdcard/DCIM/DSCM00123.JPG"));
复制代码
如果可以拿到 bitmap 就可以这么使用:

SubsamplingScaleImageView imageView = (SubsamplingScaleImageView)findViewById(id.imageView);
imageView.setImage(ImageSource.bitmap(bitmap));
可以看到使用是非常简单的。

本文在此基础之上添加了网络图片的使用,代码如下:
//使用网络图片之前需要添加网络请求权限,这个做Android开发的基本上都知道
<uses-permission android:name="android.permission.INTERNET"/>
//适配Androidhttps请求权限
android:usesCleartextTraffic="true"

public String url = "http://img-blog.csdnimg.cn/98fde8ba229541dc85a9f0f1be8f9b6c.jpeg#pic_center";

private void initView() {
        easyTVLongView = findViewById(R.id.easyLongView);
        easyTVLongView.setFocusable(true);
        easyTVLongView.requestFocus();
        easyTVLongView.setLongImages(url);
}
10.源码分析:
先看ImageSource:
在前面的使用过程中,发现SubsamplingScaleImageView都是基于 ImageSource 来进行控制的,
// 缩减之后的部分源码
public final class ImageSource {

    static final String FILE_SCHEME = "file:///";
    static final String ASSET_SCHEME = "file:///android_asset/";

    private final Uri uri;
    private final Bitmap bitmap;
    private final Integer resource;
    private boolean tile;
    private int sWidth;
    private int sHeight;
    private Rect sRegion;
    private boolean cached;

    private ImageSource(int resource) {
        this.bitmap = null;
        this.uri = null;
        this.resource = resource;
        this.tile = true;
    }
 }
- 简单来说,ImageSource 的作用跟它的命名是一样的,用来处理图片地址来源,最后 SubsamplingScaleImageView 也是从它获取图片的。这个类有好几个属性, uri bitmap resource这几个就是图片的来源, 还有几个是图片的尺寸,而我们调用的构造方法里面主要是resource和tile这两个属性, tile = true说明支持局部加载属性。
- 这个也是我们需要借鉴的。当我们再写一个图片库的时候,除了支持网络图片,也要考虑其他场景,比如对本地图片和资源的支持。还有就是如果你不知道怎么去支持的时候,这时候就可以看看 ImageSource 的实现。这就是我们为啥需要读源码,学习源码。
- 这里还有个点需要注意的是,如果直接给 bitmap 传给 ImageSource 是不会触发瓦片式加载的。因为整个图片的 bitmap 已经存在了,在做瓦片式意义不大。
再看setImage 方法
public final void setImage(@NonNull ImageSource imageSource, ImageSource previewSource, ImageViewState state) {
        //noinspection ConstantConditions
        if (imageSource == null) {
            throw new NullPointerException("imageSource must not be null");
        }

        reset(true);
        if (state != null) { restoreState(state); }

        if (previewSource != null) {
            if (imageSource.getBitmap() != null) {
                throw new IllegalArgumentException("Preview image cannot be used when a bitmap is provided for the main image");
            }
            if (imageSource.getSWidth() <= 0 || imageSource.getSHeight() <= 0) {
                throw new IllegalArgumentException("Preview image cannot be used unless dimensions are provided for the main image");
            }
            this.sWidth = imageSource.getSWidth();
            this.sHeight = imageSource.getSHeight();
            this.pRegion = previewSource.getSRegion();
            if (previewSource.getBitmap() != null) {
                this.bitmapIsCached = previewSource.isCached();
                onPreviewLoaded(previewSource.getBitmap());
            } else {
                Uri uri = previewSource.getUri();
                if (uri == null && previewSource.getResource() != null) {
                    uri = Uri.parse(ContentResolver.SCHEME_ANDROID_RESOURCE + "://" + getContext().getPackageName() + "/" + previewSource.getResource());
                }
                BitmapLoadTask task = new BitmapLoadTask(this, getContext(), bitmapDecoderFactory, uri, true);
                execute(task);
            }
        }

        if (imageSource.getBitmap() != null && imageSource.getSRegion() != null) {
            onImageLoaded(Bitmap.createBitmap(imageSource.getBitmap(), imageSource.getSRegion().left, imageSource.getSRegion().top, imageSource.getSRegion().width(), imageSource.getSRegion().height()), ORIENTATION_0, false);
        } else if (imageSource.getBitmap() != null) {
            onImageLoaded(imageSource.getBitmap(), ORIENTATION_0, imageSource.isCached());
        } else {
            sRegion = imageSource.getSRegion();
            uri = imageSource.getUri();
            if (uri == null && imageSource.getResource() != null) {
                uri = Uri.parse(ContentResolver.SCHEME_ANDROID_RESOURCE + "://" + getContext().getPackageName() + "/" + imageSource.getResource());
            }
            if (imageSource.getTile() || sRegion != null) {
                // Load the bitmap using tile decoding.
                TilesInitTask task = new TilesInitTask(this, getContext(), regionDecoderFactory, uri);
                execute(task);
            } else {
                // Load the bitmap as a single image.
                BitmapLoadTask task = new BitmapLoadTask(this, getContext(), bitmapDecoderFactory, uri, false);
                execute(task);
            }
        }
    }
然后看TilesInitTask和BitmapLoadTask
private static class TilesInitTask extends AsyncTask<Void, Void, int[]> {
        @Override
        protected int[] doInBackground(Void... params) {
            try {
                String sourceUri = source.toString();
                Context context = contextRef.get();
                DecoderFactory<? extends ImageRegionDecoder> decoderFactory = decoderFactoryRef.get();
                SubsamplingScaleImageView view = viewRef.get();
                if (context != null && decoderFactory != null && view != null) {
                    view.debug("TilesInitTask.doInBackground");            // 获取decoder
                    decoder = decoderFactory.make();
                    Point dimensions = decoder.init(context, source);
                    int sWidth = dimensions.x;
                    int sHeight = dimensions.y;
                    int exifOrientation = view.getExifOrientation(context, sourceUri);            // 获取 region,或者说修正 region
                    if (view.sRegion != null) {
                        view.sRegion.left = Math.max(0, view.sRegion.left);
                        view.sRegion.top = Math.max(0, view.sRegion.top);
                        view.sRegion.right = Math.min(sWidth, view.sRegion.right);
                        view.sRegion.bottom = Math.min(sHeight, view.sRegion.bottom);
                        sWidth = view.sRegion.width();
                        sHeight = view.sRegion.height();
                    }
                    return new int[] { sWidth, sHeight, exifOrientation };
                }
            } catch (Exception e) {
                Log.e(TAG, "Failed to initialise bitmap decoder", e);
                this.exception = e;
            }
            return null;
        }

        @Override
        protected void onPostExecute(int[] xyo) {
            final SubsamplingScaleImageView view = viewRef.get();
            if (view != null) {
                if (decoder != null && xyo != null && xyo.length == 3) {
                    view.onTilesInited(decoder, xyo[0], xyo[1], xyo[2]);
                } else if (exception != null && view.onImageEventListener != null) {
                    view.onImageEventListener.onImageLoadError(exception);
                }
            }
        }
    }
在后台执行的主要事情是调用了解码器decoder的初始化方法,获取图片的宽高信息,然后再回到主线程调用onTilesInited方法通知已经初始化完成。我们先看初始化方法做的事情,先找到解码器,内置的解码器工厂如下,
private DecoderFactory<? extends ImageRegionDecoder> regionDecoderFactory = new CompatDecoderFactory<ImageRegionDecoder>(SkiaImageRegionDecoder.class);
所以我们只需看看 SkiaImageRegionDecoder 这个decoder 既可:
public class SkiaImageRegionDecoder implements ImageRegionDecoder {
private BitmapRegionDecoder decoder;
private final ReadWriteLock decoderLock = new ReentrantReadWriteLock(true);

private static final String FILE_PREFIX = "file://";
private static final String ASSET_PREFIX = FILE_PREFIX + "/android_asset/";
private static final String RESOURCE_PREFIX = ContentResolver.SCHEME_ANDROID_RESOURCE + "://";

private final Bitmap.Config bitmapConfig;

@Keep
@SuppressWarnings("unused")
public SkiaImageRegionDecoder() {
    this(null);
}

@SuppressWarnings({"WeakerAccess", "SameParameterValue"})
public SkiaImageRegionDecoder(@Nullable Bitmap.Config bitmapConfig) {
    Bitmap.Config globalBitmapConfig = SubsamplingScaleImageView.getPreferredBitmapConfig();
    if (bitmapConfig != null) {
        this.bitmapConfig = bitmapConfig;
    } else if (globalBitmapConfig != null) {
        this.bitmapConfig = globalBitmapConfig;
    } else {       // 如果没有传配置,就会使用 565 的方式,这样一个像素占有2个字节,16位 = 5+6+5
        this.bitmapConfig = Bitmap.Config.RGB_565;
    }
}

@Override
@NonNull      // 总结起来就是根据不同的图片资源类型来选择合适的 regiondecoder 进行解析,最终返回的是图片的宽高。
public Point init(Context context, @NonNull Uri uri) throws Exception {
    String uriString = uri.toString();
    if (uriString.startsWith(RESOURCE_PREFIX)) {
        Resources res;
        String packageName = uri.getAuthority();
        if (context.getPackageName().equals(packageName)) {
            res = context.getResources();
        } else {
            PackageManager pm = context.getPackageManager();
            res = pm.getResourcesForApplication(packageName);
        }

        int id = 0;
        List<String> segments = uri.getPathSegments();
        int size = segments.size();
        if (size == 2 && segments.get(0).equals("drawable")) {
            String resName = segments.get(1);
            id = res.getIdentifier(resName, "drawable", packageName);
        } else if (size == 1 && TextUtils.isDigitsOnly(segments.get(0))) {
            try {
                id = Integer.parseInt(segments.get(0));
            } catch (NumberFormatException ignored) {
            }
        }

        decoder = BitmapRegionDecoder.newInstance(context.getResources().openRawResource(id), false);
    } else if (uriString.startsWith(ASSET_PREFIX)) {
        String assetName = uriString.substring(ASSET_PREFIX.length());
        decoder = BitmapRegionDecoder.newInstance(context.getAssets().open(assetName, AssetManager.ACCESS_RANDOM), false);
    } else if (uriString.startsWith(FILE_PREFIX)) {
        decoder = BitmapRegionDecoder.newInstance(uriString.substring(FILE_PREFIX.length()), false);
    } else {
        InputStream inputStream = null;
        try {
            ContentResolver contentResolver = context.getContentResolver();
            inputStream = contentResolver.openInputStream(uri);
            if (inputStream == null) {
                throw new Exception("Content resolver returned null stream. Unable to initialise with uri.");
            }
            decoder = BitmapRegionDecoder.newInstance(inputStream, false);
        } finally {
            if (inputStream != null) {
                try { inputStream.close(); } catch (Exception e) { /* Ignore */ }
            }
        }
    }
    return new Point(decoder.getWidth(), decoder.getHeight());
}
SkiaImageRegionDecoder 主要就是根据图片资源类型选择一个合适的 RegionDecoder。接下去再看 onTilesInited
// overrides for the dimensions of the generated tiles 省略无关的代码
    public static final int TILE_SIZE_AUTO = Integer.MAX_VALUE;
    private int maxTileWidth = TILE_SIZE_AUTO;
    private int maxTileHeight = TILE_SIZE_AUTO;

        this.decoder = decoder;
        this.sWidth = sWidth;
        this.sHeight = sHeight;
        this.sOrientation = sOrientation;
        checkReady();
        if (!checkImageLoaded() && maxTileWidth > 0 && maxTileWidth != TILE_SIZE_AUTO && maxTileHeight > 0 && maxTileHeight != TILE_SIZE_AUTO && getWidth() > 0 && getHeight() > 0) {
            initialiseBaseLayer(new Point(maxTileWidth, maxTileHeight));
        }
        invalidate();
        requestLayout();
这里就将相关参数都传给 SubsamplingScaleImageView 了,后续就可以直接用了。可以看到最后调用了invalidate 和 requestLayout,也就说最终会触发重绘操作。
onMeasure
比较简单,这块就直接略过了。
ondraw
下面直接看 ondraw 方法。ondraw 的方法很长,我们主要看一些关键逻辑:
protected void onDraw(Canvas canvas) {
        super.onDraw(canvas);
        createPaints();

        // When using tiles, on first render with no tile map ready, initialise it and kick off async base image loading.
        if (tileMap == null && decoder != null) {
            initialiseBaseLayer(getMaxBitmapDimensions(canvas));
        }

        preDraw();

        if (tileMap != null && isBaseLayerReady()) {
            // Optimum sample size for current scale
            int sampleSize = Math.min(fullImageSampleSize, calculateInSampleSize(scale));
            // First check for missing tiles - if there are any we need the base layer underneath to avoid gaps
            boolean hasMissingTiles = false;
            for (Map.Entry<Integer, List<Tile>> tileMapEntry : tileMap.entrySet()) {
                if (tileMapEntry.getKey() == sampleSize) {
                    for (Tile tile : tileMapEntry.getValue()) {
                        if (tile.visible && (tile.loading || tile.bitmap == null)) {
                            hasMissingTiles = true;
                        }
                    }
                }
            }

            // Render all loaded tiles. LinkedHashMap used for bottom up rendering - lower res tiles underneath.
            for (Map.Entry<Integer, List<Tile>> tileMapEntry : tileMap.entrySet()) {
                if (tileMapEntry.getKey() == sampleSize || hasMissingTiles) {
                    for (Tile tile : tileMapEntry.getValue()) {
                        sourceToViewRect(tile.sRect, tile.vRect);
                        if (!tile.loading && tile.bitmap != null) {
                            if (tileBgPaint != null) {
                                canvas.drawRect(tile.vRect, tileBgPaint);
                            }
                            if (matrix == null) { matrix = new Matrix(); }
                            matrix.reset();
                            setMatrixArray(srcArray, 0, 0, tile.bitmap.getWidth(), 0, tile.bitmap.getWidth(), tile.bitmap.getHeight(), 0, tile.bitmap.getHeight());
                            matrix.setPolyToPoly(srcArray, 0, dstArray, 0, 4);
                            canvas.drawBitmap(tile.bitmap, matrix, bitmapPaint);

                        }
                }
            }
        } else if (bitmap != null) {

            float xScale = scale, yScale = scale;
            if (bitmapIsPreview) {
                xScale = scale * ((float)sWidth/bitmap.getWidth());
                yScale = scale * ((float)sHeight/bitmap.getHeight());
            }

            if (matrix == null) { matrix = new Matrix(); }
            matrix.reset();
            matrix.postScale(xScale, yScale);
            matrix.postRotate(getRequiredRotation());
            matrix.postTranslate(vTranslate.x, vTranslate.y);
            if (tileBgPaint != null) {
                if (sRect == null) { sRect = new RectF(); }
                sRect.set(0f, 0f, bitmapIsPreview ? bitmap.getWidth() : sWidth, bitmapIsPreview ? bitmap.getHeight() : sHeight);
                matrix.mapRect(sRect);
                canvas.drawRect(sRect, tileBgPaint);
            }
            canvas.drawBitmap(bitmap, matrix, bitmapPaint);

        }
   }
onDraw主要做了几件事,initialiseBaseLayer,设置tileMap,最后就是先优先tileMap进行drawBitmap,再取bitmap绘制,我们先看看initialiseBaseLayer做了什么。
initialiseBaseLayer
private synchronized void initialiseBaseLayer(@NonNull Point maxTileDimensions) {
        debug("initialiseBaseLayer maxTileDimensions=%dx%d", maxTileDimensions.x, maxTileDimensions.y);

        satTemp = new ScaleAndTranslate(0f, new PointF(0, 0));  // 先给定一个初始值
        fitToBounds(true, satTemp);  // 居中

        // Load double resolution - next level will be split into four tiles and at the center all four are required,
        // so don't bother with tiling until the next level 16 tiles are needed.
        fullImageSampleSize = calculateInSampleSize(satTemp.scale);  // 计算采样率,要不要samplesize
        if (fullImageSampleSize > 1) {
            fullImageSampleSize /= 2;
        }

        if (fullImageSampleSize == 1 && sRegion == null && sWidth() < maxTileDimensions.x && sHeight() < maxTileDimensions.y) {

            // Whole image is required at native resolution, and is smaller than the canvas max bitmap size.
            // Use BitmapDecoder for better image support. 不需要regiondecoder ,直接加载图片
            decoder.recycle();
            decoder = null;
            BitmapLoadTask task = new BitmapLoadTask(this, getContext(), bitmapDecoderFactory, uri, false);
            execute(task);

        } else {
       // 需要进行瓦片化加载
            initialiseTileMap(maxTileDimensions);
       // 首先取出当前屏幕需要的采样率, fullImageSampleSIze 就是当前屏幕所需要的采样率,并不是对map所有的数据都进行解压
            List<Tile> baseGrid = tileMap.get(fullImageSampleSize);
            for (Tile baseTile : baseGrid) {
                TileLoadTask task = new TileLoadTask(this, decoder, baseTile);
                execute(task);
            }       // 按照要求来加载展示图片,同时对不是该采样率的 bitmap 进行回收
            refreshRequiredTiles(true);

        }

    }
ScaleAndTranslate是存储了绘制的时候的偏移量和缩放级别,调用 fitToBounds 其实就是先对基本的偏移位置等设置好。然后计算采用率来决定要不要进行 regiondecoder。
下面直接看 regiondecoder 相关逻辑。首先是要对 TileMap 进行初始化。
private void initialiseTileMap(Point maxTileDimensions) {
        debug("initialiseTileMap maxTileDimensions=%dx%d", maxTileDimensions.x, maxTileDimensions.y);
        this.tileMap = new LinkedHashMap<>();
        int sampleSize = fullImageSampleSize;  // 采样率
        int xTiles = 1;
        int yTiles = 1;
        while (true) { // 死循环
            int sTileWidth = sWidth()/xTiles;  // 即将被采样的图片大小
            int sTileHeight = sHeight()/yTiles;
            int subTileWidth = sTileWidth/sampleSize; // 采样率下的图片大小
            int subTileHeight = sTileHeight/sampleSize;       // maxTileDimensions 本质上就是 cavas 可以支持的最大宽高,这里调整 subtileWidth 的宽度,使得其可以显示在屏幕上,这里需要注意的是,一块tile 其实还包含1/4的不可见区域(屏幕外)
            while (subTileWidth + xTiles + 1 > maxTileDimensions.x || (subTileWidth > getWidth() * 1.25 && sampleSize < fullImageSampleSize)) {
                xTiles += 1;
                sTileWidth = sWidth()/xTiles;
                subTileWidth = sTileWidth/sampleSize;          // 当采样率为1的时候,由于此时采样后图片依旧远远大于屏幕宽度,因此,会被分割成块数也会更多
            }
            while (subTileHeight + yTiles + 1 > maxTileDimensions.y || (subTileHeight > getHeight() * 1.25 && sampleSize < fullImageSampleSize)) {
                yTiles += 1;
                sTileHeight = sHeight()/yTiles;
                subTileHeight = sTileHeight/sampleSize;
            }       // 最终划分的块数
            List<Tile> tileGrid = new ArrayList<>(xTiles * yTiles);
            for (int x = 0; x < xTiles; x++) {
                for (int y = 0; y < yTiles; y++) {
                    Tile tile = new Tile();
                    tile.sampleSize = sampleSize;
                    tile.visible = sampleSize == fullImageSampleSize;  // 当前是否可见
                    tile.sRect = new Rect(
                        x * sTileWidth,
                        y * sTileHeight,
                        x == xTiles - 1 ? sWidth() : (x + 1) * sTileWidth,
                        y == yTiles - 1 ? sHeight() : (y + 1) * sTileHeight
                    );
                    tile.vRect = new Rect(0, 0, 0, 0);
                    tile.fileSRect = new Rect(tile.sRect);
                    tileGrid.add(tile);
                }
            }       // 以采样率当做key 值,对应的 list 分块当做value
            tileMap.put(sampleSize, tileGrid);       // 采样率为1 就退出
            if (sampleSize == 1) {
                break;
            } else {
                sampleSize /= 2;
            }
        }
    }
这里顾名思义就是切片,在不同的采样率的情况下切成一个个的tile,因为是进行局部加载,所以在放大的时候,要取出对应的采样率的图片,继而取出对应的区域,试想一下,如果放大几倍,仍然用的16的采样率,那么图片放大之后肯定很模糊,所以缩放级别不同,要使用不同的采样率解码图片。这里的tileMap是一个Map,key是采样率,value是一个列表,列表存储的是对应key采样率的所有切片集合,如下图:
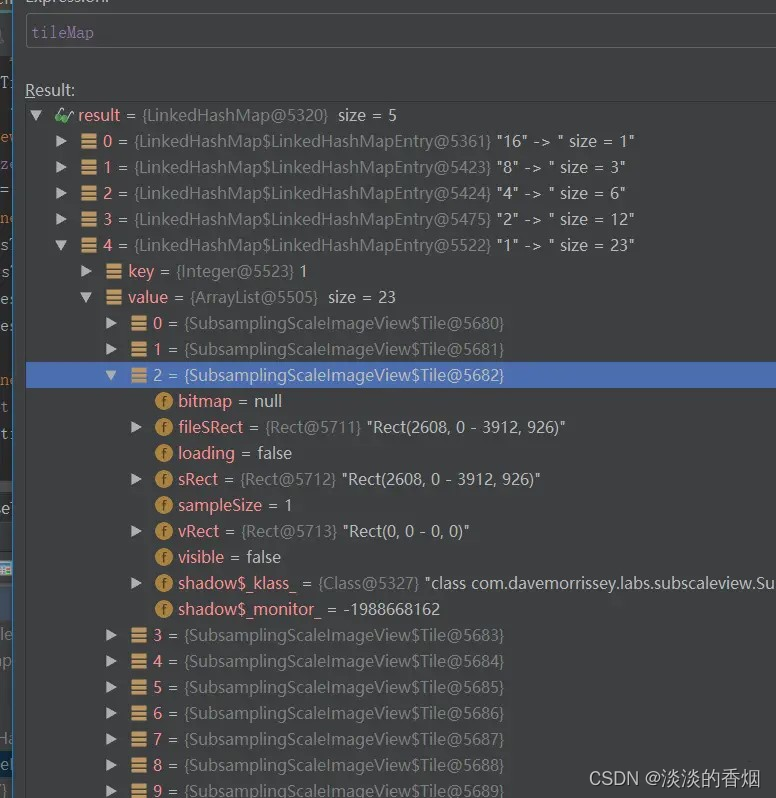
fileSRect是一个切片的矩阵大小,每一个切片的矩阵大小要确保在对应的缩放级别和采样率下能够显示正常。 初始化切片之后,就执行当前采样率下的TileLoadTask。
/**
     * Async task used to load images without blocking the UI thread.
     */
    private static class TileLoadTask extends AsyncTask<Void, Void, Bitmap> {
        private final WeakReference<SubsamplingScaleImageView> viewRef;
        private final WeakReference<ImageRegionDecoder> decoderRef;
        private final WeakReference<Tile> tileRef;
        private Exception exception;

        TileLoadTask(SubsamplingScaleImageView view, ImageRegionDecoder decoder, Tile tile) {
            this.viewRef = new WeakReference<>(view);
            this.decoderRef = new WeakReference<>(decoder);
            this.tileRef = new WeakReference<>(tile);
            tile.loading = true;
        }

        @Override
        protected Bitmap doInBackground(Void... params) {
            try {
                SubsamplingScaleImageView view = viewRef.get();
                ImageRegionDecoder decoder = decoderRef.get();
                Tile tile = tileRef.get();
                if (decoder != null && tile != null && view != null && decoder.isReady() && tile.visible) {
                    view.debug("TileLoadTask.doInBackground, tile.sRect=%s, tile.sampleSize=%d", tile.sRect, tile.sampleSize);
                    view.decoderLock.readLock().lock();
                    try {
                        if (decoder.isReady()) {
                            // Update tile's file sRect according to rotation 如果用户有过操作,需要对 rect 进行调整
                            view.fileSRect(tile.sRect, tile.fileSRect);
                            if (view.sRegion != null) {
                                tile.fileSRect.offset(view.sRegion.left, view.sRegion.top);
                            }
                            return decoder.decodeRegion(tile.fileSRect, tile.sampleSize);
                        } else {
                            tile.loading = false;
                        }
                    } finally {
                        view.decoderLock.readLock().unlock();
                    }
                } else if (tile != null) {
                    tile.loading = false;
                }
            } catch (Exception e) {
                Log.e(TAG, "Failed to decode tile", e);
                this.exception = e;
            } catch (OutOfMemoryError e) {
                Log.e(TAG, "Failed to decode tile - OutOfMemoryError", e);
                this.exception = new RuntimeException(e);
            }
            return null;
        }

        @Override
        protected void onPostExecute(Bitmap bitmap) {
            final SubsamplingScaleImageView subsamplingScaleImageView = viewRef.get();
            final Tile tile = tileRef.get();
            if (subsamplingScaleImageView != null && tile != null) {
                if (bitmap != null) {
                    tile.bitmap = bitmap;
                    tile.loading = false;
                    subsamplingScaleImageView.onTileLoaded();
                } else if (exception != null && subsamplingScaleImageView.onImageEventListener != null) {
                    subsamplingScaleImageView.onImageEventListener.onTileLoadError(exception);
                }
            }
        }
    }

    /**
     * Called by worker task when a tile has loaded. Redraws the view.
     */
    private synchronized void onTileLoaded() {
        debug("onTileLoaded");
        checkReady();
        checkImageLoaded();
        if (isBaseLayerReady() && bitmap != null) {
            if (!bitmapIsCached) {
                bitmap.recycle();
            }
            bitmap = null;
            if (onImageEventListener != null && bitmapIsCached) {
                onImageEventListener.onPreviewReleased();
            }
            bitmapIsPreview = false;
            bitmapIsCached = false;
        }
        invalidate();  // 进行重绘
    }
整体而言,没太多复杂逻辑,这里采用异步加载来获取bitmap,中间会调整 filerect,bitmap 解压完成后,就会重新绘制。
preDraw
没有太多逻辑,主要就是绘制前一些准备工作,包括缩放,位置等等。
isBaseLayerReady
主要就是看 tileMap 里面的 bitmap 是否准备好了。
for (Map.Entry<Integer, List<Tile>> tileMapEntry : tileMap.entrySet()) {
                if (tileMapEntry.getKey() == sampleSize || hasMissingTiles) {
                    for (Tile tile : tileMapEntry.getValue()) {
                        sourceToViewRect(tile.sRect, tile.vRect);
                        if (!tile.loading && tile.bitmap != null) {
                            if (tileBgPaint != null) {
                                canvas.drawRect(tile.vRect, tileBgPaint);
                            }

                            matrix.reset();
                            setMatrixArray(srcArray, 0, 0, tile.bitmap.getWidth(), 0, tile.bitmap.getWidth(), tile.bitmap.getHeight(), 0, tile.bitmap.getHeight());
                            setMatrixArray(dstArray, tile.vRect.left, tile.vRect.top, tile.vRect.right, tile.vRect.top, tile.vRect.right, tile.vRect.bottom, tile.vRect.left, tile.vRect.bottom);

                            matrix.setPolyToPoly(srcArray, 0, dstArray, 0, 4);
                            canvas.drawBitmap(tile.bitmap, matrix, bitmapPaint);
                        }
                    }
                }
  }
这就是切片绘制的关键代码,在Tile这个类中,sRect负责保存切片的原始大小,vRect则负责保存切片的绘制大小,所以 sourceToViewRect(tile.sRect, tile.vRect) 这里进行了矩阵的缩放,其实就是根据之前计算得到的scale对图片原始大小进行缩放。 接着再通过矩阵变换,将图片大小变换为绘制大小进行绘制。分析到这里,其实整个的加载过程和逻辑已经是了解得七七八八了。 还有另外的就是手势缩放的处理,通过监听move等触摸事件,然后重新计算scale的大小,接着通过scale的大小去重新得到对应的采样率,继续通过tileMap取出采样率下对应的切片,对切片请求解码。值得一提的是,在move事件的时候,这里做了优化,解码的图片并没有进行绘制,而是对原先采样率下的图片进行缩放,直到监听到up事件,才会去重新绘制对应采样率下的图片。所以在缩放的过程中,会看到一个模糊的图像,其实就是高采样率下的图片进行放大导致的。等到缩放结束,会重新绘制,图片就显示正常了。
12.封装的EasyTVLongView如下:
这里有2种加载方式:
-
通过遥控器上下左右移动随机加载图片区域
-
通过遥控器上下滑动加载超长大图
package com.example.longimageView.view;

import android.content.Context;
import android.graphics.Bitmap;
import android.graphics.BitmapFactory;
import android.graphics.Canvas;
import android.graphics.Paint;
import android.graphics.PointF;
import android.util.AttributeSet;
import android.view.KeyEvent;
import android.widget.Scroller;

import androidx.annotation.NonNull;
import androidx.annotation.Nullable;

import com.blankj.utilcode.util.LogUtils;
import com.bumptech.glide.Glide;
import com.bumptech.glide.load.engine.DiskCacheStrategy;
import com.bumptech.glide.request.target.SimpleTarget;
import com.bumptech.glide.request.transition.Transition;
import com.davemorrissey.labs.subscaleview.ImageSource;
import com.davemorrissey.labs.subscaleview.ImageViewState;
import com.davemorrissey.labs.subscaleview.SubsamplingScaleImageView;
import com.example.longimageView.BuildConfig;
import com.example.longimageView.R;
import com.example.longimageView.utils.ScreenUtils;

import java.util.Random;

/**
 * @author: njb
 * @date: 2023/4/10 20:22
 * @desc:TV端超长巨图加载组件
 */
public class EasyTVLongView extends SubsamplingScaleImageView implements SubsamplingScaleImageView.OnImageEventListener {
    private static final String TAG = "EasyLongViewLog";
    private Scroller mScroller;
    private final int scrollHeight = 200;
    private int scrollY = 0;
    private float defaultScale = 1.0f;
    private boolean isFocus = false;
    private Paint paint = new Paint();
    private PointF vPoint = new PointF();
    private PointF sPoint;
    private Bitmap bitmap;

    public EasyTVLongView(Context context, AttributeSet attr) {
        super(context, attr);
        initBitmap();
        initialise(context);
    }

    public EasyTVLongView(Context context) {
        super(context);
        initBitmap();
        initialise(context);
    }

    private void initialise(Context context) {
        mScroller = new Scroller(context);
        this.setOnFocusChangeListener((v, hasFocus) -> {
            isFocus = hasFocus;
        });
        this.setOnKeyListener((v, keyCode, event) -> {
            setDispatchKeyEvent(event);
            return false;
        });
    }

    public void setDispatchKeyEvent(KeyEvent event) {
        if (event.getAction() == KeyEvent.ACTION_DOWN) {
            if (event.getKeyCode() == KeyEvent.KEYCODE_DPAD_LEFT || event.getKeyCode() == KeyEvent.KEYCODE_DPAD_RIGHT || event.getKeyCode() == KeyEvent.KEYCODE_DPAD_DOWN || event.getKeyCode() == KeyEvent.KEYCODE_DPAD_UP || event.getKeyCode() == KeyEvent.KEYCODE_DPAD_CENTER) {
                if(isFocus){
                    play();
                }
            }
        }
    }

    /**
     * 加载图片数据
     * @param url
     */
    public void setLongImages(String url) {
        try {
            Glide.with(this.getContext())
                    .asBitmap()
                    .load(url)
                    .diskCacheStrategy(DiskCacheStrategy.ALL)
                    .into(new SimpleTarget<Bitmap>() {
                        @Override
                        public void onResourceReady(@NonNull Bitmap resource, @Nullable Transition<? super Bitmap> transition) {
                            EasyTVLongView.this.setImage(ImageSource.cachedBitmap(resource), new ImageViewState(defaultScale, new PointF(0, 0), 0));
                            if (BuildConfig.DEBUG) {
                                LogUtils.d(TAG, "---图片宽度为---- " + resource.getWidth() + "---图片高度为---" + resource.getHeight());
                            }
                            EasyTVLongView.this.onImageLoaded();
                        }

                        @Override
                        public void onDestroy() {
                            super.onDestroy();
                            EasyTVLongView.this.recycle();
                        }
                    });
            EasyTVLongView.this.setFocusable(true);
        } catch (Exception e) {
            e.printStackTrace();
            EasyTVLongView.this.onImageLoadError(e);
        }
    }

    public void play() {
        Random random = new Random();
        if (this.isReady()) {
            float maxScale = this.getMaxScale();
            float minScale = this.getMinScale();
            float scale = (random.nextFloat() * (maxScale - minScale)) + minScale;
            PointF center = new PointF(random.nextInt(this.getSWidth()), random.nextInt(this.getSHeight()));
            this.setPin(center);
            SubsamplingScaleImageView.AnimationBuilder animationBuilder = this.animateScaleAndCenter(scale, center);
            if (this.getSHeight() == 0) {
                if (animationBuilder != null) {
                    animationBuilder.withDuration(2000).withEasing(EASE_OUT_QUAD).withInterruptible(false).start();
                }
            } else {
                if (animationBuilder != null) {
                    animationBuilder.withDuration(500).start();
                }
            }
        }
    }

    public void setPin(PointF sPin) {
        this.sPoint = sPin;
        initBitmap();
        invalidate();
    }

    private void initBitmap() {
        float density = getResources().getDisplayMetrics().densityDpi;
        bitmap = BitmapFactory.decodeResource(this.getResources(), R.drawable.pushpin_blue);
        float w = (density / 420f) * bitmap.getWidth();
        float h = (density / 420f) * bitmap.getHeight();
        bitmap = Bitmap.createScaledBitmap(bitmap, (int) w, (int) h, true);
    }


    @Override
    public void computeScroll() {
        if (mScroller.computeScrollOffset()) {
            scrollTo(mScroller.getCurrX(), mScroller.getCurrY());
            postInvalidate();
        }
    }

    @Override
    protected void onDraw(Canvas canvas) {
        super.onDraw(canvas);
        if (!isReady()) {
            return;
        }
        paint.setAntiAlias(true);
        if (sPoint != null && bitmap != null) {
            sourceToViewCoord(sPoint, vPoint);
            float vX = vPoint.x - (bitmap.getWidth() / 2);
            float vY = vPoint.y - bitmap.getHeight();
            canvas.drawBitmap(bitmap, vX, vY, paint);
        }
    }

    @Override
    public void onReady() {
        if (BuildConfig.DEBUG) {
            LogUtils.d(TAG, "图片资源已准备" + this.isReady());
        }
    }

    @Override
    public void onImageLoaded() {
        if (BuildConfig.DEBUG) {
            LogUtils.d(TAG, "图片已加载" + this.isImageLoaded());
        }
    }

    @Override
    public void onPreviewLoadError(Exception e) {
        if (BuildConfig.DEBUG) {
            LogUtils.e(TAG, "图片预览失败" + e.getMessage());
        }
    }

    @Override
    public void onImageLoadError(Exception e) {
        if (BuildConfig.DEBUG) {
            LogUtils.e(TAG, "图片加载失败" + e.getMessage());
        }
    }

    @Override
    public void onTileLoadError(Exception e) {
        if (BuildConfig.DEBUG) {
            LogUtils.e(TAG, "图片平铺加载失败" + e.getMessage());
        }
    }

    @Override
    public void onPreviewReleased() {
        if (BuildConfig.DEBUG) {
            if (this.getDrawingCache() != null) {
                LogUtils.d(TAG, "图片预加载资源已回收" + this.getDrawingCache().isRecycled());
            }
        }
    }

    @Override
    protected void onDetachedFromWindow() {
        super.onDetachedFromWindow();
        this.recycle();
    }
}
13.实现的效果如下:
14.通过上下滑动加载超长大图:
package com.example.longimageView.view;

import android.content.Context;
import android.graphics.Bitmap;
import android.graphics.BitmapFactory;
import android.graphics.Canvas;
import android.graphics.Paint;
import android.graphics.PointF;
import android.util.AttributeSet;
import android.view.KeyEvent;
import android.widget.Scroller;

import androidx.annotation.NonNull;
import androidx.annotation.Nullable;

import com.blankj.utilcode.util.LogUtils;
import com.bumptech.glide.Glide;
import com.bumptech.glide.load.engine.DiskCacheStrategy;
import com.bumptech.glide.request.target.SimpleTarget;
import com.bumptech.glide.request.transition.Transition;
import com.davemorrissey.labs.subscaleview.ImageSource;
import com.davemorrissey.labs.subscaleview.ImageViewState;
import com.davemorrissey.labs.subscaleview.SubsamplingScaleImageView;
import com.example.longimageView.BuildConfig;
import com.example.longimageView.R;
import com.example.longimageView.utils.ScreenUtils;

import java.util.Random;

/**
 * @author: njb
 * @date: 2023/4/10 20:22
 * @desc:TV端超长巨图加载组件
 */
public class EasyTVLongView extends SubsamplingScaleImageView implements SubsamplingScaleImageView.OnImageEventListener {
    private static final String TAG = "EasyLongViewLog";
    private Scroller mScroller;
    private final int scrollHeight = 200;
    private int scrollY = 0;
    private float defaultScale = 1.0f;
    private boolean isFocus = false;
    private Paint paint = new Paint();
    private PointF vPoint = new PointF();
    private PointF sPoint;
    private Bitmap bitmap;

    public EasyTVLongView(Context context, AttributeSet attr) {
        super(context, attr);
      //  initBitmap();
        initialise(context);
    }

    public EasyTVLongView(Context context) {
        super(context);
        //initBitmap();
        initialise(context);
    }

    private void initialise(Context context) {
        mScroller = new Scroller(context);
        this.setOnFocusChangeListener((v, hasFocus) -> {
            isFocus = hasFocus;
        });
        this.setOnKeyListener((v, keyCode, event) -> {
            setDispatchKeyEvent(event);
            return false;
        });
    }


    public void setDispatchKeyEvent(KeyEvent event) {
       if (event.getAction() == KeyEvent.ACTION_DOWN) {
            if (event.getKeyCode() == KeyEvent.KEYCODE_DPAD_UP) {
                if (isFocus) {
                    startSmoothScrollUp(0, 50);
                }
            }
            if (event.getKeyCode() == KeyEvent.KEYCODE_DPAD_DOWN) {
                if (isFocus) {
                    startSmoothScrollDown(0, 50);
                }
            }
        }
    }

    /**
     * 向下滑动
     * @param desX
     * @param ms
     */
    public void startSmoothScrollDown(int desX, int ms) {
        int startX = getScrollX();
        int startY = getScrollY();
        scrollY = getScrollY();
        int scrollDownHeight = this.getSHeight() - scrollY - scrollHeight;
        //startScroll(x起始坐标,y起始坐标,x方向偏移值,y方向偏移值,滚动时长)
        if ((scrollDownHeight + scrollHeight) > ScreenUtils.getScreenHeight(this.getContext())) {
            mScroller.startScroll(startX, startY, desX - startX, scrollHeight, ms);
        }
        if (BuildConfig.DEBUG) {
            LogUtils.d(TAG, "----向下滑动距离---" + scrollDownHeight + "----滑动y坐标----" + startY);
        }
        invalidate();
    }

    /**
     * 向上滑动
     *
     * @param desX
     * @param ms
     */
    public void startSmoothScrollUp(int desX, int ms) {
        int startX = getScrollX();
        int startY = getScrollY();
        scrollY = getScrollY();
        if (BuildConfig.DEBUG) {
            LogUtils.d(TAG, "向上滑动滑动x坐标" + startX + "----滑动y坐标----" + startY);
        }
        if (scrollY > ScreenUtils.dip2px(this.getContext(), 60)) {
            mScroller.startScroll(0, startY, desX, -scrollHeight, ms);
        }
        invalidate();
    }

    /**
     * 加载图片数据
     *
     * @param url
     */
    public void setLongImages(String url) {
        try {
            Glide.with(this.getContext())
                    .asBitmap()
                    .load(url)
                    .diskCacheStrategy(DiskCacheStrategy.ALL)
                    .into(new SimpleTarget<Bitmap>() {
                        @Override
                        public void onResourceReady(@NonNull Bitmap resource, @Nullable Transition<? super Bitmap> transition) {
                            EasyTVLongView.this.setImage(ImageSource.cachedBitmap(resource), new ImageViewState(defaultScale, new PointF(0, 0), 0));
                            if (BuildConfig.DEBUG) {
                                LogUtils.d(TAG, "---图片宽度为---- " + resource.getWidth() + "---图片高度为---" + resource.getHeight());
                            }
                            EasyTVLongView.this.onImageLoaded();
                        }

                        @Override
                        public void onDestroy() {
                            super.onDestroy();
                            EasyTVLongView.this.recycle();
                        }
                    });
            EasyTVLongView.this.setFocusable(true);
        } catch (Exception e) {
            e.printStackTrace();
            EasyTVLongView.this.onImageLoadError(e);
        }
    }

    public void play() {
        Random random = new Random();
        if (this.isReady()) {
            float maxScale = this.getMaxScale();
            float minScale = this.getMinScale();
            float scale = (random.nextFloat() * (maxScale - minScale)) + minScale;
            PointF center = new PointF(random.nextInt(this.getSWidth()), random.nextInt(this.getSHeight()));
            this.setPin(center);
            SubsamplingScaleImageView.AnimationBuilder animationBuilder = this.animateScaleAndCenter(scale, center);
            if (this.getSHeight() == 0) {
                if (animationBuilder != null) {
                    animationBuilder.withDuration(2000).withEasing(EASE_OUT_QUAD).withInterruptible(false).start();
                }
            } else {
                if (animationBuilder != null) {
                    animationBuilder.withDuration(500).start();
                }
            }
        }
    }

    public void setPin(PointF sPin) {
        this.sPoint = sPin;
        initBitmap();
        invalidate();
    }

    private void initBitmap() {
        float density = getResources().getDisplayMetrics().densityDpi;
        bitmap = BitmapFactory.decodeResource(this.getResources(), R.drawable.pushpin_blue);
        float w = (density / 420f) * bitmap.getWidth();
        float h = (density / 420f) * bitmap.getHeight();
        bitmap = Bitmap.createScaledBitmap(bitmap, (int) w, (int) h, true);
    }


    @Override
    public void computeScroll() {
        if (mScroller.computeScrollOffset()) {
            scrollTo(mScroller.getCurrX(), mScroller.getCurrY());
            postInvalidate();
        }
    }

    @Override
    protected void onDraw(Canvas canvas) {
        super.onDraw(canvas);
        if (!isReady()) {
            return;
        }
        paint.setAntiAlias(true);
        if (sPoint != null && bitmap != null) {
            sourceToViewCoord(sPoint, vPoint);
            float vX = vPoint.x - (bitmap.getWidth() / 2);
            float vY = vPoint.y - bitmap.getHeight();
            canvas.drawBitmap(bitmap, vX, vY, paint);
        }
    }

    @Override
    public void onReady() {
        if (BuildConfig.DEBUG) {
            LogUtils.d(TAG, "图片资源已准备" + this.isReady());
        }
    }

    @Override
    public void onImageLoaded() {
        if (BuildConfig.DEBUG) {
            LogUtils.d(TAG, "图片已加载" + this.isImageLoaded());
        }
    }

    @Override
    public void onPreviewLoadError(Exception e) {
        if (BuildConfig.DEBUG) {
            LogUtils.e(TAG, "图片预览失败" + e.getMessage());
        }
    }

    @Override
    public void onImageLoadError(Exception e) {
        if (BuildConfig.DEBUG) {
            LogUtils.e(TAG, "图片加载失败" + e.getMessage());
        }
    }

    @Override
    public void onTileLoadError(Exception e) {
        if (BuildConfig.DEBUG) {
            LogUtils.e(TAG, "图片平铺加载失败" + e.getMessage());
        }
    }

    @Override
    public void onPreviewReleased() {
        if (BuildConfig.DEBUG) {
            if (this.getDrawingCache() != null) {
                LogUtils.d(TAG, "图片预加载资源已回收" + this.getDrawingCache().isRecycled());
            }
        }
    }

    @Override
    protected void onDetachedFromWindow() {
        super.onDetachedFromWindow();
        this.recycle();
    }
}
15.实现的效果如下:

16.封装后Activity的使用:
/**
 * @auth: njb
 * @date: 2022/11/7 0:11
 * @desc:
 */
public class MainActivity extends AppCompatActivity {
    // public String url = "https://qcloudimg-moss.cp47.ott.cibntv.net/data_center/files/2022/10/26/67a66d35-3f7c-4de8-9dfe-c706e42f44f2.jpg";
    public String url = "http://img-blog.csdnimg.cn/98fde8ba229541dc85a9f0f1be8f9b6c.jpeg#pic_center";
    private EasyTVLongView easyTVLongView;
    private static final String TAG = "MainLog";
    private StringBuilder stringBuilder = new StringBuilder();

    @Override
    protected void onCreate(@Nullable Bundle savedInstanceState) {
        super.onCreate(savedInstanceState);
        setContentView(R.layout.activity_main);
        initView();
    }

    private void initView() {
        easyTVLongView = findViewById(R.id.easyLongView);
        easyTVLongView.setFocusable(true);
        easyTVLongView.requestFocus();
        easyTVLongView.setLongImages(url);
    }

    @Override
    protected void onDestroy() {
        super.onDestroy();
    }
}
17.布局代码:
<?xml version="1.0" encoding="utf-8"?>
<androidx.constraintlayout.widget.ConstraintLayout xmlns:android="http://schemas.android.com/apk/res/android"
    xmlns:tools="http://schemas.android.com/tools"
    android:layout_width="match_parent"
    android:layout_height="match_parent"
    xmlns:app="http://schemas.android.com/apk/res-auto">
    <com.example.longimageView.view.EasyTVLongView
        android:id="@+id/easyLongView"
        android:layout_width="0dp"
        android:layout_height="0dp"
        android:focusable="true"
        app:layout_constraintLeft_toLeftOf="parent"
        app:layout_constraintRight_toRightOf="parent"
        app:layout_constraintTop_toTopOf="parent"
        app:layout_constraintBottom_toBottomOf="parent"
        android:visibility="visible"/>
    <TextView
        android:id="@+id/tv_up"
        android:layout_width="180dp"
        android:layout_height="60dp"
        android:background="@color/purple_700"
        android:textColor="@color/white"
        android:text="向下滑动"
        android:gravity="center"
        android:textSize="20sp"
        app:layout_constraintLeft_toLeftOf="parent"
        app:layout_constraintRight_toLeftOf="@id/tv_down"
        app:layout_constraintTop_toTopOf="parent"
        android:visibility="gone"/>
    <TextView
        android:id="@+id/tv_down"
        android:layout_width="180dp"
        android:layout_height="60dp"
        android:background="@color/purple_700"
        android:text="向上滑动"
        android:textColor="@color/white"
        android:gravity="center"
        android:textSize="20sp"
        android:visibility="gone"
        android:layout_marginStart="20dp"
        app:layout_constraintLeft_toRightOf="@id/tv_up"
        app:layout_constraintRight_toRightOf="parent"
        app:layout_constraintTop_toTopOf="parent" />
    <com.example.longimageView.view.LongImageView
        android:id="@+id/scrollCustomView"
        android:layout_width="match_parent"
        android:layout_height="400dp"
        android:visibility="gone"
        android:background="@color/colorPrimary"
        tools:ignore="MissingConstraints" />

</androidx.constraintlayout.widget.ConstraintLayout>
18.注意事项:
- 默认已经适配屏幕和图片大小,只需设置图片url即可,不需处理焦点、图片适配等
- 目前已经在Android底层做了图片回收和压缩处理,支持手势缩放、平移动画、上下滑动等
- 支持jpg、png、webp等多种格式的预览,屏幕旋转后轻松恢复比例、中心和方向
- 缓存图片使用了两种策略:一个是glide的磁盘缓存,一个是自带的图片缓存ImageSource.cachedBitmap
19.总结:
以上就是今天的内容,从源码分析到库的流程图,在到封装和具体使用,不仅实现了本地图片加载,还实现了网络图片加载,在加载过程中还有一个从模糊到高清的渐变效果,这个是比较友好的体验,而且测试了10多种机型的TV和盒子,几百台不同系统和型号的TV,基本上没有出现问题,最多加载20,000x20,000的图片,不过图片越大第一次加载就比较耗时,如果超过20,000x20,000基本上就不要考虑,因为很少有加载这么大的图片,机器本身的性能也扛不住,本文是经过多轮模拟器和真实设备的测试,已经用于实际项目中,当然不是TV开发就不会有这个需求,手机最多就是加一个放大预览或者加载webP格式的长图,不过既然有这个需求,就要学会分析和找出解决方法,期间遇到了很多问题,缓存处理、内存回收和图片清晰度、oom等都是令人头疼的问题,特别是封装成适用于vue的长图加载库,遇到的问题更多,下篇将讲解vue的长图库封装和实践。原创不易,且看且珍惜!!好了,打卡收工,关键睡觉~~
20.项目的源码地址如下:
https://gitee.com/jackning_admin/androi-long-image-view


