文章目录
一、Java原生API
引入依赖:
<dependency>
    <groupId>com.rabbitmq</groupId>
    <artifactId>amqp-client</artifactId>
    <version>5.6.0</version>
</dependency>
1、简单实例
import com.rabbitmq.client.*;
import java.io.IOException;

/**
 * 消息消费者
 */
public class MyConsumer {
    private final static String EXCHANGE_NAME = "SIMPLE_EXCHANGE";
    private final static String QUEUE_NAME = "SIMPLE_QUEUE";

    public static void main(String[] args) throws Exception {
        ConnectionFactory factory = new ConnectionFactory();
        // 连接IP
        factory.setHost("192.168.56.10");
        // 默认监听端口
        factory.setPort(5672);
        // 虚拟机
        factory.setVirtualHost("/");

        // 设置访问的用户
        factory.setUsername("admin");
        factory.setPassword("admin");
        // 建立连接
        Connection conn = factory.newConnection();
        // 创建消息通道
        Channel channel = conn.createChannel();

        // 声明交换机
        // String exchange, String type, boolean durable, boolean autoDelete, Map<String, Object> arguments
        channel.exchangeDeclare(EXCHANGE_NAME,"direct",false, false, null);

        // 声明队列
        // String queue, boolean durable, boolean exclusive, boolean autoDelete, Map<String, Object> arguments
        channel.queueDeclare(QUEUE_NAME, false, false, false, null);
        System.out.println(" Waiting for message....");

        // 绑定队列和交换机,以及routingKey
        channel.queueBind(QUEUE_NAME,EXCHANGE_NAME,"my.test");

        // 创建消费者
        Consumer consumer = new DefaultConsumer(channel) {
            @Override
            public void handleDelivery(String consumerTag, Envelope envelope, AMQP.BasicProperties properties,
                                       byte[] body) throws IOException {
                String msg = new String(body, "UTF-8");
                System.out.println("Received message : '" + msg + "'");
                System.out.println("consumerTag : " + consumerTag );
                System.out.println("deliveryTag : " + envelope.getDeliveryTag() );
            }
        };

        // 开始获取消息
        // String queue, boolean autoAck, Consumer callback
        channel.basicConsume(QUEUE_NAME, true, consumer);
    }
}
import com.rabbitmq.client.Channel;
import com.rabbitmq.client.Connection;
import com.rabbitmq.client.ConnectionFactory;

/**
 * 消息生产者
 */
public class MyProducer {
    private final static String EXCHANGE_NAME = "SIMPLE_EXCHANGE";

    public static void main(String[] args) throws Exception {
        ConnectionFactory factory = new ConnectionFactory();
        // 连接IP
        factory.setHost("192.168.56.10");
        // 连接端口
        factory.setPort(5672);
        // 虚拟机
        factory.setVirtualHost("/");
        // 用户
        factory.setUsername("admin");
        factory.setPassword("admin");

        // 建立连接
        Connection conn = factory.newConnection();
        // 创建消息通道
        Channel channel = conn.createChannel();

        // 发送消息
        String msg = "Hello world, Rabbit MQ";

        // String exchange, String routingKey, BasicProperties props, byte[] body
        channel.basicPublish(EXCHANGE_NAME, "my.test", null, msg.getBytes());

        channel.close();
        conn.close();
    }
}
2、延迟消息
RabbitMQ实现延迟消息,RabbitMQ使用死信队列实现延迟消息,RabbitMQ延时队列插件
3、消费端限流
//非自动确认消息的前提下,如果一定数目的消息(通过基于consume或者channel设置Qos的值)未被确认前,不进行消费新的消息。
channel.basicQos(2);
channel.basicConsume(QUEUE_NAME, false, consumer);
4、消息属性设置
Map<String, Object> headers = new HashMap<String, Object>();
headers.put("name", "gupao");
headers.put("level", "top");
AMQP.BasicProperties properties = new AMQP.BasicProperties.Builder()
        .deliveryMode(2)   // 2代表持久化
        .contentEncoding("UTF-8")  // 编码
        .expiration("10000")  // TTL,过期时间
        .headers(headers) // 自定义属性
        .priority(5) // 优先级,默认为5,配合队列的 x-max-priority 属性使用
        .messageId(String.valueOf(UUID.randomUUID()))
        .build();
channel.basicPublish("", QUEUE_NAME, properties, msg.getBytes());
5、消息可靠投递
RabbitMQ保证消息的可靠投递,Java实现RabbitMQ消息的可靠投递,Springboot实现RabbitMQ消息的可靠投递
二、Spring-API
引包:
<!--rabbitmq依赖 -->
<dependency>
    <groupId>org.springframework.amqp</groupId>
    <artifactId>spring-rabbit</artifactId>
    <version>1.3.5.RELEASE</version>
</dependency>
1、简单实例
(1)引入rabbitMQ.xml
<?xml version="1.0" encoding="UTF-8"?>
<beans xmlns="http://www.springframework.org/schema/beans"
       xmlns:xsi="http://www.w3.org/2001/XMLSchema-instance" xmlns:rabbit="http://www.springframework.org/schema/rabbit"
       xsi:schemaLocation="http://www.springframework.org/schema/beans
     http://www.springframework.org/schema/beans/spring-beans-3.0.xsd
     http://www.springframework.org/schema/rabbit
     http://www.springframework.org/schema/rabbit/spring-rabbit-1.2.xsd">

    <!--配置connection-factory,指定连接rabbit server参数 -->
    <rabbit:connection-factory id="connectionFactory" virtual-host="/" username="admin" password="admin" host="192.168.56.10" port="5672" />

    <!--通过指定下面的admin信息,当前producer中的exchange和queue会在rabbitmq服务器上自动生成 -->
    <rabbit:admin id="connectAdmin" connection-factory="connectionFactory" />

    <!--######分隔线######-->
    <!--定义queue -->
    <rabbit:queue name="MY_FIRST_QUEUE" durable="true" auto-delete="false" exclusive="false" declared-by="connectAdmin" />

    <!--定义direct exchange,绑定MY_FIRST_QUEUE -->
    <rabbit:direct-exchange name="MY_DIRECT_EXCHANGE" durable="true" auto-delete="false" declared-by="connectAdmin">
        <rabbit:bindings>
            <rabbit:binding queue="MY_FIRST_QUEUE" key="FirstKey">
            </rabbit:binding>
        </rabbit:bindings>
    </rabbit:direct-exchange>

    <!--定义rabbit template用于数据的接收和发送 -->
    <rabbit:template id="amqpTemplate" connection-factory="connectionFactory" exchange="MY_DIRECT_EXCHANGE" />

    <!--消息接收者 -->
    <bean id="messageReceiver" class="com.gupaoedu.consumer.FirstConsumer"></bean>

    <!--queue listener 观察 监听模式 当有消息到达时会通知监听在对应的队列上的监听对象 -->
    <rabbit:listener-container connection-factory="connectionFactory">
        <rabbit:listener queues="MY_FIRST_QUEUE" ref="messageReceiver" />
    </rabbit:listener-container>


    <!--定义queue -->
    <rabbit:queue name="MY_SECOND_QUEUE" durable="true" auto-delete="false" exclusive="false" declared-by="connectAdmin" />

    <!-- 将已经定义的Exchange绑定到MY_SECOND_QUEUE,注意关键词是key -->
    <rabbit:direct-exchange name="MY_DIRECT_EXCHANGE" durable="true" auto-delete="false" declared-by="connectAdmin">
        <rabbit:bindings>
            <rabbit:binding queue="MY_SECOND_QUEUE" key="SecondKey"></rabbit:binding>
        </rabbit:bindings>
    </rabbit:direct-exchange>

    <!-- 消息接收者 -->
    <bean id="receiverSecond" class="com.gupaoedu.consumer.SecondConsumer"></bean>

    <!-- queue litener 观察 监听模式 当有消息到达时会通知监听在对应的队列上的监听对象 -->
    <rabbit:listener-container connection-factory="connectionFactory">
        <rabbit:listener queues="MY_SECOND_QUEUE" ref="receiverSecond" />
    </rabbit:listener-container>

    <!--######分隔线######-->
    <!--定义queue -->
    <rabbit:queue name="MY_THIRD_QUEUE" durable="true" auto-delete="false" exclusive="false" declared-by="connectAdmin" />

    <!-- 定义topic exchange,绑定MY_THIRD_QUEUE,注意关键词是pattern -->
    <rabbit:topic-exchange name="MY_TOPIC_EXCHANGE" durable="true" auto-delete="false" declared-by="connectAdmin">
        <rabbit:bindings>
            <rabbit:binding queue="MY_THIRD_QUEUE" pattern="#.Third.#"></rabbit:binding>
        </rabbit:bindings>
    </rabbit:topic-exchange>

    <!--定义rabbit template用于数据的接收和发送 -->
    <rabbit:template id="amqpTemplate2" connection-factory="connectionFactory" exchange="MY_TOPIC_EXCHANGE" />

    <!-- 消息接收者 -->
    <bean id="receiverThird" class="com.gupaoedu.consumer.ThirdConsumer"></bean>

    <!-- queue litener 观察 监听模式 当有消息到达时会通知监听在对应的队列上的监听对象 -->
    <rabbit:listener-container connection-factory="connectionFactory">
        <rabbit:listener queues="MY_THIRD_QUEUE" ref="receiverThird" />
    </rabbit:listener-container>

    <!--######分隔线######-->
    <!--定义queue -->
    <rabbit:queue name="MY_FOURTH_QUEUE" durable="true" auto-delete="false" exclusive="false" declared-by="connectAdmin" />

    <!-- 定义fanout exchange,绑定MY_FIRST_QUEUE 和 MY_FOURTH_QUEUE -->
    <rabbit:fanout-exchange name="MY_FANOUT_EXCHANGE" auto-delete="false" durable="true" declared-by="connectAdmin" >
        <rabbit:bindings>
            <rabbit:binding queue="MY_FIRST_QUEUE"></rabbit:binding>
            <rabbit:binding queue="MY_FOURTH_QUEUE"></rabbit:binding>
        </rabbit:bindings>
    </rabbit:fanout-exchange>

    <!-- 消息接收者 -->
    <bean id="receiverFourth" class="com.gupaoedu.consumer.FourthConsumer"></bean>

    <!-- queue litener 观察 监听模式 当有消息到达时会通知监听在对应的队列上的监听对象 -->
    <rabbit:listener-container connection-factory="connectionFactory">
        <rabbit:listener queues="MY_FOURTH_QUEUE" ref="receiverFourth" />
    </rabbit:listener-container>
</beans>
(2)生产者
import org.slf4j.Logger;
import org.slf4j.LoggerFactory;
import org.springframework.amqp.core.AmqpTemplate;
import org.springframework.beans.factory.annotation.Autowired;
import org.springframework.beans.factory.annotation.Qualifier;
import org.springframework.stereotype.Service;

/**
 * 消息生产者
 */
@Service
public class MessageProducer {
    private Logger logger = LoggerFactory.getLogger(MessageProducer.class);

    @Autowired
    @Qualifier("amqpTemplate")
    private AmqpTemplate amqpTemplate;

    @Autowired
    @Qualifier("amqpTemplate2")
    private AmqpTemplate amqpTemplate2;

    /**
     * 演示三种交换机的使用
     */
    public void sendMessage(Object message) {


        // amqpTemplate 默认交换机 MY_DIRECT_EXCHANGE
        // amqpTemplate2 默认交换机 MY_TOPIC_EXCHANGE

        // Exchange 为 direct 模式,直接指定routingKey
        amqpTemplate.convertAndSend("FirstKey", "[Direct,FirstKey] "+message);
        amqpTemplate.convertAndSend("SecondKey", "[Direct,SecondKey] "+message);

        // Exchange模式为topic,通过topic匹配关心该主题的队列
        amqpTemplate2.convertAndSend("msg.Third.send","[Topic,msg.Third.send] "+message);

        // 广播消息,与Exchange绑定的所有队列都会收到消息,routingKey为空
        amqpTemplate2.convertAndSend("MY_FANOUT_EXCHANGE",null,"[Fanout] "+message);
    }
}
(3)消费者
public class FirstConsumer implements MessageListener {
    private Logger logger = LoggerFactory.getLogger(FirstConsumer.class);

    public void onMessage(Message message) {
        logger.info("The first consumer received message : " + message.getBody());
    }
}
public class SecondConsumer implements MessageListener {
    private Logger logger = LoggerFactory.getLogger(SecondConsumer.class);

    public void onMessage(Message message) {
        logger.info("The second consumer received message : " + message);
    }
}
public class ThirdConsumer implements MessageListener {
    private Logger logger = LoggerFactory.getLogger(ThirdConsumer.class);

    public void onMessage(Message message) {
        logger.info("The third cosumer received message : " + message);
    }
}

public class FourthConsumer implements MessageListener {
    private Logger logger = LoggerFactory.getLogger(FourthConsumer.class);

    public void onMessage(Message message) {
        logger.info("The fourth consumer received message : " + message);
    }
}
(4)测试类
import org.junit.Test;
import org.springframework.context.ApplicationContext;
import org.springframework.context.support.ClassPathXmlApplicationContext;
import com.gupaoedu.producer.MessageProducer;
public class RabbitTest {
    private ApplicationContext context = null;

    @Test
    public void sendMessage() {
        context = new ClassPathXmlApplicationContext("applicationContext.xml");
        MessageProducer messageProducer = (MessageProducer) context.getBean("messageProducer");
        int k = 100;
        while (k > 0) {
            messageProducer.sendMessage("第" + k + "次发送的消息");
            k--;
            try {
                Thread.sleep(1000);
            } catch (Exception e) {
                e.printStackTrace();
            }
        }
    }
}
三、SpringBoot-API
1、spring-amqp介绍
Spring AMQP是对Spring基于AMQP的消息收发解决方案,它是一个抽象层,不依赖于特定的AMQP Broker实现和客户端的抽象,所以可以很方便地替换。比如我们可以使用spring-rabbit来实现。
<dependency>
  <groupId>org.springframework.amqp</groupId>
  <artifactId>spring-rabbit</artifactId>
  <version>2.1.6.RELEASE</version>
</dependency>
其中包含了3个jar包:
amqp-client(java api的包)、spring-amqp(对amqp的封装)、spring.rabbit(rabbitmq对AMQP在Spring中的实现)
(1)Spring-AMQP核心对象
在Spring AMQP中,对RabbitMQ的Java API进一步进行了封装,让我们实现更加简单,主要封装对象:

(2)官方文档
https://docs.spring.io/spring-amqp/docs/2.4.13/reference/html/
(3)官方文档翻译
Spring整合RabbitMQ,SpringBoot整合RabbitMQ,Spring-AMQP官方文档详解
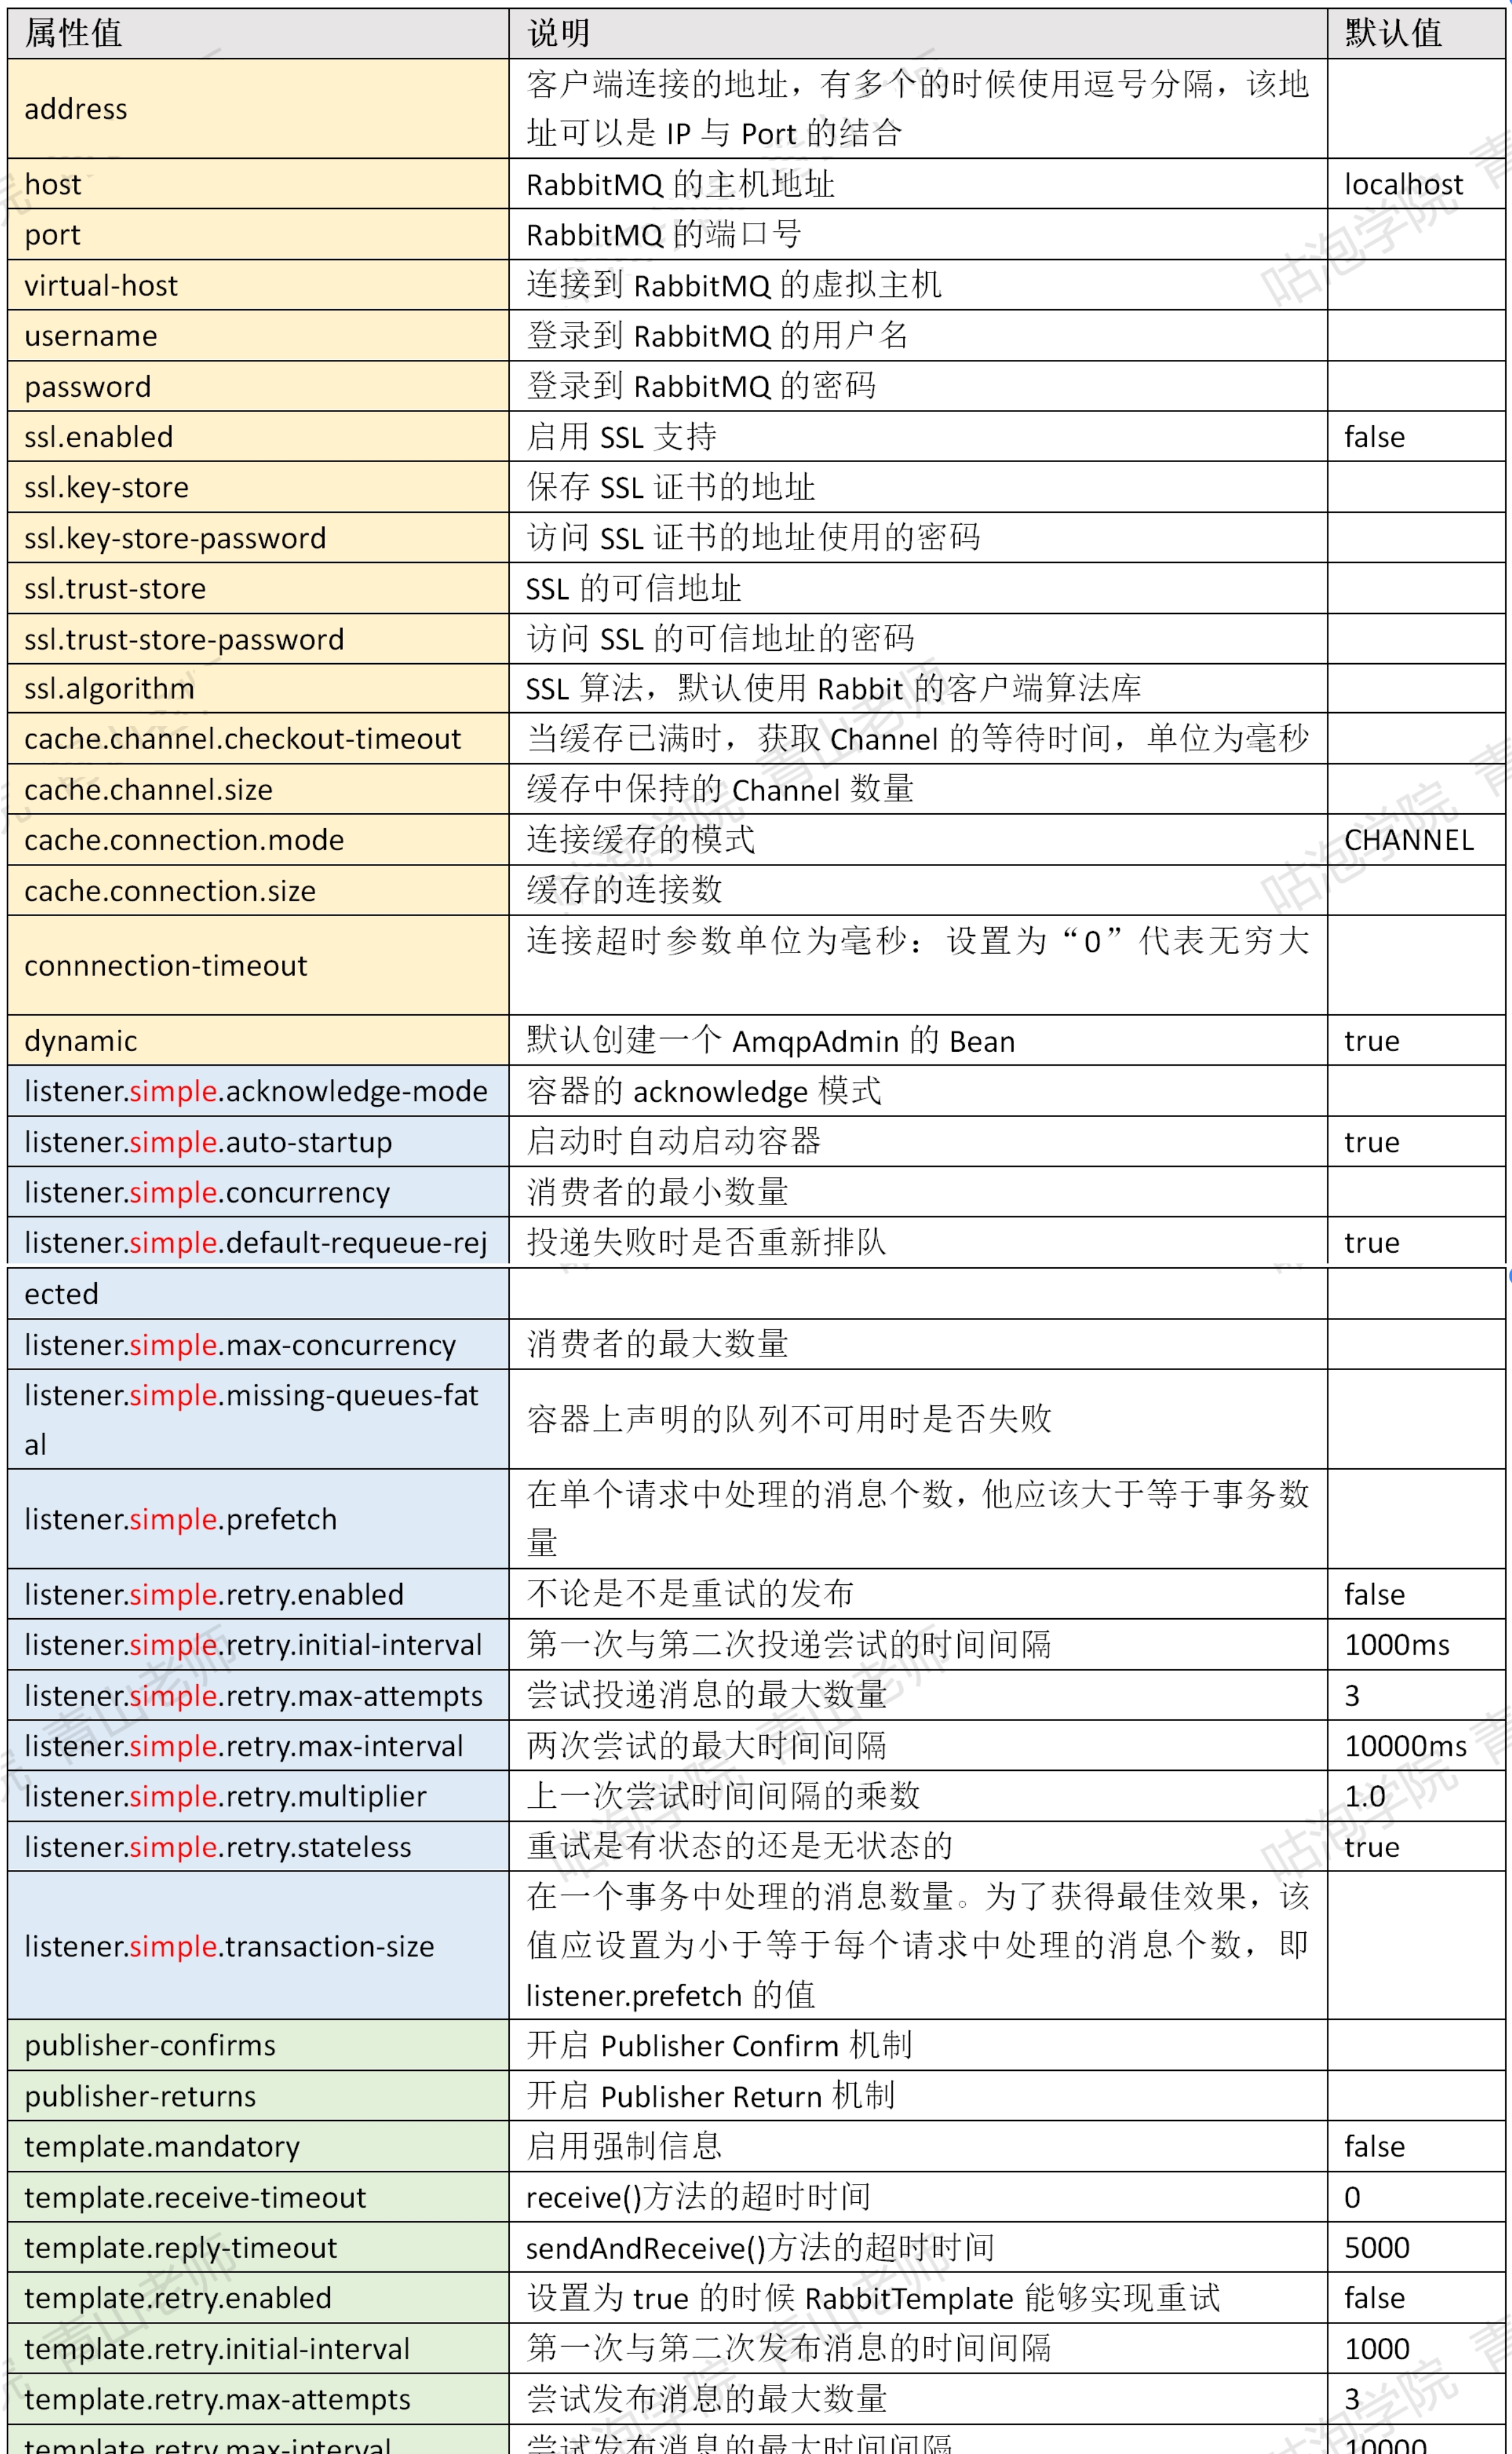
(4)SpringBoot参数(2.1.5)
注:前缀spring.rabbitmq全部省略了。
全部配置总体上分为三大类:连接类、消息消费类、消息发送类
2、配置信息
(1)手动配置连接
import org.springframework.amqp.rabbit.connection.CachingConnectionFactory;
import org.springframework.amqp.rabbit.connection.ConnectionFactory;
import org.springframework.amqp.rabbit.core.RabbitAdmin;
import org.springframework.amqp.rabbit.listener.SimpleMessageListenerContainer;
import org.springframework.amqp.support.ConsumerTagStrategy;
import org.springframework.context.annotation.Bean;
import org.springframework.context.annotation.Configuration;

@Configuration
public class AmqpConfig {

    @Bean
    public ConnectionFactory connectionFactory() throws Exception {
        CachingConnectionFactory cachingConnectionFactory = new CachingConnectionFactory();
        cachingConnectionFactory.setUri(ResourceUtil.getKey("rabbitmq.uri"));
        return cachingConnectionFactory;
    }

    @Bean
    public RabbitAdmin amqpAdmin(ConnectionFactory connectionFactory) {
        RabbitAdmin admin = new RabbitAdmin(connectionFactory);
        // admin.setAutoStartup(true);
        return admin;
    }

    @Bean
    public SimpleMessageListenerContainer container(ConnectionFactory connectionFactory) {
        SimpleMessageListenerContainer container = new SimpleMessageListenerContainer(connectionFactory);
        container.setConsumerTagStrategy(new ConsumerTagStrategy() {
            public String createConsumerTag(String queue) {
                return null;
            }
        });
        return container;
    }

}
import org.springframework.amqp.core.Binding;
import org.springframework.amqp.core.DirectExchange;
import org.springframework.amqp.core.Queue;
import org.springframework.amqp.rabbit.core.RabbitAdmin;
import org.springframework.context.annotation.AnnotationConfigApplicationContext;
import org.springframework.context.annotation.ComponentScan;
@ComponentScan(basePackages = "com.amqp")
public class AdminTest {

    public static void main(String[] args) {
        AnnotationConfigApplicationContext context = new AnnotationConfigApplicationContext(AdminTest.class);
        RabbitAdmin rabbitAdmin = context.getBean(RabbitAdmin.class);

        // 声明一个交换机
        rabbitAdmin.declareExchange(new DirectExchange("ADMIN_EXCHANGE", false, false));

        // 声明一个队列
        rabbitAdmin.declareQueue(new Queue("ADMIN_QUEUE", false, false, false));

        // 声明一个绑定
        rabbitAdmin.declareBinding( new Binding("ADMIN_QUEUE", Binding.DestinationType.QUEUE,
                "ADMIN_EXCHANGE", "admin", null));

    }
}
(2)配置Container
import org.springframework.amqp.core.AcknowledgeMode;
import org.springframework.amqp.core.Queue;
import org.springframework.amqp.rabbit.config.SimpleRabbitListenerContainerFactory;
import org.springframework.amqp.rabbit.connection.CachingConnectionFactory;
import org.springframework.amqp.rabbit.connection.ConnectionFactory;
import org.springframework.amqp.rabbit.core.RabbitAdmin;
import org.springframework.amqp.rabbit.listener.SimpleMessageListenerContainer;
import org.springframework.amqp.rabbit.transaction.RabbitTransactionManager;
import org.springframework.amqp.support.ConsumerTagStrategy;
import org.springframework.amqp.support.converter.Jackson2JsonMessageConverter;
import org.springframework.context.annotation.Bean;
import org.springframework.context.annotation.Configuration;

import java.util.UUID;

@Configuration
public class ContainerConfig {

    @Bean
    public ConnectionFactory connectionFactory() throws Exception {
        CachingConnectionFactory cachingConnectionFactory = new CachingConnectionFactory();
        return cachingConnectionFactory;
    }

    @Bean
    public RabbitAdmin amqpAdmin(ConnectionFactory connectionFactory) {
        RabbitAdmin admin = new RabbitAdmin(connectionFactory);
        // admin.setAutoStartup(true);
        return admin;
    }


    @Bean("secondQueue")
    public Queue getSecondQueue(){
        return new Queue("BASIC_SECOND_QUEUE");
    }

    @Bean("thirdQueue")
    public Queue getThirdQueue(){
        return new Queue("BASIC_THIRD_QUEUE");
    }

    @Bean
    public SimpleMessageListenerContainer messageContainer(ConnectionFactory connectionFactory) {
        SimpleMessageListenerContainer container = new SimpleMessageListenerContainer(connectionFactory);
        container.setQueues(getSecondQueue(), getThirdQueue()); //监听的队列
        container.setConcurrentConsumers(1); // 最小消费者数
        container.setMaxConcurrentConsumers(5); //  最大的消费者数量
        container.setDefaultRequeueRejected(false); //是否重回队列
        container.setAcknowledgeMode(AcknowledgeMode.AUTO); //签收模式
        container.setExposeListenerChannel(true);

        container.setConsumerTagStrategy(new ConsumerTagStrategy() {    //消费端的标签策略
            @Override
            public String createConsumerTag(String queue) {
                return queue + "_" + UUID.randomUUID().toString();
            }
        });
        return container;
    }

    @Bean
    public SimpleRabbitListenerContainerFactory rabbitListenerContainerFactory(ConnectionFactory connectionFactory) {
        SimpleRabbitListenerContainerFactory factory = new SimpleRabbitListenerContainerFactory();
        factory.setConnectionFactory(connectionFactory);
        factory.setMessageConverter(new Jackson2JsonMessageConverter()); // 消息转换器
        factory.setAcknowledgeMode(AcknowledgeMode.NONE); // 签收模式
        factory.setAutoStartup(true);

        factory.setConcurrentConsumers(2); // 最小消费者数
        factory.setMaxConcurrentConsumers(6); //最大消费者数
        factory.setTransactionManager(rabbitTransactionManager(connectionFactory));
        return factory;
    }

    public RabbitTransactionManager rabbitTransactionManager(ConnectionFactory connectionFactory) {
        return new RabbitTransactionManager(connectionFactory);
    }


}
import org.springframework.amqp.core.AmqpTemplate;
import org.springframework.amqp.core.Message;
import org.springframework.amqp.core.MessageListener;
import org.springframework.amqp.rabbit.config.SimpleRabbitListenerContainerFactory;
import org.springframework.amqp.rabbit.connection.CachingConnectionFactory;
import org.springframework.amqp.rabbit.connection.ConnectionFactory;
import org.springframework.amqp.rabbit.connection.CorrelationData;
import org.springframework.amqp.rabbit.core.RabbitTemplate;
import org.springframework.amqp.rabbit.listener.SimpleMessageListenerContainer;
import org.springframework.context.annotation.AnnotationConfigApplicationContext;
import org.springframework.context.annotation.ComponentScan;

import java.net.URI;
import java.net.URISyntaxException;

/**
 * 配置类的代码用不到,只用来演示
 */
public class ContainerSender {
    public static void main(String[] args) throws Exception {
        ConnectionFactory connectionFactory = new CachingConnectionFactory(new URI("amqp://guest:guest@localhost:5672"));
        SimpleRabbitListenerContainerFactory factory = new SimpleRabbitListenerContainerFactory();
        factory.setConnectionFactory(connectionFactory);
        SimpleMessageListenerContainer container = factory.createListenerContainer();
        // 不用工厂模式也可以创建
        // SimpleMessageListenerContainer container = new SimpleMessageListenerContainer(connectionFactory);
        container.setConcurrentConsumers(1);
        container.setQueueNames("BASIC_SECOND_QUEUE");
        container.setMessageListener(new MessageListener() {
            @Override
            public void onMessage(Message message) {
                System.out.println("收到消息:"+message);
            }
        });
        container.start();

        AmqpTemplate template = new RabbitTemplate(connectionFactory);
        template.convertAndSend("BASIC_SECOND_QUEUE", "msg 1");
        template.convertAndSend("BASIC_SECOND_QUEUE", "msg 2");
        template.convertAndSend("BASIC_SECOND_QUEUE", "msg 3");
    }

}
(3)配置template
import org.springframework.amqp.core.Message;
import org.springframework.amqp.rabbit.connection.CachingConnectionFactory;
import org.springframework.amqp.rabbit.connection.ConnectionFactory;
import org.springframework.amqp.rabbit.connection.CorrelationData;
import org.springframework.amqp.rabbit.core.RabbitAdmin;
import org.springframework.amqp.rabbit.core.RabbitTemplate;
import org.springframework.context.annotation.Bean;
import org.springframework.context.annotation.Configuration;
@Configuration
public class TemplateConfig {
    @Bean
    public ConnectionFactory connectionFactory() throws Exception {
        CachingConnectionFactory cachingConnectionFactory = new CachingConnectionFactory();
        cachingConnectionFactory.setUri(ResourceUtil.getKey("rabbitmq.uri"));
        return cachingConnectionFactory;
    }

    @Bean
    public RabbitAdmin rabbitAdmin(ConnectionFactory connectionFactory) {
        return new RabbitAdmin(connectionFactory);
    }

    @Bean
    public RabbitTemplate rabbitTemplate(ConnectionFactory connectionFactory) {
        RabbitTemplate rabbitTemplate = new RabbitTemplate(connectionFactory);
        rabbitTemplate.setMandatory(true);
        rabbitTemplate.setReturnCallback(new RabbitTemplate.ReturnCallback(){
            public void returnedMessage(Message message,
                                        int replyCode,
                                        String replyText,
                                        String exchange,
                                        String routingKey){
                System.out.println("回发的消息:");
                System.out.println("replyCode: "+replyCode);
                System.out.println("replyText: "+replyText);
                System.out.println("exchange: "+exchange);
                System.out.println("routingKey: "+routingKey);
            }
        });

        rabbitTemplate.setChannelTransacted(true);

        rabbitTemplate.setConfirmCallback(new RabbitTemplate.ConfirmCallback() {
            public void confirm(CorrelationData correlationData, boolean ack, String cause) {
                if (!ack) {
                    System.out.println("发送消息失败:" + cause);
                    throw new RuntimeException("发送异常:" + cause);
                }
            }
        });
        return rabbitTemplate;
    }
}
import org.springframework.amqp.rabbit.connection.CorrelationData;
import org.springframework.amqp.rabbit.core.RabbitTemplate;
import org.springframework.context.annotation.AnnotationConfigApplicationContext;
import org.springframework.context.annotation.ComponentScan;

@ComponentScan(basePackages = "com.amqp.template")
public class TemplateSender {
    public static void main(String[] args) {
        AnnotationConfigApplicationContext context = new AnnotationConfigApplicationContext(TemplateSender.class);
        RabbitTemplate rabbitTemplate = context.getBean(RabbitTemplate.class);

        rabbitTemplate.setConfirmCallback(new RabbitTemplate.ConfirmCallback(){
            public void confirm(CorrelationData correlationData, boolean ack, String cause) {
                if (ack) {
                    System.out.println("消息确认成功");
                } else {
                    // nack
                    System.out.println("消息确认失败");
                }
            }
        });

        rabbitTemplate.convertAndSend("BASIC_FANOUT_EXCHANGE", "", "this is a msg");
    }
}
3、简单实例
import org.springframework.amqp.core.*;
import org.springframework.amqp.rabbit.connection.CachingConnectionFactory;
import org.springframework.amqp.rabbit.connection.ConnectionFactory;
import org.springframework.amqp.rabbit.core.RabbitAdmin;
import org.springframework.amqp.rabbit.core.RabbitTemplate;
import org.springframework.amqp.rabbit.listener.SimpleMessageListenerContainer;
import org.springframework.amqp.support.ConsumerTagStrategy;
import org.springframework.beans.factory.annotation.Qualifier;
import org.springframework.context.annotation.Bean;
import org.springframework.context.annotation.Configuration;

import java.util.HashMap;
import java.util.Map;

@Configuration
public class RabbitConfig {

    /**
     * 都可以使用缺省对象
     * @return
     * @throws Exception
     */
    @Bean
    public ConnectionFactory connectionFactory() throws Exception {
        CachingConnectionFactory cachingConnectionFactory = new CachingConnectionFactory();
        cachingConnectionFactory.setUri("amqp://guest:guest@localhost:5672");
        return cachingConnectionFactory;
    }

    @Bean
    public RabbitAdmin amqpAdmin(ConnectionFactory connectionFactory) {
        RabbitAdmin admin = new RabbitAdmin(connectionFactory);
        admin.setAutoStartup(true);
        return admin;
    }

    @Bean
    public RabbitTemplate rabbitTemplate(ConnectionFactory connectionFactory) {
        return new RabbitTemplate(connectionFactory);
    }

    @Bean
    public SimpleMessageListenerContainer container(ConnectionFactory connectionFactory) {
        SimpleMessageListenerContainer container = new SimpleMessageListenerContainer(connectionFactory);
        container.setConsumerTagStrategy(new ConsumerTagStrategy() {
            public String createConsumerTag(String queue) {
                return null;
            }
        });
        return container;
    }

    // 两个交换机
    @Bean("topicExchange")
    public TopicExchange getTopicExchange(){
        return new TopicExchange("GP_BASIC_TOPIC_EXCHANGE");
    }

    @Bean("fanoutExchange")
    public FanoutExchange getFanoutExchange(){
        return  new FanoutExchange("GP_BASIC_FANOUT_EXCHANGE");
    }

    // 三个队列
    @Bean("firstQueue")
    public Queue getFirstQueue(){
        Map<String, Object> args = new HashMap<String, Object>();
        args.put("x-message-ttl",6000);
        Queue queue = new Queue("GP_BASIC_FIRST_QUEUE", false, false, true, args);
        return queue;
    }

    @Bean("secondQueue")
    public Queue getSecondQueue(){
        return new Queue("GP_BASIC_SECOND_QUEUE");
    }

    @Bean("thirdQueue")
    public Queue getThirdQueue(){
        return new Queue("GP_BASIC_THIRD_QUEUE");
    }

    // 两个绑定
    @Bean
    public Binding bindSecond(@Qualifier("secondQueue") Queue queue, @Qualifier("topicExchange") TopicExchange exchange){
        return BindingBuilder.bind(queue).to(exchange).with("#.gupao.#");
    }

    @Bean
    public Binding bindThird(@Qualifier("thirdQueue") Queue queue, @Qualifier("fanoutExchange") FanoutExchange exchange){
        return BindingBuilder.bind(queue).to(exchange);
    }
}
import org.springframework.amqp.core.Message;
import org.springframework.amqp.core.MessageDeliveryMode;
import org.springframework.amqp.core.MessageProperties;
import org.springframework.amqp.rabbit.core.RabbitAdmin;
import org.springframework.amqp.rabbit.core.RabbitTemplate;
import org.springframework.context.annotation.AnnotationConfigApplicationContext;
import org.springframework.context.annotation.ComponentScan;

/**
 * 生产者
 */
@ComponentScan(basePackages = "com.basic")
public class BasicSender {

    public static void main(String[] args) {
        AnnotationConfigApplicationContext context = new AnnotationConfigApplicationContext(BasicSender.class);
        RabbitAdmin rabbitAdmin = context.getBean(RabbitAdmin.class);
        RabbitTemplate rabbitTemplate = context.getBean(RabbitTemplate.class);

        rabbitTemplate.convertAndSend("","BASIC_FIRST_QUEUE","-------- a direct msg");

        rabbitTemplate.convertAndSend("BASIC_TOPIC_EXCHANGE","shanghai.teacher","-------- a topic msg : shanghai.teacher");
        rabbitTemplate.convertAndSend("BASIC_TOPIC_EXCHANGE","changsha.student","-------- a topic msg : changsha.student");

        rabbitTemplate.convertAndSend("BASIC_FANOUT_EXCHANGE","","-------- a fanout msg");

    }
}
import com.rabbitmq.client.Channel;
import org.springframework.amqp.rabbit.annotation.RabbitHandler;
import org.springframework.amqp.rabbit.annotation.RabbitListener;
import org.springframework.stereotype.Component;

import java.io.IOException;

/**
 * 消费者
 */
@Component
@RabbitListener(queues = "BASIC_FIRST_QUEUE")
public class FirstConsumer {

    @RabbitHandler
    public void process(String msg, Channel channel,long deliveryTag) throws IOException {
        channel.basicAck(deliveryTag, true);
        System.out.println(" first queue received msg : " + msg);
    }
}

import org.springframework.amqp.rabbit.annotation.RabbitHandler;
import org.springframework.amqp.rabbit.annotation.RabbitListener;
import org.springframework.stereotype.Component;

/**
 * 消费者
 */
@Component
@RabbitListener(queues = "BASIC_SECOND_QUEUE")
public class SecondConsumer {

    @RabbitHandler
    public void process(String msg){
        System.out.println(" second queue received msg : " + msg);
    }
}
import org.springframework.amqp.rabbit.annotation.RabbitHandler;
import org.springframework.amqp.rabbit.annotation.RabbitListener;
import org.springframework.stereotype.Component;

/**
 * 消费者
 */
@Component
@RabbitListener(queues = "BASIC_THIRD_QUEUE")
public class ThirdConsumer {

    @RabbitHandler
    public void process(String msg){
        System.out.println(" third queue received msg : " + msg);
    }
}
4、消费者消息自动转换
/**
 * 在消费端转换JSON消息
 * 监听类都要加上containerFactory属性
 * @param connectionFactory
 * @return
 */
@Bean
public SimpleRabbitListenerContainerFactory rabbitListenerContainerFactory(ConnectionFactory connectionFactory) {
    SimpleRabbitListenerContainerFactory factory = new SimpleRabbitListenerContainerFactory();
    factory.setConnectionFactory(connectionFactory);
    factory.setMessageConverter(new Jackson2JsonMessageConverter()); // 序列化方式
    factory.setAcknowledgeMode(AcknowledgeMode.MANUAL); // 应答方式
    factory.setAutoStartup(true);
    return factory;
}

import com.gupaoedu.entity.Merchant;
import org.springframework.amqp.rabbit.annotation.RabbitHandler;
import org.springframework.amqp.rabbit.annotation.RabbitListener;
import org.springframework.context.annotation.PropertySource;
import org.springframework.messaging.handler.annotation.Payload;
import org.springframework.stereotype.Component;

@Component
@PropertySource("classpath:mq.properties")
// 指定监听一个或多个队列
@RabbitListener(queues = "${com.firstqueue}", containerFactory="rabbitListenerContainerFactory")
public class FirstConsumer {

    // 处理逻辑,可以接收一个对象类型的消息
    @RabbitHandler
    public void process(@Payload Merchant merchant){
        System.out.println("First Queue received msg : " + merchant.getName());
    }

}

public class Merchant implements Serializable {
    int id; // 商户编号
    String name; // 商户名称
    String address; // 商户地址
    String accountNo; // 商户账号
    String accountName; // 户名
    String state; // 状态 1 激活 2 关闭
    String stateStr; // 状态中文
}
5、延迟消息
RabbitMQ实现延迟消息,RabbitMQ使用死信队列实现延迟消息,RabbitMQ延时队列插件
6、消息可靠投递
RabbitMQ保证消息的可靠投递,Java实现RabbitMQ消息的可靠投递,Springboot实现RabbitMQ消息的可靠投递


![[计算机入门]了解键盘](https://img-blog.csdnimg.cn/e5decd004efc46b498f0bc4d9fbae40c.png)