一、App启动涉及到的三个进程
1、Launcher进程:负责接收用户点击屏幕的事件,它其实就是一个Activity,屏幕上的各种Icon就是这个Activity中的Button,当点击Icon时,会触发启动App的流程。
2、SystemServer进程:它是属于Application Framework层的,在SystemServer中启动了非常多的服务(例如:AMS、PMS、WMS等),这些服务都交给SystemServiceManager来管理。
3、App进程:需要启动的App进程
4、Zygote进程:fork App进程的进程
二、App启动所涉及到几个大类
1、ActivityManagerService(AMS):AMS主要负责系统中四大组件的启动、切换、调度及应用进程的管理和调度等工作,它本身也是一个Binder类。
2、Instrumentation:监控应用程序和系统的交互(每个Activity都会持有一个Instrumentation引用,整个进程只会有一个Instrumentation的实例,它主要是完成对Applicaiton和Activity初始化和生命周期的工具类)
3、ActivityThread:应用程序的入口类,通过调用main方法,开启消息循环队列。
4、ApplicationThread:ApplicationThread提供Binder通讯接口,AMS则通过代理调用此App进程的本地方法。
5、ActivityManager:客户端使用的是ActivityManager类,其内部通过调用ActivityManagerNative.getDefault()得到一个ActivityManagerProxy对象,通过它与ActivityManagerService进行通信。(注:Android8.0及8.0以上系统AMS不再通过ActivityManagerNative.getDefault()获取AMS的代理对象,而是通过IActivityManager)
6、ActivityManagerProxy:AMS服务在当前进程中的代理类,负责与AMS通信。
7、ApplicationThreadProxy:ApplicaitonThread在AMS服务中的代理类,负责与ApplicationThread通信。
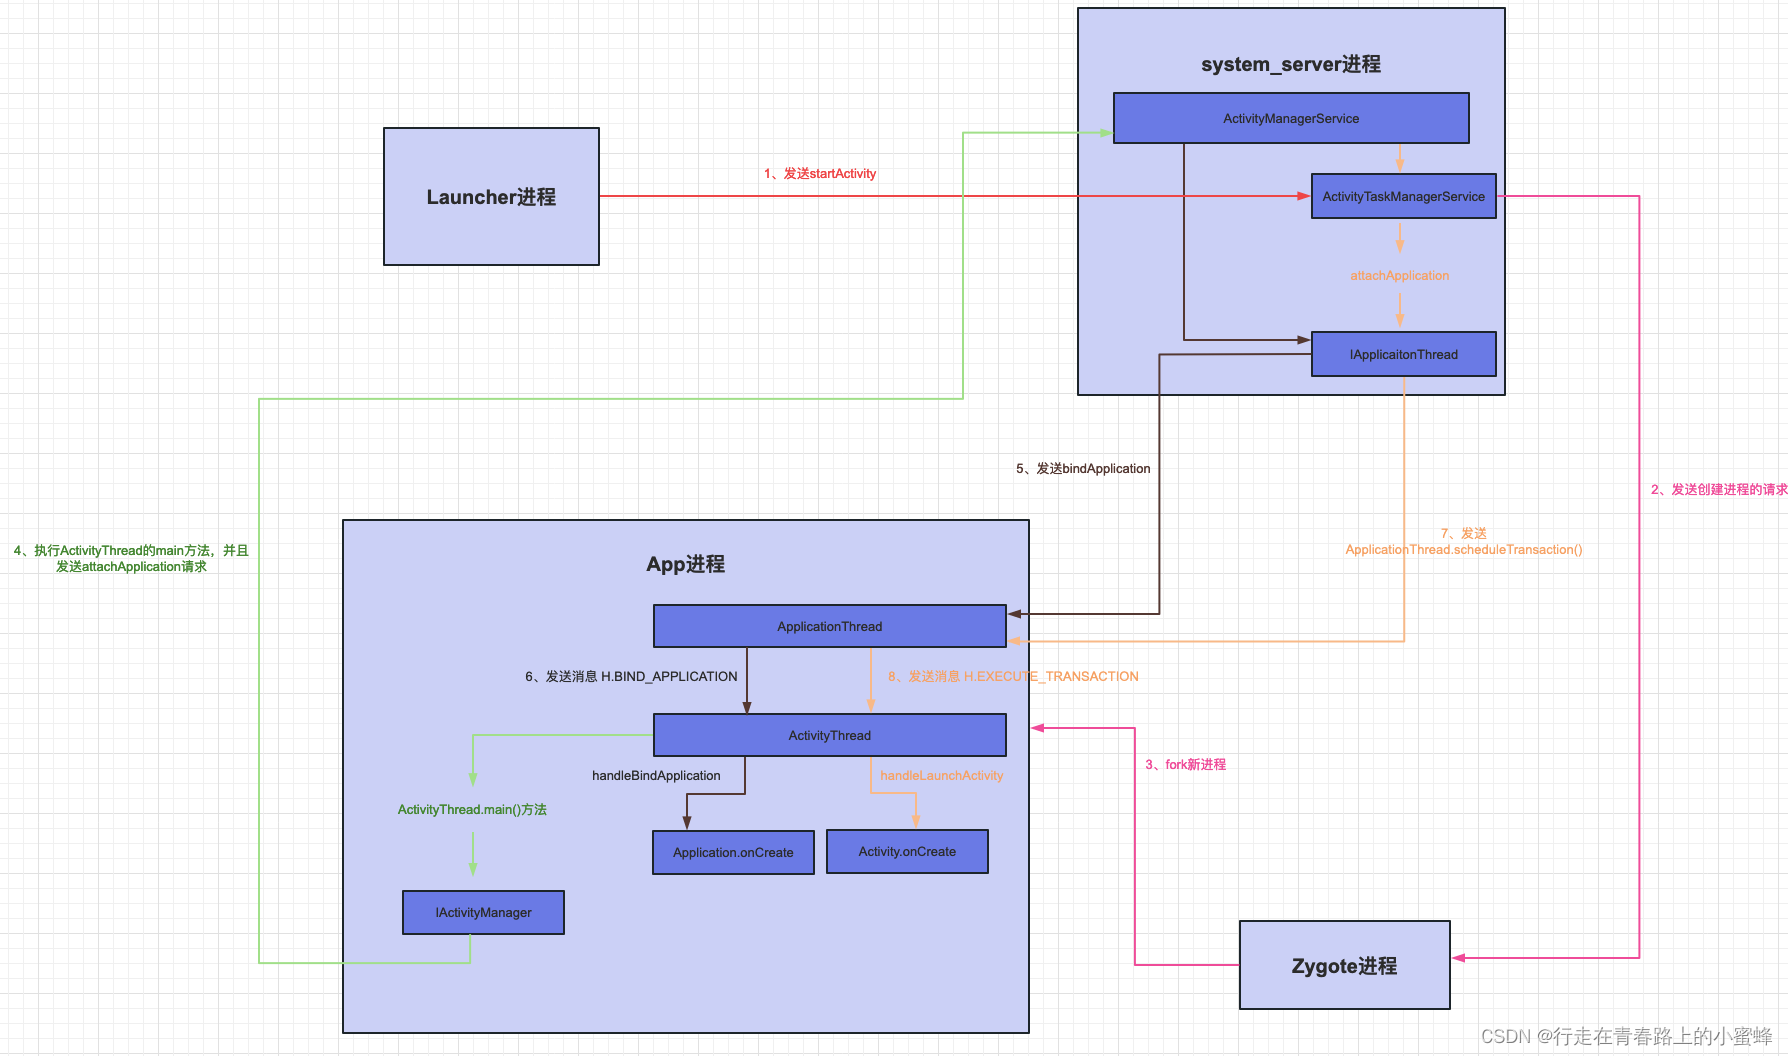
三、App启动流程概述
 或者也可以看这个简单点的图:
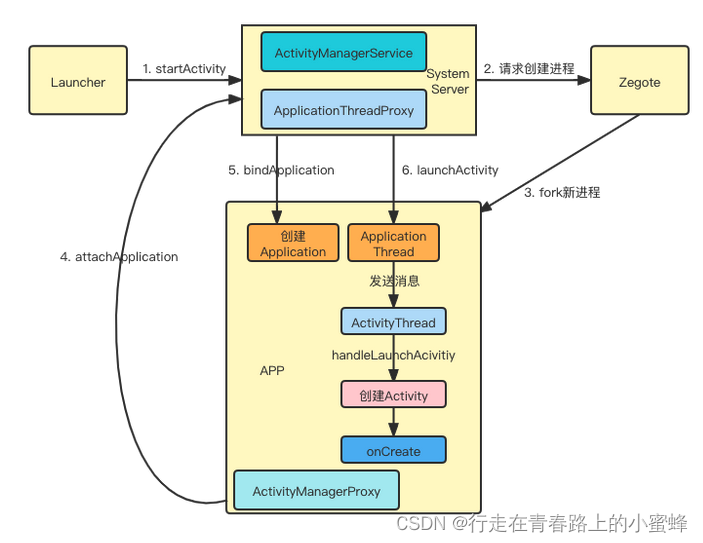
第1步:点击桌面图标,Launcher进程会采用Binder IPC(Inner-Process Communication)向system_server进程发起startActivity请求。
第2步:system_server进程接收到请求后,向zygote进程发送创建进程的请求。
第3步:Zygote进程fork出新的子进程,即App进程。
第4步:App进程创建之后,ActivityThread类的main方法会作为程序的入口执行,在ActivityThread的main方法中,会通过Binder IPC向system_server进程发起attachApplication的请求。
第5步:system_server进程在收到请求后,进行一系列的方法调用后,再通过Binder IPC向App进程发送bindApplication;
第6步:App进程的Binder线程(ApplicaitonThread)在收到bindApplication请求后,会通过Handler向主线程发送H.BIND_APPLICATION消息。在主线程收到H.BIND_APPLICATION的Handler消息后,会调用ActivityThread类中的handleBindApplication方法,完成Application的创建并回调Applicaiton.onCreate()
(注意:因为App进程与system_server进程通信是通过Binder实现的,Binder会开辟Binder线程池,那么此时这个方法的调用是在子线程中完成的,像bindApplicaiton最终需要调用Applicaiton的onCreate方法,但是这个方法是在主线程中,因此需要Handler完成线程切换)
第7步:在上述第5步的system_server进程在收到请求后,除了通过Binder IPC 向App进程发送bindApplication外,还会发送scheduleTransaction.
第8步:App进程在收到scheduleTransaction的请求后,会通过Handler向主线程发送H.EXECUTE_TRANSACTION的Handler消息。在主线程收到H.EXECUTE_TRANSACTION的Handler消息后,会调用ActivityThread类的handleLaunchActivity方法,从而完成App中起始Activity的创建并回调Activity.onCreate()
注:以上步骤中第2步,system_server进程与Zygote进程的通信 以及
第3步,Zygote进程fork出App进程 是以Socket方式 进行的通信;而Launcher进程、system_server进程、App进程间的通信是以Binder IPC方式通信的。
四、App启动流程源码剖析(该启动流程源码分析基于Android33)
关于App启动流程的分析,我们从Launcher进程开始
1、Launcher进程
首先,Launcher进程是Zygote进程fork出的一个进程,我们看到的手机桌面可以认为是Launcher进程中的一个Activity,即LauncherActivity,而桌面上的每一个Icon可以看作是这个LauncherActivity中的一个个的Button,用户点击桌面上App Icon的行为其实就是点击LauncherActivity中的Icon。
那么Launcher进程是什么时候启动的呢?
我们知道除了Launcher进程之外,还有一个很重要的进程就是SystemServer进程,而SystemServer进程是Zygote进程fork出的第一个进程,SystemServer进程在启动的过程中会启动PMS(PackageManagerService)、AMS、WMS等,PMS启动后会将系统中的应用程序安装完成,先前已经启动的AMS会将Launcher启动起来。
首先看下SystemServer进程的main方法,这里是SystemServer进程的入口函数:
	public static void main(String[] args) {
        new SystemServer().run();
    }
而在SystemServer的run方法中,启动了很多Service服务:
    private void run() {
		.....

 		try {
            t.traceBegin("StartServices");
            startBootstrapServices(t);
            startCoreServices(t);
            startOtherServices(t);
            startApexServices(t);
        } catch (Throwable ex) {
            Slog.e("System", "******************************************");
            Slog.e("System", "************ Failure starting system services", ex);
            throw ex;
        } finally {
            t.traceEnd(); // StartServices
        }

		.....
    }
其中有调用startOtherServices()方法,在startOtherServices()方法中,调用了AMS的systemReady()方法,此即为Launcher的入口,如下所示:
private void startOtherServices() {
    ...

    mActivityManagerService.systemReady(() -> {
        Slog.i(TAG, "Making services ready");
        traceBeginAndSlog("StartActivityManagerReadyPhase");
        mSystemServiceManager.startBootPhase(
                SystemService.PHASE_ACTIVITY_MANAGER_READY);

        ...
        }
    ...
}
再来看下AMS的systemReady()方法:
public void systemReady(final Runnable goingCallback, TimingsTraceLog traceLog) {
    ...

    synchronized (this) {
        ...
        mStackSupervisor.resumeFocusedStackTopActivityLocked();
        mUserController.sendUserSwitchBroadcasts(-1, currentUserId);

        ...
    }
}
这里逻辑比较长,就不一一赘述了,只需要知道这里是Launcher的入口,最后会通过AMS把LauncherActivity启动起来,再来看下LauncherActivity:
public abstract class LauncherActivity extends ListActivity {

	.....

	@Override
    protected void onListItemClick(ListView l, View v, int position, long id) {
        Intent intent = intentForPosition(position);
        startActivity(intent);
    }

	.....
}
可以看到LauncherActivity是继承于ListActivity的,并且有onListItemClick的回调方法,而这里的回调就是点击桌面Icon的回调,那么在收到点击桌面icon的回调后,调用了startActivity去执行启动Activity的流程了。
这里注意一下获取Intent的方法,IntentForPosition:
 	public Intent intentForPosition(int position) {
            if (mActivitiesList == null) {
                return null;
            }

            Intent intent = new Intent(mIntent);
            ListItem item = mActivitiesList.get(position);
            intent.setClassName(item.packageName, item.className);
            if (item.extras != null) {
                intent.putExtras(item.extras);
            }
            return intent;
        }
再回到上面调用startActivity的地方,这里调用的是Activity#startActivity方法:
	@Override
    public void startActivity(Intent intent, @Nullable Bundle options) {
        getAutofillClientController().onStartActivity(intent, mIntent);
        if (options != null) {
            startActivityForResult(intent, -1, options);
        } else {
            // Note we want to go through this call for compatibility with
            // applications that may have overridden the method.
            startActivityForResult(intent, -1);
        }
    }
接着,Activity#startActivity方法会调用Activity#startActivityForResult方法:
    public void startActivityForResult(@RequiresPermission Intent intent, int requestCode,
            @Nullable Bundle options) {
        if (mParent == null) {
            options = transferSpringboardActivityOptions(options);
            Instrumentation.ActivityResult ar =
                mInstrumentation.execStartActivity(
                    this, mMainThread.getApplicationThread(), mToken, this,
                    intent, requestCode, options);

            ......
        }
    }
注意上面重要的一行代码调用Instrumentation#execStartActivity方法:
public ActivityResult execStartActivity(
            Context who, IBinder contextThread, IBinder token, Activity target,
            Intent intent, int requestCode, Bundle options) {
	.....
	 try {
            intent.migrateExtraStreamToClipData(who);
            intent.prepareToLeaveProcess(who);
            int result = ActivityTaskManager.getService().startActivity(whoThread,
                    who.getOpPackageName(), who.getAttributionTag(), intent,
                    intent.resolveTypeIfNeeded(who.getContentResolver()), token,
                    target != null ? target.mEmbeddedID : null, requestCode, 0, null, options);
            checkStartActivityResult(result, intent);
        } catch (RemoteException e) {
            throw new RuntimeException("Failure from system", e);
        }
        return null;

}


public static IActivityTaskManager getService() {
    return IActivityTaskManagerSingleton.get();
}
//获取单例
@UnsupportedAppUsage(trackingBug = 129726065)
private static final Singleton<IActivityTaskManager> IActivityTaskManagerSingleton =
        new Singleton<IActivityTaskManager>() {
            @Override
            protected IActivityTaskManager create() {
                final IBinder b = ServiceManager.getService(Context.ACTIVITY_TASK_SERVICE);
                return IActivityTaskManager.Stub.asInterface(b);
            }
        };
然后,在Instrumentation#execStartActivity方法中,通过ActivityTaskManager.getService()获取到ActivityTaskManagerService对象(注:这里从Launcher进程调用到了SystemServer进程中的方法,通过Binder IPC通信),然后调用ActivityTaskManagerService的startActivity方法:
	@Override
    public final int startActivity(IApplicationThread caller, String callingPackage,
            String callingFeatureId, Intent intent, String resolvedType, IBinder resultTo,
            String resultWho, int requestCode, int startFlags, ProfilerInfo profilerInfo,
            Bundle bOptions) {
        return startActivityAsUser(caller, callingPackage, callingFeatureId, intent, resolvedType,
                resultTo, resultWho, requestCode, startFlags, profilerInfo, bOptions,
                UserHandle.getCallingUserId());
    }
然后调用ActivityTaskManagerService#startActivity方法又调用了然后调用ActivityTaskManagerService的startActivityAsUser方法:
private int startActivityAsUser(IApplicationThread caller, String callingPackage,
            @Nullable String callingFeatureId, Intent intent, String resolvedType,
            IBinder resultTo, String resultWho, int requestCode, int startFlags,
            ProfilerInfo profilerInfo, Bundle bOptions, int userId, boolean validateIncomingUser) {

			.....

        return getActivityStartController().obtainStarter(intent, "startActivityAsUser")
                .setCaller(caller)
                .setCallingPackage(callingPackage)
                .setCallingFeatureId(callingFeatureId)
                .setResolvedType(resolvedType)
                .setResultTo(resultTo)
                .setResultWho(resultWho)
                .setRequestCode(requestCode)
                .setStartFlags(startFlags)
                .setProfilerInfo(profilerInfo)
                .setActivityOptions(bOptions)
                .setUserId(userId)
                .execute();
            }
由上面代码可以看出这里通过getActivityStartController()得到ActivityStarter,并且调用ActivityStarter#obtainStarter方法:
	ActivityStarter obtainStarter(Intent intent, String reason) {
        return mFactory.obtain().setIntent(intent).setReason(reason);
    }
再看ActivityStarter的execute方法:
   int execute() {
        try {
              ...
              res = executeRequest(mRequest);
        } finally {
            onExecutionComplete();
        }
    }

private int executeRequest(Request request) {
        ...
        //各种权限检查
        boolean abort = !mSupervisor.checkStartAnyActivityPermission(intent, aInfo, resultWho,
                requestCode, callingPid, callingUid, callingPackage, callingFeatureId,
                request.ignoreTargetSecurity, inTask != null, callerApp, resultRecord,
                resultRootTask);
        abort |= !mService.mIntentFirewall.checkStartActivity(intent, callingUid,
                callingPid, resolvedType, aInfo.applicationInfo);
        abort |= !mService.getPermissionPolicyInternal().checkStartActivity(intent, callingUid,
                callingPackage);
        ...
        mLastStartActivityResult = startActivityUnchecked(r, sourceRecord, voiceSession,
                request.voiceInteractor, startFlags, true /* doResume */, checkedOptions, inTask,
                restrictedBgActivity, intentGrants);
        if (request.outActivity != null) {
            request.outActivity[0] = mLastStartActivityRecord;
        }

        return mLastStartActivityResult;
    }

    private int startActivityUnchecked(final ActivityRecord r, ActivityRecord sourceRecord,
                IVoiceInteractionSession voiceSession, IVoiceInteractor voiceInteractor,
                int startFlags, boolean doResume, ActivityOptions options, Task inTask,
                boolean restrictedBgActivity, NeededUriGrants intentGrants) {
        ...
        try {
            mService.deferWindowLayout();
            Trace.traceBegin(Trace.TRACE_TAG_WINDOW_MANAGER, "startActivityInner");
            result = startActivityInner(r, sourceRecord, voiceSession, voiceInteractor,
                    startFlags, doResume, options, inTask, restrictedBgActivity, intentGrants);
        } finally {
        ....
        }
        ...
        return result;
    }

    int startActivityInner(final ActivityRecord r, ActivityRecord sourceRecord,
            IVoiceInteractionSession voiceSession, IVoiceInteractor voiceInteractor,
            int startFlags, boolean doResume, ActivityOptions options, Task inTask,
            boolean restrictedBgActivity, NeededUriGrants intentGrants) {
        setInitialState(r, options, inTask, doResume, startFlags, sourceRecord, voiceSession,
                voiceInteractor, restrictedBgActivity);

        ...
        if (mDoResume) {//mDoResume=true
            final ActivityRecord topTaskActivity =
                    mStartActivity.getTask().topRunningActivityLocked();
            if (!mTargetRootTask.isTopActivityFocusable()
                    || (topTaskActivity != null && topTaskActivity.isTaskOverlay()
                    && mStartActivity != topTaskActivity)) {//此处false
                // If the activity is not focusable, we can't resume it, but still would like to
                // make sure it becomes visible as it starts (this will also trigger entry
                // animation). An example of this are PIP activities.
                // Also, we don't want to resume activities in a task that currently has an overlay
                // as the starting activity just needs to be in the visible paused state until the
                // over is removed.
                // Passing {@code null} as the start parameter ensures all activities are made
                // visible.
                mTargetRootTask.ensureActivitiesVisible(null /* starting */,
                        0 /* configChanges */, !PRESERVE_WINDOWS);
                // Go ahead and tell window manager to execute app transition for this activity
                // since the app transition will not be triggered through the resume channel.
                mTargetRootTask.mDisplayContent.executeAppTransition();
            } else {

                // If the target root-task was not previously focusable (previous top running
                // activity on that root-task was not visible) then any prior calls to move the
                // root-task to the will not update the focused root-task.  If starting the new
                // activity now allows the task root-task to be focusable, then ensure that we
                // now update the focused root-task accordingly.
                if (mTargetRootTask.isTopActivityFocusable()
                        && !mRootWindowContainer.isTopDisplayFocusedRootTask(mTargetRootTask)) {
                    mTargetRootTask.moveToFront("startActivityInner");
                }
                mRootWindowContainer.resumeFocusedTasksTopActivities(
                        mTargetRootTask, mStartActivity, mOptions, mTransientLaunch);
            }
        }
        ...
        return START_SUCCESS;
    }
最终调用了RootWindowContainer的resumeFocusedTasksTopActivities方法:
    boolean resumeFocusedTasksTopActivities(
            Task targetRootTask, ActivityRecord target, ActivityOptions targetOptions,
            boolean deferPause) {
        ...
        final Task focusedRoot = display.getFocusedRootTask();
        if (focusedRoot != null) {
            result |= focusedRoot.resumeTopActivityUncheckedLocked(target, targetOptions);
        } else if (targetRootTask == null) {
            result |= resumeHomeActivity(null /* prev */, "no-focusable-task",
                    display.getDefaultTaskDisplayArea());
        }
        return result;
    }
RootWindowContainer:根部WindowContainer,一切WindowContainer的管理者。
然后调用了Taks.resumeTopActivityUnCheckedLocked方法:
    boolean resumeTopActivityUncheckedLocked(ActivityRecord prev, ActivityOptions options) {
        return resumeTopActivityUncheckedLocked(prev, options, false /* skipPause */);
    }

 	boolean resumeTopActivityUncheckedLocked(ActivityRecord prev, ActivityOptions options,
            boolean deferPause) {
          ...
          if (isFocusableAndVisible()) {
              someActivityResumed = resumeTopActivityInnerLocked(prev, options, deferPause);
         }
        return someActivityResumed;
    }

    private boolean resumeTopActivityInnerLocked(ActivityRecord prev, ActivityOptions options,
            boolean deferPause) {
        //调用最上层activity onPause方法
        if (mResumedActivity != null) {
            ProtoLog.d(WM_DEBUG_STATES, "resumeTopActivityLocked: Pausing %s", mResumedActivity);
            pausing |= startPausingLocked(false /* uiSleeping */, next,
                    "resumeTopActivityInnerLocked");
        }
      ..
     if (next.attachedToProcess()) {
     ...
     }else{
         mTaskSupervisor.startSpecificActivity(next, true, true);
     }
     return true;
}
紧接着调用了ActivityTaskSupervisor.startSpecificActivity方法:
    void startSpecificActivity(ActivityRecord r, boolean andResume, boolean checkConfig) {
     					......

                // Create activity launch transaction.
                final ClientTransaction clientTransaction = ClientTransaction.obtain(
                        proc.getThread(), r.token);

                final boolean isTransitionForward = r.isTransitionForward();
                final IBinder fragmentToken = r.getTaskFragment().getFragmentToken();
                clientTransaction.addCallback(LaunchActivityItem.obtain(new Intent(r.intent),
                        System.identityHashCode(r), r.info,
                        // TODO: Have this take the merged configuration instead of separate global
                        // and override configs.
                        mergedConfiguration.getGlobalConfiguration(),
                        mergedConfiguration.getOverrideConfiguration(), r.compat,
                        r.getFilteredReferrer(r.launchedFromPackage), task.voiceInteractor,
                        proc.getReportedProcState(), r.getSavedState(), r.getPersistentSavedState(),
                        results, newIntents, r.takeOptions(), isTransitionForward,
                        proc.createProfilerInfoIfNeeded(), r.assistToken, activityClientController,
                        r.shareableActivityToken, r.getLaunchedFromBubble(), fragmentToken));

                // Set desired final state.
                final ActivityLifecycleItem lifecycleItem;
                if (andResume) {
                    lifecycleItem = ResumeActivityItem.obtain(isTransitionForward);
                } else {
                    lifecycleItem = PauseActivityItem.obtain();
                }
                clientTransaction.setLifecycleStateRequest(lifecycleItem);

                // Schedule transaction.
                mService.getLifecycleManager().scheduleTransaction(clientTransaction);

                if (procConfig.seq > mRootWindowContainer.getConfiguration().seq) {
                    // If the seq is increased, there should be something changed (e.g. registered
                    // activity configuration).
                    proc.setLastReportedConfiguration(procConfig);
                }
                if ((proc.mInfo.privateFlags & ApplicationInfo.PRIVATE_FLAG_CANT_SAVE_STATE) != 0
                        && mService.mHasHeavyWeightFeature) {
                    // This may be a heavy-weight process! Note that the package manager will ensure
                    // that only activity can run in the main process of the .apk, which is the only
                    // thing that will be considered heavy-weight.
                    if (proc.mName.equals(proc.mInfo.packageName)) {
                        if (mService.mHeavyWeightProcess != null
                                && mService.mHeavyWeightProcess != proc) {
                            Slog.w(TAG, "Starting new heavy weight process " + proc
                                    + " when already running "
                                    + mService.mHeavyWeightProcess);
                        }
                        mService.setHeavyWeightProcess(r);
                    }
                }

            } catch (RemoteException e) {
                if (r.launchFailed) {
                    // This is the second time we failed -- finish activity and give up.
                    Slog.e(TAG, "Second failure launching "
                            + r.intent.getComponent().flattenToShortString() + ", giving up", e);
                    proc.appDied("2nd-crash");
                    r.finishIfPossible("2nd-crash", false /* oomAdj */);
                    return false;
                }

                // This is the first time we failed -- restart process and
                // retry.
                r.launchFailed = true;
                r.detachFromProcess();
                throw e;
            }
        } finally {
            endDeferResume();
            proc.resumeConfigurationDispatch();
        }

   		.......

        return true;
    }
这里面重点关注下这行代码(这里会最终调用到ApplicationThread的scheduleTransaction方法,这个在App启动流程分析(二)中有讲到):
mService.getLifecycleManager().scheduleTransaction(clientTransaction);
ActivityTaskManagerService.startProcessAsync方法中发送了一个消息,最终执行了ActivityManagerService.startProcess:
        public void startProcess(String processName, ApplicationInfo info, boolean knownToBeDead,
                boolean isTop, String hostingType, ComponentName hostingName) {
            try {
                if (Trace.isTagEnabled(Trace.TRACE_TAG_ACTIVITY_MANAGER)) {
                    Trace.traceBegin(Trace.TRACE_TAG_ACTIVITY_MANAGER, "startProcess:"
                            + processName);
                }
                synchronized (ActivityManagerService.this) {
                    // If the process is known as top app, set a hint so when the process is
                    // started, the top priority can be applied immediately to avoid cpu being
                    // preempted by other processes before attaching the process of top app.
                    startProcessLocked(processName, info, knownToBeDead, 0 /* intentFlags */,
                            new HostingRecord(hostingType, hostingName, isTop),
                            ZYGOTE_POLICY_FLAG_LATENCY_SENSITIVE, false /* allowWhileBooting */,
                            false /* isolated */);
                }
            } finally {
                Trace.traceEnd(Trace.TRACE_TAG_ACTIVITY_MANAGER);
            }
        }
ProcessList.startProcessLocked:
    final ProcessRecord startProcessLocked(String processName,
            ApplicationInfo info, boolean knownToBeDead, int intentFlags,
            HostingRecord hostingRecord, int zygotePolicyFlags, boolean allowWhileBooting,
            boolean isolated) {
        return mProcessList.startProcessLocked(processName, info, knownToBeDead, intentFlags,
                hostingRecord, zygotePolicyFlags, allowWhileBooting, isolated, 0 /* isolatedUid */,
                null /* ABI override */, null /* entryPoint */,
                null /* entryPointArgs */, null /* crashHandler */);
    }

  ProcessRecord startProcessLocked(String processName, ApplicationInfo info,
            boolean knownToBeDead, int intentFlags, HostingRecord hostingRecord,
            int zygotePolicyFlags, boolean allowWhileBooting, boolean isolated, int isolatedUid,
            String abiOverride, String entryPoint, String[] entryPointArgs, Runnable crashHandler) {
        ...
        checkSlow(startTime, "startProcess: stepping in to startProcess");
        final boolean success =
                startProcessLocked(app, hostingRecord, zygotePolicyFlags, abiOverride);
        checkSlow(startTime, "startProcess: done starting proc!");
        return success ? app : null;
    }

    boolean startProcessLocked(ProcessRecord app, HostingRecord hostingRecord,
            int zygotePolicyFlags, String abiOverride) {
        return startProcessLocked(app, hostingRecord, zygotePolicyFlags,
                false /* disableHiddenApiChecks */, false /* disableTestApiChecks */,
                abiOverride);
    }

    boolean startProcessLocked(ProcessRecord app, HostingRecord hostingRecord,
            int zygotePolicyFlags, boolean disableHiddenApiChecks, boolean disableTestApiChecks,
            String abiOverride) {
           ...
         try {
            ...
            //记住这里的entryPoint属性,进程启动后会用到
            final String entryPoint = "android.app.ActivityThread";
            return startProcessLocked(hostingRecord, entryPoint, app, uid, gids,
                    runtimeFlags, zygotePolicyFlags, mountExternal, seInfo, requiredAbi,
                    instructionSet, invokeWith, startTime);
        } catch (RuntimeException e) {
            return false;
        }
    }

@GuardedBy("mService")
    boolean startProcessLocked(HostingRecord hostingRecord, String entryPoint, ProcessRecord app,
            int uid, int[] gids, int runtimeFlags, int zygotePolicyFlags, int mountExternal,
            String seInfo, String requiredAbi, String instructionSet, String invokeWith,
            long startTime) {
              ...
                final Process.ProcessStartResult startResult = startProcess(hostingRecord,
                        entryPoint, app,
                        uid, gids, runtimeFlags, zygotePolicyFlags, mountExternal, seInfo,
                        requiredAbi, instructionSet, invokeWith, startTime);
               handleProcessStartedLocked(app, startResult.pid, startResult.usingWrapper,
                        startSeq, false);
            return app.getPid() > 0;
        }
    }

private Process.ProcessStartResult startProcess(HostingRecord hostingRecord, String entryPoint,
            ProcessRecord app, int uid, int[] gids, int runtimeFlags, int zygotePolicyFlags,
            int mountExternal, String seInfo, String requiredAbi, String instructionSet,
            String invokeWith, long startTime) {
        try {
            ...
            if (hostingRecord.usesWebviewZygote()) {
                startResult = startWebView(entryPoint,
                        app.processName, uid, uid, gids, runtimeFlags, mountExternal,
                        app.info.targetSdkVersion, seInfo, requiredAbi, instructionSet,
                        app.info.dataDir, null, app.info.packageName,
                        app.getDisabledCompatChanges(),
                        new String[]{PROC_START_SEQ_IDENT + app.getStartSeq()});
            } else if (hostingRecord.usesAppZygote()) {
                 //普通应用会进入这里
                //创建zygote对象
                final AppZygote appZygote = createAppZygoteForProcessIfNeeded(app);

                // 使用Socket通知zygote对象
                startResult = appZygote.getProcess().start(entryPoint,
                        app.processName, uid, uid, gids, runtimeFlags, mountExternal,
                        app.info.targetSdkVersion, seInfo, requiredAbi, instructionSet,
                        app.info.dataDir, null, app.info.packageName,
                        /*zygotePolicyFlags=*/ ZYGOTE_POLICY_FLAG_EMPTY, isTopApp,
                        app.getDisabledCompatChanges(), pkgDataInfoMap, allowlistedAppDataInfoMap,
                        false, false,
                        new String[]{PROC_START_SEQ_IDENT + app.getStartSeq()});
            } else {
                regularZygote = true;
                startResult = Process.start(entryPoint,
                        app.processName, uid, uid, gids, runtimeFlags, mountExternal,
                        app.info.targetSdkVersion, seInfo, requiredAbi, instructionSet,
                        app.info.dataDir, invokeWith, app.info.packageName, zygotePolicyFlags,
                        isTopApp, app.getDisabledCompatChanges(), pkgDataInfoMap,
                        allowlistedAppDataInfoMap, bindMountAppsData, bindMountAppStorageDirs,
                        new String[]{PROC_START_SEQ_IDENT + app.getStartSeq()});
            }

            if (!regularZygote) {
                // webview and app zygote don't have the permission to create the nodes
                if (Process.createProcessGroup(uid, startResult.pid) < 0) {
                    Slog.e(ActivityManagerService.TAG, "Unable to create process group for "
                            + app.processName + " (" + startResult.pid + ")");
                }
            }

            // This runs after Process.start() as this method may block app process starting time
            // if dir is not cached. Running this method after Process.start() can make it
            // cache the dir asynchronously, so zygote can use it without waiting for it.
            if (bindMountAppStorageDirs) {
                storageManagerInternal.prepareStorageDirs(userId, pkgDataInfoMap.keySet(),
                        app.processName);
            }
            checkSlow(startTime, "startProcess: returned from zygote!");
            return startResult;
        } finally {
            Trace.traceEnd(Trace.TRACE_TAG_ACTIVITY_MANAGER);
        }
    }
ZygoteProcess.start:
 public final Process.ProcessStartResult start(@NonNull final String processClass,
                                                  final String niceName,
                                                  int uid, int gid, @Nullable int[] gids,
                                                  int runtimeFlags, int mountExternal,
                                                  int targetSdkVersion,
                                                  @Nullable String seInfo,
                                                  @NonNull String abi,
                                                  @Nullable String instructionSet,
                                                  @Nullable String appDataDir,
                                                  @Nullable String invokeWith,
                                                  @Nullable String packageName,
                                                  int zygotePolicyFlags,
                                                  boolean isTopApp,
                                                  @Nullable long[] disabledCompatChanges,
                                                  @Nullable Map<String, Pair<String, Long>>
                                                          pkgDataInfoMap,
                                                  @Nullable Map<String, Pair<String, Long>>
                                                          allowlistedDataInfoList,
                                                  boolean bindMountAppsData,
                                                  boolean bindMountAppStorageDirs,
                                                  @Nullable String[] zygoteArgs) {
        // TODO (chriswailes): Is there a better place to check this value?
        if (fetchUsapPoolEnabledPropWithMinInterval()) {
            informZygotesOfUsapPoolStatus();
        }

        try {
            return startViaZygote(processClass, niceName, uid, gid, gids,
                    runtimeFlags, mountExternal, targetSdkVersion, seInfo,
                    abi, instructionSet, appDataDir, invokeWith, /*startChildZygote=*/ false,
                    packageName, zygotePolicyFlags, isTopApp, disabledCompatChanges,
                    pkgDataInfoMap, allowlistedDataInfoList, bindMountAppsData,
                    bindMountAppStorageDirs, zygoteArgs);
        } catch (ZygoteStartFailedEx ex) {
            Log.e(LOG_TAG,
                    "Starting VM process through Zygote failed");
            throw new RuntimeException(
                    "Starting VM process through Zygote failed", ex);
        }
    }

private Process.ProcessStartResult startViaZygote(@NonNull final String processClass,
                                                      @Nullable final String niceName,
                                                      final int uid, final int gid,
                                                      @Nullable final int[] gids,
                                                      int runtimeFlags, int mountExternal,
                                                      int targetSdkVersion,
                                                      @Nullable String seInfo,
                                                      @NonNull String abi,
                                                      @Nullable String instructionSet,
                                                      @Nullable String appDataDir,
                                                      @Nullable String invokeWith,
                                                      boolean startChildZygote,
                                                      @Nullable String packageName,
                                                      int zygotePolicyFlags,
                                                      boolean isTopApp,
                                                      @Nullable long[] disabledCompatChanges,
                                                      @Nullable Map<String, Pair<String, Long>>
                                                              pkgDataInfoMap,
                                                      @Nullable Map<String, Pair<String, Long>>
                                                              allowlistedDataInfoList,
                                                      boolean bindMountAppsData,
                                                      boolean bindMountAppStorageDirs,
                                                      @Nullable String[] extraArgs)
                                                      throws ZygoteStartFailedEx {
        ...
        //添加参数,这里的processClass为“android.app.ActivityThread”
        argsForZygote.add(processClass);
        synchronized(mLock) {
            //openZygoteSocketIfNeeded会链接Socket并返回状态
            return zygoteSendArgsAndGetResult(openZygoteSocketIfNeeded(abi),
                                              zygotePolicyFlags,
                                              argsForZygote);
        }
    }

    private Process.ProcessStartResult zygoteSendArgsAndGetResult(
            ZygoteState zygoteState, int zygotePolicyFlags, @NonNull ArrayList<String> args)
            throws ZygoteStartFailedEx {
        ...
        //输入参数拼接成msg
       String msgStr = args.size() + "\n" + String.join("\n", args) + "\n";
        return attemptZygoteSendArgsAndGetResult(zygoteState, msgStr);
    }

private Process.ProcessStartResult attemptZygoteSendArgsAndGetResult(
            ZygoteState zygoteState, String msgStr) throws ZygoteStartFailedEx {
        try {
            //通过状态获取输出
            final BufferedWriter zygoteWriter = zygoteState.mZygoteOutputWriter;
            //获取输入
            final DataInputStream zygoteInputStream = zygoteState.mZygoteInputStream;
           //写入参数
            zygoteWriter.write(msgStr);
            zygoteWriter.flush();

            // Always read the entire result from the input stream to avoid leaving
            // bytes in the stream for future process starts to accidentally stumble
            // upon.
            Process.ProcessStartResult result = new Process.ProcessStartResult();
            result.pid = zygoteInputStream.readInt();
            result.usingWrapper = zygoteInputStream.readBoolean();

            if (result.pid < 0) {
                throw new ZygoteStartFailedEx("fork() failed");
            }

            return result;
        } catch (IOException ex) {
            zygoteState.close();
            Log.e(LOG_TAG, "IO Exception while communicating with Zygote - "
                    + ex.toString());
            throw new ZygoteStartFailedEx(ex);
        }
    }
这里通过Socket请求Zygote进程启动App进程,然后会等待Zygote进程的处理结果。
Zygote进程在启动的时候就会创建DVM或者ART,因此通过fork而创建的进程可以在内部获取一个DVM或者ART的实例副本。Zygote进程启动的时候会执行ZygoteInit#main方法。
先写到这里,后面关于Zygote进程fork出App进程后的后续流程在下一篇再论述。




![强化学习从基础到进阶-常见问题和面试必知必答[7]:深度确定性策略梯度DDPG算法、双延迟深度确定性策略梯度TD3算法详解](https://img-blog.csdnimg.cn/d553c7dadca54bdb82a3a234befb74d8.png#pic_center)



![[C++] 刷题日记](https://img-blog.csdnimg.cn/863681a16bf9432398264c5c22beeafb.png)