Java阶段四Day09
文章目录
- Java阶段四Day09
- 过滤器
- 创建过滤器
- 过滤器的作用
- 执行过滤器
- 为什么写配置文件
- 关于登录和认证的区别
- 前端获取用户状态
过滤器
使用JWT取代Session,不管做什么都携带着JWT,那么服务端不管处理什么请求、或绝大多数请求都要尝试获取JWT进行解析从而识别身份,也就引出了使用过滤器组件来实现不管发什么请求都会获取并识别JWT,过滤器是整个服务器里面最早接收到请求的组件。过滤器可以对请求阻止或者放行。
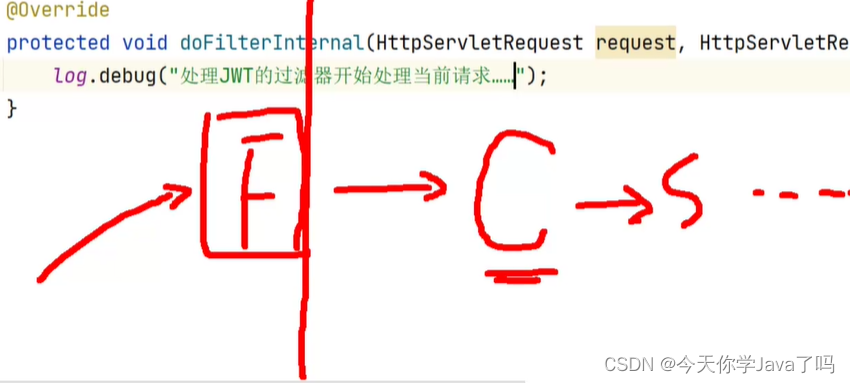
在一个服务器端程序中,可以有好多个过滤器,多个过滤器形成链,称为过滤器链。放在链里面,才有意义。
![[外链图片转存失败,源站可能有防盗链机制,建议将图片保存下来直接上传(img-HjTaltFN-1687828167804)(../../../AppData/Roaming/Typora/typora-user-images/image-20230626091701664.png)]](https://img-blog.csdnimg.cn/8da506a5b8ed4ba3be9d7235a0dfbd7a.png)
//之前配置的  http.cors();
//允许跨域访问,本质上是启用了Security框架自带的CorsFilter
http.cors();

//在SecurityConfig上添加注解 @EnableWebSecurity(debug = true)
@EnableWebSecurity(debug = true)    //开启调试模式,在控制台显示很多日志,在生产过程中不宜使用
创建过滤器
@Component
@Slf4j
public class JwtAuthorizationFilter extends OncePerRequestFilter {

    public JwtAuthorizationFilter() {
        log.debug("【持久化Terminal信息进行关联】开始");
    }

    @Override
    protected void doFilterInternal(HttpServletRequest req, HttpServletResponse resp, FilterChain chain) throws ServletException, IOException {
        log.debug("处理JWT的过滤开始处理当前请求....");
         //过滤器继续执行  即:放行,由下一个过滤器处理
        chain.doFilter(req, resp);
    }
}
![[外链图片转存失败,源站可能有防盗链机制,建议将图片保存下来直接上传(img-Xh7IstjX-1687828167804)(../../../AppData/Roaming/Typora/typora-user-images/image-20230627083807444.png)]](https://img-blog.csdnimg.cn/02d610e102864176a7f25a8cf2d05e2c.png)
SecurityContextHolderAwareRequestFilter是处理Security上下文的过滤器,当前截图未添加自定义的JWT过滤器,如果将过滤器放在其之后,则无意义,因为先读上下文时还未读到认证信息,所有应该先去解析JWT得到数据,放在Security上下文,再去检查Security上下文,才可以判断用户登录状态,认证信息。
![[外链图片转存失败,源站可能有防盗链机制,建议将图片保存下来直接上传(img-X4HR3VjH-1687828167805)(../../../AppData/Roaming/Typora/typora-user-images/image-20230627083935376.png)]](https://img-blog.csdnimg.cn/65551d45e2b94cd5842768358ae94aa5.png)
@Autowired
private JwtAuthorizationFilter jwtAuthorizationFilter;

@Override
protected void configure(HttpSecurity http) throws Exception {
    //配置Security框架不适应Session

    //SessionCreationPolicy.STATELESS  无状态,无论是否存在Session,都不使用
    //SessionCreationPolicy.NEVER   从不主动创建Session,但是,Session存在的话,会自动使用
   http.sessionManagement().sessionCreationPolicy(SessionCreationPolicy.STATELESS);


    // 将自定义的解析JWT的过滤器添加到Security框架的过滤器链中
    // 必须添加在检查SecurityContext的Authentication之前,具体位置并不严格要求
    http.addFilterBefore(jwtAuthorizationFilter, UsernamePasswordAuthenticationFilter.class);
}
![[外链图片转存失败,源站可能有防盗链机制,建议将图片保存下来直接上传(img-jFCTtirw-1687828167806)(../../../AppData/Roaming/Typora/typora-user-images/image-20230627084917474.png)]](https://img-blog.csdnimg.cn/a76f6a8fa2734ac4b03e35db78c6e490.png)
到这里过滤器刚刚准备好,完成了创建过滤器相关事情。
过滤器的作用
处理JWT的过滤器的主要作用:
- 尝试接收客户端的请求中携带的JWT数据
- 尝试解析JWT数据
- 将解析得到的用户数据创建为Authentication对象,并存入到SecurityContext中
执行过滤器
@Override
protected void doFilterInternal(HttpServletRequest req, HttpServletResponse resp, FilterChain chain) throws ServletException, IOException {
    log.debug("处理JWT的过滤器开始处理当前请求……");
    // 尝试接收客户端的请求中携带的JWT数据
    // 业内惯用的做法是:客户端会将JWT放在请求头中名为Authorization的属性中
    String jwt = req.getHeader("Authorization");
    log.debug("客户端携带的JWT:{}", jwt);

    // 判断JWT的基本有效性(没有必要尝试解析格式明显错误的JWT数据)
    if (!StringUtils.hasText(jwt) || jwt.length() < JWT_MIN_LENGTH) {
        // 对于无效的JWT,应该直接放行
        log.warn("当前请求中,客户端没有携带有效的JWT,将放行");
        chain.doFilter(req, resp);
        return;
    }

    // 尝试解析JWT数据
    log.debug("尝试解析JWT数据……");
    Claims claims = null;
    //捕获可能出现的异常
    resp.setContentType("application/json; charset=utf-8");
    try {
        claims = Jwts.parser()
            .setSigningKey(secretKey)
            .parseClaimsJws(jwt)
            .getBody();
    } catch (ExpiredJwtException e) {   //过期异常
        log.warn("解析JWT时出现异常:ExpiredJwtException");
        String message = "操作失败,您的登录信息已经过期,请重新登录!";
        JsonResult jsonResult = JsonResult.fail(ServiceCode.ERR_JWT_EXPIRED, message);
        PrintWriter writer = resp.getWriter();
        writer.println(JSON.toJSONString(jsonResult));
        writer.close();
        return;
    }catch (MalformedJwtException e) { //格式错误异常
        log.warn("解析JWT时出现异常:MalformedJwtException");
        String message = "非法访问,你的本次操作已经被记录!";
        JsonResult jsonResult = JsonResult.fail(ServiceCode.ERR_JWT_MALFORMED, message);
        PrintWriter writer = resp.getWriter();
        writer.println(JSON.toJSONString(jsonResult));
        writer.close();
        return;
    } catch (SignatureException e) {    //签名错误异常
        log.warn("解析JWT时出现异常:SignatureException");
        String message = "非法访问,你的本次操作已经被记录!";
        JsonResult jsonResult = JsonResult.fail(ServiceCode.ERR_JWT_SIGNATURE, message);
        PrintWriter writer = resp.getWriter();
        writer.println(JSON.toJSONString(jsonResult));
        writer.close();
        return;
    } catch (Throwable e) {
        log.warn("解析JWT时出现异常:{}", e);
        String message = "服务器忙,请稍后再试!【同学们,看到这句时,你应该检查服务器端的控制台,并在JwtAuthorizationFilter中解析JWT时添加处理异常的catch代码块】";
        JsonResult jsonResult = JsonResult.fail(ServiceCode.ERROR_UNKNOWN, message);
        PrintWriter writer = resp.getWriter();
        writer.println(JSON.toJSONString(jsonResult));
        writer.close();
        return;
    }

    //从解析结果中获取用户的信息
    Long id = claims.get("id", Long.class);
    String username = claims.get("username", String.class);
    String authoritiesJsonString = claims.get("authoritiesJsonString", String.class);
    log.debug("JWT中的用户id = {}", id);
    log.debug("JWT中的用户名 = {}", username);
    log.debug("JWT中的用户权限列表 = {}", authoritiesJsonString);

    // 将解析得到的用户数据创建为Authentication对象
    CurrentPrincipal principal = new CurrentPrincipal(); // 当事人
    principal.setId(id);
    principal.setUsername(username);
    Object credentials = null; // 凭证:无需凭证
    List<SimpleGrantedAuthority> authorities
        = JSON.parseArray(authoritiesJsonString, SimpleGrantedAuthority.class);
    Authentication authentication = new UsernamePasswordAuthenticationToken(
        principal, credentials, authorities);

    // 将Authentication对象存入到SecurityContext中
    SecurityContext securityContext = SecurityContextHolder.getContext();
    securityContext.setAuthentication(authentication);

    // 过滤器链继续执行,即:放行
    chain.doFilter(req, resp);
}
为什么写配置文件
写在配置文件里的东西通常可以除程序员之外的人也可以进行修改。且不会被编译,即使项目交付后也可以方便修改,所以一些如过期时间、secretKey都放在配置文件中,而不是单独创建个类
关于登录和认证的区别
- 登录 输入用户名和密码,只做一次
- 认证 检查 authentication,每次携带JWT,即每次都执行认证
前端获取用户状态
在登录页面提交表单方法中添加JWT信息,然后在具体用户权限内的方法中添加获取JWT信息
methods: {
    // 提交表单
    submitForm(formName) {
        this.$refs[formName].validate((valid) => {
            if (valid) {
                let url = 'http://localhost:8090/account/users/login';
                console.log('url = ' + url);
                let formData = this.qs.stringify(this.ruleForm);
                console.log('formData = ' + formData);

                this.axios.post(url, formData).then((r) => {
                    let jsonResult = r.data;
                    if (jsonResult.state === 20000) {
                        this.$message({
                            message: '登录成功!',
                            type: 'success'
                        });
                        //添加获取用户JWT信息
                        let loginResult = jsonResult.data
                        localStorage.setItem('localJwt',loginResult.token);
                        localStorage.setItem('currentUserId',loginResult.id);
                        localStorage.setItem('currentUserName',loginResult.username);
                        localStorage.setItem('currentUserAvatar',loginResult.avatar);
                        this.$router.push('/');
                    } else if (jsonResult.state === 40100) {
                        this.$message.error(jsonResult.message);
                    } else {
                        let title = '操作失败';
                        this.$alert(jsonResult.message, title, {
                            confirmButtonText: '确定',
                            callback: action => {
                            }
                        });
                    }
                });
            }
        });
    },
        ...
}
// 执行修改
handleEdit() {
    let url = 'http://localhost:8090/content/tags/' + this.editForm.id + '/update/info';
    console.log('url = ' + url);
    let formData = this.qs.stringify(this.editForm);
    console.log('formData = ' + formData);
	//使用create 获取JWT信息
    this.axios.create({'headers': {'Authorization': localStorage.getItem('localJwt')}}).post(url, formData).then((response) => {
        let jsonResult = response.data;
        if (jsonResult.state === 20000) {
            this.$message({
                message: '修改标签成功!',
                type: 'success'
            });
            this.editFormVisible = false;
            this.loadTagList();
        } else if (jsonResult.state === 40400) {
            let title = '操作失败';
            this.$alert(jsonResult.message, title, {
                confirmButtonText: '确定',
                callback: action => {
                    this.editFormVisible = false;
                    this.loadTagList();
                }
            });
        } else {
            let title = '操作失败';
            this.$alert(jsonResult.message, title, {
                confirmButtonText: '确定',
                callback: action => {
                }
            });
        }
    });
},
