文章目录
- 第 1 章 Java 概述
- 第 2 章 Java 语言基础
- 第 3 章 Java 面向对象编程
- 第 4 章 Java 图形用户界面程序设计
- 第 5 章 Applet 设计
- 第 6 章 Java 输入输出流与文件操作
- 第 7 章 Java 的多线程机制
- 第 9 章 常用工具类与集合框架
第 1 章 Java 概述
试编写 Java 程序,分别以 Java Application 字符界面、Java Application 图形界面和 Java Applet 的形式输出“祝大家在快乐中学习、在学习中快乐!”。
- Java Application 字符界面:
public class ConsoleOutput {
    public static void main(String[] args) {
        System.out.println("祝大家在快乐中学习、在学习中快乐!");
    }
}
- Java Application 图形界面:
import javax.swing.JOptionPane;

public class GUIOutput {
    public static void main(String[] args) {
        JOptionPane.showMessageDialog(null, "祝大家在快乐中学习、在学习中快乐!");
    }
}
- Java Applet:
import java.applet.Applet;
import java.awt.Graphics;

public class AppletOutput extends Applet {
    public void paint(Graphics g) {
        g.drawString("祝大家在快乐中学习、在学习中快乐!", 50, 50);
    }
}
<!DOCTYPE html>
<html>
    <applet code = "AppletOutput.class" height="200" width="300">
    </applet>
</html>
第 2 章 Java 语言基础
(1)编写程序实现给一个不多于 5 位的正整数,求它是几位数,并且逆序打印出各位数字。
import java.util.Scanner;

public class ReverseNumber {
    public static void main(String[] args) {
        Scanner scanner = new Scanner(System.in);
        System.out.print("请输入一个不多于5位的正整数:");
        int number = scanner.nextInt();

        // 判断位数
        int digits = 0;
        int temp = number;
        while (temp != 0) {
            temp /= 10;
            digits++;
        }
        System.out.println("位数:" + digits);

        // 逆序打印数字
        System.out.print("逆序打印各位数字:");
        while (number != 0) {
            int digit = number % 10;
            System.out.print(digit + " ");
            number /= 10;
        }
    }
}
(2)编写程序,利用条件运算符的嵌套来完成此题:学习成绩大于或等于 90 分的同学用 A 表示,60~89 分的用 B 表示,60 分以下的用 C 表示。
import java.util.Scanner;

public class GradeClassification {
    public static void main(String[] args) {
        Scanner scanner = new Scanner(System.in);
        System.out.print("请输入学习成绩:");
        int score = scanner.nextInt();

        String grade;

        grade = (score >= 90) ? "A" : ((score >= 60) ? "B" : "C");

        System.out.println("成绩等级:" + grade);
    }
}
(3)编程实现:在一维数组中存储 10 个无序整数,将其中的数值按从小到大顺序排列。
import java.util.Arrays;

public class ArraySorting {
    public static void main(String[] args) {
        int[] array = {9, 5, 2, 7, 1, 8, 3, 6, 4, 10};

        System.out.println("排序前的数组:" + Arrays.toString(array));

        Arrays.sort(array);

        System.out.println("排序后的数组:" + Arrays.toString(array));
    }
}
(4)编程实现:在一维数组中存储 10 个无序整数,查找出其中的最大值。
public class MaxValue {
    public static void main(String[] args) {
        int[] array = {9, 5, 2, 7, 1, 8, 3, 6, 4, 10};

        int max = array[0]; // 假设第一个元素为最大值

        for (int i = 1; i < array.length; i++) {
            if (array[i] > max) {
                max = array[i]; // 更新最大值
            }
        }

        System.out.println("最大值:" + max);
    }
}
(5)编一个程序练习使用以下常用字符串方法:
public String toUpperCase()
public String toLowerCase()
public String concat(String str)
public class StringMethods {
    public static void main(String[] args) {
        String str1 = "Hello";
        String str2 = "World";

        // toUpperCase() 方法将字符串转换为大写
        String upperCaseStr1 = str1.toUpperCase();
        System.out.println("转换为大写:" + upperCaseStr1);

        // toLowerCase() 方法将字符串转换为小写
        String lowerCaseStr2 = str2.toLowerCase();
        System.out.println("转换为小写:" + lowerCaseStr2);

        // concat() 方法将指定字符串连接到原始字符串的末尾
        String concatStr = str1.concat(str2);
        System.out.println("拼接字符串:" + concatStr);
    }
}
第 3 章 Java 面向对象编程
(1)定义一个教师类,教师类的数据成员有姓名、工号、职称、部门,提供两个以上的自定义构造方法以及相应的成员方法来获取教师的姓名、工号、职称等相应的信息,并通过 showTeacher() 方法来显示教师类的全部信息。请采用词能达意的规范方式为类、域、方法命名,且对源程序适当添加注释。要求编写 main() 方法来创建教师类对象,测试类的定义是否正确。
public class Teacher {
    // 数据成员
    private String name;
    private String employeeId;
    private String title;
    private String department;

    // 默认构造方法
    public Teacher() {
    }

    // 带参数的构造方法,用于初始化教师对象的信息
    public Teacher(String name, String employeeId, String title, String department) {
        this.name = name;
        this.employeeId = employeeId;
        this.title = title;
        this.department = department;
    }

    // 成员方法,用于获取教师的姓名
    public String getName() {
        return name;
    }

    // 成员方法,用于获取教师的工号
    public String getEmployeeId() {
        return employeeId;
    }

    // 成员方法,用于获取教师的职称
    public String getTitle() {
        return title;
    }

    // 成员方法,用于获取教师的部门
    public String getDepartment() {
        return department;
    }

    // 成员方法,用于显示教师类的全部信息
    public void showTeacher() {
        System.out.println("姓名:" + name);
        System.out.println("工号:" + employeeId);
        System.out.println("职称:" + title);
        System.out.println("部门:" + department);
    }

    public static void main(String[] args) {
        // 创建教师对象
        Teacher teacher = new Teacher("张三", "T001", "教授", "计算机科学系");

        // 调用 showTeacher() 方法显示教师信息
        teacher.showTeacher();
    }
}
(2)定义一个抽象的商品类,其中包含商品号、商品名、商品价格 3 个数据成员,定义三个分别用来获取商品号、商品名、价格的成员方法,一个抽象的输出数据成员的方法 showInfo()。请注意用适当的访问控制符和非访问控制符对属性和方法进行修饰。在此基础上,定义继承于商品类的一个食品子类和一个玩具子类,除具有商品类的属性之外,食品类还应该包含生产日期、保质期、主要成分等信息,玩具类还应该包含型号、材料、安全级别等信息;定义相应的方法来设置和输出以上信息。此外,要求编写一个测试程序,用恰当的测试数据创建食品类和玩具类对象,并调用有关方法,检验其运行结果是否正常。
// 抽象商品类
public abstract class Product {
    private String productNumber; // 商品号
    private String productName; // 商品名
    private double productPrice; // 商品价格

    // 构造方法
    public Product(String productNumber, String productName, double productPrice) {
        this.productNumber = productNumber;
        this.productName = productName;
        this.productPrice = productPrice;
    }

    // 获取商品号
    public String getProductNumber() {
        return productNumber;
    }

    // 获取商品名
    public String getProductName() {
        return productName;
    }

    // 获取商品价格
    public double getProductPrice() {
        return productPrice;
    }

    // 抽象方法,输出商品信息
    public abstract void showInfo();
}

// 食品子类
public class Food extends Product {
    private String productionDate; // 生产日期
    private String shelfLife; // 保质期
    private String mainIngredient; // 主要成分

    // 构造方法
    public Food(String productNumber, String productName, double productPrice, String productionDate, String shelfLife, String mainIngredient) {
        super(productNumber, productName, productPrice);
        this.productionDate = productionDate;
        this.shelfLife = shelfLife;
        this.mainIngredient = mainIngredient;
    }

    // 设置生产日期
    public void setProductionDate(String productionDate) {
        this.productionDate = productionDate;
    }

    // 设置保质期
    public void setShelfLife(String shelfLife) {
        this.shelfLife = shelfLife;
    }

    // 设置主要成分
    public void setMainIngredient(String mainIngredient) {
        this.mainIngredient = mainIngredient;
    }

    // 输出食品信息
    public void showInfo() {
        System.out.println("商品号:" + getProductNumber());
        System.out.println("商品名:" + getProductName());
        System.out.println("商品价格:" + getProductPrice());
        System.out.println("生产日期:" + productionDate);
        System.out.println("保质期:" + shelfLife);
        System.out.println("主要成分:" + mainIngredient);
    }
}

// 玩具子类
public class Toy extends Product {
    private String model; // 型号
    private String material; // 材料
    private String safetyLevel; // 安全级别

    // 构造方法
    public Toy(String productNumber, String productName, double productPrice, String model, String material, String safetyLevel) {
        super(productNumber, productName, productPrice);
        this.model = model;
        this.material = material;
        this.safetyLevel = safetyLevel;
    }

    // 设置型号
    public void setModel(String model) {
        this.model = model;
    }

    // 设置材料
    public void setMaterial(String material) {
        this.material = material;
    }

    // 设置安全级别
    public void setSafetyLevel(String safetyLevel) {
        this.safetyLevel = safetyLevel;
    }

    // 输出玩具信息
    public void showInfo() {
        System.out.println("商品号:" + getProductNumber());
        System.out.println("商品名:" + getProductName());
        System.out.println("商品价格:" + getProductPrice());
        System.out.println("型号:" + model);
        System.out.println("材料:" + material);
        System.out.println("安全级别:" + safetyLevel);
    }
}

// 测试程序
public class TestProduct {
    public static void main(String[] args) {
        // 创建食品对象
        Food food = new Food("F001", "苹果", 5.99, "2023-06-25", "7天", "苹果汁");

        // 设置食品信息
        food.setProductionDate("2023-06-20");
        food.setShelfLife("5天");
        food.setMainIngredient("苹果汁、糖");

        // 输出食品信息
        food.showInfo();

        System.out.println("--------------------------");

        // 创建玩具对象
        Toy toy = new Toy("T001", "小熊", 19.99, "ABC123", "毛绒", "安全级别A");

        // 设置玩具信息
        toy.setModel("XYZ789");
        toy.setMaterial("塑料");
        toy.setSafetyLevel("安全级别B");

        // 输出玩具信息
        toy.showInfo();
    }
}
输出结果:
商品号:F001
商品名:苹果
商品价格:5.99
生产日期:2023-06-20
保质期:5天
主要成分:苹果汁、糖
--------------------------
商品号:T001
商品名:小熊
商品价格:19.99
型号:XYZ789
材料:塑料
安全级别:安全级别B
(3)根据常识定义一个包含基本属性和常用方法的银行卡类,定义一个信用卡类和借记卡类,这两个类是银行卡类的子类;定义一个透支的接口,信用卡可以透支,借记卡不可以透支;定义一个取款异常和一个透支异常,当借记卡取款超过银行卡余额时,弹出取款异常;当信用卡透支超过 2 万元时弹出透支异常。此外,请编写测试程序,用恰当的测试数据创建信用卡对象和借记卡对象,并调用透支、存款、取款等方法,验证所定义的类、接口、异常可否正常运行。
// 银行卡类
class BankCard {
    private String cardNumber;
    private double balance;

    public BankCard(String cardNumber, double balance) {
        this.cardNumber = cardNumber;
        this.balance = balance;
    }

    public String getCardNumber() {
        return cardNumber;
    }

    public double getBalance() {
        return balance;
    }

    public void deposit(double amount) {
        balance += amount;
        System.out.println("成功存款:" + amount);
    }

    public void withdraw(double amount) throws WithdrawalException {
        if (amount > balance) {
            throw new WithdrawalException("取款异常:余额不足");
        }
        balance -= amount;
        System.out.println("成功取款:" + amount);
    }
}

// 透支接口
interface Overdraftable {
    double OVERDRAFT_LIMIT = 20000;

    void overdraft(double amount) throws OverdraftException;
}

// 信用卡类
class CreditCard extends BankCard implements Overdraftable {
    private double creditLimit;

    public CreditCard(String cardNumber, double balance, double creditLimit) {
        super(cardNumber, balance);
        this.creditLimit = creditLimit;
    }

    @Override
    public void overdraft(double amount) throws OverdraftException {
        if (amount > getBalance() + creditLimit) {
            throw new OverdraftException("透支异常:超过信用卡透支限额");
        }
        System.out.println("成功透支:" + amount);
    }
}

// 借记卡类
class DebitCard extends BankCard {
    public DebitCard(String cardNumber, double balance) {
        super(cardNumber, balance);
    }

    @Override
    public void withdraw(double amount) throws WithdrawalException {
        if (amount > getBalance()) {
            throw new WithdrawalException("取款异常:余额不足");
        }
        super.withdraw(amount);
    }
}

// 取款异常类
class WithdrawalException extends Exception {
    public WithdrawalException(String message) {
        super(message);
    }
}

// 透支异常类
class OverdraftException extends Exception {
    public OverdraftException(String message) {
        super(message);
    }
}

// 测试程序
public class BankCardTest {
    public static void main(String[] args) {
        // 创建信用卡对象并进行操作测试
        CreditCard creditCard = new CreditCard("1234567890", 10000, 20000);
        try {
            creditCard.deposit(5000);
            creditCard.withdraw(15000);
            creditCard.overdraft(30000);
        } catch (WithdrawalException | OverdraftException e) {
            System.out.println(e.getMessage());
        }
        System.out.println("信用卡余额:" + creditCard.getBalance());

        // 创建借记卡对象并进行操作测试
        DebitCard debitCard = new DebitCard("0987654321", 5000);
        try {
            debitCard.deposit(2000);
            debitCard.withdraw(8000);
        } catch (WithdrawalException e) {
            System.out.println(e.getMessage());
        }
        System.out.println("借记卡余额:" + debitCard.getBalance());
    }
}
输出结果:
成功存款:5000.0
成功取款:15000.0
透支异常:超过信用卡透支限额
信用卡余额:0.0
成功存款:2000.0
取款异常:余额不足
借记卡余额:7000.0
第 4 章 Java 图形用户界面程序设计
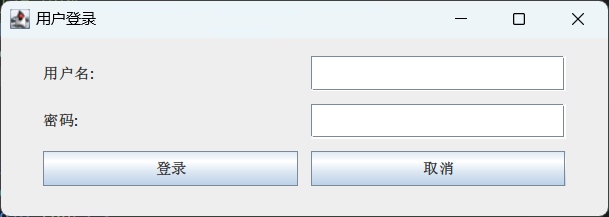
(1)编写 Java 程序,实现一个用户登录的 GUI。GUI 上有 2 个标签、1 个文本框、1 个密码框、2 个按钮共 6 个组件,对它们进行合理布局。
import javax.swing.*;
import java.awt.*;

public class LoginGUI extends JFrame {
    private JLabel usernameLabel;
    private JLabel passwordLabel;
    private JTextField usernameField;
    private JPasswordField passwordField;
    private JButton loginButton;
    private JButton cancelButton;

    public LoginGUI() {
        setTitle("用户登录");
        setDefaultCloseOperation(JFrame.EXIT_ON_CLOSE);

        // 创建面板
        JPanel panel = new JPanel(new GridLayout(3, 2, 10, 10));
        panel.setBorder(BorderFactory.createEmptyBorder(10, 10, 10, 10));

        // 创建标签
        usernameLabel = new JLabel("用户名:");
        passwordLabel = new JLabel("密码:");

        // 创建文本框和密码框
        usernameField = new JTextField(20);
        passwordField = new JPasswordField(20);

        // 创建按钮
        loginButton = new JButton("登录");
        cancelButton = new JButton("取消");

        // 添加组件到面板
        panel.add(usernameLabel);
        panel.add(usernameField);
        panel.add(passwordLabel);
        panel.add(passwordField);
        panel.add(loginButton);
        panel.add(cancelButton);

        // 设置布局管理器
        setLayout(new FlowLayout());
        add(panel);

        // 设置窗口大小和可见性
        setSize(500, 180);
        setLocationRelativeTo(null);
        setVisible(true);
    }

    public static void main(String[] args) {
        SwingUtilities.invokeLater(new Runnable() {
            public void run() {
                new LoginGUI();
            }
        });
    }
}
运行结果:
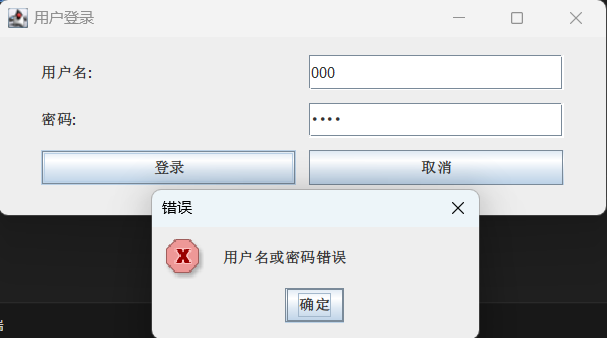
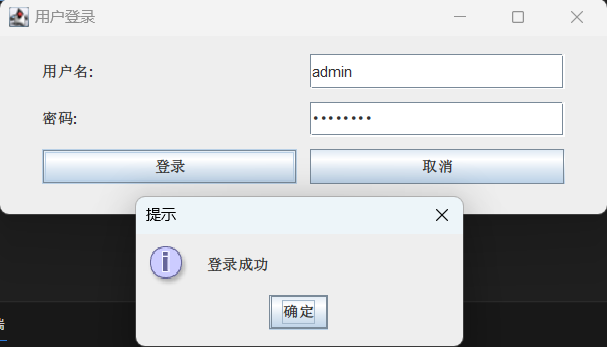
(2)在(1)的基础上,为按钮编写 ActionEvent 事件处理,对其中一个按钮的事件处理可以对文本框、密码框输入的内容进行验证,并通过消息框弹出相应的提示信息;另一个按钮的事件处理可以退出程序。
import javax.swing.*;
import java.awt.*;
import java.awt.event.ActionEvent;
import java.awt.event.ActionListener;

public class LoginGUI extends JFrame {
    private JLabel usernameLabel;
    private JLabel passwordLabel;
    private JTextField usernameField;
    private JPasswordField passwordField;
    private JButton loginButton;
    private JButton cancelButton;

    public LoginGUI() {
        setTitle("用户登录");
        setDefaultCloseOperation(JFrame.EXIT_ON_CLOSE);

        // 创建面板
        JPanel panel = new JPanel(new GridLayout(3, 2, 10, 10));
        panel.setBorder(BorderFactory.createEmptyBorder(10, 10, 10, 10));

        // 创建标签
        usernameLabel = new JLabel("用户名:");
        passwordLabel = new JLabel("密码:");

        // 创建文本框和密码框
        usernameField = new JTextField(20);
        passwordField = new JPasswordField(20);

        // 创建按钮
        loginButton = new JButton("登录");
        cancelButton = new JButton("取消");

        // 添加组件到面板
        panel.add(usernameLabel);
        panel.add(usernameField);
        panel.add(passwordLabel);
        panel.add(passwordField);
        panel.add(loginButton);
        panel.add(cancelButton);

        // 设置布局管理器
        setLayout(new FlowLayout());
        add(panel);

        // 设置登录按钮的点击事件
        loginButton.addActionListener(new ActionListener() {
            @Override
            public void actionPerformed(ActionEvent e) {
                String username = usernameField.getText();
                String password = new String(passwordField.getPassword());

                // 进行验证逻辑
                if (username.equals("admin") && password.equals("password")) {
                    JOptionPane.showMessageDialog(LoginGUI.this, "登录成功", "提示", JOptionPane.INFORMATION_MESSAGE);
                } else {
                    JOptionPane.showMessageDialog(LoginGUI.this, "用户名或密码错误", "错误", JOptionPane.ERROR_MESSAGE);
                }
            }
        });

        // 设置取消按钮的点击事件
        cancelButton.addActionListener(new ActionListener() {
            @Override
            public void actionPerformed(ActionEvent e) {
                System.exit(0);
            }
        });

        // 设置窗口大小和可见性
        setSize(500, 180);
        setLocationRelativeTo(null);
        setVisible(true);
    }

    public static void main(String[] args) {
        SwingUtilities.invokeLater(new Runnable() {
            public void run() {
                new LoginGUI();
            }
        });
    }
}
运行结果:
第 5 章 Applet 设计
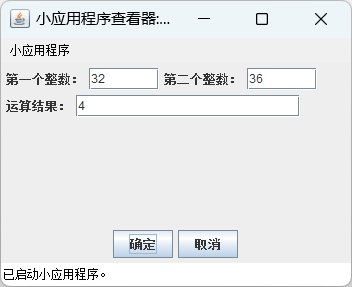
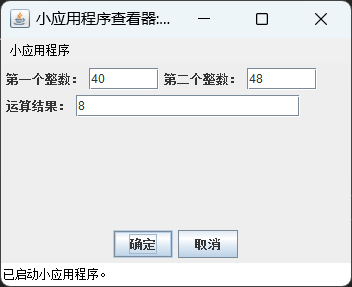
(1)对例 5-7 进行改写,使之单击“确定”按钮后在文本框中显示最大公约数,单击“取消”按钮则 3 个文本框清空。
例 5-7 :
import java.awt.*;
import javax.swing.*;
import java.applet.*;

public class AppletDemo extends JApplet {
    String s1, s2;

    public void init() {
        int x, y;
        JLabel label1 = new JLabel("第一个整数:");
        JTextField text1 = new JTextField(6);
        JLabel label2 = new JLabel("第二个整数:");
        JTextField text2 = new JTextField(6);
        JLabel label3 = new JLabel("运算结果:");
        JTextField text3 = new JTextField(20);
        JPanel p1 = new JPanel();
        p1.setLayout(new FlowLayout(FlowLayout.LEFT));
        p1.add(label1);
        p1.add(text1);
        p1.add(label2);
        p1.add(text2);
        p1.add(label3);
        p1.add(text3);
        JPanel p2 = new JPanel();
        JButton b1 = new JButton("确定");
        JButton b2 = new JButton("取消");
        p2.add(b1);
        p2.add(b2);
        add(p1, BorderLayout.CENTER);
        add(p2, BorderLayout.SOUTH);
        s1 = getParameter("x1");
        s2 = getParameter("x2");
        x = Integer.parseInt(s1);
        y = Integer.parseInt(s2);
        text1.setText(s1);
        text2.setText(s2);
        text3.setText(String.valueOf(result(x, y)));
    }

    public int result(int a, int b) {
        int m = b;
        while (m > 0) {
            m = a % b;
            a = b;
            b = m;
        }
        return a;
    }
}
<html>
    <applet code = "AppletDemo.class" height="200" width="350">
		<param name=x1 value="32">
		<param name=x2 value="36">
    </applet>
</html>
改写:
import java.awt.*;
import javax.swing.*;
import java.applet.*;
import java.awt.event.ActionEvent;
import java.awt.event.ActionListener;

public class AppletDemo extends JApplet {
    String s1, s2;
    JTextField text1, text2, text3;

    public void init() {
        int x, y;
        JLabel label1 = new JLabel("第一个整数:");
        text1 = new JTextField(6);
        JLabel label2 = new JLabel("第二个整数:");
        text2 = new JTextField(6);
        JLabel label3 = new JLabel("运算结果:");
        text3 = new JTextField(20);
        JPanel p1 = new JPanel();
        p1.setLayout(new FlowLayout(FlowLayout.LEFT));
        p1.add(label1);
        p1.add(text1);
        p1.add(label2);
        p1.add(text2);
        p1.add(label3);
        p1.add(text3);
        JPanel p2 = new JPanel();
        JButton b1 = new JButton("确定");
        JButton b2 = new JButton("取消");
        p2.add(b1);
        p2.add(b2);
        add(p1, BorderLayout.CENTER);
        add(p2, BorderLayout.SOUTH);

        // 设置确定按钮的点击事件
        b1.addActionListener(new ActionListener() {
            @Override
            public void actionPerformed(ActionEvent e) {
				int x = Integer.parseInt(text1.getText());
                int y = Integer.parseInt(text2.getText());
                int result = result(x, y);
                text3.setText(String.valueOf(result));
            }
        });

        // 设置取消按钮的点击事件
        b2.addActionListener(new ActionListener() {
            @Override
            public void actionPerformed(ActionEvent e) {
                text1.setText("");
                text2.setText("");
                text3.setText("");
            }
        });
    }

    public int result(int a, int b) {
        int m = b;
        while (m > 0) {
            m = a % b;
            a = b;
            b = m;
        }
        return a;
    }
}
<html>
    <applet code = "AppletDemo.class" height="200" width="350">
    </applet>
</html>
给两个按钮添加事件监听器。x,y的值不再从applet参数中获取,而是直接从文本框中获取。
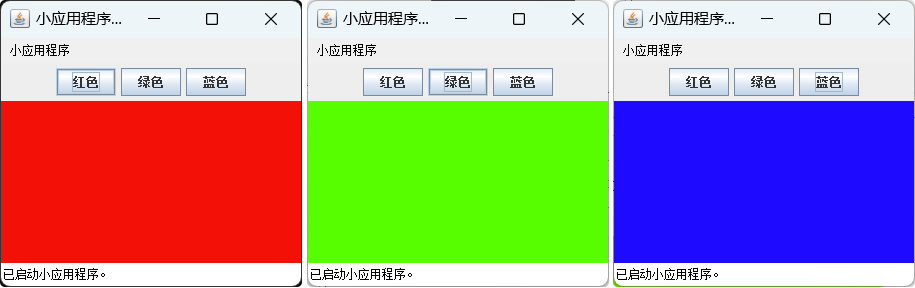
(2)编写 Applet,窗口中放置 3 个按钮,分别显示“红色”“绿色”“蓝色”,单击按钮,窗口的背景色进行相应的变化。
import java.awt.*;
import javax.swing.*;
import java.applet.*;
import java.awt.event.ActionEvent;
import java.awt.event.ActionListener;

public class ColorChangeApplet extends JApplet {
    private Color currentColor;
    private JPanel colorPanel;

    public void init() {
        currentColor = Color.WHITE;

        // 创建按钮
        JButton redButton = new JButton("红色");
        JButton greenButton = new JButton("绿色");
        JButton blueButton = new JButton("蓝色");

        // 设置按钮的点击事件
        redButton.addActionListener(new ActionListener() {
            @Override
            public void actionPerformed(ActionEvent e) {
                changeColor(Color.RED);
            }
        });

        greenButton.addActionListener(new ActionListener() {
            @Override
            public void actionPerformed(ActionEvent e) {
                changeColor(Color.GREEN);
            }
        });

        blueButton.addActionListener(new ActionListener() {
            @Override
            public void actionPerformed(ActionEvent e) {
                changeColor(Color.BLUE);
            }
        });

        // 创建面板
        JPanel buttonPanel = new JPanel();
        buttonPanel.add(redButton);
        buttonPanel.add(greenButton);
        buttonPanel.add(blueButton);

        // 创建颜色显示面板
        colorPanel = new JPanel();
        colorPanel.setBackground(currentColor);

        // 添加组件到Applet
        setLayout(new BorderLayout());
        add(buttonPanel, BorderLayout.NORTH);
        add(colorPanel, BorderLayout.CENTER);
    }

    private void changeColor(Color color) {
        currentColor = color;
        colorPanel.setBackground(currentColor);
    }
}
<html>
    <applet code="ColorChangeApplet.class" height="200" width="300">
    </applet>
</html>
运行结果:
(3)利用数组实现在 Applet 中显示图片动画效果。
import java.awt.*;
import javax.swing.*;
import java.applet.*;

public class ImageAnimationApplet extends JApplet implements Runnable {
    private Image[] images; // 图片数组
    private int currentImageIndex; // 当前显示的图片索引
    private Thread animationThread; // 动画线程
    private volatile boolean running; // 标记动画是否运行

    public void init() {
        // 加载图片
        images = new Image[3];
        images[0] = getImage(getCodeBase(), "image1.png");
        images[1] = getImage(getCodeBase(), "image2.png");
        images[2] = getImage(getCodeBase(), "image3.png");

        currentImageIndex = 0;

        // 设置面板大小
        setSize(400, 400);
    }

    public void start() {
        running = true;
        animationThread = new Thread(this);
        animationThread.start();
    }

    public void stop() {
        running = false;
        if (animationThread != null) {
            try {
                animationThread.join();
            } catch (InterruptedException e) {
                e.printStackTrace();
            }
        }
    }

    public void run() {
        while (running) {
            // 切换到下一张图片
            currentImageIndex = (currentImageIndex + 1) % images.length;

            // 重绘Applet
            repaint();

            try {
                Thread.sleep(1000); // 等待1秒
            } catch (InterruptedException e) {
                e.printStackTrace();
            }
        }
    }

    public void paint(Graphics g) {
        super.paint(g);
        Image currentImage = images[currentImageIndex];
        g.drawImage(currentImage, 0, 0, this);
    }
}
<html>
    <applet code="ImageAnimationApplet.class" height="200" width="300">
    </applet>
</html>
第 6 章 Java 输入输出流与文件操作
(1)编写 Java 程序,将键盘输入的内容写入到文本文件(*.txt)中。要求:结合 BufferedWriter 缓冲流实现。
import java.io.*;

public class KeyboardInputToFile {
    public static void main(String[] args) {
        try {
            // 创建BufferedReader对象用于从键盘读取输入
            BufferedReader reader = new BufferedReader(new InputStreamReader(System.in));

            // 创建BufferedWriter对象用于写入文件
            BufferedWriter writer = new BufferedWriter(new FileWriter("output.txt"));

            System.out.println("请输入文本内容,输入'exit'退出:");

            String input;
            while ((input = reader.readLine()) != null) {
                if (input.equals("exit")) {
                    break;
                }
                writer.write(input);
                writer.newLine(); // 写入换行符
            }

            // 关闭BufferedWriter和BufferedReader
            writer.close();
            reader.close();

            System.out.println("内容已写入文件。");
        } catch (IOException e) {
            e.printStackTrace();
        }
    }
}
(2)编写 Java 程序,利用 RandomAccessFile 类对二进制文件进行读、写操作。
import java.io.*;

public class RandomAccessFileExample {
    public static void main(String[] args) {
        try {
            // 创建RandomAccessFile对象,指定文件路径和操作模式
            RandomAccessFile file = new RandomAccessFile("binary.dat", "rw");

            // 写入数据
            file.writeInt(123);
            file.writeDouble(3.14159);
            file.writeUTF("Hello, World!");

            // 将文件指针移动到文件开头
            file.seek(0);

            // 读取数据
            int intValue = file.readInt();
            double doubleValue = file.readDouble();
            String stringValue = file.readUTF();

            System.out.println("读取到的整数:" + intValue);
            System.out.println("读取到的浮点数:" + doubleValue);
            System.out.println("读取到的字符串:" + stringValue);

            // 关闭RandomAccessFile
            file.close();
        } catch (IOException e) {
            e.printStackTrace();
        }
    }
}
输出结果:
读取到的整数:123
读取到的浮点数:3.14159
读取到的字符串:Hello, World!
第 7 章 Java 的多线程机制
(1)同一个单位的会计和出纳都可以访问同样的银行账户信息。请编写多线程的程序,正确运用同步机制,模拟会计和出纳对银行账户信息的并发访问。
public class BankAccount {
    private int balance;

    public BankAccount(int initialBalance) {
        balance = initialBalance;
    }

    public synchronized void deposit(int amount) {
        balance += amount;
        System.out.println("存款:" + amount + ",余额:" + balance);
    }

    public synchronized void withdraw(int amount) {
        if (balance >= amount) {
            balance -= amount;
            System.out.println("取款:" + amount + ",余额:" + balance);
        } else {
            System.out.println("余额不足,无法取款:" + amount);
        }
    }
}

public class Accountant implements Runnable {
    private BankAccount bankAccount;

    public Accountant(BankAccount account) {
        bankAccount = account;
    }

    public void run() {
        for (int i = 0; i < 5; i++) {
            int depositAmount = (int) (Math.random() * 1000) + 1;
            bankAccount.deposit(depositAmount);
            try {
                Thread.sleep((long) (Math.random() * 1000));
            } catch (InterruptedException e) {
                e.printStackTrace();
            }
        }
    }
}

public class Cashier implements Runnable {
    private BankAccount bankAccount;

    public Cashier(BankAccount account) {
        bankAccount = account;
    }

    public void run() {
        for (int i = 0; i < 5; i++) {
            int withdrawAmount = (int) (Math.random() * 500) + 1;
            bankAccount.withdraw(withdrawAmount);
            try {
                Thread.sleep((long) (Math.random() * 1000));
            } catch (InterruptedException e) {
                e.printStackTrace();
            }
        }
    }
}

public class BankSimulation {
    public static void main(String[] args) {
        BankAccount bankAccount = new BankAccount(1000);

        Accountant accountant = new Accountant(bankAccount);
        Cashier cashier = new Cashier(bankAccount);

        Thread accountantThread = new Thread(accountant);
        Thread cashierThread = new Thread(cashier);

        accountantThread.start();
        cashierThread.start();
    }
}
在上述代码中,我们首先定义了一个 BankAccount 类,该类表示银行账户,具有存款和取款方法。这两个方法都使用 synchronized 关键字修饰,以确保在多线程环境下的线程安全。
然后,我们定义了 Accountant 和 Cashier 两个类,分别表示会计和出纳。这两个类都实现了 Runnable 接口,并在 run() 方法中循环执行存款和取款操作。存款操作调用 deposit() 方法,取款操作调用 withdraw() 方法。
最后,我们在 BankSimulation 类中创建一个 BankAccount 对象,并分别创建一个 Accountant 线程和一个 Cashier 线程来并发执行存款和取款操作。
运行该程序,会模拟会计和出纳对银行账户信息的并发访问。由于使用了同步机制,存款和取款操作会按照顺序执行,确保了数据的一致性和线程安全性。
可能的输出结果:
取款:81,余额:919
存款:225,余额:1144
取款:457,余额:687
取款:283,余额:404
存款:832,余额:1236
取款:74,余额:1162
取款:249,余额:913
存款:483,余额:1396
存款:898,余额:2294
存款:732,余额:3026
(2)写一个多线程的程序以实现 Writer 和 Reader 共享文件。针对同样的一篇文章(保存在一个文本文件中),Writer 可以修改这篇文章,Reader 可以阅读这篇文章。请编写多线程的程序,实现:Writer 在修改这篇文章时,Reader 不可以阅读文章;而 Reader 在阅读文章时,Writer 也不可以修改文章。
import java.io.*;

public class FileSharing {
    private static final String FILE_PATH = "article.txt";
    private static final String ARTICLE_CONTENT = "This is the original content of the article.";

    private static volatile boolean writerActive = false;
    private static volatile boolean readerActive = false;

    public static void main(String[] args) {
        // 创建一个初始文章文件,写入原始内容
        createArticleFile(ARTICLE_CONTENT);

        // 创建一个 Writer 线程和一个 Reader 线程
        Thread writerThread = new Thread(new Writer());
        Thread readerThread = new Thread(new Reader());

        // 启动 Reader 线程
        readerThread.start();

        // 等待一段时间,以确保 Reader 线程开始运行
        try {
            Thread.sleep(2000);
        } catch (InterruptedException e) {
            e.printStackTrace();
        }

        // 启动 Writer 线程
        writerThread.start();
    }

    private static void createArticleFile(String content) {
        try (BufferedWriter writer = new BufferedWriter(new FileWriter(FILE_PATH))) {
            writer.write(content);
        } catch (IOException e) {
            e.printStackTrace();
        }
    }

    static class Writer implements Runnable {
        @Override
        public void run() {
            System.out.println("Writer is modifying the article.");
            writerActive = true;

            // 模拟写入操作
            try {
                Thread.sleep(3000);
            } catch (InterruptedException e) {
                e.printStackTrace();
            }

            writerActive = false;
            System.out.println("Writer has finished modifying the article.");
        }
    }

    static class Reader implements Runnable {
        @Override
        public void run() {
            // 等待 Writer 完成修改
            while (writerActive) {
                try {
                    Thread.sleep(1000);
                } catch (InterruptedException e) {
                    e.printStackTrace();
                }
            }

            System.out.println("Reader is reading the article.");
            readerActive = true;

            // 读取文章内容
            String content = readArticleFile();

            readerActive = false;
            System.out.println("Reader has finished reading the article:\n" + content);
        }

        private String readArticleFile() {
            StringBuilder content = new StringBuilder();

            try (BufferedReader reader = new BufferedReader(new FileReader(FILE_PATH))) {
                String line;
                while ((line = reader.readLine()) != null) {
                    content.append(line).append("\n");
                }
            } catch (IOException e) {
                e.printStackTrace();
            }

            return content.toString();
        }
    }
}
在上述代码中,我们首先定义了一个 FileSharing 类。
在 main 方法中,我们创建了一个初始的文章文件,并写入原始内容。
然后,我们创建一个 Writer 线程和一个 Reader 线程。
首先启动 Reader 线程,它会进入一个循环,等待 Writer 完成修改。在循环中,我们通过检查 writerActive 变量来判断 Writer 是否处于活动状态。
等待一段时间后,我们启动 Writer 线程。Writer 线程模拟对文章的修改,修改完成后将 writerActive 设置为 false。
当 Reader 线程检测到 writerActive 为 false 时,表示 Writer 已经完成修改,Reader 开始阅读文章。Reader 线程通过 readerActive 变量来表示自己是否处于活动状态。
在 Reader 线程中,我们使用 readArticleFile() 方法读取文章内容,并将其打印出来。
通过使用 volatile 关键字修饰 writerActive 和 readerActive 变量,我们确保了这两个变量在多线程环境下的可见性。
运行该程序,可以看到 Writer 和 Reader 线程之间的互斥访问效果,即当 Writer 在修改文章时,Reader 无法阅读文章,而当 Reader 在阅读文章时,Writer 无法修改文章。
输出结果:
Reader is reading the article.
Reader has finished reading the article:
This is the original content of the article.

Writer is modifying the article.
Writer has finished modifying the article.
第 9 章 常用工具类与集合框架
(1)使用 Collection 接口及有关的实现类创建一个集合,然后向集合中添加适量元素并使用 Iterator 和 for 循环实现对集合中元素的遍历输出。
import java.util.ArrayList;
import java.util.Collection;
import java.util.Iterator;

public class CollectionDemo {
    public static void main(String[] args) {
        // 创建一个ArrayList集合
        Collection<String> collection = new ArrayList<>();

        // 向集合中添加元素
        collection.add("Apple");
        collection.add("Banana");
        collection.add("Orange");
        collection.add("Grape");
        collection.add("Mango");

        // 使用Iterator遍历输出集合中的元素
        Iterator<String> iterator = collection.iterator();
        System.out.println("使用Iterator遍历输出集合中的元素:");
        while (iterator.hasNext()) {
            String element = iterator.next();
            System.out.println(element);
        }

        // 使用for循环遍历输出集合中的元素
        System.out.println("使用for循环遍历输出集合中的元素:");
        for (String element : collection) {
            System.out.println(element);
        }
    }
}
输出结果:
使用Iterator遍历输出集合中的元素:
Apple
Banana
Orange
Grape
Mango
使用for循环遍历输出集合中的元素:
Apple
Banana
Orange
Grape
Mango
(2)创建一个 List 类型的对象,然后在其中加入 3 个学生信息(学生类请自己定义)。实现如下功能:
①输出所有学生信息;
②能够按学号和姓名查找并输出学生信息;
③在第二个学生前插入一个新的学生;
④删除最后一个学生。
import java.util.ArrayList;
import java.util.List;

class Student {
    private int id;
    private String name;

    public Student(int id, String name) {
        this.id = id;
        this.name = name;
    }

    public int getId() {
        return id;
    }

    public String getName() {
        return name;
    }

    @Override
    public String toString() {
        return "Student [id=" + id + ", name=" + name + "]";
    }
}

public class StudentListDemo {
    public static void main(String[] args) {
        List<Student> studentList = new ArrayList<>();

        // 添加学生信息
        studentList.add(new Student(1, "Alice"));
        studentList.add(new Student(2, "Bob"));
        studentList.add(new Student(3, "Charlie"));

        // 输出所有学生信息
        System.out.println("所有学生信息:");
        for (Student student : studentList) {
            System.out.println(student);
        }

        // 按学号和姓名查找并输出学生信息
        int searchId = 2;
        String searchName = "Charlie";
        System.out.println("\n按学号和姓名查找学生信息:");
        for (Student student : studentList) {
            if (student.getId() == searchId || student.getName().equals(searchName)) {
                System.out.println(student);
            }
        }

        // 在第二个学生前插入一个新的学生
        Student newStudent = new Student(4, "David");
        studentList.add(1, newStudent);

        // 输出所有学生信息
        System.out.println("\n插入新学生后的学生信息:");
        for (Student student : studentList) {
            System.out.println(student);
        }

        // 删除最后一个学生
        studentList.remove(studentList.size() - 1);

        // 输出所有学生信息
        System.out.println("\n删除最后一个学生后的学生信息:");
        for (Student student : studentList) {
            System.out.println(student);
        }
    }
}
输出结果:
所有学生信息:
Student [id=1, name=Alice]
Student [id=2, name=Bob]
Student [id=3, name=Charlie]

按学号和姓名查找学生信息:
Student [id=2, name=Bob]
Student [id=3, name=Charlie]

插入新学生后的学生信息:
Student [id=1, name=Alice]
Student [id=4, name=David]
Student [id=2, name=Bob]
Student [id=3, name=Charlie]

删除最后一个学生后的学生信息:
Student [id=1, name=Alice]
Student [id=4, name=David]
Student [id=2, name=Bob]
(3)人生在世,也就是短短的 3 万天左右。请编写程序,计算自己的人生已走过了多少天。
import java.time.LocalDate;
import java.time.temporal.ChronoUnit;

public class LifeDaysCalculator {
    public static void main(String[] args) {
        // 获取当前日期
        LocalDate currentDate = LocalDate.now();

        // 设置出生日期
        LocalDate birthDate = LocalDate.of(2003, 1, 1);

        // 计算已经过去的天数
        long daysPassed = ChronoUnit.DAYS.between(birthDate, currentDate);

        // 输出结果
        System.out.println("已经过去的天数:" + daysPassed);
    }
}
输出结果:
已经过去的天数:7480
(4)请编写程序,产生 100~200 的 10 个互不相同的随机数,并输出其中的最大值和最小值。
import java.util.HashSet;
import java.util.Random;
import java.util.Set;

public class RandomNumberGenerator {
    public static void main(String[] args) {
        Set<Integer> numbers = new HashSet<>();
        Random random = new Random();

        // 生成10个互不相同的随机数
        while (numbers.size() < 10) {
            int randomNumber = random.nextInt(101) + 100; // 生成100~200的随机数
            numbers.add(randomNumber);
        }

        // 输出随机数集合
        System.out.println("随机数集合: " + numbers);

        // 找到最大值和最小值
        int min = Integer.MAX_VALUE;
        int max = Integer.MIN_VALUE;
        for (int number : numbers) {
            if (number < min) {
                min = number;
            }
            if (number > max) {
                max = number;
            }
        }

        // 输出最大值和最小值
        System.out.println("最小值: " + min);
        System.out.println("最大值: " + max);
    }
}
可能的输入结果:
随机数集合: [128, 145, 147, 101, 135, 169, 170, 109, 159, 111]
最小值: 101
最大值: 170