三次登录验证和验证码功能实现
最近手头上的事忙的差不多了,就想着自己写写小demo玩一下,结果突然看到我们旧系统的登录好像有点拉胯,然后就自己写了个小demo,指不定哪天就用上了呢
一、pom文件
首先当然是pom文件啦,这里写的比较简单,就一些基础组件
   <dependency>
            <groupId>org.springframework.boot</groupId>
            <artifactId>spring-boot-starter-jdbc</artifactId>
        </dependency>

        <dependency>
            <groupId>org.projectlombok</groupId>
            <artifactId>lombok</artifactId>
            <optional>true</optional>
        </dependency>

        <dependency>
            <groupId>org.springframework.boot</groupId>
            <artifactId>spring-boot-starter-test</artifactId>
            <scope>test</scope>
        </dependency>

        <dependency>
            <groupId>org.springframework.boot</groupId>
            <artifactId>spring-boot-starter-web</artifactId>

        </dependency>

        <dependency>
            <groupId>com.alibaba</groupId>
            <artifactId>druid-spring-boot-starter</artifactId>
            <version>1.2.11</version>
        </dependency>

        <dependency>
            <groupId>io.springfox</groupId>
            <artifactId>springfox-swagger2</artifactId>
            <version>3.0.0</version>
        </dependency>

        <dependency>
            <groupId>io.springfox</groupId>
            <artifactId>springfox-swagger-ui</artifactId>
            <version>3.0.0</version>
        </dependency>

        <dependency>
            <groupId>com.baomidou</groupId>
            <artifactId>mybatis-plus-boot-starter</artifactId>
            <version>3.5.3.1</version>
        </dependency>

        <dependency>
            <groupId>mysql</groupId>
            <artifactId>mysql-connector-java</artifactId>
            <version>8.0.29</version>
        </dependency>

        <dependency>
            <groupId>org.springframework.boot</groupId>
            <artifactId>spring-boot-starter-data-redis</artifactId>
        </dependency>

        <dependency>
            <groupId>redis.clients</groupId>
            <artifactId>jedis</artifactId>
        </dependency>

        <dependency>
            <groupId>org.aspectj</groupId>
            <artifactId>aspectjweaver</artifactId>
        </dependency>

<!--        验证码依赖包-->
        <dependency>
            <groupId>com.github.penggle</groupId>
            <artifactId>kaptcha</artifactId>
            <version>2.3.2</version>
        </dependency>
                <dependency>
            <groupId>com.google.code.gson</groupId>
            <artifactId>gson</artifactId>
            <version>2.9.0</version>
        </dependency>

        <dependency>
            <groupId>com.alibaba</groupId>
            <artifactId>fastjson</artifactId>
            <version>1.2.83</version>
        </dependency>
pom文件基本就是这些,加下来就是控制层
二、controller层
@Api(tags = "用户信息控制层")
@Controller
@RequestMapping("/base")
@Slf4j
public class UserInfoController {

    @Autowired
    private Producer producer;

    @Resource
    private StringRedisTemplate template;

    @Autowired
    private UserService userService;

    /**
     * login : 登录
     *
     * @param username
     * @param password
     * @param request
     * @return org.springframework.http.ResponseEntity<java.lang.String>
     * @author lin
     * @version 1.0
     * @date 2023/6/15 14:23
     * @since JDK 1.8
     */
    @GetMapping("/login")
    @LimitCount(key = "login", name = "登录接口", prefix = "limit")
    public ResponseEntity<String> login(
            @RequestParam(required = true) String username,
            @RequestParam(required = true) String password,
            @RequestParam(required = true) String text,
            HttpServletRequest request) throws Exception {
        if (StringUtils.equals("张三", username) && StringUtils.equals("123456", password)) {
            String userInfo = IPUtil.getUserMD5(request);
            String s = template.opsForValue().get(userInfo);
            if (text.equals(s)) {
                return new ResponseEntity<>("登录成功", HttpStatus.OK);
            } else {
                return new ResponseEntity<>("验证码有误!", HttpStatus.OK);
            }

        }
        return new ResponseEntity<>("账户名或密码错误", HttpStatus.OK);
    }

    @PostMapping("/register")
    @ResponseBody
    public Result register(@RequestBody UserVo user, HttpServletRequest request) {
        if (StringUtils.isNotBlank(user.getVerifyCode())) {
            // 校验验证码
            String userInfo = IPUtil.getUserMD5(request);
            String s = template.opsForValue().get(userInfo);
            if (user.getVerifyCode().equals(s)) {
                Result result = userService.verifyUser(user);
                return result;
            } else {
                return Result.success(false, "请输入正确验证码!");
            }
        } else {
            return Result.success(false, "请输入验证码!");
        }

    }


    /**
     * getVerifyCode : 获取验证码
     *
     * @param response
     * @param session
     * @return void
     * @author lin
     * @version 1.0
     * @date 2023/6/15 14:24
     * @since JDK 1.8
     */
    @GetMapping("/getVerifyCode")
    public void getVerifyCode(HttpServletRequest request, HttpServletResponse response, HttpSession session) throws IOException {
        response.setContentType("image/jpeg");
        String text = producer.createText();
        String userInfo = IPUtil.getUserMD5(request);
        template.opsForValue().set(userInfo, text, 10, TimeUnit.MINUTES);
        session.setAttribute("vf", text);
        BufferedImage image = producer.createImage(text);
        try (ServletOutputStream sos = response.getOutputStream()) {
            ImageIO.write(image, "jpg", sos);
        }
    }

}
这里的登录没有使用token,只是简单的采用了md5加密,后期有时间再慢慢完善吧,实现类比较简单,就先跳过了,有需要的话私信我就行,后面就是工具类
三、utils工具类
IPUtil
@Slf4j
public class IPUtil {
    private static final String UNKNOWN = "unknown";

    protected IPUtil() {

    }

    /**
     * getIpAddr : 获取公网ip和内网ip
     *
     * @param request
     * @return java.lang.String
     * @author lin
     * @version 1.0
     * @date 2023/6/15 13:48
     * @since JDK 1.8
     */
    public static String getIpAddr(HttpServletRequest request) {
        String ip = request.getHeader("x-forwarded-for");
        if (ip == null || ip.length() == 0 || UNKNOWN.equalsIgnoreCase(ip)) {
            ip = request.getHeader("Proxy-Client-IP");
        }
        if (ip == null || ip.length() == 0 || UNKNOWN.equalsIgnoreCase(ip)) {
            ip = request.getHeader("WL-Proxy-Client-IP");
        }
        if (ip == null || ip.length() == 0 || UNKNOWN.equalsIgnoreCase(ip)) {
            ip = request.getRemoteAddr();
        }
        return "0:0:0:0:0:0:0:1".equals(ip) ? "127.0.0.1" : ip;
    }

    /**
     * getUserMD5 : 加密用户信息
     *
     * @author lin
     * @version 1.0
     * @date 2023/6/15 15:06
     * @param request
     * @return java.lang.String
     * @since JDK 1.8
     */
    public static String getUserMD5(HttpServletRequest request) {
        String ip = IPUtil.getIpAddr(request);
        String header = request.getHeader("User-Agent");
        String userInfo = MD5Utils.inputPassToFormPass("user-service" + ip + header);
        return userInfo;
    }

}
MD5Utils
public class MD5Utils {
    public static String md5(String src) {
        return DigestUtils.md5Hex(src);
    }

    private static final String salt = "123abc";

    public static String inputPassToFormPass(String inputPass) {
        String str = ""+salt.charAt(0)+salt.charAt(2) + inputPass +salt.charAt(5) + salt.charAt(4);
        System.out.println(str);
        return md5(str);
    }
}
四、配置类
VerifyCodeConfig
@Configuration
public class VerifyCodeConfig {
    @Bean
    Producer producer() {
        Properties properties = new Properties();
        //设置图片边框
        properties.setProperty("kaptcha.border", "yes");
        //设置图片边框为蓝色
        properties.setProperty("kaptcha.border.color", "black");
        //背景颜色渐变开始
        properties.put("kaptcha.background.clear.from", "127,255,212");
        //背景颜色渐变结束
        properties.put("kaptcha.background.clear.to", "240,255,255");
        // 字体颜色
        properties.put("kaptcha.textproducer.font.color", "black");
        // 文字间隔
        properties.put("kaptcha.textproducer.char.space", "10");
        //如果需要去掉干扰线
        properties.put("kaptcha.noise.impl", "com.google.code.kaptcha.impl.NoNoise");
        // 字体
        properties.put("kaptcha.textproducer.font.names", "Arial,Courier,cmr10,宋体,楷体,微软雅黑");
        // 图片宽度
        properties.setProperty("kaptcha.image.width", "200");
        // 图片高度
        properties.setProperty("kaptcha.image.height", "50");
        // 从哪些字符中产生
        properties.setProperty("kaptcha.textproducer.char.string", "0123456789abcdefghijklmnopqrsduvwxyzABCDEFGHIJKLMNOPQRSTUVWXYZ");
        // 字符个数
        properties.setProperty("kaptcha.textproducer.char.length", "4");
        DefaultKaptcha defaultKaptcha = new DefaultKaptcha();
        defaultKaptcha.setConfig(new Config(properties));
        return defaultKaptcha;
    }
}
RedisConfig
@Configuration
public class RedisConfig extends CachingConfigurerSupport {

    @Value("${spring.data.redis.host}")
    private String host;

    @Value("${spring.data.redis.port}")
    private int port;

    @Value("${spring.data.redis.password}")
    private String password;

    @Value("${spring.data.redis.timeout}")
    private int timeout;

    @Value("${spring.data.redis.jedis.pool.max-idle}")
    private int maxIdle;

    @Value("${spring.data.redis.jedis.pool.max-wait}")
    private long maxWaitMillis;

    @Value("${spring.data.redis.database:0}")
    private int database;

    @Bean
    public JedisPool redisPoolFactory() {
        JedisPoolConfig jedisPoolConfig = new JedisPoolConfig();
        jedisPoolConfig.setMaxIdle(maxIdle);
        jedisPoolConfig.setMaxWaitMillis(maxWaitMillis);
        if (StringUtils.isNotBlank(password)) {
            return new JedisPool(jedisPoolConfig, host, port, timeout, password, database);
        } else {
            return new JedisPool(jedisPoolConfig, host, port, timeout, null, database);
        }
    }

    @Bean
    JedisConnectionFactory jedisConnectionFactory() {
        RedisStandaloneConfiguration redisStandaloneConfiguration = new RedisStandaloneConfiguration();
        redisStandaloneConfiguration.setHostName(host);
        redisStandaloneConfiguration.setPort(port);
        redisStandaloneConfiguration.setPassword(RedisPassword.of(password));
        redisStandaloneConfiguration.setDatabase(database);

        JedisClientConfiguration.JedisClientConfigurationBuilder jedisClientConfiguration = JedisClientConfiguration
                .builder();
        jedisClientConfiguration.connectTimeout(Duration.ofMillis(timeout));
        jedisClientConfiguration.usePooling();
        return new JedisConnectionFactory(redisStandaloneConfiguration, jedisClientConfiguration.build());
    }

    @Bean
    public RedisTemplate<String, Serializable> limitRedisTemplate(RedisConnectionFactory redisConnectionFactory) {
        RedisTemplate<String, Serializable> template = new RedisTemplate<>();
        template.setKeySerializer(new StringRedisSerializer());
        template.setValueSerializer(new GenericJackson2JsonRedisSerializer());
        template.setConnectionFactory(redisConnectionFactory);
        return template;
    }
}
五、注解类
LimitCount
@Target(ElementType.METHOD)
@Retention(RetentionPolicy.RUNTIME)
public @interface LimitCount {
    /**
     * 资源名称,用于描述接口功能
     */
    String name() default "";

    /**
     * 资源 key
     */
    String key() default "";

    /**
     * key prefix
     *
     * @return
     */
    String prefix() default "";

    /**
     * 时间的,单位秒
     * 默认60s过期
     */
    int period() default 60;

    /**
     * 限制访问次数
     * 默认3次
     */
    int count() default 3;

}
LimitCountAspect
@Slf4j
@Aspect
@Component
public class LimitCountAspect {

    private final RedisTemplate<String, Serializable> limitRedisTemplate;

    @Autowired
    public LimitCountAspect(RedisTemplate<String, Serializable> limitRedisTemplate) {
        this.limitRedisTemplate = limitRedisTemplate;
    }

    @Resource
    private StringRedisTemplate stringRedisTemplate;

    @Pointcut("@annotation(com.linlin.ocr.annotation.LimitCount)")
    public void pointcut() {
        // do nothing
    }

    @Around("pointcut()")
    public Object around(ProceedingJoinPoint point) throws Throwable {
        HttpServletRequest request = ((ServletRequestAttributes) Objects.requireNonNull(
                RequestContextHolder.getRequestAttributes())).getRequest();

        MethodSignature signature = (MethodSignature) point.getSignature();
        Method method = signature.getMethod();
        LimitCount annotation = method.getAnnotation(LimitCount.class);
        //注解名称
        String name = annotation.name();
        //注解key
        String key = annotation.key();
        //访问IP
        String ip = IPUtil.getIpAddr(request);
        //过期时间
        int limitPeriod = annotation.period();
        //过期次数
        int limitCount = annotation.count();

        ImmutableList<String> keys = ImmutableList.of(StringUtils.join(annotation.prefix() + "_", key, ip));
        String luaScript = buildLuaScript();
        RedisScript<Number> redisScript = new DefaultRedisScript<>(luaScript, Number.class);
        Number count = limitRedisTemplate.execute(redisScript, keys, limitCount, limitPeriod);
        log.info("IP:{} 第 {} 次访问key为 {},描述为 [{}] 的接口", ip, count, keys, name);
        if (count != null && count.intValue() <= limitCount) {
            return point.proceed();
        } else {
            String s = keys.get(0);
            Long expire = stringRedisTemplate.getExpire(s);
            return new ResponseEntity<>("接口访问超出频率限制,请等待"+expire+"s再试!", HttpStatus.OK);
        }
    }

    /**
     * 限流脚本
     * 调用的时候不超过阈值,则直接返回并执行计算器自加。
     *
     * @return lua脚本
     */
    private String buildLuaScript() {
        return "local c" +
                "\nc = redis.call('get',KEYS[1])" +
                "\nif c and tonumber(c) > tonumber(ARGV[1]) then" +
                "\nreturn c;" +
                "\nend" +
                "\nc = redis.call('incr',KEYS[1])" +
                "\nif tonumber(c) == 1 then" +
                "\nredis.call('expire',KEYS[1],ARGV[2])" +
                "\nend" +
                "\nreturn c;";
    }

}
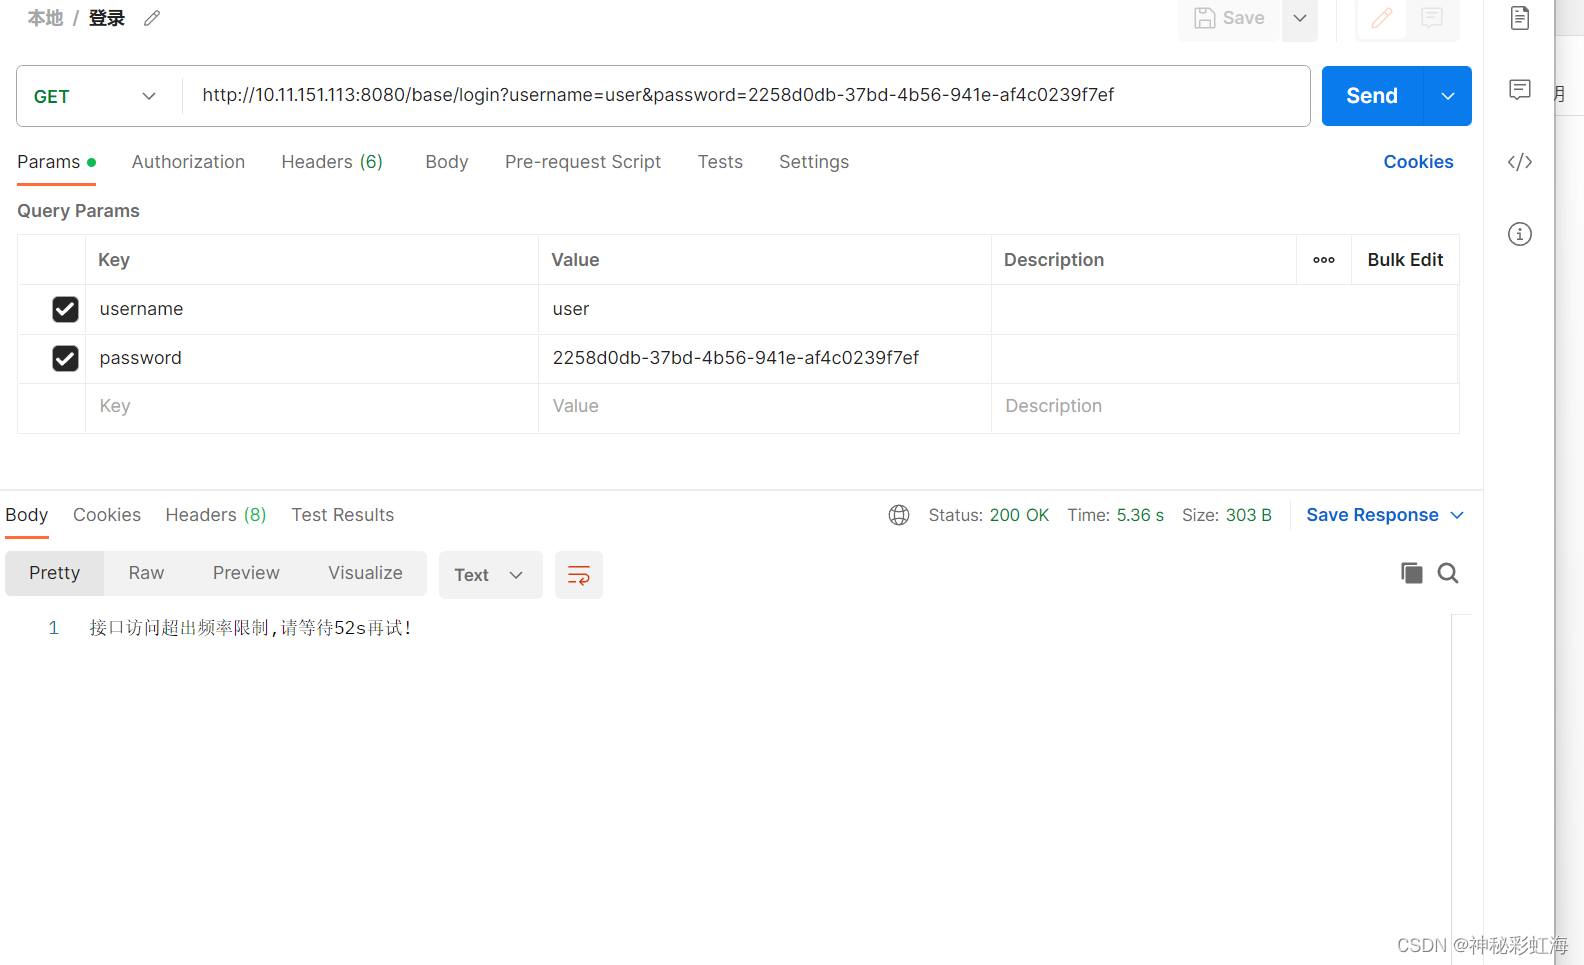
以上就是全部的登录验证的逻辑和代码实现,弄完以后三次登录差不多是这么个效果,验证码这个需要前端,等过段时间得空了再补上吧
