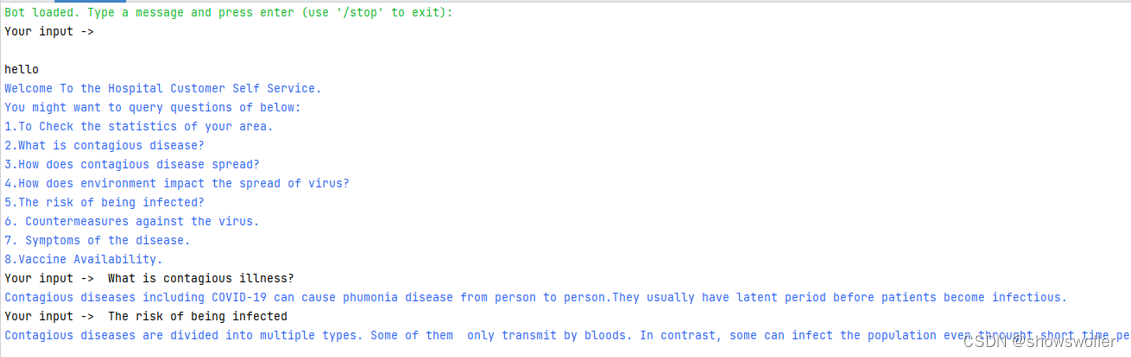
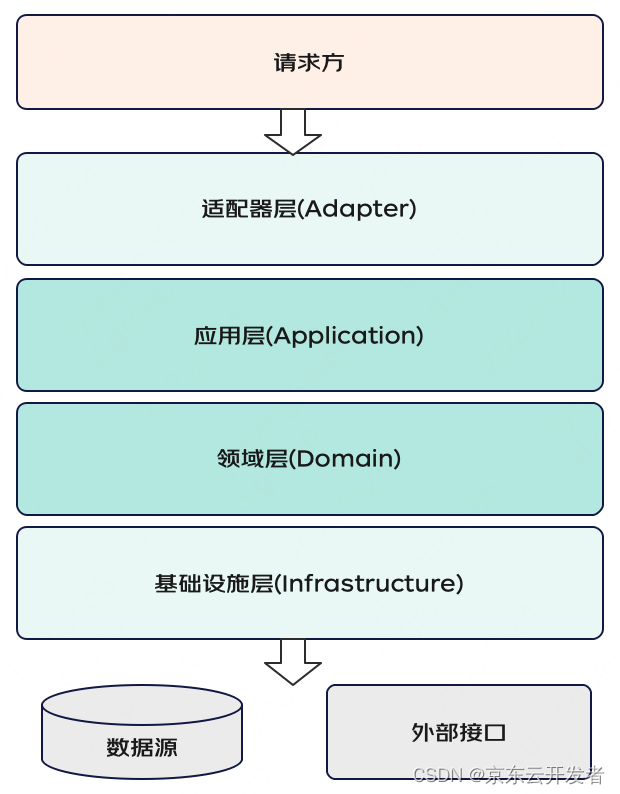
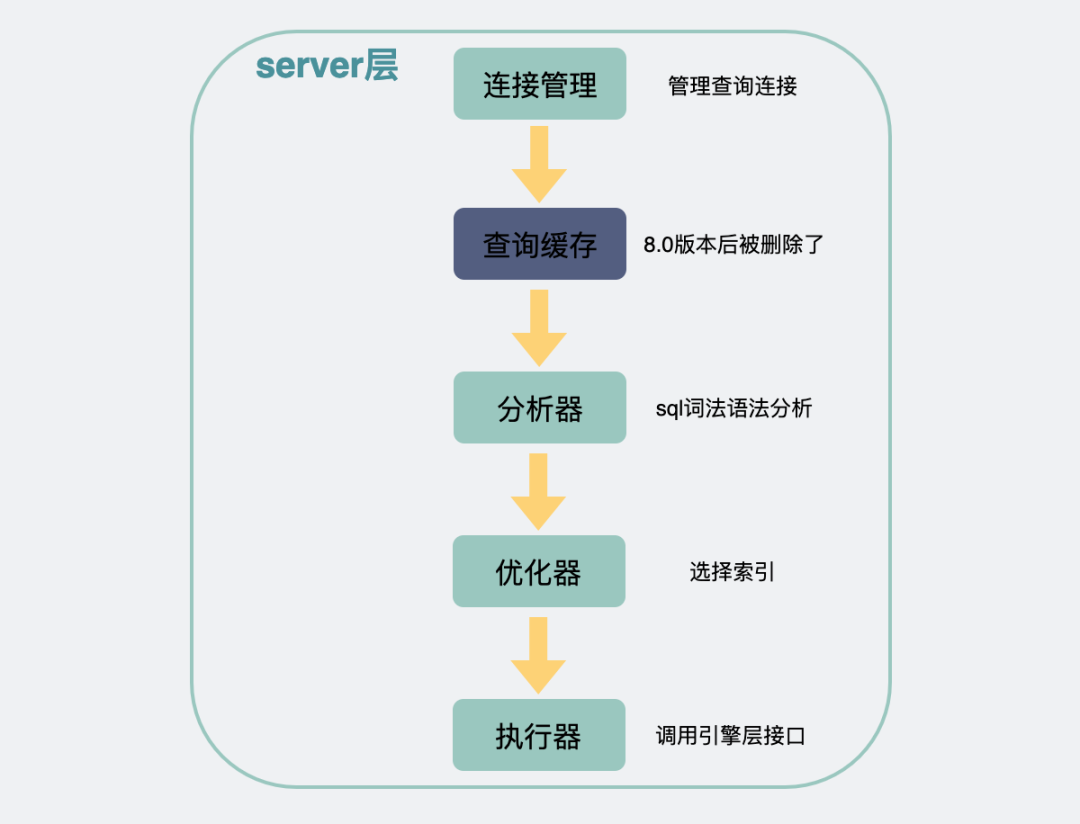
说明
【跟月影学可视化】学习笔记。
光照效果简介
物体的光照效果是由光源、介质(物体的材质)和反射类型决定的,而反射类型又由物体的材质特点决定。
在 3D 光照模型中,根据不同的光源特点分为四种:
环境光(Ambient Light):指物体所在的三维空间中天然的光,它充满整个空间,在每一处的光照强度都一样。- 特点1:在空间中均匀分布,在任何位置上环境光的颜色都相同
- 特点2:环境光没有方向,与物体的材质有关
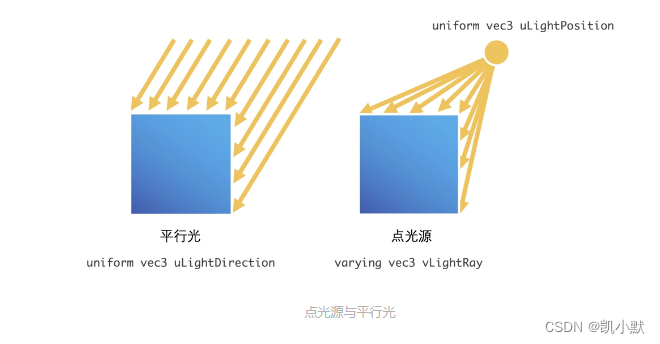
平行光(Directional Light):平行光是朝着某个方向照射的光,能够照亮几何体的一部分表面,它属于有向光。点光源(Positional Light):指空间中某一点发出的光,与方向光不同的是,点光源不仅有方向属性,还有位置属性。聚光灯(Spot Light):与点光源相比,聚光灯增加了方向以及角度范围,只有在这个范围内,光线才能照到。
点光源跟平行光的示意图:
聚光灯示意图:

有向光在与物体发生作用的时候,根据物体的材质特性,会产生两种反射类型:
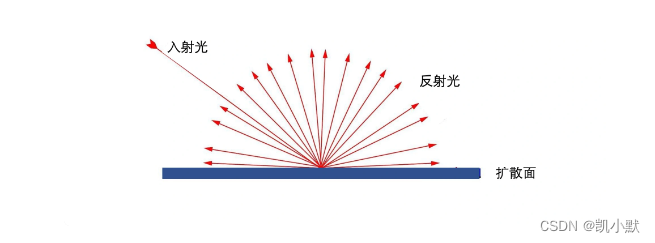
漫反射(Diffuse reflection)镜面反射(Specular reflection)
漫反射示意图:
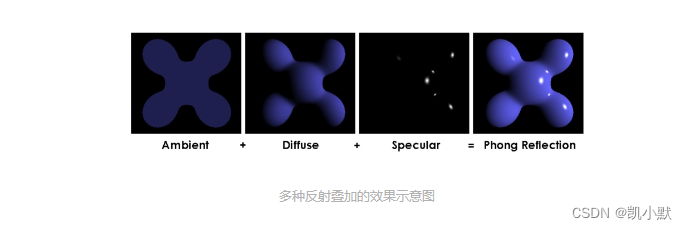
一个物体最终的光照效果,是漫反射、镜面反射以及环境光叠加在一起的效果,示意图如下:
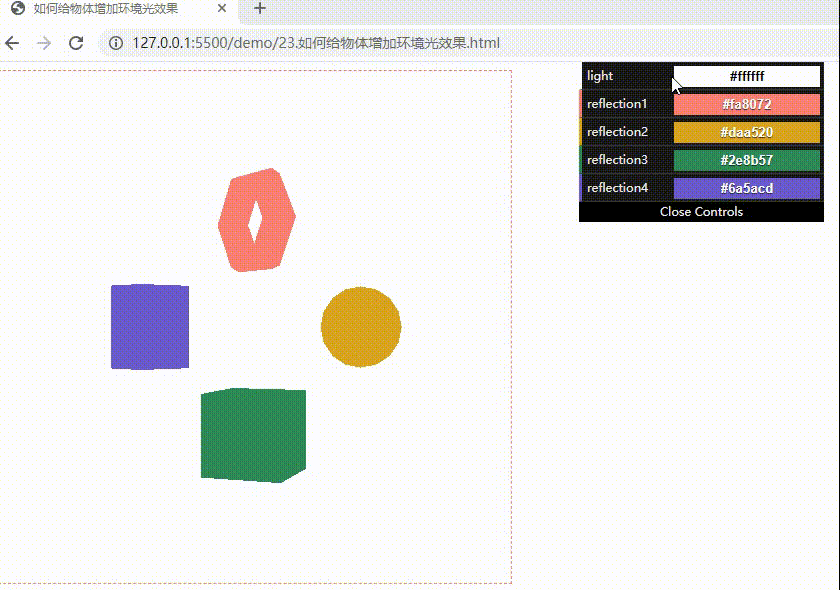
如何给物体增加环境光效果?
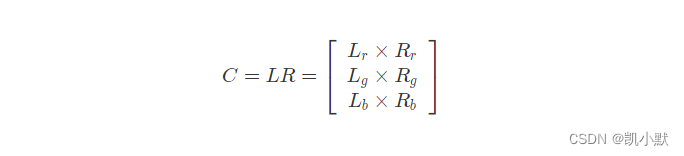
环境光没有方向,物体表面反射环境光的效果,只和环境光本身以及材质的反射率有关。
物体在环境光中呈现的颜色的公式如下:(环境光的颜色为 L,材质对光的反射率为 R。)
下面实现给物体增加环境光效果:
<!DOCTYPE html>
<html lang="en">
    <head>
        <meta charset="UTF-8" />
        <meta http-equiv="X-UA-Compatible" content="IE=edge" />
        <meta name="viewport" content="width=device-width, initial-scale=1.0" />
        <title>如何给物体增加环境光效果</title>
        <style>
            canvas {
                border: 1px dashed #fa8072;
            }
        </style>
    </head>
    <body>
        <canvas width="512" height="512"></canvas>
        <script type="module">
            import { Renderer, Camera, Transform, Sphere, Box, Cylinder, Torus, Orbit, Program, Mesh, Color } from './common/lib/ogl/index.mjs';
            // JavaScript Controller Library
            import * as dat from './common/lib/dat.gui.js';
            console.log(dat)

            const canvas = document.querySelector('canvas');
            const renderer = new Renderer({
                canvas,
                width: 512,
                height: 512,
            });

            const gl = renderer.gl;
            gl.clearColor(1, 1, 1, 1);
            const camera = new Camera(gl, {fov: 35});
            camera.position.set(0, 0, 10);
            camera.lookAt([0, 0, 0]);

            const scene = new Transform();

            const vertex = `
                precision highp float;

                attribute vec3 position;
                attribute vec3 normal;

                uniform mat4 modelViewMatrix;
                uniform mat4 projectionMatrix;
                uniform mat3 normalMatrix;

                void main() {
                    gl_Position = projectionMatrix * modelViewMatrix * vec4(position, 1.0);
                }
            `;

            // 传入环境光 ambientLight 和材质反射率 materialReflection
            const fragment = `
                precision highp float;

                uniform vec3 ambientLight;
                uniform vec3 materialReflection;

                void main() {
                    gl_FragColor.rgb = ambientLight * materialReflection;
                    gl_FragColor.a = 1.0;
                }
            `;

            // 创建四个不同的几何体,初始化它们的环境光 ambientLight 以及材质反射率 materialReflection
            const sphereGeometry = new Sphere(gl);
            const cubeGeometry = new Box(gl);
            const cylinderGeometry = new Cylinder(gl);
            const torusGeometry = new Torus(gl);

            const program1 = new Program(gl, {
                vertex,
                fragment,
                uniforms: {
                    ambientLight: {value: [1, 1, 1]},
                    materialReflection: {value: [250/255, 128/255, 114/255]},
                },
            });
            const program2 = new Program(gl, {
                vertex,
                fragment,
                uniforms: {
                    ambientLight: {value: [1, 1, 1]},
                    materialReflection: {value: [218/255, 165/255, 32/255]},
                },
            });
            const program3 = new Program(gl, {
                vertex,
                fragment,
                uniforms: {
                    ambientLight: {value: [1, 1, 1]},
                    materialReflection: {value: [46/255, 139/255, 87/255]},
                },
            });
            const program4 = new Program(gl, {
                vertex,
                fragment,
                uniforms: {
                    ambientLight: {value: [1, 1, 1]},
                    materialReflection: {value: [106/255, 90/255, 205/255]},
                },
            });

            const torus = new Mesh(gl, {geometry: torusGeometry, program: program1});
            torus.position.set(0, 1.3, 0);
            torus.setParent(scene);

            const sphere = new Mesh(gl, {geometry: sphereGeometry, program: program2});
            sphere.position.set(1.3, 0, 0);
            sphere.setParent(scene);

            const cube = new Mesh(gl, {geometry: cubeGeometry, program: program3});
            cube.position.set(0, -1.3, 0);
            cube.setParent(scene);

            const cylinder = new Mesh(gl, {geometry: cylinderGeometry, program: program4});
            cylinder.position.set(-1.3, 0, 0);
            cylinder.setParent(scene);

            const controls = new Orbit(camera);

            // 添加动画
            requestAnimationFrame(update);
            function update() {
                requestAnimationFrame(update);
                controls.update();

                torus.rotation.y -= 0.02;
                sphere.rotation.y -= 0.03;
                cube.rotation.y -= 0.04;
                cylinder.rotation.y -= 0.02;

                renderer.render({scene, camera});
            }

            // 添加控制
            const gui = new dat.GUI();
            const palette = {
                light: '#FFFFFF',
                reflection1: '#fa8072', // salmon rgb(250, 128, 114) [250/255, 128/255, 114/255, 1]
                reflection2: '#daa520', // goldenrod rgb(218, 165, 32) [218/255, 165/255, 32/255, 1]
                reflection3: '#2e8b57', // seagreen rgb(46, 139, 87) [46/255, 139/255, 87/255, 1]
                reflection4: '#6a5acd', // slateblue rgb(106, 90, 205) [106/255, 90/255, 205/255, 1]
            };
            gui.addColor(palette, 'light').onChange((val) => {
                const color = new Color(val);
                program1.uniforms.ambientLight.value = color;
                program2.uniforms.ambientLight.value = color;
                program3.uniforms.ambientLight.value = color;
                program4.uniforms.ambientLight.value = color;
            });
            gui.addColor(palette, 'reflection1').onChange((val) => {
                program1.uniforms.materialReflection.value = new Color(val);
            });
            gui.addColor(palette, 'reflection2').onChange((val) => {
                program2.uniforms.materialReflection.value = new Color(val);
            });
            gui.addColor(palette, 'reflection3').onChange((val) => {
                program3.uniforms.materialReflection.value = new Color(val);
            });
            gui.addColor(palette, 'reflection4').onChange((val) => {
                program4.uniforms.materialReflection.value = new Color(val);
            });
        </script>
    </body>
</html>
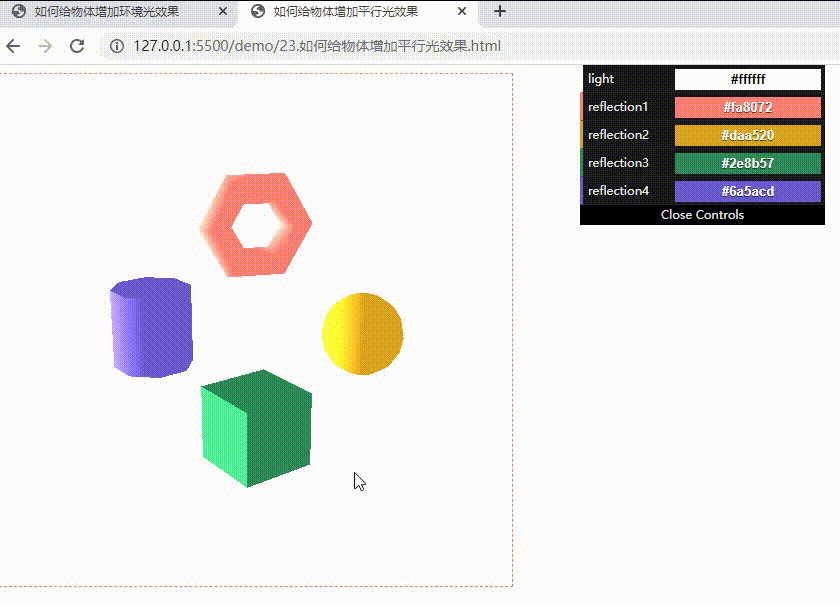
如何给物体增加平行光效果?
有向光的漫反射在各个方向上的反射光均匀分布,反射强度与光的射入方向与法线的夹角的余弦成正比。
下面实现给物体增加平行光效果:
<!DOCTYPE html>
<html lang="en">
    <head>
        <meta charset="UTF-8" />
        <meta http-equiv="X-UA-Compatible" content="IE=edge" />
        <meta name="viewport" content="width=device-width, initial-scale=1.0" />
        <title>如何给物体增加平行光效果</title>
        <style>
            canvas {
                border: 1px dashed #fa8072;
            }
        </style>
    </head>
    <body>
        <canvas width="512" height="512"></canvas>
        <script type="module">
            import { Renderer, Camera, Transform, Sphere, Box, Cylinder, Torus, Orbit, Program, Mesh, Color } from './common/lib/ogl/index.mjs';
            // JavaScript Controller Library
            import * as dat from './common/lib/dat.gui.js';
            console.log(dat)

            const canvas = document.querySelector('canvas');
            const renderer = new Renderer({
                canvas,
                width: 512,
                height: 512,
            });

            const gl = renderer.gl;
            gl.clearColor(1, 1, 1, 1);
            const camera = new Camera(gl, {fov: 35});
            camera.position.set(0, 0, 10);
            camera.lookAt([0, 0, 0]);

            const scene = new Transform();

            // 在顶点着色器中计算光线的方向的运算次数少
            const vertex = `
                precision highp float;

                attribute vec3 position;
                attribute vec3 normal;

                uniform mat4 modelViewMatrix;
                uniform mat4 projectionMatrix;
                uniform mat4 viewMatrix;
                uniform mat3 normalMatrix;
                // 添加一道平行光
                uniform vec3 directionalLight;

                varying vec3 vNormal;
                varying vec3 vDir;

                void main() {
                    // 计算光线方向
                    vec4 invDirectional = viewMatrix * vec4(directionalLight, 0.0);
                    vDir = -invDirectional.xyz;

                    // 计算法向量
                    vNormal = normalize(normalMatrix * normal);
                    gl_Position = projectionMatrix * modelViewMatrix * vec4(position, 1.0);
                }
            `;

            // 传入环境光 ambientLight 和材质反射率 materialReflection
            // 在片元着色器里,计算光线方向与法向量夹角的余弦,计算出漫反射光。
            const fragment = `
                precision highp float;

                uniform vec3 ambientLight;
                uniform vec3 materialReflection;
                uniform vec3 directionalLightColor;

                varying vec3 vNormal;
                varying vec3 vDir;

                void main() {
                    // 求光线与法线夹角的余弦
                    float cos = max(dot(normalize(vDir), vNormal), 0.0);

                    // 计算漫反射
                    vec3 diffuse = cos * directionalLightColor;

                    // 合成颜色
                    gl_FragColor.rgb = (ambientLight + diffuse) * materialReflection;
                    gl_FragColor.a = 1.0;
                }
            `;

            // 创建四个不同的几何体,初始化它们的环境光 ambientLight 以及材质反射率 materialReflection
            const sphereGeometry = new Sphere(gl);
            const cubeGeometry = new Box(gl);
            const cylinderGeometry = new Cylinder(gl);
            const torusGeometry = new Torus(gl);

            // 添加一个水平向右的白色平行光
            const ambientLight = { value: [1, 1, 1] };

            const directional = {
                directionalLight: {
                    value: [1, 0, 0]
                },
                directionalLightColor: {
                    value: [1, 1, 1]
                }
            };

            const program1 = new Program(gl, {
                vertex,
                fragment,
                uniforms: {
                    ambientLight,
                    materialReflection: {value: [250/255, 128/255, 114/255]},
                    ...directional
                },
            });
            const program2 = new Program(gl, {
                vertex,
                fragment,
                uniforms: {
                    ambientLight,
                    materialReflection: {value: [218/255, 165/255, 32/255]},
                    ...directional
                },
            });
            const program3 = new Program(gl, {
                vertex,
                fragment,
                uniforms: {
                    ambientLight,
                    materialReflection: {value: [46/255, 139/255, 87/255]},
                    ...directional
                },
            });
            const program4 = new Program(gl, {
                vertex,
                fragment,
                uniforms: {
                    ambientLight,
                    materialReflection: {value: [106/255, 90/255, 205/255]},
                    ...directional
                },
            });

            const torus = new Mesh(gl, {geometry: torusGeometry, program: program1});
            torus.position.set(0, 1.3, 0);
            torus.setParent(scene);

            const sphere = new Mesh(gl, {geometry: sphereGeometry, program: program2});
            sphere.position.set(1.3, 0, 0);
            sphere.setParent(scene);

            const cube = new Mesh(gl, {geometry: cubeGeometry, program: program3});
            cube.position.set(0, -1.3, 0);
            cube.setParent(scene);

            const cylinder = new Mesh(gl, {geometry: cylinderGeometry, program: program4});
            cylinder.position.set(-1.3, 0, 0);
            cylinder.setParent(scene);

            const controls = new Orbit(camera);

            // 添加动画
            requestAnimationFrame(update);
            function update() {
                requestAnimationFrame(update);
                controls.update();

                torus.rotation.y -= 0.02;
                sphere.rotation.y -= 0.03;
                cube.rotation.y -= 0.04;
                cylinder.rotation.y -= 0.02;

                renderer.render({scene, camera});
            }

            // 添加控制
            const gui = new dat.GUI();
            const palette = {
                light: '#FFFFFF',
                reflection1: '#fa8072', // salmon rgb(250, 128, 114) [250/255, 128/255, 114/255, 1]
                reflection2: '#daa520', // goldenrod rgb(218, 165, 32) [218/255, 165/255, 32/255, 1]
                reflection3: '#2e8b57', // seagreen rgb(46, 139, 87) [46/255, 139/255, 87/255, 1]
                reflection4: '#6a5acd', // slateblue rgb(106, 90, 205) [106/255, 90/255, 205/255, 1]
            };
            gui.addColor(palette, 'light').onChange((val) => {
                const color = new Color(val);
                program1.uniforms.ambientLight.value = color;
                program2.uniforms.ambientLight.value = color;
                program3.uniforms.ambientLight.value = color;
                program4.uniforms.ambientLight.value = color;
            });
            gui.addColor(palette, 'reflection1').onChange((val) => {
                program1.uniforms.materialReflection.value = new Color(val);
            });
            gui.addColor(palette, 'reflection2').onChange((val) => {
                program2.uniforms.materialReflection.value = new Color(val);
            });
            gui.addColor(palette, 'reflection3').onChange((val) => {
                program3.uniforms.materialReflection.value = new Color(val);
            });
            gui.addColor(palette, 'reflection4').onChange((val) => {
                program4.uniforms.materialReflection.value = new Color(val);
            });
        </script>
    </body>
</html>
加了平行光线之后,我们可以感受到明显的阴暗变化,效果如下:
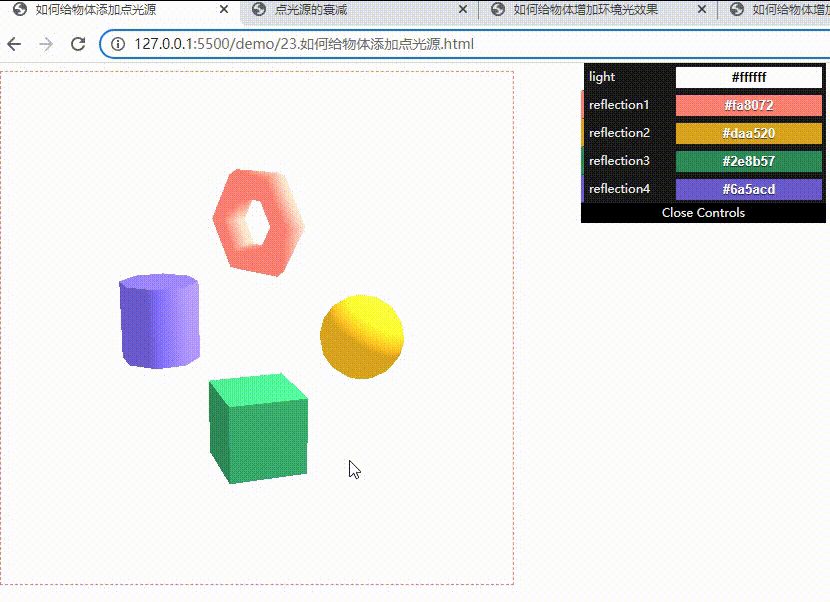
如何给物体添加点光源?
计算点光源的光照,要先根据光源位置和物体表面相对位置来确定方向,然后再和平行光一样,计算光的方向和物体表面法向的夹角。
<!DOCTYPE html>
<html lang="en">
    <head>
        <meta charset="UTF-8" />
        <meta http-equiv="X-UA-Compatible" content="IE=edge" />
        <meta name="viewport" content="width=device-width, initial-scale=1.0" />
        <title>如何给物体添加点光源</title>
        <style>
            canvas {
                border: 1px dashed #fa8072;
            }
        </style>
    </head>
    <body>
        <canvas width="512" height="512"></canvas>
        <script type="module">
            import { Renderer, Camera, Transform, Sphere, Box, Cylinder, Torus, Orbit, Program, Mesh, Color } from './common/lib/ogl/index.mjs';
            // JavaScript Controller Library
            import * as dat from './common/lib/dat.gui.js';
            console.log(dat)

            const canvas = document.querySelector('canvas');
            const renderer = new Renderer({
                canvas,
                width: 512,
                height: 512,
            });

            const gl = renderer.gl;
            gl.clearColor(1, 1, 1, 1);
            const camera = new Camera(gl, {fov: 35});
            camera.position.set(0, 0, 10);
            camera.lookAt([0, 0, 0]);

            const scene = new Transform();

            // 在顶点着色器中,将物体变换后的坐标传给片元着色器
            const vertex = `
                precision highp float;

                attribute vec3 position;
                attribute vec3 normal;
                uniform mat4 modelViewMatrix;
                uniform mat4 projectionMatrix;
                uniform mat3 normalMatrix;

                varying vec3 vNormal;
                varying vec3 vPos;

                void main() {
                    vec4 pos = modelViewMatrix * vec4(position, 1.0);
                    vPos = pos.xyz;
                    vNormal = normalize(normalMatrix * normal);
                    gl_Position = projectionMatrix * pos;
                }
            `;

            // 传入环境光 ambientLight 和材质反射率 materialReflection
            // 片元着色器中计算光线方向与法向量夹角的余弦
            const fragment = `
                precision highp float;

                uniform vec3 ambientLight;
                uniform vec3 materialReflection;
                uniform vec3 pointLightColor;
                uniform vec3 pointLightPosition;
                uniform mat4 viewMatrix;
                uniform vec3 pointLightDecayFactor;

                varying vec3 vNormal;
                varying vec3 vPos;

                void main() {
                    // 光线到点坐标的方向
                    vec3 dir = (viewMatrix * vec4(pointLightPosition, 1.0)).xyz - vPos;

                    // 与法线夹角余弦
                    float cos = max(dot(normalize(dir), vNormal), 0.0);

                    // 计算漫反射
                    vec3 diffuse = cos * pointLightColor;

                    // 合成颜色
                    gl_FragColor.rgb = (ambientLight + diffuse) * materialReflection;
                    gl_FragColor.a = 1.0;
                }
            `;

            // 创建四个不同的几何体,初始化它们的环境光 ambientLight 以及材质反射率 materialReflection
            const sphereGeometry = new Sphere(gl);
            const cubeGeometry = new Box(gl);
            const cylinderGeometry = new Cylinder(gl);
            const torusGeometry = new Torus(gl);

            // 添加一个水平向右的白色平行光
            const ambientLight = { value: [1, 1, 1] };

            const directional = {
                pointLightPosition: {
                    value: [3, 3, 0]
                },
                pointLightColor: {
                    value: [1, 1, 1]
                }
            };

            const program1 = new Program(gl, {
                vertex,
                fragment,
                uniforms: {
                    ambientLight,
                    materialReflection: {value: [250/255, 128/255, 114/255]},
                    ...directional
                },
            });
            const program2 = new Program(gl, {
                vertex,
                fragment,
                uniforms: {
                    ambientLight,
                    materialReflection: {value: [218/255, 165/255, 32/255]},
                    ...directional
                },
            });
            const program3 = new Program(gl, {
                vertex,
                fragment,
                uniforms: {
                    ambientLight,
                    materialReflection: {value: [46/255, 139/255, 87/255]},
                    ...directional
                },
            });
            const program4 = new Program(gl, {
                vertex,
                fragment,
                uniforms: {
                    ambientLight,
                    materialReflection: {value: [106/255, 90/255, 205/255]},
                    ...directional
                },
            });

            const torus = new Mesh(gl, {geometry: torusGeometry, program: program1});
            torus.position.set(0, 1.3, 0);
            torus.setParent(scene);

            const sphere = new Mesh(gl, {geometry: sphereGeometry, program: program2});
            sphere.position.set(1.3, 0, 0);
            sphere.setParent(scene);

            const cube = new Mesh(gl, {geometry: cubeGeometry, program: program3});
            cube.position.set(0, -1.3, 0);
            cube.setParent(scene);

            const cylinder = new Mesh(gl, {geometry: cylinderGeometry, program: program4});
            cylinder.position.set(-1.3, 0, 0);
            cylinder.setParent(scene);

            const controls = new Orbit(camera);

            // 添加动画
            requestAnimationFrame(update);
            function update() {
                requestAnimationFrame(update);
                controls.update();

                torus.rotation.y -= 0.02;
                sphere.rotation.y -= 0.03;
                cube.rotation.y -= 0.04;
                cylinder.rotation.y -= 0.02;

                renderer.render({scene, camera});
            }

            // 添加控制
            const gui = new dat.GUI();
            const palette = {
                light: '#FFFFFF',
                reflection1: '#fa8072', // salmon rgb(250, 128, 114) [250/255, 128/255, 114/255, 1]
                reflection2: '#daa520', // goldenrod rgb(218, 165, 32) [218/255, 165/255, 32/255, 1]
                reflection3: '#2e8b57', // seagreen rgb(46, 139, 87) [46/255, 139/255, 87/255, 1]
                reflection4: '#6a5acd', // slateblue rgb(106, 90, 205) [106/255, 90/255, 205/255, 1]
            };
            gui.addColor(palette, 'light').onChange((val) => {
                const color = new Color(val);
                program1.uniforms.ambientLight.value = color;
                program2.uniforms.ambientLight.value = color;
                program3.uniforms.ambientLight.value = color;
                program4.uniforms.ambientLight.value = color;
            });
            gui.addColor(palette, 'reflection1').onChange((val) => {
                program1.uniforms.materialReflection.value = new Color(val);
            });
            gui.addColor(palette, 'reflection2').onChange((val) => {
                program2.uniforms.materialReflection.value = new Color(val);
            });
            gui.addColor(palette, 'reflection3').onChange((val) => {
                program3.uniforms.materialReflection.value = new Color(val);
            });
            gui.addColor(palette, 'reflection4').onChange((val) => {
                program4.uniforms.materialReflection.value = new Color(val);
            });
        </script>
    </body>
</html>
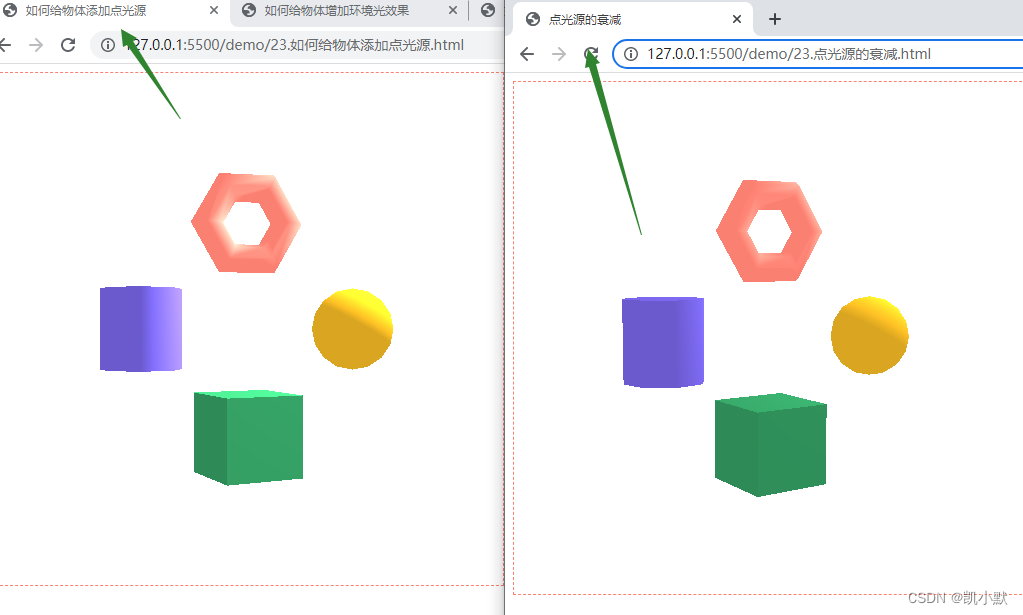
点光源的衰减
真实世界中,点光源的光照强度会随着空间的距离增加而衰减。我们需要模拟一个衰减系数出来。
衰减系数等于一个常量 d 0 d_0 d0(通常为 1),除以衰减函数 P。衰减函数可以用一个二次多项式 P 来描述,公式如下:
- A、B、C 为常量
- z 是当前位置到点光源的距离

然后利用光线到点坐标的距离,用来计算衰减,实现如下:
<!DOCTYPE html>
<html lang="en">
    <head>
        <meta charset="UTF-8" />
        <meta http-equiv="X-UA-Compatible" content="IE=edge" />
        <meta name="viewport" content="width=device-width, initial-scale=1.0" />
        <title>点光源的衰减</title>
        <style>
            canvas {
                border: 1px dashed #fa8072;
            }
        </style>
    </head>
    <body>
        <canvas width="512" height="512"></canvas>
        <script type="module">
            import { Renderer, Camera, Transform, Sphere, Box, Cylinder, Torus, Orbit, Program, Mesh, Color } from './common/lib/ogl/index.mjs';
            // JavaScript Controller Library
            import * as dat from './common/lib/dat.gui.js';
            console.log(dat)

            const canvas = document.querySelector('canvas');
            const renderer = new Renderer({
                canvas,
                width: 512,
                height: 512,
            });

            const gl = renderer.gl;
            gl.clearColor(1, 1, 1, 1);
            const camera = new Camera(gl, {fov: 35});
            camera.position.set(0, 0, 10);
            camera.lookAt([0, 0, 0]);

            const scene = new Transform();

            // 在顶点着色器中,将物体变换后的坐标传给片元着色器
            const vertex = `
                precision highp float;

                attribute vec3 position;
                attribute vec3 normal;
                uniform mat4 modelViewMatrix;
                uniform mat4 projectionMatrix;
                uniform mat3 normalMatrix;

                varying vec3 vNormal;
                varying vec3 vPos;

                void main() {
                    vec4 pos = modelViewMatrix * vec4(position, 1.0);
                    vPos = pos.xyz;
                    vNormal = normalize(normalMatrix * normal);
                    gl_Position = projectionMatrix * pos;
                }
            `;

            // 传入环境光 ambientLight 和材质反射率 materialReflection
            // 片元着色器中计算光线方向与法向量夹角的余弦
            const fragment = `
                precision highp float;

                uniform vec3 ambientLight;
                uniform vec3 materialReflection;
                uniform vec3 pointLightColor;
                uniform vec3 pointLightPosition;
                uniform mat4 viewMatrix;
                uniform vec3 pointLightDecayFactor;

                varying vec3 vNormal;
                varying vec3 vPos;

                void main() {
                    // 光线到点坐标的方向
                    vec3 dir = (viewMatrix * vec4(pointLightPosition, 1.0)).xyz - vPos;

                    // 光线到点坐标的距离,用来计算衰减
                    float dis = length(dir);

                    // 与法线夹角余弦
                    float cos = max(dot(normalize(dir), vNormal), 0.0);

                    // 计算衰减
                    float decay = min(1.0, 1.0 /
                        (pointLightDecayFactor.x * pow(dis, 2.0) + pointLightDecayFactor.y * dis + pointLightDecayFactor.z));

                    // 计算漫反射
                    vec3 diffuse = decay * cos * pointLightColor;

                    // 合成颜色
                    gl_FragColor.rgb = (ambientLight + diffuse) * materialReflection;
                    gl_FragColor.a = 1.0;
                }
            `;

            // 创建四个不同的几何体,初始化它们的环境光 ambientLight 以及材质反射率 materialReflection
            const sphereGeometry = new Sphere(gl);
            const cubeGeometry = new Box(gl);
            const cylinderGeometry = new Cylinder(gl);
            const torusGeometry = new Torus(gl);

            // 添加一个水平向右的白色平行光
            const ambientLight = { value: [1, 1, 1] };

            const directional = {
                pointLightPosition: {
                    value: [3, 3, 0]
                },
                pointLightColor: {
                    value: [1, 1, 1]
                },
                pointLightDecayFactor: { value: [0.08, 0, 1] },
            };

            const program1 = new Program(gl, {
                vertex,
                fragment,
                uniforms: {
                    ambientLight,
                    materialReflection: {value: [250/255, 128/255, 114/255]},
                    ...directional
                },
            });
            const program2 = new Program(gl, {
                vertex,
                fragment,
                uniforms: {
                    ambientLight,
                    materialReflection: {value: [218/255, 165/255, 32/255]},
                    ...directional
                },
            });
            const program3 = new Program(gl, {
                vertex,
                fragment,
                uniforms: {
                    ambientLight,
                    materialReflection: {value: [46/255, 139/255, 87/255]},
                    ...directional
                },
            });
            const program4 = new Program(gl, {
                vertex,
                fragment,
                uniforms: {
                    ambientLight,
                    materialReflection: {value: [106/255, 90/255, 205/255]},
                    ...directional
                },
            });

            const torus = new Mesh(gl, {geometry: torusGeometry, program: program1});
            torus.position.set(0, 1.3, 0);
            torus.setParent(scene);

            const sphere = new Mesh(gl, {geometry: sphereGeometry, program: program2});
            sphere.position.set(1.3, 0, 0);
            sphere.setParent(scene);

            const cube = new Mesh(gl, {geometry: cubeGeometry, program: program3});
            cube.position.set(0, -1.3, 0);
            cube.setParent(scene);

            const cylinder = new Mesh(gl, {geometry: cylinderGeometry, program: program4});
            cylinder.position.set(-1.3, 0, 0);
            cylinder.setParent(scene);

            const controls = new Orbit(camera);

            // 添加动画
            requestAnimationFrame(update);
            function update() {
                requestAnimationFrame(update);
                controls.update();

                torus.rotation.y -= 0.02;
                sphere.rotation.y -= 0.03;
                cube.rotation.y -= 0.04;
                cylinder.rotation.y -= 0.02;

                renderer.render({scene, camera});
            }

            // 添加控制
            const gui = new dat.GUI();
            const palette = {
                light: '#FFFFFF',
                reflection1: '#fa8072', // salmon rgb(250, 128, 114) [250/255, 128/255, 114/255, 1]
                reflection2: '#daa520', // goldenrod rgb(218, 165, 32) [218/255, 165/255, 32/255, 1]
                reflection3: '#2e8b57', // seagreen rgb(46, 139, 87) [46/255, 139/255, 87/255, 1]
                reflection4: '#6a5acd', // slateblue rgb(106, 90, 205) [106/255, 90/255, 205/255, 1]
            };
            gui.addColor(palette, 'light').onChange((val) => {
                const color = new Color(val);
                program1.uniforms.ambientLight.value = color;
                program2.uniforms.ambientLight.value = color;
                program3.uniforms.ambientLight.value = color;
                program4.uniforms.ambientLight.value = color;
            });
            gui.addColor(palette, 'reflection1').onChange((val) => {
                program1.uniforms.materialReflection.value = new Color(val);
            });
            gui.addColor(palette, 'reflection2').onChange((val) => {
                program2.uniforms.materialReflection.value = new Color(val);
            });
            gui.addColor(palette, 'reflection3').onChange((val) => {
                program3.uniforms.materialReflection.value = new Color(val);
            });
            gui.addColor(palette, 'reflection4').onChange((val) => {
                program4.uniforms.materialReflection.value = new Color(val);
            });
        </script>
    </body>
</html>
衰减对比效果如下:光线强度随着距离衰减,可以右边较远的几何体几乎没有光照。
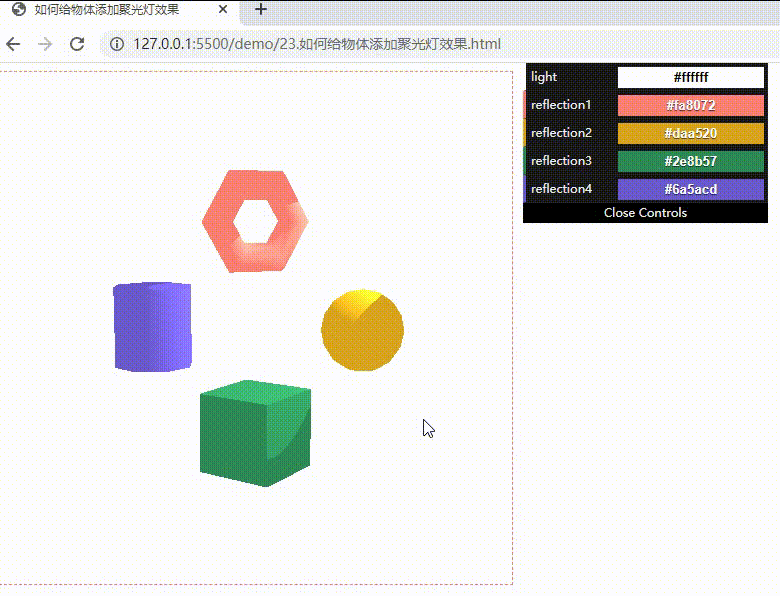
如何给物体添加聚光灯效果?
与点光源相比,聚光灯相对来说比较复杂,要用 5 个参数来描述:
spotLightColor聚光灯颜色spotLightPosition聚光灯位置spotLightDecayFactor聚光灯衰减系数spotLightDirection聚光灯方向spotLightAngle聚光灯角度
利用聚光灯方向和角度,就可以求法向量与光线方向夹角的余弦值,这个值可以判断坐标是否在夹角内,最终的光照效果就只会出现在光照的角度内。
<!DOCTYPE html>
<html lang="en">
    <head>
        <meta charset="UTF-8" />
        <meta http-equiv="X-UA-Compatible" content="IE=edge" />
        <meta name="viewport" content="width=device-width, initial-scale=1.0" />
        <title>如何给物体添加聚光灯效果</title>
        <style>
            canvas {
                border: 1px dashed #fa8072;
            }
        </style>
    </head>
    <body>
        <canvas width="512" height="512"></canvas>
        <script type="module">
            import { Renderer, Camera, Transform, Sphere, Box, Cylinder, Torus, Orbit, Program, Mesh, Color } from './common/lib/ogl/index.mjs';
            // JavaScript Controller Library
            import * as dat from './common/lib/dat.gui.js';
            console.log(dat)

            const canvas = document.querySelector('canvas');
            const renderer = new Renderer({
                canvas,
                width: 512,
                height: 512,
            });

            const gl = renderer.gl;
            gl.clearColor(1, 1, 1, 1);
            const camera = new Camera(gl, {fov: 35});
            camera.position.set(0, 0, 10);
            camera.lookAt([0, 0, 0]);

            const scene = new Transform();

            // 在顶点着色器中,将物体变换后的坐标传给片元着色器
            const vertex = `
                precision highp float;

                attribute vec3 position;
                attribute vec3 normal;
                uniform mat4 modelViewMatrix;
                uniform mat4 projectionMatrix;
                uniform mat3 normalMatrix;

                varying vec3 vNormal;
                varying vec3 vPos;

                void main() {
                    vec4 pos = modelViewMatrix * vec4(position, 1.0);
                    vPos = pos.xyz;
                    vNormal = normalize(normalMatrix * normal);
                    gl_Position = projectionMatrix * pos;
                }
            `;

            // 传入环境光 ambientLight 和材质反射率 materialReflection
            // 片元着色器中求法向量与光线方向夹角的余弦值
            const fragment = `
                precision highp float;

                uniform mat4 viewMatrix;
                uniform vec3 ambientLight;
                uniform vec3 materialReflection;
                uniform vec3 spotLightColor;
                uniform vec3 spotLightPosition;
                uniform vec3 spotLightDecayFactor;
                uniform vec3 spotLightDirection;
                uniform float spotLightAngle;

                varying vec3 vNormal;
                varying vec3 vPos;

                void main() {
                    // 光线到点坐标的方向
                    vec3 invLight = (viewMatrix * vec4(spotLightPosition, 1.0)).xyz - vPos;
                    vec3 invNormal = normalize(invLight);

                    // 光线到点坐标的距离,用来计算衰减
                    float dis = length(invLight);

                    // 聚光灯的朝向
                    vec3 dir = (viewMatrix * vec4(spotLightDirection, 0.0)).xyz;

                    // 通过余弦值判断夹角范围
                    float ang = cos(spotLightAngle);
                    float r = step(ang, dot(invNormal, normalize(-dir)));

                    // 与法线夹角余弦
                    float cos = max(dot(invNormal, vNormal), 0.0);
                    // 计算衰减
                    float decay = min(1.0, 1.0 /
                        (spotLightDecayFactor.x * pow(dis, 2.0) + spotLightDecayFactor.y * dis + spotLightDecayFactor.z));

                    // 计算漫反射
                    vec3 diffuse = r * decay * cos * spotLightColor;

                    // 合成颜色
                    gl_FragColor.rgb = (ambientLight + diffuse) * materialReflection;
                    gl_FragColor.a = 1.0;
                }
            `;

            // 创建四个不同的几何体,初始化它们的环境光 ambientLight 以及材质反射率 materialReflection
            const sphereGeometry = new Sphere(gl);
            const cubeGeometry = new Box(gl);
            const cylinderGeometry = new Cylinder(gl);
            const torusGeometry = new Torus(gl);

            // 添加一个水平向右的白色平行光
            const ambientLight = { value: [1, 1, 1] };

            const directional = {
                spotLightPosition: { value: [3, 3, 0] },
                spotLightColor: { value: [1, 1, 1] },
                spotLightDecayFactor: { value: [0.05, 0, 1] },
                spotLightDirection: { value: [-1, -1, 0] },
                spotLightAngle: { value: Math.PI / 12 },
            };

            const program1 = new Program(gl, {
                vertex,
                fragment,
                uniforms: {
                    ambientLight,
                    materialReflection: {value: [250/255, 128/255, 114/255]},
                    ...directional
                },
            });
            const program2 = new Program(gl, {
                vertex,
                fragment,
                uniforms: {
                    ambientLight,
                    materialReflection: {value: [218/255, 165/255, 32/255]},
                    ...directional
                },
            });
            const program3 = new Program(gl, {
                vertex,
                fragment,
                uniforms: {
                    ambientLight,
                    materialReflection: {value: [46/255, 139/255, 87/255]},
                    ...directional
                },
            });
            const program4 = new Program(gl, {
                vertex,
                fragment,
                uniforms: {
                    ambientLight,
                    materialReflection: {value: [106/255, 90/255, 205/255]},
                    ...directional
                },
            });

            const torus = new Mesh(gl, {geometry: torusGeometry, program: program1});
            torus.position.set(0, 1.3, 0);
            torus.setParent(scene);

            const sphere = new Mesh(gl, {geometry: sphereGeometry, program: program2});
            sphere.position.set(1.3, 0, 0);
            sphere.setParent(scene);

            const cube = new Mesh(gl, {geometry: cubeGeometry, program: program3});
            cube.position.set(0, -1.3, 0);
            cube.setParent(scene);

            const cylinder = new Mesh(gl, {geometry: cylinderGeometry, program: program4});
            cylinder.position.set(-1.3, 0, 0);
            cylinder.setParent(scene);

            const controls = new Orbit(camera);

            // 添加动画
            requestAnimationFrame(update);
            function update() {
                requestAnimationFrame(update);
                controls.update();

                torus.rotation.y -= 0.02;
                sphere.rotation.y -= 0.03;
                cube.rotation.y -= 0.04;
                cylinder.rotation.y -= 0.02;

                renderer.render({scene, camera});
            }

            // 添加控制
            const gui = new dat.GUI();
            const palette = {
                light: '#FFFFFF',
                reflection1: '#fa8072', // salmon rgb(250, 128, 114) [250/255, 128/255, 114/255, 1]
                reflection2: '#daa520', // goldenrod rgb(218, 165, 32) [218/255, 165/255, 32/255, 1]
                reflection3: '#2e8b57', // seagreen rgb(46, 139, 87) [46/255, 139/255, 87/255, 1]
                reflection4: '#6a5acd', // slateblue rgb(106, 90, 205) [106/255, 90/255, 205/255, 1]
            };
            gui.addColor(palette, 'light').onChange((val) => {
                const color = new Color(val);
                program1.uniforms.ambientLight.value = color;
                program2.uniforms.ambientLight.value = color;
                program3.uniforms.ambientLight.value = color;
                program4.uniforms.ambientLight.value = color;
            });
            gui.addColor(palette, 'reflection1').onChange((val) => {
                program1.uniforms.materialReflection.value = new Color(val);
            });
            gui.addColor(palette, 'reflection2').onChange((val) => {
                program2.uniforms.materialReflection.value = new Color(val);
            });
            gui.addColor(palette, 'reflection3').onChange((val) => {
                program3.uniforms.materialReflection.value = new Color(val);
            });
            gui.addColor(palette, 'reflection4').onChange((val) => {
                program4.uniforms.materialReflection.value = new Color(val);
            });
        </script>
    </body>
</html>
大致的效果如下:可以明显的感受到聚光灯的效果


![[附源码]Python计算机毕业设计Django心理健康系统](https://img-blog.csdnimg.cn/0344369b61e54fee84958502112e8e13.png)