参考:
https://github.com/google/mediapipe
https://developers.google.com/mediapipe/solutions/guide
框架也支持cv、nlp、audio等项目,速度很快:

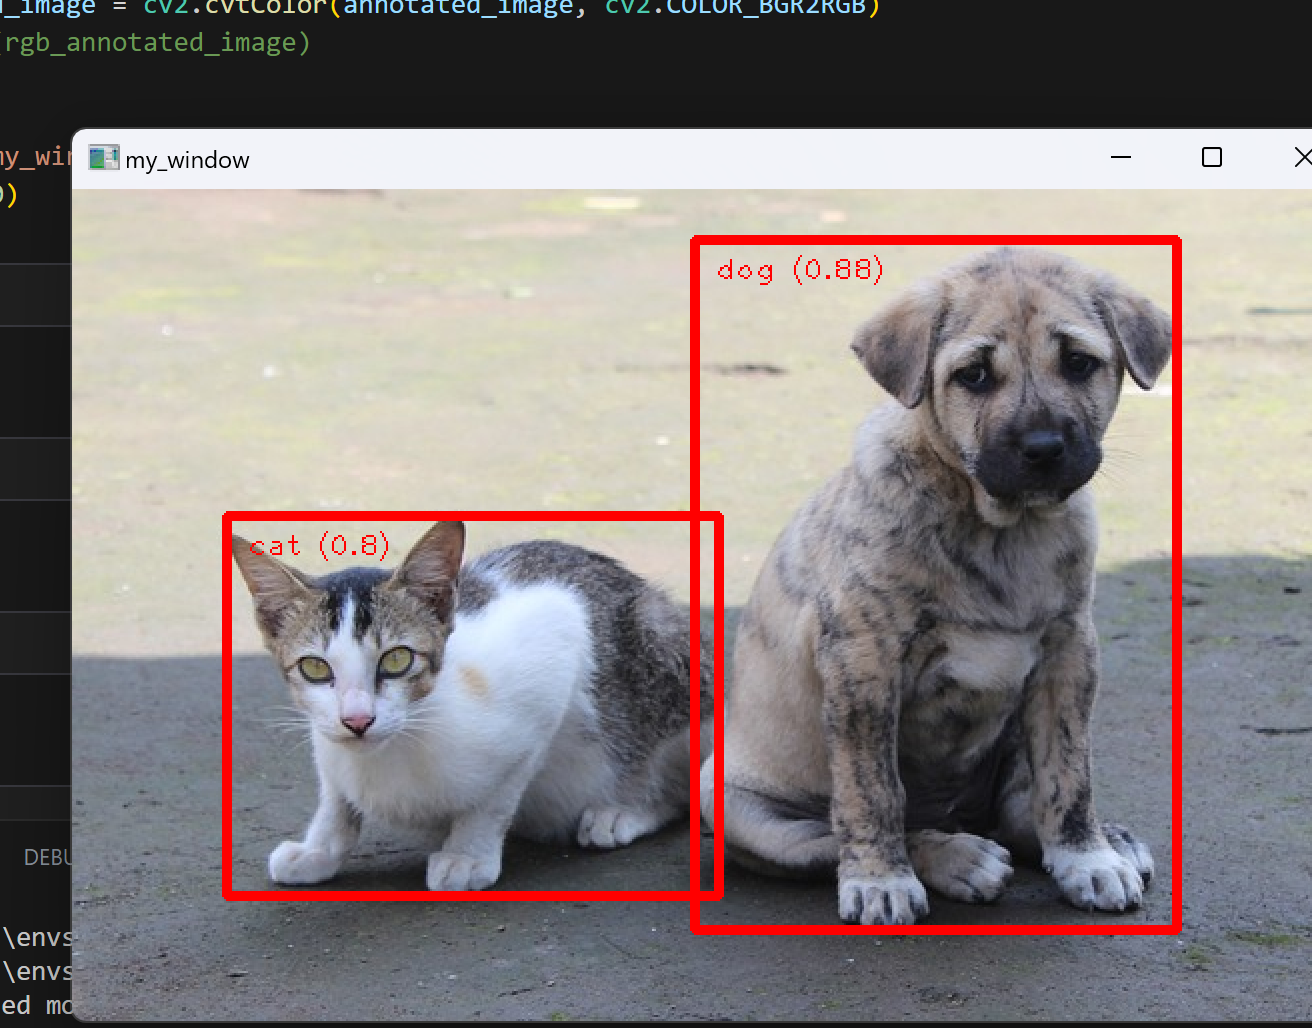
1、图形识别
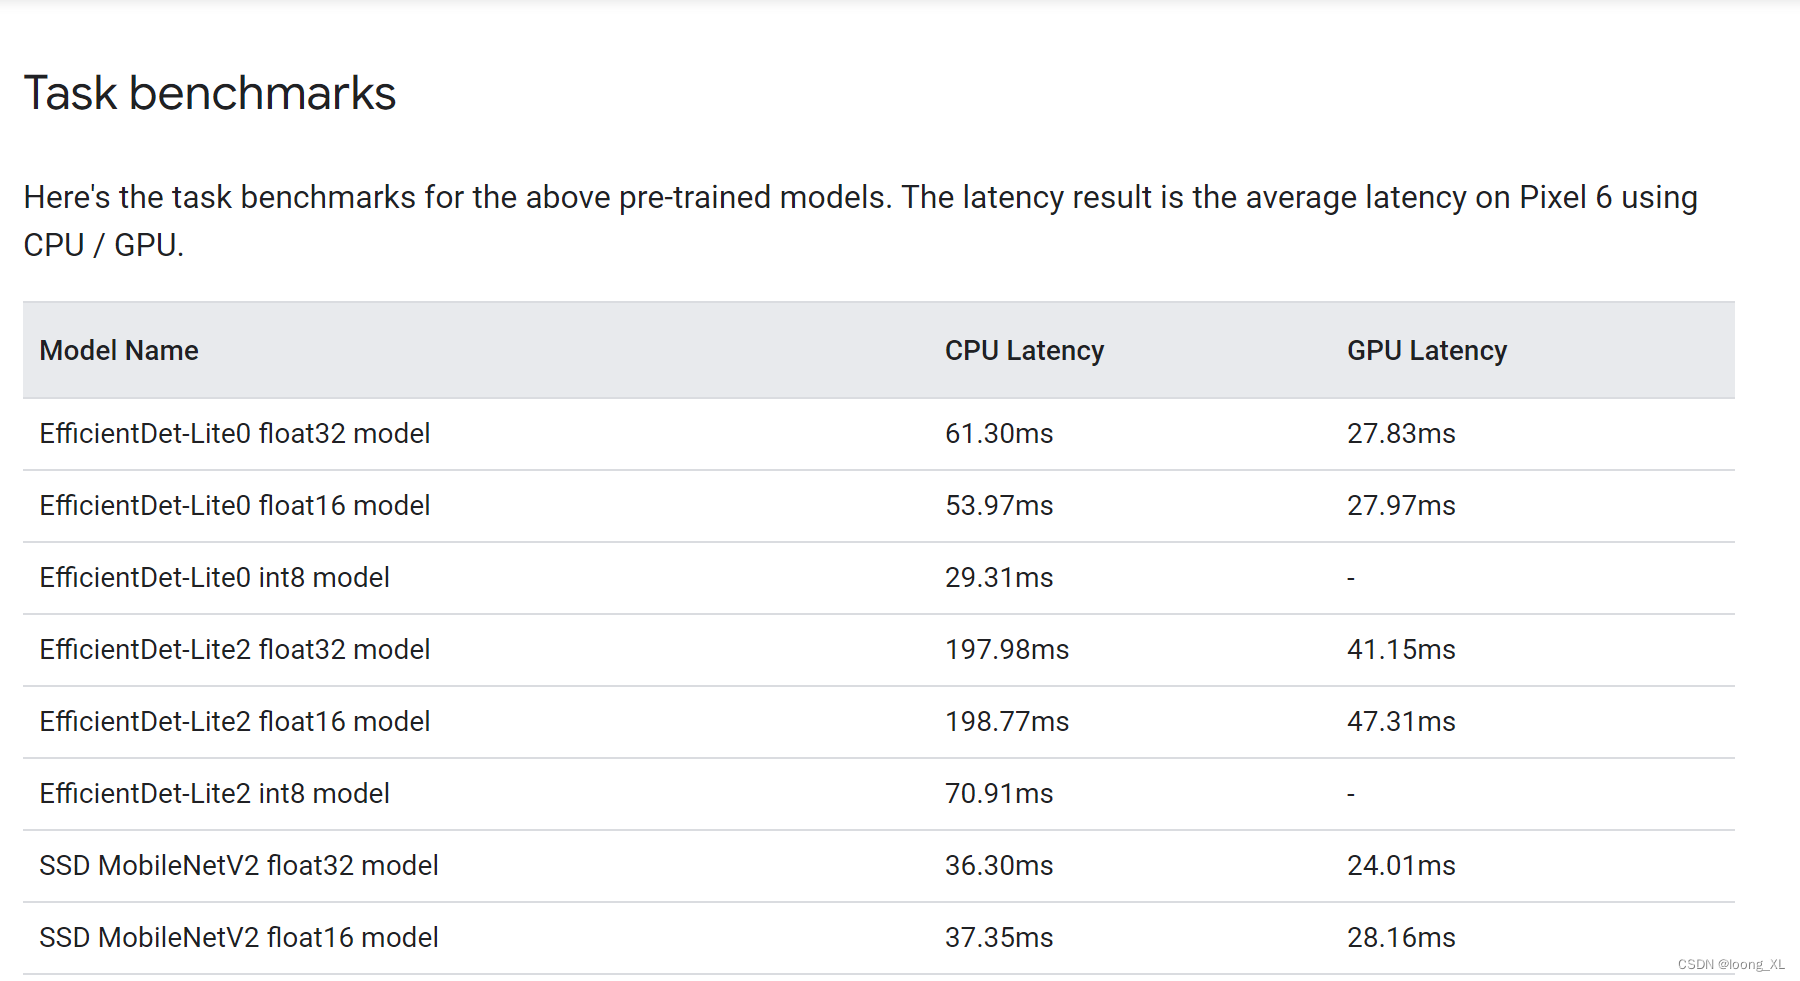
参考:https://developers.google.com/mediapipe/solutions/vision/object_detector/python
https://github.com/google/mediapipe/blob/master/docs/solutions/face_mesh.md
模型下载:https://developers.google.com/mediapipe/solutions/vision/object_detector
代码:
import cv2
import numpy as np

IMAGE_FILE="cat_dog.png"


MARGIN = 10  # pixels
ROW_SIZE = 10  # pixels
FONT_SIZE = 1
FONT_THICKNESS = 1
TEXT_COLOR = (255, 0, 0)  # red


def visualize(
    image,
    detection_result
) -> np.ndarray:
  """Draws bounding boxes on the input image and return it.
  Args:
    image: The input RGB image.
    detection_result: The list of all "Detection" entities to be visualize.
  Returns:
    Image with bounding boxes.
  """
  for detection in detection_result.detections:
    # Draw bounding_box
    bbox = detection.bounding_box
    start_point = bbox.origin_x, bbox.origin_y
    end_point = bbox.origin_x + bbox.width, bbox.origin_y + bbox.height
    cv2.rectangle(image, start_point, end_point, TEXT_COLOR, 3)

    # Draw label and score
    category = detection.categories[0]
    category_name = category.category_name
    probability = round(category.score, 2)
    result_text = category_name + ' (' + str(probability) + ')'
    text_location = (MARGIN + bbox.origin_x,
                     MARGIN + ROW_SIZE + bbox.origin_y)
    cv2.putText(image, result_text, text_location, cv2.FONT_HERSHEY_PLAIN,
                FONT_SIZE, TEXT_COLOR, FONT_THICKNESS)

  return image

# STEP 1: Import the necessary modules.
import numpy as np
import mediapipe as mp
from mediapipe.tasks import python
from mediapipe.tasks.python import vision

# STEP 2: Create an ObjectDetector object.
base_options = python.BaseOptions(model_asset_path='efficientdet_lite0.tflite')
options = vision.ObjectDetectorOptions(base_options=base_options,
                                       score_threshold=0.5)
detector = vision.ObjectDetector.create_from_options(options)

# STEP 3: Load the input image.
image = mp.Image.create_from_file(IMAGE_FILE)

# STEP 4: Detect objects in the input image.
detection_result = detector.detect(image)

# STEP 5: Process the detection result. In this case, visualize it.
image_copy = np.copy(image.numpy_view())
annotated_image = visualize(image_copy, detection_result)
rgb_annotated_image = cv2.cvtColor(annotated_image, cv2.COLOR_BGR2RGB)
# cv2_imshow(rgb_annotated_image)


cv2.imshow('my_window',rgb_annotated_image)
cv2.waitKey(0)
2、人脸检测
只输出检测坐标分类信息,没有向量等信息不可以用于后续人脸库检索,可能需要额外方法提取人脸向量特征
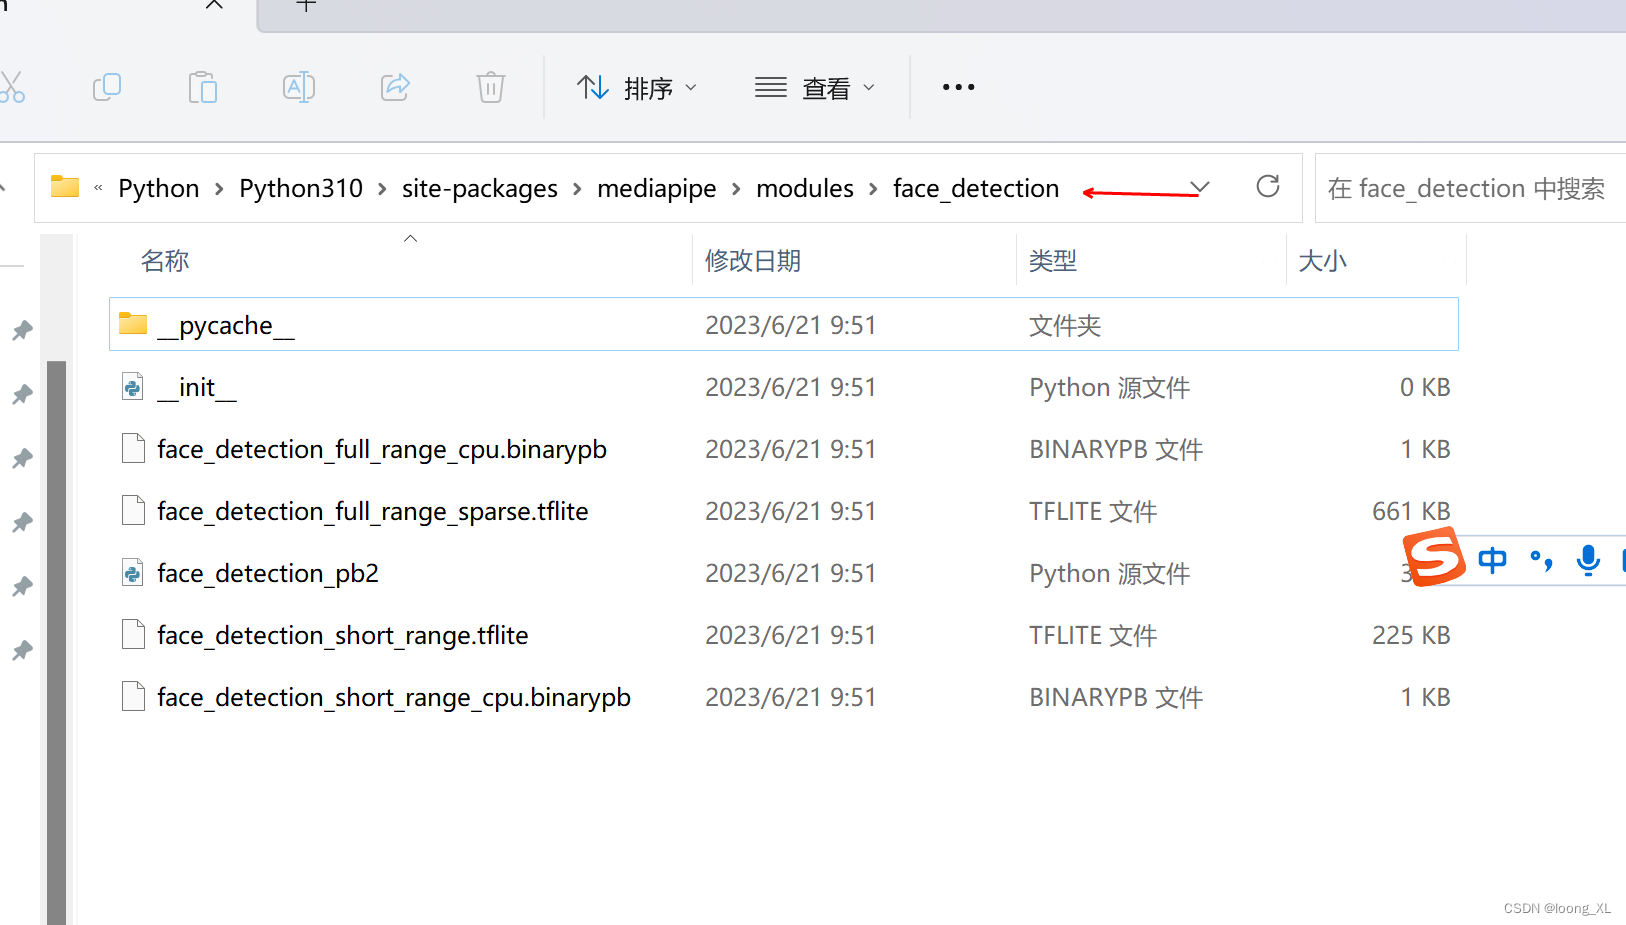
用高阶solutions接口,模型在安装mediapipe时就自动下载到如下modules目录了,solutions现在python支持的方法可以参考:
https://github.com/google/mediapipe/blob/master/docs/solutions/solutions.md

实时人脸 OpenCV摄像头:
import cv2
import time
import mediapipe as mp

class FaceDetector():
    def __init__(self, confidence=0.5, model=0) -> None:
        self.confidence = confidence
        self.model = model

        self.mp_draws = mp.solutions.drawing_utils
        self.mp_faces = mp.solutions.face_detection
        self.faces = self.mp_faces.FaceDetection(min_detection_confidence=confidence, model_selection=model)

    def face_detection(self, image, draw=True, position=False):
        img_rgb = cv2.cvtColor(image, cv2.COLOR_BGR2RGB)
        results = self.faces.process(image)
        lst_box = list()

        if results.detections:
            if draw:
                for id, detection in enumerate(results.detections):
                    h, w, c = image.shape

                    r_bbox = detection.location_data.relative_bounding_box
                    print("-"*20)
                    bbox = int(r_bbox.xmin * w), int(r_bbox.ymin * h), \
                            int(r_bbox.width * w), int(r_bbox.height * h)
                    score = detection.score

                    print(bbox)
                    lst_box.append([id, bbox, score])
                    self.draw_box_detection(image, bbox, score)
                    # self.mp_draws.draw_detection(image, detection)
        return lst_box

    def draw_box_detection(self, image, bbox, score):
        xmin, ymin = bbox[0], bbox[1]
        h, w, c = image.shape
        l = 30

        cv2.rectangle(image, bbox, color=(255, 0, 255),  thickness=1)
        cv2.line(image, (xmin, ymin), (xmin+l, ymin), (255, 0, 255), thickness=5)
        cv2.line(image, (xmin, ymin), (xmin, ymin+l), (255, 0, 255), thickness=5)
        cv2.putText(image, f"{str(int(score[0] * 100))}%", (xmin, ymin - 10),
                    cv2.FONT_HERSHEY_PLAIN, fontScale=1.3,
                    color=(0, 255,0), thickness=1)


def main():
    capture = cv2.VideoCapture(0)
    face_detector = FaceDetector()
    prev_time = 0
    while True:
        sucess, frame = capture.read()
        lst_position = face_detector.face_detection(frame)
        if len(lst_position) != 0:
            print(lst_position[0])

        # calculate fps
        current_time = time.time()
        fps = 1 / (current_time - prev_time)
        prev_time = current_time

        # put fps of video in display
        cv2.putText(frame,  f"{str(int(fps))}", (19, 50),
                    cv2.FONT_HERSHEY_PLAIN, 1.5,
                    (0, 255, 255), thickness=2)

        # display video window
        cv2.imshow("Video Display", frame)
        if cv2.waitKey(1) & 0xFF == ord('q'):
            break

    capture.release()
    cv2.destroyAllWindows()

if __name__ == "__main__":
    main()
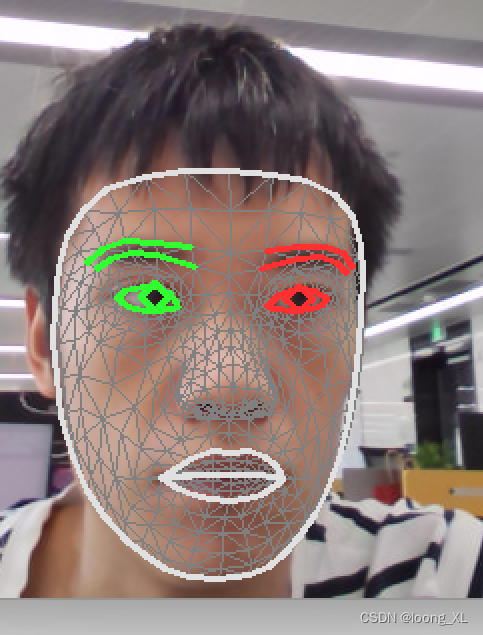
实时人脸mesh(参数设置支持检测人脸数量max_num_faces
Maximum number of faces to detect. Default to 1. ):
with mp_face_mesh.FaceMesh(
max_num_faces=3,
refine_landmarks=True,
min_detection_confidence=0.5,
min_tracking_confidence=0.5) as face_mesh:
import cv2
import time
import mediapipe as mp

class FaceMesh():
    def __init__(self, mode=False, max_face=1,
                 refine_landmarks=False,
                 detect_confidence=0.5, track_confidence=0.5) -> None:
        self.mode = mode
        self.max_face = max_face
        self.refine_landmarks = refine_landmarks
        self.detect_confidence = detect_confidence
        self.track_confidence = track_confidence

        self.mp_draws = mp.solutions.drawing_utils
        self.mp_face_mesh = mp.solutions.face_mesh
        self.face_mesh = self.mp_face_mesh.FaceMesh(static_image_mode=self.mode,
                                                max_num_faces=self.max_face,
                                                refine_landmarks=self.refine_landmarks,
                                                min_detection_confidence=self.detect_confidence,
                                                min_tracking_confidence=self.track_confidence)

    def draw_mesh(self, image, thickness=1, circle_radius=1, color=(0,255, 0)):
        draw_spec = self.mp_draws.DrawingSpec(thickness=thickness, circle_radius=circle_radius, color=color)
        img_rgb = cv2.cvtColor(image, cv2.COLOR_BGR2RGB)
        results = self.face_mesh.process(img_rgb)
        lst_mark = list()

        if results.multi_face_landmarks:
            h, w, c = image.shape
            for face_id, landmarks in enumerate(results.multi_face_landmarks):
                self.mp_draws.draw_landmarks(image, landmarks,
                                             self.mp_face_mesh.FACEMESH_FACE_OVAL, draw_spec)
                for id,mark in enumerate(landmarks.landmark):
                    cx, cy = mark.x, mark.y
                    lst_mark.append([face_id, id, cx, cy])

        return lst_mark


def main():
    capture = cv2.VideoCapture(0)
    face_mesh = FaceMesh()
    prev_time = 0
    while True:
        sucess, frame = capture.read()
        lst_position = face_mesh.draw_mesh(frame)
        if len(lst_position) != 0:
            print(lst_position[0])

        # calculate fps
        current_time = time.time()
        fps = 1 / (current_time - prev_time)
        prev_time = current_time

        # put fps of video in display
        cv2.putText(frame,  f"{str(int(fps))}", (19, 50), cv2.FONT_HERSHEY_PLAIN, 1.5, (0, 255, 255), thickness=2)

        # display video window
        cv2.imshow("Video Display", frame)
        if cv2.waitKey(1) & 0xFF == ord('q'):
            break

    capture.release()
    cv2.destroyAllWindows()

if __name__ == "__main__":
    main()
import cv2
import mediapipe as mp
mp_drawing = mp.solutions.drawing_utils
mp_drawing_styles = mp.solutions.drawing_styles
mp_face_mesh = mp.solutions.face_mesh

# For static images:
IMAGE_FILES = []
drawing_spec = mp_drawing.DrawingSpec(thickness=1, circle_radius=1)
with mp_face_mesh.FaceMesh(
    static_image_mode=True,
    max_num_faces=1,
    refine_landmarks=True,
    min_detection_confidence=0.5) as face_mesh:
  for idx, file in enumerate(IMAGE_FILES):
    image = cv2.imread(file)
    # Convert the BGR image to RGB before processing.
    results = face_mesh.process(cv2.cvtColor(image, cv2.COLOR_BGR2RGB))

    # Print and draw face mesh landmarks on the image.
    if not results.multi_face_landmarks:
      continue
    annotated_image = image.copy()
    for face_landmarks in results.multi_face_landmarks:
      print('face_landmarks:', face_landmarks)
      mp_drawing.draw_landmarks(
          image=annotated_image,
          landmark_list=face_landmarks,
          connections=mp_face_mesh.FACEMESH_TESSELATION,
          landmark_drawing_spec=None,
          connection_drawing_spec=mp_drawing_styles
          .get_default_face_mesh_tesselation_style())
      mp_drawing.draw_landmarks(
          image=annotated_image,
          landmark_list=face_landmarks,
          connections=mp_face_mesh.FACEMESH_CONTOURS,
          landmark_drawing_spec=None,
          connection_drawing_spec=mp_drawing_styles
          .get_default_face_mesh_contours_style())
      mp_drawing.draw_landmarks(
          image=annotated_image,
          landmark_list=face_landmarks,
          connections=mp_face_mesh.FACEMESH_IRISES,
          landmark_drawing_spec=None,
          connection_drawing_spec=mp_drawing_styles
          .get_default_face_mesh_iris_connections_style())
    cv2.imwrite('/tmp/annotated_image' + str(idx) + '.png', annotated_image)

# For webcam input:
drawing_spec = mp_drawing.DrawingSpec(thickness=1, circle_radius=1)
cap = cv2.VideoCapture(0)
with mp_face_mesh.FaceMesh(
    max_num_faces=1,
    refine_landmarks=True,
    min_detection_confidence=0.5,
    min_tracking_confidence=0.5) as face_mesh:
  while cap.isOpened():
    success, image = cap.read()
    if not success:
      print("Ignoring empty camera frame.")
      # If loading a video, use 'break' instead of 'continue'.
      continue

    # To improve performance, optionally mark the image as not writeable to
    # pass by reference.
    image.flags.writeable = False
    image = cv2.cvtColor(image, cv2.COLOR_BGR2RGB)
    results = face_mesh.process(image)

    # Draw the face mesh annotations on the image.
    image.flags.writeable = True
    image = cv2.cvtColor(image, cv2.COLOR_RGB2BGR)
    if results.multi_face_landmarks:
      for face_landmarks in results.multi_face_landmarks:
        mp_drawing.draw_landmarks(
            image=image,
            landmark_list=face_landmarks,
            connections=mp_face_mesh.FACEMESH_TESSELATION,
            landmark_drawing_spec=None,
            connection_drawing_spec=mp_drawing_styles
            .get_default_face_mesh_tesselation_style())
        mp_drawing.draw_landmarks(
            image=image,
            landmark_list=face_landmarks,
            connections=mp_face_mesh.FACEMESH_CONTOURS,
            landmark_drawing_spec=None,
            connection_drawing_spec=mp_drawing_styles
            .get_default_face_mesh_contours_style())
        mp_drawing.draw_landmarks(
            image=image,
            landmark_list=face_landmarks,
            connections=mp_face_mesh.FACEMESH_IRISES,
            landmark_drawing_spec=None,
            connection_drawing_spec=mp_drawing_styles
            .get_default_face_mesh_iris_connections_style())
    # Flip the image horizontally for a selfie-view display.
    cv2.imshow('MediaPipe Face Mesh', cv2.flip(image, 1))
    if cv2.waitKey(5) & 0xFF == 27:
      break
cap.release()
3、人体关键点检测
参考:https://www.hackersrealm.net/post/realtime-human-pose-estimation-using-python
https://github.com/realsanjeev/Object-Detection-using-OpenCV
https://github.com/google/mediapipe/blob/master/docs/solutions/pose.md
import cv2
import mediapipe as mp
import time

class PoseDetector():
    def __init__(self, mode=False, complexity=1, smooth_landmarks=True,
                 enable_segmentation=False, smooth_segmentation=True,
                 detection_confidence=0.5, tracking_confidence=0.5) -> None:
        self.mode = mode
        self.complexity = complexity
        self.smooth_landmarks = smooth_landmarks
        self.enable_segmentation = enable_segmentation
        self.smooth_segmentations = smooth_segmentation
        self.detection_confidence = detection_confidence
        self.tracking_confidence = tracking_confidence

        self.mp_pose = mp.solutions.pose
        self.mp_draw = mp.solutions.drawing_utils
        self.poses = self.mp_pose.Pose(static_image_mode=self.mode,
                                  model_complexity=self.complexity,
                                  smooth_landmarks=self.smooth_landmarks,
                                  enable_segmentation=self.enable_segmentation,
                                  smooth_segmentation=self.smooth_segmentations,
                                  min_detection_confidence=self.detection_confidence,
                                  min_tracking_confidence=self.tracking_confidence
                                  )


    def findPose(self, image, draw=True, postion_mark=False):
        img_rgb = cv2.cvtColor(image, cv2.COLOR_BGR2RGB)
        results = self.poses.process(img_rgb)
        lst_mark_postion = list()
        if results.pose_landmarks:
            if draw:
                self.mp_draw.draw_landmarks(image, results.pose_landmarks,
                                            self.mp_pose.POSE_CONNECTIONS)

        if postion_mark:
            for id, mark in enumerate(results.pose_landmarks.landmark):
                h, w, c = image.shape
                cx, cy = int(mark.x * w), int(mark.y * h)
                lst_mark_postion.append([id, cx, cy])
        return lst_mark_postion


pose_detector = PoseDetector()
cap = cv2.VideoCapture(0)

while cap.isOpened():
    # read frame
    _, frame = cap.read()
    try:
         # resize the frame for portrait video
        #  frame = cv2.resize(frame, (350, 600))
         # convert to RGB
         frame_rgb = cv2.cvtColor(frame, cv2.COLOR_BGR2RGB)

         # process the frame for pose detection
         pose_results = pose_detector.poses.process(frame_rgb)
         # print(pose_results.pose_landmarks)

         # draw skeleton on the frame
         pose_detector.mp_draw.draw_landmarks(frame, pose_results.pose_landmarks, pose_detector.mp_pose.POSE_CONNECTIONS)
         # display the frame
         cv2.imshow('Output', frame)
    except:
        break

    if cv2.waitKey(1) == ord('q'):
        break

cap.release()
cv2.destroyAllWindows()
4、手部关键点检测
# opencv-python
import cv2
# mediapipe人工智能工具包
import mediapipe as mp
# 进度条库
from tqdm import tqdm
# 时间库
import time


# 导入solution
mp_hands = mp.solutions.hands
# 导入模型
hands = mp_hands.Hands(static_image_mode=False,        # 是静态图片还是连续视频帧
                       max_num_hands=2,                # 最多检测几只手
                       min_detection_confidence=0.7,   # 置信度阈值
                       min_tracking_confidence=0.5)    # 追踪阈值
# 导入绘图函数
mpDraw = mp.solutions.drawing_utils

def process_frame(img):


    # 记录该帧开始处理的时间
    start_time = time.time()

    # 获取图像宽高
    h, w = img.shape[0], img.shape[1]

    # 水平镜像翻转图像,使图中左右手与真实左右手对应
    # 参数 1:水平翻转,0:竖直翻转,-1:水平和竖直都翻转
    img = cv2.flip(img, 1)
    # BGR转RGB
    img_RGB = cv2.cvtColor(img, cv2.COLOR_BGR2RGB)

    # 将RGB图像输入模型,获取预测结果
    results = hands.process(img_RGB)

    if results.multi_hand_landmarks: # 如果有检测到手

        handness_str = ''
        index_finger_tip_str = ''
        for hand_idx in range(len(results.multi_hand_landmarks)):

            # 获取该手的21个关键点坐标
            hand_21 = results.multi_hand_landmarks[hand_idx]

            # 可视化关键点及骨架连线
            mpDraw.draw_landmarks(img, hand_21, mp_hands.HAND_CONNECTIONS)

            # 记录左右手信息
            temp_handness = results.multi_handedness[hand_idx].classification[0].label
            handness_str += '{}:{} '.format(hand_idx, temp_handness)

            # 获取手腕根部深度坐标
            cz0 = hand_21.landmark[0].z

            for i in range(21): # 遍历该手的21个关键点

                # 获取3D坐标
                cx = int(hand_21.landmark[i].x * w)
                cy = int(hand_21.landmark[i].y * h)
                cz = hand_21.landmark[i].z
                depth_z = cz0 - cz

                # 用圆的半径反映深度大小
                radius = max(int(6 * (1 + depth_z*5)), 0)

                if i == 0: # 手腕
                    img = cv2.circle(img,(cx,cy), radius, (0,0,255), -1)
                if i == 8: # 食指指尖
                    img = cv2.circle(img,(cx,cy), radius, (193,182,255), -1)
                    # 将相对于手腕的深度距离显示在画面中
                    index_finger_tip_str += '{}:{:.2f} '.format(hand_idx, depth_z)
                if i in [1,5,9,13,17]: # 指根
                    img = cv2.circle(img,(cx,cy), radius, (16,144,247), -1)
                if i in [2,6,10,14,18]: # 第一指节
                    img = cv2.circle(img,(cx,cy), radius, (1,240,255), -1)
                if i in [3,7,11,15,19]: # 第二指节
                    img = cv2.circle(img,(cx,cy), radius, (140,47,240), -1)
                if i in [4,12,16,20]: # 指尖(除食指指尖)
                    img = cv2.circle(img,(cx,cy), radius, (223,155,60), -1)

        scaler = 1
        img = cv2.putText(img, handness_str, (25 * scaler, 100 * scaler), cv2.FONT_HERSHEY_SIMPLEX, 1.25 * scaler, (255, 0, 255), 2 * scaler)
        img = cv2.putText(img, index_finger_tip_str, (25 * scaler, 150 * scaler), cv2.FONT_HERSHEY_SIMPLEX, 1.25 * scaler, (255, 0, 255), 2 * scaler)

        # 记录该帧处理完毕的时间
        end_time = time.time()
        # 计算每秒处理图像帧数FPS
        FPS = 1/(end_time - start_time)

        # 在图像上写FPS数值,参数依次为:图片,添加的文字,左上角坐标,字体,字体大小,颜色,字体粗细
        img = cv2.putText(img, 'FPS  '+str(int(FPS)), (25 * scaler, 50 * scaler), cv2.FONT_HERSHEY_SIMPLEX, 1.25 * scaler, (255, 0, 255), 2 * scaler)
    return img


# 调用摄像头逐帧实时处理模板
# 不需修改任何代码,只需定义process_frame函数即可


# 导入opencv-python
import cv2
import time

# 获取摄像头,传入0表示获取系统默认摄像头
cap = cv2.VideoCapture(0)

# 打开cap
cap.open(0)

# 无限循环,直到break被触发
while cap.isOpened():
    # 获取画面
    success, frame = cap.read()
    if not success:
        break

    ## !!!处理帧函数
    frame = process_frame(frame)

    # 展示处理后的三通道图像
    cv2.imshow('my_window', frame)

    if cv2.waitKey(1) in [ord('q'),27]: # 按键盘上的q或esc退出(在英文输入法下)
        break

# 关闭摄像头
cap.release()

# 关闭图像窗口
cv2.destroyAllWindows()


![数据结构07:查找[C++][朴素二叉排序树BST]](https://img-blog.csdnimg.cn/bee9c8852b0241bbbb517307232303b7.png)