欢迎关注「全栈工程师修炼指南」公众号
点击 👇 下方卡片 即可关注我哟!
设为「星标⭐」每天带你 基础入门 到 进阶实践 再到 放弃学习!
专注 企业运维实践、网络安全、系统运维、应用开发、物联网实战、全栈文章 等知识分享
“ 花开堪折直须折,莫待无花空折枝。 ”
作者主页:[ https://www.weiyigeek.top ]
博客:[ https://blog.weiyigeek.top ]
作者<安全开发运维>答疑交流群,回复【学习交流群】即可加入
文章目录:

0x01 如何定义使用静态资源与HTML网页渲染
1.Gin中静态资源映射实践
描述: 此处使用graceful来管理我们的gin服务,能够平滑的停止Gin服务,然后又实践了静态资源映射三种方式的使用。
go get -u gopkg.in/tylerb/graceful.v1
go mod tidy
静态资源映射三种方式
router.Static 指定某个目录为静态资源目录,可直接访问这个目录下的资源,url 要具体到资源名称。
router.StaticFS 比前面一个多了个功能,当目录下不存 index.html 文件时,会列出该目录下的所有文件。
router.StaticFile 指定某个具体的文件作为静态资源访问。
静态目录常规示例
# Linux Bash
mkdir -vp ./static/dist/assets/{css,js,img} ./storage/app/public
mkdir -vp ./templates/{index,posts,users}

# Windows PowerShell
mkdir ./static/dist/assets/css
mkdir ./static/dist/assets/js
mkdir ./static/dist/assets/img
mkdir ./storage/app/public
# mkdir ./templates/{index,posts,users}
代码示例:
package main

import (
	"context"
	"fmt"
	"html/template"
	"log"
	"net/http"
	"os"
	"os/signal"
	"syscall"
	"time"

	"github.com/gin-gonic/gin"
	"gopkg.in/tylerb/graceful.v1"
)

func main() {
	router := gin.Default()
	// 1.静态资源映射
	// 前端项目静态资源
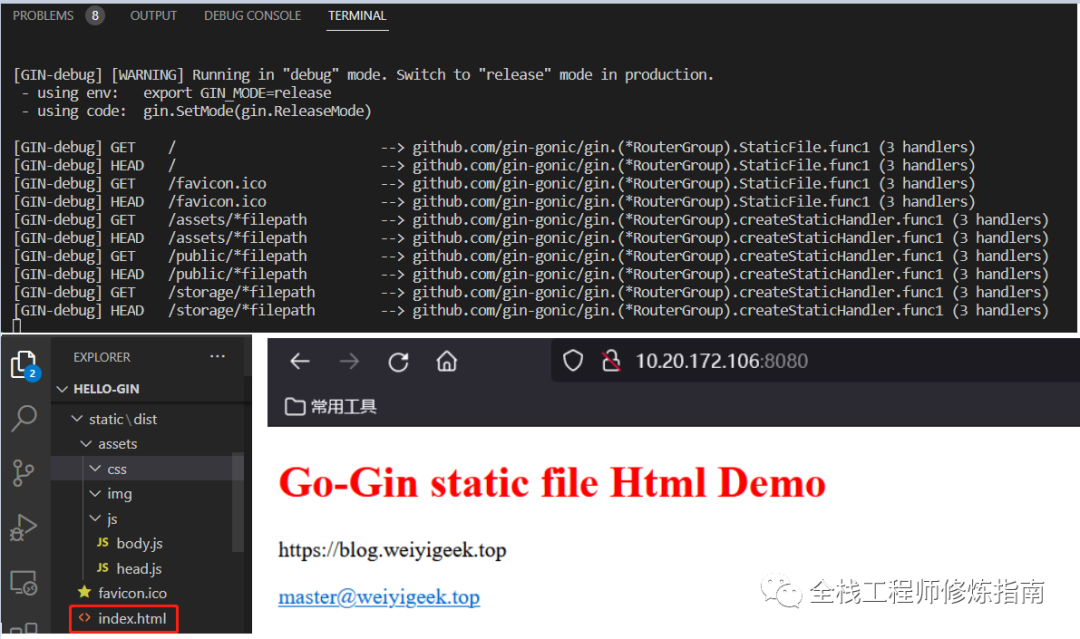
	router.StaticFile("/", "./static/dist/index.html")
	router.StaticFile("/favicon.ico", "./static/dist/favicon.ico")
	router.Static("/assets", "./static/dist/assets")
	// 其他静态文件资源
	router.Static("/public", "./static")
	router.Static("/storage", "./storage/app/public")

	// 使用 graceful 管理 Gin 服务从而优雅的停止
	srv := &graceful.Server{
		Timeout: 10 * time.Second,
		Server: &http.Server{
			Addr:    ":8080",
			Handler: router,
		},
	}

	// 开启一个goroutine启动服务 启动 HTTP Server
	go func() {
		if err := srv.ListenAndServe(); err != nil && err != http.ErrServerClosed {
			log.Fatalf("listen: %s\n", err)
		}
	}()

	// 等待中断信号
	quit := make(chan os.Signal)
	// kill 默认会发送 syscall.SIGTERM 信号
	// kill -2 发送 syscall.SIGINT 信号,我们常用的Ctrl+C就是触发系统SIGINT信号
	// kill -9 发送 syscall.SIGKILL 信号,但是不能被捕获,所以不需要添加它
	// signal.Notify把收到的 syscall.SIGINT或syscall.SIGTERM 信号转发给quit
	signal.Notify(quit, syscall.SIGINT, syscall.SIGTERM) // 此处不会阻塞
	<-quit                                               // 阻塞在此,当接收到上述两种信号时才会往下执行
	log.Println("Shutdown Server ...")

	// 创建一个 5 秒的超时上下文
	ctx, cancel := context.WithTimeout(context.Background(), 5*time.Second)
	defer cancel()

	// 关闭 HTTP Server
	// 	// 5秒内优雅关闭服务(将未处理完的请求处理完再关闭服务),超过5秒就超时退出
	if err := srv.Shutdown(ctx); err != nil {
		log.Fatal("Server Shutdown:", err)
	}
	log.Println("Server exiting")
}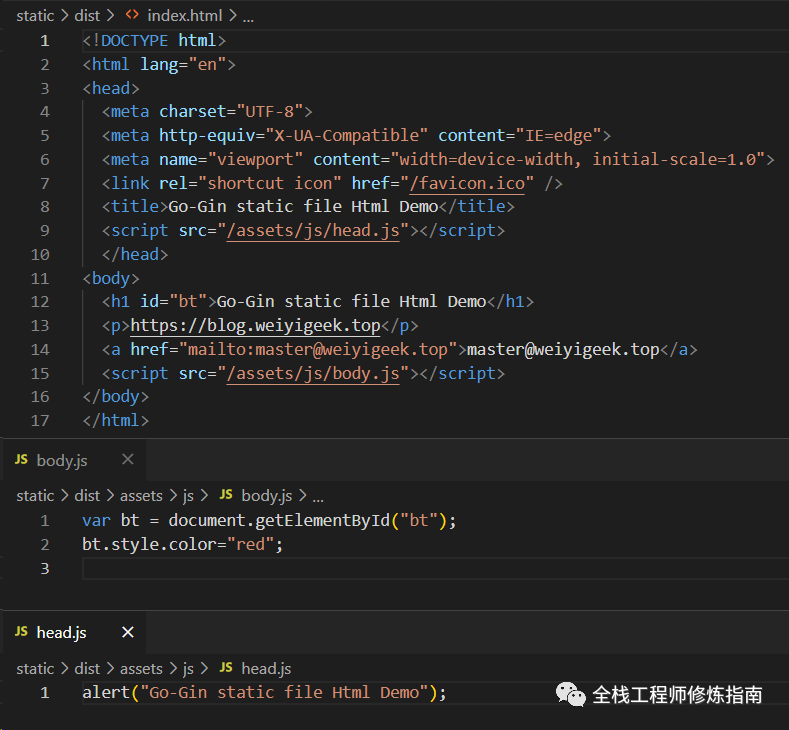
访问效果:
2.Gin中网页HTML渲染实践
描述: 此处仍然在上述main.go中实践添加路由,以及在项目中添加templates模板文件, 模板文件目录结构如下:
│  go.mod
│  go.sum
│  main.go
├─templates
│  ├─index
│  │      index.tmpl
│  ├─posts
│  │      index.tmpl
│  └─users
│          index.tmpl
方式1.使用 LoadHTMLFiles 加载HTML文件的一部分,并将结果与HTML呈现器相关联。
// templates\index\index.tmpl
{{ define "index/index.tmpl" }}
<!DOCTYPE html>
<html lang="en">
<head>
  <meta charset="UTF-8">
  <meta http-equiv="X-UA-Compatible" content="IE=edge">
  <meta name="viewport" content="width=device-width, initial-scale=1.0">
  <title>HTML 渲染 示例1</title>
</head>
<body>
  <h1>{{.title}}</h1>
  <p>HTML 渲染 示例2</p>
</body>
</html>
{{ end }}

// main.go 插入下述代码片段,以及此路由!
router.LoadHTMLFiles("templates/index/index.tmpl")
	router.GET("/index", func(c *gin.Context) {
		c.HTML(http.StatusOK, "index/index.tmpl", gin.H{"title": "HTML 渲染 示例1"})
	})
执行效果:
[GIN] 2023/06/10 - 16:50:28 | 200 |       512.8µs |       127.0.0.1 | GET      "/index"
[GIN] 2023/06/10 - 16:51:04 | 200 |         471µs |       127.0.0.1 | GET      "/index"
方式2.LoadHTMLGlob加载由glob模式标识的HTML文件,并将结果与HTML呈现器相关联,并使用不同目录下名称相同的模板。
// templates\posts\index.tmpl
{{ define "posts/index.tmpl" }}
<!DOCTYPE html>
<html lang="en">
<head>
  <meta charset="UTF-8">
  <meta http-equiv="X-UA-Compatible" content="IE=edge">
  <meta name="viewport" content="width=device-width, initial-scale=1.0">
  <title>HTML 渲染 示例2</title>
</head>
<body>
  <article>
    <h2>{{.title}}</h2>
    <p>{{.page}}</p>
    <span>{{.date}}</span>
  </article>
</body>
</html>
{{ end }}


// main.go 插入下述代码片段,以及此路由!
router.LoadHTMLGlob("templates/**/*") //: 注意其目录层级用**表示,文件用*表示
router.GET("/posts/index", func(c *gin.Context) {
  c.HTML(http.StatusOK, "posts/index.tmpl", gin.H{
    "title": "这是一篇文章标题",
    "page":  "欢迎访问【全栈工程师修炼指南】公众号,以及作者博客站点:https://blog.weiyigeek.top",
    "date":  time.DateTime,
  })
})
执行效果:
温馨提示: 如果模板在多级目录里面的话需要这样配置 r.LoadHTMLGlob("templates/**/**/*") /** 表示目录进行匹配。
方式3.自定义模板功能,即自定义变量分隔符以及模板中变量的处理函数
// templates\users\index.tmpl
{[{ define "users/index.tmpl" }]}
<p>当前日期:</p>
<p>Date: {[{.now | formatAsDate}]}</p>
{[{ end }]}

// 在 main.go 中的main函数中插入下述代码片段,以及此路由!
// 自定义模板功能
// 自定义分隔 (关键点)
router.Delims("{[{", "}]}")
// 自定义模板中的变量函数,此处使用SetFuncMap设置用于template.FuncMap的FuncMap。
router.SetFuncMap(template.FuncMap{
  "formatAsDate": formatAsDate,
})
// 手动加载模板文件,当然也可以使用LoadHTMLGlob
router.LoadHTMLFiles("./templates/users/index.tmpl")
router.GET("/users/index", func(c *gin.Context) {
  c.HTML(http.StatusOK, "users/index.tmpl", map[string]interface{}{
    "now": time.Date(2023, 06, 10, 0, 0, 0, 0, time.UTC),
  })
})

.....

// 在main.go中插入此template.FuncMap的FuncMap函数
func formatAsDate(t time.Time) string {
	year, month, day := t.Date()
	return fmt.Sprintf("%d/%02d/%02d", year, month, day)
}
执行效果:
3.Gin中HTML模板渲染语法总结
描述: 本小节主要讲解HTML模板渲染和模板语法、以及自定义模板函数,为Gin中展示HTML页面做一个铺垫,也是学习Gin的一个重要章节
3.1 模板参数传入示例
// 片段示例1
type Article struct
{
  Article string
  Desc string
  Content string
}
r.GET("/", func(c *gin.Context) {
  // 方式1
  c.HTML(200, "admin/index.html", gin.H{
    "title":          "hello gin templates",
    "score":          92,
    "hobby":          []string{"带娃","吃饭", "睡觉", "coding"},
    "testEmptySlice": []string{},
    "news": &Article{
      Title:   "新闻标题",
      Desc:    "文章描述",
      Content: "文章主体",
    },
		"timeStamp":      2953130242,
  })
})


// 片段示例2
type UserInfo struct {
  Name string
  Gender string
  Age int
}
router.GET("/", func(c *gin.Context) {
  user := UserInfo{
    Name: "WeiyiGeek",
    Gender: "男",
    Age: 18,
  }
  // 方式2
  c.HTML(http.StatusOK, "default/index.html", map[string]interface{}{
      "title": "前台首页",
      "user": user,
  })
})
3.2 渲染模板语法
0.模板定义语法
首先在项目根目录新建 templates 文件夹,然后在文件夹中新建 admin / default文件以及对应的 index.html, 此处演示文件如下:
<!-- templates —> admin -> index.html  -->
<!-- 给模板定义一个名字 define end 成对出现-->
<!-- 给模板配置名称,用来区分不同文件夹下的模板,成对出现-->
{{ define "admin/index.html" }}
<!DOCTYPE html>
<html lang="en">
<head>
  <meta charset="UTF-8">
  <meta http-equiv="X-UA-Compatible" content="IE=edge">
  <meta name="viewport" content="width=device-width, initial-scale=1.0">
  <title>后台管理页面</title>
</head>
<body>
  <h1>这是一个后台管理页面的 html 模板</h1>
  <!-- 注释,执行时会忽略,可以多行。注释不能嵌套,并且必须紧贴分界符始止 -->
  {{/* 注释说明: title 参数 以及 .user 对象 */}}
  <h3>{{.title}}</h3>
  <h4>{{.user.Name}}</h4>
  <h4>{{.user.Age}}</h4>
</body>
</html>
{{ end }}

<!-- 嵌套 template 示例 -->
<!-- templates —> deafult -> header.html  -->
{{ define "default/pheader.html" }}
<head>
<meta charset="UTF-8">
<meta http-equiv="X-UA-Compatible" content="IE=edge">
<meta name="viewport" content="width=device-width, initial-scale=1.0">
<title>header 页面</title>
</head>
{{end}}
<!-- 在其他 文件中引入该模板 -->
<!-- 相当于给模板定义一个名字 define end 成对出现-->
{{ define "default/index.html" }}
<!DOCTYPE html>
<html lang="en">
{{template "default/header.html" .}}
<body>
  <p> 模板嵌套示例,引入时注意最后的 点 [.]</p>
</body>
{{end}}
1.数据输出与变量赋值输出
<!-- 1.// gin 中默认使用 {{}} 输出数据 -->
<!-- 模板语法都包含在{{和}}中间,其中{{.}}中的点表示当前对象 -->
{{.title}}

<!-- 2.// gin 中变量赋值与输出 -->
<!-- 赋值给一个变量cj -->
{{ $cj := .score }}
<!-- 输出变量 -->
<h4>{{$cj}}</h4>

<!-- 3.//去除模板内容右侧的所有空白符号 -->
<!-- 注意:-要紧挨{{和}},同时与模板值之间需要使用空格分隔 -->
{{- .Name -}}
2.比较函数,布尔函数会将任何类型的的零值视为False否则为True.
eq :等于,类似于 arg1 == ag2 则为True
ne :不等于,类似于 arg1 != ag2 则为True
lt :等于,类似于 arg1 < ag2 则为True
le :等于,类似于 arg1 <= ag2 则为True
gt :等于,类似于 arg1 > ag2 则为True
ge :等于,类似于 arg1 >= ag2 则为True
3.条件判断、range 循环遍历
使用示例:
<!-- # 条件语句 -->
{{ if pipeline }} html 标签 {{ else if pipeline }} TI {{ end }}
{{ if eq .arg1 .arg2 }} <p> 等于 </p> {{ else }} <p> 不等于 </p> {{ end }}

<!-- # range 循环遍历 -->
<ul>
  {{range $key, $value := .hobby}}
    <li style="color:black">{{$key}} - {{$value}}</li>
  {{else}}
    <li style="color:white">列表为空</li>
  {{end}}
</ul>
4.with 解构结构体属性值输出
使用示例:
<!-- with 结构结构体, 相当于将 user 赋值给一个点. -->
{{with .user}}
  <h4>姓名:{{.Name}}</h4>
  <h4>性别:{{.Gender}}</h4>
  <h4>年龄:{{.Age}}</h4>
{{end}}

<!-- 如果没有 with 字以前要输出数据. -->
<h4>{{.user.Name}}</h4>
<h4>{{.user.Gender}}</h4>
<h4>{{.user.Age}}</h4>
5.预定义函数, 在执行模板时函数从两个函数字典中查找(首先是模板函数字典,然后是全局函数字典)
温馨提示:一般不在模板内定义函数,而是使用 Funcs 方法添加函数到模板里。
预定义的全局函数如下所示:
and :函数返回它的第一个 empty 参数或者最后一个参数,就是说"and x y"等价于"if x then y else x";所有参数都会执行
or :返回第一个非 empty 参数或者最后一个参数,亦即"or x y"等价于"if x then x else y";所有参数都会执行
not :返回它的单个参数的布尔值的否定
len :返回它的参数的整数类型长度
index : 执行结果为第一个参数以剩下的参数为索引/键指向的值;如
"index x 1 2 3"返回x[1][2][3]的值;每个被索引的主体必须是数组、切片或者字典print : 即 fmt.Sprint
printf : 即 fmt.Sprintf
println : 即 fmt.Sprintln
html : 返回与其参数的文本表示形式等效的转义 HTML,注意此函数在 html/template 中不可用
urlquery :以适合嵌入到网址查询中的形式返回其参数的文本表示的转义值,同样此函数在 html/template 中不可用
js : 返回与其参数的文本表示形式等效的转义 JavaScript
call : 执行结果是调用第一个参数的返回值,该参数必须是函数类型,其余参数作为调用该函数的参数;
如"call .X.Y 1 2"等价于 go 语言里的 dot.X.Y(1, 2);其中 Y 是函数类型的字段或者字典的值,或者其他类似情况;
call 的第一个参数的执行结果必须是函数类型的值(和预定义函数如 print 明显不同);
该函数类型值必须有 1 到 2 个返回值,如果有 2 个则后一个必须是 error 接口类型;
如果有 2 个返回值的方法返回的 error 非 nil,模板执行会中断并返回给调用模板执行者该错误
使用示例:
# 输入标题长度
{{len .title}}

# 输出对应下标值
{{index .hobby 2}}
6.自定义模板函数,我们可以为传入的模板参数定义模板函数,例如下述示例
// 预定义模板函数
func formatAsDate(t time.Time) string {
  year, month, day := t.Date()
  return fmt.Sprintf("%d/%02d/%02d", year, month, day)
}

....

// 注册全局模板函数 注意顺序,注册模板函数需要在加载模板上面
router.SetFuncMap(template.FuncMap{
  "formatDate": formatAsDate,
})
// 加载模板
router.LoadHTMLGlob("templates/**/*")
router.GET("/", func(c *gin.Context) {
c.HTML(http.StatusOK, "default/index.html", map[string]interface{}{
    "msg": "当前时间",
    "now": time.Now(),
  })
})
使用示例:
<p>{{.msg}}</p>
<p> {{.now | formatDate}} </p>
<!-- // 或者 -->
<div> {{formatDate .now }} </div>
3.2 模板渲染实践演示
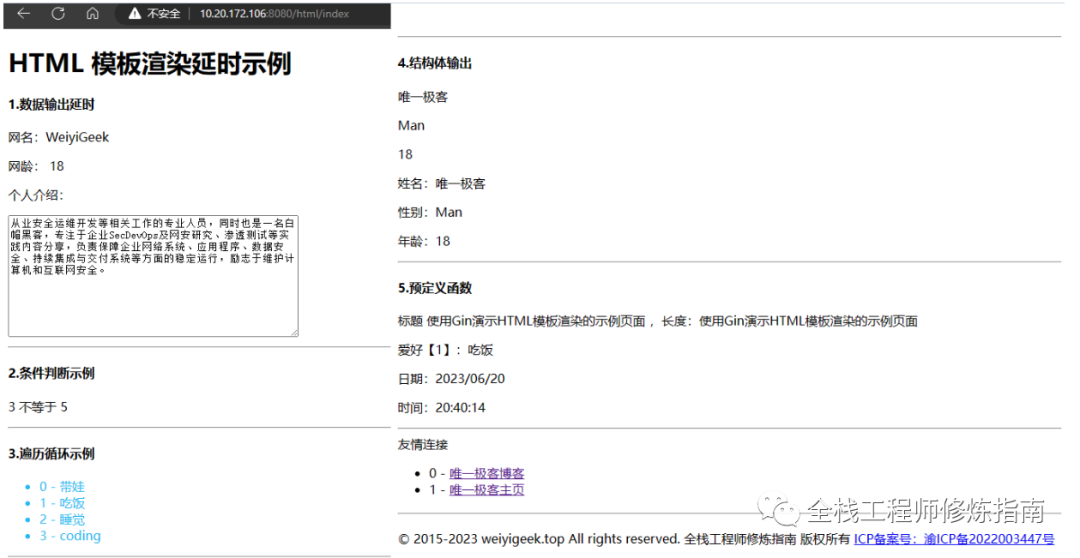
描述: 此处作者将上述在Gin中进行HTML模板渲染语法进行实例演示,帮助大家快速上手。
模板文件层级:
templates> tree /F
├─index
│      footer.html
│      header.html
├─public
│      index.html
└─users
模板文件:
templates\index\header.html
{{define "index/header.html"}}
<head>
  <meta charset="UTF-8">
  <meta name="viewport" content="width=device-width, initial-scale=1.0">
  <title>{{.page_title}}</title>
</head>
{{end}}
templates\index\footer.html
{{ define "index/footer.html" }}
<footer id="footer">
  <span>友情连接</span>
  <ul class="layout links">
    {{range $key, $value := .links}}
      {{with $value}}
      <li>{{$key}} - <a href="{{.Link}}" target="_blank">{{.Name}}</a></li>
      {{end}}
    {{end}}

  </ul>
  <hr class="layout" style="margin: 20px auto !important;">
  <div class="layout copyright clearfix"> <span class="col-l">© 2015-2023 weiyigeek.top All rights reserved. 全栈工程师修炼指南 版权所有</span> <span class="col-c"><a href="//beian.miit.gov.cn/" target="_blank"> ICP备案号:{{.page_beian}}  </a></span>
</footer>
{{ end }}
templates\public\index.html
{{ define "public/index.html" }}
<!DOCTYPE html>
<html lang="en">
  {{ template "index/header.html" .}}
<body>
  <h1> HTML 模板渲染延时示例 </h1>
  <div>
    {{/* 我是模板注释说明,我并不会显示 */}}
    <h4>1.数据输出延时</h4>
    <p>网名:{{.username}}</p>
    <p>网龄:{{ $wl := .username_age }} {{$wl}}</p>
    <p>个人介绍:</p>
    <textarea name="introduction" id="introduction" cols="50" rows="10">{{- .username_introduction -}}</textarea>
  </div><hr>

  <div>
    <h4>2.条件判断示例</h4>
    {{if eq .arg1 .arg2}}
      <p> {{.arg1}} 等于 {{.arg2}} </p>
    {{ else }}
      <p> {{.arg1}} 不等于 {{.arg2}}</p>
    {{end}}
  </div> <hr>

  <div>
    <h4>3.遍历循环示例</h4>
    <ul>
      {{range $key, $value := .hobby}}
        <li style="color:rgb(38, 183, 240)">{{$key}} - {{$value}}</li>
      {{else}}
        <li style="color:white">列表为空</li>
      {{end}}
    </ul>
  </div><hr>

  <div>
    <h4>4.结构体输出</h4>
    <!-- 传统方式输出结构体 -->
    <p>{{.user.Name}}</p>
    <p>{{.user.Gender}}</p>
    <p>{{.user.Age}}</p>

    <!-- 使用 with 输出结构体 -->
    {{with .user}}
      <p>姓名:{{.Name}}</p>
      <p>性别:{{.Gender}}</p>
      <p>年龄:{{.Age}}</p>
    {{end}}
  </div><hr>

  <div>
    <h4>5.预定义函数</h4>
    <p>标题 {{.page_title}} ,长度:{{.page_title}} </p>
    <p>爱好【1】:{{index .hobby 1}} </p>
  </div>

  <div>
    <p> 日期:{{.nowDateTime | formatDate}} </p>
    <p> 时间:{{.nowDateTime | formatTime}} </p>
  </div><hr>

  {{ template "index/footer.html" .}}
</body>
</html>
{{ end }}
亲,文章就要看完了,不关注一下【全栈工程师修炼指南】吗?

路由设置与模板渲染传递控制器函数
routers\router.go
// 自定义模板参数分隔字符
r.Delims("{[{", "}]}")
...
// 注册全局模板函数,需要在在加载模板之前
	r.SetFuncMap(template.FuncMap{
		"formatDate": index.FormatAsDate,
		"formatTime": index.FormatAsTime,
	})
	// 加载模板
	r.LoadHTMLGlob("templates/**/*")
....
//  路由组
_html := r.Group("/html")
{
  _html.GET("/index", index.TemplateHTMLDemo)
}
......
controller\index\index.go
package index

import (
	"fmt"
	"net/http"
	"time"

	"github.com/gin-gonic/gin"
)

type UserInfo struct {
	Name   string
	Gender string
	Age    int
}

type Links struct {
	Name string
	Link string
}

// 预定义模板函数
// 日期处理
func FormatAsDate(t time.Time) string {
	year, month, day := t.Date()
	return fmt.Sprintf("%d/%02d/%02d", year, month, day)
}

// 时间处理
func FormatAsTime(t time.Time) string {
	return fmt.Sprintf("%02d:%02d:%02d", t.Hour(), t.Minute(), t.Second())
}

// 模板渲染示例
func TemplateHTMLDemo(c *gin.Context) {
	// 方式1
	var links []Links = []Links{
		{"唯一极客博客", "https://weiyigeek.top"},
		{"唯一极客主页", "https://blog.weiyigeek.top"},
	}
	// 方式2
	// links = append(links, Links{
	// 	Name: "唯一极客博客",
	// 	Link: "https://weiyigeek.top",
	// }, Links{
	// 	Name: "唯一极客主页",
	// 	Link: "https://blog.weiyigeek.top",
	// })

	c.HTML(http.StatusOK, "public/index.html", map[string]interface{}{
		"page_title":            "使用Gin演示HTML模板渲染的示例页面",
		"username":              "WeiyiGeek",
		"username_age":          18,
		"username_introduction": "从业安全运维开发等相关工作的专业人员,同时也是一名白帽黑客,专注于企业SecDevOps及网安研究、渗透测试等实践内容分享,负责保障企业网络系统、应用程序、数据安全、持续集成与交付系统等方面的稳定运行,励志于维护计算机和互联网安全。",
		"arg1":                  3,
		"arg2":                  5,
		"hobby":                 []string{"带娃", "吃饭", "睡觉", "coding"},
		"user": &UserInfo{
			Name:   "唯一极客",
			Gender: "Man",
			Age:    18,
		},
		"nowDateTime": time.Now(),
		"links":       links,
		"page_beian":  "渝ICP备2022003447号",
	})
}
本文至此完毕,更多技术文章,尽情等待下篇好文!
原文地址1: https://blog.weiyigeek.top/2023/6-20-749.html
原文地址2: https://www.weiyigeek.top/blog/2023/6-20-749.html
如果此篇文章对你有帮助,请你将它分享给更多的人!

 学习书籍推荐 往期发布文章
公众号回复【0008】获取【Ubuntu22.04安装与加固脚本】
公众号回复【10001】获取【WinServer安全加固脚本】
公众号回复【10002】获取【KylinOS银河麒麟安全加固脚本】
公众号回复【0011】获取【k8S二进制安装部署教程】
公众号回复【0014】获取【Nginx学习之路汇总】
公众号回复【0015】获取【Jenkins学习之路汇总】
公众号回复【10005】获取【adb工具刷抖音赚米】
热文推荐
Golang | Web开发之Gin框架快速入门基础实践
Golang | Web开发之Gin路由访问日志自定义输出实践
Golang | Web开发之Gin多服务配置及优雅关闭平滑重启
Golang | Web开发之Gin使用swag生成项目的Swagger-API接口文档
欢迎长按(扫描)二维码 ,获取更多渠道哟!

欢迎关注 【全栈工程师修炼指南】(^U^)ノ~YO
添加作者微信【weiyigeeker】,拉你一起学习交流吧!
关注回复【学习交流群】即可加入【安全开发运维沟通交流群】
温馨提示: 由于作者水平有限,本章错漏缺点在所难免,希望读者批评指正,若有问题或建议请在文章末尾留下您宝贵的经验知识,或联系邮箱地址
master@weiyigeek.top 或 关注公众号 [全栈工程师修炼指南] 留言。
点个【赞 + 在看】吧!
点击【"阅读原文"】获取更多有趣的知识!
![[Eigen中文文档] 稀疏矩阵操作](https://img-blog.csdnimg.cn/c691a960e075455caab3de3d0fceae45.jpeg#pic_center)

