一、Android双屏异触-指定触摸为副屏触摸
在双屏异显产品中,有时候主副屏都带有触摸屏,并且要求主副屏触摸各自操作互不干扰。
Android 现有框架中已经支持副输入设备的逻辑,只是默认将所有的外部热插拔设备统一指定为副输入设备,这种逻辑我们如果是一个 I2C 加上一个 USB 触摸那么默认就可以支持,USB 触摸就是副 TP。
但,有时候我们是双 I2C 或双 USB 的搭配,我们就需要改造现有逻辑,方案如下:
通过属性配置副屏 TP 的: 设备名、PID&VID、USB 端口,在 EventHub 中获取输入设备的设备名、PID&VID、USB 端口与属性值进行对比,如果是配置中的设备就将其标记为副输入设备。
实现
diff --git a/frameworks/native/services/inputflinger/EventHub.cpp b/frameworks/native/services/inputflinger/EventHub.cpp
old mode 100644
new mode 100755
index 2bcc5c7..1542a7b
--- a/frameworks/native/services/inputflinger/EventHub.cpp
+++ b/frameworks/native/services/inputflinger/EventHub.cpp
@@ -64,6 +64,11 @@
 #define INDENT2 "    "
 #define INDENT3 "      "

+// for multi touch panel
+#define DEVICE_MATCH_METHOD_MAX 10
+#define USB_LOCATION_MATCH_START 13 //"usb-ff540000."
+#define USB_LOCATION_MATCH_LEN 7 //"usb-1.1"
+
 namespace android {

 static const char *WAKE_LOCK_ID = "KeyEvents";
@@ -1184,17 +1189,17 @@ status_t EventHub::openDeviceLocked(const char *devicePath) {
     int32_t deviceId = mNextDeviceId++;
     Device* device = new Device(fd, deviceId, String8(devicePath), identifier);

-    ALOGV("add device %d: %s\n", deviceId, devicePath);
-    ALOGV("  bus:        %04x\n"
+    ALOGI("add device %d: %s\n", deviceId, devicePath);
+    ALOGI("  bus:        %04x\n"
          "  vendor      %04x\n"
          "  product     %04x\n"
          "  version     %04x\n",
         identifier.bus, identifier.vendor, identifier.product, identifier.version);
-    ALOGV("  name:       \"%s\"\n", identifier.name.string());
-    ALOGV("  location:   \"%s\"\n", identifier.location.string());
-    ALOGV("  unique id:  \"%s\"\n", identifier.uniqueId.string());
-    ALOGV("  descriptor: \"%s\"\n", identifier.descriptor.string());
-    ALOGV("  driver:     v%d.%d.%d\n",
+    ALOGI("  name:       \"%s\"\n", identifier.name.string());
+    ALOGI("  location:   \"%s\"\n", identifier.location.string());
+    ALOGI("  unique id:  \"%s\"\n", identifier.uniqueId.string());
+    ALOGI("  descriptor: \"%s\"\n", identifier.descriptor.string());
+    ALOGI("  driver:     v%d.%d.%d\n",
         driverVersion >> 16, (driverVersion >> 8) & 0xff, driverVersion & 0xff);

     // Load the configuration file for the device.
@@ -1357,10 +1362,35 @@ status_t EventHub::openDeviceLocked(const char *devicePath) {
     }

     // Determine whether the device is external or internal.
-    if (isExternalDeviceLocked(device)) {
+    if((device->classes & 0x04) == INPUT_DEVICE_CLASS_TOUCH) {
+        int count = 0;
+        char flag[DEVICE_MATCH_METHOD_MAX][PROPERTY_VALUE_MAX];
+        char value[PROPERTY_VALUE_MAX] = {0};
+
+        property_get("ro.input.external", value, "");
+
+        if (isExternalDeviceLocked(device)) {
+            sprintf(flag[count++], "%04x:%04x", identifier.vendor, identifier.product);
+            if (identifier.location.length() >= USB_LOCATION_MATCH_START+USB_LOCATION_MATCH_LEN) {
+                strncpy(flag[count++], identifier.location.string()+USB_LOCATION_MATCH_START, USB_LOCATION_MATCH_LEN);
+            }
+        } else {
+            sprintf(flag[count++], "%s", device->identifier.name.string());
+        }
+
+        for (int i=0; i<count; i++) {
+            ALOGI("openDeviceLocked:%d, value=%s flag=%s\n", __LINE__, value, flag[i]);
+            if (strstr(value, flag[i])) {
+                device->classes |= INPUT_DEVICE_CLASS_EXTERNAL;
+                ALOGI("openDeviceLocked:%d, name:\"%s\" id:%d device_class:%x vid:%04x pid:%04x is external input device\n",
+                    __LINE__, device->identifier.name.string(), device->id, device->classes, identifier.vendor, identifier.product);
+                break;
+            }
+        }
+    } else {
         device->classes |= INPUT_DEVICE_CLASS_EXTERNAL;
     }
-
+
     if (device->classes & (INPUT_DEVICE_CLASS_JOYSTICK | INPUT_DEVICE_CLASS_DPAD)
             && device->classes & INPUT_DEVICE_CLASS_GAMEPAD) {
         device->controllerNumber = getNextControllerNumberLocked(device);
属性配置格式说明
属性名:ro.input.external
 也可以同时配置多个设备,各属性值之间用“,”隔开。
例如
ro.input.external=222a:0001,Hanvon electromagnetic pen,usb-1.4
以上属性配置“vid=222a,pid=0001”的 USB TP 和设备名为“Hanvon electromagnetic pen”的 I2C TP 以及 USB 端口为 1.4 的 TP 为副屏 TP,其它未配置的都默认为主屏 TP。
源码:https://github.com/aystshen/Android-MultiTouchPanel
二、Android定时开关机与看门狗
此方案用于实现 Android 主板的定时开机与看门狗功能,应用于一些特殊产品,如:广告机、自动售货机等。
 看门狗
看门狗
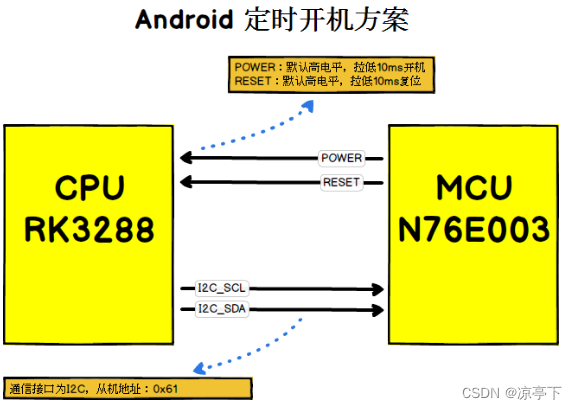
看门狗功能默认关闭,直到 Android 发送命令打开看门狗功能。如果看门狗功能处于打开状态,Android 系统会在小于看门狗超时时长内定时发送心跳数据给 MCU,如果看门狗超时时长到,仍未收到心跳数据,则拉低 RESET 引脚10ms,使 CPU 复位重启。
定时开机
当 MCU 收到数据后启动计时,时间到拉低 POWER 引脚10ms,使 CPU 开机,同时清除本次定时任务,直到下次 CPU 重新下发新的定时任务。
协议
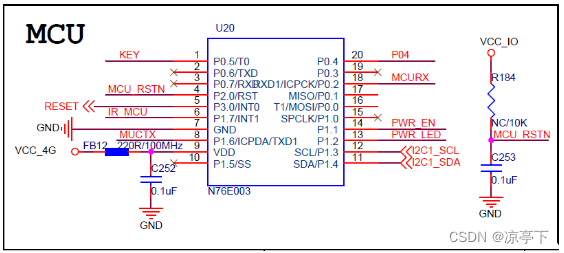
通信接口为 I2C,从机地址:0x61。

 源码 https://github.com/aystshen/Android-TimedBootDriver
API
heartbeat
发送看门狗(Watchdog)心跳,至少在每个看门狗超时周期内发送一次心跳,否则超时复位。
定义:
int heartbeat();
返回值 <0:失败,>=0:成功。
setUptime 设置定时开机倒计时,当倒计时结束则开机。
定义:
int setUptime(int time);//time 开机倒计时(单位:秒)。
返回 <0:失败,>=0:成功。
getUptime 获取定时开机剩余时间。
int getUptime(); // <0:失败,>=0:剩余时间(单位:秒)。
openWatchdog 打开看门狗。
int openWatchdog(); // 返回 <0:失败,>=0:成功。
closeWatchdog 关闭看门狗。
int closeWatchdog(); //<0:失败,>=0:成功。
setWatchdogDuration 设置看门狗超时时长。
int setWatchdogDuration(int duration);//duration 看门狗超时时长(单位:秒)
返回值 <0:失败,>=0:成功。
getWatchdogDuration 获取看门狗超时时长。
int getWatchdogDuration();//<0:失败,>=0:看门狗超时时长(单位:秒)
watchdogIsOpen 判断看门狗是否开启。
boolean watchdogIsOpen();//true:看门狗打开,false:看门狗关闭。
使用
- 在 APP 源码 src/main 目录下新建 aidl/android/os/ 这样的目录结构。
- 在 aidl/android/os/ 目录下新建 IMcuService.aidl 文件,内容如下:
package android.os;

/** {@hide} */
interface IMcuService
{
    int heartbeat();
    int setUptime(int time);
    int getUptime();
    int openWatchdog();
    int closeWatchdog();
    int setWatchdogDuration(int duration);
    int getWatchdogDuration();
    boolean watchdogIsOpen();
}
3.参考源码 Mcu.java
package com.ayst.androidx.supply;

import android.annotation.SuppressLint;
import android.content.Context;
import android.os.IBinder;
import android.os.IMcuService;
import android.os.RemoteException;

import java.lang.reflect.Method;

/**
 * Created by Administrator on 2018/11/6.
 */
public class Mcu {
    private IMcuService mMcuService;

    @SuppressLint("WrongConstant")
    public Mcu(Context context) {
        Method method = null;
        try {
            method = Class.forName("android.os.ServiceManager").getMethod("getService", String.class);
            IBinder binder = (IBinder) method.invoke(null, new Object[]{"mcu"});
            mMcuService = IMcuService.Stub.asInterface(binder);
        } catch (Exception e) {
            e.printStackTrace();
        }
    }

    /**
     * Heartbeat
     */
    public void heartbeat() {
        if (null != mMcuService) {
            try {
                mMcuService.heartbeat();
            } catch (RemoteException e) {
                e.printStackTrace();
            }
        }
    }

    /**
     * Set the boot countdown
     * @param time (unit: second)
     * @return <0:error
     */
    public int setUptime(int time) {
        if (null != mMcuService) {
            try {
                return mMcuService.setUptime(time);
            } catch (RemoteException e) {
                e.printStackTrace();
            }
        }
        return -1;
    }

    /**
     * Get the boot countdown
     * @return time
     */
    public int getUptime() {
        if (null != mMcuService) {
            try {
                return mMcuService.getUptime();
            } catch (RemoteException e) {
                e.printStackTrace();
            }
        }
        return 0;
    }

    /**
     * Enable watchdog
     * @return <0:error
     */
    public int openWatchdog() {
        if (null != mMcuService) {
            try {
                return mMcuService.openWatchdog();
            } catch (RemoteException e) {
                e.printStackTrace();
            }
        }
        return -1;
    }

    /**
     * Disable watchdog
     * @return <0:error
     */
    public int closeWatchdog() {
        if (null != mMcuService) {
            try {
                return mMcuService.closeWatchdog();
            } catch (RemoteException e) {
                e.printStackTrace();
            }
        }
        return -1;
    }

    /**
     * Watchdog is open
     * @return
     */
    public boolean watchdogIsOpen() {
        if (null != mMcuService) {
            try {
                return mMcuService.watchdogIsOpen();
            } catch (RemoteException e) {
                e.printStackTrace();
            }
        }
        return false;
    }

    /**
     * Set watchdog over time duration
     * @param duration (unit: second)
     * @return <0:error
     */
    public int setWatchdogDuration(int duration) {
        if (null != mMcuService) {
            try {
                return mMcuService.setWatchdogDuration(duration);
            } catch (RemoteException e) {
                e.printStackTrace();
            }
        }
        return -1;
    }

    /**
     * Get watchdog over time duration
     * @return
     */
    public int getWatchdogDuration() {
        if (null != mMcuService) {
            try {
                return mMcuService.getWatchdogDuration();
            } catch (RemoteException e) {
                e.printStackTrace();
            }
        }
        return 0;
    }
}
