【MongoDB】五、MongoDB分片集群的部署
- 实验目的
- 实验内容
- 实验步骤
- 环境准备
- 部署 Config server
- 配置Config Server副本集
- 部署Shard
- 部署mongos
- 启动分片功能
- 查看分片信息
- 实验小结
实验目的
能够通过部署MongoDB分片集群熟悉MongoDB分片集群架构和基本操作,从而解决大数据项目中数据量爆发式增长的需求
实验内容
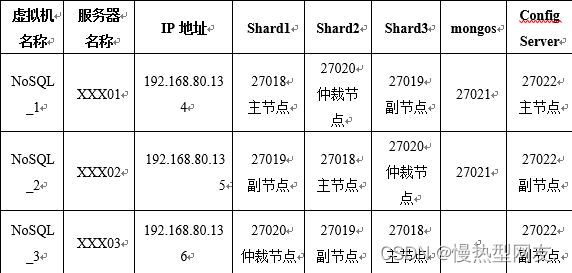
(1)根据上表中分片集群端口号的分配情况部署分片集群(XXX是姓名拼音首字母)。
(2)启动分片功能。
(3)模拟写入数据,对数据库和和集合进行分片操作,并查看分片信息。
实验步骤
环境准备
1、在nosql01中创建相关数据文件、配置文件以及日志文件的存放目录
命令:
cd /opt/servers/mongodb-demo/
mkdir shardcluster
mkdir -p /opt/servers/mongodb-demo/shardcluster/configServer/configFile
mkdir -p /opt/servers/mongodb-demo/shardcluster/configServer/data
mkdir -p /opt/servers/mongodb-demo/shardcluster/configServer/logs
mkdir -p /opt/servers/mongodb-demo/shardcluster/shard/configFile
mkdir -p /opt/servers/mongodb-demo/shardcluster/shard/shard1_data
mkdir -p /opt/servers/mongodb-demo/shardcluster/shard/shard2_data
mkdir -p /opt/servers/mongodb-demo/shardcluster/shard/shard3_data
mkdir -p /opt/servers/mongodb-demo/shardcluster/shard/logs
mkdir -p /opt/servers/mongodb-demo/shardcluster/mongos/configFile
mkdir -p /opt/servers/mongodb-demo/shardcluster/mongos/logs
2、在服务器nosql01的配置服务器、分片服务器以及路由服务器的日志目录下,创建对应的日志管理文件。
# 配置服务器日志管理文件
touch /opt/servers/mongodb-demo/shardcluster/configServer/logs/config_server.log
# 分片服务器1的日志管理文件
touch /opt/servers/mongodb-demo/shardcluster/shard/logs/shard1.log
# 分片服务器2的日志管理文件
touch /opt/servers/mongodb-demo/shardcluster/shard/logs/shard2.log
# 分片服务器3的日志管理文件
touch /opt/servers/mongodb-demo/shardcluster/shard/logs/shard3.log
# 路由服务器日志管理文件
touch /opt/servers/mongodb-demo/shardcluster/mongos/logs/mongos.log
3、分发集群配置文件:将服务器nosql01上用于存放分片集群相关配置文件、日志文件和数据文件等相关内容的目录shardcluster分发到服务器nosql02和nosql03上,具体命令如下:
命令:
scp -r /opt/servers/mongodb-demo/shardcluster/ root@zrz02:/opt/servers/mongodb-demo/
scp -r /opt/servers/mongodb-demo/shardcluster/ root@zrz03:/opt/servers/mongodb-demo/
部署 Config server
1、创建配置文件
cd /configServer/configFile/
touch mongodb_config.conf
2、编辑配置文件mongodb_config.conf,添加配置服务器的相关参数,具体命令如下:
vi mongodb_config.conf
#数据文件存放位置
dbpath=/opt/servers/mongodb-demo/shardcluster/configServer/data
#日志文件
logpath=/opt/servers/mongodb-demo/shardcluster/configServer/logs/config_server.log
#端口号
port=27022
#绑定服务ip
bind_ip=zrz01
#使用追加的方式写日志
logappend=true
#以守护进程的方式运行MongoDB
fork=true
#最大同时连接数
maxConns=5000
#复制集名称
replSet=configs
#声明这是一个集群的Config Server
configsvr=true
3、将配置文件mongodb_config.conf通过scp命令分发到服务器nosql02和nosql03的目录configFile下
命令:
scp /opt/servers/mongodb-demo/shardcluster/configServer/configFile/mongodb_config.conf root@zrz02:/opt/servers/mongodb-demo/shardcluster/configServer/configFile/

scp /opt/servers/mongodb-demo/shardcluster/configServer/configFile/mongodb_config.conf root@zrz03:/opt/servers/mongodb-demo/shardcluster/configServer/configFile/
4、修改服务器nosql02和nosql03配置文件mongodb_config.conf中的参数bind_ip的值,即将bind_ip的值修改为对应服务器的IP地址或主机名。
命令:
cd /opt/servers/mongodb-demo/shardcluster/configServer/configFile/
vi mongodb_config.conf
5、启动Config Server
 cd /opt/servers/mongodb-demo/mongodb/bin/
 ./mongod -f /opt/servers/mongodb-demo/shardcluster/configServer/configFile/mongodb_config.conf
配置Config Server副本集
1、登录MongoDB客户端
命令:
mongo --host zrz01 --port 27022
2、对副本集进行初始化操作
命令:
rs.initiate()
rs.add("zrz02:27022")
rs.add("zrz03:27022")
rs.status()
部署Shard
1、创建配置文件(zrz01)
命令:
cd /opt/servers/mongodb-demo/shardcluster/shard/configFile/
touch mongodb_shard1.conf
touch mongodb_shard2.conf
touch mongodb_shard3.conf
2、执行“vi”命令,在配置文件mongodb_shard1.conf mongodb_shard2.conf mongodb_shard3.conf中添加分片服务器1的相关参数(服务器zrz01)
mongodb_shard1.conf
命令:
vi mongodb_shard1.conf
dbpath=/opt/servers/mongodb-demo/shardcluster/shard/shard1_data/
logpath=/opt/servers/mongodb-demo/shardcluster/shard/logs/shard1.log
port=27018
logappend=true
fork=true
maxConns=5000
bind_ip=zrz01
#声明开启分片
shardsvr=true
#指定分片shar1的副本集名称
replSet=shard1
mongodb_shard2.conf
命令:
vi mongodb_shard2.conf
dbpath=/opt/servers/mongodb-demo/shardcluster/shard/shard2_data/
logpath=/opt/servers/mongodb-demo/shardcluster/shard/logs/shard2.log
port=27020
logappend=true
fork=true
maxConns=5000
bind_ip=zrz01
#声明开启分片
shardsvr=true
#指定分片shar2的副本集名称
replSet=shard2
mongodb_shard3.conf
命令:
vi mongodb_shard3.conf
dbpath=/opt/servers/mongodb-demo/shardcluster/shard/shard3_data/
logpath=/opt/servers/mongodb-demo/shardcluster/shard/logs/shard3.log
port=27019
logappend=true
fork=true
maxConns=5000
bind_ip=zrz01
#声明开启分片
shardsvr=true
#指定分片shar3的副本集名称
replSet=shard3
3、创建配置文件(zrz02)
命令:
cd /opt/servers/mongodb-demo/shardcluster/shard/configFile/
touch mongodb_shard1.conf
touch mongodb_shard2.conf
touch mongodb_shard3.conf
4、执行“vi”命令,在配置文件mongodb_shard1.conf mongodb_shard2.conf mongodb_shard3.conf中添加分片服务器1的相关参数(服务器zrz02)
mongodb_shard1.conf
命令:
vi mongodb_shard1.conf
dbpath=/opt/servers/mongodb-demo/shardcluster/shard/shard1_data/
logpath=/opt/servers/mongodb-demo/shardcluster/shard/logs/shard1.log
port=27019
logappend=true
fork=true
maxConns=5000
bind_ip=zrz02
#声明开启分片
shardsvr=true
#指定分片shar1的副本集名称
replSet=shard1
mongodb_shard2.conf
命令:
vi mongodb_shard2.conf
dbpath=/opt/servers/mongodb-demo/shardcluster/shard/shard2_data/
logpath=/opt/servers/mongodb-demo/shardcluster/shard/logs/shard2.log
port=27018
logappend=true
fork=true
maxConns=5000
bind_ip=zrz02
#声明开启分片
shardsvr=true
#指定分片shar2的副本集名称
replSet=shard2
mongodb_shard3.conf
命令:
vi mongodb_shard3.conf
dbpath=/opt/servers/mongodb-demo/shardcluster/shard/shard3_data/
logpath=/opt/servers/mongodb-demo/shardcluster/shard/logs/shard3.log
port=27020
logappend=true
fork=true
maxConns=5000
bind_ip=zrz02
#声明开启分片
shardsvr=true
#指定分片shar3的副本集名称
replSet=shard3
5、创建配置文件(zrz03)

6、执行“vi”命令,在配置文件mongodb_shard1.conf mongodb_shard2.conf mongodb_shard3.conf中添加分片服务器1的相关参数(服务器zrz03)
mongodb_shard1.conf
命令:
vi mongodb_shard1.conf
dbpath=/opt/servers/mongodb-demo/shardcluster/shard/shard1_data/
logpath=/opt/servers/mongodb-demo/shardcluster/shard/logs/shard1.log
port=27020
logappend=true
fork=true
maxConns=5000
bind_ip=zrz03
#声明开启分片
shardsvr=true
#指定分片shar1的副本集名称
replSet=shard1
mongodb_shard2.conf
命令:
vi mongodb_shard2.conf
dbpath=/opt/servers/mongodb-demo/shardcluster/shard/shard2_data/
logpath=/opt/servers/mongodb-demo/shardcluster/shard/logs/shard2.log
port=27019
logappend=true
fork=true
maxConns=5000
bind_ip=zrz03
#声明开启分片
shardsvr=true
#指定分片shar2的副本集名称
replSet=shard2
mongodb_shard3.conf
命令:
vi mongodb_shard3.conf
dbpath=/opt/servers/mongodb-demo/shardcluster/shard/shard3_data/
logpath=/opt/servers/mongodb-demo/shardcluster/shard/logs/shard3.log
port=27018
logappend=true
fork=true
maxConns=5000
bind_ip=zrz03
#声明开启分片
shardsvr=true
#指定分片shar3的副本集名称
replSet=shard3
7、启动Shard
命令:
mongod -f /opt/servers/mongodb-demo/shardcluster/shard/configFile/mongodb_shard1.conf
mongod -f /opt/servers/mongodb-demo/shardcluster/shard/configFile/mongodb_shard2.conf
mongod -f /opt/servers/mongodb-demo/shardcluster/shard/configFile/mongodb_shard3.conf
8、配置Shard副本集
命令(zrz01):
mongo --host zrz01 --port 27018
rs.initiate()
rs.add('zrz02:27019')
rs.addArb('zrz03:27020')
rs.status()
命令(zrz02):
mongo --host zrz02 --port 27018
rs.initiate()
rs.add('zrz03:27019')
rs.addArb('zrz01:27020')
rs.status()
命令(zrz03):
mongo --host zrz03 --port 27018
rs.initiate()
rs.add('zrz01:27019')
rs.addArb('zrz02:27020')
rs.status()
部署mongos
1、创建配置文件
命令:
cd  /opt/servers/mongodb-demo/shardcluster/mongos/configFile/
ll
2、执行“vi”命令,在配置文件mongodb_mongos.conf中添加路由服务器的相关参数
命令:
vi mongodb_mongos.conf
logpath=/opt/servers/mongodb-demo/shardcluster/mongos/logs/mongos.log
logappend = true
port=27021
bind_ip=zrz01
fork=true
#指定配置服务器(Config Server)地址
configdb=configs/zrz01:27022,zrz02:27022,zrz03:27022
maxConns=20000
3、由于在分片集群中规划了两个mongos,因此,需要将配置文件mongodb_mongos.conf通过scp命令分发至服务器nosql02的目录/mongos/configFile下
命令:
scp /opt/servers/mongodb-demo/shardcluster/mongos/configFile/mongodb_mongos.conf root@zrz02:/opt/servers/mongodb-demo/shardcluster/mongos/configFile/
4、修改服务器zrz02的配置文件mongodb_mongos.conf中参数bind_ip的值,即将值修改为当前服务器的IP地址或主机名(即zrz02)

5、启动mongos服务
命令:
mongos -f /opt/servers/mongodb-demo/shardcluster/mongos/configFile/mongodb_mongos.conf
启动分片功能
1、在服务器zrz01中登录mongos的MongoDB客户端(需要通过mongos操作分片集群)
注意在MongoDB的bin目录下执行
mongo --host zrz01 --port 27021
2、切换到数据库gateway
向分片集群中添加三个Shard,分别为shard1、shard2和shard3
命令:
use gateway
sh.addShard("shard1/zrz01:27018,zrz02:27019,zrz03:27020")
sh.addShard("shard2/zrz01:27020,zrz02:27018,zrz03:27019")
sh.addShard("shard3/zrz01:27019,zrz02:27020,zrz03:27018")
3、设置chunk
命令:
# 切换到数据库config
use config
# 设置块大小为1M
db.settings.save({"_id":"chunksize","value":1})
4、模拟写入数据
在分片集群中,创建数据库school,并向数据库中添加集合user,然后模拟向集合中写入五万条文档
命令:
#切换(创建)数据库school
use school
#向集合user中添加5万条文档
mongos> for(i=1;i<=50000;i++){db.user.insert({"id":i,"name":"zrz"+i})}
db.user.find()
5、对数据库进行分片操作
在开启集合分片前,需要先开启数据库的分片功能
命令:
#切换到数据库gateway
use gateway
#实现数据库school分片功能
sh.enableSharding("school")
6、对集合进行分片操作前,需要为集合user创建索引
命令:
#切换到数据库school
use school
#以"id"作为索引
db.user.createIndex({"id":1})
将以索引“id”作为分片键,对集合user进行分片操作
命令:
#切换到数据库gateway
use gateway
#以"id"作为分片键对集合user进行分片
sh.shardCollection("school.user",{"id":1})
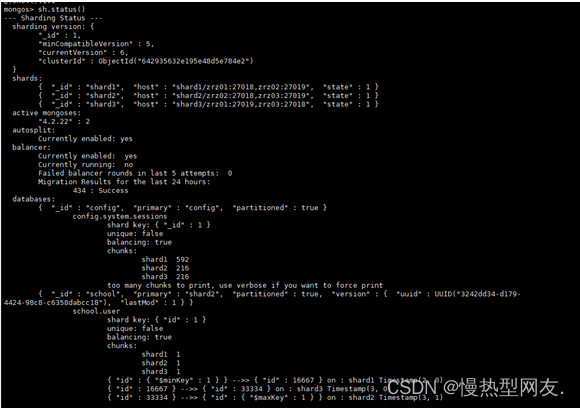
查看分片信息
sh.status()
实验小结
通过本次对MongoDB分片集群的部署,熟悉了MongoDB分片集群架构和基本操作,更好的理解了分片策略。在实验过程中遇到了很多硬件或者是软件上的问题,请教老师,询问同学,上网查资料,都是解决这些问题的途径。最终将遇到的问题一一解决最终完成实验。
注意事项:
1、有疑问前,知识学习前,先用搜索。
2、熟读写基础知识,学得会不如学得牢。
3、选择交流平台,如QQ群,网站论坛等。
4、尽我能力帮助他人,在帮助他人的同时你会深刻巩固知识。
