目录
0、项目介绍
1、效果展示
2、项目搭建
3、项目代码展示与部分讲解
拍照脚本data_collection.py
图片检测Picdetect.py
摄像头检测Videodetect.py
主函数CountMain.py
自定义模块tally.py
4、项目资源
5、项目总结
0、项目介绍
有一段时间没有更新专栏了,本次项目是我的软件课设,自主命题。智能计数指的是对特定物体进行计数(对于比较规整的物体效果很好,例如硬币、钥匙、方块等),表单信息指的是对图片进行计数并写入excel表格当中。从投入到应用角度来看,使用深度学习的方法是更加的准确,而使用opencv的方法有局限性,仍然有改进的空间。
使用步骤:
1、图片检测:
(1)运行data_collection脚本,将对应的物体放在红框当中,轨迹栏可以调整其大小,对框外进行高斯模糊,使用摄像头对圆签进行拍照。(拍照背景最好是纯色,且与物体的颜色有较大的对比)
(2)运行Picdetect.py文件,窗口显示后,如果显示数值与实际值有所不同,可以调整轨迹栏,调整到合适的值后,要记得修改轨迹栏初始化的值。点击键盘s即可保存图片到指定文件夹。
2、摄像头检测:
仅仅只运行Videodetect.py文件,窗口展示后,可以实时调整轨迹栏的滑动条,调整到在这个环境下适合的值,记得修改。点击键盘s即可保存图片,再次按下空格键即可继续检测。
3、控制台交互检测
模式功能可选,包括了Real-time、Mutil-image模式,Real-time模式即为摄像头检测,Mutil-image检测下还有Single-image模式可选,点击Esc键即可返回到是否进行Single-image。
1、效果展示
图片检测
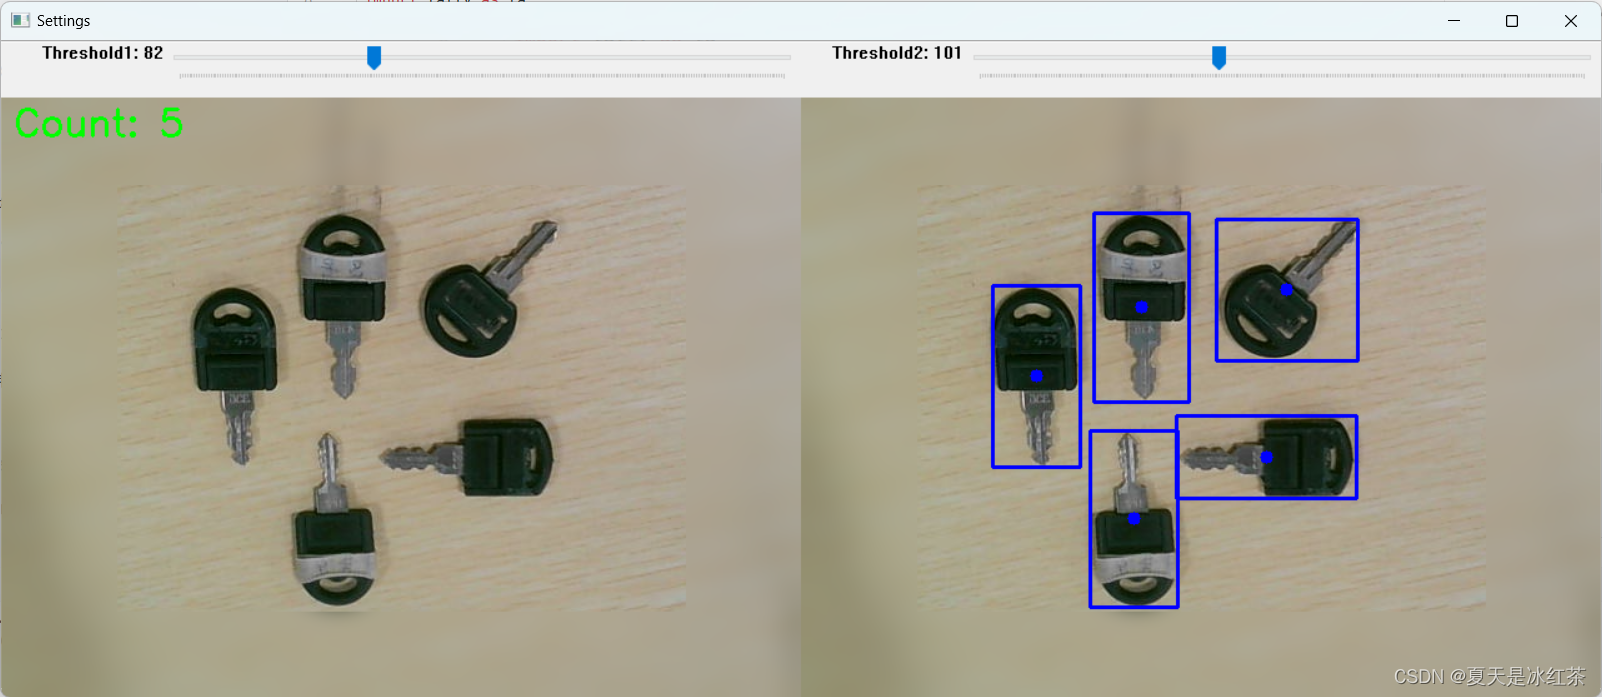 摄像头检测
摄像头检测

控制台交互检测
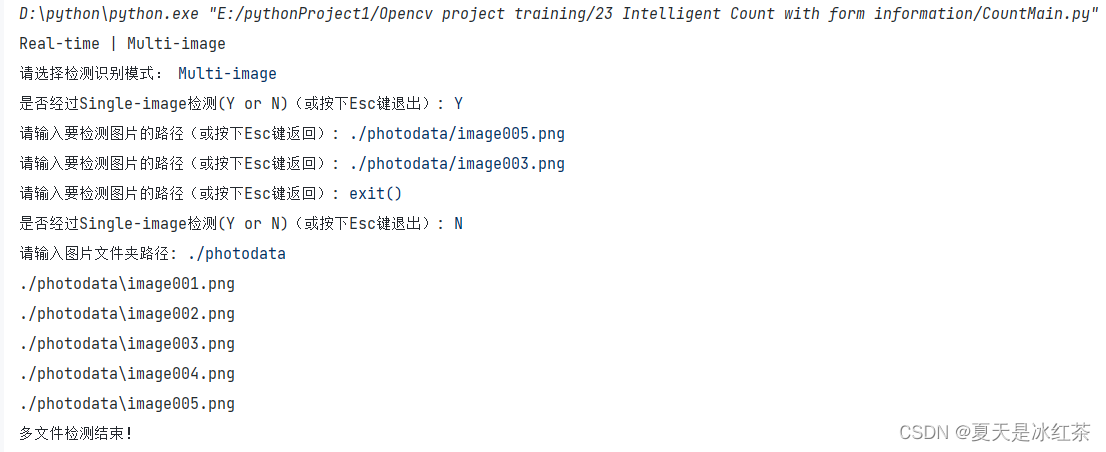
表单信息

2、项目搭建
关于这一步其实是很有必要的,因为我曾经看过很多博主直接就将代码贴在文章中,代码文件没有明确的说明在哪个目录下,创建时候还要通过import去琢磨一番。
———— 23 Intelligent Count with form information
  —— photodata
  —— Pic
        -img
        -data.xlsx
  —— Video
        -img
        -data.xlsx
  —— CountMain.py
  —— data_collection.py
  —— main2ship.py
  —— Picdetect.py
  —— tally.py
  —— Videodetect.py
3、项目代码展示与部分讲解
拍照脚本data_collection.py
"""
author : Auorui(夏天是冰红茶)
time : 2023-6-3
function:It is used for data acquisition. Place the round sticks
        in the red box, and perform Gaussian filter processing
        outside the box. Adjust the brightness and size of the
        box adaptively through the track bar. Press the keyboard
        "s" to take photos of the round sticks. The number is unlimited.
"""
import cv2
import tally as ta

Vcap = ta.VideoCap()
Vcap.CapInit(mode=1, w=640, h=480)
count = 1

cv2.namedWindow("photodata")
cv2.createTrackbar("bbox_scale", "photodata", 100, 900, ta.onTrackbarChange)
cv2.createTrackbar("brightness_factor", "photodata", 50, 100, ta.onTrackbarChange)

while True:
    img = Vcap.read()
    img = cv2.flip(img,1)
    bbox_scale = cv2.getTrackbarPos("bbox_scale", "photodata") / 1000.0 + 0.1
    brightness_factor = cv2.getTrackbarPos("brightness_factor", "photodata") / 100.0 + 0.5

    position, img_with_box = ta.Bbox_img(img, bbox_scale=bbox_scale)
    img_with_blur = ta.maskBbox(img, position)

    img_with_blur_and_light = ta.Adjusted_image(img_with_blur, brightness_factor=brightness_factor)

    imgStacked = ta.stackImages(1, [img_with_box,img_with_blur_and_light])
    cv2.imshow("photodata", imgStacked)

    k = cv2.waitKey(1) & 0xFF
    if k == ord('s'):
        filename = "./photodata/image{:03d}.png".format(count)
        cv2.imwrite(filename, img_with_blur_and_light)
        print("image{:03d}.png保存成功!".format(count))
        count += 1
    elif k == 27:
        break
使用注意:
用于数据采集,将物体放在红框中的位置,框外进行了高斯滤波处理,通过轨迹栏自适应的调整亮度和框的大小,按下键盘“s”对圆签进行拍照 ,数量不限。
展示:第一行为调整框的大小,也就是识别的区域,第二行为亮度调整,根据当前的环境适当的调整亮度。原图在左,数据图在右,将目标对准摄像头后就可以按下键“s”,保存右图。
图片检测Picdetect.py
"""
author : Auorui(夏天是冰红茶)
time : 2023-6-18
"""
import cv2
import tally as ta
import os
from datetime import datetime

cv2.namedWindow("Settings")
cv2.resizeWindow("Settings", 640, 240)
cv2.createTrackbar("Threshold1", "Settings", 82, 255, ta.empty)
cv2.createTrackbar("Threshold2", "Settings", 101, 255, ta.empty)

img = cv2.imread("./photodata/image005.png")
success_text = "Successfully saved"
success_text_color = (0, 0, 255)
text_size = 20

save_dir = "./Pic/img"
excel_path = "./Pic/data.xlsx"

image_count = 1
data = []
while True:
    imgPre = ta.preProcessing(img)
    imgStacked,total,imgContours=ta.drawContour(img, imgPre, minArea=15)
    k = cv2.waitKey(1) & 0xFF
    if k == ord('s'):
        current_time = datetime.now().strftime("%Y-%m-%d %H:%M:%S")
        image_name = f"Picimg_{str(image_count).zfill(3)}.png"
        image_path = os.path.join(save_dir, image_name)
        cv2.imwrite(image_path, imgContours)

        data.append([current_time, image_name, total])

        image_count += 1

        cv2.rectangle(imgStacked, (480, 140),
                      (785, 190),
                      (255, 0, 0), -1)
        cv2.putText(imgStacked,
                    success_text,
                    (485, 180),
                    cv2.FONT_HERSHEY_SIMPLEX, text_size / 20, success_text_color, 2)

        cv2.imshow("Settings", imgStacked)
        while True:
            k = cv2.waitKey(1)
            if k == ord(' '):
                break

        ta.excelmation(excel_path,data)
    elif k == 27:
        break

cv2.destroyAllWindows()
摄像头检测Videodetect.py
"""
author : Auorui(夏天是冰红茶)
time : 2023-6-18
"""
import cv2
import tally as ta
import os
from datetime import datetime

Vcap = ta.VideoCap()
Vcap.CapInit(mode=1, w=845, h=480)

cv2.namedWindow("Settings")
cv2.resizeWindow("Settings", 640, 240)
cv2.createTrackbar("Threshold1", "Settings", 82, 255, ta.empty)
cv2.createTrackbar("Threshold2", "Settings", 101, 255, ta.empty)

success_text = "Successfully saved"
success_text_color = (0, 0, 255)
text_size = 20

save_dir = "./Video/img"
excel_path = "./Video/data.xlsx"

image_count = 1
data = []

while True:
    img = Vcap.read()

    imgPre = ta.preProcessing(img)

    imgStacked,total,imgContours=ta.drawContour(img, imgPre, minArea=15)

    k = cv2.waitKey(1) & 0xFF
    if k == ord('s'):
        current_time = datetime.now().strftime("%Y-%m-%d %H:%M:%S")
        image_name = f"Videoimg_{str(image_count).zfill(3)}.png"
        image_path = os.path.join(save_dir, image_name)
        cv2.imwrite(image_path, imgContours)

        data.append([current_time, image_name, total])

        image_count += 1

        cv2.rectangle(imgStacked, (700, 140),
                      (1005, 190),
                      (255, 0, 0), -1)
        cv2.putText(imgStacked,
                    success_text,
                    (705, 180),
                    cv2.FONT_HERSHEY_SIMPLEX, text_size / 20, success_text_color, 2)

        cv2.imshow("Settings", imgStacked)
        while True:
            k = cv2.waitKey(1)
            if k == ord(' '):
                break

        ta.excelmation(excel_path,data)

    elif k == 27:
        break

cv2.destroyAllWindows()
主函数CountMain.py
import cv2
import tally as ta
import os
from datetime import datetime

# 通用
success_text = "Successfully saved"
success_text_color = (0, 0, 255)
text_size = 20
image_count = 1
data = []

####################----------轨迹栏初始化----------#####################
cv2.namedWindow("Settings")
cv2.resizeWindow("Settings", 640, 240)
cv2.createTrackbar("Threshold1", "Settings", 82, 255, ta.empty)
cv2.createTrackbar("Threshold2", "Settings", 101, 255, ta.empty)
########################################################################

##########-----模式检测-----##########
print("Real-time | Multi-image")    #
print("请选择检测识别模式:",end=' ')  #
recongnitionMode = input()          #
#####################################

save_dir, excel_path=ta.ImagePath(recongnitionMode)

if recongnitionMode=='Real-time':
    Vcap = ta.VideoCap()
    Vcap.CapInit(mode=0, w=845, h=480)
    while True:
        img = Vcap.read()
        imgPre = ta.preProcessing(img)
        imgStacked, total, imgContours = ta.drawContour(img, imgPre, minArea=15)

        k = cv2.waitKey(1) & 0xFF
        if k == ord('s'):
            current_time = datetime.now().strftime("%Y-%m-%d %H:%M:%S")
            image_name = f"Videoimg_{str(image_count).zfill(3)}.png"
            image_path = os.path.join(save_dir, image_name)
            cv2.imwrite(image_path, imgContours)
            data.append([current_time, image_name, total])
            image_count += 1
            cv2.rectangle(imgStacked, (700, 140),
                          (1005, 190),
                          (255, 0, 0), -1)
            cv2.putText(imgStacked,
                        success_text,
                        (705, 180),
                        cv2.FONT_HERSHEY_SIMPLEX, text_size / 20, success_text_color, 2)
            cv2.imshow("Settings", imgStacked)
            while True:
                k = cv2.waitKey(1)
                if k == ord(' '):
                    break

            ta.excelmation(excel_path, data)
        elif k == 27:
            break

if recongnitionMode == 'Multi-image':
    while True:
        print("是否经过Single-image检测(Y or N)(或按下Esc键退出):", end=' ')
        Single_mode = input()
        if Single_mode.lower() == 'esc':
            break
        if Single_mode == 'Y':
            while True:
                print("请输入要检测图片的路径(或按下Esc键返回):", end=' ')
                path = input().strip()  # ./photodata/image005.png
                if path.lower() == 'esc':
                    break
                if path.lower() == 'exit()':
                    break
                img = cv2.imread(path)
                while True:
                    imgPre = ta.preProcessing(img)
                    imgStacked, total, imgContours = ta.drawContour(img, imgPre, minArea=15)
                    k = cv2.waitKey(1)
                    if k == 27:
                        break
        elif Single_mode == 'N':
            print("请输入图片文件夹路径:", end=' ')
            folder_path = input().strip()
            if folder_path.lower() == 'esc':
                break
            if folder_path.lower() == 'exit()':
                break
            image_files = ta.readPath(folder_path)
            # print(image_files)
            for image in image_files:
                print(image)
                img = cv2.imread(image)
                imgPre = ta.preProcessing(img)
                imgStacked, total, imgContours = ta.drawContour(img, imgPre, minArea=15)
                current_time = datetime.now().strftime("%Y-%m-%d %H:%M:%S")
                image_name = f"Picimg_{str(image_count).zfill(3)}.png"
                image_path = os.path.join(save_dir, image_name)
                cv2.imwrite(image_path, imgContours)
                data.append([current_time, image_name, total])
                image_count += 1
                ta.excelmation(excel_path, data)
            print("多文件检测结束!")
            break

        elif Single_mode.lower() == 'exit()':
            break
自定义模块tally.py
这部分代码上传至了Github上,需用自取。
作用:集成了本项目中所有用到的功能函数,建议大家可以学习学习。
4、项目资源
GitHub:23 智能计数和表单信息
5、项目总结
使用钥匙是因为我身旁没有比较好的检测物体,拿的是我旁边的桌子上的备用钥匙,挺多的,代码也是按照了实验室的光照环境和物体本身的条件下修改的,拿去做其他的计数时要修改一部分代码。
这里我也尝试使用了特征匹配的方法,但效果就是强差人意了,而且也不如轨迹栏那么容易调整。
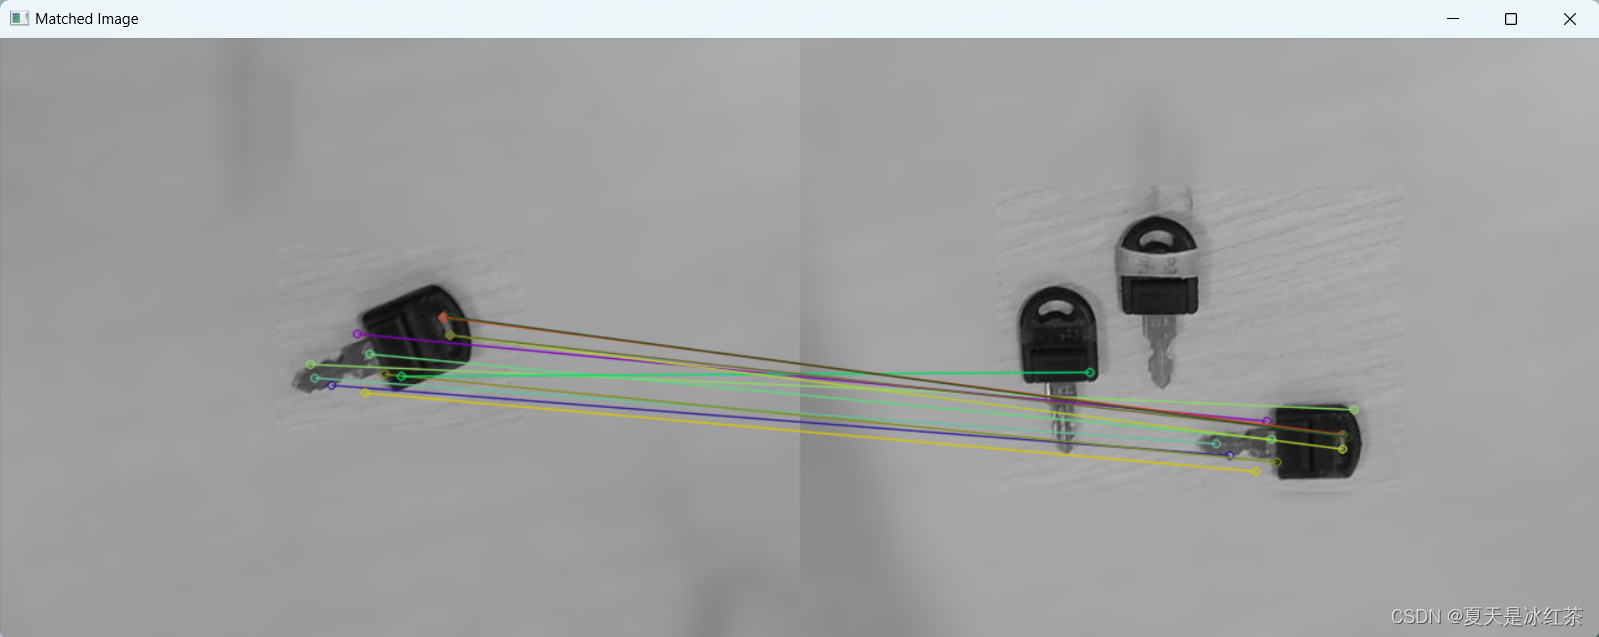
控制台显示数量为12,感兴趣的可以去GitHub里面找到main2sift.py文件,运行看看,这里我就不展示代码了。
最初采用的轮廓绘点的方法,得到的效果很差。而且正是因为考虑到了外界环境的影响,所有才写了data_collection.py文件,用于减少外界环境的影响,但当Threshold1与Threshold2都调的较小时,就会出现轮廓点,总之误差是比较的大的。
修改方法:这里的修改方法是针对于个人使用在不同的场景下,你需要在tally.py文件中找到findContours函数,角点(approx)和面积(area),都要在打开视频的条件下,将其值打印在控制台中,找到你觉得合适的值在源码上进行修改。


