1.Oauth2认证协议
简单理解: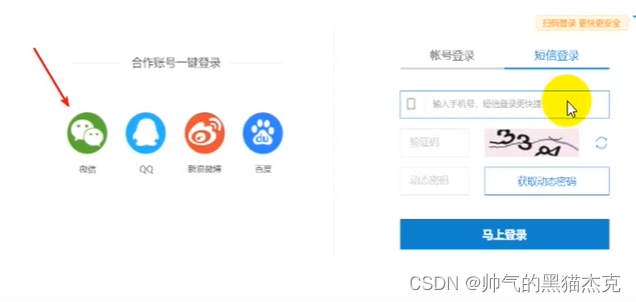
OAuth2是目前最流行的授权协议,用来授权第三方应用,获取用户数据。
1.1 流程

客户端通过认证和授权,向资源服务器去访问资源。
其中,授权和认证都需要在授权服务器,由资源拥有者(这里不指客户端),授予访问权限。
1.2 token

授权码:是用于向授权服务器申请访问令牌的一种凭据,客户端通过向授权服务器发送请求获取授权码,随后再使用该授权码向授权服务器请求访问令牌,从而获取对资源的访问权限
1.3 会话技术
一般是指cookie和session之间建立的一种会话机制。
1.假如我们登录,访问CSDN,就是跟服务器长久建立一次会话技术。通过CSDN服务器生成的session id,通过cookie响应到客户端。
2.当我访问服务器其他资源时,我客户端中的cookie中的session id 与服务器储存着的session id 进行比对。
3.找到相应的,返回给我们和上次请求相同的数据。
作用:判别是否是同一浏览器的http请求。
2.SpringSecurityOauth2架构模式
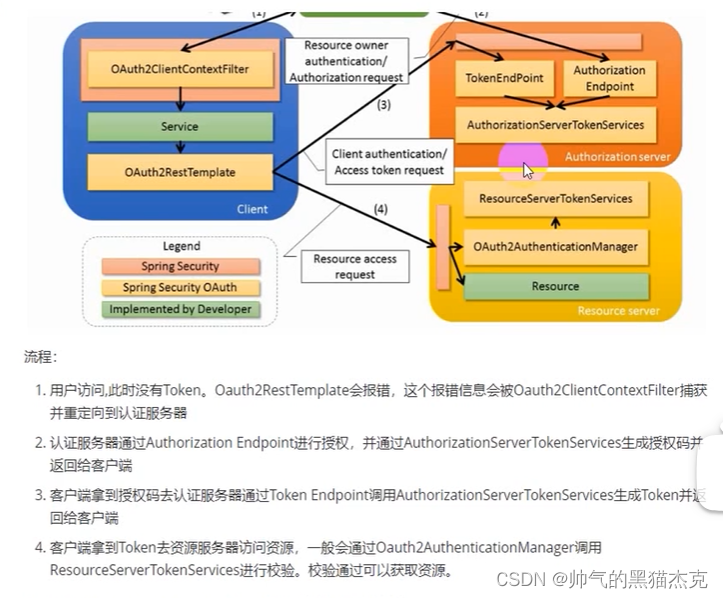
对下面图流程(图起参考作用)就是:
- 我访问资源服务器,要经过Client因为没有token,Oauth2RestTemplate会报错,被Oauth2RestFiter捕获。
- 重定向到 Authoraization server(授权服务器),经过Authorization Endpoint(授权端点),再到AuthorizationServerTokenServices,获得授权码.
- 我们拿到授权码后,还是要经过TokenEndPoint(令牌端点),再到AuthorizationServerTokenServices,获得token
- 客户端有了token后,拿着token访问资源,通过Oauth2AuthenticationManager调用ResourceServerTokenServices进行校验。
2.1 授权模式
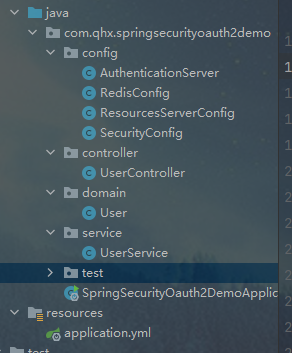
包目录
2.1.1 导入依赖
		<!--版本号-->
        <spring-boot.version>2.6.13</spring-boot.version>
		<spring-cloud.version>2021.0.7</spring-cloud.version>

	<!--lombok -->
		<dependency>
			<groupId>org.projectlombok</groupId>
			<artifactId>lombok</artifactId>
		</dependency>
		<!--oauth2-->
		<dependency>
			<groupId>org.springframework.cloud</groupId>
			<artifactId>spring-cloud-starter-oauth2</artifactId>
			<version>2.2.2.RELEASE</version>
		</dependency>
		<!--security-->
		<dependency>
			<groupId>org.springframework.cloud</groupId>
			<artifactId>spring-cloud-starter-security</artifactId>
			<version>2.2.2.RELEASE</version>
		</dependency>

	<dependencyManagement>
		<dependencies>
			<dependency>
				<groupId>org.springframework.boot</groupId>
				<artifactId>spring-boot-dependencies</artifactId>
				<version>${spring-boot.version}</version>
				<type>pom</type>
				<scope>import</scope>
			</dependency>
         <!--spring-cloud依赖-->
			<dependency>
				<groupId>org.springframework.cloud</groupId>
				<artifactId>spring-cloud-dependencies</artifactId>
				<version>${spring-cloud.version}</version>
				<type>pom</type>
				<scope>import</scope>
			</dependency>
		</dependencies>
	</dependencyManagement>
2.1.2 流程大概
1.我们不是自定义实现UserDetailService 去自定义 loadUserByUsername()方法,
2.自定义SercutiyConfig extends WebSecurityConfigurerAdapter 继承这个逻辑。
3.自定义 AuthenticationServer extends AuthorizationServerConfigurerAdapter (在实际开发中,授权服务器逻辑是框架帮我们定义的)
4. 自定义 ResourcesServerConfig extends ResourceServerConfigurerAdapter(也就是我们没用框架时候的资源)
2.1.3 代码实现
SecurityConfig.java
@Configuration
@EnableWebSecurity
public class SecurityConfig extends WebSecurityConfigurerAdapter {


        //@Override
        //protected void configure(AuthenticationManagerBuilder auth) throws Exception {    //auth.inMemoryAuthentication()
        //    auth.inMemoryAuthentication()
        //            .withUser("lxs")
        //            .password("{noop}123") //使用springsecurity5,需要加上{noop}指定使用NoOpPasswordEncoder给DelegatingPasswordEncoder去校验密码
        //            .roles("admin");
        //}


        @Override
        //解决静态资源被拦截的问题
        public void configure(WebSecurity web) throws Exception {

         // web.ignoring().antMatchers("/asserts/**");
        }


        @Override
        protected void configure(HttpSecurity http) throws Exception {
            http.authorizeRequests()
                    // 所有符合下面路径,放行
                    .antMatchers("/oauth/**","/login/**","/logout/**").permitAll()
                    // 剩下任何请求,都要认证后才能访问。
                    .anyRequest().authenticated()
                    .and().formLogin().permitAll()
                    // 关闭跨域保护;
                    .and().csrf().disable();
        }


        // 密码容器
        @Bean
        public PasswordEncoder passwordEncoder(){
                return new BCryptPasswordEncoder();
        }

    }
AuthenticationServer.java(授权服务器,实际情况由框架定义)
@Configuration
@EnableAuthorizationServer
public class AuthenticationServer extends AuthorizationServerConfigurerAdapter {
    @Autowired
    private PasswordEncoder passwordEncoder;

    @Override
    public void configure(ClientDetailsServiceConfigurer clients) throws Exception {
        clients.inMemory()
                // id 和 secret 也是oauth处理的
                .withClient("admin") // 配置 client - id
                .secret(passwordEncoder.encode("112233")) // 配置client- secret 简单理解秘钥
                .accessTokenValiditySeconds(3600)// 配置access-token有效时间
                .redirectUris("http://www.baidu.com")// 配置配置拿到令牌后重定向的网址(客户端)
                .scopes("all")// 配置申请的权限范围
                .authorizedGrantTypes("authorization_code"); // 配置授权类型
    }
}
ResourcesServerConfig.java
@Configuration
@EnableResourceServer
public class ResourcesServerConfig extends ResourceServerConfigurerAdapter {
    @Override
    public void configure(HttpSecurity http) throws Exception {
        http.authorizeRequests().anyRequest().authenticated()
                // 参考一下securityConf中对资源的拦截
                .and().requestMatchers().antMatchers("/user/**");
    }
}
UserController.java
@RestController
@RequestMapping("/user")
public class UserController {

    @RequestMapping("/getCurrentUser")
    public Object getCurrentUser(Authentication authentication){
        Object principal = authentication.getPrincipal();
        return principal;

    }
}
1.访问地址 ,先去授权服务器的 授权端点,拿授权码。路径参数,都是授权服务器的配置。
http://localhost:8888/oauth/authorize?response_type=code&client_id=admin&redirect_uri=http://www.baidu.com&scope=all
2.点击approve ,再点击 Authorize

3.跳转到网址,这里有授权码
.
4.之后再去令牌端点,拿token。
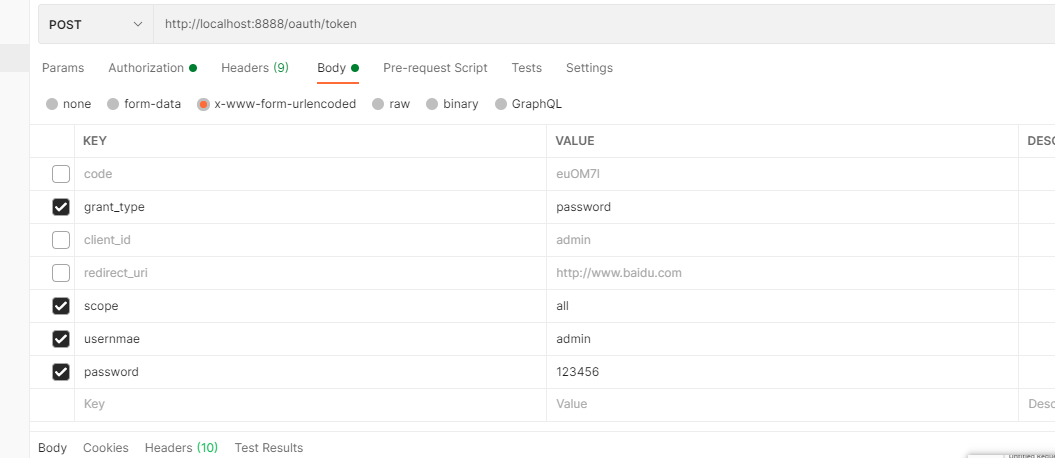
http://localhost:8888/oauth/token
PostMan配置
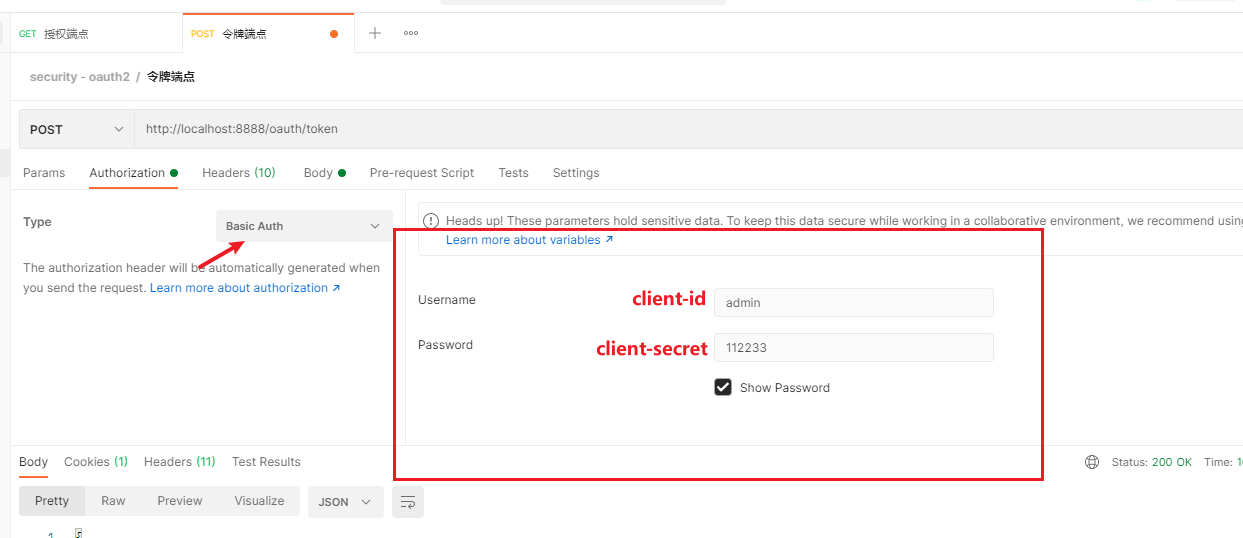
这里要和你 授权服务器的配置 要对应。
PS: 一旦你请求失败,需要重新获取授权码。

5.拿到token后,就能访问资源服务器了
{
    "access_token": "t-nFqHHJWc3cFzD4q0p4RF8a--Y", // 令牌码
    "token_type": "bearer", // 令牌类型
    "expires_in": 3599, // 有效期
    "scope": "all" // 访问范围
}
6.成功拿到请求数据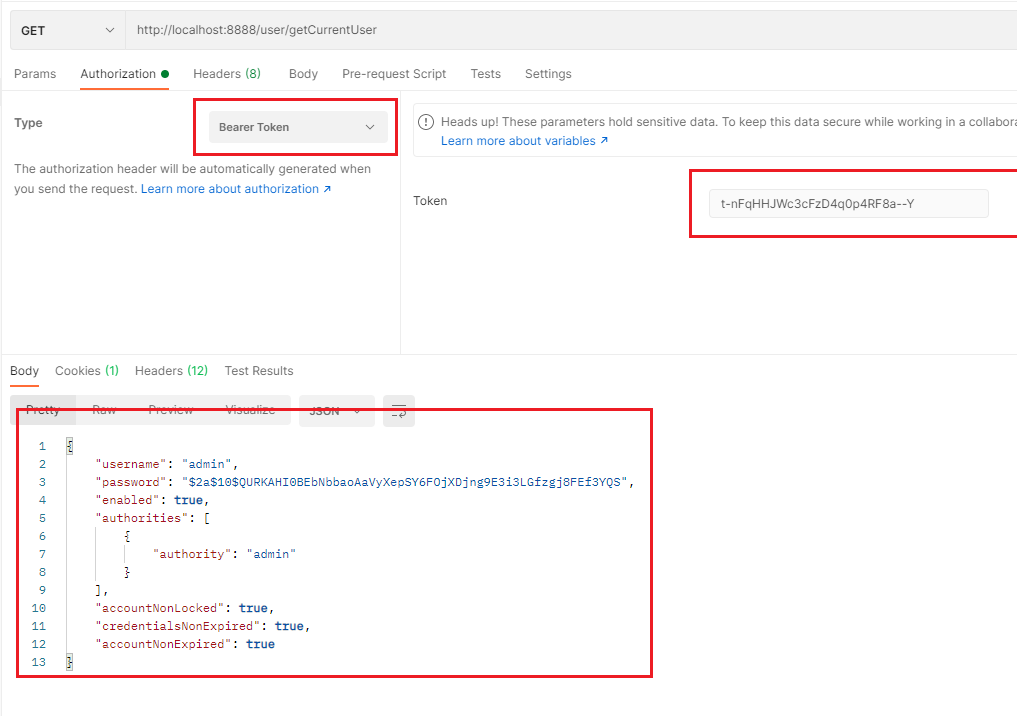
2.2 密码模式
利用上述demo授权码模式 demo的基础上修改。
说白了,我就绕过授权码,用登录的用户名和密码直接拿token。token -> 资源服务器
之前是 授权码 -> token -> 资源服务器
AuthenticationServer.java
 @Autowired
    private UserService userService; // ----新增

    @Autowired
    private AuthenticationManager authenticationManager; // ----新增

    /**
     *  密码模式
     * @param
     * @return
     */
    @Override  // -----新增
    public void configure(AuthorizationServerEndpointsConfigurer endpoints) throws Exception {
        endpoints.authenticationManager(authenticationManager)
                .userDetailsService(userService);
    }

    @Override
    public void configure(ClientDetailsServiceConfigurer clients) throws Exception {
        clients.inMemory()
                // id 和 secret 也是oauth处理的
                .withClient("admin") // 配置 client - id
                .secret(passwordEncoder.encode("112233")) // 配置client- secret 简单理解秘钥
                .accessTokenValiditySeconds(3600)// 配置access-token有效时间
                .redirectUris("http://www.baidu.com")// 配置配置拿到令牌后重定向的网址(客户端)
                .scopes("all")// 配置申请的权限范围
                .authorizedGrantTypes("password"); // 配置授权类型  // ------修改
        // authorization_code
    }
SecurityConfi.java
        @Override
        @Bean
        public AuthenticationManager authenticationManagerBean() throws Exception {
                return super.authenticationManagerBean();
        }
2.3 redis存储token
2.3.1 导入相关依赖
	<dependency>
			<groupId>org.springframework.boot</groupId>
			<artifactId>spring-boot-starter-data-redis</artifactId>
		</dependency>
		<!--commons-pools连接池,lettuce没有内置的数据库连接池所以要用第三方的 -->
		<dependency>
			<groupId>org.apache.commons</groupId>
			<artifactId>commons-pool2</artifactId>
		</dependency>
2.3.2 yml配置文件
# redis配置
spring:
  redis:
    password: 123456
    # 默认0库
    database: 0
    #连接超时时间
    timeout: 10000ms
    port: 6379
    host: 192.168.88.135
    lettuce:
      pool:
        # 设置最大连接数
        max-active: 1024
        # 最大阻塞时间
        max-wait: 10000ms
        # 最大空间连接,默认8
        max-idle: 200
        # 最小空间连接,默认5
        min-idle: 5
RedisConfig.java
新建RedisConfig,你可以理解为我们新建redis
@Configuration
public class RedisConfig {


    @Autowired
    private RedisConnectionFactory redisConnectionFactory;

    @Bean
    // 这好像是security-oauth2 专门用来新增redis用的
    public TokenStore redisTokenStore(){
        return new RedisTokenStore(redisConnectionFactory);
    }
}
AuthenticationServer.java 新加配置
 @Autowired
    @Qualifier("redisTokenStore")
    private RedisTokenStore redisTokenStore; // ----新增
    /**
     *  密码模式
     * @param
     * @return
     */
    @Override
    public void configure(AuthorizationServerEndpointsConfigurer endpoints) throws Exception {
        endpoints.authenticationManager(authenticationManager)
                .userDetailsService(userService)
                .tokenStore(redisTokenStore); // ----新增
    }
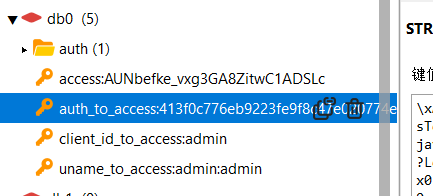
会发现你的数据库里面新增5个token。
