经常使用BERT来做研究,因此对Encoder的架构较为熟悉,但是从来没有了解过GPT这样的Decoder架构,尤其对自回归的形式不知道源码是如何实现的。
为了方便对比和讨论,接来下所探讨的源码都是基于HuggingFace这个框架的。
Bert注意力机制
先看一看Bert这个Encoder架构是如何实现autoencoding的。在BertModel这个类中,可以看到其结构是由BertEmbeddings和BertEncoder两个重要的模块构成的。
class BertModel(BertPreTrainedModel):
    """

    The model can behave as an encoder (with only self-attention) as well as a decoder, in which case a layer of
    cross-attention is added between the self-attention layers, following the architecture described in [Attention is
    all you need](https://arxiv.org/abs/1706.03762) by Ashish Vaswani, Noam Shazeer, Niki Parmar, Jakob Uszkoreit,
    Llion Jones, Aidan N. Gomez, Lukasz Kaiser and Illia Polosukhin.

    To behave as an decoder the model needs to be initialized with the `is_decoder` argument of the configuration set
    to `True`. To be used in a Seq2Seq model, the model needs to initialized with both `is_decoder` argument and
    `add_cross_attention` set to `True`; an `encoder_hidden_states` is then expected as an input to the forward pass.
    """

    def __init__(self, config, add_pooling_layer=True):
        super().__init__(config)
        self.config = config

        self.embeddings = BertEmbeddings(config)
        self.encoder = BertEncoder(config)

        self.pooler = BertPooler(config) if add_pooling_layer else None

        # Initialize weights and apply final processing
        self.post_init()
BertEmbeddings相对简单,因此编码过程是在BertEncoder中。那么接下来就是不断地层层拨开BertEncoder。
最终我们定位到了BertSelfAttention类,下面就是其定义的一些参数:
def __init__(self, config, position_embedding_type=None):
        super().__init__()
        if config.hidden_size % config.num_attention_heads != 0 and not hasattr(config, "embedding_size"):
            raise ValueError(
                f"The hidden size ({config.hidden_size}) is not a multiple of the number of attention "
                f"heads ({config.num_attention_heads})"
            )

        self.num_attention_heads = config.num_attention_heads
        self.attention_head_size = int(config.hidden_size / config.num_attention_heads)
        self.all_head_size = self.num_attention_heads * self.attention_head_size

        self.query = nn.Linear(config.hidden_size, self.all_head_size) # all_head_size与hidden_size大小相同
        self.key = nn.Linear(config.hidden_size, self.all_head_size)
        self.value = nn.Linear(config.hidden_size, self.all_head_size)

        self.dropout = nn.Dropout(config.attention_probs_dropout_prob)
        self.position_embedding_type = position_embedding_type or getattr(
            config, "position_embedding_type", "absolute"
        )
        if self.position_embedding_type == "relative_key" or self.position_embedding_type == "relative_key_query":
            self.max_position_embeddings = config.max_position_embeddings
            self.distance_embedding = nn.Embedding(2 * config.max_position_embeddings - 1, self.attention_head_size)
看到了我们耳熟能详的Q、K、V了,从源码来看就是利用了三个线性层,我把代码拿出来:
self.query = nn.Linear(config.hidden_size, self.all_head_size)
self.key = nn.Linear(config.hidden_size, self.all_head_size)
self.value = nn.Linear(config.hidden_size, self.all_head_size)
那么接下来就是对应项相乘就好了,在这里我就只给出Q和K的计算就好了,源码中还有很多细节,这里就不展开了,下面就是计算的代码:
# Take the dot product between "query" and "key" to get the raw attention scores.
attention_scores = torch.matmul(query_layer, key_layer.transpose(-1, -2))
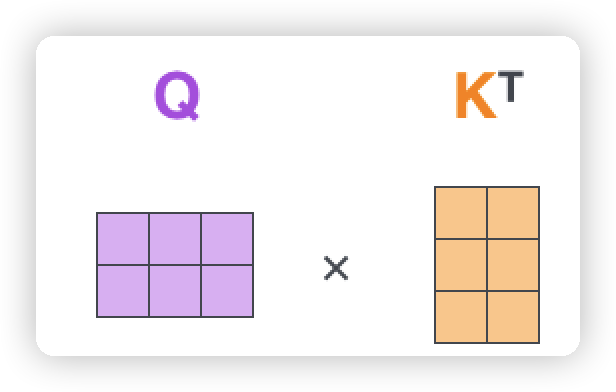
其中query_layer和key_layer是经过transpose_for_scores这个方法计算得出的,它们的转换关系如下:
def transpose_for_scores(self, x):
        new_x_shape = x.size()[:-1] + (self.num_attention_heads, self.attention_head_size) # self.num_attention_heads * self.attention_head_size = hidden_size
        x = x.view(*new_x_shape)
        return x.permute(0, 2, 1, 3) #  (bs, num_attention_heads, length, attention_head_size)
……
key_layer = self.transpose_for_scores(self.key(hidden_states))
value_layer = self.transpose_for_scores(self.value(hidden_states))
query_layer = self.transpose_for_scores(mixed_query_layer)
可以看出通过矩阵的乘法就实现了BERT的双向注意力机制,attention_scores就是注意力机制的得分。
GPT2注意力机制
直接上源码,GPT2Model类的定义如下:
class GPT2Model(GPT2PreTrainedModel):
    _keys_to_ignore_on_load_unexpected = [r"h\.\d+\.attn\.bias", r"h\.\d+\.attn\.masked_bias"]
    _keys_to_ignore_on_load_missing = [r"attn.masked_bias", r"h\.\d+\.attn\.masked_bias", r"h\.\d+\.attn\.bias"]

    def __init__(self, config):
        super().__init__(config)

        self.embed_dim = config.hidden_size

        self.wte = nn.Embedding(config.vocab_size, self.embed_dim)
        self.wpe = nn.Embedding(config.max_position_embeddings, self.embed_dim)

        self.drop = nn.Dropout(config.embd_pdrop)
        self.h = nn.ModuleList([GPT2Block(config, layer_idx=i) for i in range(config.num_hidden_layers)])
        self.ln_f = nn.LayerNorm(self.embed_dim, eps=config.layer_norm_epsilon)

        # Model parallel
        self.model_parallel = False
        self.device_map = None
        self.gradient_checkpointing = False

        # Initialize weights and apply final processing
        self.post_init()
可以看出,其相对BERT开始,更直接一些。直接的地方在于,其将GPT2Block直接给出,而BERT需要很多层封装。接下来我们看一下GPT2Block中的GPT2Attention是怎么定义的。
GPT2Attention类中定义的部分内容如下(我只放了部分明显直接的代码):
class GPT2Attention(nn.Module):
    def __init__(self, config, is_cross_attention=False, layer_idx=None):
      # 在某些时候,我们可能希望模型中的某些参数参数不更新(从开始到结束均保持不变),但又希望参数保存下来,这是我们就会用到 register_buffer() 。
      self.register_buffer(
            "bias",
            torch.tril(torch.ones((max_positions, max_positions), dtype=torch.bool)).view(
                1, 1, max_positions, max_positions
            ),
            persistent=False,
        ) # 生成了下三角矩阵,这个就是掩码的生成。
      # Layer-wise attention scaling, reordering, and upcasting
      self.scale_attn_by_inverse_layer_idx = config.scale_attn_by_inverse_layer_idx
      self.layer_idx = layer_idx
      self.reorder_and_upcast_attn = config.reorder_and_upcast_attn

      if self.is_cross_attention: # 这里假设不使用is_cross_attention,即is_cross_attention=False
          self.c_attn = Conv1D(2 * self.embed_dim, self.embed_dim)
          self.q_attn = Conv1D(self.embed_dim, self.embed_dim)
      else:
          self.c_attn = Conv1D(3 * self.embed_dim, self.embed_dim)
        self.c_proj = Conv1D(self.embed_dim, self.embed_dim)

        self.attn_dropout = nn.Dropout(config.attn_pdrop)
        self.resid_dropout = nn.Dropout(config.resid_pdrop)
可以明显看出,GPT的计算是使用了1维卷积来实现QKV权重的生成(但是不清楚为什么,看源码和nn.Linear效果差不多)。
当然,这里的Conv1D并不是使用了Pytorch的nn.Conv1D,而是自己重写的一个,我们来看看其是如何定义的,定义的源码如下:
class Conv1D(nn.Module):
"""
1D-convolutional layer as defined by Radford et al. for OpenAI GPT (and also used in GPT-2).
Basically works like a linear layer but the weights are transposed.(自己手写的原因)
Args:
nf (`int`): The number of output features.
nx (`int`): The number of input features.
"""
def __init__(self, nf, nx): # 假设是 Conv1D(3 * self.embed_dim, self.embed_dim) ,即不考虑is_cross_attention的情况
super().__init__()
self.nf = nf
self.weight = nn.Parameter(torch.empty(nx, nf))
self.bias = nn.Parameter(torch.zeros(nf))
nn.init.normal_(self.weight, std=0.02)
def forward(self, x):
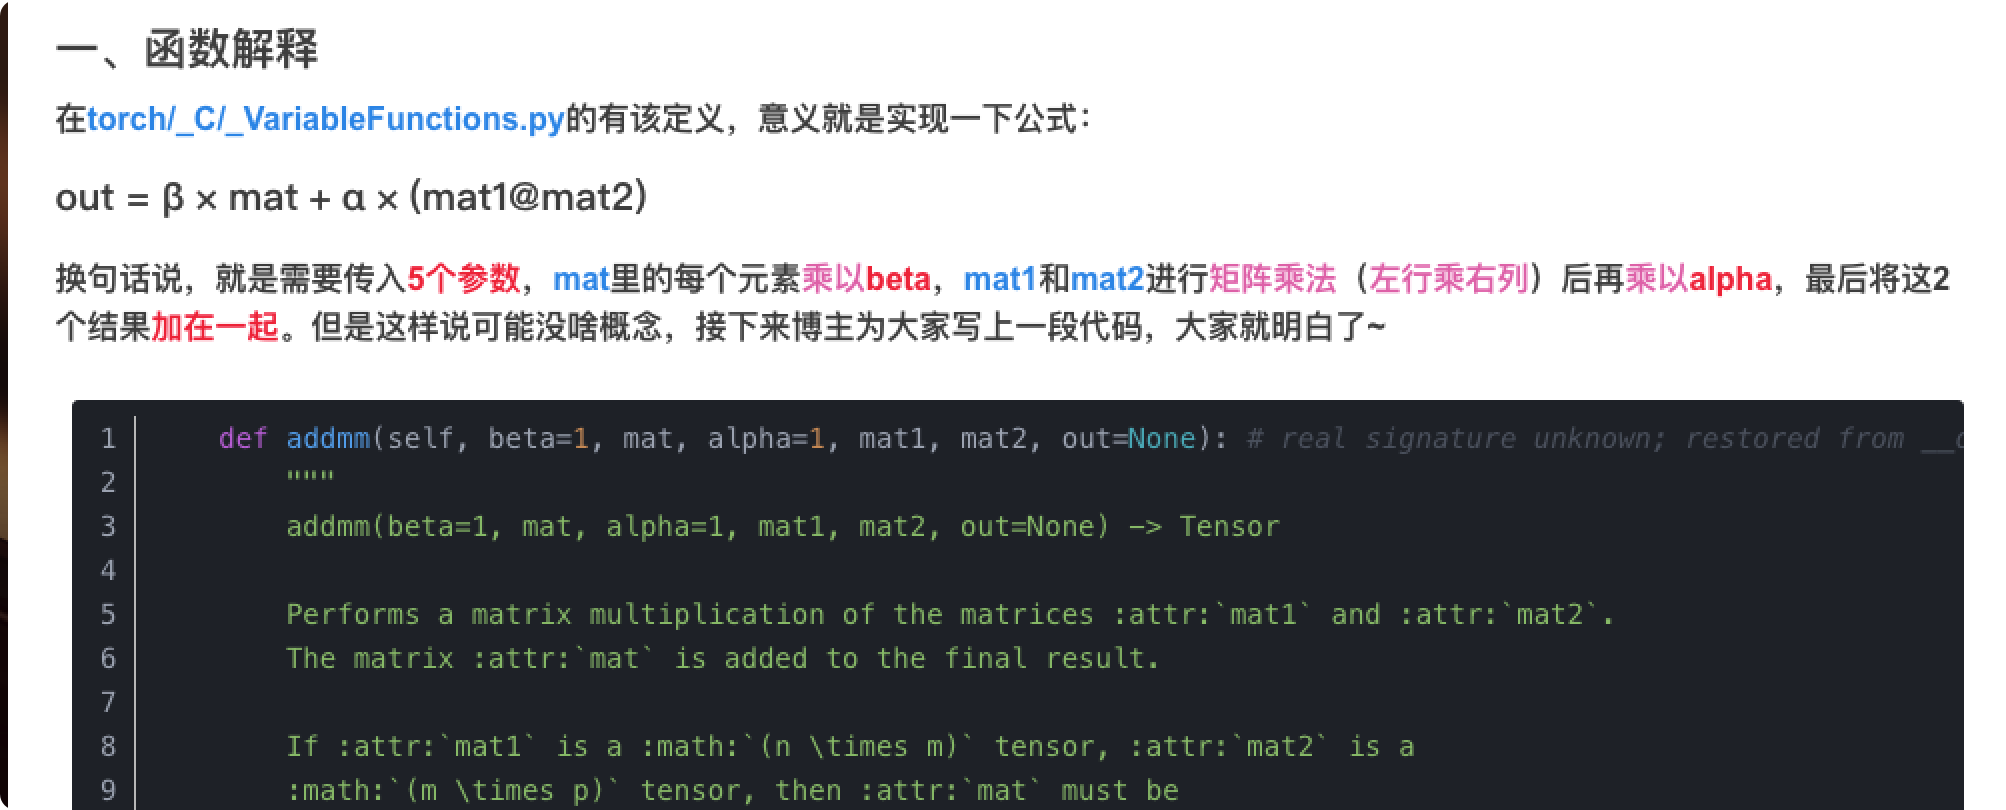
size_out = x.size()[:-1] + (self.nf,)
x = torch.addmm(self.bias, x.view(-1, x.size(-1)), self.weight) # 将 (batch_size, seq_len, embed_dim) 变为(batch_size, seq_len, 3 * embed_dim)
x = x.view(size_out)
return x
这里使用了一个torch.addmm来实现了卷积计算,计算的方式就如下图所示:
然后通过下面的代码实现了Q,K,V的权重获得。其中hidden_states.shape = (batch_size, seq_len, embed_dim), self.split_size=embed_dim。
query, key, value = self.c_attn(hidden_states).split(self.split_size, dim=2)
通过split方法就实现了上述在_int_()方法中的3 * self.embed_dim切分。
_attn方法给出了QKV的计算:
def _attn(self, query, key, value, attention_mask=None, head_mask=None):
    # Q, K矩阵相乘, 求每个 token 相对当前 sequence 所有 token 的注意力
    # [batch, heads, sequence_len, head_dim] * [batch, heads, head_dim, sequence_len] 变为  [batch, heads, sequence_len, sequence_len]
    attn_weights = torch.matmul(query, key.transpose(-1, -2))
		if self.scale_attn_weights:
       # 缩放计算,除以 sqrt(n_embd)
        attn_weights = attn_weights / torch.full(
            [], value.size(-1) ** 0.5, dtype=attn_weights.dtype, device=attn_weights.device
        )

    # Layer-wise attention scaling
    if self.scale_attn_by_inverse_layer_idx:
        attn_weights = attn_weights / float(self.layer_idx + 1)

    # 掩去 mask 位置的注意力
    # 解码时,每个位置的 token 只能跟自己以及之前位置的 token 计算注意力
    if not self.is_cross_attention:
        # if only "normal" attention layer implements causal mask
        query_length, key_length = query.size(-2), key.size(-2)
        causal_mask = self.bias[:, :, key_length - query_length : key_length, :key_length] # 使用的 self.register_buffer生成的掩码矩阵
        mask_value = torch.finfo(attn_weights.dtype).min # 获得attn_weights.dtype数值类型的最小值

      	# Need to be a tensor, otherwise we get error: `RuntimeError: expected scalar type float but found double`.Need to be on the same device, otherwise `RuntimeError: ..., x and y to be on the same device`
        mask_value =  ([], mask_value, dtype=attn_weights.dtype).to(attn_weights.device)
        # torch.where(condition,a,b)其中输入参数condition:条件限制,如果满足条件,则选择a,否则选择b作为输出。
        attn_weights = torch.where(causal_mask, attn_weights.to(attn_weights.dtype), mask_value)

    if attention_mask is not None:
        # Apply the attention mask
        attn_weights = attn_weights + attention_mask

    attn_weights = nn.functional.softmax(attn_weights, dim=-1)

    # Downcast (if necessary) back to V's dtype (if in mixed-precision) -- No-Op otherwise
    attn_weights = attn_weights.type(value.dtype)
    attn_weights = self.attn_dropout(attn_weights)

    # Mask heads if we want to
    if head_mask is not None:
        attn_weights = attn_weights * head_mask

    attn_output = torch.matmul(attn_weights, value)

    return attn_output, attn_weights
至此,我们可以看到causal_mask就是GPT模型的自回归重要的特征。attn_weights就是注意力机制的计算。
相关推荐:
past_key_values在P-TuningV2中的巧用