背景知识:
我们在编写各种文档时,为了防止文档丢失,更改失误,失误后能恢复到原来的版本,不得不复制出一个副本。每个版本有各自的内容,但最终会只有一份报告需要被我们使用 。但在此之前的工作都需要这些不同版本的报告,于是每次都是复制粘贴副本,产出的文件就越来越多,文件多不是问题,问题是:随着版本数量的不断增多,你还记得这些版本各自都是修改了什么吗?文档如此,我们写的项目代码,也是存在这个问题的!!
如何解决-->版本控制器:
为了能够更方便我们管理这些不同版本的文件,便有了版本控制器。所谓的版本控制器,就是能让你了解到一个文件的历史,以及它的发展过程的系统。通俗的讲就是一个可以记录工程的每一次改动和版本迭代的一个管理系统,同时也方便多人协同作业。目前最主流的版本控制器就是 Git 。Git 可以控制电脑上所有格式的文件,例如 doc、excel、dwg、dgn、rvt等等。对于我们开发人员来说,Git 最重要的就是可以帮助我们管理软件开发项目中的源代码
文件!
注意事项:
所有的版本控制系统,Git 也不例外,其实只能跟踪文本文件的改动,比如 TXT 文件,网页,所有的程序代码等等。版本控制系统可以告诉你每次的改动,比如在第5行加了一个单词“Linux”,在第8行删了一个单词 “Windows”。而图片、视频这些二进制文件,虽然也能由版本控制系统管理,但没法跟踪文件的变化,只能把二进制文件每次改动串起来,也就是只知道图片从100KB改成了120KB,但到底改了啥,版本控制系统不知道,也没法知道。
一、Git安装
1.1Linux Centos安装
安装 Git:
sudo 1 yum -y install git查看 Git 安装的版本:
git --version二、Git基本操作
2.1创建 Git 本地仓库
仓库是进行版本控制的一个文件目录。我们要想对文件进行版本控制,就必须先创建一个仓库出来。创建一个 Git 本地仓库对应的命令为 git init ,注意命令要在文件目录下执行,例如:
hyb@139-159-150-152:~/gitcode$ pwd
/home/hyb/gitcode
hyb@139-159-150-152:~/gitcode$ git init
Initialized empty Git repository in /home/hyb/gitcode/.git/
hyb@139-159-150-152:~/gitcode$ ll -a
total 12
drwxrwxr-x 3 hyb hyb 4096 May 5 15:49 ./
drwxr-xr-x 13 hyb hyb 4096 May 5 15:47 ../
drwxrwxr-x 7 hyb hyb 4096 May 5 15:49 .git/
我们发现,当前目录下多了一个.git 的隐藏文件, .git 目录是 Git 来跟踪管理仓库的,不要手动
修改这个目录里面的文件,不然改乱了,就把 Git 仓库给破坏了。
查看.git文件夹中的内容:
hyb@139-159-150-152:~/gitcode$ tree .git/
.git/
├── branches
├── config
├── description
├── HEAD
├── hooks
│ ├── applypatch-msg.sample
│ ├── commit-msg.sample
│ ├── fsmonitor-watchman.sample
│ ├── post-update.sample
│ ├── pre-applypatch.sample
│ ├── pre-commit.sample
│ ├── pre-merge-commit.sample
│ ├── prepare-commit-msg.sample
│ ├── pre-push.sample
│ ├── pre-rebase.sample
│ ├── pre-receive.sample
│ └── update.sample
├── info
│ └── exclude
├── objects
│ ├── info
│ └── pack
└── refs
├── heads
└── tags
9 directories, 16 files
2.2配置Git
当安装 Git 后首先要做的事情是设置你的 用户名称 和 e-mail 地址,这是非常重要的。配置命令为:
git config [--global] user.name "Your Name"
git config [--global] user.email "email@example.com"
# 把 Your Name 改成你的昵称
# 把 email@example.com 改成邮箱的格式,只要格式正确即可。
# --global:将配置项生效于所有当前机器的git仓库中(全局)
其中 --global(--global:将配置项生效于所有当前机器的git仓库中(全局)) 是一个可选项。如果使用了该选项,表示这台机器上所有的 Git 仓库都会使用这个配置。如果你希望在不同仓库中使用不同的 name 或 e-mail ,可以不要 --global 选项,但要注意的是,执行命令时必须要在仓库里。
查看配置是否成功:
git config -l删除对应的配置命令为:
git config [--global] --unset user.name
git config [--global] --unset user.email
三、认识工作区、暂存区、版本库
工作区:是在电脑上你要写代码或文件的目录。
暂存区:英文叫 stage 或 index。一般存放在 .git 目录下的 index 文件(.git/index)中,我们
把暂存区有时也叫作索引(index)。
版本库:又名仓库,英文名 repository 。工作区有一个隐藏目录 .git ,它不算工作区,而是 Git 的版本库。这个版本库里面的所有文件都可以被 Git 管理起来,每个文件的修改、删除,Git
都能跟踪,以便任何时刻都可以追踪历史,或者在将来某个时刻可以“还原”。
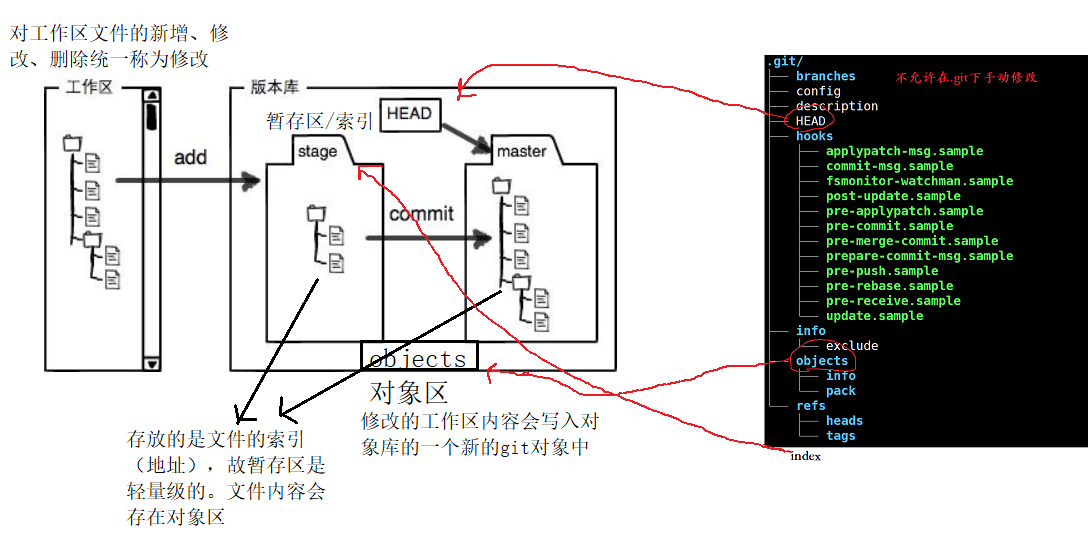
- 图中左侧为工作区,右侧为版本库。Git 的版本库里存了很多东西,其中最重要的就是暂存区。
- 在创建 Git 版本库时,Git 会为我们自动创建一个唯一的 master 分支,以及指向 master 的一个指针叫 HEAD。(分支和HEAD的概念后面再说)
- 当对工作区修改(或新增)的文件执行 git add 命令时,暂存区目录树的文件索引会被更新。
- 当执行提交操作git commit 时,master 分支会做相应的更新,可以简单理解为暂存区的目录
- 树才会被真正写到版本库中。
- 由上述描述我们便能得知:通过新建或粘贴进目录的文件,并不能称之为向仓库中新增文件,而只是在工作区新增了文件。必须要通过使用 git add 和 git commit 命令才能将文件添加到仓库中进行管理
3.1添加文件(场景一)
在包含 .git 的目录下新建一个 ReadMe 文件,我们可以使用 git add 命令可以将文件添加到暂存
区:
- 添加一个或多个文件到暂存区: git add [file1] [file2] ...
- 添加指定目录到暂存区,包括子目录: git add [dir]
- 添加当前目录下的所有文件改动到暂存区: git add .
- 再使用 git commit 命令将暂存区内容添加到本地仓库中:
- 提交暂存区全部内容到本地仓库中: git commit -m "message"
- 提交暂存区的指定文件到仓库区: git commit [file1] [file2] ... -m "message"
- 注意git commit 后面的-m 选项,要跟上描述本次提交的 message,由用户自己完成,这部分内容绝对不能省略,并要好好描述,是用来记录你的提交细节,是给我们人看的。
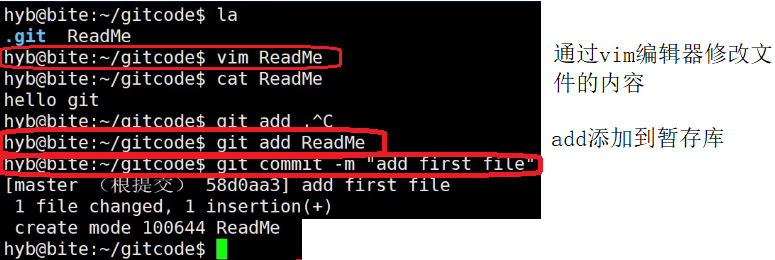
hyb@139-159-150-152:~/gitcode$ vim ReadMe
hyb@139-159-150-152:~/gitcode$ cat ReadMe
hello bit
hello bit
hyb@139-159-150-152:~/gitcode$ git add ReadMe
hyb@139-159-150-152:~/gitcode$ git commit -m "commit my first file"
[master (root-commit) c614289] commit my first file
1 file changed, 2 insertions(+)
create mode 100644 ReadMe
git commit 命令执行成功后会告诉我们,1个文件被改动(就是我们新添加的ReadMe文件),插
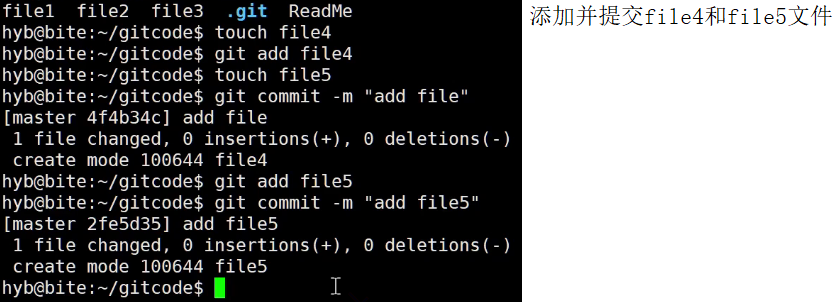
入了两行内容(ReadMe有两行内容)。我们还可以多次 add 不同的文件,而只 commit 一次便可以提交所有文件,是因为需要提交的文件是通通被 add 到暂存区中,然后一次性 commit 暂存区的所有修改。如:
hyb@139-159-150-152:~/gitcode$ touch file1 file2 file3
hyb@139-159-150-152:~/gitcode$ git add file1
hyb@139-159-150-152:~/gitcode$ git add file2
hyb@139-159-150-152:~/gitcode$ git add file3
hyb@139-159-150-152:~/gitcode$ git commit -m "add 3 files"
[master 23807c5] add 3 files
3 files changed, 0 insertions(+), 0 deletions(-)
create mode 100644 file1
create mode 100644 file2
create mode 100644 file3
截至目前为止,我们已经更够将代码直接提交至本地仓库了。我们可以使用 git log 命令,来查看
下历史提交记录:

hyb@139-159-150-152:~/gitcode$ git log
commit 23807c536969cd886c4fb624b997ca575756eed6 (HEAD -> master)
Author: hyb91 <2689241679@qq.com>
Date: Sat May 6 11:27:32 2023 +0800
add 3 files
commit c61428926f3853d4ec6dde904415b0e6c1dabcc6
Author: hyb91 <2689241679@qq.com>
Date: Sat May 6 11:25:50 2023 +0800
commit my first file
该命令显示从最近到最远的提交日志,并且可以看到我们 commit 时的日志消息。
如果嫌输出信息太多,看得眼花缭乱的,可以试试加上--pretty=oneline 参数
yb@139-159-150-152:~/gitcode$ git log --pretty=oneline
23807c536969cd886c4fb624b997ca575756eed6 (HEAD -> master) add 3 files
c61428926f3853d4ec6dde904415b0e6c1dabcc6 commit my first file
需要说明的是,我们看到的一大串类似23807c5...56eed6 的是每次提交的 commit id (版本
号),Git 的commit id 不是1,2,3……递增的数字,而是一个 SHA1 计算出来的一个非常大的数
字,用十六进制表示(你看到的commit id 和我的肯定不一样,以你自己的为准)。
index 就是我们的暂存区
HEAD 就是我们的默认指向master分支的指针
hyb@139-159-150-152:~/gitcode$ cat .git/HEAD
ref: refs/heads/master
而默认的 master分支,就是:
hyb@139-159-150-152:~/gitcode$ cat .git/refs/heads/master
23807c536969cd886c4fb624b997ca575756eed6
 objects 为 Git 的对象库,里面包含了创建的各种版本库对象及内容。当执行 git add 命令
时,暂存区的目录树被更新,同时工作区修改(或新增)的文件内容被写入到对象库中的一个新的
对象中,就位于 ".git/objects" 目录下,让我们来看看这些对象有何用处:
hyb@139-159-150-152:~/gitcode$ ls .git/objects/
23 83 8f 9c c6 e6 info pack
查找 object 时要将 commit id 分成2部分,其前2位是文件夹名称,后38位是文件名称。
找到这个文件之后,一般不能直接看到里面是什么,该类文件是经过 sha (安全哈希算法)加密过的文件,好在我们可以使用 git cat-file 命令来查看版本库对象的内容:
hyb@139-159-150-152:~/gitcode$ git cat-file -p 23807c536969cd886c4fb624b997ca575
tree 830a8c9feefbdc098bbae2cdc25e5034ce1920d7
parent c61428926f3853d4ec6dde904415b0e6c1dabcc6
author hyb91 <2689241679@qq.com> 1683343652 +0800
committer hyb91 <2689241679@qq.com> 1683343652 +0800
add 3 files
# 这就是我们最近一次的提交!
其中,还有一行 tree 830a8c9feefbdc098bbae2cdc25e5034ce1920d7 ,我们使用同样的方
法,看看结果:
hyb@139-159-150-152:~/gitcode$ git cat-file -p 830a8c9feefbdc098bbae2cdc25e5034c
100644 blob 9c9e1f0f6bff3015df71a0963004476f5e6cfd54 ReadMe
100644 blob e69de29bb2d1d6434b8b29ae775ad8c2e48c5391 file1
100644 blob e69de29bb2d1d6434b8b29ae775ad8c2e48c5391 file2
100644 blob e69de29bb2d1d6434b8b29ae775ad8c2e48c5391 file3
在看 ReadMe 对应的 9c9e1f0f6bff3015df71a0963004476f5e6cfd54 :
hyb@139-159-150-152:~/gitcode$ git cat-file -p 9c9e1f0f6bff3015df71a0963004476f5
hello bit
hello bit
# 这是我们对ReadMe做的修改!!被git记录了下来!!
总结一下,在本地的 git 仓库中,有几个文件或者目录很特殊
- index: 暂存区, git add 后会更新该内容。
- HEAD: 默认指向 master 分支的一个指针。
- refs/heads/master: 文件里保存当前 master 分支的最新commit id 。
- objects: 包含了创建的各种版本库对象及内容,可以简单理解为放了 git 维护的所有修改。
3.2修改文件
Git 比其他版本控制系统设计得优秀,因为 Git 跟踪并管理的是修改,而非文件。
什么是修改?比如你新增了一行,这就是一个修改,删除了一行,也是一个修改,更改了某些字符,也是一个修改,删了一些又加了一些,也是一个修改,甚至创建一个新文件,也算一个修改。
 git diff [file] 命令用来显示暂存区和工作区文件的差异,显示的格式正是Unix通用的diff格式。也可以使用 git diff HEAD -- [file] 命令来查看版本库和工作区文件的区别。知道了对 ReadMe 做了什么修改后,再把它提交到本地仓库就放心多了。

3.3版本回退
之前我们也提到过,Git 能够管理文件的历史版本,这也是版本控制器重要的能力。如果有一天你发现之前前的工作做的出现了很大的问题,需要在某个特定的历史版本重新开始,这个时候,就需要版本回退的功能了。
执行 git reset 命令用于回退版本,可以指定退回某一次提交的版本。要解释一下“回退”本质是
要将版本库中的内容进行回退,工作区或暂存区是否回退由命令参数决定:
git reset 命令语法格式为: git reset [--soft | --mixed | --hard] [HEAD]- --mixed 为默认选项,使用时可以不用带该参数。该参数将暂存区的内容退回为指定提交版本内容,工作区文件保持不变。
- --soft 参数对于工作区和暂存区的内容都不变,只是将版本库回退到某个指定版本。
- --hard 参数将暂存区与工作区都退回到指定版本。切记工作区有未提交的代码时不要用这个命令,因为工作区会回滚,你没有提交的代码就再也找不回了,所以使用该参数前一定要慎重。
HEAD 说明:
◦ 可直接写成 commit id,表示指定退回的版本
◦ HEAD 表示当前版本
◦ HEAD^ 上一个版本
◦ HEAD^^ 上上一个版本
◦ 以此类推...
• 可以使用 ~数字表示:
◦ HEAD~0 表示当前版本
◦ HEAD~1 上一个版本
◦ HEAD^2 上上一个版本
◦ 以此类推...
为了便于表述,方便测试回退功能,我们先做一些准备工作:更新3个版本的 ReadMe,并分别进行3次提交,如下所示:
# 第一次修改提交
hyb@139-159-150-152:~/gitcode$ cat ReadMe
hello bit
hello git
hello world
hello version1
hyb@139-159-150-152:~/gitcode$ git add ReadMe
hyb@139-159-150-152:~/gitcode$ git commit -m"add version1"
[master cff9d1e] add version1
1 file changed, 1 insertion(+)
# 第二次修改提交
hyb@139-159-150-152:~/gitcode$ cat ReadMe
hello bit
hello git
hello world
hello version1
hello version2
hyb@139-159-150-152:~/gitcode$ git add ReadMe
hyb@139-159-150-152:~/gitcode$ git commit -m"add version2"
1 file changed, 1 insertion(+)
# 第三次修改提交
hyb@139-159-150-152:~/gitcode$ cat ReadMe
hello bit
hello git
hello world
hello version1
hello version2
hello version3
hyb@139-159-150-152:~/gitcode$ git add ReadMe
hyb@139-159-150-152:~/gitcode$ git commit -m"add version3"
[master d95c13f] add version3
1 file changed, 1 insertion(+)
# 查看历史提交记录
hyb@139-159-150-152:~/gitcode$ git log --pretty=oneline
d95c13ffc878a55a25a3d04e22abfc7d2e3e1383 (HEAD -> master) add version3
14c12c32464d6ead7159f5c24e786ce450c899dd add version2
cff9d1e019333318156f8c7d356a78c9e49a6e7b add version1
...
现在,如果我们在提交完 version3 后, 发现 version 3 编写错误,想回退到 version2,重新基于
version 2 开始编写。由于我们在这里希望的是将工作区的内容也回退到 version 2 版本,所以需
要用到 --hard 参数,示例如下:
hyb@139-159-150-152:~/gitcode$ git log --pretty=oneline
d95c13ffc878a55a25a3d04e22abfc7d2e3e1383 (HEAD -> master) add version3
14c12c32464d6ead7159f5c24e786ce450c899dd add version2
cff9d1e019333318156f8c7d356a78c9e49a6e7b add version1
...
hyb@139-159-150-152:~/gitcode$ git reset --hard 14c12c32464d6ead7159f5c24e786ce4
HEAD is now at 14c12c3 add version2
hyb@139-159-150-152:~/gitcode$ cat ReadMe
hello bit
hello git
hello world
hello version1
hello version2
我们惊奇的发现,此时ReadMe 文件的内容,已经回退到 version2 了!,当前,我们再次用 git
log 查看一下提交日志,发现HEAD 指向了version2,如下所示:
hyb@139-159-150-152:~/gitcode$ git log --pretty=oneline
14c12c32464d6ead7159f5c24e786ce450c899dd (HEAD -> master) add version2
cff9d1e019333318156f8c7d356a78c9e49a6e7b add version1
...
到这里一般回退功能就演示完了,但现在如果我后悔了,想再回到 version 3 怎么办?我们可以继续使用 git reset 命令,回退到 version 3 版本,但我们必须要拿到 version 3 的 commit
id 去指定回退的版本。
但我们看到了 git log 并不能打印出 version 3 的commit id ,运气好的话我们可以从终端
上去找找之前的记录,运气不好的话 commit id 已经被我们搞丢了=。
Git 还提供了一个git reflog 命令能补救一下,该命令用来记录本地的每一次命令。
hyb@139-159-150-152:~/gitcode$ git reflog
14c12c3 (HEAD -> master) HEAD@{0}: reset: moving to 14c12c32464d6ead7159f5c24e78
d95c13f HEAD@{1}: commit: add version3
14c12c3 (HEAD -> master) HEAD@{2}: commit: add version2
cff9d1e HEAD@{3}: commit: add version1
94da695 HEAD@{4}: commit: add modify ReadMe file
23807c5 HEAD@{5}: commit: add 3 files
c614289 HEAD@{6}: commit (initial): commit my first file
这样,你就可以很方便的找到你的所有操作记录了,但d95c13f 这个是啥东西?这个是 version
3 的commit id 的部分。没错,Git 版本回退的时候,也可以使用部分commit id 来代表目标版
本。示例如下:
# 回退到v3
hyb@139-159-150-152:~/gitcode$ git reset --hard d95c13f
HEAD is now at d95c13f add version3
# 查看工作区
hyb@139-159-150-152:~/gitcode$ cat ReadMe
hello bit
hello git
hello world
hello version1
hello version2
hello version3
# 查看log
hyb@139-159-150-152:~/gitcode$ git log --pretty=oneline
d95c13ffc878a55a25a3d04e22abfc7d2e3e1383 (HEAD -> master) add version3
14c12c32464d6ead7159f5c24e786ce450c899dd add version2
cff9d1e019333318156f8c7d356a78c9e49a6e7b add version1
94da6950d27e623c0368b22f1ffc4bff761b5b00 add modify ReadMe file
23807c536969cd886c4fb624b997ca575756eed6 add 3 files
c61428926f3853d4ec6dde904415b0e6c1dabcc6 commit my first file
可往往是理想很丰满,现实很骨感。在实际开发中,由于长时间的开发了,导致 commit id 早就找
不到了,可突然某一天,我又想回退到 version3,那该如何操作呢?貌似现在不可能了。。。
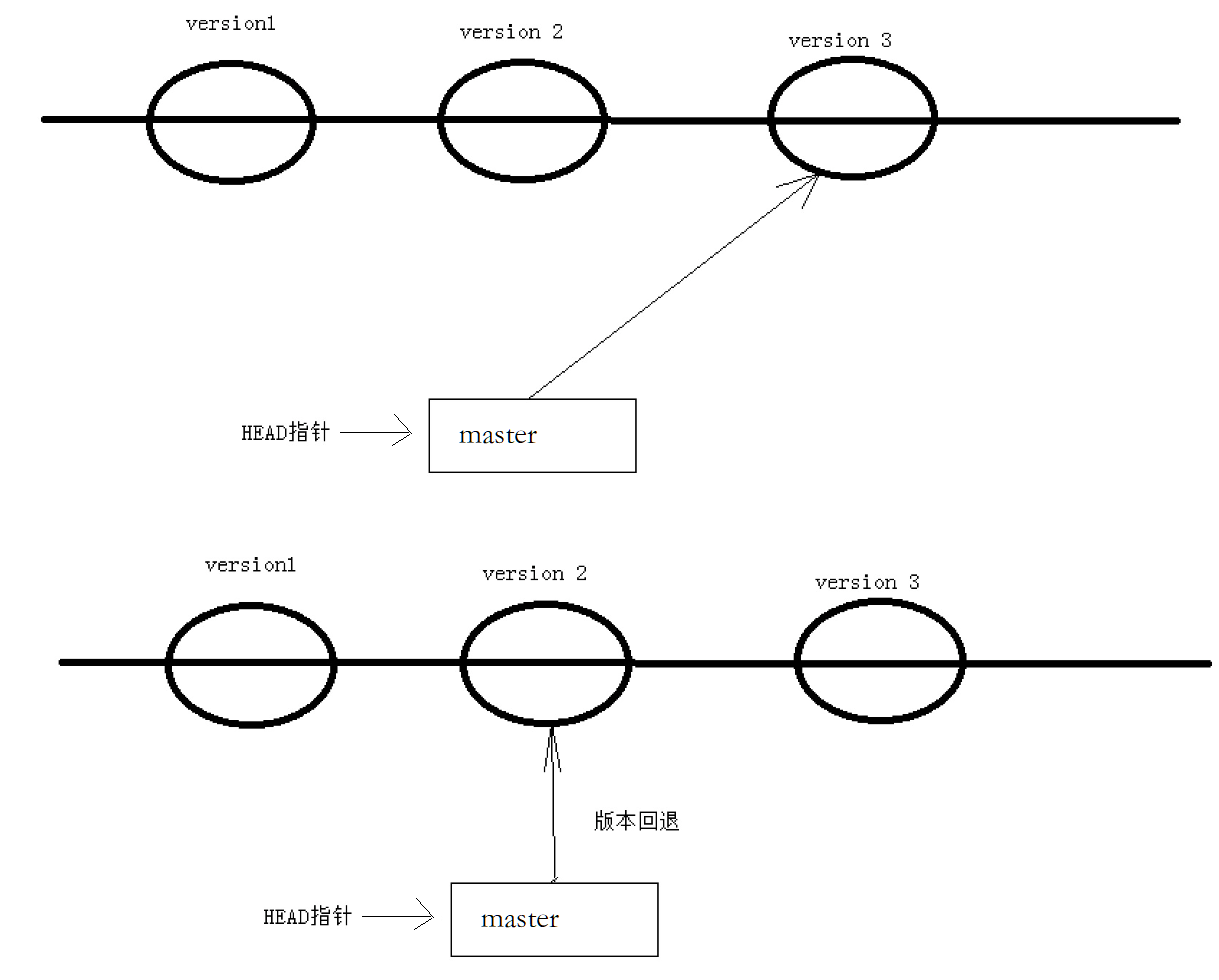
值得说的是,Git 的版本回退速度非常快,因为 Git 在内部有个指向当前分支(此处是master)的
HEAD 指针, refs/heads/master 文件里保存当前 master 分支的最新commit id 。当我们
在回退版本的时候,Git 仅仅是给 refs/heads/master 中存储一个特定的version,可以简单理解
成如下示意图:
四、撤销修改
如果我们在我们的工作区写了很长时间代码,越写越写不下去,觉得自己写的实在是垃圾,想恢复到上一个版本。
4.1情况一:对于工作区的代码,还没有add
# 向ReadMe中新增一行代码
hyb@139-159-150-152:~/gitcode$ git status
On branch master
nothing to commit, working tree clean
hyb@139-159-150-152:~/gitcode$ vim ReadMe
hyb@139-159-150-152:~/gitcode$ cat ReadMe
hello bit
hello git
hello world
hello version1
hello version2
hello version3
This piece of code is like shit #新增代码
hyb@139-159-150-152:~/gitcode$ git status
On branch master
Changes not staged for commit:
(use "git add <file>..." to update what will be committed)
(use "git restore <file>..." to discard changes in working directory)
modified: ReadMe
no changes added to commit (use "git add" and/or "git commit -a")
# 直接删除代码
hyb@139-159-150-152:~/gitcode$ vim ReadMe
hyb@139-159-150-152:~/gitcode$ cat ReadMe
hello bit
hello git
hello world
hello version1
hello version2
hello version3
hyb@139-159-150-152:~/gitcode$ git status
On branch master
nothing to commit, working tree clean
辛亏我们工作效率不高,才写了一行代码就发现不行了,要是你写了3天,一直都没有提交,该怎么删掉呢?你自己都忘了自己新增过哪些,有同学说,我可以git diff xxx 一下,看看差别在删啊,
那你肯定又要花3天时间删代码了,并且很大的概率还会改出bug。一周过去了,你怎么向你的老板交代呢?
Git 其实还为我们提供了更好的方式,我们可以使用 git checkout -- [file] 命令让工作区的
文件回到最近一次 add 或 commit 时的状态。 要注意git checkout -- [file] 命令中的
-- 很重要,切记不要省略,一旦省略,该命令就变为其他意思了,后面我们再说。示例如下:
# 向ReadMe中新增一行代码
hyb@139-159-150-152:~/gitcode$ vim ReadMe
hyb@139-159-150-152:~/gitcode$ cat ReadMe
hello bit
hello git
hello world
hello version1
hello version2
hello version3
This piece of code is like shit #新增代码
# 恢复到上一次 add 或 commit
hyb@139-159-150-152:~/gitcode$ git checkout -- ReadMe
hyb@139-159-150-152:~/gitcode$ cat ReadMe
hello bit
hello git
hello world
hello version1
hello version2
hello version3
4.2情况二:已经add ,但没有commit
add 后还是保存到了暂存区呢?怎么撤销呢?
# 向ReadMe中新增一行代码
hyb@139-159-150-152:~/gitcode$ vim ReadMe
hyb@139-159-150-152:~/gitcode$ cat ReadMe
hello bit
hello git
hello world
hello version1
hello version2
hello version3
This piece of code is like shit #新增代码
# add 存入暂存区
hyb@139-159-150-152:~/gitcode$ git add ReadMe
hyb@139-159-150-152:~/gitcode$ git status
On branch master
Changes to be committed:
(use "git restore --staged <file>..." to unstage)
modified: ReadMe
让我们来回忆一下学过的git reset 回退命令,该命令如果使用 --mixed 参数,可以将暂存区
的内容退回为指定的版本内容,但工作区文件保持不变。那我们就可以回退下暂存区的内容了!!!示例如下:
# --mixed 是默认参数,使用时可以省略
hyb@139-159-150-152:~/gitcode$ git reset HEAD ReadMe
Unstaged changes after reset:
M ReadMe
hyb@139-159-150-152:~/gitcode$ git status
On branch master
Changes not staged for commit:
(use "git add <file>..." to update what will be committed)
(use "git restore <file>..." to discard changes in working directory)
modified: ReadMe
no changes added to commit (use "git add" and/or "git commit -a")
hyb@139-159-150-152:~/gitcode$ git checkout -- ReadMe
hyb@139-159-150-152:~/gitcode$ git status
On branch master
nothing to commit, working tree clean
hyb@139-159-150-152:~/gitcode$ cat ReadMe
hello bit
hello git
hello world
hello version1
hello version2
hello version3
4.3情况三:已经add ,并且也commit 了
不要担心,我们可以git reset --hard HEAD^ 回退到上一个版本!不过,这是有条件的,就是
你还没有把自己的本地版本库推送到远程。还记得Git是分布式版本控制系统吗?我们后面会讲到远程版本库,一旦你推送到远程版本库,你就真的惨了……
# 向ReadMe中新增一行代码
hyb@139-159-150-152:~/gitcode$ vim ReadMe
hyb@139-159-150-152:~/gitcode$ cat ReadMe
hello bit
hello git
hello world
hello version1
hello version2
hello version3
This piece of code is like shit #新增代码
# 提交
hyb@139-159-150-152:~/gitcode$ git add ReadMe
hyb@139-159-150-152:~/gitcode$ git commit -m"test quash"
[master 5f71ae1] test quash
1 file changed, 1 insertion(+)
# 回退
hyb@139-159-150-152:~/gitcode$ git reset --hard HEAD^
HEAD is now at 144a3f8 add file
hyb@139-159-150-152:~/gitcode$ cat ReadMe
hello bit
hello git
hello world
hello version1
hello version2
hello version3
五、删除文件
在 Git 中,删除也是一个修改操作,我们实战一下, 如果要删除file5 文件,怎么搞呢?如果你这样
做了:
hyb@139-159-150-152:~/gitcode$ ls
file1 file2 file3 file4 file5 ReadMe
hyb@139-159-150-152:~/gitcode$ rm file5
但这样直接删除是没有用的,反而徒增烦恼, git status 命令会立刻告诉你哪些文件被删除了:
hyb@139-159-150-152:~/gitcode$ git status
On branch master
Changes not staged for commit:
(use "git add/rm <file>..." to update what will be committed)
(use "git restore <file>..." to discard changes in working directory)
deleted: file5
no changes added to commit (use "git add" and/or "git commit -a")
此时,工作区和版本库就不一致了,要删文件,目前除了要删工作区的文件,还要清除版本库的文
件。
一般走到这里,有两种可能:
• 确实要从版本库中删除该文件
• 不小心删错了
对第二种情况,很明显误删,需要使用 git 来进行恢复,很简单,我们刚学过(删除也是修改):
hyb@139-159-150-152:~/gitcode$ git checkout -- file5
hyb@139-159-150-152:~/gitcode$ ls
file1 file2 file3 file4 file5 ReadMe
对于第一种情况,很明显是没有删完,我们只删除了工作区的文件。这时就需要使用 git rm 将文
件从暂存区和工作区中删除,并且 commit :
hyb@139-159-150-152:~/gitcode$ git rm file5
rm 'file5'
hyb@139-159-150-152:~/gitcode$ git status
On branch master
Changes to be committed:
(use "git restore --staged <file>..." to unstage)
deleted: file5
hyb@139-159-150-152:~/gitcode$ git commit -m"deleted file5"
[master 5476bde] deleted file5
1 file changed, 0 insertions(+), 0 deletions(-)
delete mode 100644 file5
hyb@139-159-150-152:~/gitcode$ git status
On branch master
nothing to commit, working tree clean
现在,文件就从版本库中被删除了。
八、远程操作
8.1理解分布式版本控制系统
我们目前所说的所有内容(工作区,暂存区,版本库等等),都是在本地!也就是在你的笔记本或者计算机上。而我们的 Git 其实是分布式版本控制系统!什么意思呢?可以简单理解为,我们每个人的电脑上都是一个完整的版本库,这样你工作的时候,就不需要联网了,因为版本库就在你自己的电脑上。既然每个人电脑上都有一个完整的版本库,那多个人如何协作呢?比方说你在自己电脑上改了文件A,你的同事也在他的电脑上改了文件A,这时,你们俩之间只需把各自的修改推送给对方,就可以互相看到对方的修改了。

分布式版本控制系统的安全性要高很多,因为每个人电脑里都有完整的版本库,某一个人的电脑坏掉了不要紧,随便从其他人那里复制一个就可以了。
在实际使用分布式版本控制系统的时候,其实很少在两人之间的电脑上推送版本库的修改,因为可能你们俩不在一个局域网内,两台电脑互相访问不了。也可能今天你的同事病了,他的电脑压根没有开机。因此,分布式版本控制系统通常也有一台充当“中央服务器”的电脑,但这个服务器的作用仅仅是用来方便“交换”大家的修改,没有它大家也一样干活,只是交换修改不方便而已。有了这个“中央服务器”的电脑,这样就不怕本地出现什么故障了(比如运气差,硬盘坏了,上面的所有东西全部丢失,包括git的所有内容)
九、远程仓库
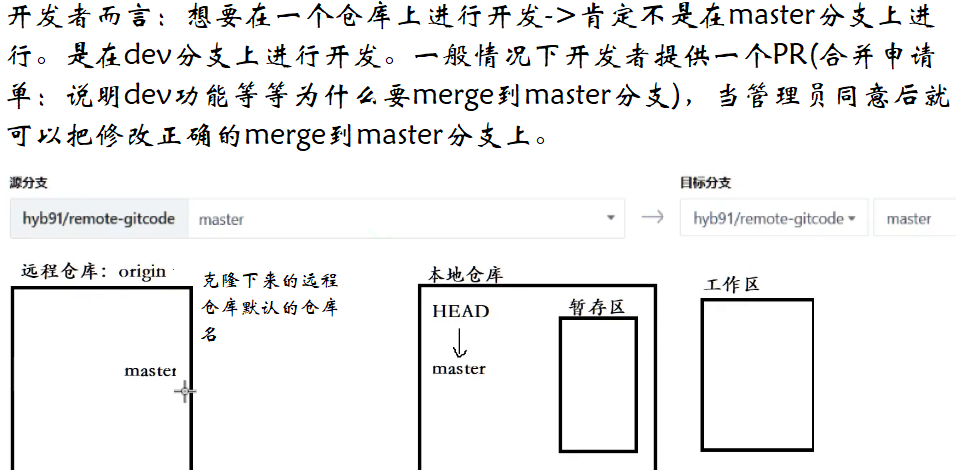
Git 是分布式版本控制系统,同一个 Git 仓库,可以分布到不同的机器上。怎么分布呢?最早,肯定只有一台机器有一个原始版本库,此后,别的机器可以 “克隆” 这个原始版本库,而且每台机器的版本库其实都是一样的,并没有主次之分。你肯定会想,至少需要两台机器才能玩远程库不是?但是我只有一台电脑,怎么玩?其实一台电脑上也是可以克隆多个版本库的,只要不在同一个目录下。不过,现实生活中是不会有人这么傻的在一台电脑上搞几个远程库玩,因为一台电脑上搞几个远程库完全没有意义,而且硬盘挂了会导致所有库都挂掉,所以我也不告诉你在一台电脑上怎么克隆多个仓库。实际情况往往是这样,找一台电脑充当服务器的角色,每天24小时开机,其他每个人都从这个“服务器”仓库克隆一份到自己的电脑上,并且各自把各自的提交推送到服务器仓库里,也从服务器仓库中拉取别人的提交。完全可以自己搭建一台运行 Git 的服务器,不过现阶段,为了学 Git 先搭个服务器绝对是小题大作。好在这个世界上有个叫 GitHub 的神奇的网站,从名字就可以看出,这个网站就是提供 Git 仓库托管服务的,所以,只要注册一个GitHub账号,就可以免费获得 Git 远程仓库。
9.1新建远程仓库


9.2克隆远程仓库
克隆/下载远端仓库到本地,需要使用 git clone 命令,后面跟上我们的远端仓库的链接,远端仓库
的链接可以从仓库中找到:选择“克隆/下载”获取远程仓库链接:

SH 协议和 HTTPS 协议是 Git 最常使用的两种数据传输协议。SSH 协议使用了公钥加密和公钥登陆机制,体现了其实用性和安全性,使用此协议需要将我们的公钥放上服务器,由 Git 服务器进行管理。使用 HTTPS 方式时,没有要求,可以直接克隆下来。
使用 HTTPS 方式:
hyb@139-159-150-152:~$ git clone https://gitee.com/hyb91/git_teaching.git
Cloning into 'git_teaching'...
Username for 'https://gitee.com': hyb91
Password for 'https://hyb91@gitee.com':
remote: Enumerating objects: 4, done.
remote: Counting objects: 100% (4/4), done.
remote: Compressing objects: 100% (4/4), done.
remote: Total 4 (delta 0), reused 0 (delta 0), pack-reused 0
Unpacking objects: 100% (4/4), 1.80 KiB | 1.80 MiB/s, done.
hyb@139-159-150-152:~$ ls
gitcode git_teaching
hyb@139-159-150-152:~$ ls git_teaching/
README.en.md README.md
使用 SSH 方式:
hyb@139-159-150-152:~$ git clone git@gitee.com:hyb91/git_teaching.git
Cloning into 'git_teaching'...
The authenticity of host 'gitee.com (212.64.63.215)' can't be established.
ECDSA key fingerprint is SHA256:FQGC9Kn/eye1W8icdBgrQp+KkGYoFgbVr17bmjey0Wc.
Are you sure you want to continue connecting (yes/no/[fingerprint])? yes
Warning: Permanently added 'gitee.com,212.64.63.215' (ECDSA) to the list of know
git@gitee.com: Permission denied (publickey).
fatal: Could not read from remote repository.
Please make sure you have the correct access rights
and the repository exists.
使用 SSH 方式克隆仓库,由于我们没有添加公钥到远端库中,服务器拒绝了我们的 clone 链接。需要我们设置一下:
第一步:创建SSH Key。在用户主目录下,看看有没有.ssh目录,如果有,再看看这个目录下有没有id_rsa 和id_rsa.pub 这两个文件,如果已经有了,可直接跳到下一步。如果没有,需要创建
SSH Key:
# 注意要输入自己的邮箱,然后一路回车,使用默认值即可
hyb@139-159-150-152:~$ ssh-keygen -t rsa -C "2689241679@qq.com"
Generating public/private rsa key pair.
Enter file in which to save the key (/home/hyb/.ssh/id_rsa):
Enter passphrase (empty for no passphrase):
Enter same passphrase again:
Your identification has been saved in /home/hyb/.ssh/id_rsa
Your public key has been saved in /home/hyb/.ssh/id_rsa.pub
The key fingerprint is:
SHA256:sepKZUwKIXjJxYcot49tvOW+Aa+pEhdsRqVDFSmgQZo 2689241679@qq.com
The key's randomart image is:
+---[RSA 3072]----+
|*+oB=+ |
|==Oo+ . |
|E*+o .. . |
| *o + o |
| o *o + S |
|. o ==.. |
| o ..++ |
|. ..+.. |
| ...+o+. |
+----[SHA256]-----+
顺利的话,可以在用户主目录里找到.ssh 目录,里面有id_rsa 和id_rsa.pub 两个文件,这两
个就是SSH Key的秘钥对, id_rsa 是私钥,不能泄露出去, id_rsa.pub 是公钥,可以放心地告
诉任何人。
hyb@139-159-150-152:~$ ls -a .ssh/
. .. id_rsa id_rsa.pub known_hosts
第二步:添加自己的公钥到远端仓库。
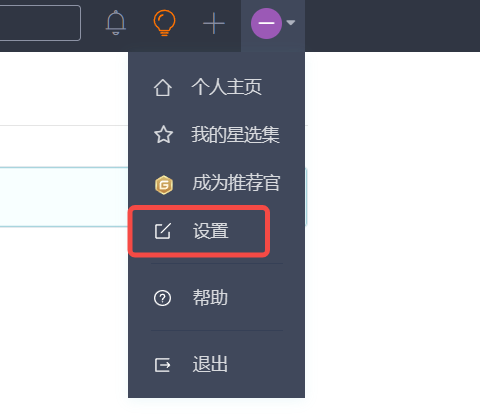
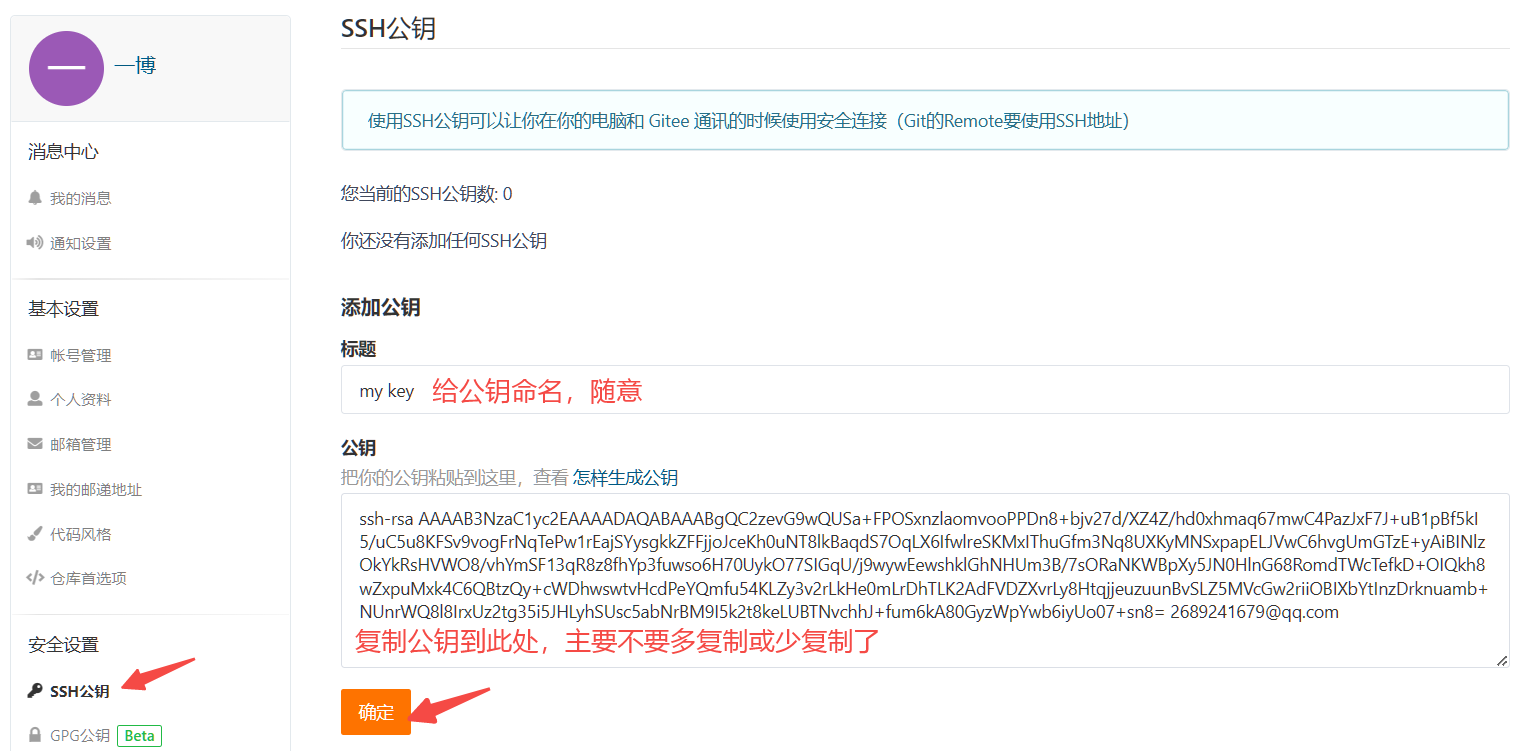
点击确认后,需要对你进行认证,输入你的账号密码即可。至此,我们的准备工作全部做完,欢快的clone吧。
hyb@139-159-150-152:~$ git clone git@gitee.com:hyb91/git_teaching.git
Cloning into 'git_teaching'...
Warning: Permanently added the ECDSA host key for IP address '212.64.63.190' to
remote: Enumerating objects: 4, done.
remote: Counting objects: 100% (4/4), done.
remote: Compressing objects: 100% (4/4), done.
remote: Total 4 (delta 0), reused 0 (delta 0), pack-reused 0
Receiving objects: 100% (4/4), done.
hyb@139-159-150-152:~$ ls
gitcode git_teaching
hyb@139-159-150-152:~$ ls git_teaching/
README.en.md README.md
done, 成功!如果有多个人协作开发,GitHub/Gitee 允许添加多个公钥,只要把每个人的电脑上的
Key 都添加到 GitHub/Gitee,就可以在每台电脑上往 GitHub/Gitee 上提交推送了。
当我们从远程仓库克隆后,实际上 Git 会自动把本地的 master 分支和远程的 master 分支对应起来,并且,远程仓库的默认名称是 origin 。在本地我们可以使用 git remote 命令,来查看远程库的
信息,如:
hyb@139-159-150-152:~/git_teaching$ git remote
origin
或者,用 git remote -v 显示更详细的信息:
hyb@139-159-150-152:~/git_teaching$ git remote -v
origin git@gitee.com:hyb91/git_teaching.git (fetch)
origin git@gitee.com:hyb91/git_teaching.git (push)
上面显示了可以抓取和推送的origin的地址。如果没有推送权限,就看不到 push 的地址。
9.3向远程仓库推送
本地已经clone 成功远程仓库后,我们便可以向仓库中提交内容,例如新增一个file.txt 文件:
# 新建文件
hyb@139-159-150-152:~/git_teaching$ ls
README.en.md README.md
hyb@139-159-150-152:~/git_teaching$ vim file.txt
hyb@139-159-150-152:~/git_teaching$ cat file.txt
hello git
# 提交文件
hyb@139-159-150-152:~/git_teaching$ git add .
hyb@139-159-150-152:~/git_teaching$ git commit -m"create file.txt"
[master 7ce3183] create file.txt
1 file changed, 1 insertion(+)
create mode 100644 file.txt提交时要注意,如果我们之前设置过全局的 name 和 e-mail,这两项配置需要和 gitee 上配置的用户名和邮箱一致,否则会出错。
![]()
![]()
或者从来没有设置过全局的 name 和 e-mail,那么我们第一次提交时也会报错。这就需要我们重新配置下了,同样要注意需要和 gitee 上配置的用户名和邮箱一致。如何配置已讲过,在这里就不再赘述。到这里我们已经将内容提交至本地仓库中,如何将本地仓库的内容推送至远程仓库呢,需要使用 git push 命令,该命令用于将本地的分支版本上传到远程并合并,命令格式如下:
git push <远程主机名> <本地分支名>:<远程分支名>
# 如果本地分支名与远程分支名相同,则可以省略冒号:
git push <远程主机名> <本地分支名>
此时我们要将本地的 master 分支推送到 origin 主机的 master 分支,则可以:
hyb@139-159-150-152:~/git_teaching$ git push origin master
Enumerating objects: 4, done.
Counting objects: 100% (4/4), done.
Compressing objects: 100% (2/2), done.
Writing objects: 100% (3/3), 308 bytes | 308.00 KiB/s, done.
Total 3 (delta 0), reused 0 (delta 0)
remote: Powered by GITEE.COM [GNK-6.4]
To gitee.com:hyb91/git_teaching.git
c6ce3f0..7ce3183 master -> master
推送成功!这里由于我们使用的是 SSH 协议,是不用每一次推送都输入密码的,方便了我们的推送操作。如果你使用的是 HTTPS 协议,有个麻烦地方就是每次推送都必须输入口令。
接下来,看看码云远端:
 代码已经被推送至远端了:

9.4拉取远程仓库
在 gitee 上点击 README.md 文件并在线修改它:

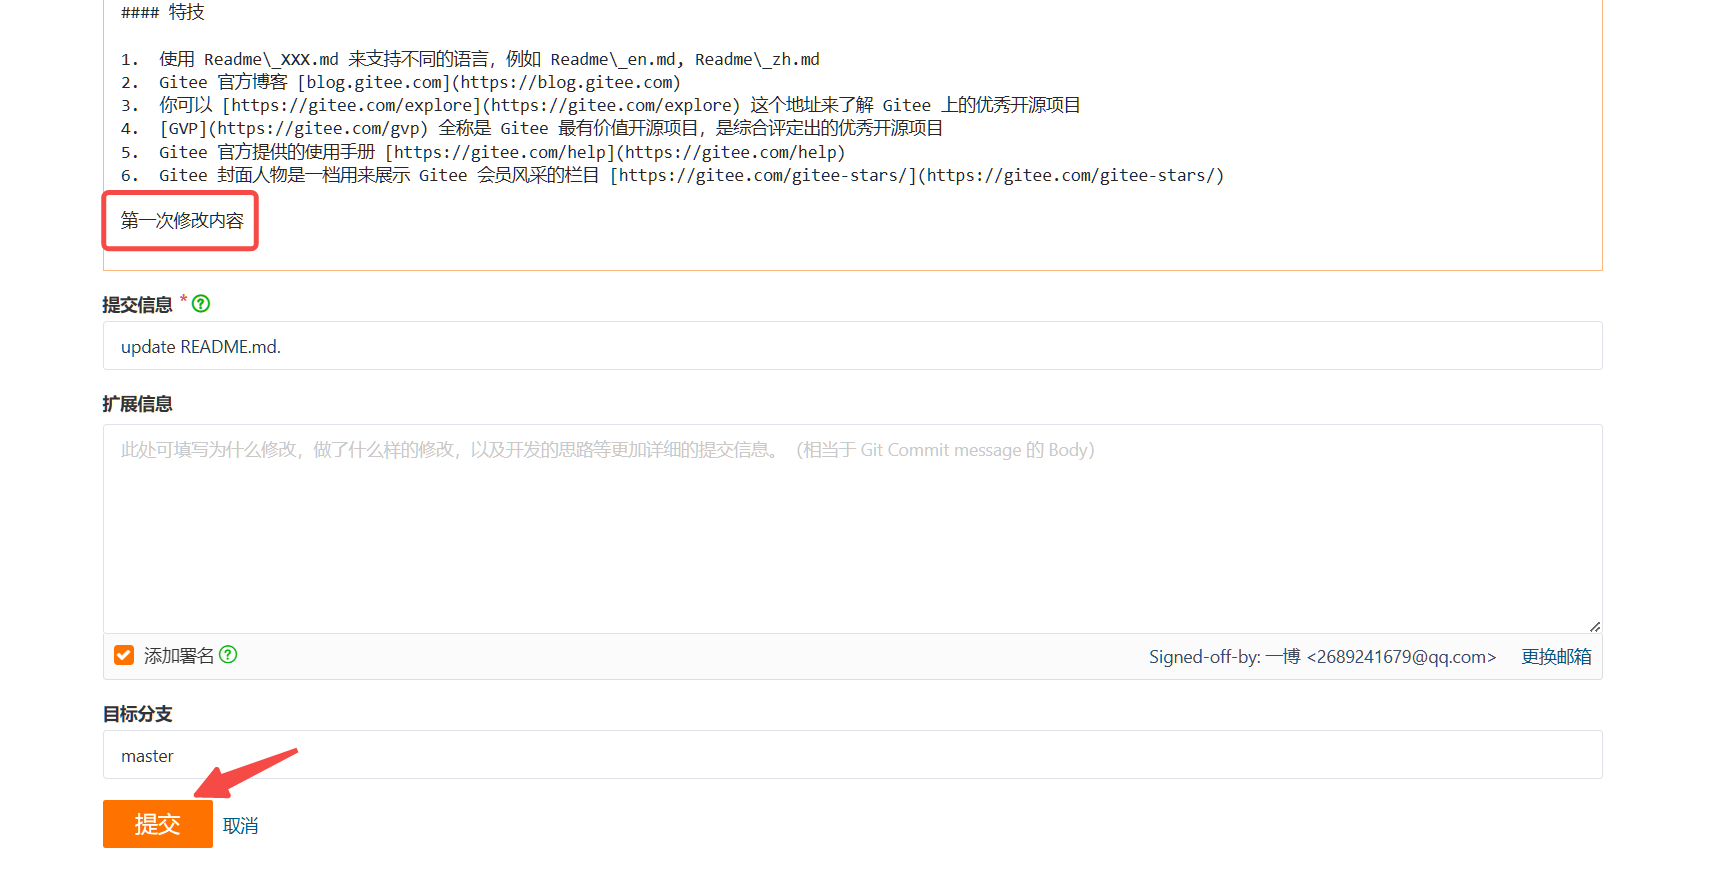
此时,远程仓库是要领先于本地仓库一个版本,为了使本地仓库保持最新的版本,我们需要拉取下远端代码,并合并到本地。Git 提供了git pull 命令,该命令用于从远程获取代码并合并本地的版
本。格式如下:
git pull <远程主机名> <远程分支名>:<本地分支名>
# 如果远程分支是与当前分支合并,则冒号后面的部分可以省略。
git pull <远程主机名> <远程分支名>
# 拉取远程分支,并与当前分支进行合并
hyb@139-159-150-152:~/git_teaching$ git pull origin master
remote: Enumerating objects: 5, done.
remote: Counting objects: 100% (5/5), done.
remote: Compressing objects: 100% (3/3), done.
remote: Total 3 (delta 1), reused 0 (delta 0), pack-reused 0
Unpacking objects: 100% (3/3), 1.02 KiB | 1.02 MiB/s, done.
From gitee.com:hyb91/git_teaching
* branch master -> FETCH_HEAD
7ce3183..60e6b0a master -> origin/master
Updating 7ce3183..60e6b0a
Fast-forward
README.md | 2 ++
1 file changed, 2 insertions(+)
hyb@139-159-150-152:~/git_teaching$ cat README.md
...
第一次修改内容
我们发现,拉取成功了!
十、配置 Git
10.1忽略特殊文件
在日常开发中,我们有些文件不想或者不应该提交到远端,比如保存了数据库密码的配置文件,那怎么让 Git 知道呢?在 Git 工作区的根目录下创建一个特殊的.gitignore 文件,然后把要忽略的文件
名填进去,Git 就会自动忽略这些文件了。不需要从头写.gitignore 文件,gitee 在创建仓库时就可以为我们生成,不过需要我们主动勾选一下:

如果当时没有选择这个选择,在工作区创建一个也是可以的。无论哪种方式,最终都可以得到一个完整的.gitignore 文件,例如我们想忽略以 .so 和 .ini 结尾所有文件, .gitignore 的内容
如下:
# 省略选择模本的内容
...
# My configurations:
*.ini
*.so
在.gitignore 文件中也可以指定某个确定的文件。
最后一步就是把.gitignore 也提交到远端,就完成了:
hyb@139-159-150-152:~/git_teaching$ vim .gitignore
hyb@139-159-150-152:~/git_teaching$ git add .
hyb@139-159-150-152:~/git_teaching$ git commit -m"add .gitignore"
[master 97811ab] add .gitignore
1 file changed, 3 insertions(+)
create mode 100644 .gitignore
hyb@139-159-150-152:~/git_teaching$ git push origin master
Enumerating objects: 4, done.
Counting objects: 100% (4/4), done.
Compressing objects: 100% (2/2), done.
Writing objects: 100% (3/3), 362 bytes | 362.00 KiB/s, done.
Total 3 (delta 0), reused 0 (delta 0)
remote: Powered by GITEE.COM [GNK-6.4]
To gitee.com:hyb91/git_teaching.git
60e6b0a..97811ab master -> master
接着我们就来验证一下.gitignore文件的能力,在工作区新增两个文件 a.so b.ini :
hyb@139-159-150-152:~/git_teaching$ touch a.so b.ini
hyb@139-159-150-152:~/git_teaching$ git status
On branch master
Your branch is up to date with 'origin/master'.
nothing to commit, working tree clean
检验.gitignore 的标准就是git status 命令是不是说working tree clean 。我们发现
Git 并没有提示在工作区中有文件新增,果然.gitignore 生效了!
但有些时候,你就是想添加一个文件到 Git,但由于这个文件被.gitignore 忽略了,根本添加不
了,那么可以用 -f 强制添加:
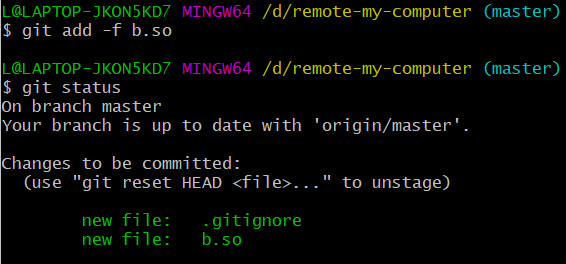
$ git 1 add -f [filename]或者你发现,可能是.gitignore 写得有问题,需要找出来到底哪个规则写错了,比如说 a.so 文件
是要被添加的,可以用 git check-ignore 命令检查:
hyb@139-159-150-152:~/git_teaching$ git check-ignore -v a.so
.gitignore:3:*.so a.so
Git 会告诉我们, .gitignore 的第3行规则忽略了该文件,于是我们就可以知道应该修订哪个规
则。还有些时候,当我们编写了规则排除了部分文件时,例如:
# 排除所有.开头的隐藏文件:
.*
但是我们发现.* 这个规则把.gitignore 也排除了。虽然可以用 git add -f 强制添加进去,但有强迫症的童鞋还是希望不要破坏.gitignore 规则,这个时候,可以添加一条例外规则:
# 排除所有.开头的隐藏文件:
.*
# 不排除.gitignore
!.gitignore
把指定文件排除在.gitignore 规则外的写法就是! +文件名,所以,只需把例外文件添加进去即
可。
10.2给命令配置别名
在我们使用 Git 期间,有些命令敲的时候着实让人头疼(太长了。。),幸运的是,git支持对命令进行简化!
举个例子,将git status 简化为git st ,对应的命令为:
$ git config --global 1 alias.st status--global 参数是全局参数,也就是这些命令在这台电脑的所有Git仓库下都有用。如果不加,那只
针对当前的仓库起作用。好了,现在敲git st 看看效果:
hyb@139-159-150-152:~/git_teaching$ git st
On branch master
Your branch is up to date with 'origin/master'.
nothing to commit, working tree clean
再来配置一个git last ,让其显示最后一次提交信息:
$ git config --global alias.last 'log -1'这样,用 git last 就能显示最近一次的提交:
hyb@139-159-150-152:~/git_teaching$ git last
commit 97811abd1d43774aeb54fee32bf4fc76b2b08170 (HEAD -> master, origin/master,
Author: hyb91 <2689241679@qq.com>
Date: Fri May 12 17:27:06 2023 +0800
add .gitignore
不过,我个人还是不推荐大家现在去使用他,等大家工作了,再去简化自己的工作吧.
十一、标签管理
11.1理解标签
标签tag ,可以简单的理解为是对某次 commit 的一个标识,相当于起了一个别名。例如,在项目
发布某个版本的时候,针对最后一次 commit 起一个 v1.0 这样的标签来标识里程碑的意义。这有什么用呢?相较于难以记住的commit id , tag 很好的解决这个问题,因为tag 一定要给一个让人容易记住,且有意义的名字。当我们需要回退到某个重要版本时,直接使用标签就能很快定位到。
11.2创建标签
在Git中打标签非常简单,首先,切换到需要打标签的分支上:
hyb@139-159-150-152:~/git_teaching$ git branch
* master
然后,敲命令git tag [name] 就可以打一个新标签:
hyb@139-159-150-152:~/git_teaching$ 1 git tag v1.0可以用命令git tag 查看所有标签:hyb@139-159-150-152:~/git_teaching$ git tag
v1.0默认标签是打在最新提交的commit 上的。那如何在指定的commit上打标签呢?方法是找到历史提
交的commit id,然后打上就可以了,示例如下:
# 历史记录
hyb@139-159-150-152:~/git_teaching$ git log --pretty=oneline --abbrev-commit
97811ab (HEAD -> master, tag: v1.0, origin/master, origin/HEAD) add .gitignore
60e6b0a update README.md.
7ce3183 create file.txt
c6ce3f0 Initial commit
# 对 Initial commit 这次提交打标签
hyb@139-159-150-152:~/git_teaching$ git tag v0.9 c6ce3f0
hyb@139-159-150-152:~/git_teaching$ git tag
v0.9
v1.0注意,标签不是按时间顺序列出,而是按字母排序的。可以用 git show [tagname] 查看标签信息。
hyb@139-159-150-152:~/git_teaching$ git show v1.0
commit 97811abd1d43774aeb54fee32bf4fc76b2b08170 (HEAD -> master, tag: v1.0, orig
Author: hyb91 <2689241679@qq.com>
Date: Fri May 12 17:27:06 2023 +0800
add .gitignore
diff --git a/.gitignore b/.gitignore
...Git 还提供可以创建带有说明的标签,用-a指定标签名,-m指定说明文字,格式为:
git tag -a [name] -1 m "XXX" [commit_id]另外,打完标签之后,使用 tree .git 命令查看一下你的本地库有什么变化,肯定能帮助你理解!
11.3操作标签
如果标签打错了,也可以删除:
hyb@139-159-150-152:~/git_teaching$ git tag
v0.9
v1.0
hyb@139-159-150-152:~/git_teaching$ git tag -d v0.9
Deleted tag 'v0.9' (was c6ce3f0)
hyb@139-159-150-152:~/git_teaching$ git tag
v1.0因为创建的标签都只存储在本地,不会自动推送到远程。所以,打错的标签可以在本地安全删除。
如果要推送某个标签到远程,使用命令git push origin <tagname>
hyb@139-159-150-152:~/git_teaching$ git tag
v1.0
hyb@139-159-150-152:~/git_teaching$ git push origin v1.0
Total 0 (delta 0), reused 0 (delta 0)
remote: Powered by GITEE.COM [GNK-6.4]
To gitee.com:hyb91/git_teaching.git
* [new tag] v1.0 -> v1.0
此时,查看远端码云,看到了标签已经被更新!完美!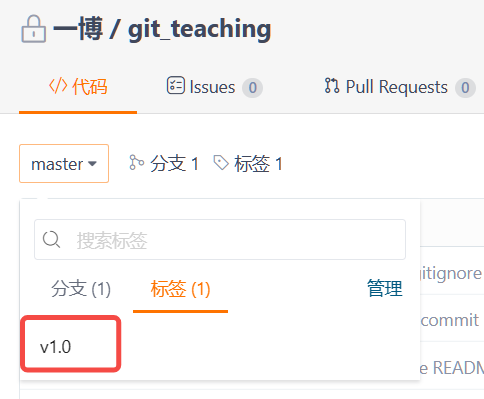
当然,如果你本地有很多标签,也可以一次性的全部推送到远端:
git 1 push origin --tags如果标签已经推送到远程,要删除远程标签就麻烦一点,先从本地删除:
hyb@139-159-150-152:~/git_teaching$ git tag
v1.0
hyb@139-159-150-152:~/git_teaching$ git tag -d v1.0
Deleted tag 'v1.0' (was 97811ab)
然后,从远程删除。删除命令也是push,但是格式如下:
hyb@139-159-150-152:~/git_teaching$ git push origin :refs/tags/v1.0
remote: Powered by GITEE.COM [GNK-6.4]
To gitee.com:hyb91/git_teaching.git
- [deleted] v1.0
在码云上查看确实删除成功:


![[Flutter]理解Widget-Key的作用](https://img-blog.csdnimg.cn/1769a8a74e424f4ebe059114f2106357.jpeg)
