目录
精灵图
精灵图的使用步骤
背景图片大小
background连写
文字阴影
盒子阴影
过渡
骨架标签
SEO三大标签
版心的介绍
css书写顺序
项目结构搭建
精灵图
场景:项目中将多张小图片,合并成一张大图片,这张大图片称之为精灵图
优点:减少服务器发送次数,减轻服务器的压力,提高页面加载速度
例如:需要在网页中展示8张小图片
•8张小图片分别发送 → 发送8次
•合成一张精灵图发送 → 发送1次
优点:减少服务器发送次数,减轻服务器的压力,提高页面加载速度。
精灵图的使用步骤
1.
创建一个盒子
2.
通过PxCook量取小图片大小,将小图片的宽高设置给盒子
3.
将精灵图设置为盒子的背景图片
4.
通过PxCook测量小图片左上角坐标,分别取
负值
设置给盒子的background-position:x y
<style>
        span {
            display: inline-block;
            width: 18px;
            height: 24px;
            background-color: pink;
            background-image: url(./images/taobao.png);
            /* 背景图位置属性: 改变背景图的位置 */
            /* 水平方向位置  垂直方向的位置 */
            /* 想要向左侧移动图片, 位置取负数;  */
            background-position: -3px 0;
        }

        b {
            display: block;
            width: 25px;
            height: 21px;
            background-color: green;
            background-image: url(./images/taobao.png);
            background-position: 0 -90px;
        }
    </style>
</head>
<body>
    <!-- <img src="./images/taobao.png" alt=""> -->
    <!-- 精灵图的标签都用行内标签  span, b, i -->
    <span></span>


    <b></b>
</body>
</html>
背景图片大小
background-size:宽度 高度;
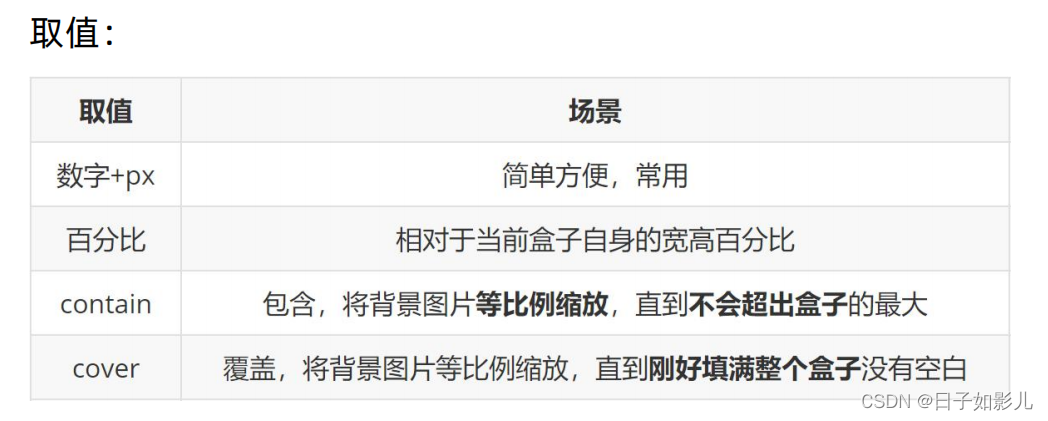
盒子和图是等比例的话 以上的取值都可以
    <style>
        .box {
            width: 400px;
            height:300px;
            background-color: pink;
            background-image: url(./images/1.jpg);
            background-repeat: no-repeat;
            /* background-size: 300px; */
            /* background-size: 50%; */

            /* 如果图的宽或高与盒子的尺寸相同了, 另一个方向停止缩放 -- 导致盒子可能有留白 */
            background-size: contain;
            /* 保证宽或高和盒子尺寸完全相同 , 导致图片显示不全 */
            /* background-size: cover; */

            /* 工作中, 图的比例和盒子的比例都是相同的, contain 和cover效果完全相同; */
        }
    </style>
</head>
<body>
    <div class="box"></div>
</body>
background连写

一般是单独写的 bg 和bgs
文字阴影
属性名:
text-shadow
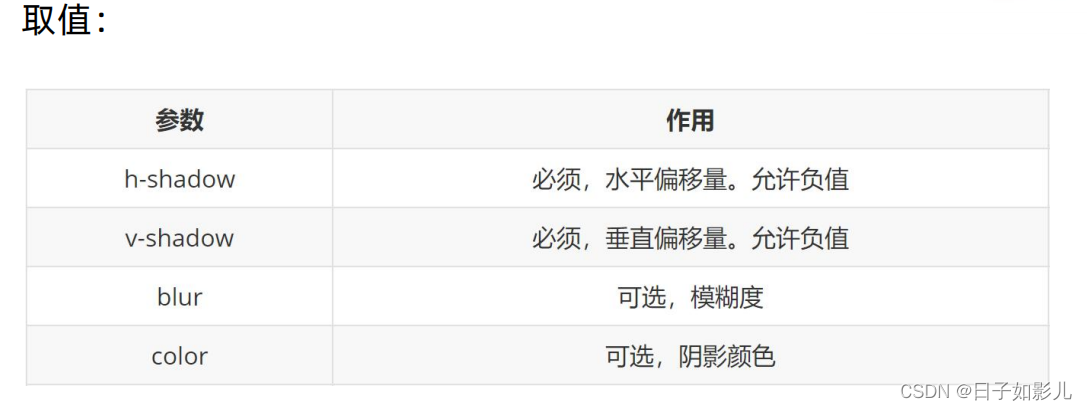
阴影可以叠加设置,每组阴影取值之间以逗号隔开
盒子阴影
box-shadow

   <style>
        .box {
            width: 200px;
            height: 200px;
            background-color: pink;

            box-shadow: 5px 10px 20px 10px green inset;

            /* 注意: 外阴影, 不能添加outset, 添加了会导致属性报错 */
            /* box-shadow: 5px 10px 20px 10px green outset; */
        }
    </style>
</head>
<body>
    <div class="box"></div>
</body>
过渡
作用:让元素的样式慢慢的变化,常配合hover使用,增强网页交互体验
属性名:
transition
常见取值:

1. 过渡需要:默认状态 和 hover状态样式不同,才能有过渡效果
2. transition属性给需要过渡的元素
本身加
3. transition属性设置在不同状态中,效果不同的
① 给默认状态设置,鼠标移入移出都有过渡效果
② 给hover状态设置,鼠标移入有过渡效果,移出没有过渡效果
  <style>
        /* 过渡配合hover使用, 谁变化谁加过渡属性 */
        .box {
            width: 200px;
            height: 200px;
            background-color: pink;
            /* 宽度200, 悬停的时候宽度600, 花费1秒钟 */
            /* transition: width 1s, background-color 2s; */

            /* 如果变化的属性多, 直接写all,表示所有 */
            transition: all 1s;
        }

        .box:hover {
            width: 600px;
            background-color: red;
        }
    </style>
</head>
<body>
    <div class="box"></div>
</body>
骨架标签
1、
<!DOCTYPE html>
文档类型声明,告诉浏览器该网页的
HTML版本
注意点:DOCTYPE需要写在页面的
第一行,不属于HTML标签
2、
<html lang="en"> 标识
网页 使用的
语言
作用:
搜索引擎归类
+
浏览器翻译
常见语言:
zh-CN
简体中文 /
en
英文
3、
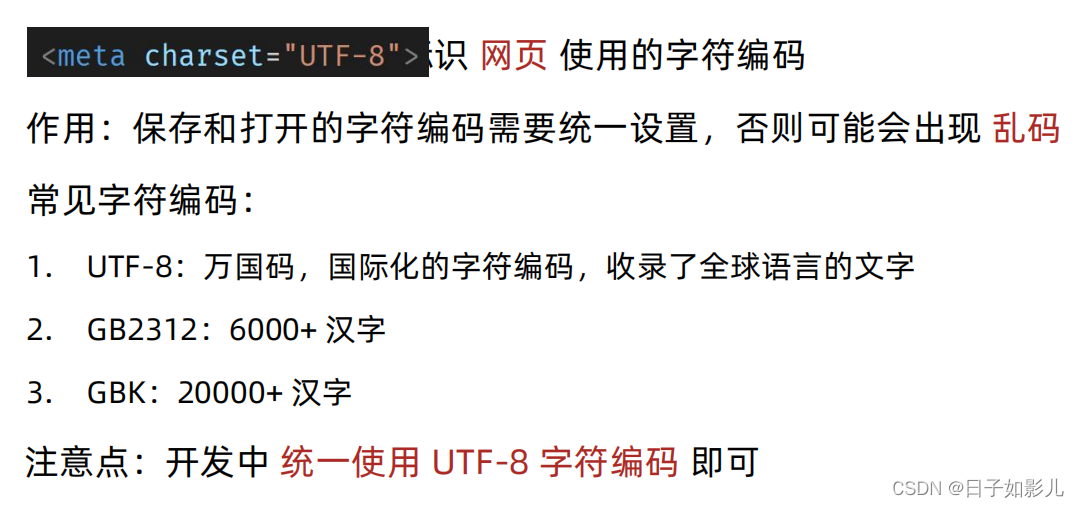
<!DOCTYPE html>
<!-- 中文网站 -->
<html lang="zh-CN">
<head>
    <!--charset="UTF-8" 规定网页的字符编码  -->
    <meta charset="UTF-8">

    <!-- ie(兼容性差) / edge -->
    <meta http-equiv="X-UA-Compatible" content="IE=edge">

    <!-- 宽度 = 设备宽度 : 移动端网页的时候要用 -->
    <meta name="viewport" content="width=device-width, initial-scale=1.0">
    <title>Document</title>
</head>
<body>

</body>
</html>
SEO三大标签
SEO(Search Engine Optimization):搜索引擎优化
作用:让网站在搜索引擎上的排名靠前
提升SEO的常见方法:
1. 竞价排名
2. 将网页制作成html后缀
3. 标签语义化(在合适的地方使用合适的标签)
4. ……
1.
title
:网页标题标签
2.
description
:网页描述标签
3.
keywords
:网页关键词标签
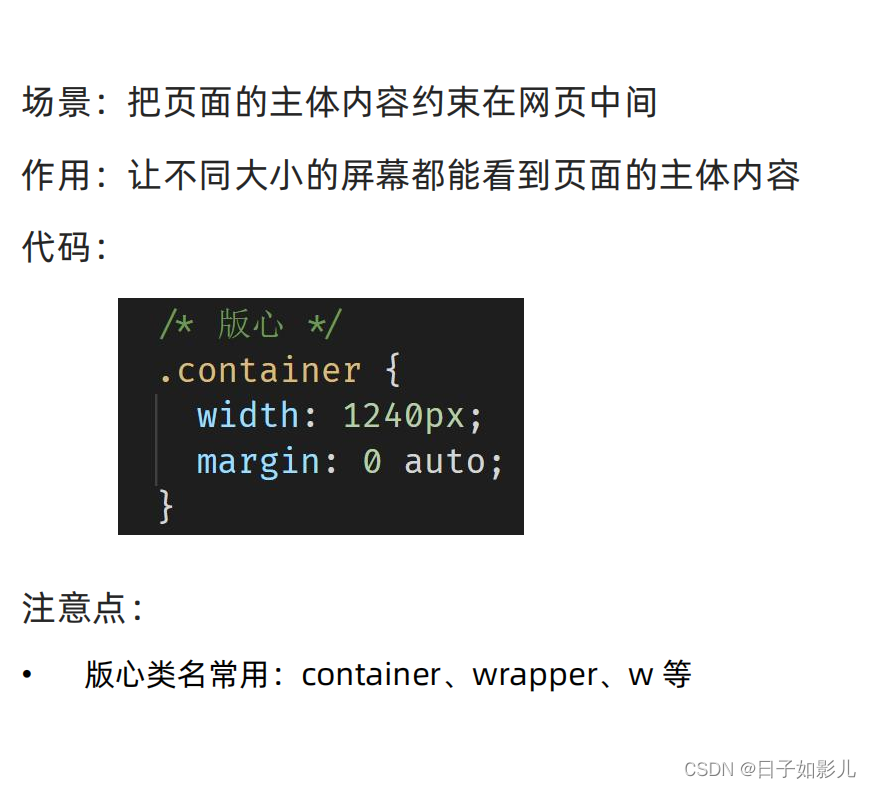
版心的介绍
css书写顺序

项目结构搭建
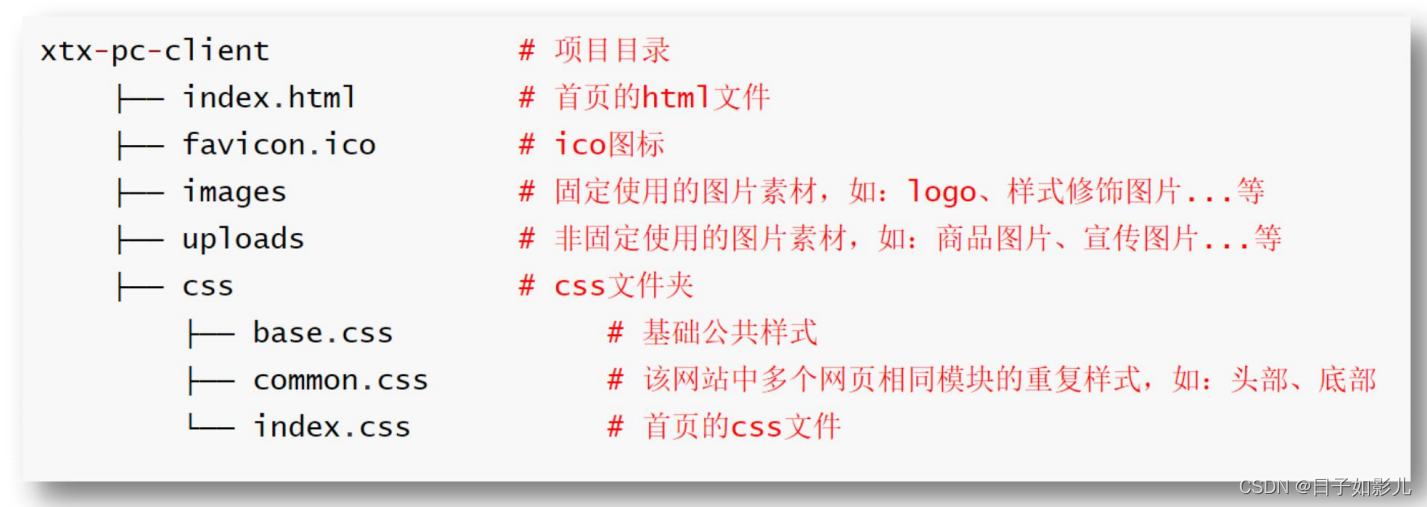
1、文件和目录准备
1.
新建项目文件夹
xtx-pc-client
,在VScode中打开
• 在实际开发中,项目文件夹不建议使用中文
• 所有项目相关文件都保存在
xtx-pc-client
目录中
2.
复制
favicon.ico
到
xtx-pc-client
目录
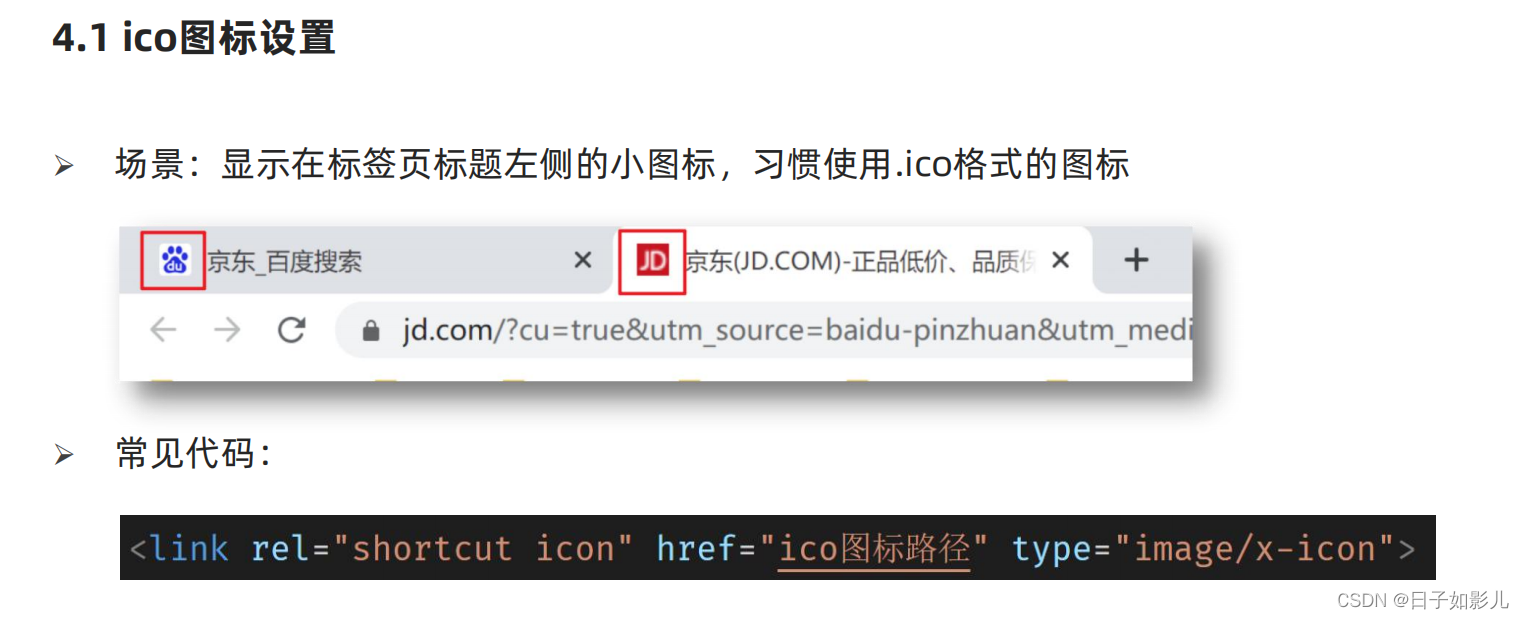
• 一般习惯将ico图标放在项目根目录
3.
复制
images
和
uploads
目录到
xtx-pc-client
目录中
• images :存放网站 固定使用
的图片素材,如:logo、样式修饰图片… 等
• uploads:存放网站 非固定使用
的图片素材,如:商品图片、宣传图片…等
4.
新建 index.html 在根目录
5.
新建 css 文件夹保存网站的样式,并新建以下CSS文件:
• base.css:基础公共样式(清除默认样式的代码)
• common.css:该网站中多个网页相同模块的重复样式,如:头部、底部
• index.css:首页样式
2、项目代码准备
<!DOCTYPE html>
<html lang="en">
<head>
    <meta charset="UTF-8">
    <meta http-equiv="X-UA-Compatible" content="IE=edge">
    <meta name="viewport" content="width=device-width, initial-scale=1.0">
    <!-- meta:desc -->
    <meta name="description" content="小兔鲜儿官网,致力于打造全球最大的食品、生鲜电商购物平台">
    <!-- meta:kw -->
    <meta name="keywords" content="小兔鲜儿,食品,生鲜,服装,家电,电商,购物">
    <title>小兔鲜儿-新鲜、惠民、快捷!</title>
    <!-- link:favicon -->
    <link rel="shortcut icon" href="favicon.ico" type="image/x-icon">
    <!-- 按顺序引入: 外链式样式表后写的生效 -->
    <link rel="stylesheet" href="./css/base.css">
    <link rel="stylesheet" href="./css/common.css">
    <link rel="stylesheet" href="./css/index.css">
</head>
base.css:
/* 清除默认样式的代码 */
/* 去除常见标签默认的 margin 和 padding */
body,
h1,
h2,
h3,
h4,
h5,
h6,
p,
ul,
ol,
li,
dl,
dt,
dd,
input {
  margin: 0;
  padding: 0;
}

/* 內减模式 */
* {
    box-sizing: border-box;
}

/* 设置网页统一的字体大小、行高、字体系列相关属性 */
body {
  font: 16px/1.5 "Helvetica Neue", Helvetica, Arial, "Microsoft Yahei",
    "Hiragino Sans GB", "Heiti SC", "WenQuanYi Micro Hei", sans-serif;
  color: #333;
}

/* 去除列表默认样式 */
ul,
ol {
  list-style: none;
}

/* 去除默认的倾斜效果 */
em,
i {
  font-style: normal;
}

/* 去除a标签默认下划线,并设置默认文字颜色 */
a {
  text-decoration: none;
  color: #333;
}

/* 设置img的垂直对齐方式为居中对齐,去除img默认下间隙 */
img {
  vertical-align: middle;
}

/* 去除input默认样式 */
input {
  border: none;
  outline: none;
  color: #333;
}

/* 左浮动 */
.fl {
  float: left;
}

/* 右浮动 */
.fr {
  float: right;
}

/* 双伪元素清除法 */
.clearfix::before,
.clearfix::after {
  content: "";
  display: table;
}
.clearfix::after {
  clear: both;
}
padding:上下 左右
margin:上下 左右
以下为common.css的易错代码:(看看)
.shortcut .wrapper a span {
    display: inline-block;
    margin-right: 8px;
    width: 11px;
    height: 16px;
    background-image: url(../images/sprites.png);
    background-position: -160px -70px;

    vertical-align: middle;
}

.logo h1 a {
    display: block;
    width: 207px;
    height: 70px;
    background-image: url(../images/logo.png);
    background-size: contain;
    /* 目的: 让h1里面的字看不见 */
    font-size: 0;
}

.nav li a {
    padding-bottom: 7px;
}


.nav li a:hover {
    color: #27ba9b;
    border-bottom: 1px solid #27ba9b;
}
 </div>
        <div class="search">
            <input type="text" placeholder="搜一搜">
            <!-- 定位 放大镜 -->
            <span></span>
        </div>
        <div class="car">
            <span>2</span>
        </div>
.search {
position: relative;
float: left;
margin-top: 24px;
margin-left: 34px;
width: 172px;
height: 30px;
border-bottom: 2px solid #e7e7e7;
}
.search input {
padding-left: 30px;
width: 172px;
height: 28px;
}
.search input::placeholder {
font-size: 14px;
color: #ccc;
}
.search span {
position: absolute;
left: 2px;
top: 0;
/* display: inline-block; */
width: 18px;
height: 18px;
background-image: url(../images/sprites.png);
background-position: -79px -69px;
}
.car {
    position: relative;
    float: left;
    margin-top: 28px;
    margin-left: 15px;
    width: 23px;
    height: 23px;
    background-image: url(../images/sprites.png);
    background-position: -119px -69px;
}

.car span {
    /* 绝对定位, 盒子具备行内块特点 */
    position: absolute;
    right: -13px;
    top: -6px;
    width: 20px;
    height: 15px;
    background-color: #e26237;
    border-radius: 8px;

    font-size: 13px;
    color: #fff;
    text-align: center;
    line-height: 15px;
}
以下是版权部分:
<!-- 版权区域 -->
    <div class="footer">
        <div class="wrapper">
            <div class="top">
                <ul>
                    <li>
                        <!-- 通过伪元素添加标签实现精灵图 -->
                        <span>价格亲民</span>
                    </li>
                    <li>
                        <span>价格亲民</span>
                    </li>
                    <li>
                        <span>价格亲民</span>
                    </li>
                </ul>
            </div>
            <div class="bottom">
                <p>
                    <a href="#">关于我们</a> |
                    <a href="#">关于我们</a> |
                    <a href="#">关于我们</a> |
                    <a href="#">关于我们</a> |
                    <a href="#">关于我们</a> |
                    <a href="#">关于我们</a> |
                    <a href="#">关于我们</a>
                </p>
                <p>CopyRight @ 小兔鲜儿</p>
            </div>
        </div>
    </div>
</body>
</html>
.footer .top li:last-child {
margin-right: 0;
}.footer .top li {
position: relative;
float: left;
margin-right: 300px;
width: 195px;
height: 58px;
line-height: 58px;
}
.footer .top li:last-child {
    margin-right: 0;
}
/* 伪元素添加的标签 行内 */
/* 如果行内块和行内文字无法通过vertical-align或行高对齐, 定位 */
.footer .top li::before {
position: absolute;
left: 0;
top: 0;
/* display: inline-block; */
content: '';
width: 58px;
height: 58px;
background-image: url(../images/sprites.png);
vertical-align: middle;
}
.footer .top li span {
margin-left: 77px;
font-size: 28px;
color: #fff;
}
/* 第二个li里面的berfore添加背景图位置属性 */
.footer .top li:nth-child(2)::before {
background-position: -64px 0;
}
text-align: center;最后一行居中对齐

