文章目录
- 背景
- 第1个坑: 类型不匹配
- 第2个坑: `BeanUtils.copyProperties`是浅拷贝
- 第3个坑:属性名称不一致
- 第4个坑:Null 值覆盖
- 第5个坑:注意引入的包
- 第6个坑:Boolean类型数据+is属性开头的坑
- 第7个坑:查找不到字段引用
- 第8个坑:不同内部类,即使相同属性,也是赋值失败
- 第9个坑:bean对应的属性,没有getter和setter方法,赋值失败
- 第10个坑:BeanUtils.copyProperties + 泛型
- 第11个坑:性能问题
- 替换BeanUtils.copyProperties的方案
背景
我们日常开发中,经常涉及到DO、DTO、VO对象属性拷贝赋值,很容易想到org.springframework.beans.BeanUtils的copyProperties 。它会自动通过反射机制获取源对象和目标对象的属性,并将对应的属性值进行复制。可以减少手动编写属性复制代码的工作量,提高代码的可读性和维护性。
但是你知道嘛?使用BeanUtils的copyProperties ,会有好几个坑,下面盘点一下:
第1个坑: 类型不匹配
@Data
public class SourceBean {
    private Long age;
}

@Data
public class TargetBean {
    private String age;
}

public class Test {

    public static void main(String[] args) {
        SourceBean source = new SourceBean();
        source.setAge(25L);

        TargetBean target = new TargetBean();
        BeanUtils.copyProperties(source, target);

        System.out.println(target.getAge());  //拷贝赋值失败,输出null
    }
}
在上述demo中,源对象SourceBean的age属性是一个Long类型,而目标对象TargetBean的age属性是一个String类型。由于类型不匹配,BeanUtils.copyProperties不会赋值成功的。我跑demo的结果,控制台输出null。
第2个坑: BeanUtils.copyProperties是浅拷贝
先给大家复习一下,什么是深拷贝?什么是浅拷贝?
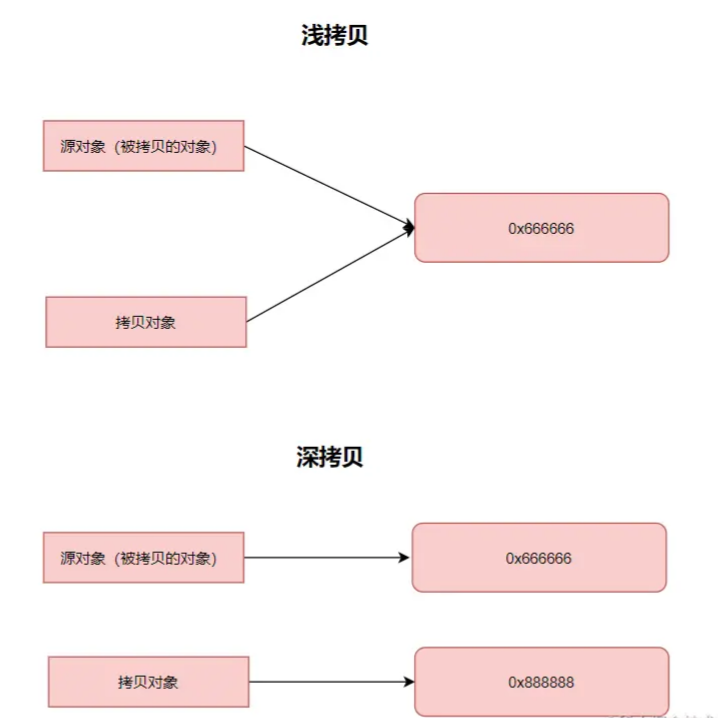
浅拷贝是指创建一个新对象,该对象的属性值与原始对象相同,但对于引用类型的属性,仍然共享相同的引用。换句话说,浅拷贝只复制对象及其引用,而不复制引用指向的对象本身。
深拷贝是指创建一个新对象,该对象的属性值与原始对象相同,包括引用类型的属性。深拷贝会递归复制引用对象,创建全新的对象,以确保拷贝后的对象与原始对象完全独立。
我再给个代码demo给大家看看哈:
public class Address {
    private String city;
    //getter 和 setter 方法省略
}

public class Person {
    private String name;
    private Address address;
    //getter 和 setter 方法省略
}

 Person sourcePerson = new Person();
 sourcePerson.setName("John");
 Address address = new Address();
 address.setCity("New York");
 sourcePerson.setAddress(address);

 Person targetPerson = new Person();
 BeanUtils.copyProperties(sourcePerson, targetPerson);

 sourcePerson.getAddress().setCity("London");

 System.out.println(targetPerson.getAddress().getCity());  // 输出为 "London"
在上述示例中,源对象Person的属性address是一个引用类型。当使用BeanUtils.copyProperties方法进行属性复制时,实际上只复制了引用,即目标对象targetPerson的 address 属性引用和源对象 sourcePerson 的 address 属性引用指向同一个对象。因此,当修改源对象的address对象时,目标对象的address对象也会被修改。
大家日常开发中,要注意这个坑~
第3个坑:属性名称不一致
public class SourceBean {
    private String username;

    // getter 和 setter 方法省略
}

public class TargetBean {
    private String userName;
    // getter 和 setter 方法省略
}

 SourceBean source = new SourceBean();
 source.setUsername("测试");

 TargetBean target = new TargetBean();
 BeanUtils.copyProperties(source, target);

 System.out.println(target.getUserName());   // 输出为 null
在上述示例中,源对象SourceBean 的属性名称是username,而目标对象TargetBean的属性名称也是userName。但是,两个 username,一个N是大写,一个n是小写,即属性名称不一致,BeanUtils.copyProperties方法无法自动映射这些属性(无法忽略大小写自动匹配),因此目标对象的userName属性值为null。
大家日常开发中,要注意这个坑哈~ 比如大小写不一致,差一两个字母等等。
第4个坑:Null 值覆盖
@Data
public class SourceBean {

    private String name;
    private String address;

}

@Data
public class TargetBean {

    private String name;
    private String address;
}

SourceBean source = new SourceBean();
source.setName("John");
source.setAddress(null);

TargetBean target = new TargetBean();
target.setAddress("address");
BeanUtils.copyProperties(source, target);

System.out.println(target.getAddress());  // 输出为 null
在上述示例中,源对象 SourceBean 的 address 属性值为 null。默认情况下,BeanUtils.copyProperties 方法会将源对象中的 null 值属性覆盖到目标对象中。因此,目标对象的 address 属性值也为 null。
如果你不希望 null 值覆盖目标对象中的属性,可以使用 BeanUtils.copyProperties 方法的重载方法,并传入一个自定义的 ConvertUtilsBean 实例来进行配置。
第5个坑:注意引入的包
BeanUtils.copyProperties其实有两个包,分别是spring、apache。大家注意一下哈,这两个包,是有点不一样的:
//org.springframework.beans.BeanUtils(源对象在左边,目标对象在右边)
public static void copyProperties(Object source, Object target) throws BeansException
//org.apache.commons.beanutils.BeanUtils(源对象在右边,目标对象在左边)
public static void copyProperties(Object dest, Object orig) throws IllegalAccessException, InvocationTargetException
大家使用的时候,要注意一下哈,千万注意自己引入的哪个BeanUtils,写对应参数位置。
第6个坑:Boolean类型数据+is属性开头的坑
把SourceBean和TargetBean中的都有个属性isTianLuo,它们的数据类型保持不变,但是一个为基本类型boolean,一个为包装类型Boolean
@Data
public class SourceBean {
    private boolean isTianLuo;
}

@Data
public class TargetBean {
    private Boolean isTianLuo;
}
跑测试用里的时候,发现赋值不上:
SourceBean source = new SourceBean();
source.setTianLuo(true);

TargetBean target = new TargetBean();
BeanUtils.copyProperties(source, target);
System.out.println(target.getIsTianLuo()); // 输出为 null
为什么呢?即使是一个包装类型,一个基本类型,应该可以赋值上才对的。
这是因为当属性类型为boolean时,属性名以is开头,属性名会去掉前面的is,因此源对象和目标对象属性对不上啦。
大家使用BeanUtils.copyProperties过程中,要注意哈~
第7个坑:查找不到字段引用
在某些开发场景呢,如果我们要修改某个字段的赋值,我们可能会全文搜索它的所有set方法,看哪些地方引用到。
但是呢,如果使用BeanUtils.copyProperties,就不知道是否引用到对应的ste方法啦,即查找不到字段引用。这就可能导致你会漏掉修改对应的字段。
第8个坑:不同内部类,即使相同属性,也是赋值失败
@Data
public class CopySource {

    public String outerName;
    public CopySource.InnerClass innerClass;

    @Data
    public static class InnerClass {
        public String InnerName;
    }
}

@Data
public class CopyTarget {
    public String outerName;
    public CopyTarget.InnerClass innerClass;

    @Data
   public static class InnerClass {
        public String InnerName;
    }
}

CopySource test1 = new CopySource();
test1.outerName = "outTianluo";

CopySource.InnerClass innerClass = new CopySource.InnerClass();
innerClass.InnerName = "innerTianLuo";
test1.innerClass = innerClass;

System.out.println(test1);
CopyTarget test2 = new CopyTarget();
BeanUtils.copyProperties(test1, test2);

System.out.println(test2);  //输出CopyTarget(outerName=outTianluo, innerClass=null)
以上demo中,CopySource和CopyTarget各自存在一个内部类InnerClass,虽然这个内部类属性也相同,类名也相同,但是在不同的类中,因此Spring会认为属性不同,不会Copy;如果要复制成功,可以让他们指向同一个内部类。
第9个坑:bean对应的属性,没有getter和setter方法,赋值失败
BeanUtils.copyProperties要拷贝属性值成功,需要对应的bean要有getter和setter方法。因为它是用反射拿到set和get方法再去拿属性值和设置属性值的。
@Data
public class SourceBean {
    private String value;
}

@Getter   //没有对应的setter方法
public class TargetBean {
    private String value;
}

SourceBean source = new SourceBean();
source.setValue("测试");

TargetBean target = new TargetBean();
BeanUtils.copyProperties(source, target);
System.out.println(target.getValue()); //输出null
第10个坑:BeanUtils.copyProperties + 泛型
如果BeanUtils.copyProperties遇到泛型,也是很可能赋值失败的哈。大家看下这个例子:
@Data
public class CopySource {

    public String outerName;
    public List<CopySource.InnerClass> clazz;

    @Data
    public static class InnerClass {
        public String InnerName;
    }
}

@ToString
@Data
public class CopyTarget {
    public String outerName;
    public List<CopyTarget.InnerClass> clazz;

    @Data
    public static class InnerClass {
        public String InnerName;
    }
}

CopySource test1 = new CopySource();
test1.outerName = "outTianluo";

CopySource.InnerClass innerClass = new CopySource.InnerClass();
innerClass.InnerName = "innerTianLuo";

List<CopySource.InnerClass> clazz = new ArrayList<>();
clazz.add(innerClass);
test1.setClazz(clazz);

System.out.println(test1);
CopyTarget test2 = new CopyTarget();
BeanUtils.copyProperties(test1, test2);

System.out.println(test2);  //输出CopyTarget(outerName=outTianluo, clazz=null)
这里面的例子,BeanUtils.copyProperties方法拷贝包含泛型属性的对象clazz。CopyTarget和CopySource的泛型属性类型不匹配,因此拷贝赋值失败。
如果是低版本的包,泛型如果不匹配,则会报错,高本版则知识拷贝赋值失败。
第11个坑:性能问题
由于这些BeanUtils类都是采用反射机制实现的,对程序的效率也会有影响。我跑了个demo对比:
SourceBean sourceBean = new SourceBean();
sourceBean.setName("tianLuoBoy");
TargetBean target = new TargetBean();

long beginTime = System.currentTimeMillis();
for (int i = 0; i < 100000; i++) {  //循环10万次
      target.setName(sourceBean.getName());
}
System.out.println("common setter time:" + (System.currentTimeMillis() - beginTime));

long beginTime1 = System.currentTimeMillis();
for (int i = 0; i < 100000; i++) {  //循环10万次
    BeanUtils.copyProperties(sourceBean, target);
}
System.out.println("bean copy time:" + (System.currentTimeMillis() - beginTime1));

//输出
common setter time:3
bean copy time:331
可以发现,简单的setter和BeanUtils.copyProperties对比,性能差距非常大。因此,慎用BeanUtils.copyProperties!!!
替换BeanUtils.copyProperties的方案
以上聊了BeanUtils.copyProperties的11个坑,都是在跟大家聊,要慎用BeanUtils.copyProperties。那有没有推荐替换它的方案呢。
- 第一种,那就是使用原始的setter和getter方法。
使用手动的setter方法进行属性赋值。这种方法可能需要编写更多的代码,但是可以提供更细粒度的控制,并且在性能方面通常比BeanUtils.copyProperties更高效。
Target target = new Target();
target.setName(source.getName());
target.setAge(source.getAge());
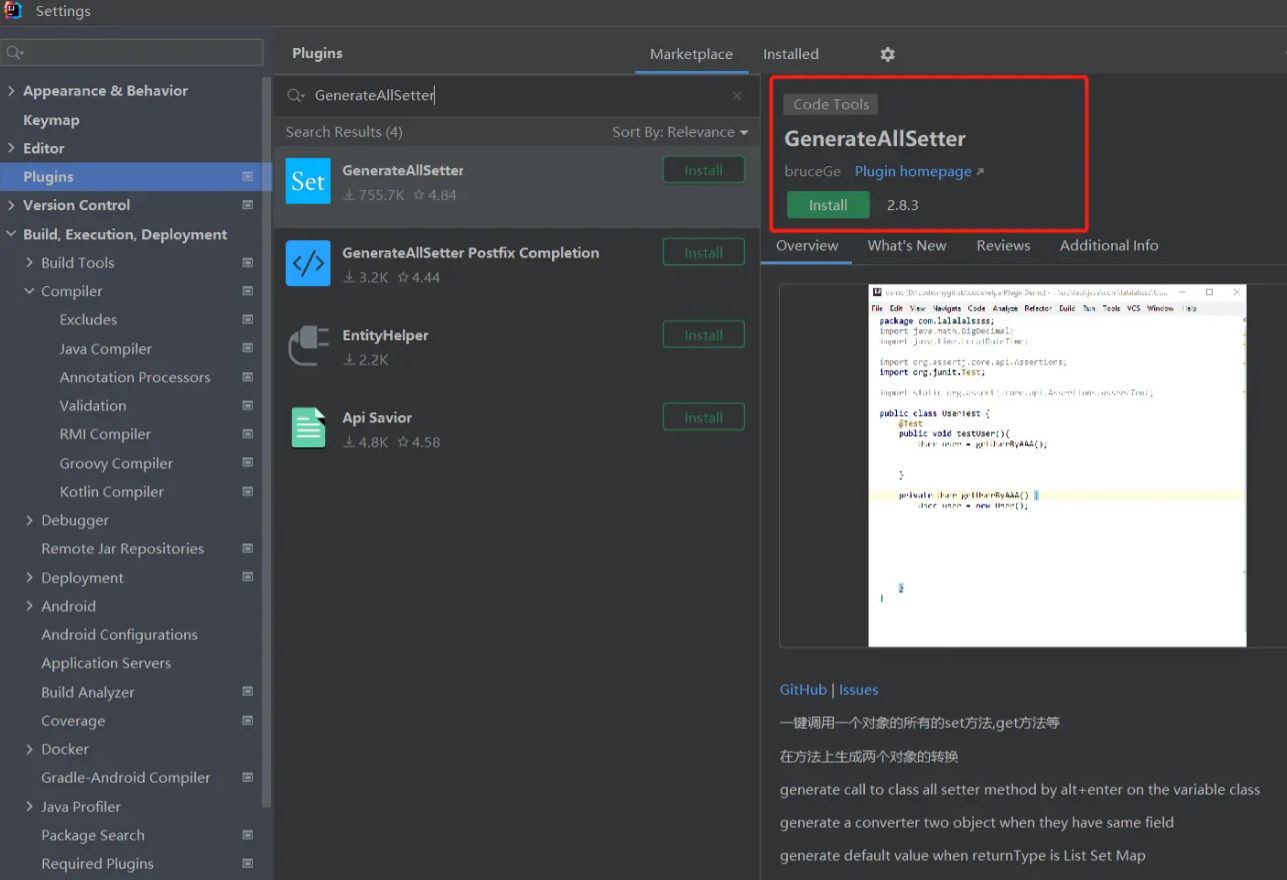
如果实在对象bean的属性比较多的话,可以使用插件GenerateAllSetter,它可以一键生成对象的set方法,挺方便的。
- 第二种方案,使用映射工具库,如MapStruct、ModelMapper等,它们可以自动生成属性映射的代码。这些工具库可以减少手动编写setter方法的工作量,并提供更好的性能。
使用MapStruct的示例:
@Mapper
public interface SourceTargetMapper {
    SourceTargetMapper INSTANCE = Mappers.getMapper(SourceTargetMapper.class);

    @Mapping(source = "name", target = "name")
    @Mapping(source = "age", target = "age")
    Target mapToTarget(Source source);
}

Target target = SourceTargetMapper.INSTANCE.mapToTarget(source);
