目录
- 1. Axios
- 1.1 Axios介绍
- 1.2 为什么使用Axios
- 1.3 Axios API
- 1.3 Vue使用axios向服务器请求数据
- 1.4 Vue使用axios向服务器提交数据
- 1.5 Vue封装网络请求
- 2. 使用Vue-cli解决Ajax跨域问题
- 3. GitHub用户搜索案例
- 4. Vue-resource
1. Axios
1.1 Axios介绍
Axios 是一个开源的可以用在浏览器端和 NodeJS 的异步通信框架,她的主要作用就是实现 AJAX 异步通信,其功能特点如下:
- 从浏览器中创建 XMLHttpRequests
- 从 node.js 创建 http 请求
- 支持 Promise API [JS中链式编程]
- 拦截请求和响应
- 转换请求数据和响应数据
- 取消请求
- 自动转换 JSON 数据
- 客户端支持防御 XSRF(跨站请求伪造)
GitHub:https://github.com/axios/axios
中文文档:http://www.axios-js.com/
使用axios需要下载库
npm install axios
联系阅读:前端跨域(待更新)
1.2 为什么使用Axios
1.axios:
- 从 node.js 创建 http 请求
- 支持 Promise API
- 客户端支持防止CSRF
- 提供了一些并发请求的接口(重要,方便了很多的操作)
2.jQuery ajax:
- 本身是针对MVC的编程,不符合现在前端MVVM
- 基于原生的XHR开发,XHR本身的架构不清晰,已经有了fetch的替代方案
- JQuery整个项目太大,单纯使用ajax却要引入整个JQuery非常的不合理(采取个性化打包的方案又不能享受CDN服务)
1.3 Axios API
-
axios.request(config) -
axios.get(url [,config]) -
axios.delete(url [,config]) -
axios.head(url [,config]) -
axios.post(url [,data [,config]]) -
axios.put(url [,data [,config]]) -
axios.patch(url [,data [,config]])
1.3 Vue使用axios向服务器请求数据
<template>
  <div class="footer">
    <ul>
      <li v-for="(item,index) in links" :key="index">
        <a href="item.url">{{item.name}}</a>
      </li>
    </ul>
  </div>
</template>

<script>
import axios from 'axios'
export default {
  name: "MyFooter",
  data() {
    return {
      links: []
    }
  },
  mounted() {
    axios.get('http://api.eduwork.cn/admin/link').then(
    res => {
        this.links = res.data
    },
    error => {
    	console.log('请求失败了', error.message)
    }).catch(err=>{
       console.log(err);
    })
  }
}
</script>

<style scoped>
.footer {
  float: left;
  margin-top: 20px;
  width: 100%;
  height: 100px;
  background-color: cornflowerblue;
}
</style>
1.4 Vue使用axios向服务器提交数据
<template>
  <from action="#">
    网站名称: <input type="text" v-model="link.name">{{link.name}}<br>
    网站位置: <input type="text" v-model="link.url">{{link.url}}<br>
    位置排序: <input type="text" v-model="link.ord">{{link.ord}}<br>
    <input type="hidden" v-model="link.do_submit">{{link.do_submit}}<br>

    <button @click.prevent="doSubmit">添加数据</button>
  </from>
</template>

<script>
import axios from "axios";
export default {
  name: "MyConn",
  data() {
    return {
      num: 0,
      link: {
        name:'',
        url:'',
        ord: 0,
        do_submit: true
      }
    }
  },
  methods: {
    doSubmit() {
      axios.post('http://api.eduwork.cn/admin/link/add',this.link,{
        //将数据转换成字符串拼接
        transformRequest: [
            function (data) {
              let str = ''
              for (let key in data) {
                str += encodeURIComponent(key) + '=' + encodeURIComponent(data[key]) + '&'
              }
              return str
            }
        ],
        headers: {
          "Content-Type": "application/x-www-form-urlencoded"
        }
      }).then(res=>{
        console.log(res);
      }).catch(err=>{
        console.log(err);
      })
    }
  }
}
</script>
<style scoped>
.myconn {
  width: 90%;
  height: 150px;
  background-color: brown;
  margin: 10px;
}
</style>
1.5 Vue封装网络请求
network/request.js
import axios from "axios";

//创建实例
const instance = axios.create({
    baseURL:'http://api.eduwork.cn/admin',
    timeout: 5000
})

export function get(url,params) {
    return instance.get(url,{
        params
    })
}

get().then().catch();


export function post(url, params) {
    return instance.post(url, params, {
        //将数据转换成字符串拼接
        transformRequest: [
            function (data) {
                let str = ''
                for (let key in data) {
                    str += encodeURIComponent(key) + '=' + encodeURIComponent(data[key]) + '&'
                }
                return str
            }
        ],
        headers: {
            "Content-Type": "application/x-www-form-urlencoded"
        }
    })
}

export function del(url) {
    return instance.delete(url)
}

//请求拦截器
instance.interceptors.request.use(
    config=>{
        config.headers.token = '123243'
        return config
    },
    error => {
        return Promise.reject(error)
    },
)
//响应拦截器
instance.interceptors.response.use(
    response => {
        // 如果返回的状态码为200,说明接口请求成功,可以正常拿到数据
        // 否则的话抛出错误
        if (response.status === 200) {
            return Promise.resolve(response);
        } else {
            return Promise.reject(response);
        }
    },
    error => {
        if (error.response.status) {
            return Promise.reject(error.response);
        }
    }
);
应用axios封装
提交数据
<template>
  <from action="#">
    网站名称: <input type="text" v-model="link.name">{{link.name}}<br>
    网站位置: <input type="text" v-model="link.url">{{link.url}}<br>
    位置排序: <input type="text" v-model="link.ord">{{link.ord}}<br>
    <input type="hidden" v-model="link.do_submit">{{link.do_submit}}<br>

    <button @click.prevent="doSubmit">添加数据</button>
  </from>
</template>
<script>
import {post} from '../../network/request'
export default {
  name: "MyConn",
  data() {
    return {
      num: 0,
      link: {
        name:'',
        url:'',
        ord: 0,
        do_submit: true
      }
    }
  },
  props: {
    article: {
      type: Array
    }
  },
  methods: {
    doSubmit() {
      post('/link/add',this.link).then(res=>{
          console.log(res);
        }).catch(err=>{
          console.log(err);
        })
    }
  }
}
</script>

<style scoped>
.myconn {
  width: 90%;
  height: 150px;
  background-color: brown;
  margin: 10px;
}
</style>
请求数据
<template>
  <div class="footer">
    <ul>
      <li v-for="(item,index) in links" :key="index">
        <a href="item.url">{{item.name}}</a>
      </li>
    </ul>
  </div>
</template>

<script>
import {get} from '.../network/request'
export default {
  name: "MyFooter",
  data() {
    return {
      links: []
    }
  },
  mounted() {
    get('/link',{id:1}).then(res=>{
        this.links = res.data
      }).catch(err=>{
       console.log(err);
    })
  }
}
</script>

<style scoped>
.footer {
  float: left;
  margin-top: 20px;
  width: 100%;
  height: 100px;
  background-color: cornflowerblue;
}
</style>
2. 使用Vue-cli解决Ajax跨域问题
使用vue-cli开启代理服务器ajax跨域问题
方法一:在vue.config.js中添加如下配置:
module.exports={
	//开启代理服务器
	devServer:{
	  proxy:"http://localhost:5000"
	}
}
优点:配置简单,请求资源时直接发给前端(8080)即可。
缺点:不能配置多个代理,不能灵活的控制请求是否走代理。
工作方式:若按照上述配置代理,当请求了前端不存在的资源时,那么该请求会转发给服务器 (优先匹配前端资源),在同级目录public下,是前端资源,现在前端资源找,没有才会请求服务器。
方法二:编写vue.config.js配置具体代理规则:
module.exports = {
devServer: {
    proxy: {
      '/api1': {
        // 匹配所有以 '/api1'开头的请求路径
        target: 'http://localhost:5000', // 将请求代理到目标服务器上
        changeOrigin: true,
        //重写路径 将请求中的/api1 重写为为空字符串,否则代理请求发到服务器,是请求/api1/xxx下的东西,服务器里不一定有api1,需要把api1去掉
        pathRewrite: { '^/api1': '' },
        ws: true,           //用于支持websocket
        changeOrigin: true, //用于控制请求头中的host值
      },
      '/api2': {
        // 匹配所有以 '/api2'开头的请求路径
        target: 'http://localhost:5001', // 代理目标的基础路径
        changeOrigin: true,
        pathRewrite: { '^/api2': '' },
        ws: true,           //用于支持websocket
        changeOrigin: true, //用于控制请求头中的host值
      },
    },
  },
}
/*
   changeOrigin设置为true时,服务器收到的请求头中的host为:localhost:5000
   changeOrigin设置为false时,服务器收到的请求头中的host为:localhost:8080
   changeOrigin默认值为true
*/
优点:可以配置多个代理,且可以灵活的控制请求是否走代理。
缺点:配置略微繁琐,请求资源时必须加前缀。
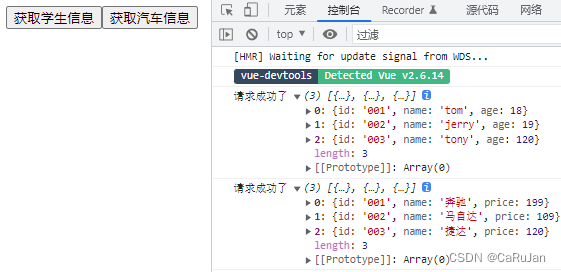
App.vue
<template>
  <div id="app">
    <!-- 在8080端口上获取5000和5001端口上的数据  -->
    <button @click="getStudents">获取学生信息</button>
    <button @click="getCars">获取汽车信息</button>
  </div>
</template>

<script>
import axios from "axios";
export default {
  name: "App",
  methods: {
    getStudents() {
      //这里加前缀api1走代理,不加前缀api1就不走代理,找前端资源,即public目录下
      axios.get("http://localhost:8080/api1/students").then(
        (response) => {
          console.log("请求成功了", response.data);
        },
        (error) => {
          console.log("请求失败了", error.message);
        }
      );
    },
    getCars() {
      axios.get("http://localhost:8080/api2/cars").then(
        (response) => {
          console.log("请求成功了", response.data);
        },
        (error) => {
          console.log("请求失败了", error.message);
        }
      );
    },
  },
};
</script>
3. GitHub用户搜索案例
public/index.html
<!DOCTYPE html>
<html lang="">
  <head>
    <meta charset="utf-8">
    <!-- 针对IE浏览器端的特殊配置,含义市让IE浏览器以最高渲染级别渲染页面 -->
    <meta http-equiv="X-UA-Compatible" content="IE=edge">
    <!-- 开启移动端的理想端口 -->
    <meta name="viewport" content="width=device-width,initial-scale=1.0">
    <!-- 配置页签图标 -->
    <link rel="icon" href="<%= BASE_URL %>favicon.ico">
    <!-- 引入第三方样式 -->
    <link rel="stylesheet" href="<%= BASE_URL %>css/bootstrap.css">

    <title><%= htmlWebpackPlugin.options.title %></title>
  </head>
  <body>
    <noscript>
      <strong>We're sorry but <%= htmlWebpackPlugin.options.title %> doesn't work properly without JavaScript enabled. Please enable it to continue.</strong>
    </noscript>
    <div id="app"></div>
    <!-- built files will be auto injected -->
  </body>
</html>
scr/main.js
import Vue from 'vue'
import App from './App.vue'

Vue.config.productionTip = false

new Vue({
  render: h => h(App),
  beforeCreate() {
    Vue.prototype.$bus = this
  }
}).$mount('#app')
src/components/Search.vue
<template>
<div>
<section class="jumbotron">
<h3 class="jumbotron-heading">Search Github Users</h3>
<div>
<input type="text" placeholder="enter the name you search" v-model="keyWord" />
<button @click="searchUsers">Search</button>
</div>
</section>
</div>
</template>
<script>
import axios from "axios"
export default {
name:'Search',
components: {},
props: {},
data() {
return {
keyWord: ""
};
},
methods: {
searchUsers() {
//请求前更新List数据
this.$bus.$emit('updateListData', {isFirst: false, isLoading:true, errMsg: '', users:[]})
axios.get(`https://api.github.com/search/users?q=${this.keyWord}`).then(
response => {
// console.log('请求成功了',response.data.items);
this.$bus.$emit('updateListData', {isLoading:false, errMsg: '', users:response.data.items})
},
error => {
console.log('请求失败了')
this.$bus.$emit('updateListData', {isLoading:false, errMsg: error.message, users:[]})
})
},
}
};
</script>
<style lang="less" scoped>
</style>
src/components/List.vue
<template>
    <div class="row">
        <!-- 展示用户列表 -->
        <div v-show="info.users.length" class="card" v-for="user in info.users" :key="user.login">
            <a :href="user.html_ur" target="_blank">
            <img :src="user.avatar_url" style='width: 100px'/>
            </a>
            <p class="card-text">{{user.login}}</p>
        </div>
        <!-- 展示欢迎词 -->
        <h3 v-show="info.isFirst">welecom to use</h3>
        <!-- 展示加载中 -->
        <h3 v-show="info.isLoading">loading.....</h3>
        <!-- 展示错误信息 -->
        <h3 v-show="info.errMsg">{{info.errMsg}}</h3>
    </div>
</template>

<script>
export default {
  name: 'List',
  components: {},
  props: {},
  data() {
    return {
      info: {
        isFirst: true,
        isLoading: false,
        errMsg: "",
        users: []
      }
    };
  },
  mounted() {
    this.$bus.$on('updateListData', (dataObj) =>{
        // console.log('List组件收到数据',dataObj);
        // 通过对象扩展运算符,合并对象
        this.info = {...this.info, ...dataObj}
    })
  }
};
</script>

<style scoped>

.album {
  min-height: 50rem; /* Can be removed; just added for demo purposes */
  padding-top: 3rem;
  padding-bottom: 3rem;
  background-color: #f7f7f7;
}

.card {
  float: left;
  width: 33.333%;
  padding: .75rem;
  margin-bottom: 2rem;
  border: 1px solid #efefef;
  text-align: center;
}

.card > img {
  margin-bottom: .75rem;
  border-radius: 100px;
}

.card-text {
  font-size: 85%;
}

</style>
App.vue
<template>
  <div class="container">
    <Search/>
    <List/>
  </div>
</template>

<script>
import Search from './components/Search'
import List from './components/List.vue'
export default {
  name: 'App',
  components: {Search,List}
}
</script>

<style>
</style>
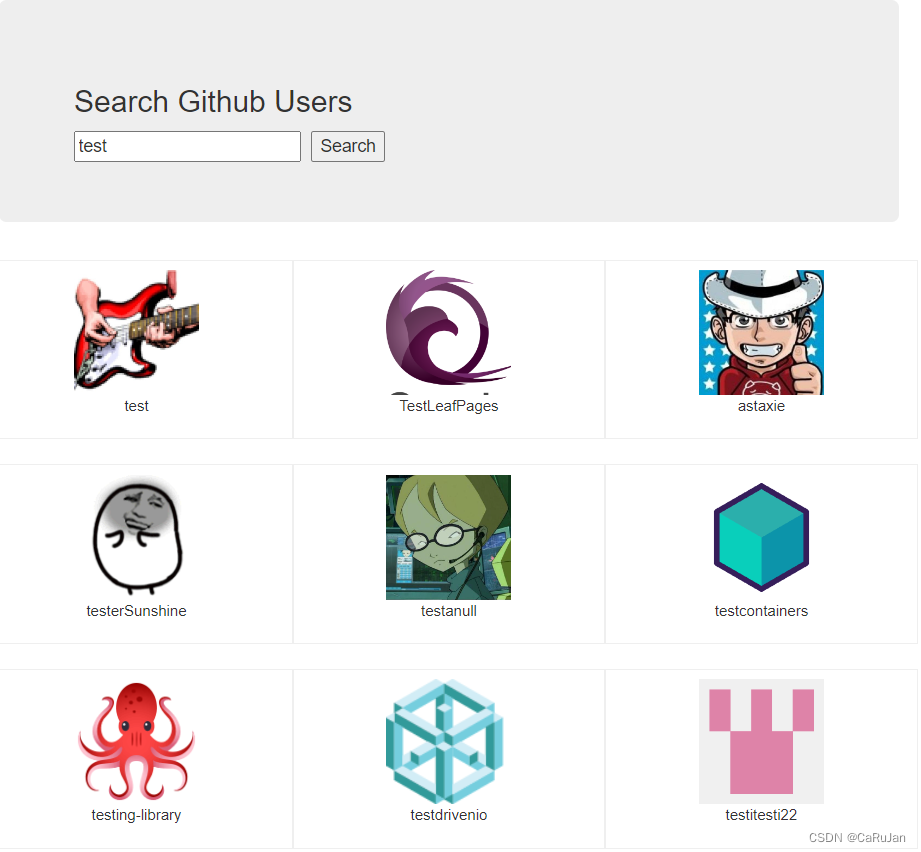
效果
4. Vue-resource
Vue项目常用的两个Ajax库
axios: 通用的Ajax请求库,官方推荐,效率高vue-resource: vue插件库,vue 1.x使用广泛,官方已不维护
下载vue-resource 库npm i vue-resource
使用vue-resourceVue.use(VueResource)
src/main.js
import Vue from 'vue'
import App from './App.vue'

Vue.config.productionTip = false
//使用插件
Vue.use(VueResource)

new Vue({
  render: h => h(App),
  beforeCreate() {
    Vue.prototype.$bus = this
  }
}).$mount('#app')
src/components/Search.vue
export default {
    name:'Search',
    components: {},
    props: {},
    data() {
        return {
            keyWord: ""
        };
    },
    methods: {
        searchUsers() {
            //请求前更新List数据
            this.$bus.$emit('updateListData', {isFirst: false, isLoading:true, errMsg: '', users:[]})
            //还是github搜索案例,但是使用this.$http来使用vue-resource,其他不变
            this.$http.get(`https://api.github.com/search/users?q=${this.keyWord}`).then(
                response => {
                    // console.log('请求成功了',response.data.items);
                    this.$bus.$emit('updateListData', {isLoading:false, errMsg: '', users:response.data.items})

                },
                error => {
                    console.log('请求失败了')
                    this.$bus.$emit('updateListData', {isLoading:false, errMsg: error.message, users:[]})
                })
        },
    }
};


