欢迎来到博主 Apeiron 的博客,祝您旅程愉快 ! 时止则止,时行则行。动静不失其时,其道光明。

目录
1、缘起
2、小程序中组件的分类
3、常用的视图容器类组件
3.1、view 组件
3.2、scroll - view 组件
3.3、swiper 和 swiper-item 组件
3.4、text 组件的基本使用
3.5、rich-text 组件
3.7、image 组件
4、总结
1、缘起
小程序的组件包括视图容器、文本、图片、按钮、输入框、列表、轮播图、导航栏、下拉菜单和弹窗等,用于构建小程序界面和实现交互功能。
2、小程序中组件的分类
小程序中的组件也是由宿主环境提供的,开发者可以基于组件快速搭出漂亮的页面结构。官方把小程序的组件分为了 9 大类,分别是:
① 视图容器
② 基础内容
③ 表单组件
④ 导航组件
⑤ 媒体组件
⑥ map 地图组件
⑦ canvas 画布组件
⑧ 开放能力
⑨ 无障碍访问
注:上述标红的文字是工作中常用的四大组件。
3、常用的视图容器类组件
3.1、view 组件
① 普通视图区域
② 类似于 HTML 中的 div ,是一个块级元素
③ 常用来实现页面的布局效果
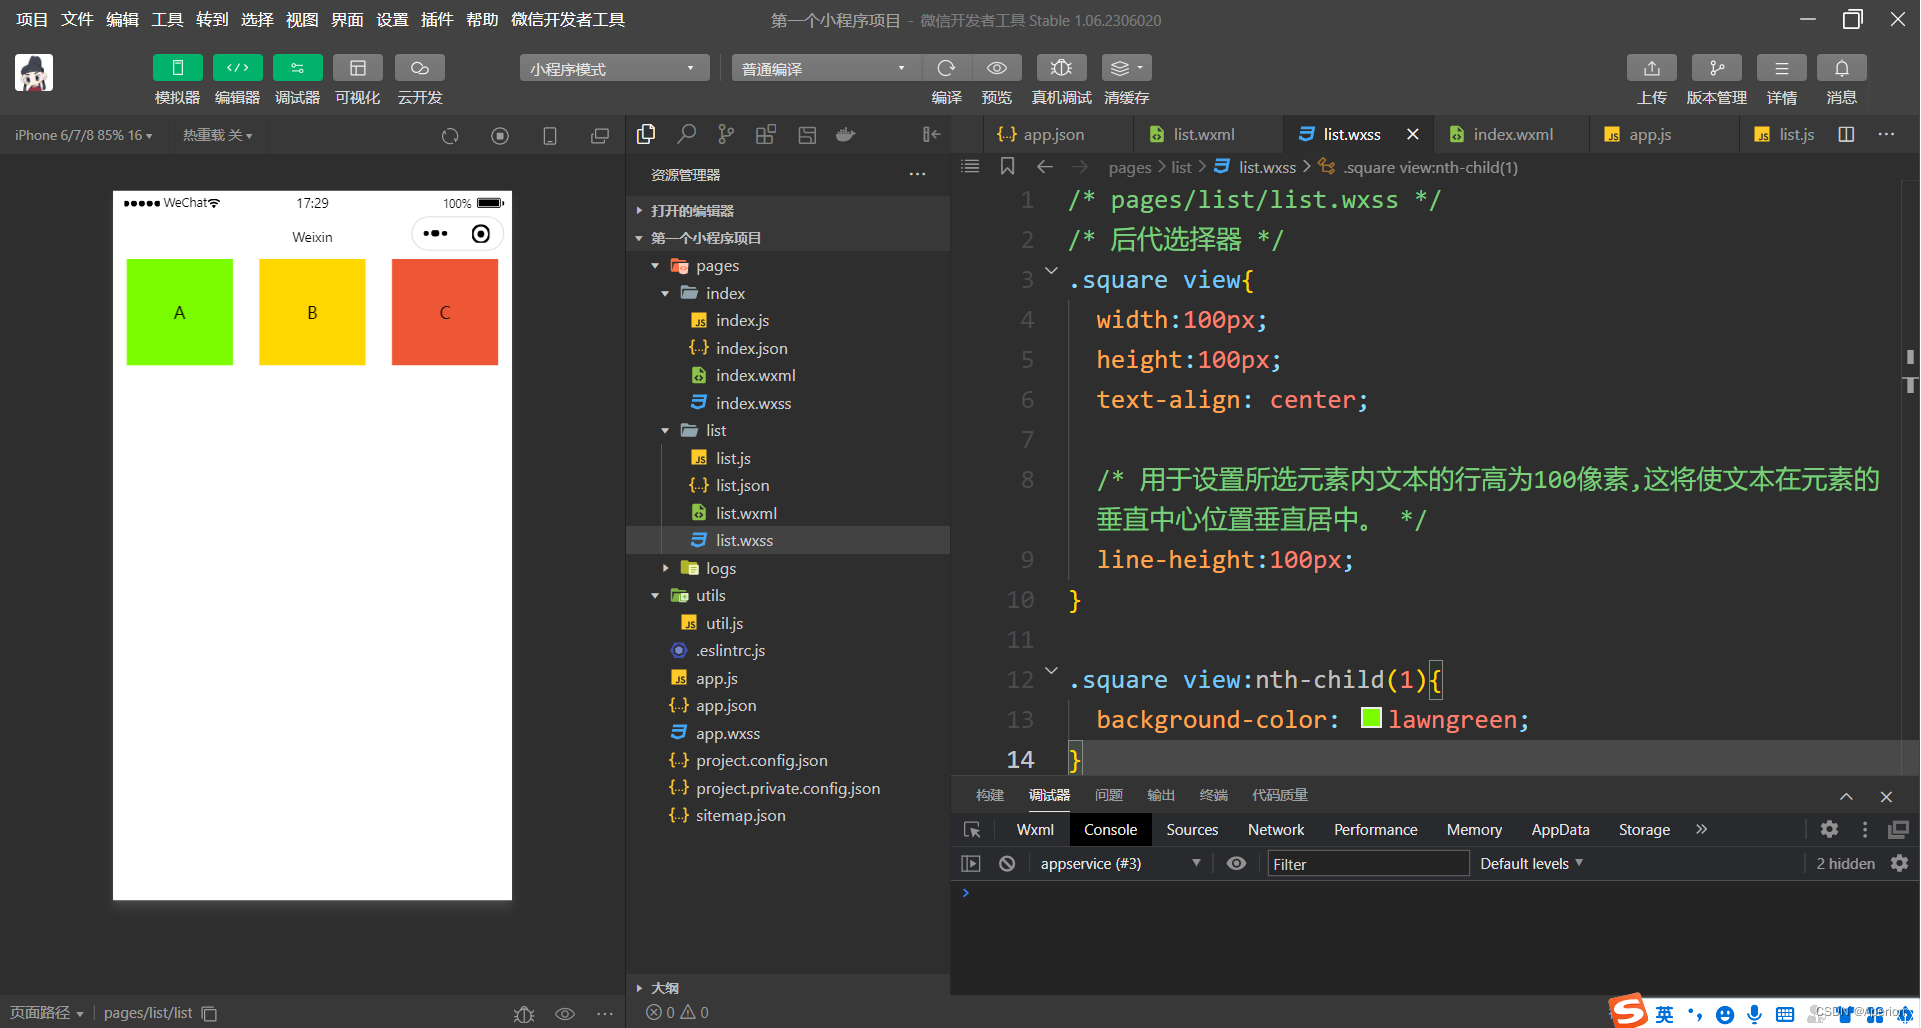
示例代码:
.wxml
<!--pages/list/list.wxml-->
<view class = "square">
  <view>A</view>
  <view>B</view>
  <view>C</view>
</view>
.wxss
/* pages/list/list.wxss */
/* 后代选择器 */
.square view{
  width:100px;
  height:100px;
  text-align: center;

  /* 用于设置所选元素内文本的行高为100像素,这将使文本在元素的垂直中心位置垂直居中。 */
  line-height:100px;
}

.square view:nth-child(1){
  background-color: lawngreen;
}

.square view:nth-child(2){
  background-color: #ffd700;
}

.square view:nth-child(3){
  background-color: #ed5736;
}

.square {
  display:flex;
  justify-content: space-around;
}
3.2、scroll - view 组件
① 可滚动的视图区域
② 常用来实现滚动列表效果
示例代码:
.wxml
<!--pages/list/list.wxml-->
<scroll-view class = "container1" scroll-y>
  <view>A</view>
  <view>B</view>
  <view>C</view>
</scroll-view>
① scroll-y 属性:允许纵向滚动
② scroll-x 属性:允许横向滚动
③ 注意:使用竖向滚动时,必须给 scroll-view 一个固定的高度
.wxss
示例代码:
/* pages/list/list.wxss */
/* 后代选择器 */
.container1 view{
  width:100px;
  height:100px;
  text-align: center;

  /* 用于设置所选元素内文本的行高为100像素,这将使文本在元素的垂直中心位置垂直居中。 */
  line-height:100px;
}

.container1 view:nth-child(1){
  background-color: lawngreen;
}

.container1 view:nth-child(2){
  background-color: #ffd700;
}

.container1 view:nth-child(3){
  background-color: #ed5736;
}

.container1 {
  border: 1px solid red;
  width:100px;
  height:150px;
}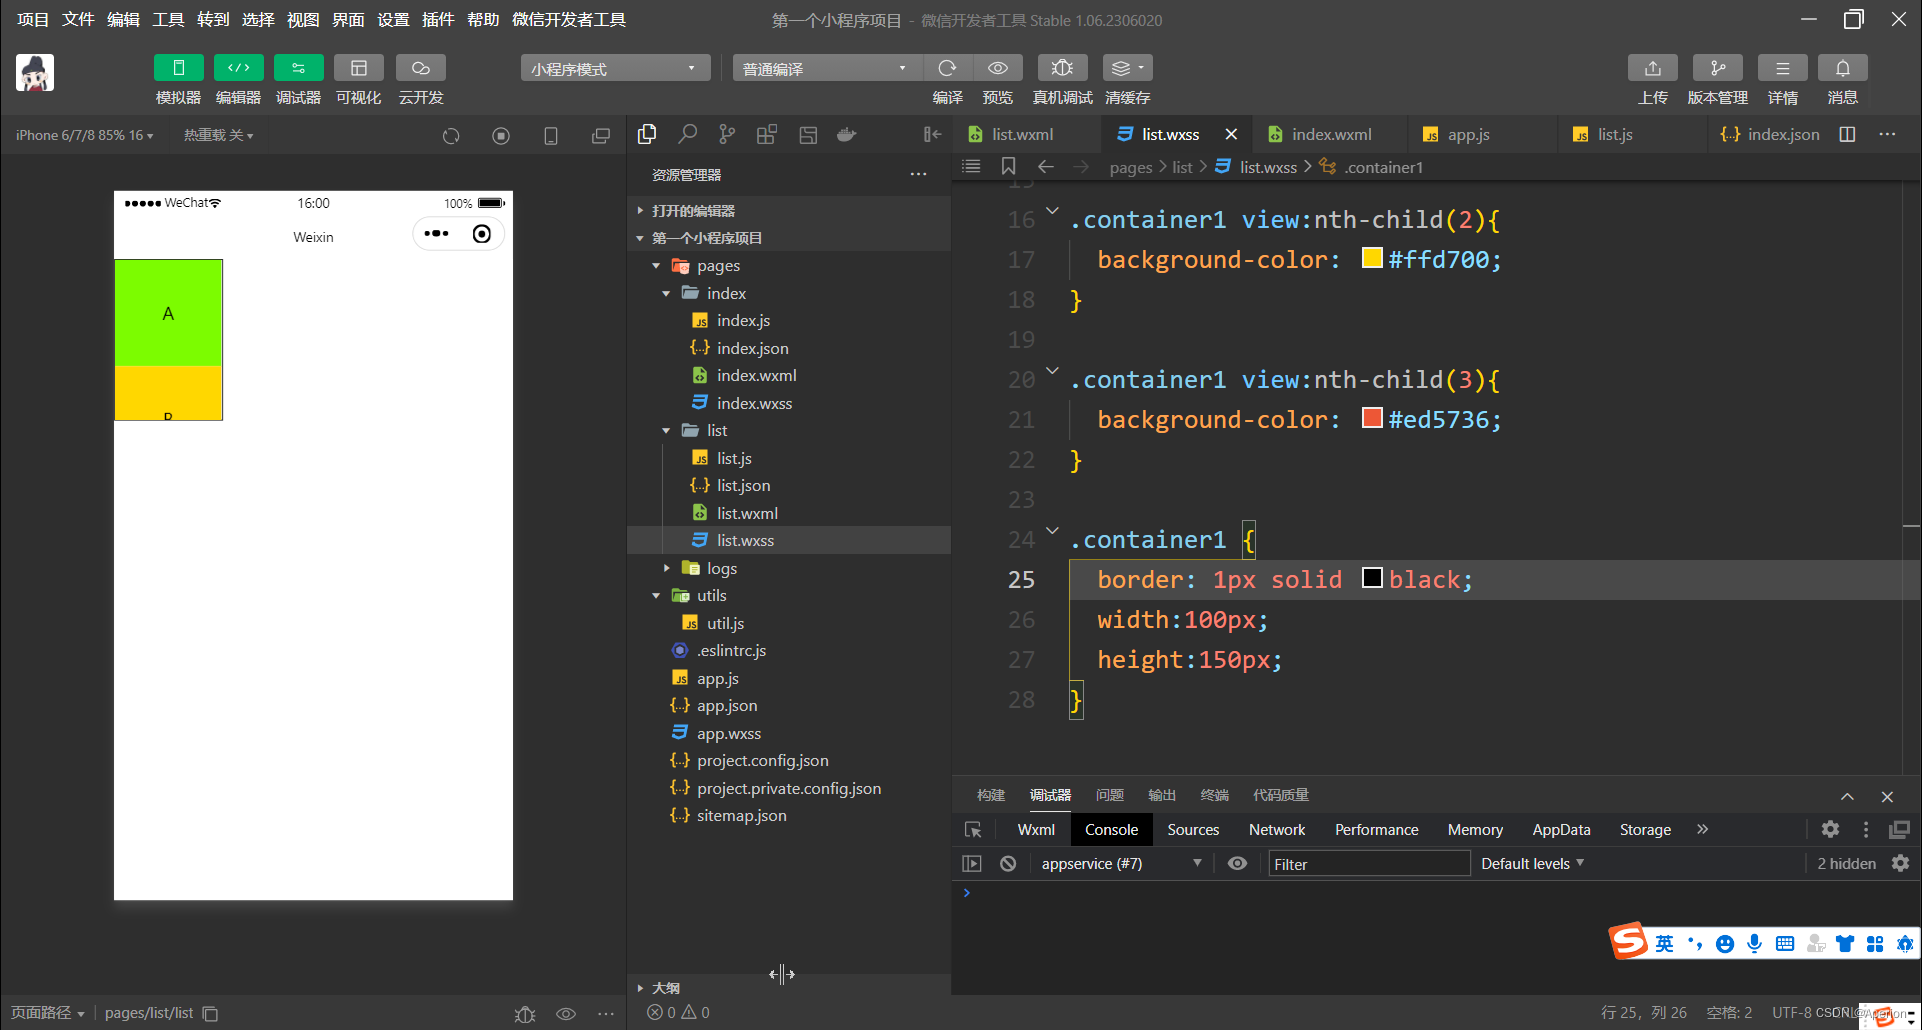
注:把鼠标放在方块内上下拖动,就可以实现纵向滚动效果。
3.3、swiper 和 swiper-item 组件
轮翻 banner 容器组件和轮翻 banner item 组件。
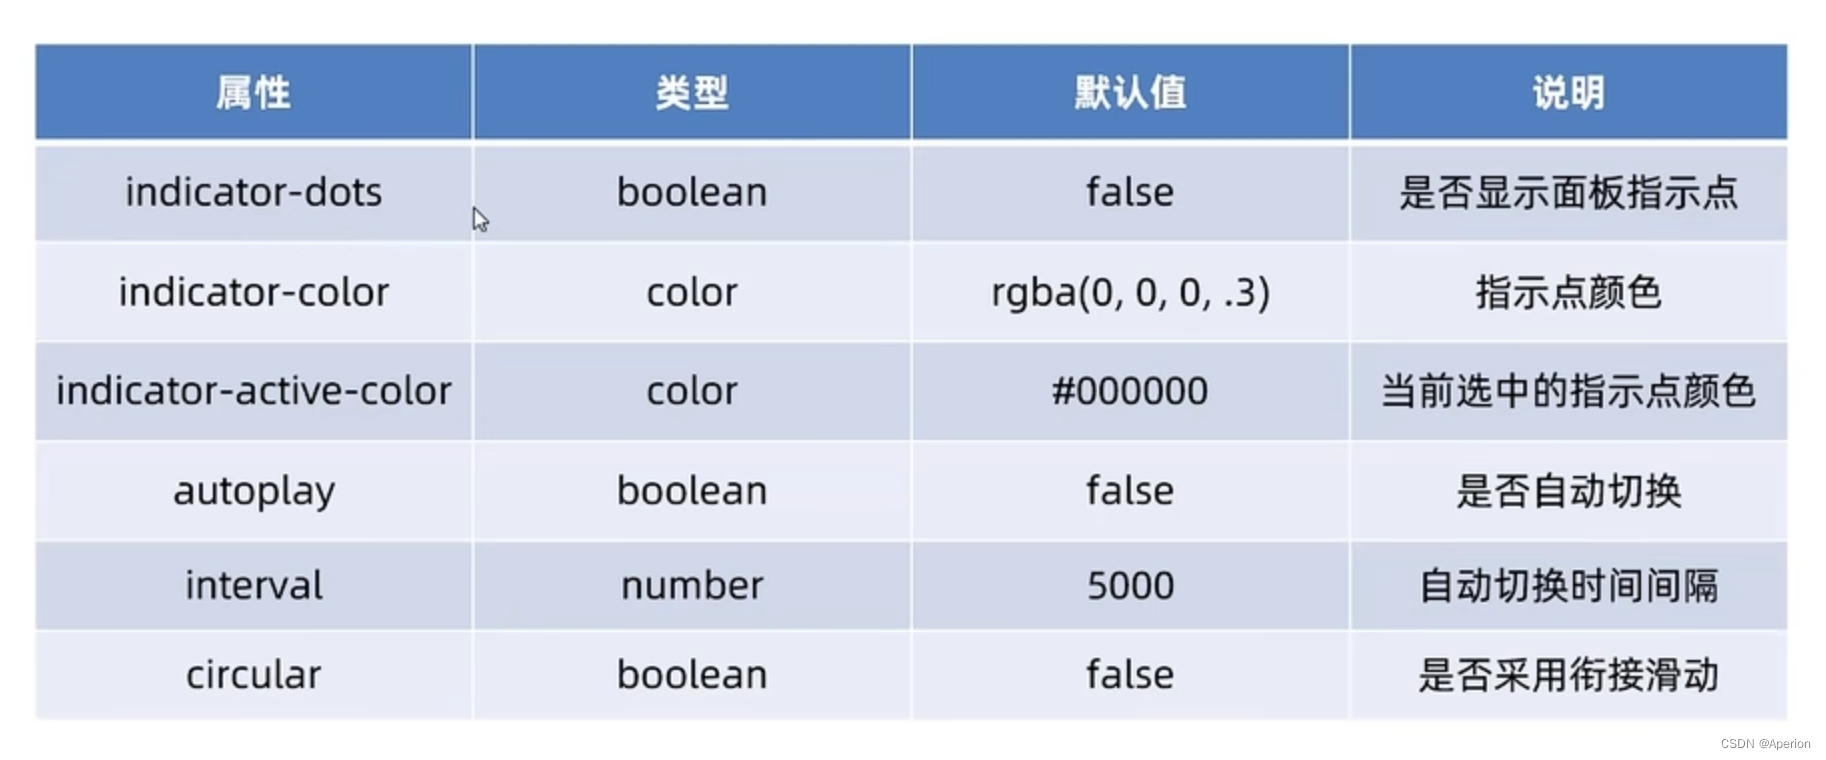
swiper 组件的基本属性
示例代码:
① .wxml
<!--pages/list/list.wxml-->
<!-- indicator-dots  属性:显示面板指示点 -->
<swiper class="swiper-container" indicator-dots indicator-color="white" indicator-active-color="gray" autoplay interval="3000" circular>
  <!-- 第1项 -->
  <swiper-item>
      <view class="item">A</view>
  </swiper-item>

  <!-- 第2项 -->
  <swiper-item>
      <view class="item">B</view>
  </swiper-item>

  <!-- 第3项 -->
  <swiper-item>
      <view class="item">C</view>
  </swiper-item>
</swiper>
② .wxss
/* pages/list/list.wxss */
.swiper-container{
  height:150px; /*轮播图容器的高度*/
}

.item {
  height:100%;
  line-height:150px;
  text-align:center;
}

swiper-item:nth-child(1) .item {
  background-color:lightgreen;
}

swiper-item:nth-child(2) .item {
  background-color:#ed5736;
}

swiper-item:nth-child(3) .item {
  background-color:#ffd700;
}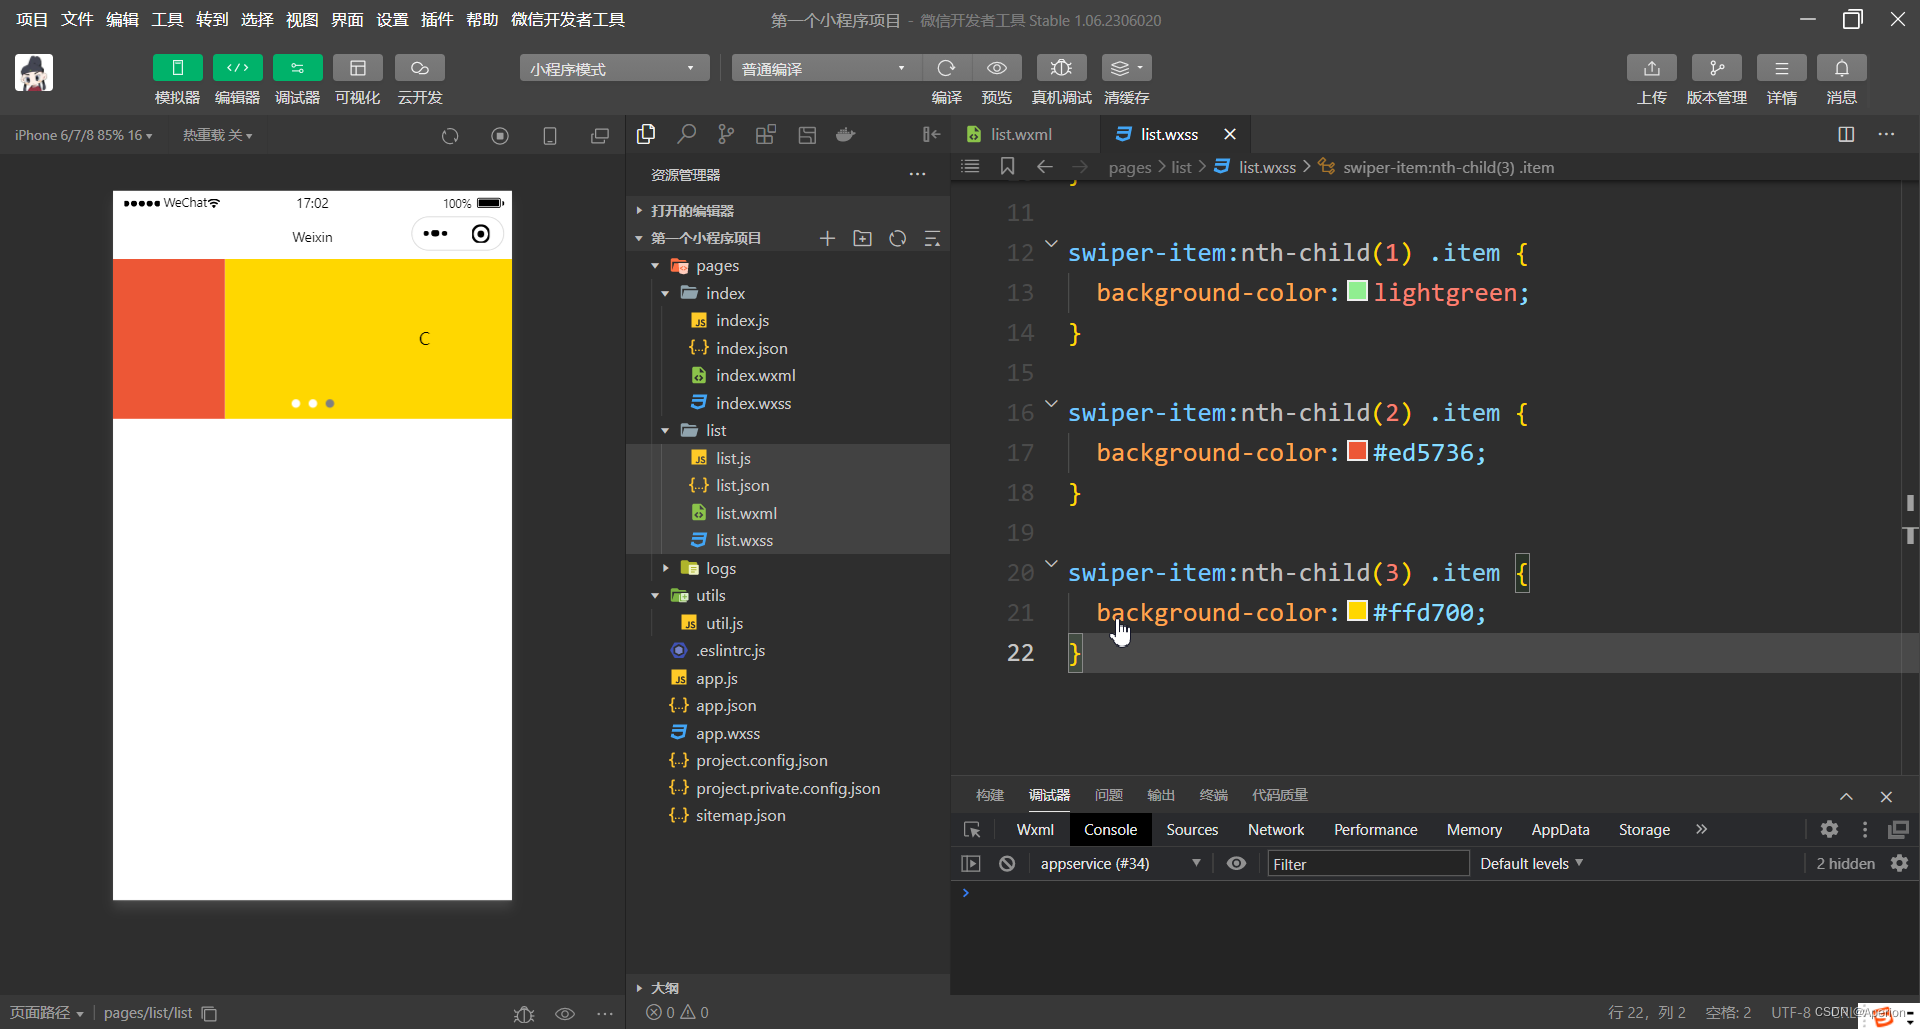
注:上述代码就可以实现一个轮播图的效果。
3.4、text 组件的基本使用
① 文本组件
② 类似于 HTML 中的 span 标签,是一个行内元素
作用:通过 text 组件的 selectable 属性,实现长按选中文本内容的效果
示例代码:
<!--pages/list/list.wxml-->
<view>
  长按选中文本内容的效果
  <text selectable>Hello Applet</text>
</view>
在模拟器中,不能实现长按选中文本内容的效果,只能在手机上预览,然后查看长按选中文本内容的效果。

3.5、rich-text 组件
① 富文本组件
② 支持把 HTML 字符串渲染为 WXML 结构
作用:通过 rich-text 组件的 nodes 属性节点,把 HTML 字符串渲染为对应的 UI 结构
示例代码:
<!--pages/list/list.wxml-->
<rich-text nodes="<h1 style='color:red;'>标题</h1>"></rich-text>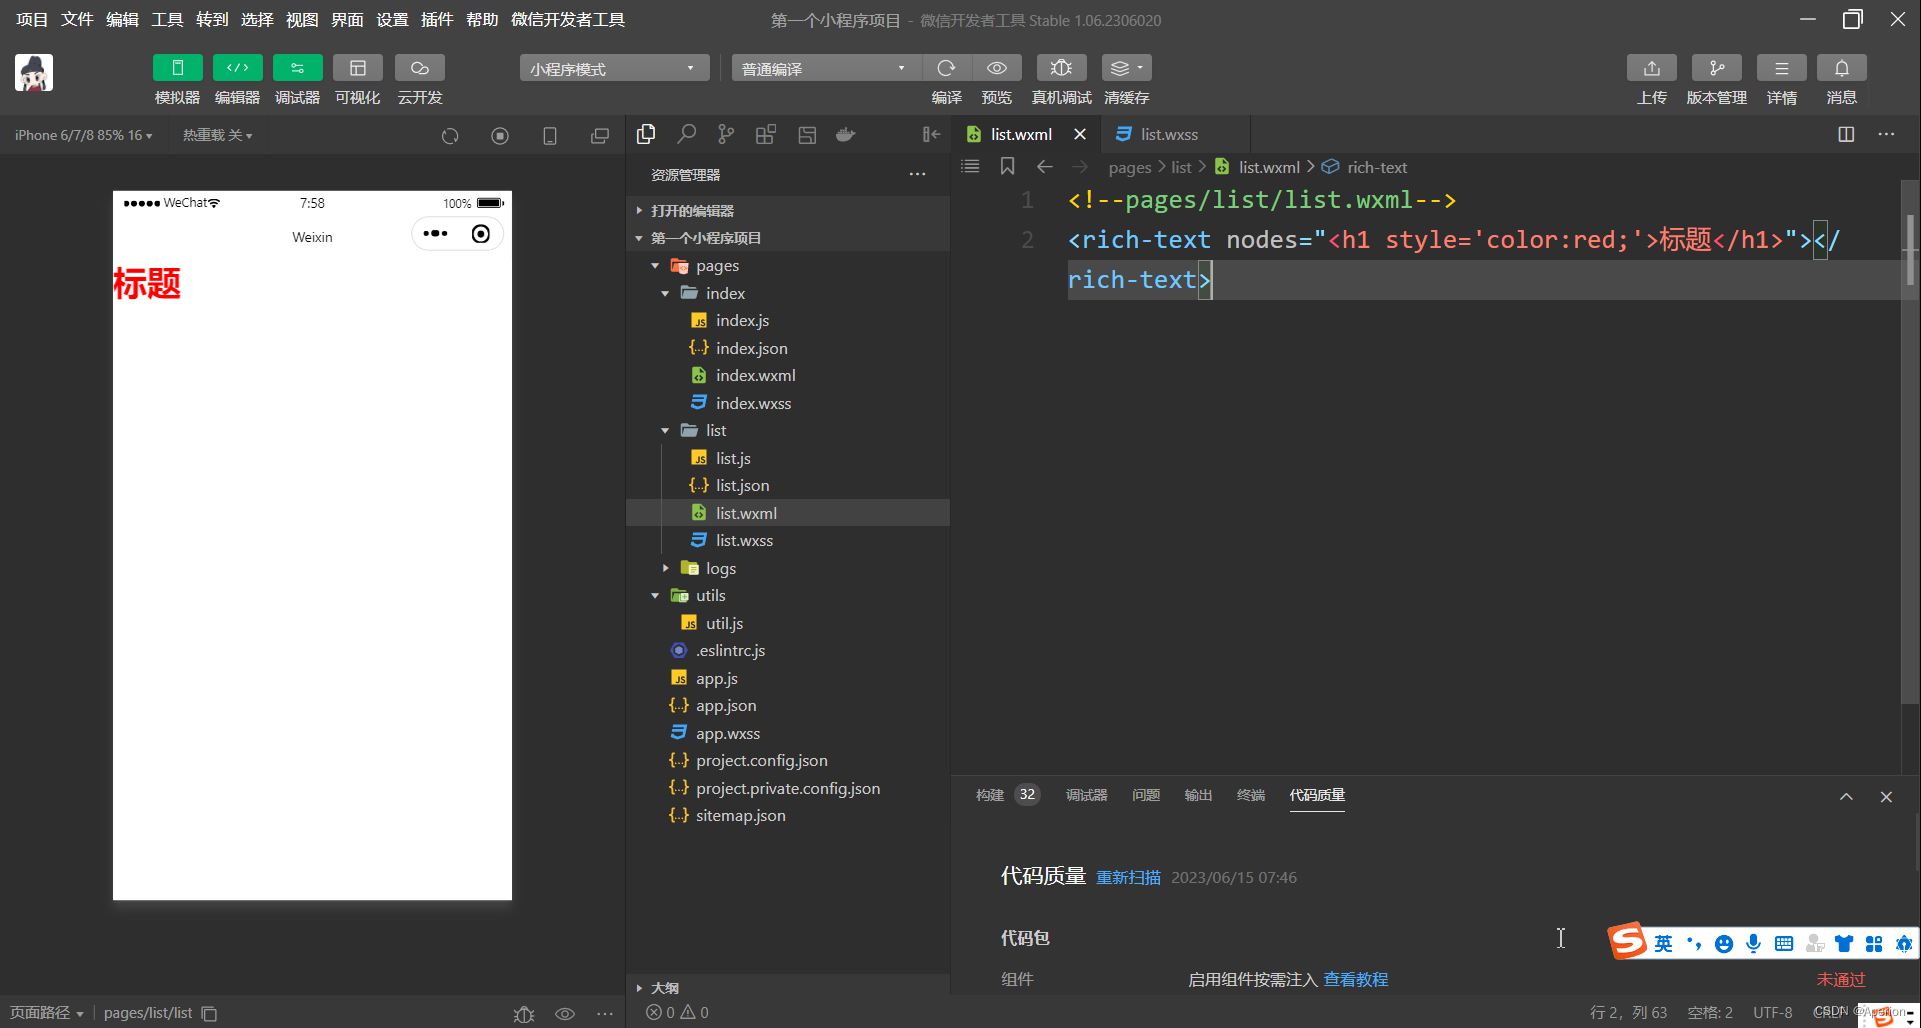
3.6、button 组件
① 按钮组件
② 功能比 HTML 中的 button 按钮丰富
③ 通过 open-type 属性可以调用微信提供的各种功能(客服、转发、获取用户授权、获取用户信息等)
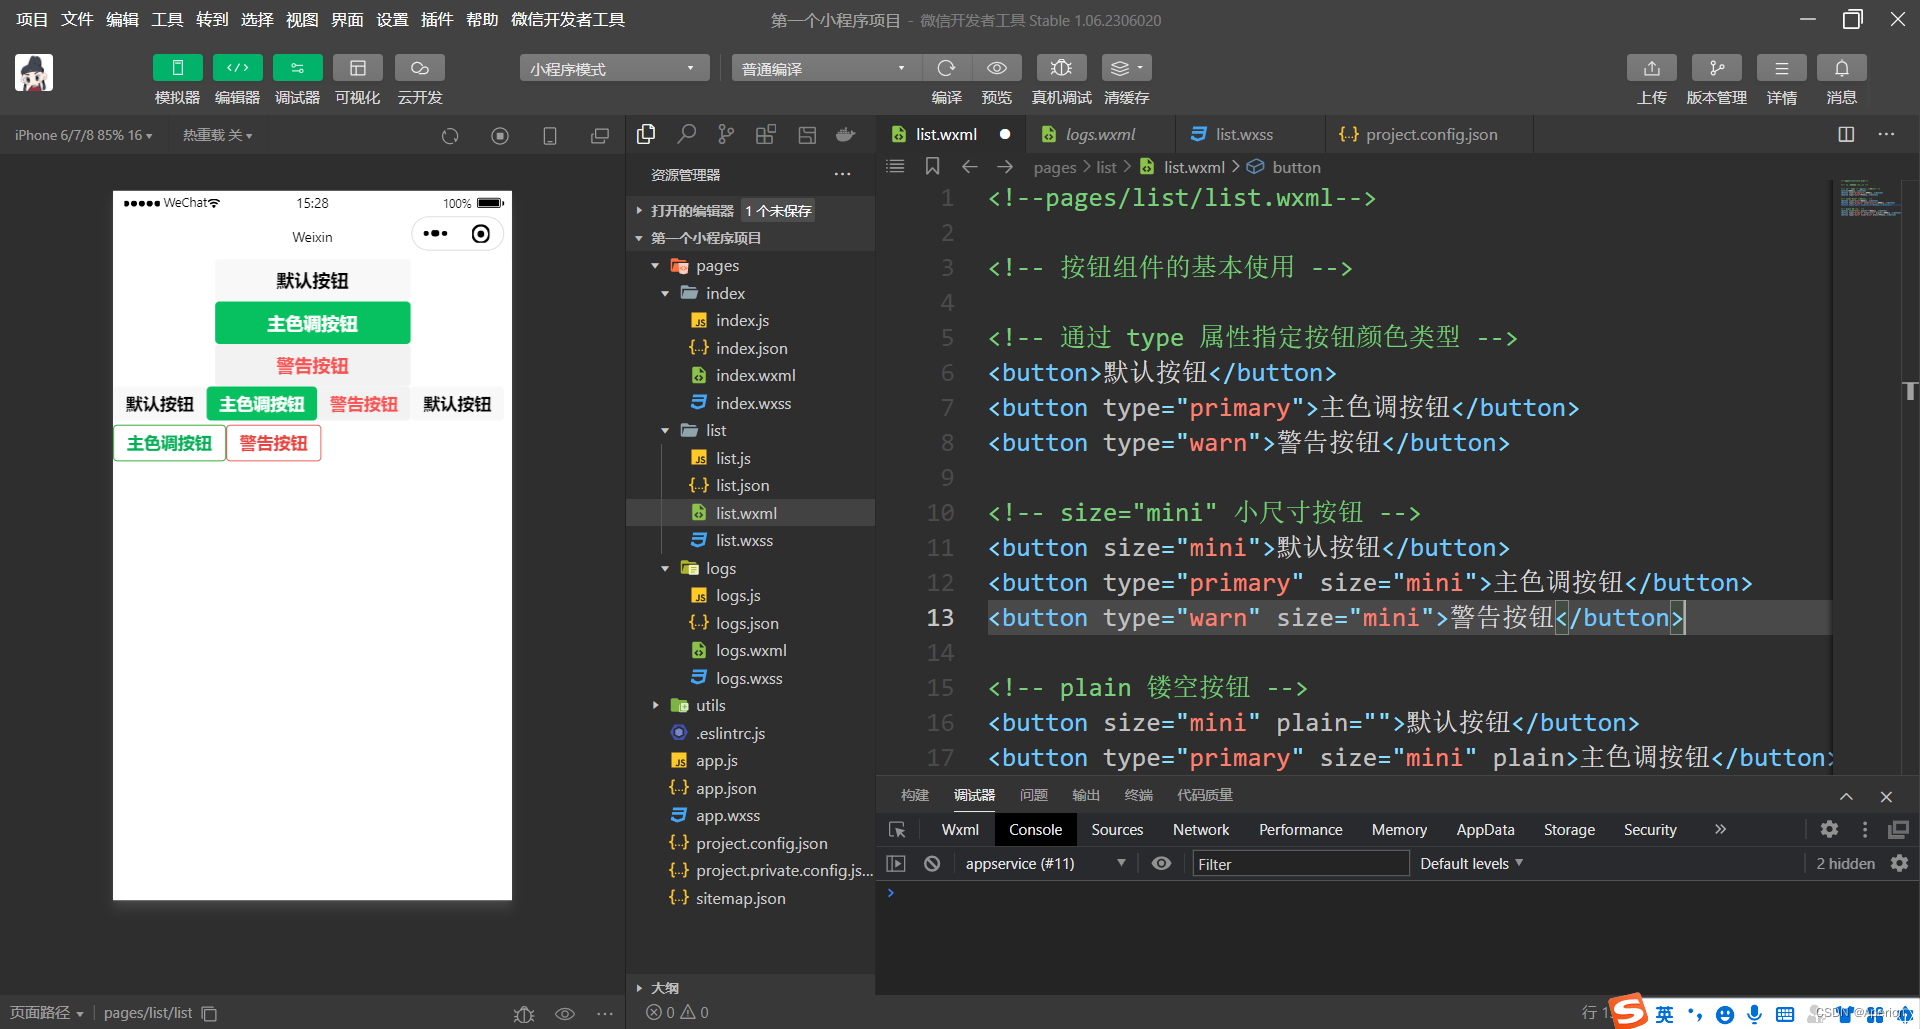
button 按钮的基本使用
示例代码:
<!--pages/list/list.wxml-->

<!-- 按钮组件的基本使用 -->

<!-- 通过 type 属性指定按钮颜色类型 -->
<button>默认按钮</button>
<button type="primary">主色调按钮</button>
<button type="warn">警告按钮</button>

<!-- size="mini" 小尺寸按钮 -->
<button size="mini">默认按钮</button>
<button type="primary" size="mini">主色调按钮</button>
<button type="warn" size="mini">警告按钮</button>

<!-- plain 镂空按钮 -->
<button size="mini" plain="">默认按钮</button>
<button type="primary" size="mini" plain>主色调按钮</button>
<button type="warn" size="mini" plain>警告按钮</button>
3.7、image 组件
① image 组件的 mode 属性
image 组件的 mode 属性 用来指定图片的 裁剪 和 缩放 模式,常用的 mode 属性值如下:

② image 组件的基本使用
示例代码:
<!--pages/list/list.wxml-->

<!-- image 空图片 -->
<image></image>

<image src="/images/Photo13.jpg"></image>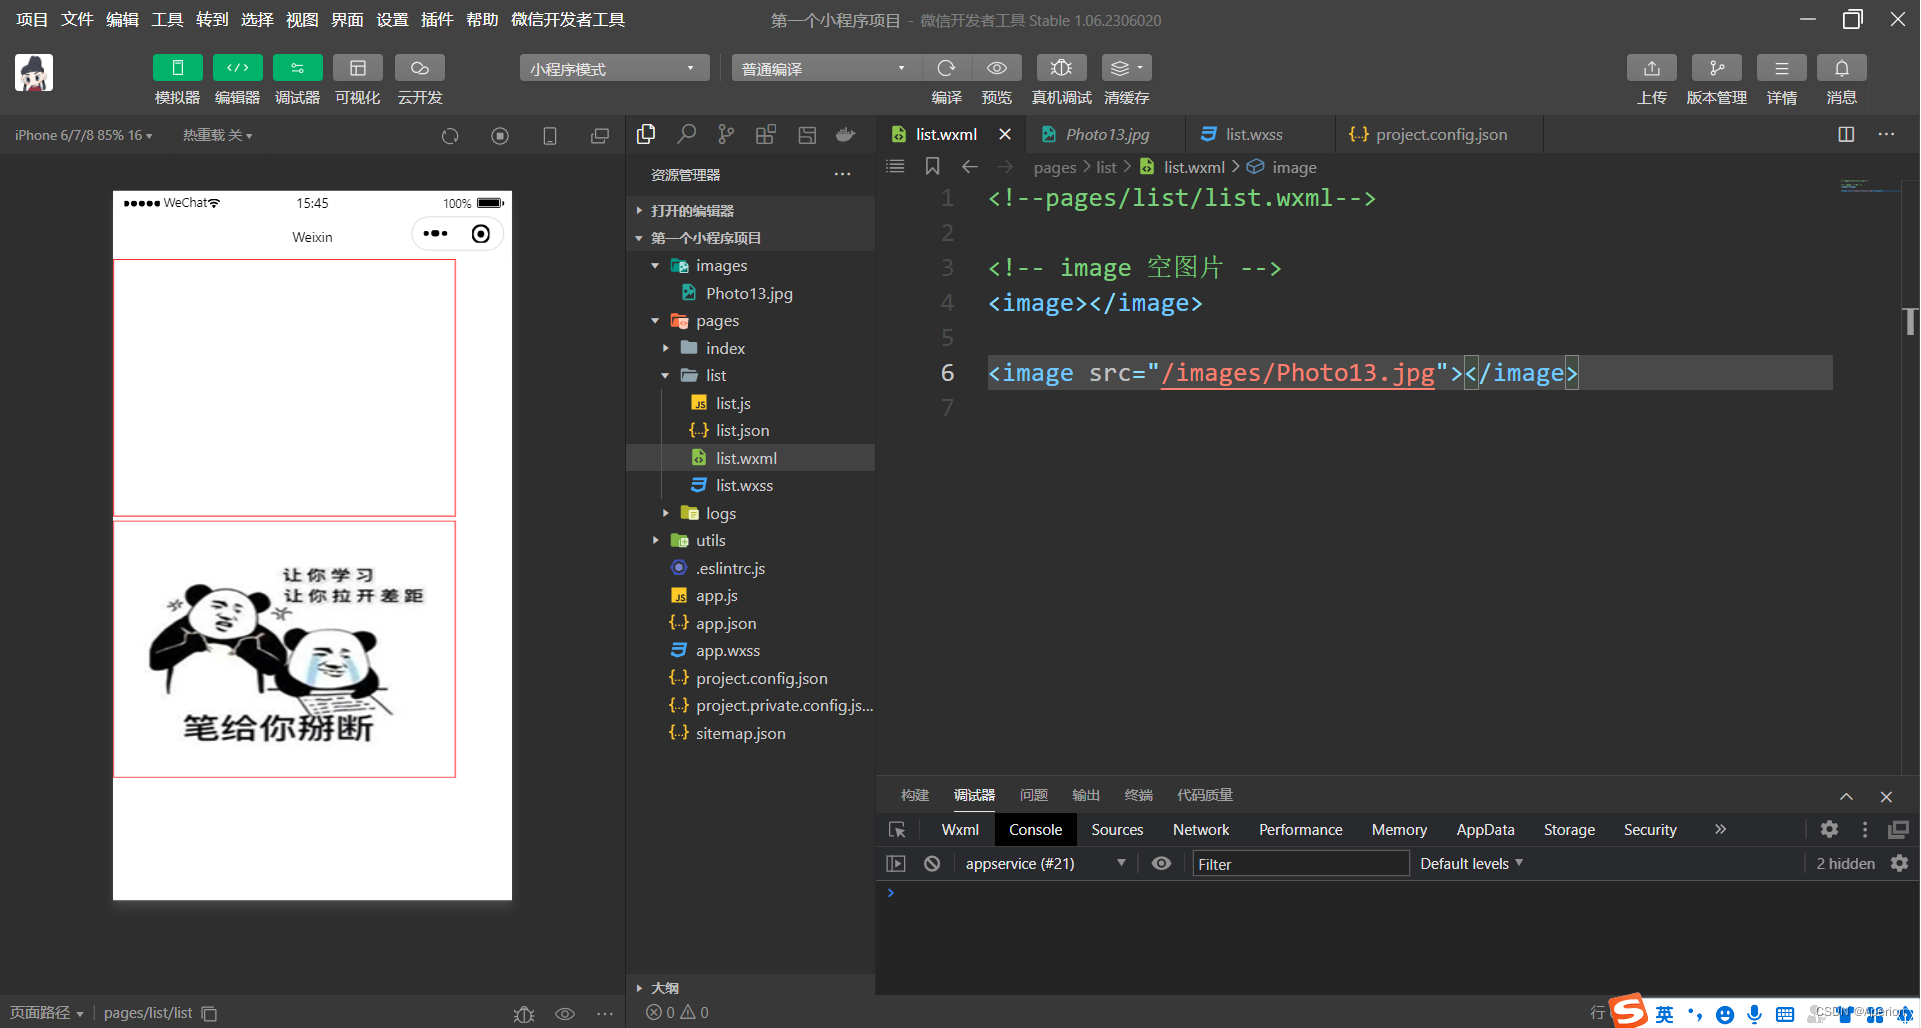
注:上述代码和图片展示 image 的 mode 默认属性效果,mode 的其他属性,请各位读者自行体验查看。
4、总结
本期的分享总结就到这里了,如果有疑问的小伙伴儿,我们在评论区交流嗷~~~,笔者必回,我们下期再见啦 !
博客中难免存在疏漏和错误之处,皆归因于作者水平有限,诚请各位读者不吝指正 !
< 前端 - CSS > 专栏系列持续更新 ,欢迎订阅关注 !


