本篇文章聊聊如何通过 Docker 和八十行左右的 Python 代码,实现一款类似 Midjourney 官方图片解析功能 Describe 的 Prompt 工具。
让你在玩 Midjourney、Stable Diffusion 这类模型时,不再为生成 Prompt 描述挠头。
写在前面
本文将提供两个版本的工具,分别支持 CPU 和 GPU 推理使用,如果你有一张大于 8GB 显存的显卡,可以愉快的使用全部的功能,如果你只有 CPU,那么也可以使用 CPU 版本的应用来进行偷懒。
本篇文章的代码已上传至 GitHub soulteary/docker-prompt-generator[1],欢迎自取。
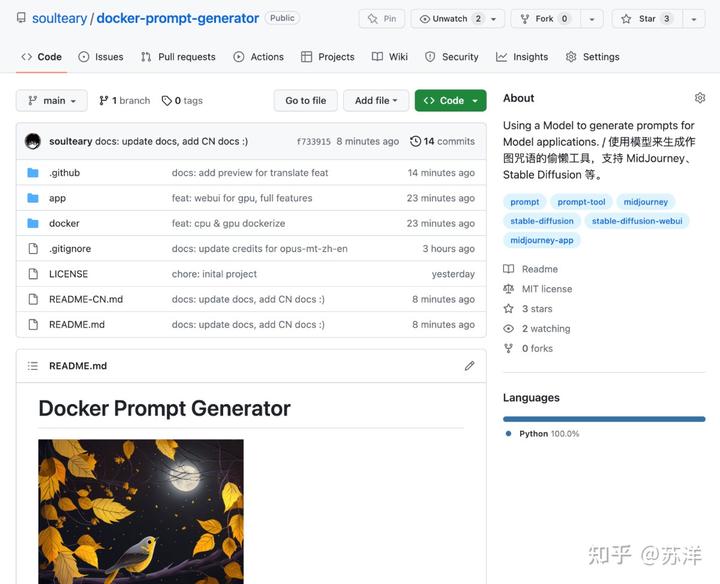
本篇文章的开源代码
昨晚在玩 Midjourney 的时候,在想 Prompt 的时候,想到挠头。作为一个懒人,计上心头:能不能让模型帮我生成 Prompt 呢,输入一些关键词或者句子,然后让程序帮助我完成完整的 Prompt 内容。(俗话:文生文)于是我开了个坑,创建了上面的这个开源项目,在简单验证可行性之后,就去补觉了。
一觉起来,看到有着相同兴趣爱好的同事转发了一篇文章:Midjourney 发布了新功能,“describe”,支持解析图片为几段不同的 Prompt 文本,并支持继续进行图片生成。(俗话:图生文,然后文生图)
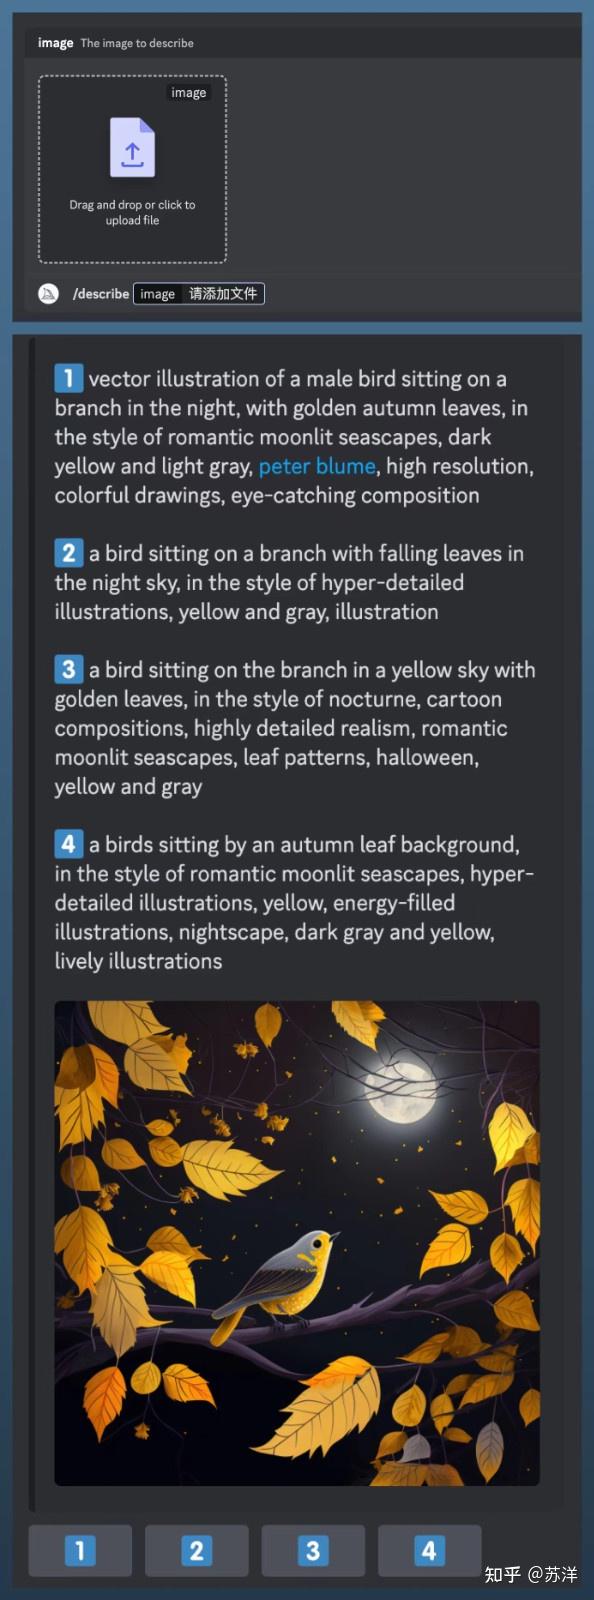
Midjourney 官方的“图生文”功能:describe
这个功能相比昨晚折腾的小东西,显然更能体现先进的生产效率嘛(作为懒人体验非常好)。
可惜网上扫了一圈,发现官方功能并不开源,那么,我来实现一个吧。
“作图咒语生成器” 的使用
为了更快的上手和使用到这个工具,我们需要先完成环境的配置。
应用和 Docker 环境准备
在过去的几篇文章[2]里,我提到过了我个人习惯和推荐的开发环境,基于 Docker 和 Nvidia 官方基础容器的深度学习环境,所以就不再赘述相关知识点,感兴趣可以自行翻阅,比如这篇《基于 Docker 的深度学习环境:入门篇》[3]。相信老读者应该已经很熟悉啦。
当然,因为本文包含纯 CPU 也能玩的部分,你也可以参考几个月前的《在搭载 M1 及 M2 芯片 MacBook设备上玩 Stable Diffusion 模型》[4],来配置你的环境。
在准备好 Docker 环境的配置之后,我们就可以继续玩啦。
我们随便找一个合适的目录,使用 git clone 或者下载 Zip 压缩包的方式,先把“Docker Prompt Generator(Docker 作图咒语生成器)”项目的代码下载到本地。
git clone https://github.com/soulteary/docker-prompt-generator.git
# or
curl -sL -o docker-prompt-generator.zip https://github.com/soulteary/docker-prompt-generator/archive/refs/heads/main.zip
接着,进入项目目录,使用 Nvidia 原厂的 PyTorch Docker 基础镜像来完成基础环境的构建,相比于我们直接从 DockerHub 拉制作好的镜像,自行构建将能节约大量时间。
我们在项目目录中执行下面的命令,就能够完成应用模型应用的构建啦:
# 构建基础镜像
docker build -t soulteary/prompt-generator:base . -f docker/Dockerfile.base

# 构建 CPU 应用
docker build -t soulteary/prompt-generator:cpu . -f docker/Dockerfile.cpu

# 构建 GPU 应用
docker build -t soulteary/prompt-generator:gpu . -f docker/Dockerfile.gpu
然后,根据你的硬件环境,选择性执行下面的命令,就能够启动一个带有 Web UI 界面的模型应用啦。
# 运行 CPU 镜像
docker run --gpus all --ipc=host --ulimit memlock=-1 --ulimit stack=67108864 --rm -it -p 7860:7860 soulteary/prompt-generator:cpu

# 运行 GPU 镜像
docker run --gpus all --ipc=host --ulimit memlock=-1 --ulimit stack=67108864 --rm -it -p 7860:7860 soulteary/prompt-generator:gpu
我们在浏览器中输入运行容器的宿主机的 IP 地址,就能够开始使用工具啦。
使用工具
工具的使用,非常简单,分别有使用“图片生成描述”和使用“文本生成描述”两种。
我找了一张之前模型生成的图片,然后将这张图片喂给这个程序,点击按钮,就能获得图片的描述文本啦。
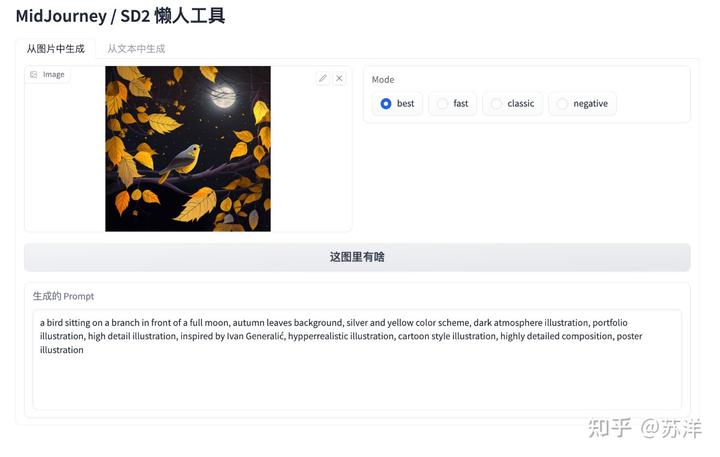
将图片解析为描述文本
我们可以在 Midjourney 或者 Stable Diffusion 中,直接使用这段文本来继续生成图片,或者使用“从文本中生成”,来扩展内容,让内容更适合 Midjourney 这类应用。
为了体现工具的中文翻译和续写能力,我们单独写一段简单的中文描述:“一只小鸟立梢头,一轮明月当空照,一片黄叶铺枝头”。
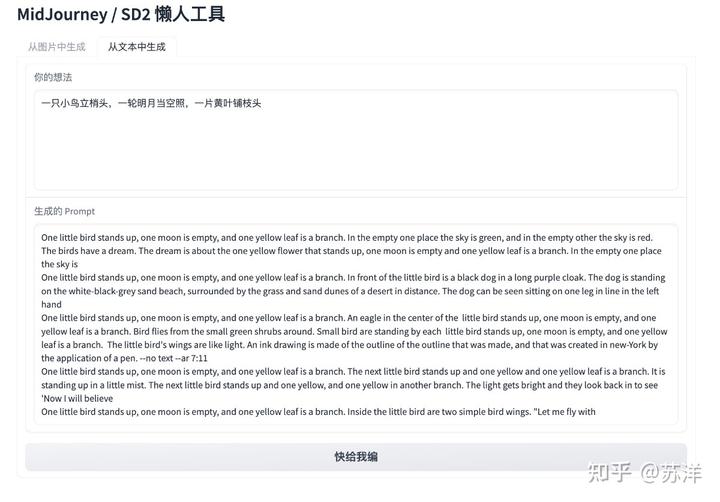
使用中文生成图片生成“咒语”(描述)
可以看到,基于我们的输入内容,生成了非常多不同的文本。
想要验证文本内容是否符合原意,我们可以将内容粘贴到 Midjourney 中进行测试。
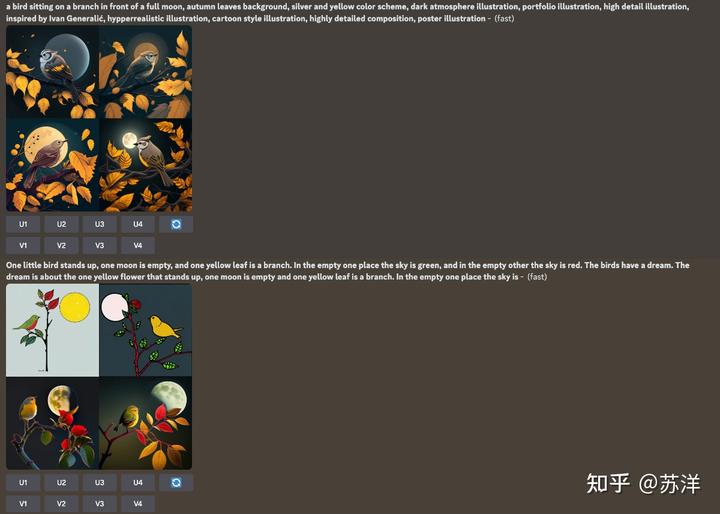
使用上面两段文本来生成图片
因为模型存在随机性,如果想要得到更好的结果,还需要对描述进行更多的调整优化,不过,看起来工具解析图片,生成的描述,其实是能够做到开箱即用的,而根据我们的三言两语生成的文本,也生成出了符合要求的图片。

这次试验中相对好的结果
好啦,工具的基础使用,我们介绍完啦。
模型应用功能实现
下面是工具的实现流程和思考,如果你想学习或快速使用开源模型项目来构建你的 AI 容器应用,可以继续浏览。
应用功能设计
在“动手”前,我们需要先明确功能设计,以及考虑使用什么样的技术来做具体功能的技术支撑。
在我日常使用 Stable Diffusion、Midjourney 的过程中,时常有三个场景挠头:
- 我只有一些关键词,需要发挥想象力把关键词串起来,然后喂给模型应用。如果描述内容不够好,或者关键词之间的关联比较远,那么图片的生成效果就不会特别好。
- 我有一张图片,想让模型围绕图片中的内容,比如:构图、某些元素、情感等进行二次创作,而不是简单的做图片中的元素替换。
- 我更习惯使用中文做描述,而不是英文,但是目前模型生成图片,想要好的效果,需要使用英文,总是借助翻译工具,切换程序界面或者网页,还是挺麻烦的。
解决第一个问题,我们可以使用最近火爆出圈的 GPT-4 的前辈的前辈:GPT-2 其实就能够满足需求,将内容(一句话、几个关键词)进行快速续写。相比较使用 GPT-3 / GPT-4,无需联网,也无需付费,模型文件更是“便宜大碗”,用 CPU 就能跑起来。
解决第二个问题,我们可以使用 OpenAI 在一年前推出的 CLIP 神经网络模型[5],以及 Salesforce 推出的 BLIP [6],能够从图片中抽取出最合适的描述文本,让我们用在新的 AIGC 图片生成任务中。稍作优化调整,我们只需要大概使用 6~8GB 显存就能将这部分功能的模型跑起来。
解决第三个问题,我们可以使用赫尔辛基大学开源的 OPUS MT 模型[7],实现将中文翻译为英文,进一步偷懒,以及解决上面两类原始模型不支持中文输入的问题。
因为前两个场景问题中的模型不支持中文,而我又是一个懒人,不想输入英文来玩图,所以我们先来解决第三个问题,让整个应用实现流程更丝滑。
中文 Prompt 翻译为英文 Prompt 功能
想要实现第一个懒人功能,从用户输入的中文内容中,自动生成英文,我们需要使用中英双语的翻译模型。赫尔辛基大学的开源组织将预训练模型开放在了 HuggingFace 社区,Helsinki-NLP/opus-mt-zh-en[8]。
我们可以通过写十五行简单的 Python 代码,来完成模型文件的下载,以及实现将中文自动转换为合适的英文内容的功能。比如下面的例子中,程序运行完毕,将输出《火影忍者》中的金句“青春不能回头,所以青春没有终点”的译文。
from transformers import AutoTokenizer, AutoModelForSeq2SeqLM
import torch

model = AutoModelForSeq2SeqLM.from_pretrained("Helsinki-NLP/opus-mt-zh-en").eval()
tokenizer = AutoTokenizer.from_pretrained("Helsinki-NLP/opus-mt-zh-en")

def translate(text):
    with torch.no_grad():
        encoded = tokenizer([text], return_tensors="pt")
        sequences = model.generate(**encoded)
        return tokenizer.batch_decode(sequences, skip_special_tokens=True)[0]

input = "青春不能回头,所以青春没有终点。 ——《火影忍者》"
print(input, translate(input))
将上面的代码保存为 translate.py,然后执行 python translate.py,等待模型下载完毕,我们将得到类似下面的结果:
青春不能回头,所以青春没有终点。 Youth can't turn back, so there's no end to youth.是不是看起来还不错?这部分代码保存在了项目中的 soulteary/docker-prompt-generator/app/translate.py[9]。
接下来,我们来实现 Prompt “免费续杯”(有逻辑续写)功能。
实现 MidJourney Prompt 续写功能
基于一些内容,进行继续的内容生成,是生成类模型的看家本领,比如大家已经熟悉的不能再熟悉的 ChatGPT 背后的 GPT 模型系列。
作为一个懒人,我在网上寻觅了一番,找到了一个 Google 离职创业的“国外大姐” 基于 GPT-2 使用 25 万条 MidJourney 数据 fine-tune 好的 GPT2 模型:succinctly/text2image-prompt-generator[10],简单试了试了试效果还不错,那么我们就用它来实现这部分功能吧。(其实,用前几篇文章里的 LLaMA 也行,可以自行替换。)
和上面一样,我们实现一个不到 30 行的简单的程序,就能够实现模型自动下载,以及调用模型根据我们的输入内容(上文中热血台词的翻译)生成一些符合 Midjourney 或 Stable Diffusion 的新的 Prompt 内容:
from transformers import pipeline, set_seed
import random
import re

text_pipe = pipeline('text-generation', model='succinctly/text2image-prompt-generator')

def text_generate(input):
    seed = random.randint(100, 1000000)
    set_seed(seed)

    for count in range(6):
        sequences = text_pipe(input, max_length=random.randint(60, 90), num_return_sequences=8)
        list = []
        for sequence in sequences:
            line = sequence['generated_text'].strip()
            if line != input and len(line) > (len(input) + 4) and line.endswith((":", "-", "—")) is False:
                list.append(line)

        result = "\n".join(list)
        result = re.sub('[^ ]+\.[^ ]+','', result)
        result = result.replace("<", "").replace(">", "")
        if result != "":
            return result
        if count == 5:
            return result

input = "Youth can't turn back, so there's no end to youth."
print(input, text_generate(input))
我们将上面的代码保存为 text-generation.py,然后执行 python text-generation.py,稍等片刻我们将得到类似下面的内容:
# Setting `pad_token_id` to `eos_token_id`:50256 for open-end generation.
Youth can't turn back, so there's no end to youth. Youth can't turn back, so there's no end to youth. Young, handsome, confident, lonely boy sitting on his  can't turn back, so there's no end to youth. Where old yang waits, young man on the streets of Bangkok::10 film poster::10 photorealism, postprocessing, low angle::10 Trending on artstation::8 —ar 47:82
Youth can't turn back, so there's no end to youth. By Karel Thole and Mike Mignola --ar 2:3
Youth can't turn back, so there's no end to youth. And there is a bright hope about a future where there will be time.
内容看起来好像还不错,我们直接在 Midjourney 中输入测试,将得到类似下面的结果。
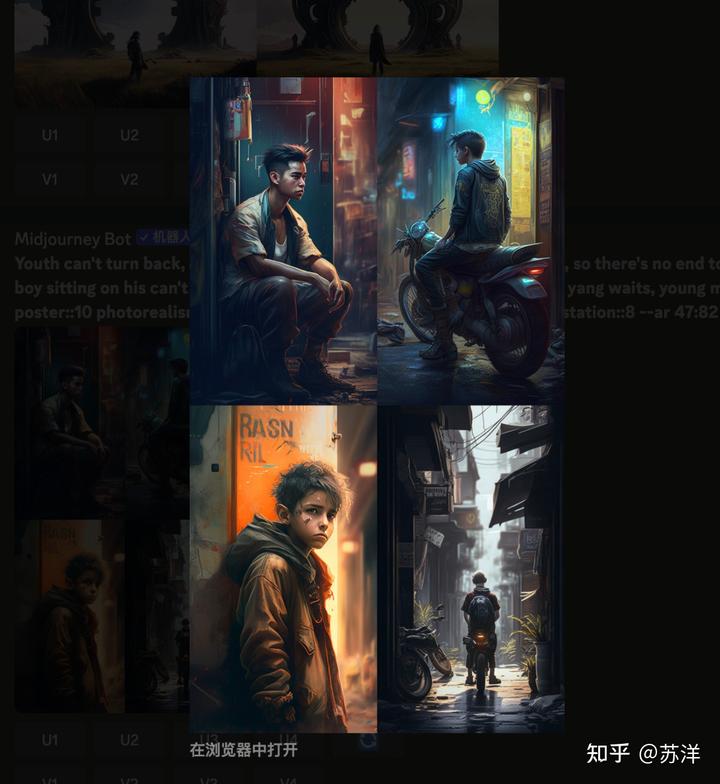
将我们生成的 Prompt 内容,使用 Midjourney 进行图片生成
看起来算是及格了,这部分代码保存在项目的 soulteary/docker-prompt-generator/app/text-generation.py[11]中,有需要可以自取。
完成了两个功能之后,我们来实现根据图片内容生成 Prompt 描述的应用功能。
实现根据图片生成 Prompt 描述功能
相比较上面两个功能,使用 CPU 就能搞定,内容生成效率也非常高。
但是想要快速的根据图片生成 Prompt 则需要显卡的支持。不过根据我的试验,运行起来只需要 6~8GB 左右的显存,还是比较省钱的。(没有显卡可以使用云服务器代替,买个按量的,玩罢销毁即可。)
这里,我们依旧是实现一段简单的,不到 30 行的 Python 代码,完成模型下载、应用加载、图片下载,以及将图片转换为 Prompt 的功能:
from clip_interrogator import Config, Interrogator
import torch
config = Config()
config.device = 'cuda' if torch.cuda.is_available() else 'cpu'
config.blip_offload = False if torch.cuda.is_available() else True
config.chunk_size = 2048
config.flavor_intermediate_count = 512
config.blip_num_beams = 64
config.clip_model_name = "ViT-H-14/laion2b_s32b_b79k"
ci = Interrogator(config)

def get_prompt_from_image(image):
    return ci.interrogate(image.convert('RGB'))

import requests
import shutil
r = requests.get("https://pic1.zhimg.com/v2-6e056c49362bff9af1eb39ce530ac0c6_1440w.jpg?source=d16d100b", stream=True)
if r.status_code == 200:
    with open('./image.jpg', 'wb') as f:
        r.raw.decode_content = True
        shutil.copyfileobj(r.raw, f)

from PIL import Image
print(get_prompt_from_image(Image.open('./image.jpg')))
代码中的图片,使用了我专栏中上一篇文章的题图(同样使用 Midjourney 生成)。将上面的内容保存为 clip.py,然后执行 python clip.py,稍等片刻,我们将得到类似下面的结果:
# WARNING:root:Pytorch pre-release version 1.14.0a0+410ce96 - assuming intent to test it
Loading BLIP model...
load checkpoint from https://storage.googleapis.com/sfr-vision-language-research/BLIP/models/model_large_caption.pth
Loading CLIP model...
Loaded CLIP model and data in 8.29 seconds.
100%|████████████████████████████████████████████████████████████████████████████████████████████████████████████████████████████████████████████████████████████████| 55/55 [00:00<00:00, 316.23it/s]
Flavor chain:  38%|███████████████████████████████████████████████████████▏                                                                                           | 12/32 [00:04<00:07,  2.74it/s]
100%|████████████████████████████████████████████████████████████████████████████████████████████████████████████████████████████████████████████████████████████████| 55/55 [00:00<00:00, 441.49it/s]
100%|██████████████████████████████████████████████████████████████████████████████████████████████████████████████████████████████████████████████████████████████████| 6/6 [00:00<00:00, 346.74it/s]
100%|████████████████████████████████████████████████████████████████████████████████████████████████████████████████████████████████████████████████████████████████| 50/50 [00:00<00:00, 457.84it/s]

a robot with a speech bubble on a blue background, highly detailed hyper real retro, artificial intelligence!!, toy photography, by Emma Andijewska, markings on robot, computer generated, blueish, delete, small gadget, animated, blue body, in retro colors
从结果中看,描述还是比较准确的。这部分代码我保存在了项目的 soulteary/docker-midjourney-prompt-generator/app/clip.py[12]。
好啦,到目前为止,三个主要功能,我们就都实现完毕了。接下来,我们借助 Docker 和 Gradio 来完成 Web UI 和一键运行的模型容器应用。
使用 Docker 构建 AI 应用容器
接下来,我们来完成 AI 应用的容器构建和相关代码编写。
前文中提到,我们将实现两个版本的应用,分别支持 CPU 和 GPU 来完成快速的 AI 模型推理功能。因为后者可以向下兼容前者,所以我们先来实现一个包含前两个应用功能,CPU 就能跑的模型基础镜像。
完成只需要 CPU 运行的应用容器镜像
结合上文中的代码,Dockerfile 文件不难编写:
FROM nvcr.io/nvidia/pytorch:22.12-py3
LABEL org.opencontainers.image.authors="soulteary@gmail.com"

RUN pip config set global.index-url https://pypi.tuna.tsinghua.edu.cn/simple && \
    pip install transformers sentencepiece sacremoses && \
    pip install gradio

WORKDIR /app

RUN cat > /get-models.py <<EOF
from transformers import AutoTokenizer, AutoModelForSeq2SeqLM, pipeline
AutoModelForSeq2SeqLM.from_pretrained('Helsinki-NLP/opus-mt-zh-en')
AutoTokenizer.from_pretrained('Helsinki-NLP/opus-mt-zh-en')
pipeline('text-generation', model='succinctly/text2image-prompt-generator')
EOF

RUN python /get-models.py && \
    rm -rf /get-models.py
将上面的内容保存为 Dockerfile.base,然后使用 docker build -t soulteary/prompt-generator:base . -f Dockerfile.base ,稍等片刻,包含了模型文件的基础应用模型就搞定啦。
[+] Building 189.5s (7/8)
 => [internal] load .dockerignore                                                                                                                                                                0.0s
 => => transferring context: 2B                                                                                                                                                                  0.0s
 => [internal] load build definition from Dockerfile.base                                                                                                                                        0.0s
 => => transferring dockerfile: 692B                                                                                                                                                             0.0s
 => [internal] load metadata for nvcr.io/nvidia/pytorch:22.12-py3                                                                                                                                0.0s
 => [1/5] FROM nvcr.io/nvidia/pytorch:22.12-py3                                                                                                                                                  0.0s
 => CACHED [2/5] RUN pip config set global.index-url https://pypi.tuna.tsinghua.edu.cn/simple &&     pip install transformers sentencepiece sacremoses &&     pip install gradio                 0.0s
 => CACHED [3/5] WORKDIR /app                                                                                                                                                                    0.0s
 => CACHED [4/5] RUN cat > /get-models.py <<EOF                                                                                                                                                  0.0s
 => [5/5] RUN python /get-models.py &&     rm -rf /get-models.py                                                                                                                               189.4s
 => => # Downloading (…)olve/main/source.spm: 100%|██████████| 805k/805k [00:06<00:00, 130kB/s]
 => => # Downloading (…)olve/main/target.spm: 100%|██████████| 807k/807k [00:01<00:00, 440kB/s]
 => => # Downloading (…)olve/main/vocab.json: 100%|██████████| 1.62M/1.62M [00:01<00:00, 1.21MB/s]
 => => # Downloading (…)lve/main/config.json: 100%|██████████| 907/907 [00:00<00:00, 499kB/s]
 => => # Downloading pytorch_model.bin: 100%|██████████| 665M/665M [00:11<00:00, 57.2MB/s]
 => => # Downloading (…)okenizer_config.json: 100%|██████████| 255/255 [00:00<00:00, 81.9kB/s]
实现过程中,我这边的构建时间大概要 5 分钟左右,可以从椅子上起来,动一动,听首歌放松一会。
镜像构建完毕,可以使用下面的命令,进入包含模型和 PyTorch 环境的 Docker 镜像。在这个镜像中,我们可以自由的使用前两个功能相关的模型:
docker run --gpus all --ipc=host --ulimit memlock=-1 --ulimit stack=67108864 --rm -it -p 7680:7680 soulteary/prompt-generator:base bash有了环境之后,我们来继续实现一个简单的 Web UI,实现上文中的懒人功能:让模型根据我们输入的中文内容,生成可以绘制高质量图片的 Prompt:
from transformers import AutoTokenizer, AutoModelForSeq2SeqLM
import torch

model = AutoModelForSeq2SeqLM.from_pretrained('Helsinki-NLP/opus-mt-zh-en').eval()
tokenizer = AutoTokenizer.from_pretrained('Helsinki-NLP/opus-mt-zh-en')

def translate(text):
    with torch.no_grad():
        encoded = tokenizer([text], return_tensors='pt')
        sequences = model.generate(**encoded)
        return tokenizer.batch_decode(sequences, skip_special_tokens=True)[0]

from transformers import pipeline, set_seed
import random
import re

text_pipe = pipeline('text-generation', model='succinctly/text2image-prompt-generator')

def text_generate(input):
    seed = random.randint(100, 1000000)
    set_seed(seed)
    text_in_english = translate(input)
    for count in range(6):
        sequences = text_pipe(text_in_english, max_length=random.randint(60, 90), num_return_sequences=8)
        list = []
        for sequence in sequences:
            line = sequence['generated_text'].strip()
            if line != text_in_english and len(line) > (len(text_in_english) + 4) and line.endswith((':', '-', '—')) is False:
                list.append(line)

        result = "\n".join(list)
        result = re.sub('[^ ]+\.[^ ]+','', result)
        result = result.replace('<', '').replace('>', '')
        if result != '':
            return result
        if count == 5:
            return result

import gradio as gr

with gr.Blocks() as block:
    with gr.Column():
        with gr.Tab('文本生成'):
            input = gr.Textbox(lines=6, label='你的想法', placeholder='在此输入内容...')
            output = gr.Textbox(lines=6, label='生成的 Prompt')
            submit_btn = gr.Button('快给我编')

    submit_btn.click(
        fn=text_generate,
        inputs=input,
        outputs=output
    )

block.queue(max_size=64).launch(show_api=False, enable_queue=True, debug=True, share=False, server_name='0.0.0.0')
在容器环境中创建一个名为 webui.cpu.py 的文件,然后使用 python webui.cpu.py,将看到类似下面的日志输出:
Running on local URL:  http://0.0.0.0:7860

To create a public link, set `share=True` in `launch()`.
然后我们在浏览器中打开容器所在设备的 IP (如果在本机运行,可以访问 http://127.0.0.1:7860 ,就能访问 Web 服务啦。
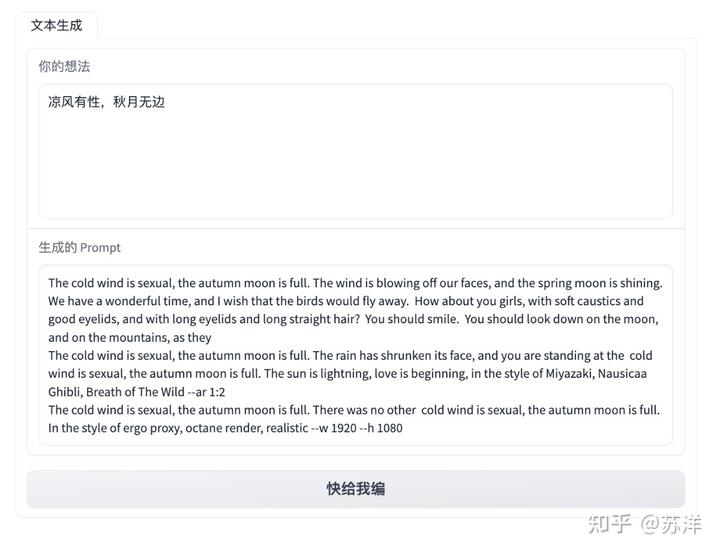
随便输入点什么,它都能给你继续往下编
我们在上面的输入框里输入一些内容,然后点击“快给我编”按钮,就能够得到一堆模型编出来的 Prompt 内容啦。
实现完“文生文”功能之后,我们来实现“图生文”相关功能。
完成需要 GPU 运行的应用容器镜像
结合上文,完成 GPU 相关功能需要的容器环境也不难:
FROM soulteary/prompt-generator:base
LABEL org.opencontainers.image.authors="soulteary@gmail.com"

RUN pip config set global.index-url https://pypi.tuna.tsinghua.edu.cn/simple && \
    pip install clip_interrogator git+https://github.com/pharmapsychotic/BLIP.git@lib#egg=blip

RUN cat > /get-models.py <<EOF
from clip_interrogator import Config, Interrogator
import torch
config = Config()
config.device = 'cuda' if torch.cuda.is_available() else 'cpu'
config.blip_offload = False if torch.cuda.is_available() else True
config.chunk_size = 2048
config.flavor_intermediate_count = 512
config.blip_num_beams = 64
config.clip_model_name = "ViT-H-14/laion2b_s32b_b79k"
ci = Interrogator(config)
EOF

RUN python /get-models.py && \
    rm -rf /get-models.py
将上面的内容保存为 Dockerfile.gpu 文件,然后使用 docker build -t soulteary/prompt-generator:gpu . -f Dockerfile.gpu 完成镜像的构建。
耐心等待镜像构建完毕,使用下面的命令,能够进入包含三种模型和 PyTorch 环境的 Docker 镜像:
docker run --gpus all --ipc=host --ulimit memlock=-1 --ulimit stack=67108864 --rm -it -p 7680:7680 soulteary/prompt-generator:gpu bash接着,来编写能够调用三种模型能力的 Python 程序:
from transformers import AutoTokenizer, AutoModelForSeq2SeqLM
import torch

model = AutoModelForSeq2SeqLM.from_pretrained('Helsinki-NLP/opus-mt-zh-en').eval()
tokenizer = AutoTokenizer.from_pretrained('Helsinki-NLP/opus-mt-zh-en')

def translate(text):
    with torch.no_grad():
        encoded = tokenizer([text], return_tensors='pt')
        sequences = model.generate(**encoded)
        return tokenizer.batch_decode(sequences, skip_special_tokens=True)[0]

from transformers import pipeline, set_seed
import random
import re

text_pipe = pipeline('text-generation', model='succinctly/text2image-prompt-generator')

def text_generate(input):
    seed = random.randint(100, 1000000)
    set_seed(seed)
    text_in_english = translate(input)
    for count in range(6):
        sequences = text_pipe(text_in_english, max_length=random.randint(60, 90), num_return_sequences=8)
        list = []
        for sequence in sequences:
            line = sequence['generated_text'].strip()
            if line != text_in_english and len(line) > (len(text_in_english) + 4) and line.endswith((':', '-', '—')) is False:
                list.append(line)

        result = "\n".join(list)
        result = re.sub('[^ ]+\.[^ ]+','', result)
        result = result.replace('<', '').replace('>', '')
        if result != '':
            return result
        if count == 5:
            return result

from clip_interrogator import Config, Interrogator
import torch
import gradio as gr

config = Config()
config.device = 'cuda' if torch.cuda.is_available() else 'cpu'
config.blip_offload = False if torch.cuda.is_available() else True
config.chunk_size = 2048
config.flavor_intermediate_count = 512
config.blip_num_beams = 64
config.clip_model_name = "ViT-H-14/laion2b_s32b_b79k"

ci = Interrogator(config)

def get_prompt_from_image(image, mode):
    image = image.convert('RGB')
    if mode == 'best':
        prompt = ci.interrogate(image)
    elif mode == 'classic':
        prompt = ci.interrogate_classic(image)
    elif mode == 'fast':
        prompt = ci.interrogate_fast(image)
    elif mode == 'negative':
        prompt = ci.interrogate_negative(image)
    return prompt

with gr.Blocks() as block:
    with gr.Column():
        gr.HTML('<h1>MidJourney / SD2 懒人工具</h1>')
        with gr.Tab('从图片中生成'):
            with gr.Row():
                input_image = gr.Image(type='pil')
                with gr.Column():
                    input_mode = gr.Radio(['best', 'fast', 'classic', 'negative'], value='best', label='Mode')
            img_btn = gr.Button('这图里有啥')
            output_image = gr.Textbox(lines=6, label='生成的 Prompt')

        with gr.Tab('从文本中生成'):
            input_text = gr.Textbox(lines=6, label='你的想法', placeholder='在此输入内容...')
            output_text = gr.Textbox(lines=6, label='生成的 Prompt')
            text_btn = gr.Button('快给我编')

    img_btn.click(fn=get_prompt_from_image, inputs=[input_image, input_mode], outputs=output_image)
    text_btn.click(fn=text_generate, inputs=input_text, outputs=output_text)

block.queue(max_size=64).launch(show_api=False, enable_queue=True, debug=True, share=False, server_name='0.0.0.0')
我们将上面的程序保存为 webui.gpu.py,然后使用 python webui.gpu.py 运行程序,将得到类似下面的日志:
██████████████████████████████████████████████████████████████████████████████████████████████████████████████| 44.0/44.0 [00:00<00:00, 31.5kB/s]
Downloading: 100%|██████████████████████████████████████████████████████████████████████████████████████████████████████████████████████████████████████████████████| 786k/786k [00:01<00:00, 772kB/s]
Downloading: 100%|██████████████████████████████████████████████████████████████████████████████████████████████████████████████████████████████████████████████████| 788k/788k [00:00<00:00, 863kB/s]
Downloading: 100%|███████████████████████████████████████████████████████████████████████████████████████████████████████████████████████████████████████████████| 1.54M/1.54M [00:01<00:00, 1.29MB/s]
Downloading: 100%|████████████████████████████████████████████████████████████████████████████████████████████████████████████████████████████████████████████████████| 907/907 [00:00<00:00, 618kB/s]
Downloading: 100%|█████████████████████████████████████████████████████████████████████████████████████████████████████████████████████████████████████████████████| 634M/634M [00:27<00:00, 23.8MB/s]
Downloading: 100%|████████████████████████████████████████████████████████████████████████████████████████████████████████████████████████████████████████████████████| 255/255 [00:00<00:00, 172kB/s]
Downloading: 100%|██████████████████████████████████████████████████████████████████████████████████████████████████████████████████████████████████████████████████| 779k/779k [00:01<00:00, 757kB/s]
Downloading: 100%|██████████████████████████████████████████████████████████████████████████████████████████████████████████████████████████████████████████████████| 446k/446k [00:00<00:00, 556kB/s]
Downloading: 100%|███████████████████████████████████████████████████████████████████████████████████████████████████████████████████████████████████████████████| 2.01M/2.01M [00:01<00:00, 1.60MB/s]
Downloading: 100%|█████████████████████████████████████████████████████████████████████████████████████████████████████████████████████████████████████████████████| 99.0/99.0 [00:00<00:00, 69.2kB/s]
I0405 12:50:42.798199 140240289830720 instantiator.py:21] Created a temporary directory at /tmp/tmpuvpi8s9q
I0405 12:50:42.798363 140240289830720 instantiator.py:76] Writing /tmp/tmpuvpi8s9q/_remote_module_non_scriptable.py
W0405 12:50:42.878760 140240289830720 version.py:27] Pytorch pre-release version 1.14.0a0+410ce96 - assuming intent to test it
I0405 12:50:43.373221 140240289830720 font_manager.py:1633] generated new fontManager
Loading BLIP model...
load checkpoint from https://storage.googleapis.com/sfr-vision-language-research/BLIP/models/model_large_caption.pth
Loading CLIP model...
I0405 12:51:00.455630 140240289830720 factory.py:158] Loaded ViT-H-14 model config.
I0405 12:51:06.642275 140240289830720 factory.py:206] Loading pretrained ViT-H-14 weights (laion2b_s32b_b79k).
Loaded CLIP model and data in 8.22 seconds.
Running on local URL:  http://0.0.0.0:7860

To create a public link, set `share=True` in `launch()`.
当看到 Running on local URL: http://0.0.0.0:7860 的日志的时候,我们就可以在浏览器中访问程序啦。
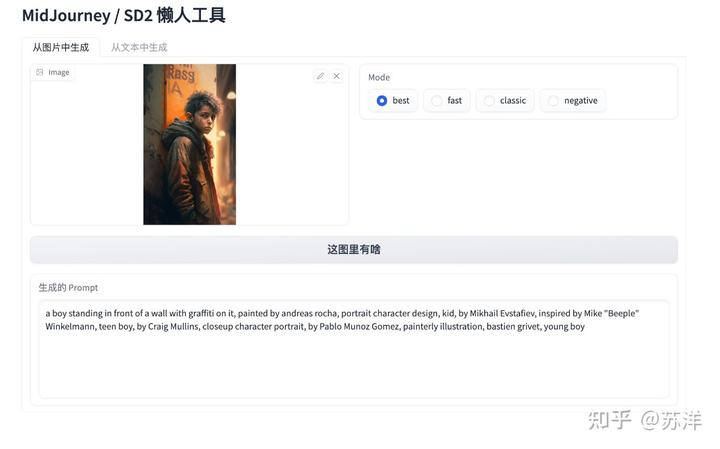
将上文中的图喂给它
将上文中的图片投喂给它,然后点下“这图里有啥”按钮,稍等片刻,我们将得到一些比较合理的 Prompts 内容,你可以用这些内容去生成图片。

喂它文本,扩写内容
当然,你也可以将生成的文本内容再投喂给它,来获得更多的 Prompt 内容,让图片的变化更丰富一些。
其他:显存资源消耗
在模型识别图片的过程中,我简单记录了应用的显存消耗,峰值大概在 8GB 左右。
Wed Apr  5 21:00:09 2023
+-----------------------------------------------------------------------------+
| NVIDIA-SMI 525.89.02    Driver Version: 525.89.02    CUDA Version: 12.0     |
|-------------------------------+----------------------+----------------------+
| GPU  Name        Persistence-M| Bus-Id        Disp.A | Volatile Uncorr. ECC |
| Fan  Temp  Perf  Pwr:Usage/Cap|         Memory-Usage | GPU-Util  Compute M. |
|                               |                      |               MIG M. |
|===============================+======================+======================|
|   0  NVIDIA GeForce ...  Off  | 00000000:01:00.0 Off |                  Off |
| 31%   35C    P8    23W / 450W |   8111MiB / 24564MiB |      0%      Default |
|                               |                      |                  N/A |
+-------------------------------+----------------------+----------------------+

+-----------------------------------------------------------------------------+
| Processes:                                                                  |
|  GPU   GI   CI        PID   Type   Process name                  GPU Memory |
|        ID   ID                                                   Usage      |
|=============================================================================|
|    0   N/A  N/A      1286      G   /usr/lib/xorg/Xorg                  9MiB |
|    0   N/A  N/A      1504      G   /usr/bin/gnome-shell               10MiB |
|    0   N/A  N/A    115252      C   python                           8086MiB |
+-----------------------------------------------------------------------------+
最后
好了,这篇文章就先聊到这里啦。
引用链接
[1] soulteary/docker-prompt-generator: https://github.com/soulteary/docker-prompt-generator[2] 几篇文章: https://soulteary.com/tags/python.html[3] 《基于 Docker 的深度学习环境:入门篇》: https://soulteary.com/2023/03/22/docker-based-deep-learning-environment-getting-started.html[4] 《在搭载 M1 及 M2 芯片 MacBook设备上玩 Stable Diffusion 模型》: https://soulteary.com/2022/12/10/play-the-stable-diffusion-model-on-macbook-devices-with-m1-and-m2-chips.html[5] CLIP 神经网络模型: https://openai.com/research/clip[6] Salesforce 推出的 BLIP : https://blog.salesforceairesearch.com/blip-bootstrapping-language-image-pretraining/[7] 赫尔辛基大学开源的 OPUS MT 模型: https://github.com/Helsinki-NLP/OPUS-MT-train[8] Helsinki-NLP/opus-mt-zh-en: https://huggingface.co/Helsinki-NLP/opus-mt-zh-en[9] soulteary/docker-prompt-generator/app/translate.py: https://github.com/soulteary/docker-prompt-generator/blob/main/app/translate.py[10] succinctly/text2image-prompt-generator: https://huggingface.co/succinctly/text2image-prompt-generator[11] soulteary/docker-prompt-generator/app/text-generation.py: https://github.com/soulteary/docker-prompt-generator/blob/main/app/text-generation.py[12] soulteary/docker-midjourney-prompt-generator/app/clip.py: https://github.com/soulteary/docker-midjourney-prompt-generator/blob/main/app/clip.py[13] 关于“交友”的一些建议和看法: 致新朋友:为生活投票,不断寻找更好的朋友 - 知乎[14] 关于折腾群入群的那些事: 关于折腾群入群的那些事 - 知乎
如果你觉得内容还算实用,欢迎点赞分享给你的朋友,在此谢过。
转载:https://zhuanlan.zhihu.com/p/619702740
