feign是ribbon +hystrix 的整合
01.新建 sp09-feign 项目
第一步:
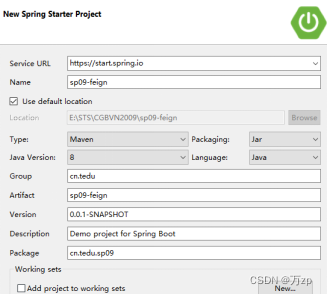
第二步:选择依赖:

pom.xml
需要添加 sp01-commons 依赖:
<?xml version="1.0" encoding="UTF-8"?>
<project xmlns="http://maven.apache.org/POM/4.0.0" xmlns:xsi="http://www.w3.org/2001/XMLSchema-instance"
	xsi:schemaLocation="http://maven.apache.org/POM/4.0.0 https://maven.apache.org/xsd/maven-4.0.0.xsd">
	<modelVersion>4.0.0</modelVersion>
	<parent>
		<groupId>org.springframework.boot</groupId>
		<artifactId>spring-boot-starter-parent</artifactId>
		<version>2.3.1.RELEASE</version>
		<relativePath/> <!-- lookup parent from repository -->
	</parent>
	<groupId>cn.tedu</groupId>
	<artifactId>sp09-feign</artifactId>
	<version>0.0.1-SNAPSHOT</version>
	<name>sp09-feign</name>
	<description>Demo project for Spring Boot</description>
	<properties>
		<java.version>1.8</java.version>
		<spring-cloud.version>Hoxton.SR12</spring-cloud.version>
	</properties>
	<dependencies>
		<dependency>
			<groupId>org.springframework.boot</groupId>
			<artifactId>spring-boot-starter-actuator</artifactId>
		</dependency>
		<dependency>
			<groupId>org.springframework.boot</groupId>
			<artifactId>spring-boot-starter-web</artifactId>
		</dependency>
		<dependency>
			<groupId>org.springframework.cloud</groupId>
			<artifactId>spring-cloud-starter-netflix-eureka-client</artifactId>
		</dependency>
		<dependency>
			<groupId>org.springframework.cloud</groupId>
			<artifactId>spring-cloud-starter-openfeign</artifactId>
		</dependency>

		<dependency>
			<groupId>org.springframework.boot</groupId>
			<artifactId>spring-boot-starter-test</artifactId>
			<scope>test</scope>
			<exclusions>
				<exclusion>
					<groupId>org.junit.vintage</groupId>
					<artifactId>junit-vintage-engine</artifactId>
				</exclusion>
			</exclusions>
		</dependency>
		<dependency>
			<groupId>cn.tedu</groupId>
			<artifactId>sp01-commons</artifactId>
			<version>0.0.1-SNAPSHOT</version>
		</dependency>
	</dependencies>
	<dependencyManagement>
		<dependencies>
			<dependency>
				<groupId>org.springframework.cloud</groupId>
				<artifactId>spring-cloud-dependencies</artifactId>
				<version>${spring-cloud.version}</version>
				<type>pom</type>
				<scope>import</scope>
			</dependency>
		</dependencies>
	</dependencyManagement>

	<build>
		<plugins>
			<plugin>
				<groupId>org.springframework.boot</groupId>
				<artifactId>spring-boot-maven-plugin</artifactId>
			</plugin>
		</plugins>
	</build>

</project>
第三步:修改sp09-feign项目的application.yml
spring:
  application:
    name: feign

server:
  port: 3001

eureka:
  client:
    service-url:
      defaultZone: http://eureka1:2001/eureka, http://eureka2:2002/eureka
第四步:sp09-feign的主程序添加 @EnableDiscoveryClient 和 @EnableFeignClients
package cn.tedu.sp09;

import org.springframework.boot.SpringApplication;
import org.springframework.boot.autoconfigure.SpringBootApplication;
import org.springframework.cloud.client.discovery.EnableDiscoveryClient;
import org.springframework.cloud.openfeign.EnableFeignClients;

@EnableDiscoveryClient
@EnableFeignClients
@SpringBootApplication
public class Sp09FeignApplication {

	public static void main(String[] args) {
		SpringApplication.run(Sp09FeignApplication.class, args);
	}

}
02.feign 声明式客户端
feign 利用了我们熟悉的 spring mvc 注解来对接口方法进行设置,降低了我们的学习成本。
通过这些设置,feign可以拼接后台服务的访问路径和提交的参数

例如:

@GetMapping("/{userId}/score")
JsonResult addScore(@PathVariable Integer userId, @RequestParam Integer score);

当这样调用该方法:

service.addScore(7, 100);

那么 feign 会向服务器发送请求:

http://用户微服务/7/score?score=100

注意:如果 score 参数名与变量名不同,需要添加参数名设置:
@GetMapping("/{userId}/score")
JsonResult addScore(@PathVariable Integer userId, @RequestParam("score") Integer s);
第一步:声明三个代理接口
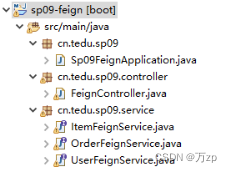
这里的三个Feign类型service接口,就好像是ribbon中的ribbonController(但是没有注解controller,并不能接受客户端的request请求,所以只是类似),只是调用service中的方法。具体方法的实现还是要在原来的service中去完成。
@FeignClient(“item-service”),中的item-service是在service服务中的application.yml文件中的spring.application.name来确定的
ItemFeignService:
package cn.tedu.sp09.service;

import java.util.List;

import org.springframework.cloud.openfeign.FeignClient;
import org.springframework.web.bind.annotation.GetMapping;
import org.springframework.web.bind.annotation.PathVariable;
import org.springframework.web.bind.annotation.PostMapping;
import org.springframework.web.bind.annotation.RequestBody;

import cn.tedu.sp01.pojo.Item;
import cn.tedu.web.util.JsonResult;

@FeignClient("item-service")
public interface ItemFeignService {
	@GetMapping("/{orderId}")
	JsonResult<List<Item>> getItems(@PathVariable String orderId);

	@PostMapping("/decreaseNumber")
	JsonResult decreaseNumber(@RequestBody List<Item> items);
}
UserFeignService
注意,如果请求参数名与方法参数名不同,@RequestParam不能省略,并且要指定请求参数名:
@RequestParam(“score”) Integer s
package cn.tedu.sp09.service;

import org.springframework.cloud.openfeign.FeignClient;
import org.springframework.web.bind.annotation.GetMapping;
import org.springframework.web.bind.annotation.PathVariable;
import org.springframework.web.bind.annotation.RequestParam;

import cn.tedu.sp01.pojo.User;
import cn.tedu.web.util.JsonResult;

@FeignClient("user-service")
public interface UserFeignService {
	@GetMapping("/{userId}")
	JsonResult<User> getUser(@PathVariable Integer userId);

    // 拼接路径 /{userId}/score?score=新增积分
	@GetMapping("/{userId}/score")
	JsonResult addScore(@PathVariable Integer userId, @RequestParam Integer score);
}
OrderFeignService:
package cn.tedu.sp09.service;

import org.springframework.cloud.openfeign.FeignClient;
import org.springframework.web.bind.annotation.GetMapping;
import org.springframework.web.bind.annotation.PathVariable;

import cn.tedu.sp01.pojo.Order;
import cn.tedu.web.util.JsonResult;

@FeignClient("order-service")
public interface OrderFeignService {
	@GetMapping("/{orderId}")
	JsonResult<Order> getOrder(@PathVariable String orderId);

	@GetMapping("/")
	JsonResult addOrder();

}
第二步:编写FeignController,这个是用来接受web请求的,是真正的controller
FeignController:
package cn.tedu.sp09.controller;

import java.util.List;

import org.springframework.beans.factory.annotation.Autowired;
import org.springframework.web.bind.annotation.GetMapping;
import org.springframework.web.bind.annotation.PathVariable;
import org.springframework.web.bind.annotation.PostMapping;
import org.springframework.web.bind.annotation.RequestBody;
import org.springframework.web.bind.annotation.RestController;

import cn.tedu.sp01.pojo.Item;
import cn.tedu.sp01.pojo.Order;
import cn.tedu.sp01.pojo.User;
import cn.tedu.sp09.service.ItemFeignService;
import cn.tedu.sp09.service.OrderFeignService;
import cn.tedu.sp09.service.UserFeignService;
import cn.tedu.web.util.JsonResult;

@RestController
public class FeignController {
	@Autowired
	private ItemFeignService itemService;
	@Autowired
	private UserFeignService userService;
	@Autowired
	private OrderFeignService orderService;

	@GetMapping("/item-service/{orderId}")
	public JsonResult<List<Item>> getItems(@PathVariable String orderId) {
		return itemService.getItems(orderId);
	}

	@PostMapping("/item-service/decreaseNumber")
	public JsonResult decreaseNumber(@RequestBody List<Item> items) {
		return itemService.decreaseNumber(items);
	}


	@GetMapping("/user-service/{userId}")
	public JsonResult<User> getUser(@PathVariable Integer userId) {
		return userService.getUser(userId);
	}

	@GetMapping("/user-service/{userId}/score")
	public JsonResult addScore(@PathVariable Integer userId, Integer score) {
		return userService.addScore(userId, score);
	}


	@GetMapping("/order-service/{orderId}")
	public JsonResult<Order> getOrder(@PathVariable String orderId) {
		return orderService.getOrder(orderId);
	}

	@GetMapping("/order-service")
	public JsonResult addOrder() {
		return orderService.addOrder();
	}
}
为什么可以直接在@GetMapping(“/order-service”)中直接写order-service,因为feign有ribbon技术,可以直接调用服务的服务名
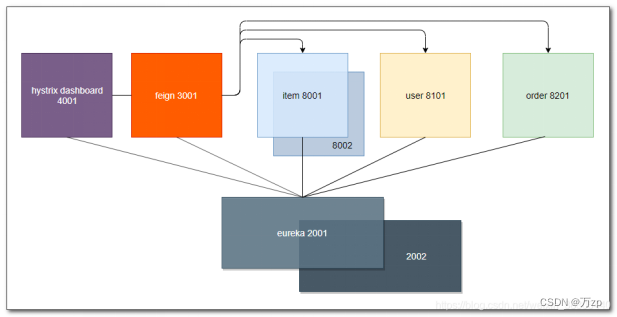
调用流程

第三步:启动服务,并访问测试
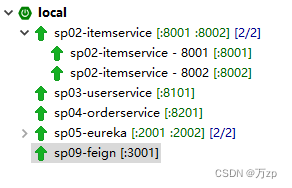
http://eureka1:2001
http://localhost:3001/item-service/35
http://localhost:3001/item-service/decreaseNumber
使用postman,POST发送以下格式数据:
[{“id”:1, “name”:“abc”, “number”:23},{“id”:2, “name”:“def”, “number”:11}]
http://localhost:3001/user-service/7
http://localhost:3001/user-service/7/score?score=100
http://localhost:3001/order-service/123abc
http://localhost:3001/order-service/
03.配合ribbon 负载均衡和重试
无需额外配置,feign 默认已启用了 ribbon 负载均衡和重试机制。可以通过配置对参数进行调整
重试的默认配置参数:
ConnectTimeout=1000
ReadTimeout=1000
MaxAutoRetries=0
MaxAutoRetriesNextServer=1
第一步:可以在sp09-feign 项目的application.yml 配置 ribbon 超时和重试
ribbon.xxx 全局配置
item-service.ribbon.xxx 对特定服务实例的配置
spring:
  application:
    name: feign

server:
  port: 3001

eureka:
  client:
    service-url:
      defaultZone: http://eureka1:2001/eureka, http://eureka2:2002/eureka
ribbon:
  ConnectTimeout: 1000
  ReadTimeOut: 1000
  MaxAutoRetries: 1
  MaxAutoRetriesNextServer: 2
item-service:
  ribbon:
    ConnectTimeout: 1000
    ReadTimeOut: 1000
    MaxAutoRetries: 2
    MaxAutoRetriesNextServer: 1
启动服务,访问测试
http://localhost:3001/item-service/35
04.feign + hystrix 降级
feign 启用 hystrix
第一步:feign 默认没有启用 hystrix,添加配置,启用 hystrix
feign.hystrix.enabled=true
application.yml 添加配置
feign:
  hystrix:
    enabled: true
第二步:降级类
降级类需要实现远程接口
ItemFeignServiceFB
package cn.tedu.sp09.service;

import java.util.List;
import org.springframework.stereotype.Component;
import cn.tedu.sp01.pojo.Item;
import cn.tedu.web.util.JsonResult;

@Component
public class ItemFeignServiceFB implements ItemFeignService{

	@Override
	public JsonResult<List<Item>> getItems(String orderId) {
		return JsonResult.err("获取订单失败");
	}

	@Override
	public JsonResult decreaseNumber(List<Item> items) {
		return JsonResult.err("减少库存失败");
	}
}
UserFeginServiceFB
package cn.tedu.sp09.service;

import org.springframework.stereotype.Component;
import cn.tedu.sp01.pojo.User;
import cn.tedu.web.util.JsonResult;

@Component
public class UserFeignServiceFB implements UserFeignService {

	@Override
	public JsonResult<User> getUser(Integer userId) {
		return JsonResult.err("获取用户失败");
	}

	@Override
	public JsonResult addScore(Integer userId, Integer score) {
		return JsonResult.err("增加积分失败");
	}

}
OrderFeignServiceFB
package cn.tedu.sp09.service;

import org.springframework.stereotype.Component;
import cn.tedu.sp01.pojo.Order;
import cn.tedu.web.util.JsonResult;

@Component
public class OrderFeignServiceFB implements OrderFeignService {

	@Override
	public JsonResult<Order> getOrder(String orderId) {
		return JsonResult.err("获取订单失败");
	}

	@Override
	public JsonResult addOrder() {
		return JsonResult.err("保存订单失败");
	}

}
第三步:在代理接口(ItemFeignService)中去声明降级类
远程调用失败, 会执行降级类中的代码,在注解@FeignClient中去添加属性fallback
ItemFeignService
@FeignClient(name="item-service",fallback = ItemFeignServiceFB.class)
public interface ItemFeignService {
UserFeignService
@FeignClient(name="user-service",fallback = UserFeignServiceFB.class)
public interface UserFeignService {
OrderFeignService
@FeignClient(name="order-service",fallback = OrderFeignServiceFB.class)
public interface OrderFeignService {
04.feign + hystrix 监控和熔断测试
 第一步:修改sp09-feign项目
pom.xml 添加 hystrix 起步依赖,feign 没有包含完整的 hystrix 依赖
右键点击项目,编辑起步依赖,添加hystrix依赖

<dependency>
	  <groupId>org.springframework.cloud</groupId>
	  <artifactId>spring-cloud-starter-netflix-hystrix</artifactId>
</dependency>
第二步:主程序添加 @EnableCircuitBreaker
package cn.tedu.sp09;

import org.springframework.boot.SpringApplication;
import org.springframework.boot.autoconfigure.SpringBootApplication;
import org.springframework.cloud.client.SpringCloudApplication;
import org.springframework.cloud.client.circuitbreaker.EnableCircuitBreaker;
import org.springframework.cloud.client.discovery.EnableDiscoveryClient;
import org.springframework.cloud.openfeign.EnableFeignClients;

//@EnableCircuitBreaker
//@EnableDiscoveryClient
//@SpringBootApplication
@SpringCloudApplication
@EnableFeignClients
public class Sp09FeignApplication {

	public static void main(String[] args) {
		SpringApplication.run(Sp09FeignApplication.class, args);
	}

}
第三步:sp09-feign 配置 actuator,暴露 hystrix.stream 监控端点
actuator 依赖
查看pom.xml, 确认已经添加了 actuator 依赖
<dependency>
		<groupId>org.springframework.boot</groupId>
		<artifactId>spring-boot-starter-actuator</artifactId>
</dependency>
application.yml 暴露 hystrix.stream 端点
management:
  endpoints:
    web:
      exposure:
        include: hystrix.stream
第四步:启动服务,查看监控端点
http://localhost:3001/actuator

第五步:启动hystrix dashboard
启动 hystrix dashboard 服务,填入feign监控路径,开启监控
访问 http://localhost:4001/hystrix
在其中填入 feign 监控路径:
http://localhost:3001/actuator/hystrix.stream
访问微服务,以产生监控数据
http://localhost:3001/item-service/35
http://localhost:3001/user-service/7
http://localhost:3001/user-service/7/score?score=100
http://localhost:3001/order-service/123abc
http://localhost:3001/order-service/
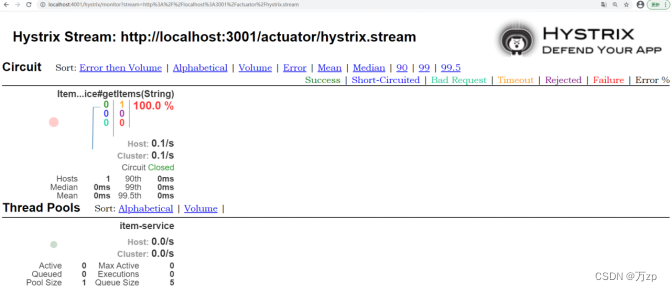
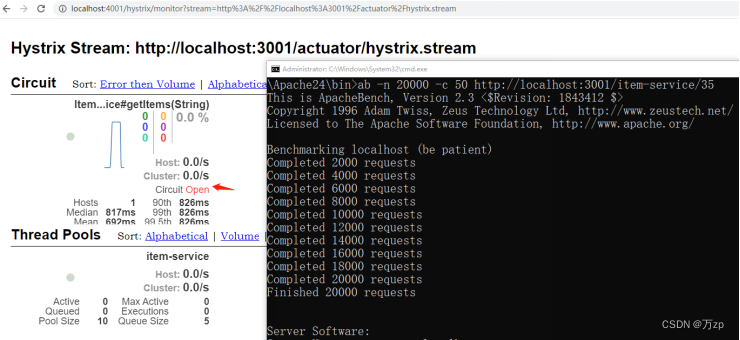
第六步:熔断测试
用ab工具,以并发50次,来发送20000个请求
ab -n 20000 -c 50 http://localhost:3001/item-service/35
断路器状态为 Open,所有请求会被短路,直接降级执行fallback方法