1、 背景
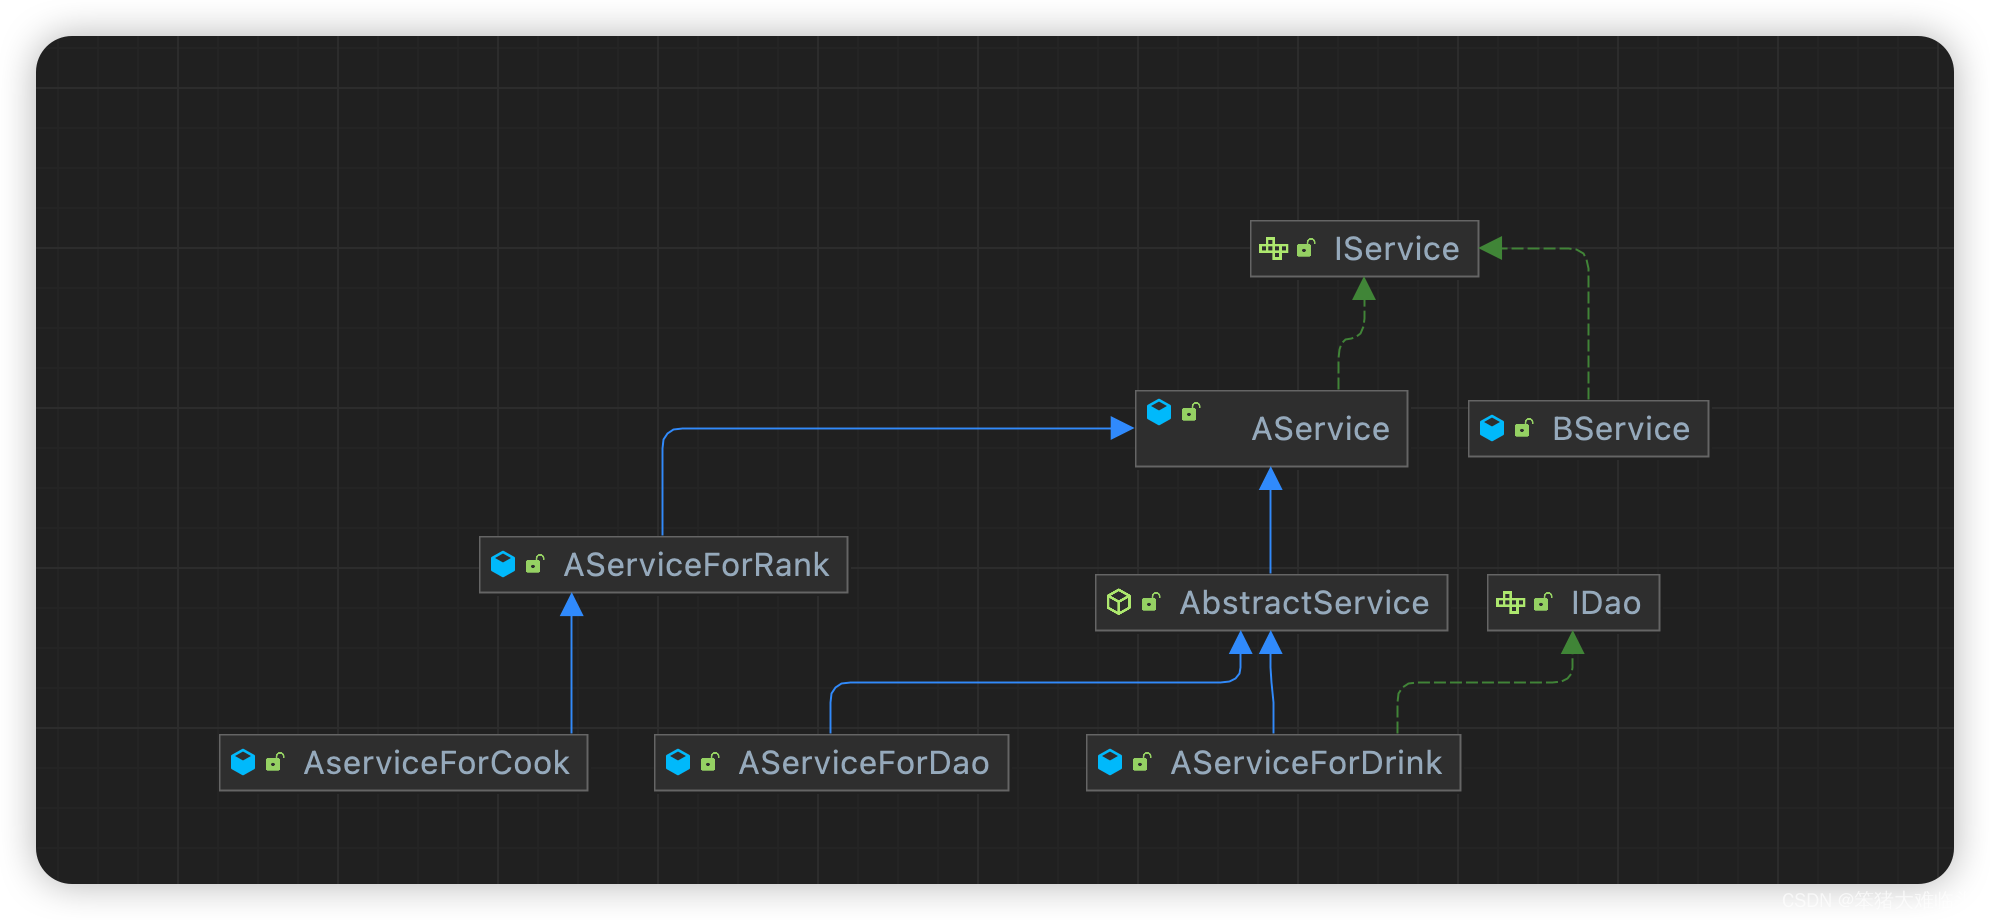
众所周知该注解是Spring中用于依赖注入的注解,但是该注解只是简单根据类型的注入, 并且如果该类型存在多个实现类的情况下无法抉择具体哪一个实现类就会抛出错误,除非搭配@Qualifier注解然后使用硬编码的方式去指定Bean的名字去抉择哪个实现类。但是很明显这很不合理, 因为常常我们写代码写着写着我们的类图可能就会变成如下面的的结构,这时我们想注入AService 就必须再加上 @Qualifier("AService") 才能注入成功。
2、扩展特性
为了实现我们自己的@Autowired 我们先想一下可以扩展哪些好玩的功能
- 1、当要注入的类不是抽象类和接口则直接注入该类
- 2、当要注入的类是抽象类或者接口,则增加一个type参数去指定具体注入哪个实现类
- 3、支持根据从配置文件获取要注入的实现类。 并且可以是全路径类名或者是beanName。
- 4、增加自定义注入策略用该策略的结果进行注入
最终我们的自定义注解@SuperAutowired如下:
@Target({ElementType.FIELD, ElementType.PARAMETER})
@Retention(RetentionPolicy.RUNTIME)
public @interface SuperAutowired {

    /**
     * 从类型注入Bean
     */
    Class<?> type() default Void.class;

    /**
     * 从配置文件等中获取该属性值作为Bean注入
     */
    String propValue() default "";

    /**
     * 自定义注入Bean
     */
    Class<? extends SuperAutowiredProxy>[] proxy() default {};

    String extData() default "";
}
3、 与Spring集成
那么如何像 @Autowired注解一样,可以在Spring创建Bean对象后也对标记了@SuperAutowired进行依赖注入? 这时候就轮到我们的Spring扩展点BeanPostProcessor, 它可以在Bean实例化之后做一些对Bean的处理,我们拿到这个Bean后就可以自行对其属性值进行赋值或者修改了。 Spring每个Bean被实例化之后就获取所有BeanPostProcessor然后回调其中的方法把Bean给到我们。
其实@Autowired 也是用的自定义BeanPostProcessor去实现的 就是 AutowiredAnnotationBeanPostProcessor#postProcessProperties
这里我们直继承BeanPostProcessor, 然后实现postProcessAfterInitialization方法即可, 这个方法会在bean实例化之后并且执行对象的初始化方法之后被回调。 然后整体逻辑也很简单,无非就是获取这个bean的所有属性判断是否包含我们的注解,如果包含则执行我们的注入逻辑即可。这里写的业务逻辑与我上面写的特性相同。
@Component
public class SuperAutowiredBeanPostProcessor implements BeanPostProcessor, ApplicationContextAware {

    private ApplicationContext applicationContext;

    /**
     * @param bean          容器当前实例化的Bean
     * @param beanName      该Bean的名字
     */
    @Override
    public Object postProcessAfterInitialization(Object bean, String beanName) throws BeansException {
        ReflectionUtils.doWithFields(bean.getClass(),field -> {
            injectBean(bean, field);
        });
        return bean;
    }

    private void injectBean(Object bean, Field field) {
        SuperAutowired myAutowiredAnnotation = field.getAnnotation(SuperAutowired.class);
        if (myAutowiredAnnotation == null){
            return;
        }

        Object beanValue = null;
        ReflectionUtils.makeAccessible(field);

        // 自定义注入逻辑
        if (beanValue == null){
            beanValue = proxyGetBean(field, myAutowiredAnnotation);
        }

        // 配置属性注入
        if (beanValue == null){
            beanValue = propertiesGetBean(field, myAutowiredAnnotation);
        }

        // 类型注入
        if (beanValue == null){
            beanValue = autowireGetBean(field, myAutowiredAnnotation);
        }

        if (beanValue == null){
            throw new RuntimeException("无法找到对应的实现类");
        }

        ReflectionUtils.setField(field, bean,beanValue);
    }

    private Object proxyGetBean(Field field, SuperAutowired myAutowiredAnnotation) {
        if (myAutowiredAnnotation.proxy().length <= 0) {
            return null;
        }
        Class<? extends SuperAutowiredProxy> proxyClass = myAutowiredAnnotation.proxy()[0];
        SuperAutowiredProxy proxy = applicationContext.getBean(proxyClass);
        return proxy.getBean(myAutowiredAnnotation, applicationContext,field.getType());
    }

    private Object propertiesGetBean(Field field, SuperAutowired myAutowiredAnnotation) {
        if ("".equals(myAutowiredAnnotation.propValue())){
            return null;
        }

        Environment environment = applicationContext.getEnvironment();
        String className = environment.getProperty(myAutowiredAnnotation.propValue());
        if (className == null || Objects.equals(className, "")){
           throw new RuntimeException("该属性值" + myAutowiredAnnotation.propValue() + "为空无法找不到对应的实现类");
        }

        if (className.contains(".")){
            // 当类名处理
            Class<?> beanClass = loadClass(className);
            return getSameBean(beanClass);
        }else {
            // 当bean类处理
            return applicationContext.getBean(className);
        }
    }

    private Class<?> loadClass(String className) {
        try {
            Class<?> beanClass = ClassUtils.getDefaultClassLoader().loadClass(className);
            return beanClass;
        } catch (ClassNotFoundException e) {
            throw new RuntimeException(e);
        }
    }


    private Object autowireGetBean(Field field, SuperAutowired myAutowiredAnnotation) {
        Object beanValue;
        Class<?> fieldType = field.getType();
        if (fieldType.isInterface() || Modifier.isAbstract(fieldType.getModifiers())){
            // 如果是接口按 传统autowired注入. 但是可能会有多个实现类. 一般只有一个实现类就不用指定 type了
            try {
                beanValue = applicationContext.getBean(fieldType);
            } catch (NoUniqueBeanDefinitionException e) {
                Class<?> type = myAutowiredAnnotation.type();
                if (type != Void.class){
                    beanValue = getSameBean(type);
                }else{
                    throw e;
                }
            }
        }else{
            // 如果是具体类则具体注入
            beanValue = getSameBean(fieldType);
        }
        return beanValue;
    }

    @Override
    public void setApplicationContext(ApplicationContext atx) throws BeansException {
        this.applicationContext = atx;
    }


    private Object getSameBean(Class<?> fieldType) {
        Map<String, ?> beansOfType = applicationContext.getBeansOfType(fieldType);
        if (beansOfType.size() <= 0){
            throw new RuntimeException("没有找到实现类: " + fieldType.getName());
        }

        for (Object value : beansOfType.values()) {
            if (isSameClass(value.getClass(), fieldType)) {
                return value;
            }
        }
        throw new RuntimeException("有多个实现类请指定: " + fieldType.getName());
    }

    public boolean isSameClass(Class<?> class1, Class<?> class2) {
        if (class1 == class2) {
            return true;
        }
        if (class2.isAssignableFrom(class1) || class1.isAssignableFrom(class2)) {
            return false;
        }
        return false;
    }
}
/**
 *  自定义注入Bean策略
 */
public interface  SuperAutowiredProxy {

    Object getBean(SuperAutowired superAutowired,
                   ApplicationContext atx,
                   Class<?> clazz);
}
4、测试
4.1 准备
自行先建立几个测试的Bean,然后自行扩展自定义注入的策略. 然后在配置文件配置值方便测试
alolication.yml配置文件
myBean:
  # 类名
  iService: com.burukeyou.b9_spring_ioc.service.AserviceForCook
  # bean Name
  iService2: AServiceForRank
public interface IService {
}

@Component
public class AService implements IService {

}

@Component
public class BService implements AService {

}
@Component
public class CService implements AService {

}
@Component
public class MyIServiceProxyBean implements SuperAutowiredProxy, InvocationHandler {

    @Override
    public Object getBean(SuperAutowired superAutowired,
                          ApplicationContext atx,
                          Class<?> clazz) {
        String extData = superAutowired.extData();

        //
        if ("db".equals(extData)){
            // 比如: 从db加载要注入的bean
            String beanName = .... 省略......;
            return atx.getBean(beanName);
        }else {
            // 动态代理生成该Bean
            if (clazz.isInterface()){
                return Proxy.newProxyInstance(ClassLoader.getSystemClassLoader(), new Class[]{clazz}, this);
            }
        }

        return null;
    }

    @Override
    public Object invoke(Object proxy, Method method, Object[] args) throws Throwable {
        // 过滤掉Object类的方法
        if (method.getDeclaringClass() == Object.class) {
            return method.invoke(this, args);
        }

        System.out.println("MyIServiceProxyBean pre invoke: " + method.getName());
        return null;
    }
}
@SuperAutowired注入使用案例
@Component
@Data
public class MyComponent {

    @SuperAutowired(type = AServiceForRank.class)
    private IService a;

    @SuperAutowired
    private AService b;

    @SuperAutowired
    private BService c;

    @SuperAutowired
    private CService d;

	// 从配置读取注入
    @SuperAutowired(propValue = "myBean.iService")
    private IService e;

    @SuperAutowired(propValue = "myBean.iService2")
    private IService f;

    @SuperAutowired(proxy = MyIServiceProxyBean.class)
    private IService g;
4.2 单测:
- 没起SpringBoot环境,手动创建Spring上下文简单测试下。 有SpringBoot环境直接启动测试即可。
    @Test
    public void testMain() throws IOException {
        AnnotationConfigApplicationContext context = new AnnotationConfigApplicationContext();
        ConfigurableEnvironment environment = context.getEnvironment();

        // 加载alolication.yml配置到容器
        List<PropertySource<?>> config = new YamlPropertySourceLoader()
                .load("config", new ClassPathResource("alolication.yml"));
        context.getEnvironment().getPropertySources().addLast(config.get(0));
        context.setEnvironment(environment);

        // todo 扫描包并启动容器  ---你的bean的包位置
        context.scan("com.burukeyou.b9_spring_ioc");
        context.refresh();

        // 测试此对象能否依赖注入成功
        MyComponent myComponent = context.getBean(MyComponent.class);

        context.close();
    }
最后
至此我们就对@Autowired进行了增强, 如果需要还可自行扩展更加强大的功能。 比如我们可以增加refresh功能, 比如可以缓存每个注入的实例, 然后我们可以监听某些配置或数据库的变化一键去重新替换该实例注入的值(就像Nacos刷新机制)。 再比如我们可以增加支持配置class文件本地或者网络位置,然后我们自定义ClassLoader去读取该class文件生成class对象到JVM中,然后实例化再去注入。 再比如。。。。如果还什么可扩展的好玩的实用的搞怪的功能欢迎留下你的评论。
