Kubernetes配置Jenkins Slave
部署在kubernetes集群内
1、部署jenkins
1.1、命名空间
apiVersion: v1
kind: Namespace
metadata:
  name: jenkinsci
  labels:
    app: jenkinsci
1.2、Deployment
apiVersion: apps/v1
kind: Deployment
metadata:
  name: jenkinsci
  namespace: jenkinsci
  labels:
    app: jenkinsci
spec:
  replicas: 1
  selector:
    matchLabels:
      app: jenkinsci
  template:
    metadata:
      labels:
        app: jenkinsci
    spec:
      # 增加污点容忍,可以在具有NoSchedule污点节点上部署
      tolerations:
        - key: node-role.kubernetes.io/master
          operator: Exists
          effect: NoSchedule
        - key: node-role.kubernetes.io/control-plane
          operator: Exists
          effect: NoSchedule
      # 选择具有jenkinsci标签的节点部署
      nodeSelector:
        node-role: jenkinsci
      containers:
        - name: jenkinsci
          # 镜像制作详情https://blog.csdn.net/gyfghh/article/details/130377218
          image: registry.cn-hangzhou.aliyuncs.com/ialso/jenkinsci:0.1
          imagePullPolicy: IfNotPresent
          ports:
            - containerPort: 8080
              name: web
            - containerPort: 50000
              name: jnlp
          volumeMounts:
            - name: timezone
              mountPath: /etc/localtime
            - name: docker
              mountPath: /var/run/docker.sock
            - name: jenkinsci-data
              mountPath: /root/.jenkins
      volumes:
        # 时间处理
        - name: timezone
          hostPath:
            path: /usr/share/zoneinfo/Asia/Shanghai
        # 使用宿主机docker
        - name: docker
          hostPath:
            path: /var/run/docker.sock
        # jenkins数据存放位置
        - name: jenkinsci-data
          hostPath:
            path: /root/.jenkins
1.3、service
apiVersion: v1
kind: Service
metadata:
  name: jenkinsci
  namespace: jenkinsci
spec:
  selector:
    app: jenkinsci
  ports:
    - name: web
      port: 80
      targetPort: 8080
    - name: jnlp
      port: 50000
      targetPort: 50000
  type: ClusterIP
1.4、配置外部访问
apiVersion: networking.k8s.io/v1
kind: Ingress
metadata:
  name: ingress-jenkinsci
  namespace: jenkinsci
  annotations:
    kubernetes.io/ingress.class: "nginx"
spec:
  # 转发规则
  rules:
    - host: jenkins.ialso.cn
      http:
        paths:
          - path: /
            pathType: Prefix
            backend:
              service:
                name: jenkinsci
                port:
                  number: 80
1.5、数据文件
文件中已包含所有所需插件
链接:https://pan.baidu.com/s/1feLvKsWGK-wMu7Bi6rl_0w?pwd=atqe, 解压缩放入/root/.jenkins
账户:Jenkinsci 密码:xumeng2233.
1.6、配置jenkins localtion
Dashboard->Manage Jenkins->Configure System
需根据jenkinsci在kubernetes中访问url对jenkins进行配置
# http://{service-name}.{name-space}.svc.cluster.local
http://jenkinsci.jenkinsci.svc.cluster.local
1.7、自定义jenkins
如果不使用提供的数据文件,自定义jenkins需要安装下列插件
- Credentials
- Credentials Binding Plugin
- Git
- Gitee
- Pipeline
- Git Parameter
- Email Extension Template
- Build With Parameters
- Kubernetes
- Kubernetes CLI
然后可参照文章:https://blog.csdn.net/gyfghh/article/details/130377218, 对所需内容进行配置
2、密钥配置
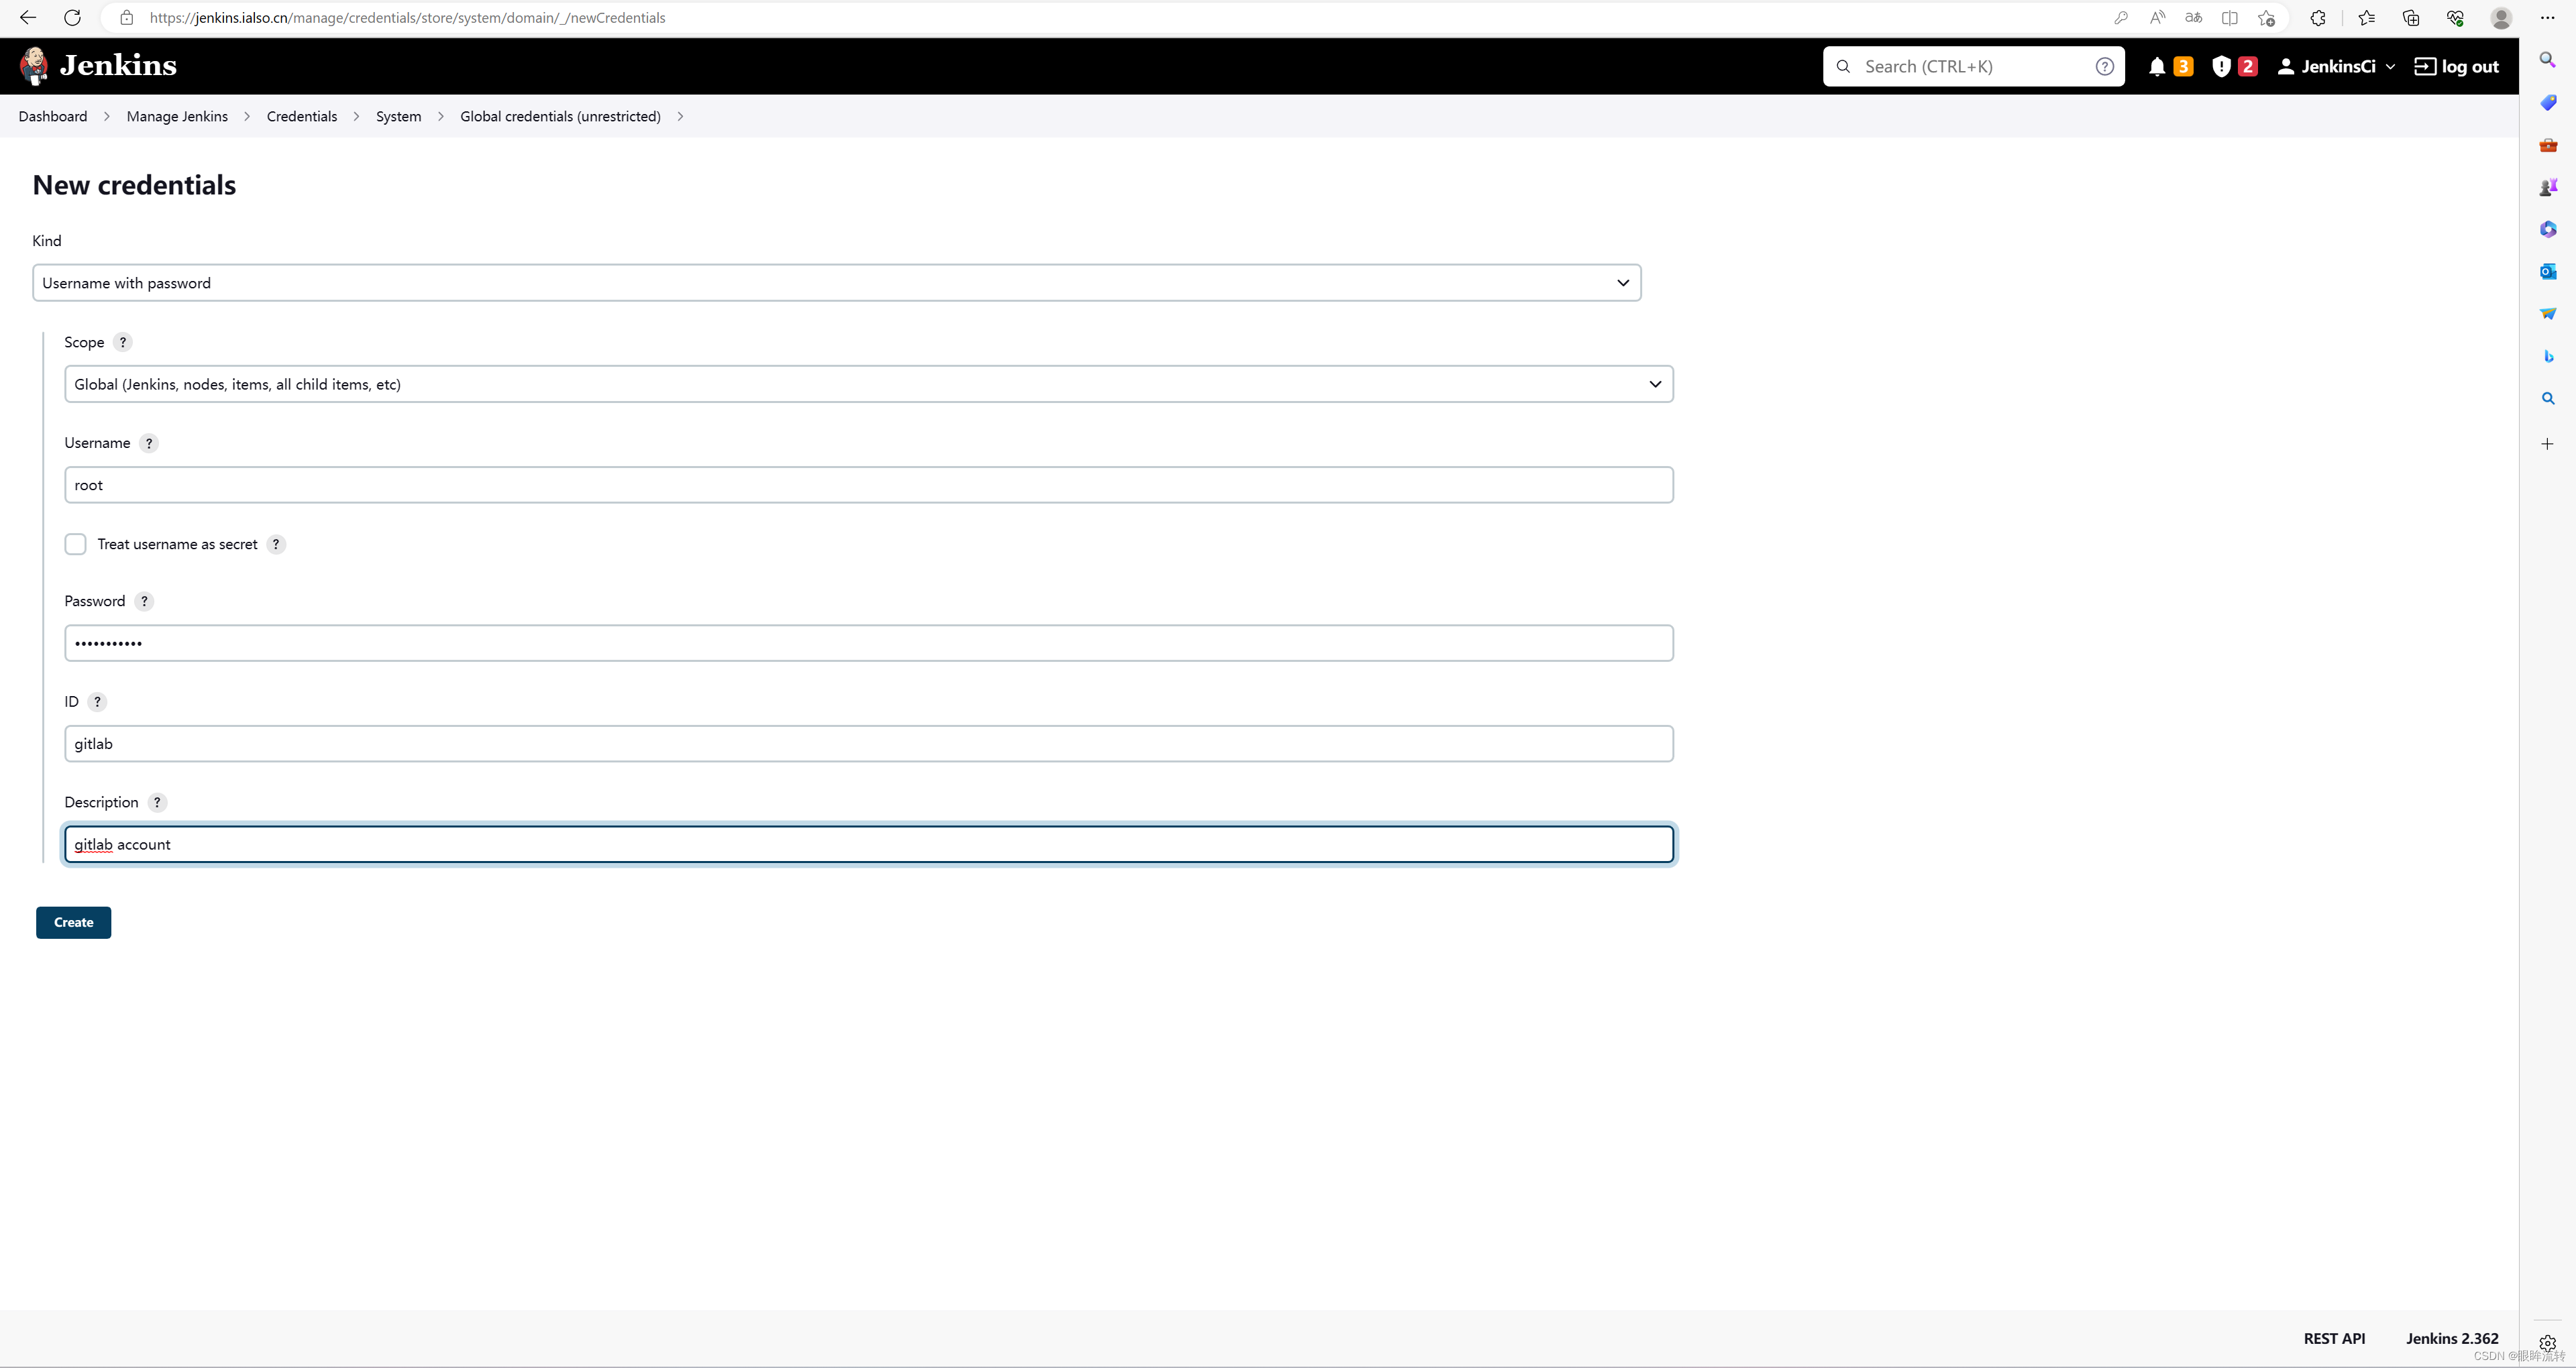
2.1、Gitlab
Dashboard->Manage Jenkins->Credentials->System->Global credentials->Username with password
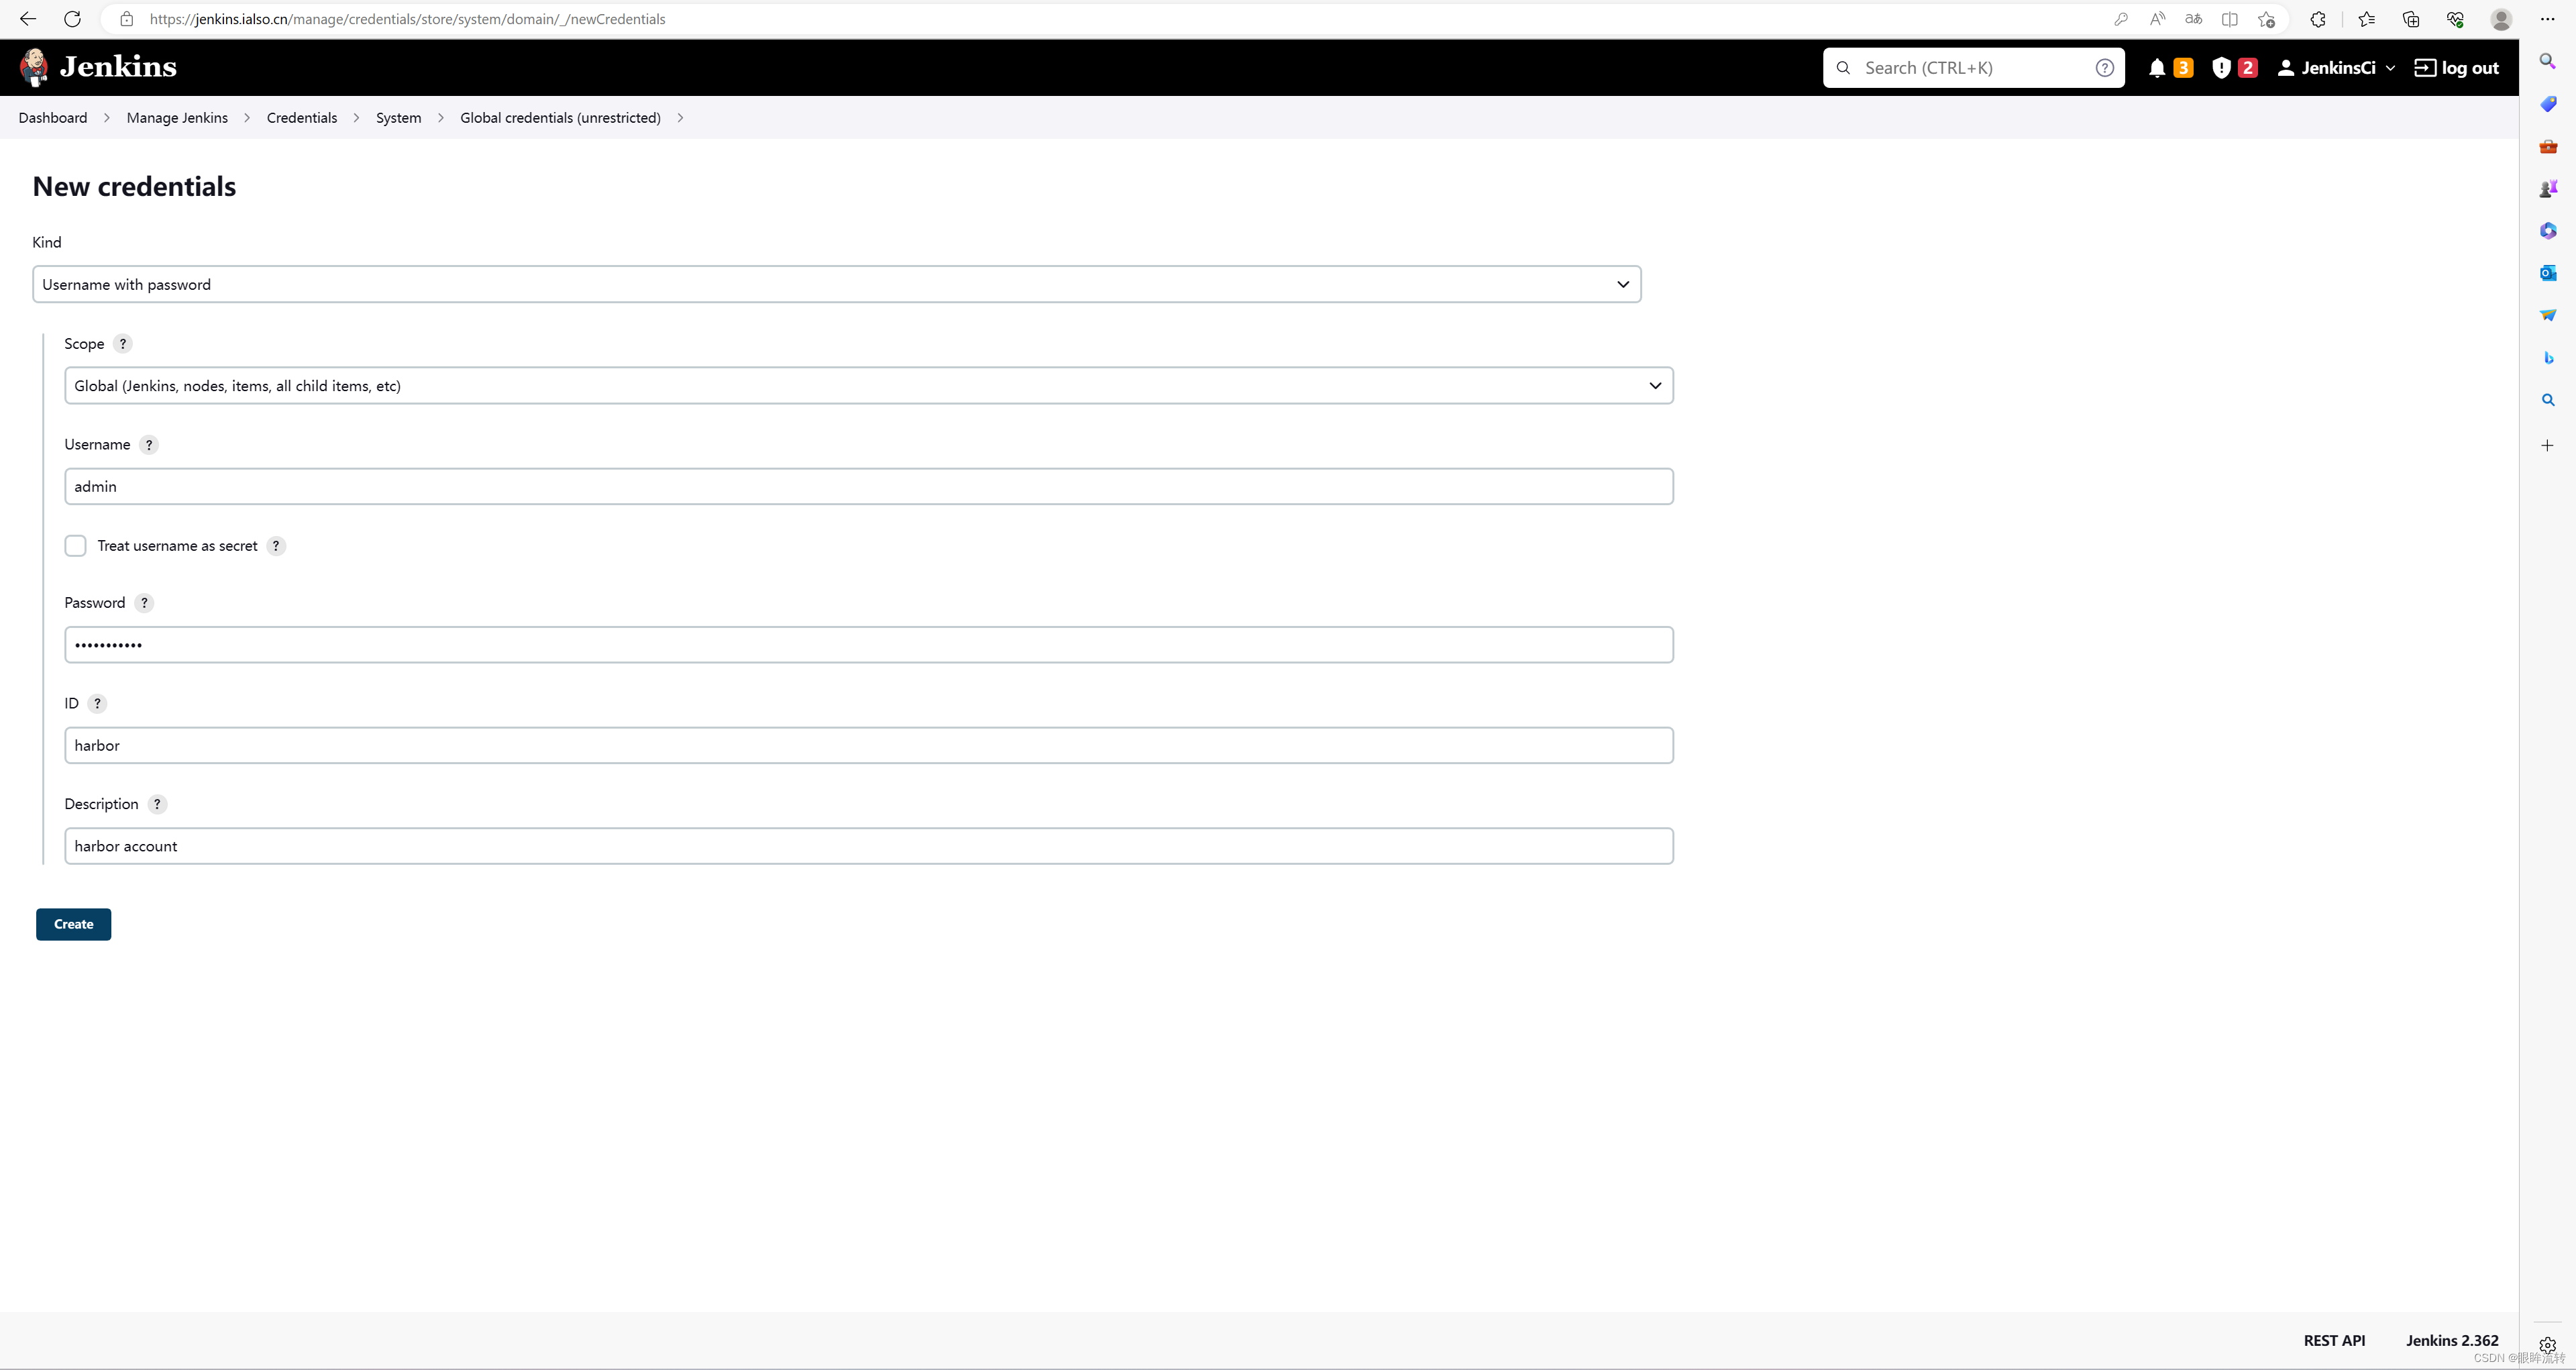
2.2、Harbor
Dashboard->Manage Jenkins->Credentials->System->Global credentials->Username with password
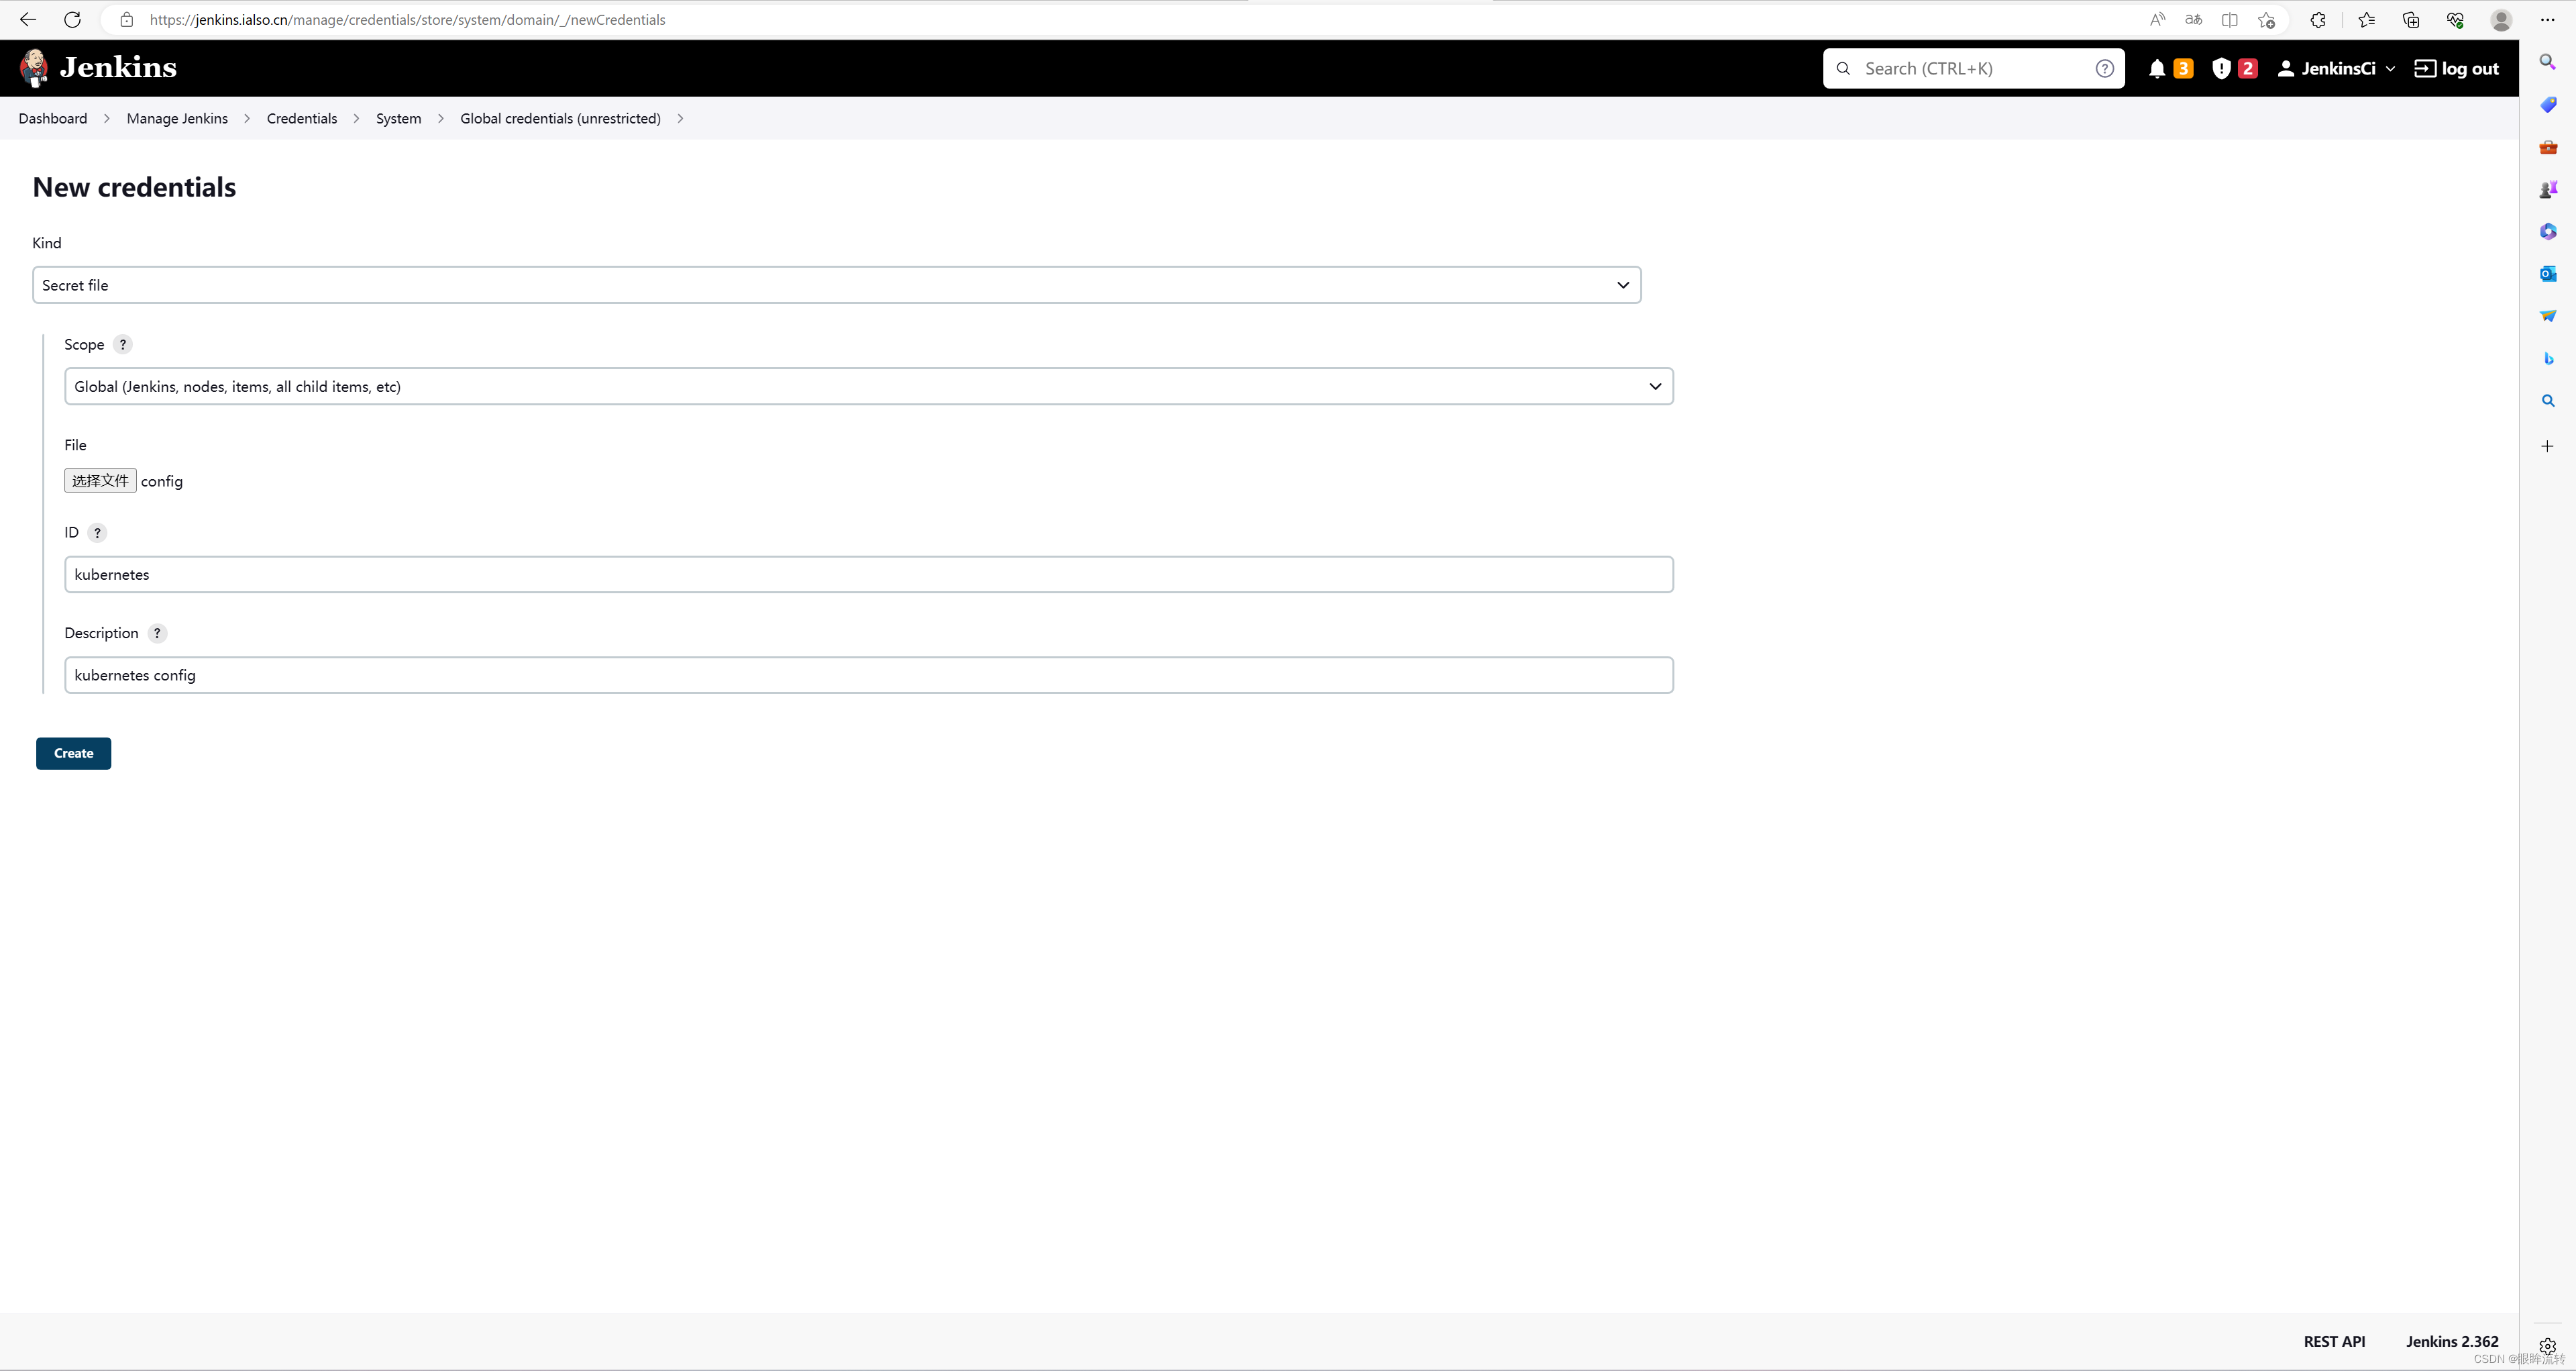
2.3、kubernetes
Dashboard->Manage Jenkins->Credentials->System->Global credentials-> Secret file
文件选择kubernetes集群中的~/.kube/config
3、配置Agent
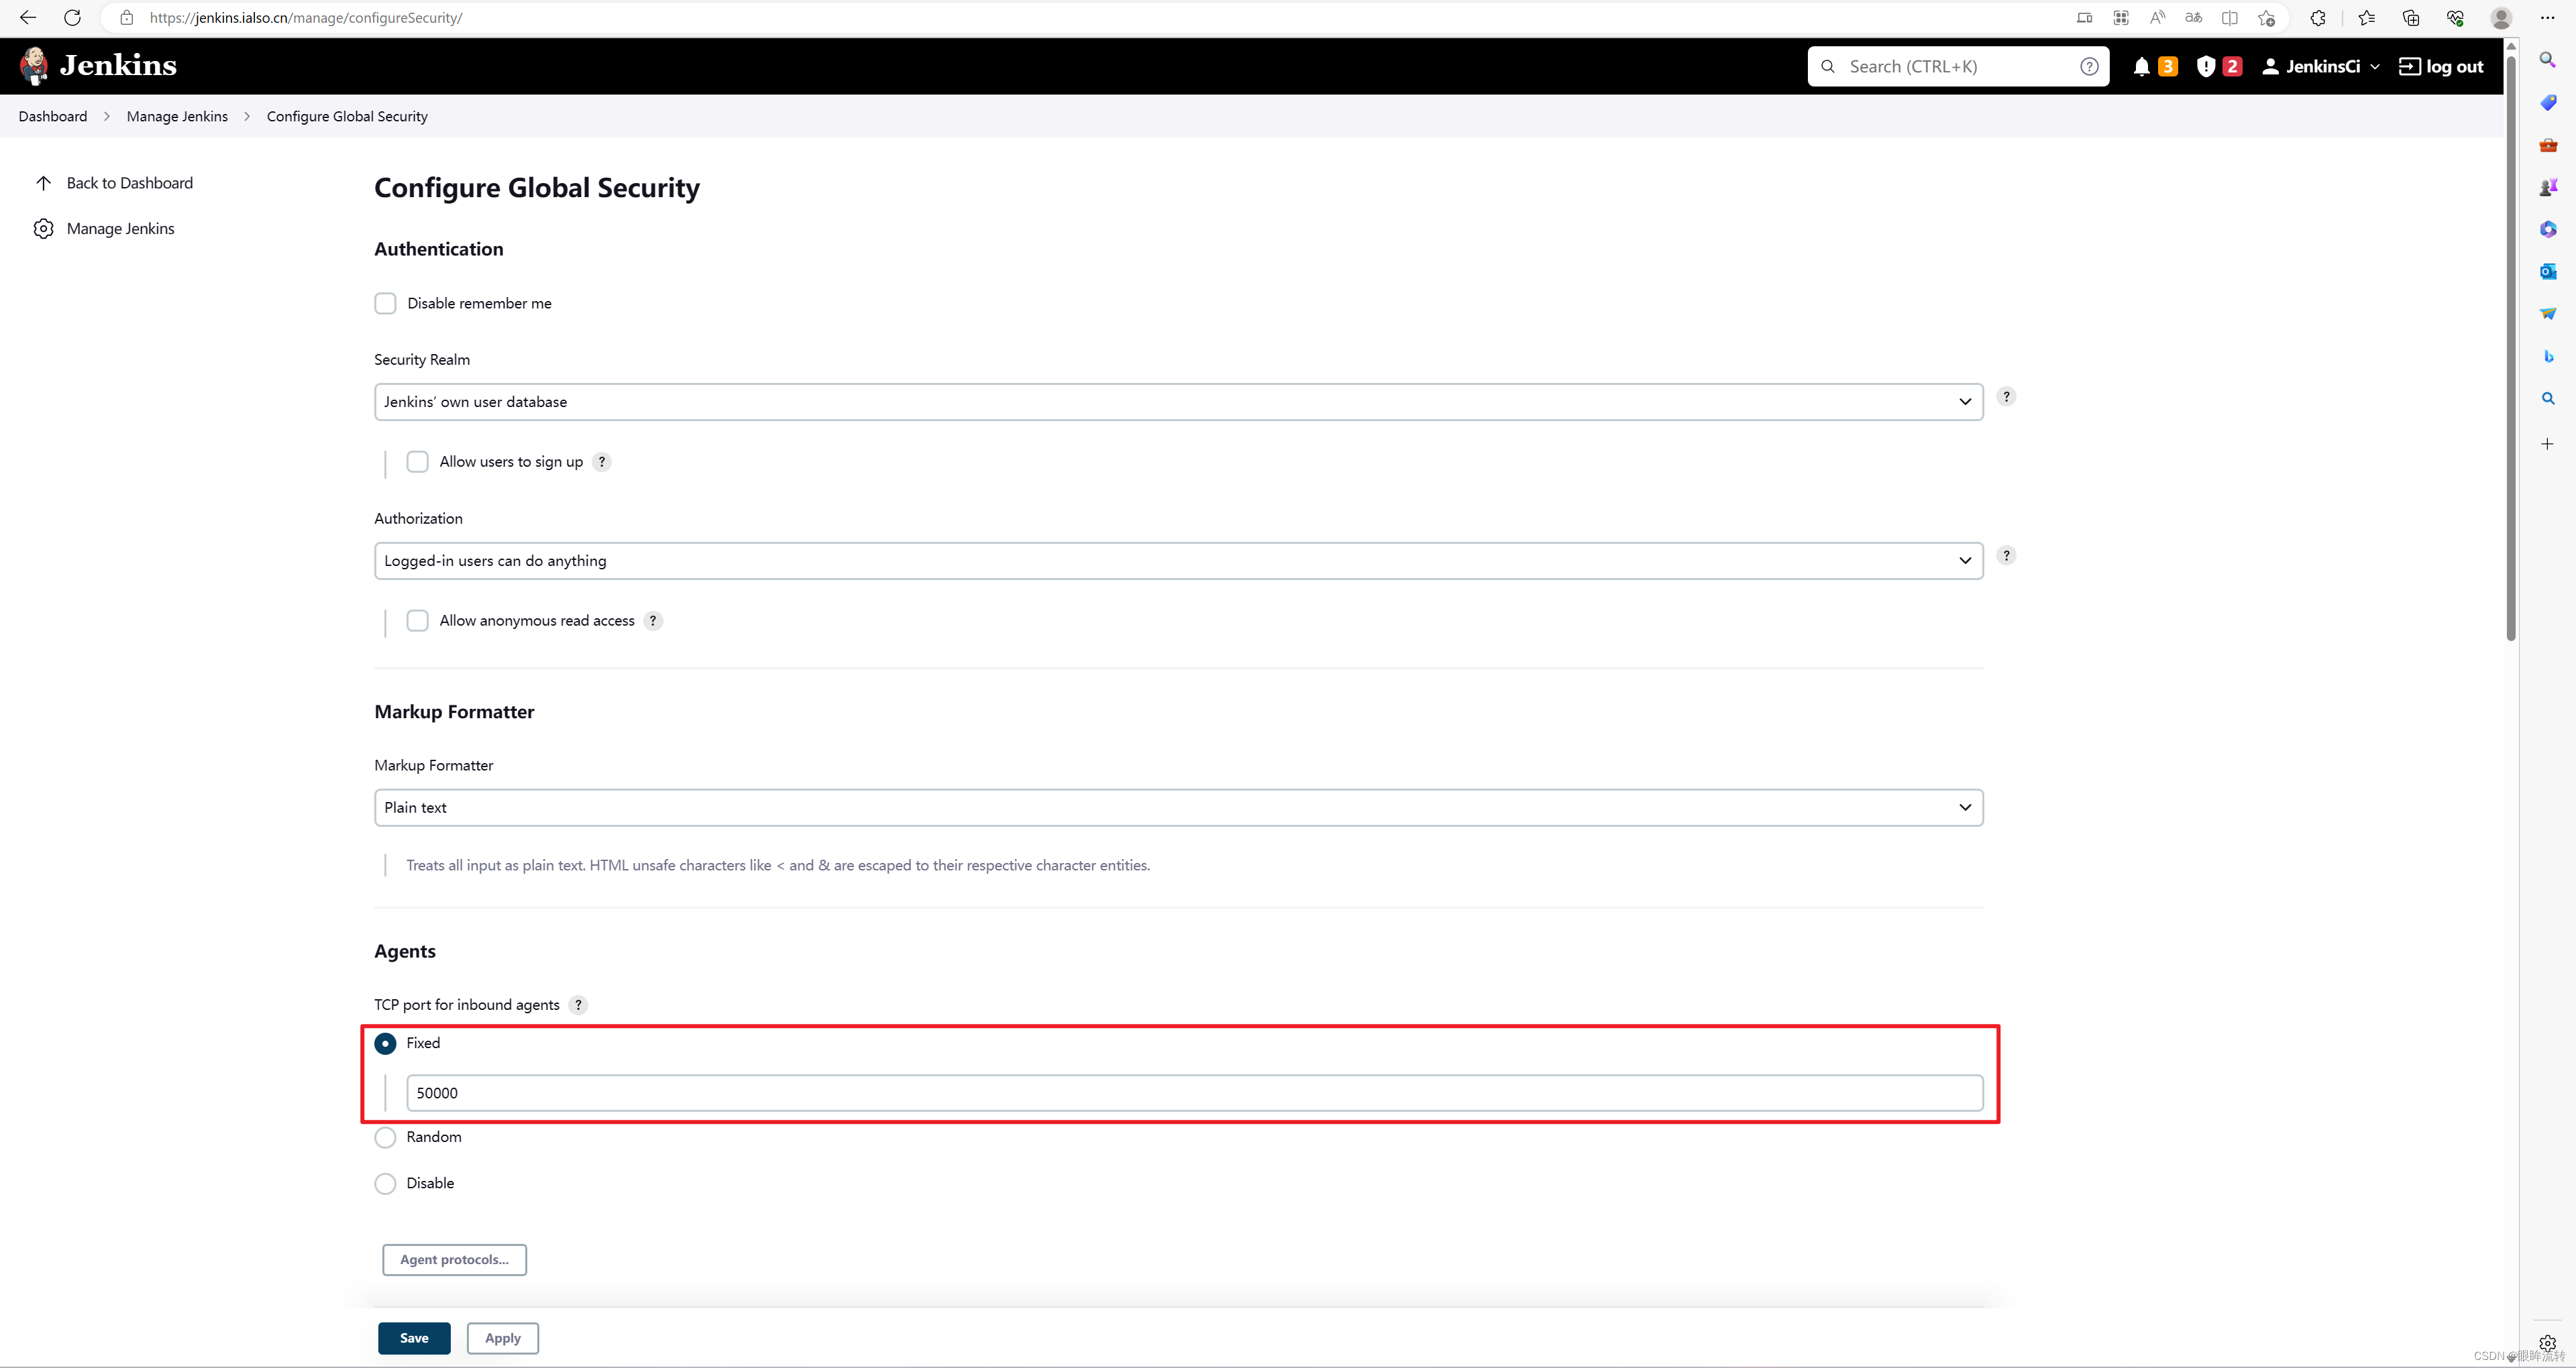
Dashboard->Manage Jenkins->Configure Global Security->Agents
将模式修改为Fixed,端口为50000
4、配置kubernetes集群
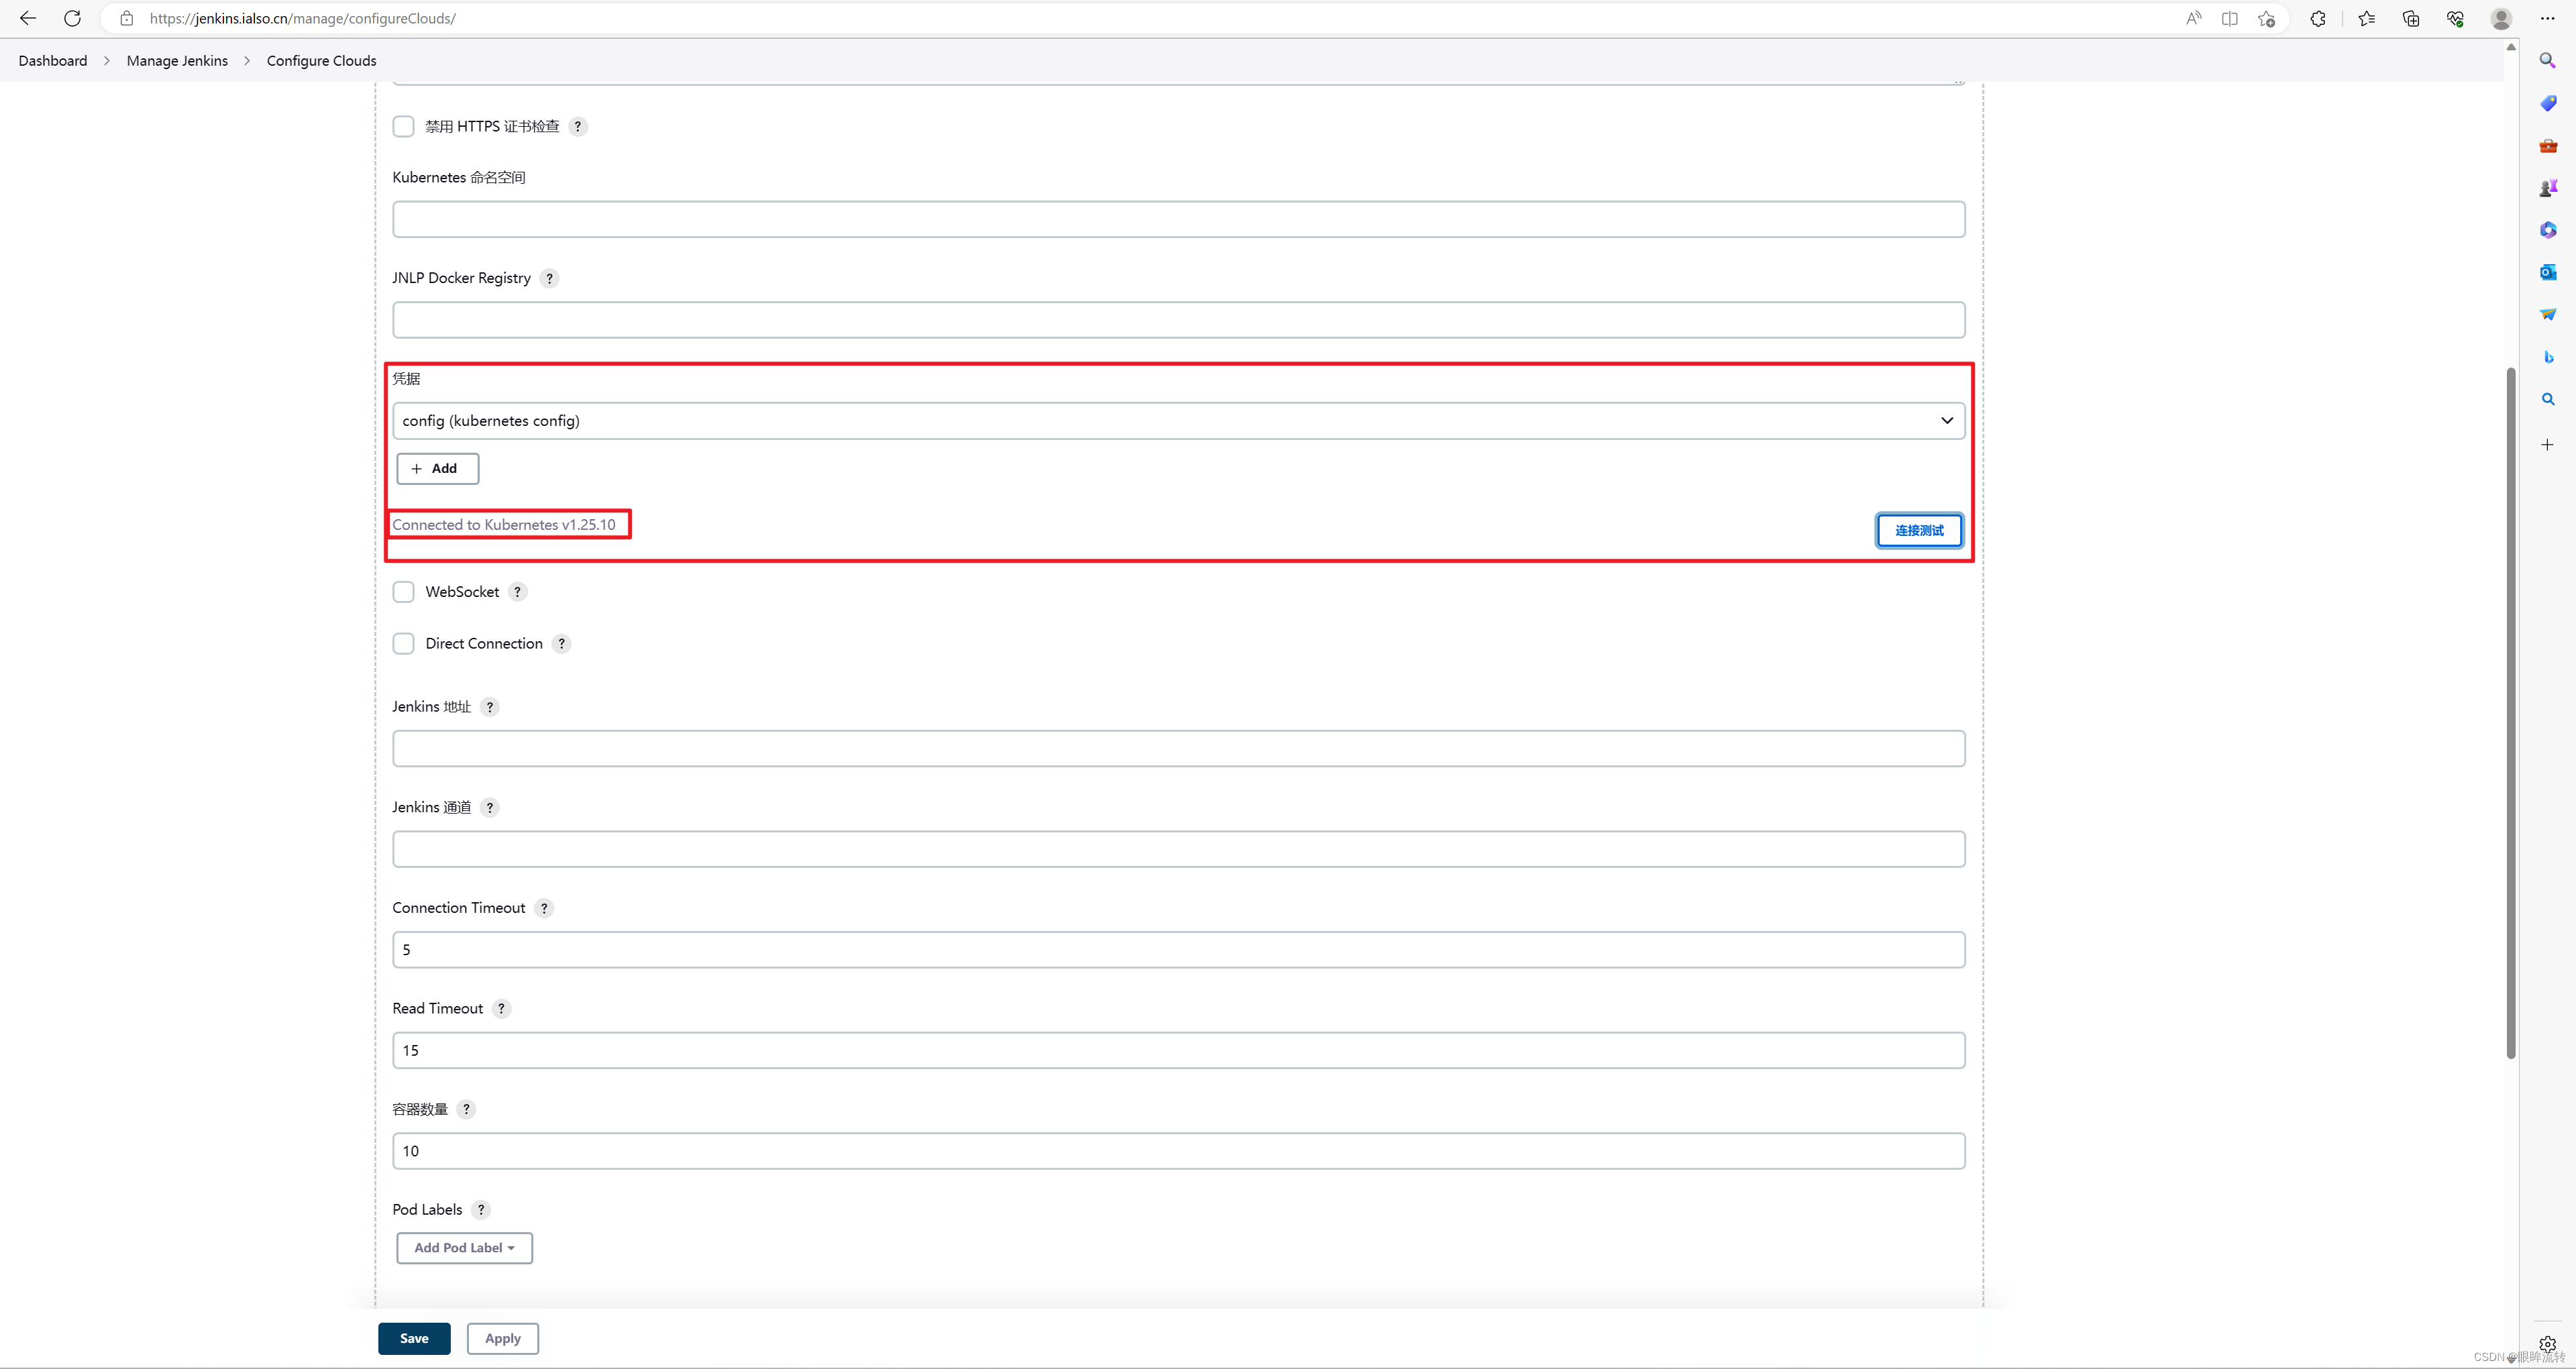
Dashboard->Manage Jenkins->Manage Nodes and Clouds->Configure Clouds
选择上面步骤创建的kubernetes凭证,随后测试连接
5、镜像准备
接下来需要在jenkins slave里面进行项目打包、编译、镜像构建、集群中部署,因此需要两个中间镜像:docker、kubectl
5.1、idocker
alpine默认源没有docker,需要修改下/etc/apk/repositories
#/media/cdrom/apks
http://mirrors.tuna.tsinghua.edu.cn/alpine/v3.17/main
http://mirrors.tuna.tsinghua.edu.cn/alpine/v3.17/community
#http://mirrors.tuna.tsinghua.edu.cn/alpine/edge/main
#http://mirrors.tuna.tsinghua.edu.cn/alpine/edge/community
#http://mirrors.tuna.tsinghua.edu.cn/alpine/edge/testing
idocker Dockerfile如下
# 如不想从头制作,可使用registry.cn-hangzhou.aliyuncs.com/ialso/idocker:latest
# Build: docker build --no-cache --force-rm -t idocker ./
# Run: docker run -d --name idocker -v /var/run/docker.sock:/var/run/docker.sock idocker
# Into: docker exec -it idocker /bin/sh
FROM alpine:3.17

COPY repositories /etc/apk/repositories

RUN apk update && \
    apk add docker-cli

ENTRYPOINT ["/bin/sh", "-c", "sleep 600"]
5.2、ikubectl
待补
6、配置slave
6.1、项目配置
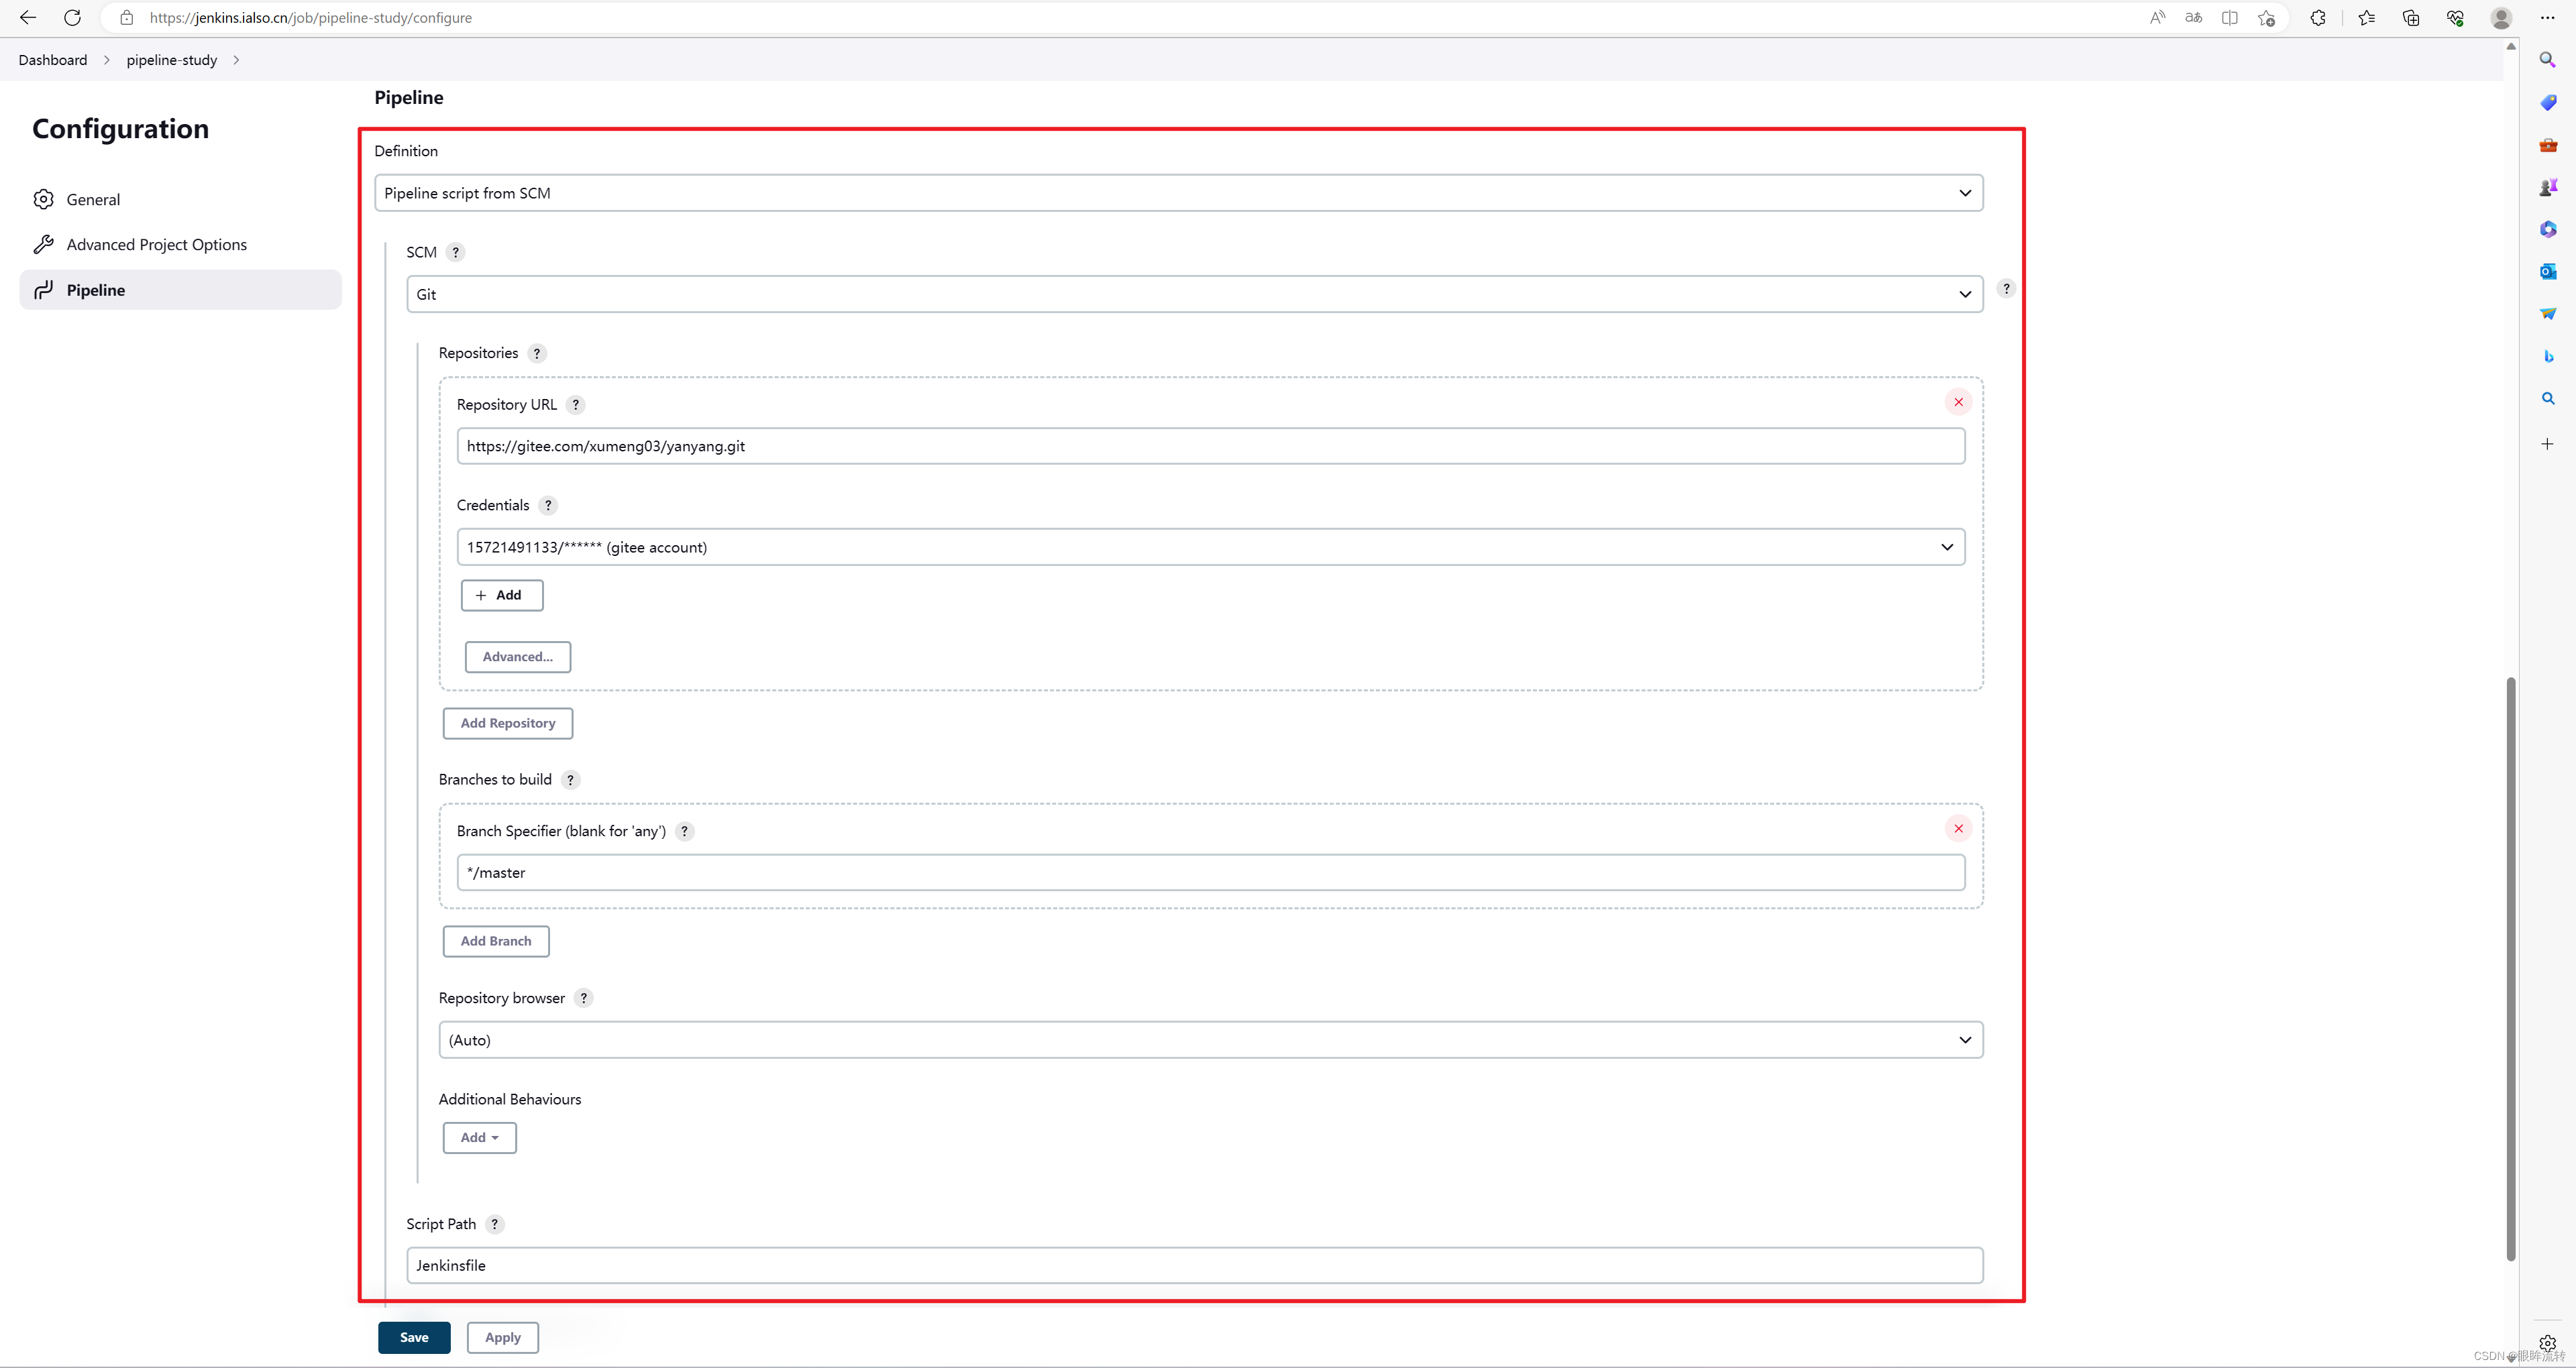
需在项目中将Jenkinsfile配置为Pipeline script from SCM, 并配置相关信息
6.2、Jenkinsfile
此文件需放置在项目根目录
// Jenkinsfile
pipeline {
    // 配置代理
    agent {
        // kubernetes代理信息
        kubernetes {
            // 这里要填写Jenkins configureClouds中配置的kubernetes信息
            cloud 'kubernetes'
            label "jenkinsci"
            // 超时时间
            slaveConnectTimeout 1200
            // podTemplate
            yamlFile 'PodTemplate.yaml'
        }
    }
    stages {
        stage('拉取') {
            steps {
                checkout scmGit(branches: [[name: '*/master']], extensions: [], userRemoteConfigs: [[credentialsId: 'gitee', url: 'https://gitee.com/xumeng03/yanyang.git']])
                sh 'ls'
            }
        }
        stage('构建、推送') {
            steps {
                container(name: 'docker'){
                    sh """
                        docker images
                    """
                }
            }
        }
        stage('部署') {
            steps {
                sh 'echo deploy'
            }
        }
    }
}
6.3、podTemplate
此文件需放置在yamlFile能对应到的位置,这里是项目根目录
apiVersion: v1
kind: Pod
metadata:
  name: jenkinsci
  namespace: devops
spec:
  containers:
    - name: jnlp
      image: jenkins/jnlp-slave:4.9-1-jdk11
      imagePullPolicy: IfNotPresent
      volumeMounts:
        - name: timezone
          mountPath: /etc/localtime
    - name: docker
      image: registry.cn-hangzhou.aliyuncs.com/ialso/idocker:latest
      imagePullPolicy: IfNotPresent
      command:
        - "cat"
      tty: true
      volumeMounts:
        - name: timezone
          mountPath: /etc/localtime
        - name: docker
          mountPath: /var/run/docker.sock
  volumes:
    - name: timezone
      hostPath:
        path: /usr/share/zoneinfo/Asia/Shanghai
    - name: docker
      hostPath:
        path: /var/run/docker.sock


