一、自动装配原理图
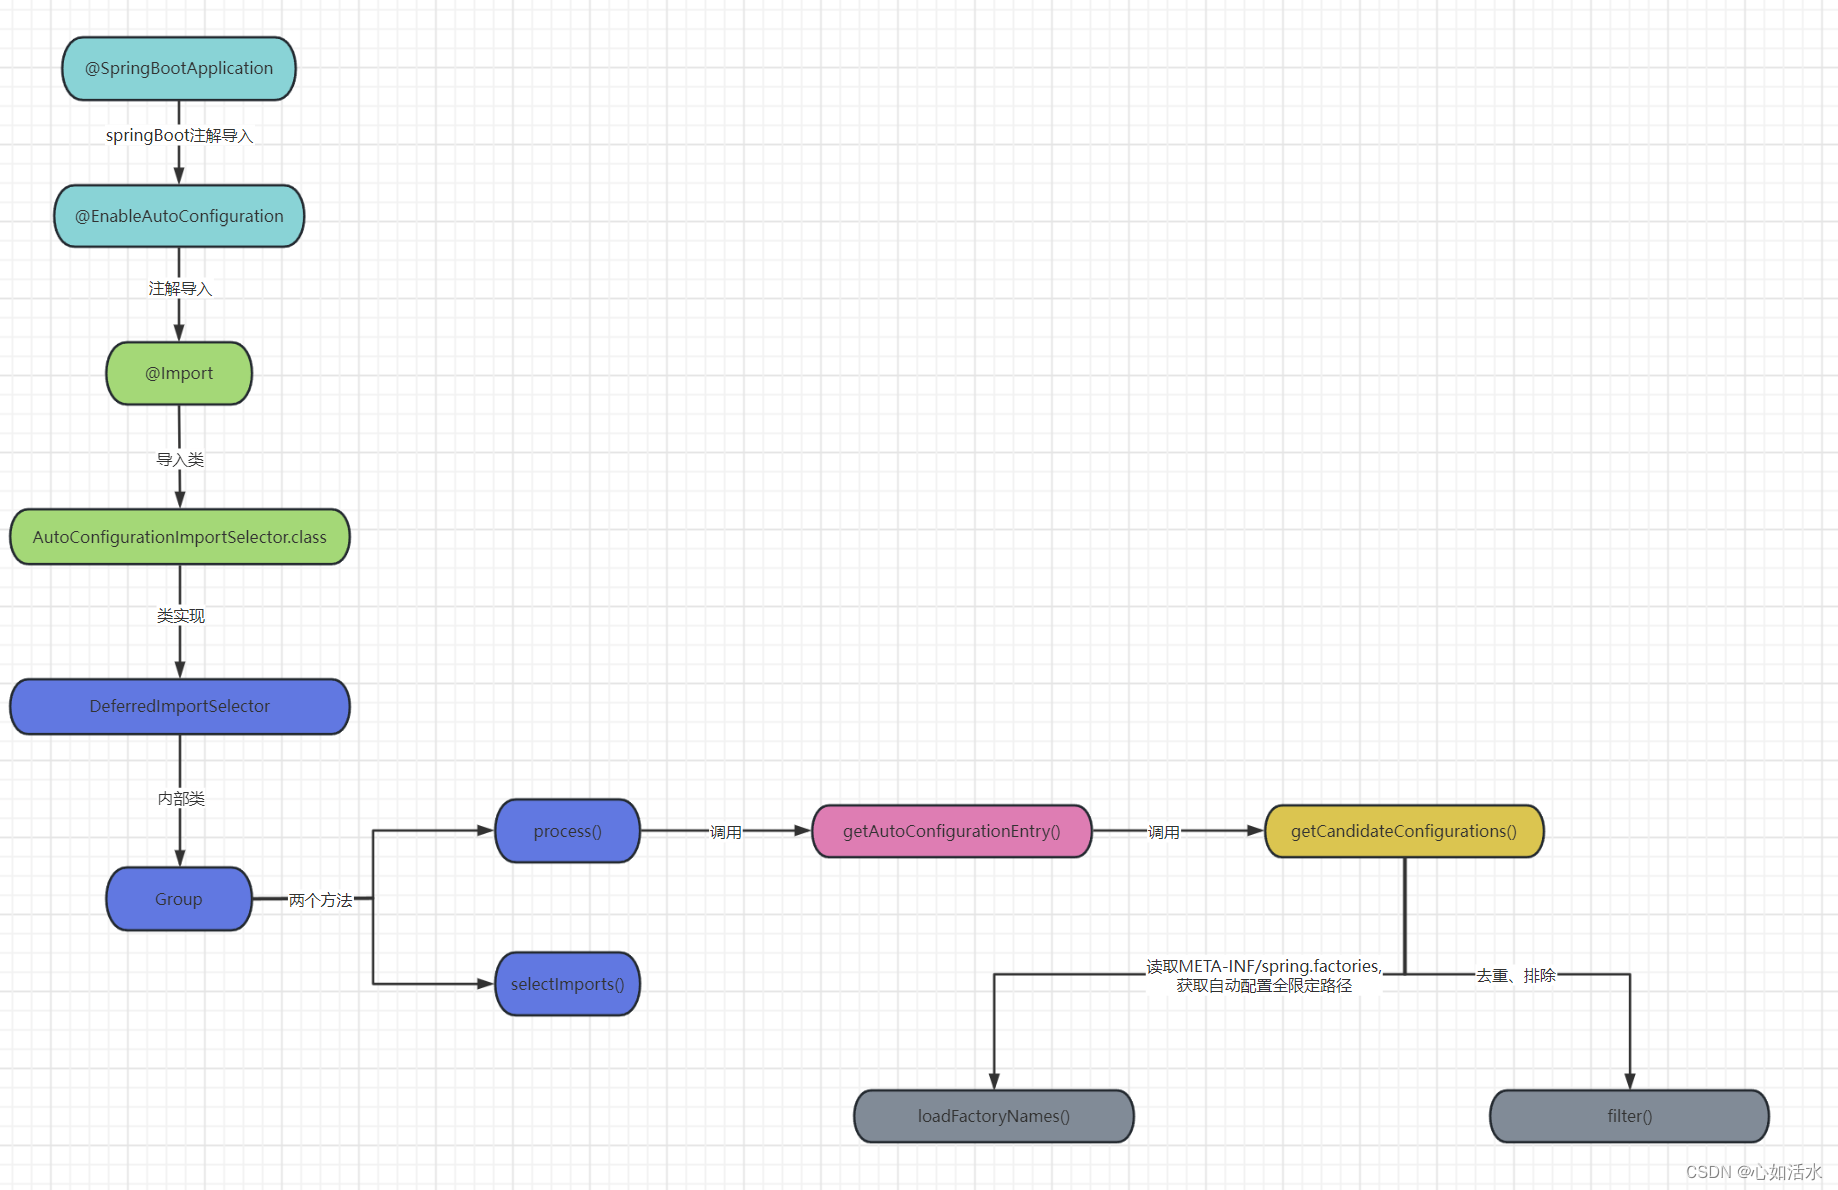
二、入口
springboot的核心注解@SpringBootApplication

接着看 @SpringBootApplication 注解
截图:
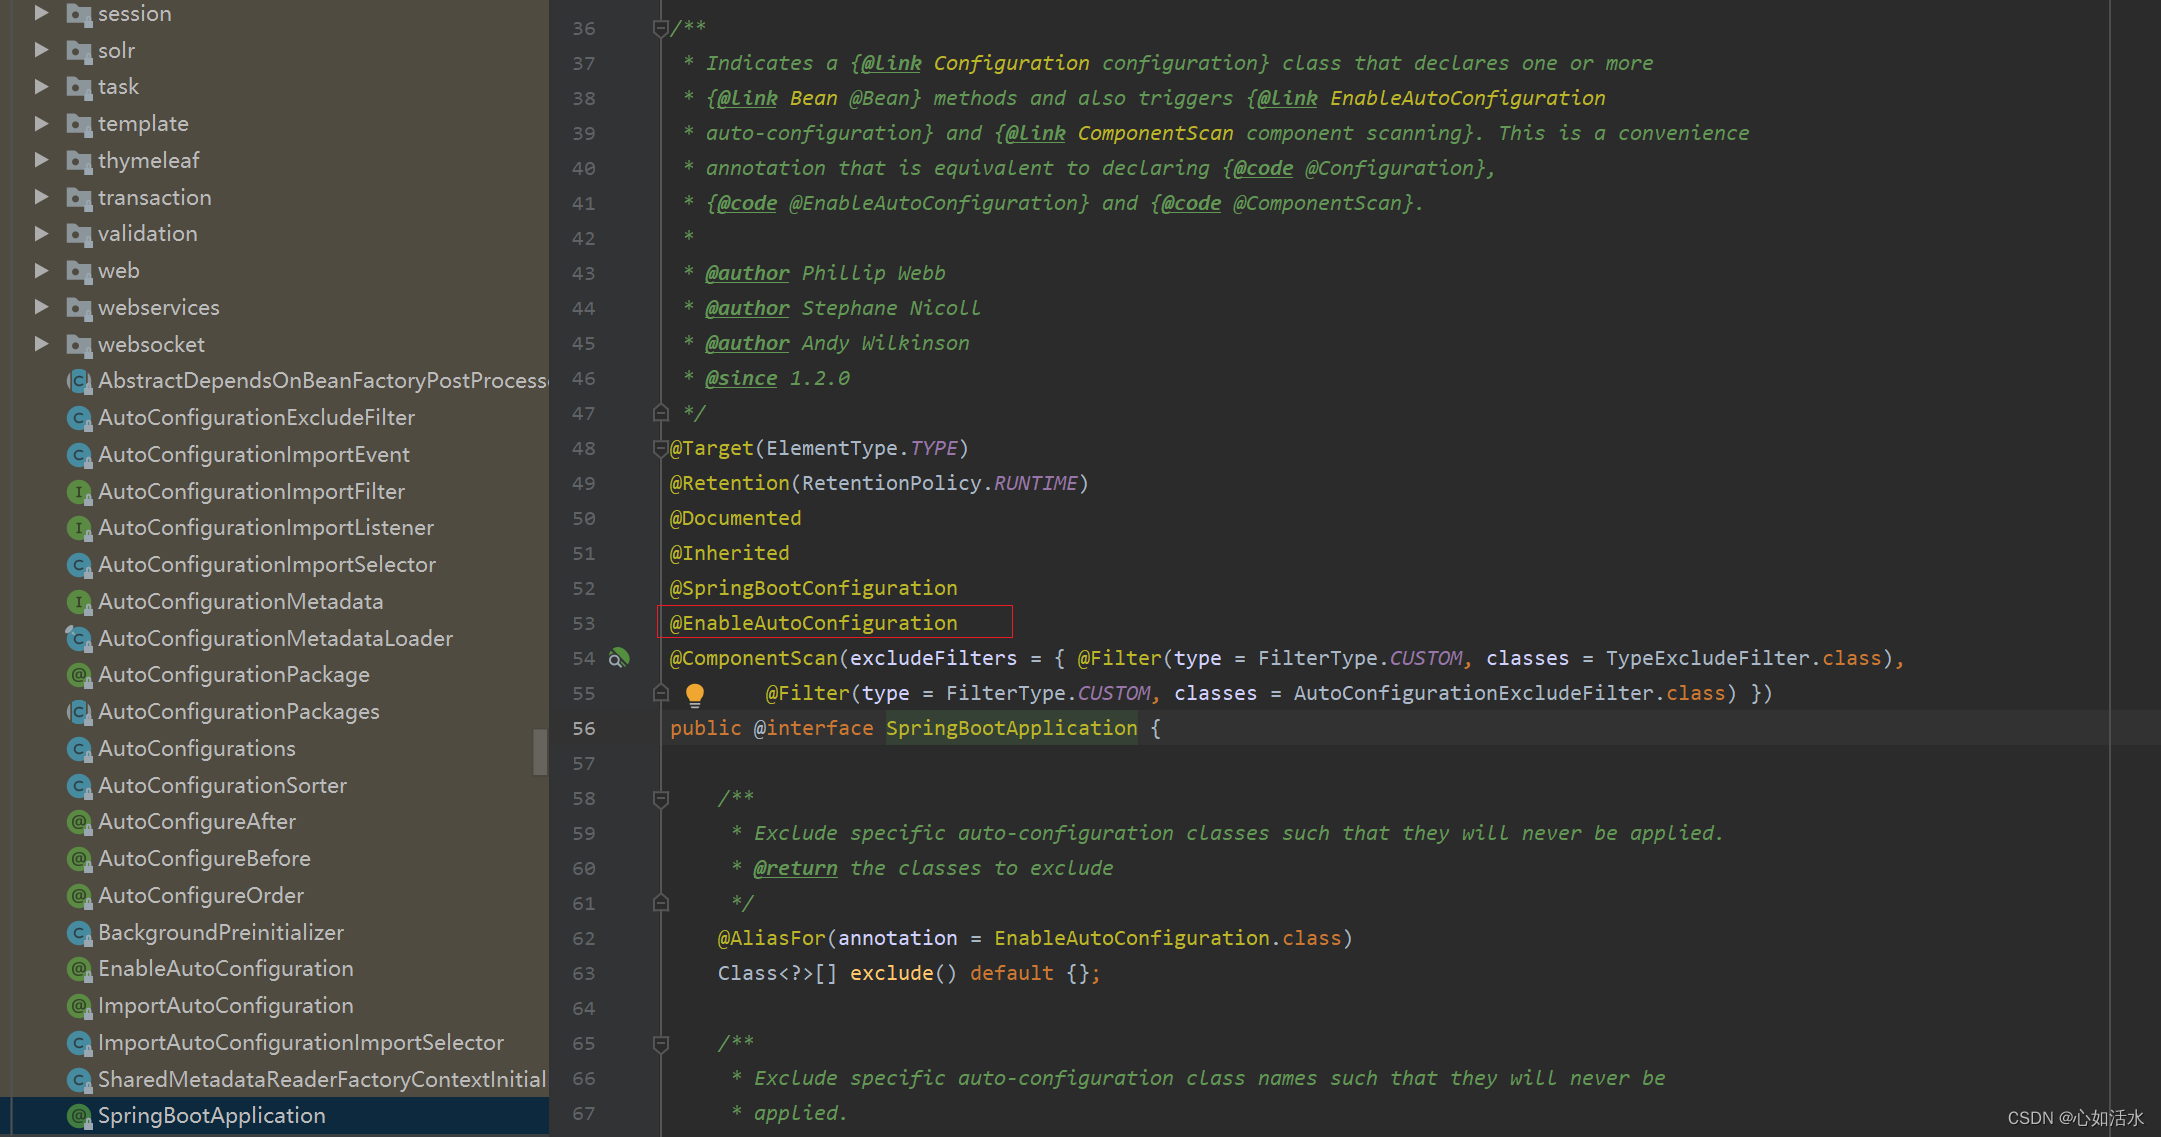
代码:
@Target({ElementType.TYPE}) //注解的适用范围,Type表示注解可以描述在类、接口、注解或者枚举中
@Retention(RetentionPolicy.RUNTIME) // 表示注解的生命周期,Runtime运行时
@Documented // 表示注解可以记录在javadoc中
@Inherited // 标识可以被子类继承该注解
//--------------------------------------------------------
@SpringBootConfiguration // 表示该类为配置类
@EnableAutoConfiguration // 启动自动配置功能
@ComponentScan(
        excludeFilters = {@ComponentScan.Filter(
                type = FilterType.CUSTOM,
                classes = {TypeExcludeFilter.class}
        ), @ComponentScan.Filter(
                type = FilterType.CUSTOM,
                classes = {AutoConfigurationExcludeFilter.class}
        )}
)
public @interface SpringBootApplication {
}
接着看红框的注解 @EnableAutoConfiguration
截图:
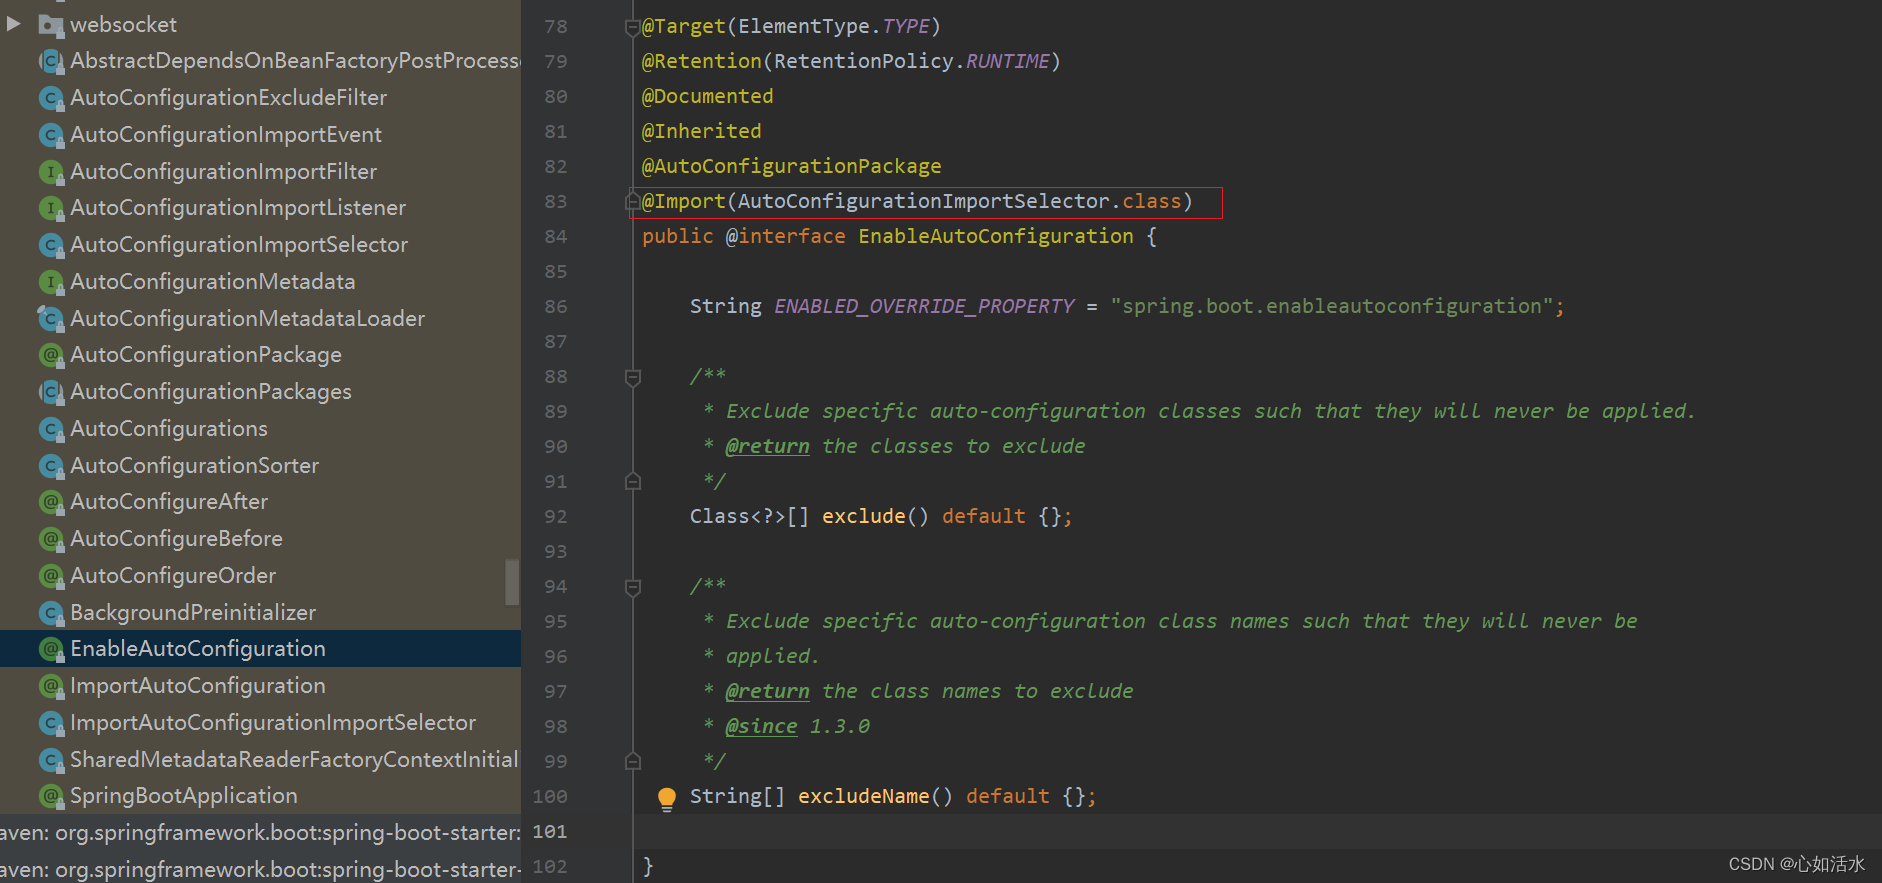
代码:
@Target({ElementType.TYPE})
@Retention(RetentionPolicy.RUNTIME)
@Documented
@Inherited
//--------------------------------------------------------
@AutoConfigurationPackage //自动配置包
@Import({AutoConfigurationImportSelector.class}) //Spring的底层注解@Import,给容器中导入一个组件
public @interface EnableAutoConfiguration {

    //@AutoConfigurationPackage 注解的功能是由@Import 注解实现的,它是Spring框架的底层注解,它的作用就是给容器中导入某个组件类。
    //AutoConfigurationImportSelector可以帮助SpringBoot应用将所有符合条件@Configuration配置都加载到当前SpringBoot创建并使用的
    //IOC容器(ApplicationContext)中,AutoConfigurationImportSelector是通过SelectImports这个方法告诉SpringBoot都需要导入那些组件

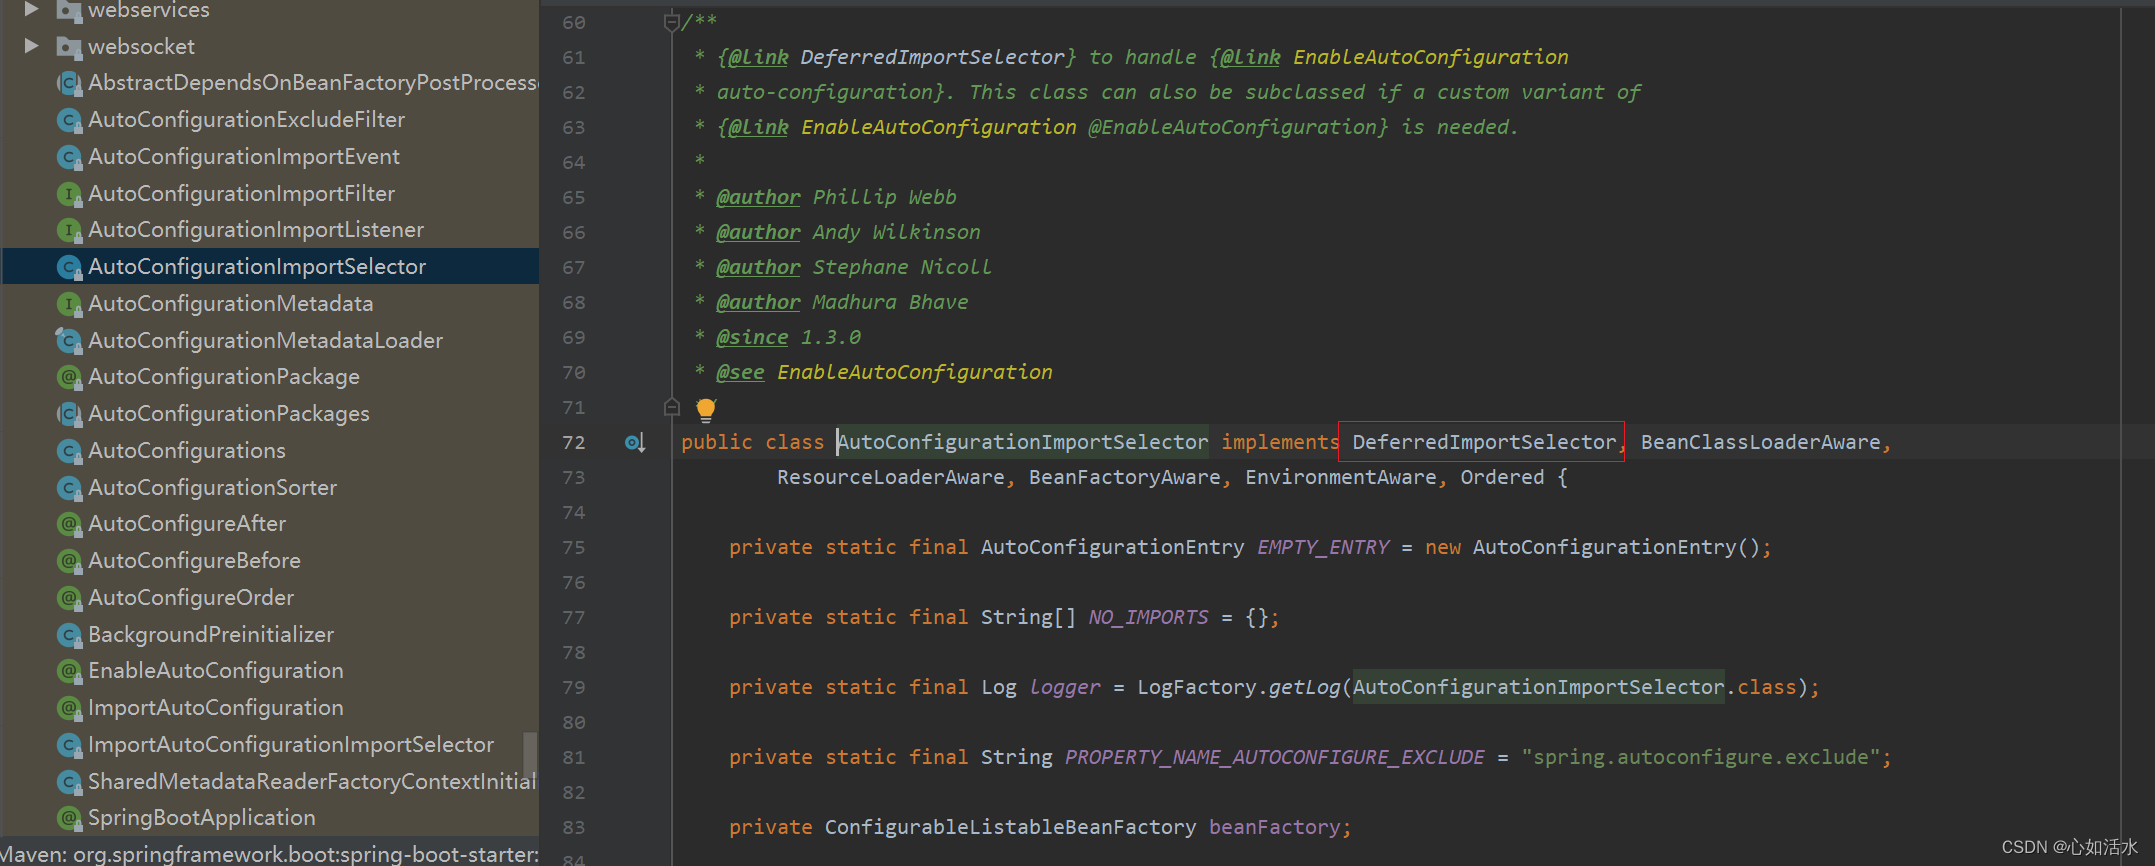
    //AutoConfigurationImportSelector 组件是实现了 DeferredImportSelector 类,以及很多的 Aware 接口,这些 Aware 接口来实现一些回调方法,
    // 通过这些回调,把 AutoConfigurationImportSelector 的属性进行赋值。


    // 分析下 DeferredImportSelector 这个类
    // 有个内部接口 Group 接口,这个接口里面有两个方法 process() 和 selectImport()
    // 为什么要强度这两个方法,因为这两个方法在 SpringBoot 启动的时候会被调用。
    //跟自动配置逻辑相关的入口方法在 DeferredImportSelectorGrouping 类的 getImport() 方法处,
    // 所以我们就从 getImport() 方法开始入手。 先保留这个疑问,等到剖析run()方法时就会串起来的!!!
    //然后下面来看一下AutoConfigurationImportSelect组件类中的方法是怎么被调用的?


    //我们现在来看一下 DeferredImportSelectorGrouping 这个类:
    // 调用 DeferredImportSelectGrouping 的 getImport() 方法,在这个方法里面又会去调用 group.process() 和 group.selectImports(),
    // 去找这两个方法的具体实现


}
接着看红框的 AutoConfigurationImportSelector.class 这个类
截图:
接着看接口 DeferredImportSelector 的实现
截图:
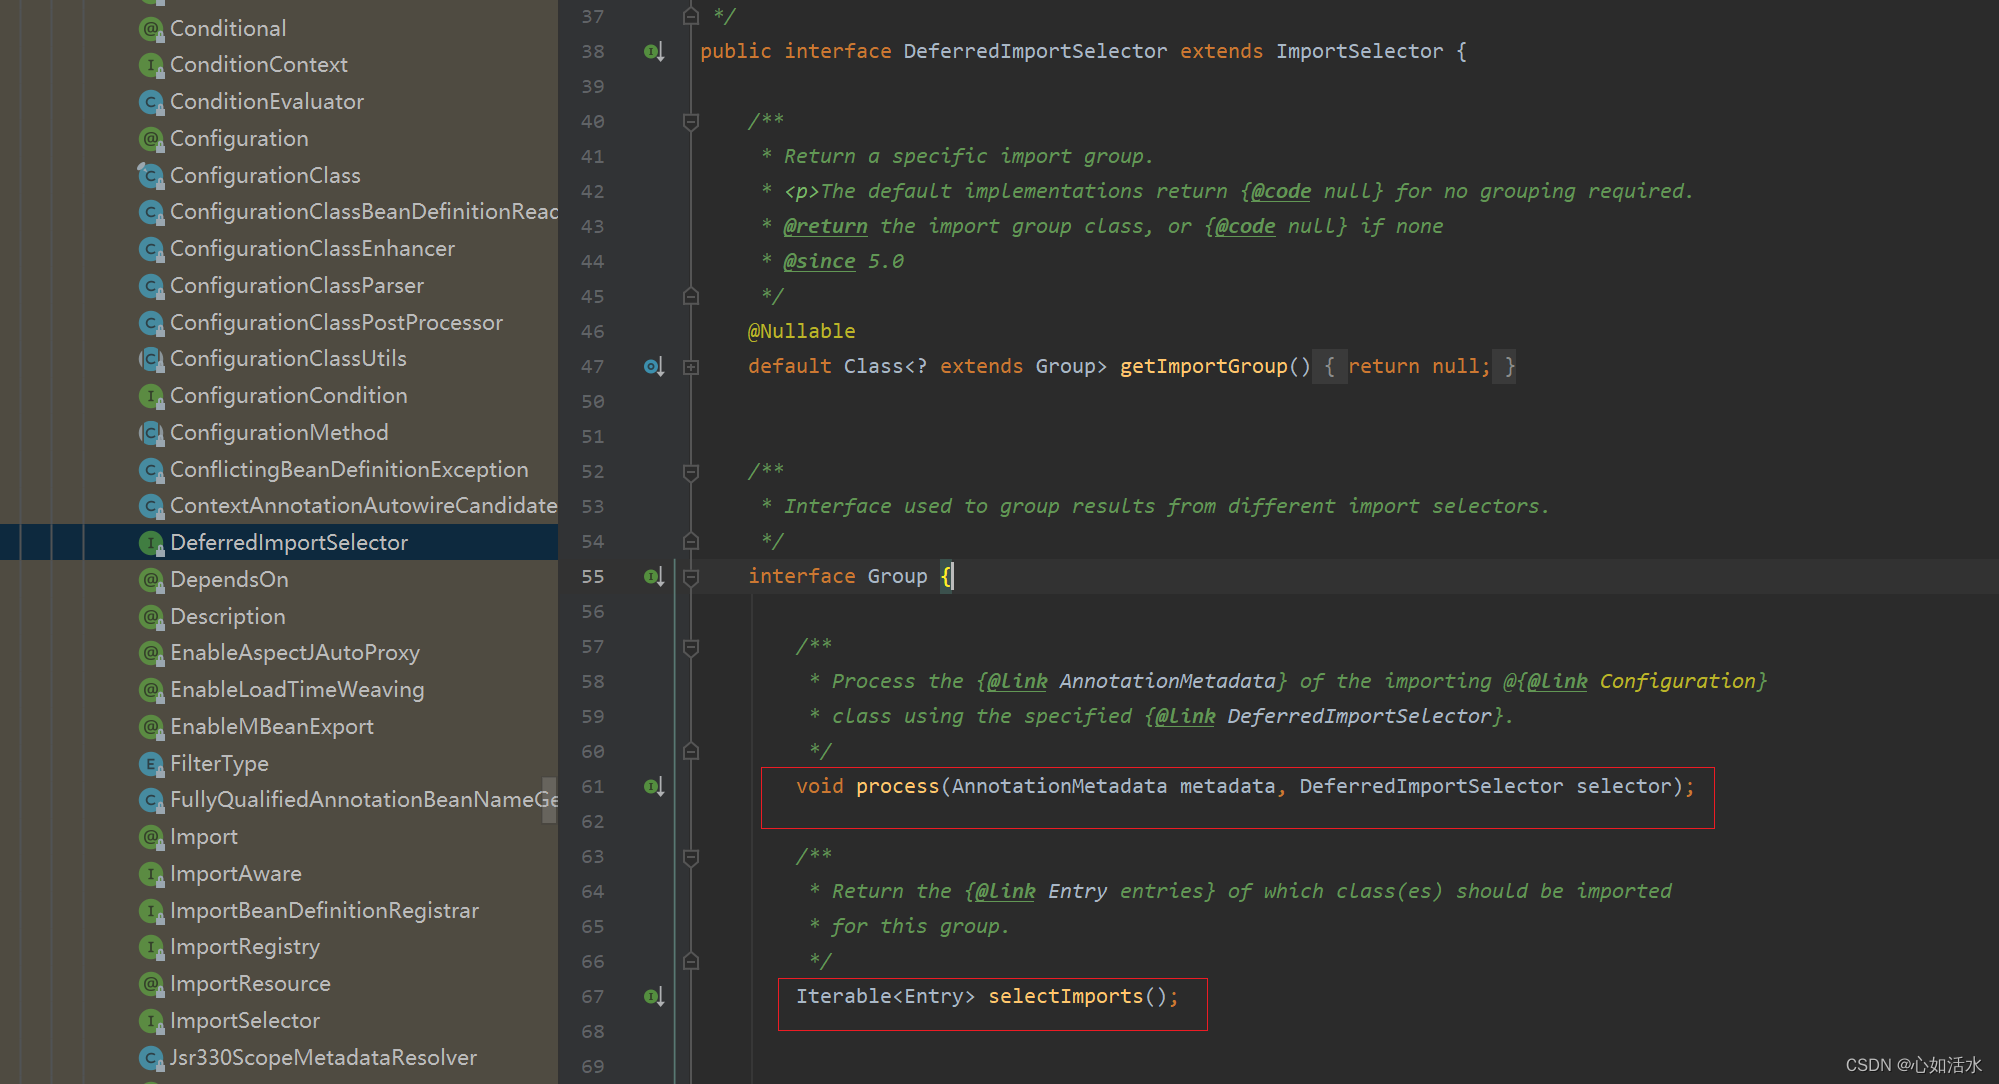
在这个DeferredImportSelector类中,有一个内部接口Group接口,这个接口里面有两个方法 process()和selectImport()
接着看下这两个接口的作用,实现类就是上面的 AutoConfigurationImportSelector
2.1 process() 方法实现
截图:

代码:
@Override
public void process(AnnotationMetadata annotationMetadata, DeferredImportSelector deferredImportSelector) {
        Assert.state(deferredImportSelector instanceof org.springframework.boot.autoconfigure.AutoConfigurationImportSelector, () -> {
            return String.format("Only %s implementations are supported, got %s", org.springframework.boot.autoconfigure.AutoConfigurationImportSelector.class.getSimpleName(), deferredImportSelector.getClass().getName());
        });
        // 【1】调用 getAutoConfigurationEntry 方法得到自动配置类放入 AutoConfigurationEntry 对象,
        // AutoConfigurationEntry 中封装有符合条件的自动配置类已经要排除的类
         AutoConfigurationImportSelector.AutoConfigurationEntry autoConfigurationEntry = ((AutoConfigurationImportSelector)deferredImportSelector).getAutoConfigurationEntry(this.getAutoConfigurationMetadata(), annotationMetadata);
        // 【2】又将封装了自动配置类的 autoConfigurationEntry 对象装进 autoConfigurationEntries 集合中
         this.autoConfigurationEntries.add(autoConfigurationEntry);
        // 【3】遍历刚获取符合条件的自动配置类
         Iterator var4 = autoConfigurationEntry.getConfigurations().iterator();

         while(var4.hasNext()) {
             String importClassName = (String)var4.next();
             //这里符合条件的自动配置类作为key,annotationMetadata 作为值加入 entries 集合中
             this.entries.putIfAbsent(importClassName, annotationMetadata);
         }

    }
接着看 getAutoConfigurationEntry() 方法实现
截图:
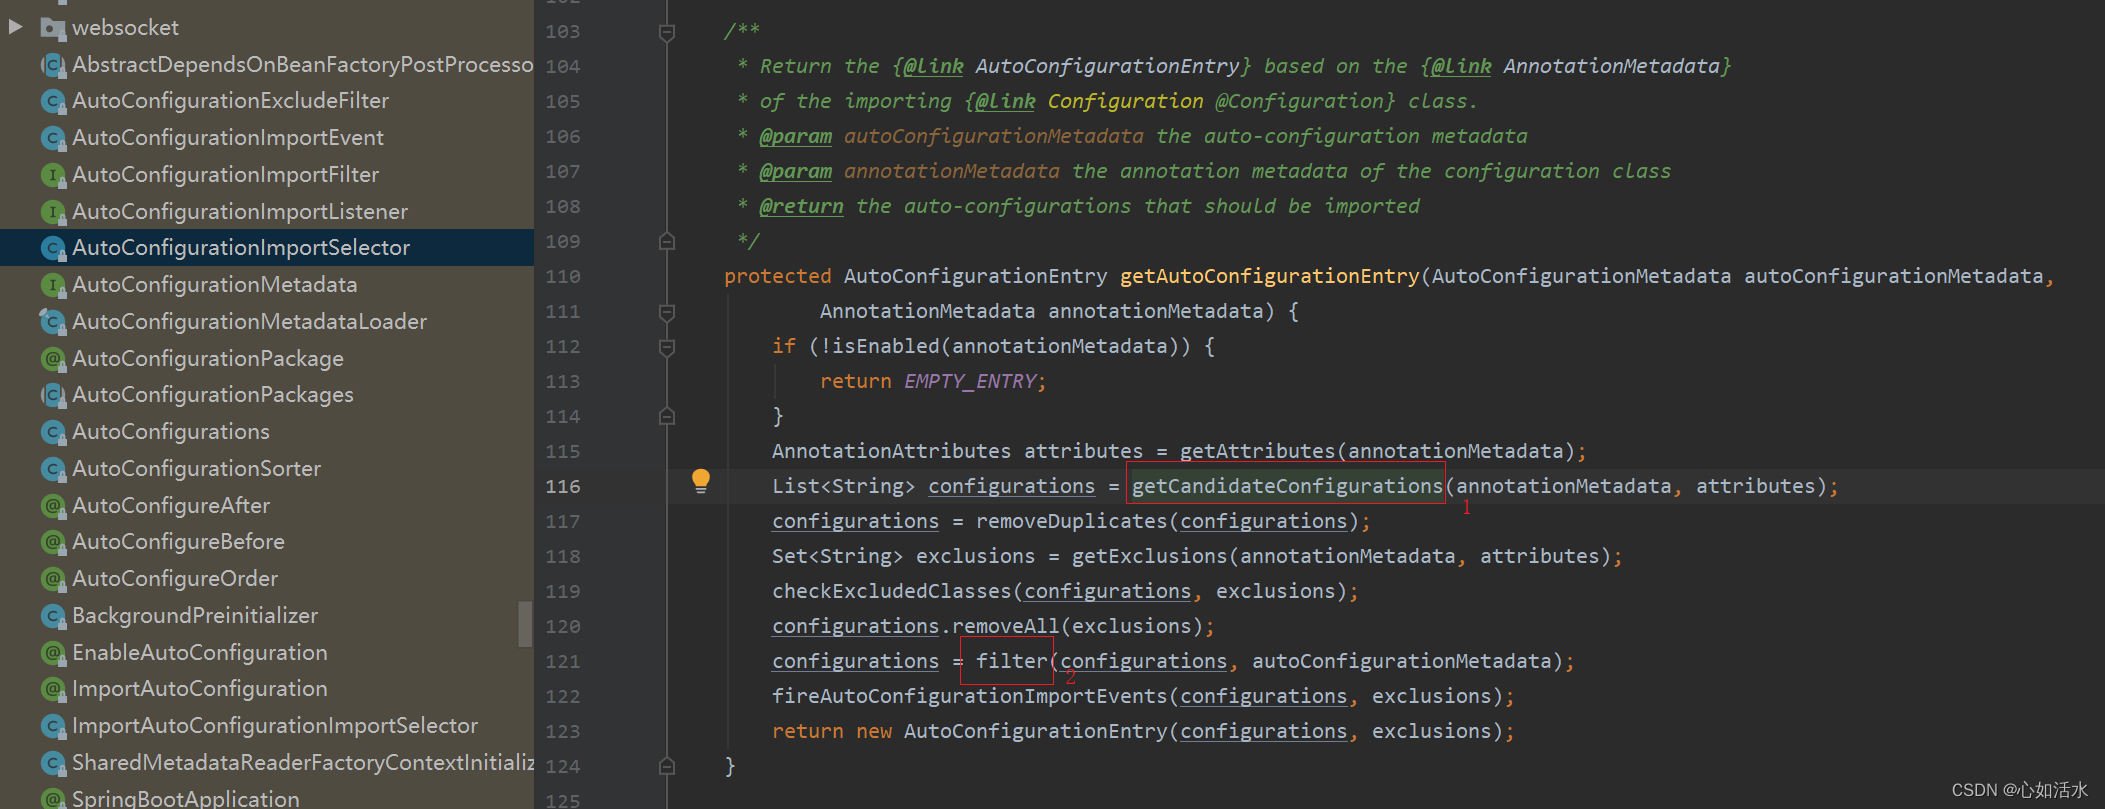
代码:
/**
* Return the {@link AutoConfigurationEntry} based on the {@link AnnotationMetadata}
* of the importing {@link Configuration @Configuration} class.
* 根据导入 @Configuration 类的 AnnotationMetadata 返回  AutoConfigurationEntry
* @param autoConfigurationMetadata the auto-configuration metadata --自动配置元数据
* @param annotationMetadata the annotation metadata of the configuration class -- 配置类的注释元数据
* @return the auto-configurations that should be imported --导入的自动配置
*/
protected AutoConfigurationImportSelector.AutoConfigurationEntry getAutoConfigurationEntry(AutoConfigurationMetadata autoConfigurationMetadata, AnnotationMetadata annotationMetadata) {
        if (!this.isEnabled(annotationMetadata)) {
            return EMPTY_ENTRY;
        } else {
            AnnotationAttributes attributes = this.getAttributes(annotationMetadata);
             //【1】得到 spring.factories 文件配置的所有自动配置类, EnablesAutoConfiguration 的类
            List<String> configurations = this.getCandidateConfigurations(annotationMetadata, attributes);
            //注意:虽然能拿到所有 spring.factories 下所有 EnableAutoConfiguration 后缀的配置类,
            //但是每个配置类里面也会有很多的 @Bean 注解的类。同样会进行实例化。
            //那么如果没有用到的话,这些Bean没有必要实例化,所以要进行条件帅选以及剔除

            // 利用 LinkedHashSet 移除重复的配置类
            configurations = this.removeDuplicates(configurations);

            //得到要移除的自动配置类,比如注解属性exclude 的配置类
            //比如:@SpringBootApplication(exclude = DataSourceAutoConfiguration.class)
            // 将会获取到 exclude = DataSourceAutoConfiguration.class 的注解数据
            Set<String> exclusions = this.getExclusions(annotationMetadata, attributes);
            //检查要被排除的配置类,因为有些不是自动配置类的,故要抛出异常
            this.checkExcludedClasses(configurations, exclusions);
            //【2】将要移除的配置类异常
            configurations.removeAll(exclusions);
            //【3】因为spring.factories 文件获取的自动配置类太多,如果有些不必要的自动配置类都加载进内存,会造成内存浪费,因此这里需要进行过滤
            //这个filter就是关键过滤
            configurations = this.filter(configurations, autoConfigurationMetadata);
            //【4】获取了符合条件的自动配置类后,此时触发 AutoConfigurationImportEvent 事件
            //目的是告知 ConditionEvaluationReport 条件评估报告器对象来记录符合条件的自动配置类
            this.fireAutoConfigurationImportEvents(configurations, exclusions);
            //【5】将符合条件和要排除的自动配置类封装进 AutoConfiguration 对象并返回
            return new AutoConfigurationImportSelector.AutoConfigurationEntry(configurations, exclusions);
        }
    }
2.1.1 getCandidateConfigurations() 方法实现
接着看红框1方法 getCandidateConfigurations()
截图:

代码:
/**
* Return the auto-configuration class names that should be considered. By default
* this method will load candidates using {@link SpringFactoriesLoader} with
* {@link #getSpringFactoriesLoaderFactoryClass()}.
* 返回应该考虑的自动配置类名。默认情况下,此方法将使用带有getSpringFactoriesLoaderFactoryClass()的SpringFactoriesLoad加载候选者
* @param metadata the source metadata
* @param attributes the {@link #getAttributes(AnnotationMetadata) annotation
* attributes}
* @return a list of candidate configurations
*/
 protected List<String> getCandidateConfigurations(AnnotationMetadata metadata, AnnotationAttributes attributes) {
        //这个方法需要传入两个参数 getSpringFactoriesLoaderFactoryClass
        //getSpringFactoriesLoaderFactoryClass() 这个方法返回的就是 EnableAutoConfiguration.class
        //getBeanClassLoader() 这个方法返回的是 BeanClassLoader(类加载器)
        List<String> configurations = SpringFactoriesLoader.loadFactoryNames(this.getSpringFactoriesLoaderFactoryClass(), this.getBeanClassLoader());
        Assert.notEmpty(configurations, "No auto configuration classes found in META-INF/spring.factories. If you are using a custom packaging, make sure that file is correct.");
        return configurations;
    }
接着看红框 loadFactoryNames() 方法实现
截图:
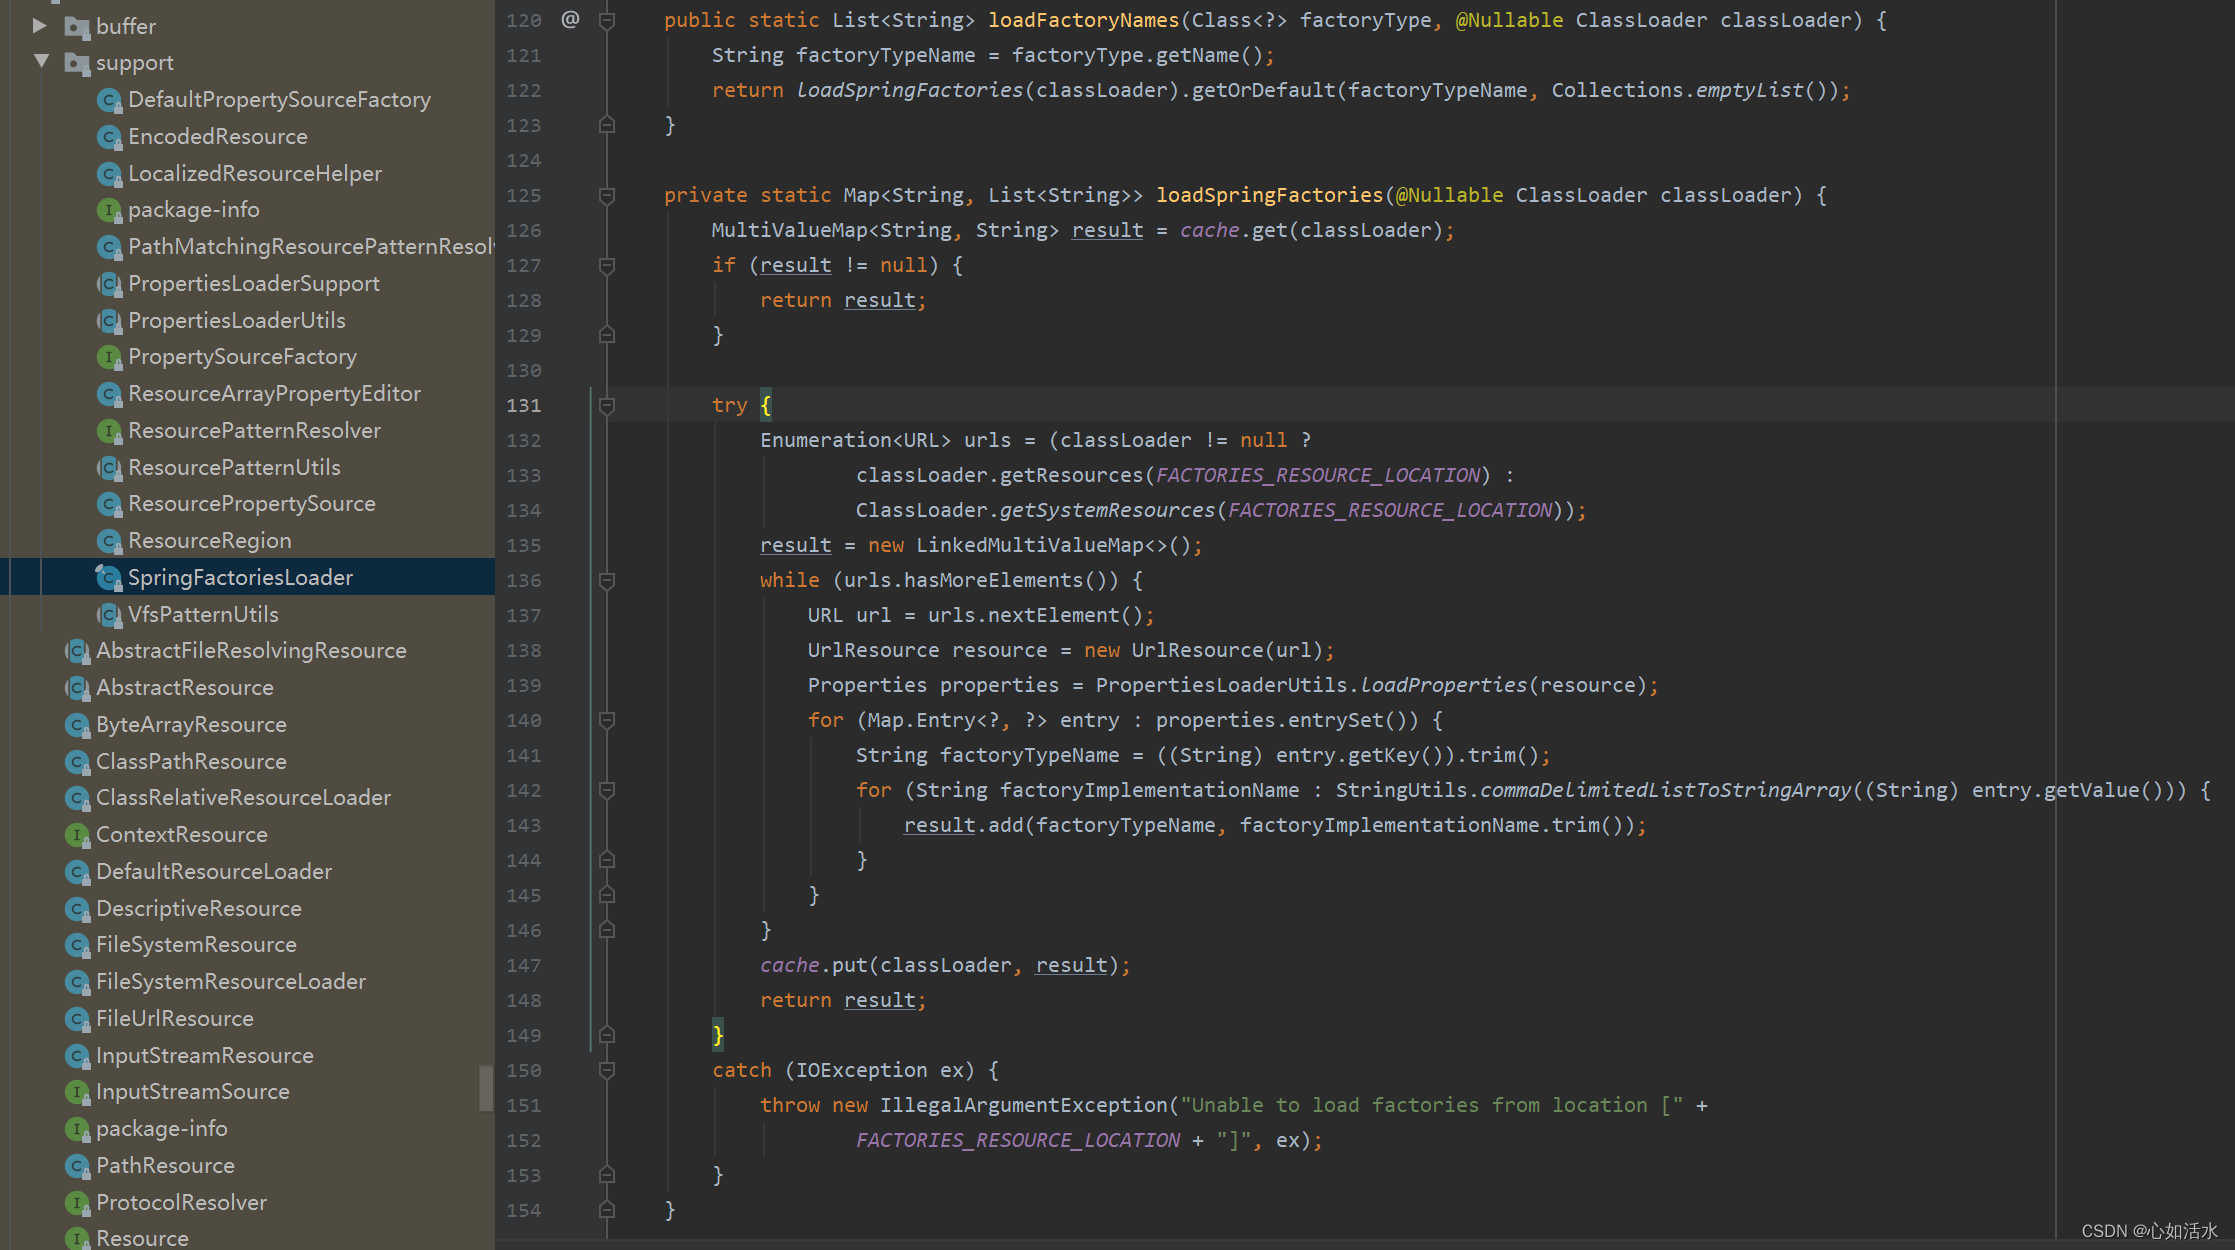
代码:
/**
	 * Load the fully qualified class names of factory implementations of the
	 * given type from {@value #FACTORIES_RESOURCE_LOCATION}, using the given
	 * class loader.
     * 使用给定的类加载器从“META-INF/spring.factors”加载给定类型的工厂实现的完全限定类名
	 * @param factoryType the interface or abstract class representing the factory -- 表示工厂的接口或抽象类
	 * @param classLoader the ClassLoader to use for loading resources; can be
	 * {@code null} to use the default -- 用于加载资源的 ClassLoader;可以是null以使用默认值
	 * @throws IllegalArgumentException if an error occurs while loading factory names--如果是加载工厂名称时发生异常
	 * @see #loadFactories
	 */
	public static List<String> loadFactoryNames(Class<?> factoryType, @Nullable ClassLoader classLoader) {
		String factoryTypeName = factoryType.getName();
		return loadSpringFactories(classLoader).getOrDefault(factoryTypeName, Collections.emptyList());
	}

    // SpringFactoriesLoader 会加载所有jar包下的 META-INF/spring.factories
    //这样子的话就会把所有spring.factories中的自动配置类的全限定路径给拿到了,现在回到 getCandidateConfigurations()
    //这个方法,然后对这个List进行帅选以及剔除,接着看filter()的过滤方法
	private static Map<String, List<String>> loadSpringFactories(@Nullable ClassLoader classLoader) {
		MultiValueMap<String, String> result = cache.get(classLoader);
		if (result != null) {
			return result;
		}

		try {
			Enumeration<URL> urls = (classLoader != null ?
					classLoader.getResources(FACTORIES_RESOURCE_LOCATION) :
					ClassLoader.getSystemResources(FACTORIES_RESOURCE_LOCATION));
			result = new LinkedMultiValueMap<>();
			while (urls.hasMoreElements()) {
				URL url = urls.nextElement();
				UrlResource resource = new UrlResource(url);
				Properties properties = PropertiesLoaderUtils.loadProperties(resource);
				for (Map.Entry<?, ?> entry : properties.entrySet()) {
					String factoryTypeName = ((String) entry.getKey()).trim();
					for (String factoryImplementationName : StringUtils.commaDelimitedListToStringArray((String) entry.getValue())) {
						result.add(factoryTypeName, factoryImplementationName.trim());
					}
				}
			}
			cache.put(classLoader, result);
			return result;
		}
		catch (IOException ex) {
			throw new IllegalArgumentException("Unable to load factories from location [" +
					FACTORIES_RESOURCE_LOCATION + "]", ex);
		}
	}
2.1.2 filter() 方法实现
接着看上面红框2 filter() 方法实现
截图:
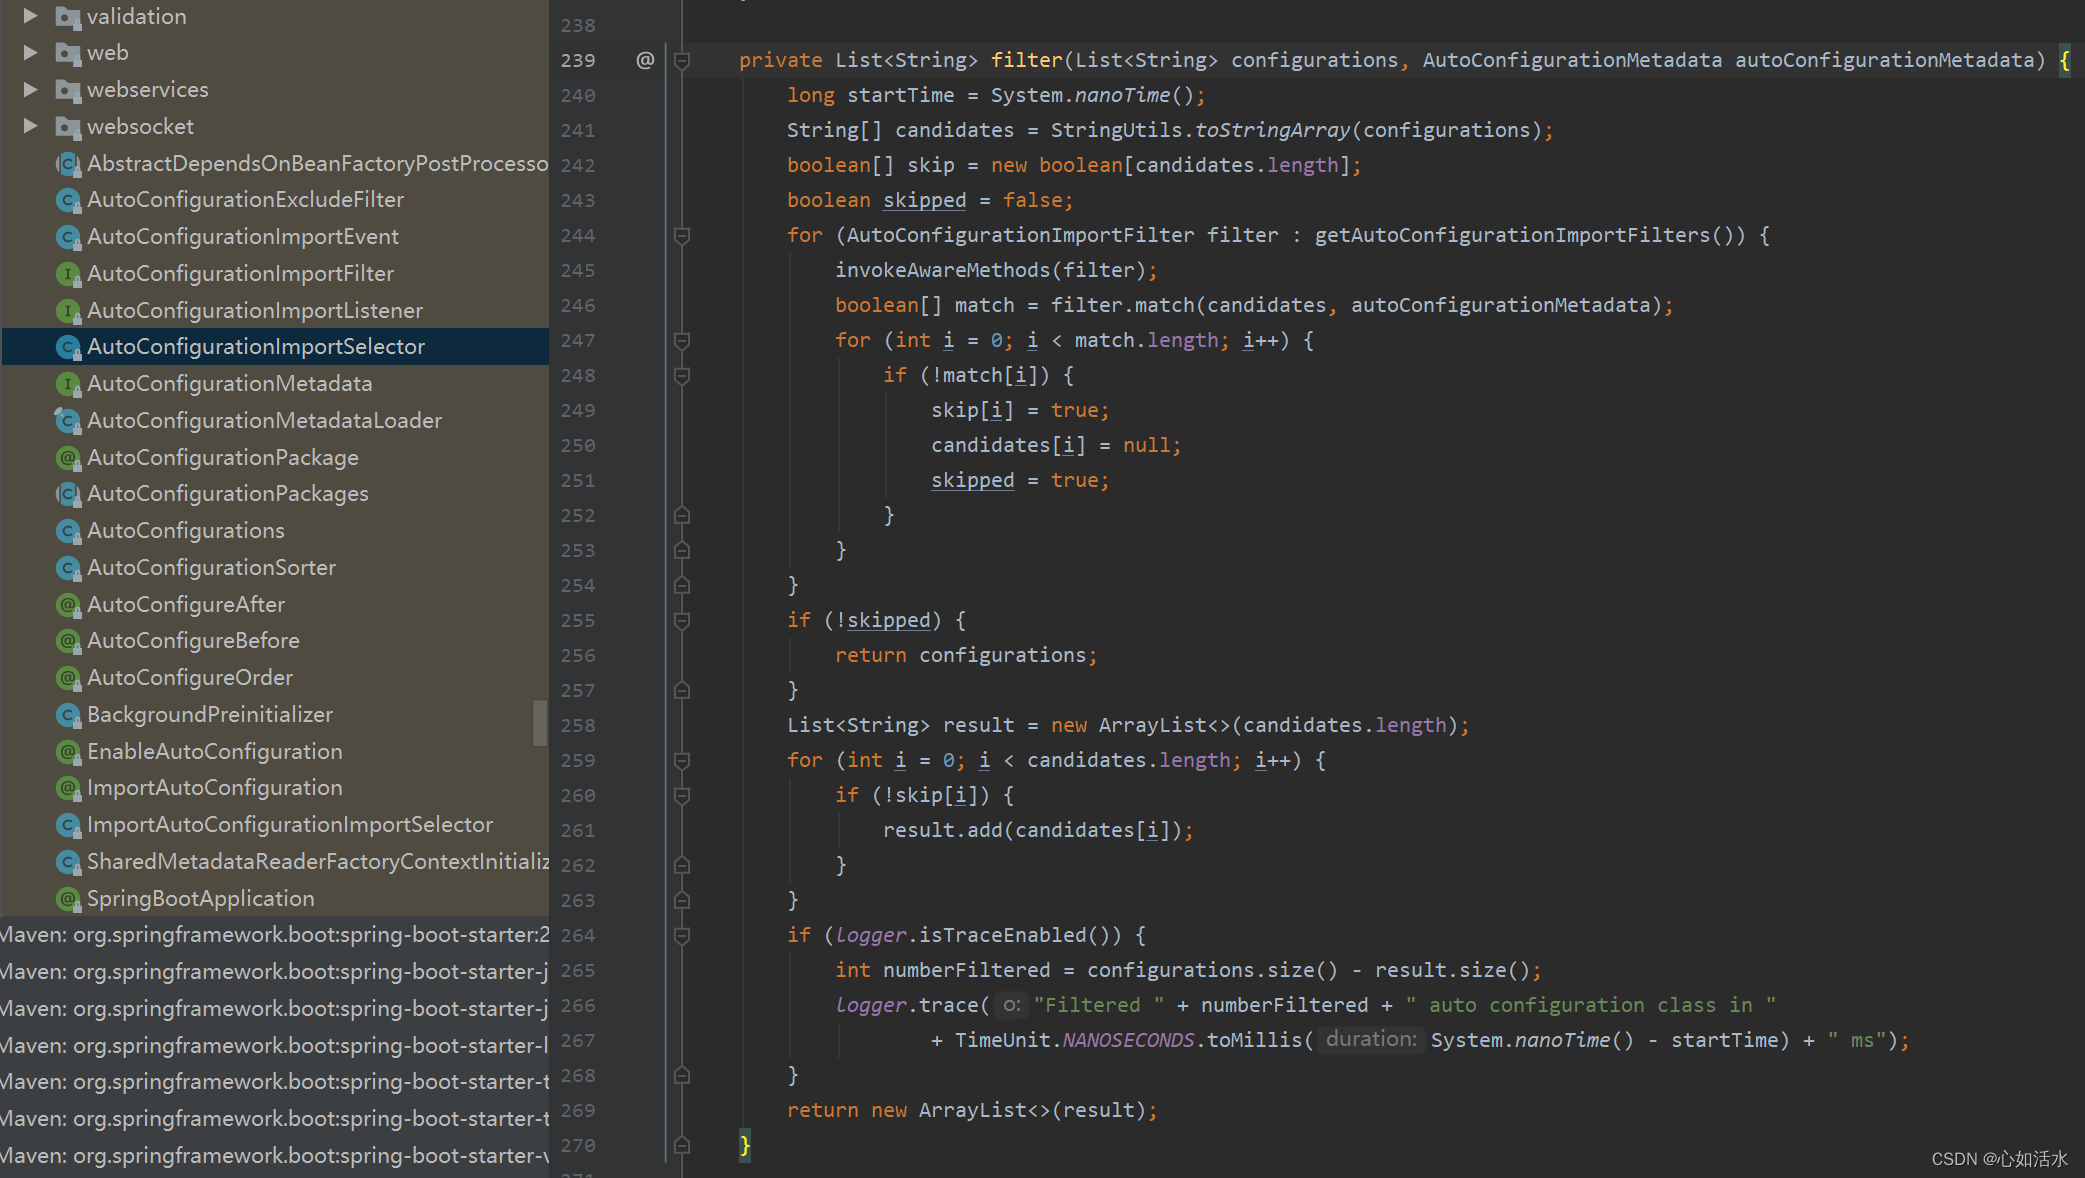
代码:
 private List<String> filter(List<String> configurations, AutoConfigurationMetadata autoConfigurationMetadata) {
        long startTime = System.nanoTime();
        //将从 spring.factories 中获取的自动配置类进行转化,转成字符串数组
        String[] candidates = StringUtils.toStringArray(configurations);
        //定义 skip 数组,是否需要跳过,注意 skip 数组与 candidates 数组顺序一一对应
        boolean[] skip = new boolean[candidates.length];
        boolean skipped = false;

        //getAutoConfigurationImportFilters() 方法拿到 onBeanCondition、onClassCondition、onWebApplicationCondition
        //然后遍历这三个条件类去过滤从spring.factories加载的大量配置类
        Iterator var8 = this.getAutoConfigurationImportFilters().iterator();

        while(var8.hasNext()) {
            AutoConfigurationImportFilter filter = (AutoConfigurationImportFilter)var8.next();
            //调用各种aware方法,将 beanClassLoader、beanFactory 等注入到 filter 对象中
            //这里的 filter 对象是 onBeanCondition、onClassCondition 和 onWebApplicationCondition
            this.invokeAwareMethods(filter);
            //判断各种 filter 类与每个 candidate 是否匹配
            //这里实质是通过 candidate(自动配置类) 拿到棘突的 @ConditionOnClass、@ConditionOnBean 和 @ConditionOnWebApplication 里面的注解值
            //注意:candidates 数组与 match 数组一一对应
            boolean[] match = filter.match(candidates, autoConfigurationMetadata);
            //遍历 match 数组,注意 match 顺序跟 candidates 的自动配置类一一对应
            for(int i = 0; i < match.length; ++i) {
                //如果不匹配的话
                if (!match[i]) {
                    //不匹配的话将记录在 skip 数组中,标志 skip[i] = true 也与 candidates 数组一一对应
                    skip[i] = true;
                    //因为不匹配,将相应的自动配置类置空
                    candidates[i] = null;
                    skipped = true;
                }
            }
        }

        if (!skipped) {
            return configurations;
        } else {
            List<String> result = new ArrayList(candidates.length);

            int numberFiltered;
            for(numberFiltered = 0; numberFiltered < candidates.length; ++numberFiltered) {
                if (!skip[numberFiltered]) {
                    result.add(candidates[numberFiltered]);
                }
            }

            if (logger.isTraceEnabled()) {
                numberFiltered = configurations.size() - result.size();
                logger.trace("Filtered " + numberFiltered + " auto configuration class in " + TimeUnit.NANOSECONDS.toMillis(System.nanoTime() - startTime) + " ms");
            }

            return new ArrayList(result);
        }
    }
该方法去重和排除一些不必要的自动配置类。
2.2 selectImports()方法实现
截图:
 代码:
代码:
 public Iterable<DeferredImportSelector.Group.Entry> selectImports() {
        if (this.autoConfigurationEntries.isEmpty()) {
            return Collections.emptyList();
        } else {
            // 这里得到所有要排除的自动配置类的set集合
            Set<String> allExclusions = (Set)this.autoConfigurationEntries.stream().map(org.springframework.boot.autoconfigure.AutoConfigurationImportSelector.AutoConfigurationEntry::getExclusions).flatMap(Collection::stream).collect(Collectors.toSet());
            //这里得到经过过滤所有符合条件的自动配置类的set集合
            Set<String> processedConfigurations = (Set)this.autoConfigurationEntries.stream().map(org.springframework.boot.autoconfigure.AutoConfigurationImportSelector.AutoConfigurationEntry::getConfigurations).flatMap(Collection::stream).collect(Collectors.toCollection(LinkedHashSet::new));
            //移除将要排除的自动配置类
            processedConfigurations.removeAll(allExclusions);
            //对标注有 @Order 注解的自动配置类进行排序
            return (Iterable)this.sortAutoConfigurations(processedConfigurations, this.getAutoConfigurationMetadata()).stream().map((importClassName) -> {
                return new DeferredImportSelector.Group.Entry((AnnotationMetadata)this.entries.get(importClassName), importClassName);
            }).collect(Collectors.toList());
        }
    }
三、创建一个自动配置类
1、创建⼀一个项⽬目,命名为 my-spring-boot-starter,引⼊入 SpringBoot 相关依赖
 <dependencies>
        <dependency>
            <groupId>org.springframework.boot</groupId>
            <artifactId>spring-boot-starter</artifactId>
        </dependency>
        <dependency>
            <groupId>org.springframework.boot</groupId>
            <artifactId>spring-boot-configuration-processor</artifactId>
            <optional>true</optional>
        </dependency>
    </dependencies>
2、编写配置⽂文件
截图:

代码:
@ConfigurationProperties(prefix = "first")
public class MyStarter {

    public String firstStarter;

    public String getFirstStarter() {
        return firstStarter;
    }

    public void setFirstStarter(String firstStarter) {
        this.firstStarter = firstStarter;
    }

}
3. ⾃自动装配
截图:
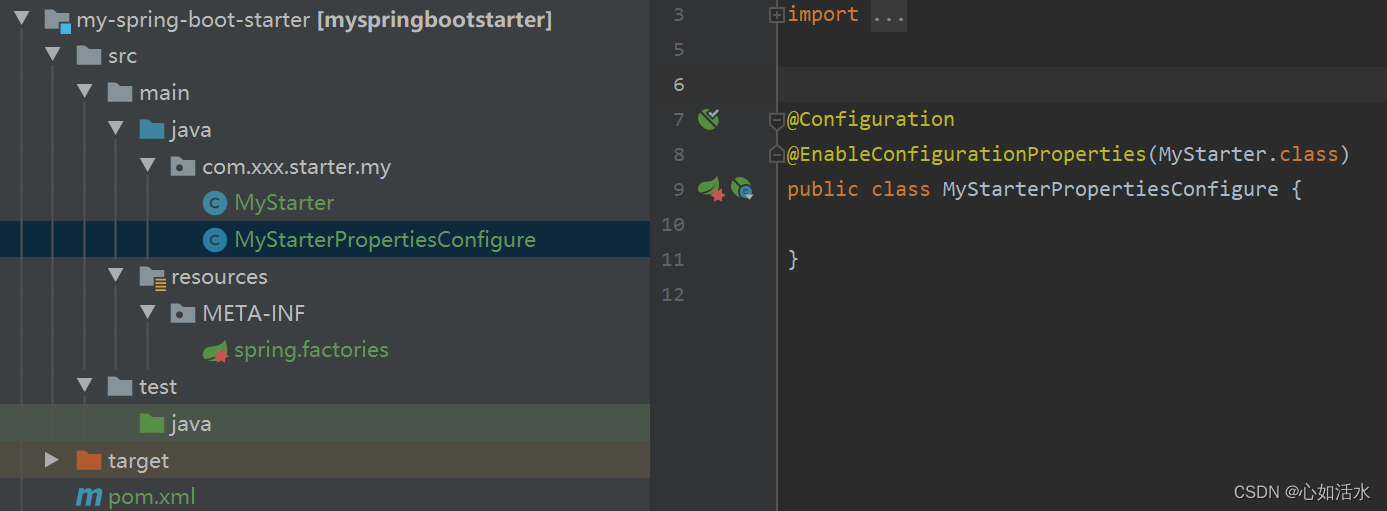 代码:
代码:
@Configuration
@EnableConfigurationProperties(MyStarter.class)
public class MyStarterPropertiesConfigure {

}
4. 配置⾃自动类
在 /resources/META-INF/spring.factories ⽂文件中添加⾃自动配置类路路径
截图:
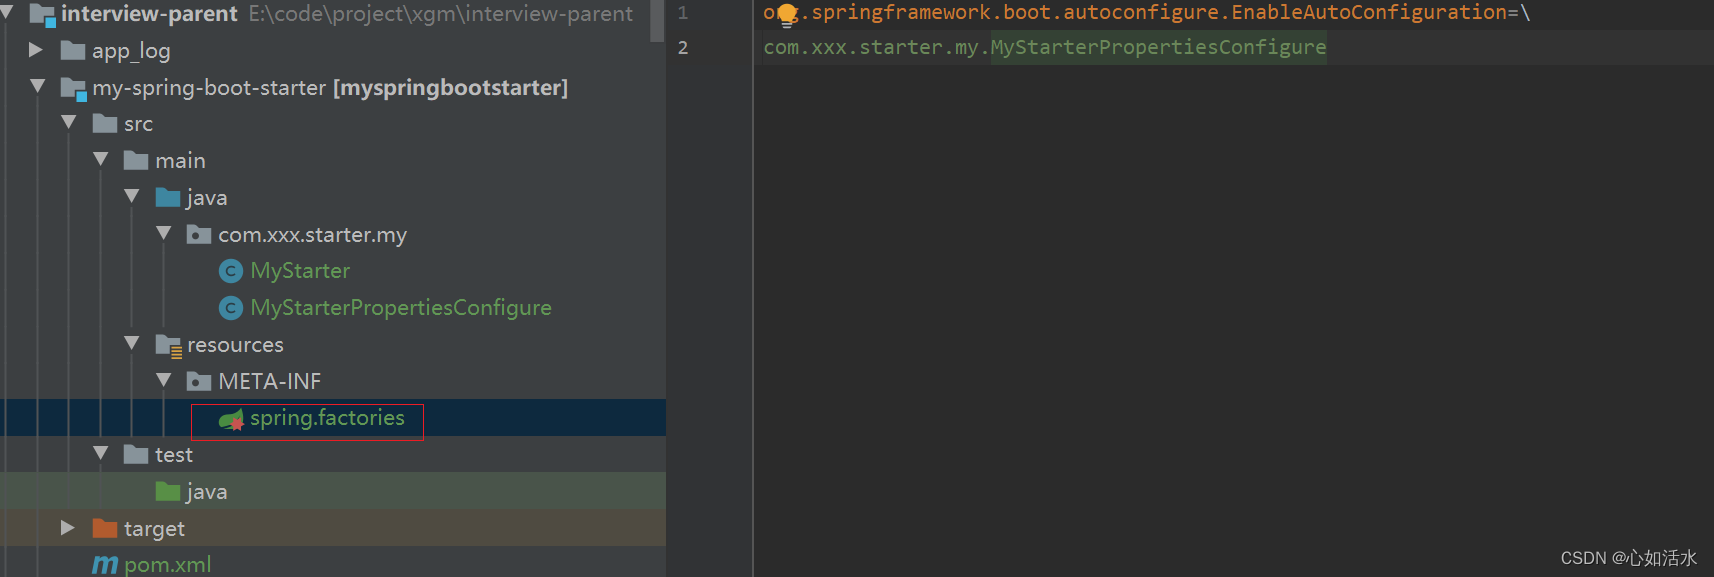
代码:
org.springframework.boot.autoconfigure.EnableAutoConfiguration=\
com.xxx.starter.my.MyStarterPropertiesConfigure
5、引⼊入⾃自定义 starter 依赖
截图:
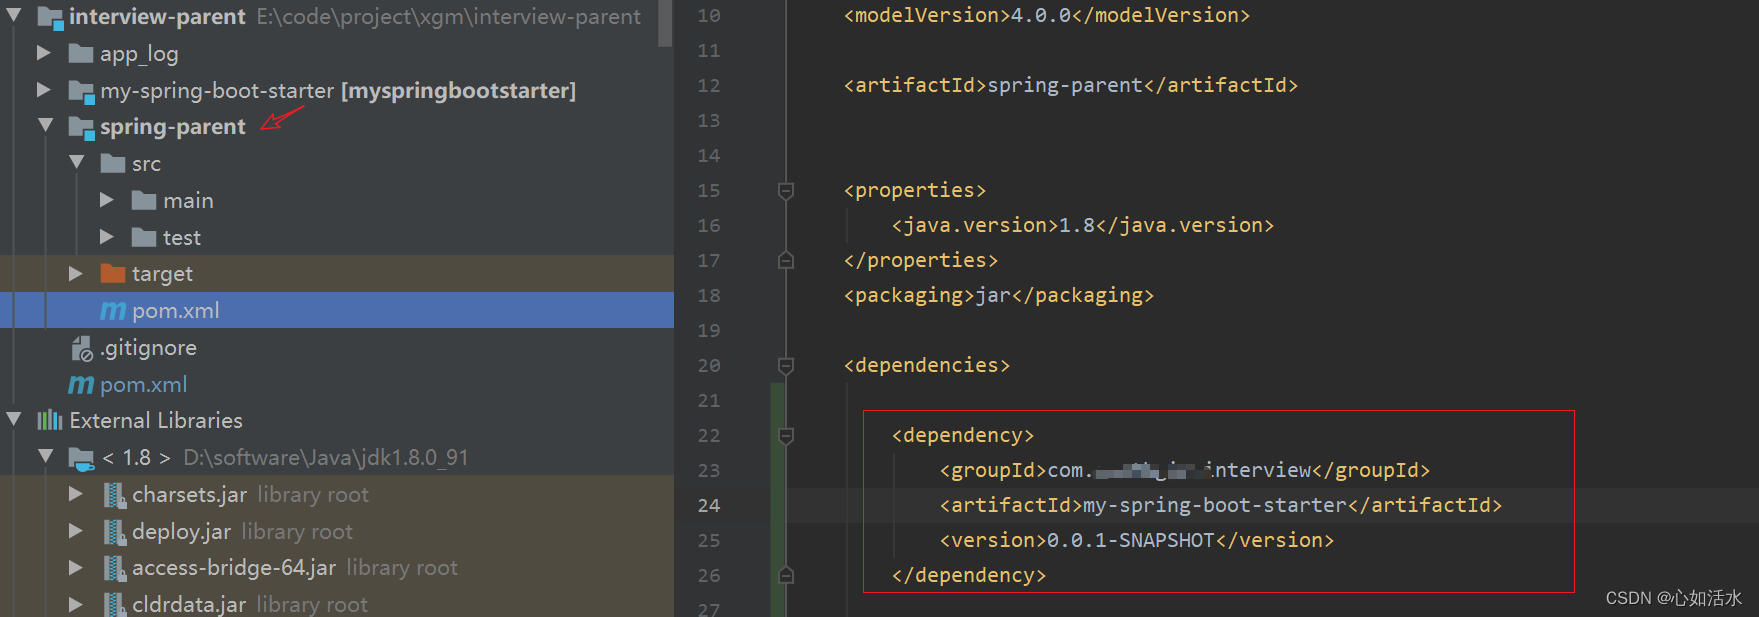
将 my-spring-boot-starter 模块引入到 spring-parent 中
6、在模块中创建一个 controller 测试下
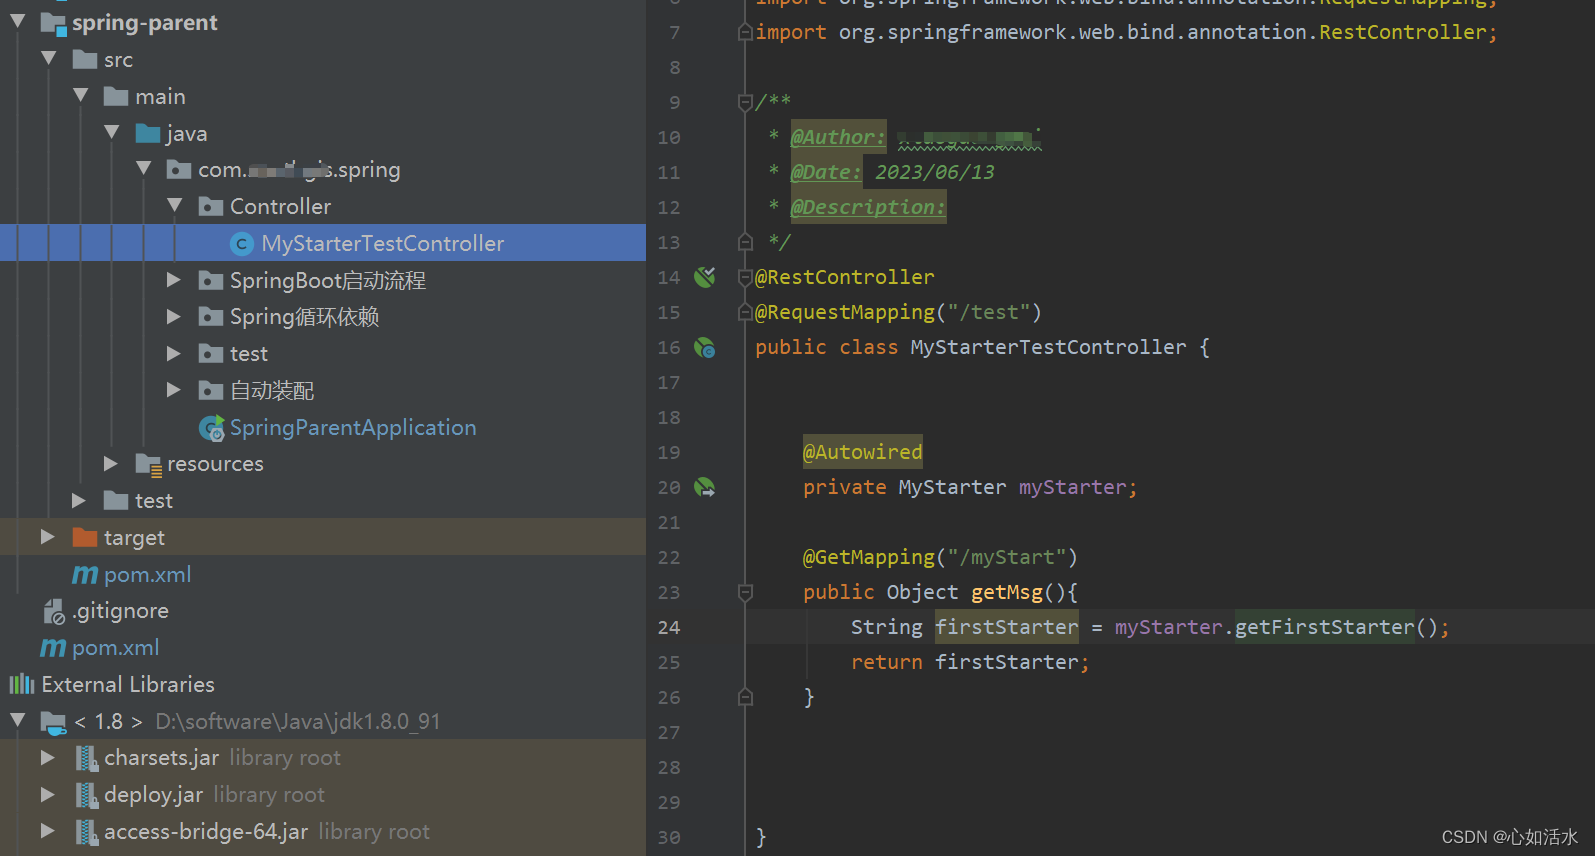
代码:
@RestController
@RequestMapping("/test")
public class MyStarterTestController {


    @Autowired
    private MyStarter myStarter;

    @GetMapping("/myStart")
    public Object getMsg(){
        String firstStarter = myStarter.getFirstStarter();
        return firstStarter;
    }


}
yml配置:

7、访问
http://localhost:9000/test/myStart
结果如下:

参考文章:SpringBoot源码深度剖析——@SpringBootApplication注解和new SpringApplication().run()方法深度解密_生活,没那么矫情的博客-CSDN博客




![深度学习应用篇-推荐系统[11]:推荐系统的组成、场景转化指标(pv点击率,uv点击率,曝光点击率)、用户数据指标等评价指标详解](https://img-blog.csdnimg.cn/img_convert/3be20f20fef024e998854b404aa0f662.png)

