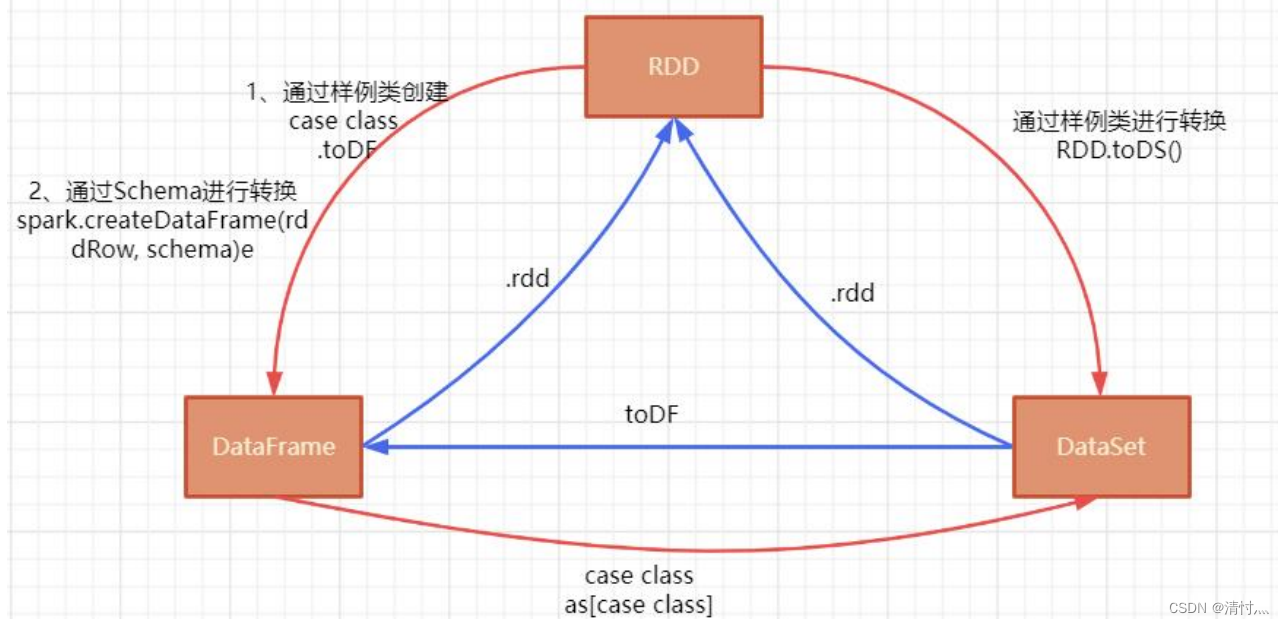
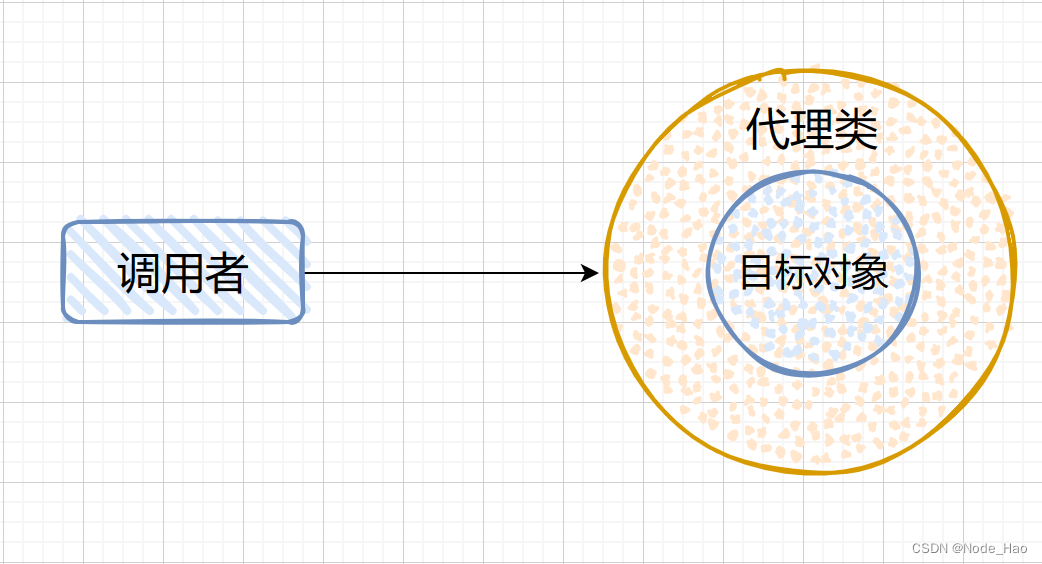
原理
- 页面中设置一个父盒子 bannerBox,固定宽高,相当于一个窗口,超出部分隐藏
- bannerBox 内部设置一个图片盒子 imgBox,横向(或纵向)依次排列图片
- 添加定时器,每隔一段时间,imgBox 向左(或向上)移动一段距离
- 为移动的过程添加 transition 过渡效果

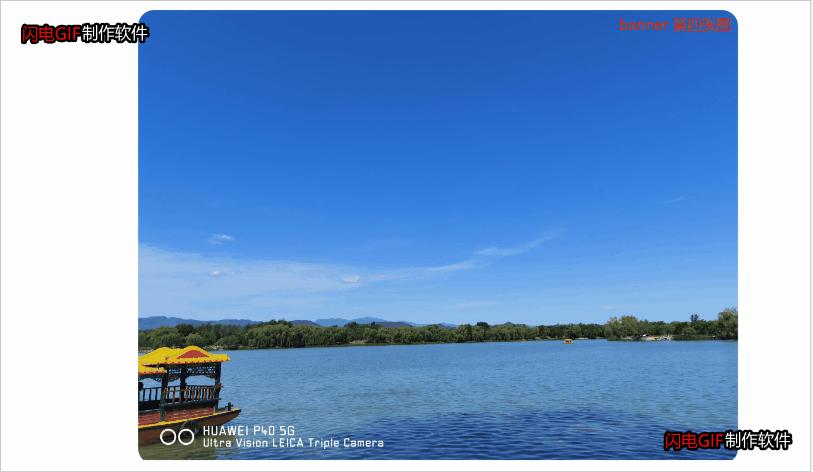
- 如上图所示,一共 4 张图,每张宽度设置为 600px,imgBox 宽度设置为 4*600 = 2400px,使得 4 张图片恰好可以在 imgBox 内横向排开。bannerBox 宽度为 600px,溢出部分隐藏,每隔 2 秒,imgBox 向左移动 600px。
初步实现
DOM 结构搭建
- 设置 bannerBox、imgBox、img 的相关属性
<div class="bannerBox">
  <div
    class="imgBox clearfix"
    :style="{
      width: imgList.length * 600 + 'px',
    }"
  >
    <div class="sinImg" v-for="(item, index) in imgList" :key="index">
      <img :src="item" alt="" />
    </div>
  </div>
</div>
data() {
return {
banner1: require("@I/banner1.jpg"),
banner2: require("@I/banner2.jpg"),
banner3: require("@I/banner3.jpg"),
banner4: require("@I/banner4.jpg"),
imgList: [],
activeIndex: 0,
};
},
mounted() {
this.getImgList();
},
methods: {
getImgList() {
this.imgList = [ this.banner1, this.banner2, this.banner3, this.banner4 ];
},
}
.bannerBox {
 width: 600px;
 overflow: hidden;
 border-radius: 16px;
 .imgBox {
   transform: translateX(0);
   .sinImg {
     float: left;
     img {
       width: 600px;
     }
   }
 }
}
- imgBox 盒子范围

- 第二张图片位置

添加定时器
<div class="bannerBox">
  <div
    class="imgBox clearfix"
    :style="{
      width: imgList.length * 600 + 'px',
      transform: transform,
      transition: transition,
    }"
  >
    <div class="sinImg" v-for="(item, index) in imgList" :key="index">
      <img :src="item" alt="" />
    </div>
  </div>
</div>
data() {
return {
banner1: require("@I/banner1.jpg"),
banner2: require("@I/banner2.jpg"),
banner3: require("@I/banner3.jpg"),
banner4: require("@I/banner4.jpg"),
imgList: [],
activeIndex: 0,
timmer: null,
transition: "transform 1s ease-in-out",
transform: "translateX(0px)",
};
},
mounted() {
this.getImgList();
},
methods: {
getImgList() {
this.imgList = [ this.banner1, this.banner2, this.banner3, this.banner4 ];
this.bannerFunc();
},
}
bannerFunc() {
this.timmer = setInterval(() => {
this.activeIndex += 1;
if (this.activeIndex > this.imgList.length - 1) {
this.activeIndex = 0;
}
this.transform = "translateX(" + this.activeIndex * -600 + "px)";
}, 2000);
},
- 上述方法在轮播图播放到最后一张 banner4 时,索引重置,会显示第一张图片 banner1,但是由于有 transition 过渡属性。视觉上的效果是,轮播图播放到 banner4 时,在 1s 的时间内,imgBox 向右移动(与轮播自动播放方向相反),快速依次略过 banner3 和 banner2,到达 banner1
优化无缝衔接
- 为了优化视觉效果,在图片数组最后添加一张 banner1,轮播图到达最后一张(banner1)时,关闭 transition 过渡属性,并且瞬间移动到数组第一张(banner1),开启新一轮的轮播
- 在 setInterval 定时器内部添加 setTimeout 定时器,用延时来模拟 transition 的 1s 过渡
getImgList() {
this.imgList = [ this.banner1, this.banner2, this.banner3, this.banner4, this.banner1 ];
this.bannerFunc();
},
bannerFunc() {
this.consoleTimeStr("开始调用 bannerFunc 方法", "red");
this.timmer = setInterval(() => {
this.consoleTimeStr("开始调用 toNext 方法", "blue");
this.activeIndex += 1;
this.transform = "translateX(" + this.activeIndex * -600 + "px)";
this.transition = "transform 1s ease-in-out";
if (this.activeIndex == this.imgList.length - 1) {
this.activeIndex = 0;
this.consoleTimeStr("无缝衔接准备~", "yellowgreen");
setTimeout(() => {
this.transform = "translateX(" + this.activeIndex * -600 + "px)";
this.transition = "none";
this.consoleTimeStr("偷偷切换回去了!", "green");
}, 1000);
}
}, 2000);
},
consoleTimeStr(flag, color) {
let time = new Date();
let minute = time.getMinutes();
let second = time.getSeconds();
if (minute < 10) {
minute = "0" + minute;
}
if (second < 10) {
second = "0" + second;
}
let str = minute + ":" + second;
console.log("%c" + flag + ",当前时间:" + str, "color: " + color + ";");
},
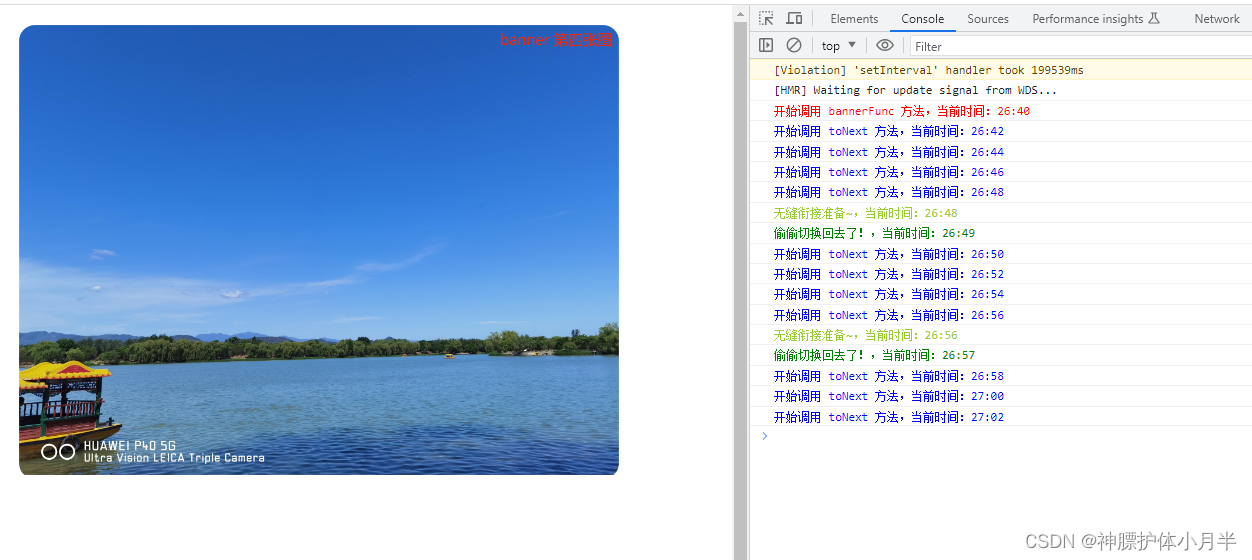
- 上述打印语句可以看出,在 26:48 时,开启了 1s 的 setTimeout 定时器
- 在这 1s 内,关闭了 transition 过渡效果,将 imgBox 位移恢复到初始位置,可以看做是瞬间位移
- 这样做就解决了上一步骤向相反方快速移动的效果
左右切换按钮
- 轮播可添加左右切换按钮
- 自动切换的效果可封装为右切换效果
完整代码
<template>
<div class="page">
<div class="bannerBox">
<div
class="imgBox clearfix"
:style="{
width: imgList.length * 600 + 'px',
transform: transform,
transition: transition,
}"
>
<div class="sinImg" v-for="(item, index) in imgList" :key="index">
<img :src="item" alt="" />
</div>
</div>
</div>
<div class="dotBox clearfix">
<div :class="{ active: activeIndex == 1 }"></div>
<div :class="{ active: activeIndex == 2 }"></div>
<div :class="{ active: activeIndex == 3 }"></div>
<div :class="{ active: activeIndex == 4 }"></div>
</div>
<div class="btnBox">
<div class="left" @click="toPrev('clear')"><</div>
<div class="right" @click="toNext('clear')">></div>
</div>
</div>
</template>
<script>
export default {
data() {
return {
banner1: require("@I/banner1.jpg"),
banner2: require("@I/banner2.jpg"),
banner3: require("@I/banner3.jpg"),
banner4: require("@I/banner4.jpg"),
imgList: [],
activeIndex: 1,
timmer: null,
transition: "transform 1s ease-in-out",
transform: "translateX(-600px)",
};
},
mounted() {
this.getImgList();
},
methods: {
getImgList() {
this.imgList = [
this.banner4,
this.banner1,
this.banner2,
this.banner3,
this.banner4,
this.banner1,
];
this.bannerFunc();
},
bannerFunc() {
this.consoleTimeStr("开始调用 bannerFunc 方法", "red");
this.timmer = setInterval(() => {
this.toNext();
}, 2000);
},
toPrev() {
this.consoleTimeStr("开始调用 toPrev 方法", "blue");
this.activeIndex -= 1;
this.transform = "translateX(" + this.activeIndex * -600 + "px)";
this.transition = "transform 1s ease-in-out";
if (this.activeIndex == 0) {
this.activeIndex = this.imgList.length - 2;
this.consoleTimeStr("无缝衔接准备~", "yellowgreen");
setTimeout(() => {
this.transform = "translateX(" + this.activeIndex * -600 + "px)";
this.transition = "none";
this.consoleTimeStr("偷偷切换回去了!", "green");
}, 1000);
}
console.log("activeIndex", this.activeIndex, "transform", this.transform);
},
toNext() {
this.consoleTimeStr("开始调用 toNext 方法", "blue");
this.activeIndex += 1;
this.transform = "translateX(" + this.activeIndex * -600 + "px)";
this.transition = "transform 1s ease-in-out";
if (this.activeIndex == this.imgList.length - 1) {
this.activeIndex = 1;
this.consoleTimeStr("无缝衔接准备~", "yellowgreen");
setTimeout(() => {
this.transform = "translateX(" + this.activeIndex * -600 + "px)";
this.transition = "none";
this.consoleTimeStr("偷偷切换回去了!", "green");
}, 1000);
}
console.log("activeIndex", this.activeIndex, "transform", this.transform);
},
consoleTimeStr(flag, color) {
let time = new Date();
let minute = time.getMinutes();
let second = time.getSeconds();
if (minute < 10) {
minute = "0" + minute;
}
if (second < 10) {
second = "0" + second;
}
let str = minute + ":" + second;
console.log("%c" + flag + ",当前时间:" + str, "color: " + color + ";");
},
},
};
</script>
<style lang="scss" scoped>
.page {
width: 600px;
position: relative;
margin: 20px auto;
.bannerBox {
width: 600px;
overflow: hidden;
border-radius: 16px;
.imgBox {
.sinImg {
float: left;
img {
width: 600px;
}
}
}
}
.dotBox {
width: 70px;
position: absolute;
bottom: 10px;
left: 50%;
transform: translateX(-50%);
div {
float: left;
width: 10px;
height: 10px;
border-radius: 50%;
margin-right: 10px;
cursor: pointer;
background: rgba(255, 255, 255, 0.2);
&:last-child {
margin-right: 0;
}
&.active {
background: rgba(255, 255, 255, 0.9);
}
}
}
.btnBox {
width: 100%;
height: 80px;
line-height: 80px;
position: absolute;
top: 50%;
transform: translateY(-50%);
div {
position: absolute;
cursor: pointer;
font-size: 36px;
color: #fff;
font-weight: bold;
font-family: cursive;
}
.left {
left: 10px;
}
.right {
right: 10px;
}
}
}
.clearfix:after {
content: "";
display: block;
clear: both;
visibility: hidden;
}
</style>
未完待续
- 上述效果暂时未考虑点击左右切换按钮时,停止定时器的效果,后续有时间再补充