摘要:本案例是CenterNet-Hourglass论文复现的体验案例,此模型是对Objects as Points 中提出的CenterNet进行结果复现。
本文分享自华为云社区《CenterNet-Hourglass (物体检测/Pytorch)》,作者:HWCloudAI。
目标检测常采用Anchor的方法来获取物体可能存在的位置,再对该位置进行分类,这样的做法耗时、低效,同时需要后处理(比如NMS)。CenterNet将目标看成一个点,即目标bounding box的中心点,整个问题转变成了关键点估计问题,其他目标属性,比如尺寸、3D位置、方向和姿态等都以估计的中心点为基准进行参数回归。
本案例是CenterNet-Hourglass论文复现的体验案例,此模型是对Objects as Points 中提出的CenterNet进行结果复现(原论文Table 2 最后一行)。本模型是以Hourglass网络架构作为backbone,以ExtremNet 作为预训练模型,在COCO数据集上进行50epochs的训练后得到的。本项目是基于原论文的官方代码进行针对ModelArts平台的修改来实现ModelArts上的训练与部署。
具体算法介绍:AI Gallery_算法_模型_云市场-华为云
注意事项:
1.本案例使用框架:PyTorch1.4.0
2.本案例使用硬件:GPU: 1*NVIDIA-V100NV32(32GB) | CPU: 8 核 64GB
3.运行代码方法: 点击本页面顶部菜单栏的三角形运行按钮或按Ctrl+Enter键 运行每个方块中的代码
4.JupyterLab的详细用法: 请参考《ModelAtrs JupyterLab使用指导》
5.碰到问题的解决办法: 请参考《ModelAtrs JupyterLab常见问题解决办法》
1.下载数据和代码
运行下面代码,进行数据和代码的下载和解压
本案例使用COCO数据集。
import os
#数据代码下载
!wget https://obs-aigallery-zc.obs.cn-north-4.myhuaweicloud.com/algorithm/CenterNet.zip
# 解压缩
os.system('unzip  CenterNet.zip -d ./')
--2021-06-25 17:50:11-- https://obs-aigallery-zc.obs.cn-north-4.myhuaweicloud.com/algorithm/CenterNet.zip
Resolving proxy-notebook.modelarts.com (proxy-notebook.modelarts.com)... 192.168.6.62
Connecting to proxy-notebook.modelarts.com (proxy-notebook.modelarts.com)|192.168.6.62|:8083... connected.
Proxy request sent, awaiting response... 200 OK
Length: 1529663572 (1.4G) [application/zip]
Saving to: ‘CenterNet.zip’
CenterNet.zip 100%[===================>] 1.42G 279MB/s in 5.6s
2021-06-25 17:50:16 (261 MB/s) - ‘CenterNet.zip’ saved [1529663572/1529663572]
02.训练
2.1依赖库加载和安装
from __future__ import absolute_import
from __future__ import division
from __future__ import print_function
root_path = './CenterNet/'
os.chdir(root_path)
os.system('pip install pycocotools')
import _init_paths
import torch
import torch.utils.data
from opts import opts
from models.model import create_model, load_model, save_model
from models.data_parallel import DataParallel
from logger import Logger
from datasets.dataset_factory import get_dataset
from trains.train_factory import train_factory
from evaluation import test, prefetch_test, image_infer
USE_MODELARTS = True
INFO:root:Using MoXing-v2.0.0.rc0-19e4d3ab
INFO:root:Using OBS-Python-SDK-3.20.9.1
NMS not imported! If you need it, do
 cd $CenterNet_ROOT/src/lib/external
 make
2.2训练函数
def main(opt):
 torch.manual_seed(opt.seed)
 torch.backends.cudnn.benchmark = not opt.not_cuda_benchmark and not opt.test
  Dataset = get_dataset(opt.dataset, opt.task)
  opt = opts().update_dataset_info_and_set_heads(opt, Dataset)
  logger = Logger(opt)
 os.environ['CUDA_VISIBLE_DEVICES'] = opt.gpus_str
 opt.device = torch.device('cuda' if opt.gpus[0] >= 0 else 'cpu')
 print('Creating model...')
  model = create_model(opt.arch, opt.heads, opt.head_conv)
  optimizer = torch.optim.Adam(model.parameters(), opt.lr)
 start_epoch = 0
 if opt.load_model != '':
    model, optimizer, start_epoch = load_model(
      model, opt.load_model, optimizer, opt.resume, opt.lr, opt.lr_step)
  Trainer = train_factory[opt.task]
  trainer = Trainer(opt, model, optimizer)
 trainer.set_device(opt.gpus, opt.chunk_sizes, opt.device)
 print('Setting up data...')
 train_loader = torch.utils.data.DataLoader(
 Dataset(opt, 'train'),
 batch_size=opt.batch_size,
      shuffle=True,
 num_workers=opt.num_workers,
 pin_memory=True,
 drop_last=True
 )
 print('Starting training...')
  best = 1e10
 for epoch in range(start_epoch + 1, opt.num_epochs + 1):
    mark = epoch if opt.save_all else 'last'
 log_dict_train, _ = trainer.train(epoch, train_loader)
 logger.write('epoch: {} |'.format(epoch))
 for k, v in log_dict_train.items():
 logger.scalar_summary('train_{}'.format(k), v, epoch)
 logger.write('{} {:8f} | '.format(k, v))
 save_model(os.path.join(opt.save_dir, 'model_last.pth'),
                 epoch, model)
 logger.write('\n')
 if epoch in opt.lr_step:
 save_model(os.path.join(opt.save_dir, 'model_{}.pth'.format(epoch)),
                 epoch, model, optimizer)
 lr = opt.lr * (0.1 ** (opt.lr_step.index(epoch) + 1))
 print('Drop LR to', lr)
 for param_group in optimizer.param_groups:
 param_group['lr'] = lr
 logger.close()
2.3开始训练
训练需要一点时间,请耐心等待
if __name__ == '__main__':
  opt = opts().parse()
 if USE_MODELARTS:
 pwd = os.getcwd()
 print('Copying dataset to work space...')
 print('Listing directory: ')
 print(os.listdir())
 if not os.path.exists(opt.save_dir):
 os.makedirs(opt.save_dir)
  main(opt)
 if USE_MODELARTS:
 print("Processing model checkpoints & service config for deployment...")
 if not opt.eval:
 infer_dir = os.path.join(opt.save_dir, 'model')
 os.makedirs(infer_dir)
 os.system(f'mv ./trained_model/* {infer_dir}')
 pretrained_pth = os.path.join(infer_dir, '*.pth')
 ckpt_dir = os.path.join(opt.save_dir, 'checkpoints')
 os.makedirs(ckpt_dir)
 os.system(f'mv {pretrained_pth} {ckpt_dir}')
 pth_files = os.path.join(opt.save_dir, '*.pth')
 infer_pth = os.path.join(ckpt_dir, f'{opt.model_deploy}.pth')
 os.system(f'mv {pth_files} {ckpt_dir}')
 os.system(f'mv {infer_pth} {infer_dir}')
 print(os.listdir(opt.save_dir))
 print("ModelArts post-training work is done!")
Fix size testing.
training chunk_sizes: [8]
The output will be saved to  ./output/exp/ctdet/default
Copying dataset to work space...
Listing directory:
['pre-trained_weights', '.ipynb_checkpoints', 'coco_eval.py', 'train.py', 'coco', 'output', 'training_logs', 'trained_model', '_init_paths.py', '__pycache__', 'coco_classes.py', 'lib', 'evaluation.py']
heads {'hm': 80, 'wh': 2, 'reg': 2}
Creating model...
loaded ./trained_model/epoch_50_mAP_42.7.pth, epoch 50
Setting up data...
==> initializing coco 2017 train data.
loading annotations into memory...
Done (t=0.54s)
creating index...
index created!
Loaded train 5000 samples
Starting training...
/home/ma-user/anaconda3/envs/Pytorch-1.4.0/lib/python3.6/site-packages/torch/nn/_reduction.py:43: UserWarning: size_average and reduce args will be deprecated, please use reduction='sum' instead.
 warnings.warn(warning.format(ret))
ctdet/default| train: [1][0/625] |loss 1.7568 |hm_loss 1.3771 |wh_loss 1.9394 |off_loss 0.1857 |Data 0.384s (0.384s) |Net 5.019s (5.019s)
ctdet/default| train: [1][200/625] |loss 1.9275 |hm_loss 1.4429 |wh_loss 2.7269 |off_loss 0.2119 |Data 0.001s (0.003s) |Net 0.759s (0.779s)
ctdet/default| train: [1][400/625] |loss 1.9290 |hm_loss 1.4430 |wh_loss 2.7423 |off_loss 0.2118 |Data 0.001s (0.002s) |Net 0.760s (0.770s)
ctdet/default| train: [1][600/625] |loss 1.9276 |hm_loss 1.4397 |wh_loss 2.7623 |off_loss 0.2117 |Data 0.001s (0.002s) |Net 0.765s (0.767s)
Processing model checkpoints & service config for deployment...
['model', 'logs_2021-06-25-17-51', 'opt.txt', 'checkpoints']
ModelArts post-training work is done!
3.模型测试
3.1推理函数
# -*- coding: utf-8 -*-
# TODO 添加模型运行需要导入的模块
import os
import torch
import numpy as np
from PIL import Image
from io import BytesIO
from collections import OrderedDict
import cv2
import sys
sys.path.insert(0, './lib')
from opts import opts
from coco_classes import coco_class_map
from detectors.detector_factory import detector_factory
class ModelClass():
 def __init__(self, model_path):
 self.model_path = model_path # 本行代码必须保留,且无需修改
 self.opt = opts().parse()
 self.opt.num_classes = 80
 self.opt.resume = True
 self.opt.keep_res = True
 self.opt.fix_res = False
 self.opt.heads = {'hm': 80, 'wh': 2, 'reg': 2}
 self.opt.load_model = model_path
 self.opt.mean = np.array([0.40789654, 0.44719302, 0.47026115],
 dtype=np.float32).reshape(1, 1, 3)
 self.opt.std = np.array([0.28863828, 0.27408164, 0.27809835],
 dtype=np.float32).reshape(1, 1, 3)
 self.opt.batch_infer = False
 # configurable varibales:
 if 'BATCH_INFER' in os.environ:
 print('Batch inference mode!')
 self.opt.batch_infer = True
 if 'FLIP_TEST' in os.environ:
 print('Flip test!')
 self.opt.flip_test = True
 if 'MULTI_SCALE' in os.environ:
 print('Multi scale!')
 self.opt.test_scales = [0.5,0.75,1,1.25,1.5]
 self.device = torch.device("cuda" if torch.cuda.is_available() else "cpu")
 if not torch.cuda.is_available():
 self.opt.gpus = [-1]
 self.class_map = coco_class_map()
 torch.set_grad_enabled(False)
        Detector = detector_factory[self.opt.task]
 self.detector = Detector(self.opt)
 print('load model success')
 def predict(self, file_name):
        image = Image.open(file_name).convert('RGB')
 img = np.array(image)
 img = img[:, :, ::-1]
        results = self.detector.run(img)['results']
        image = cv2.cvtColor(np.asarray(image),cv2.COLOR_RGB2BGR)
 if not self.opt.batch_infer:
 for c_id, dets in results.items():
 for det in dets:
 if det[4] > self.opt.vis_thresh:
                        scores = str(round(float(det[4]), 4))
                        classes = self.class_map[c_id]
                        image = cv2.rectangle(image,(int(det[0]),int(det[1])),(int(det[2]),int(det[3])),(0,255,0),2)
                        image = cv2.putText(image,classes+':'+scores,(int(det[0]),int(det[1])),cv2.FONT_HERSHEY_SIMPLEX,0.7,(0,0,255),2)
 else:
 for c_id, dets in results.items():
 for det in dets:
                    scores = str(round(float(det[4]), 4))
                    classes = self.class_map[c_id]
                    image = cv2.rectangle(image,(int(det[0]),int(det[1])),(int(det[2]),int(det[3])),(0,255,0),2)
                    image = cv2.putText(image,classes+':'+scores,(int(det[0]),int(det[1])),cv2.FONT_HERSHEY_SIMPLEX,0.5,(0,0,255),2)
 return image
3.2开始推理
可以自行修改预测的图像路径
if __name__ == '__main__':
 import matplotlib.pyplot as plt
 img_path = './coco/train/000000021903.jpg'
 model_path = './output/exp/ctdet/default/model/model_last.pth' #模型的保存路径,你可以自己找一下
 # 以下代码无需修改
 my_model = ModelClass(model_path)
    result = my_model.predict(img_path)
    result = Image.fromarray(cv2.cvtColor(result,cv2.COLOR_BGR2RGB))
 plt.figure(figsize=(10,10)) #设置窗口大小
 plt.imshow(result)
 plt.show()
Fix size testing.
training chunk_sizes: [8]
The output will be saved to ./output/exp/ctdet/default
Creating model...
loaded ./output/exp/ctdet/default/model/model_last.pth, epoch 1
load model success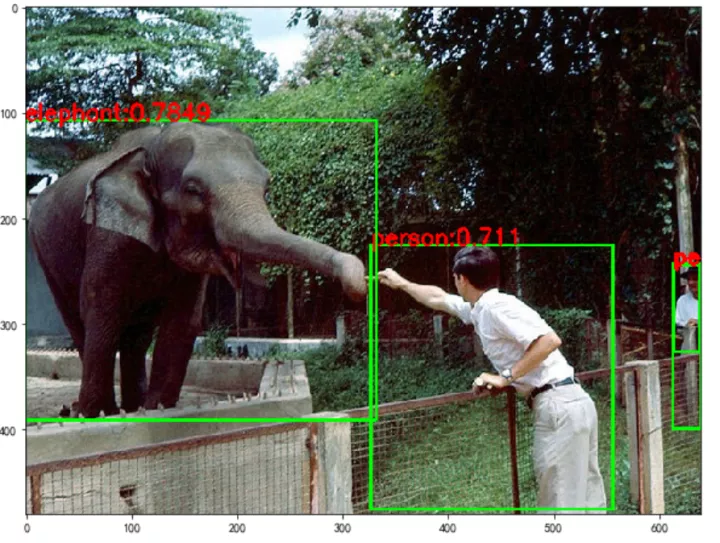
点击关注,第一时间了解华为云新鲜技术~
![[附源码]Python计算机毕业设计SSM健身房管理系统(程序+LW)](https://img-blog.csdnimg.cn/82e218dccbe846febad7fb4c0906e364.png)


![[Java反序列化]—CommonsCollections6](https://img-blog.csdnimg.cn/9acbc52247cf487ea974508c8641c140.png)