一、前言
halo各位大佬很久没更新了最近在搞微信支付,因商户号审核了我半个月和小程序认证也找了资料并且将商户号和小程序进行关联,至此微信支付Native支付完成.此篇文章过长我将分几个阶段的文章发布(项目源码都有,小程序和PC端)
在此之前已经更新了微信支付开篇、微信支付安全、本次更新为项目实战篇,实战篇分为几个章节因为代码量确实有点多哈.

本次项目使用技术栈
后端: SpringBoot3.1.x、Mysql8.0、MybatisPlus
前端: Vue3、Vite、ElementPlus
小程序: Uniapp、Uview
二、项目创建
1. 创建SpringBoot项目(wx-play-demo) 3.x (这是我的版本) 使用JDK 17 该博文案例已上传到 gitee 仓库
<?xml version="1.0" encoding="UTF-8"?>
<project xmlns="http://maven.apache.org/POM/4.0.0" xmlns:xsi="http://www.w3.org/2001/XMLSchema-instance"
         xsi:schemaLocation="http://maven.apache.org/POM/4.0.0 https://maven.apache.org/xsd/maven-4.0.0.xsd">
    <modelVersion>4.0.0</modelVersion>
    <parent>
        <groupId>org.springframework.boot</groupId>
        <artifactId>spring-boot-starter-parent</artifactId>
        <version>3.1.0</version>
        <relativePath/> <!-- lookup parent from repository -->
    </parent>
    <groupId>com.yby6</groupId>
    <artifactId>wx-play-demo-blog</artifactId>
    <version>0.0.1-SNAPSHOT</version>
    <name>wx-play-demo-blog</name>
    <description>wx-play-demo-blog</description>
    <properties>
        <java.version>17</java.version>
    </properties>
    <dependencies>
        <dependency>
            <groupId>org.springframework.boot</groupId>
            <artifactId>spring-boot-starter-web</artifactId>
        </dependency>

        <dependency>
            <groupId>org.springframework.boot</groupId>
            <artifactId>spring-boot-devtools</artifactId>
            <scope>runtime</scope>
            <optional>true</optional>
        </dependency>
        <dependency>
            <groupId>com.mysql</groupId>
            <artifactId>mysql-connector-j</artifactId>
            <scope>runtime</scope>
        </dependency>

        <dependency>
            <groupId>com.baomidou</groupId>
            <artifactId>mybatis-plus-boot-starter</artifactId>
            <version>3.5.3.1</version>
        </dependency>

        <!-- sql性能分析插件 -->
        <dependency>
            <groupId>p6spy</groupId>
            <artifactId>p6spy</artifactId>
            <version>3.9.1</version>
        </dependency>

        <!--   可以帮助我们生成自定义配置的元数据信息,让配置文件和Java代码之间的对应参数可以自动定位,方便开发     -->
        <dependency>
            <groupId>org.springframework.boot</groupId>
            <artifactId>spring-boot-configuration-processor</artifactId>
            <optional>true</optional>
        </dependency>

        <dependency>
            <groupId>org.projectlombok</groupId>
            <artifactId>lombok</artifactId>
            <optional>true</optional>
        </dependency>

        <dependency>
            <groupId>org.springframework.boot</groupId>
            <artifactId>spring-boot-starter-test</artifactId>
        </dependency>

        <dependency>
            <groupId>org.apache.commons</groupId>
            <artifactId>commons-lang3</artifactId>
            <version>3.12.0</version>
        </dependency>

        <!-- 微信 APIv3 SDK 最新版本 -->
        <dependency>
            <groupId>com.github.wechatpay-apiv3</groupId>
            <artifactId>wechatpay-apache-httpclient</artifactId>
            <version>0.3.0</version>
        </dependency>


        <!--微信支付 APIv2 SDK-->
        <dependency>
            <groupId>com.github.wxpay</groupId>
            <artifactId>wxpay-sdk</artifactId>
            <version>0.0.3</version>
        </dependency>

        <!--  让支付更加轻盈 -->
        <dependency>
            <groupId>com.github.javen205</groupId>
            <artifactId>IJPay-WxPay</artifactId>
            <version>2.9.6</version>
        </dependency>

        <!-- 支付宝支付 -->
        <dependency>
            <groupId>com.github.javen205</groupId>
            <artifactId>IJPay-AliPay</artifactId>
            <version>2.9.6</version>
        </dependency>

        <dependency>
            <groupId>cn.hutool</groupId>
            <artifactId>hutool-all</artifactId>
            <version>5.8.15</version>
        </dependency>

        <dependency>
            <groupId>com.google.zxing</groupId>
            <artifactId>core</artifactId>
            <version>3.5.1</version>
        </dependency>

    </dependencies>

    <build>
        <plugins>
            <plugin>
                <groupId>org.graalvm.buildtools</groupId>
                <artifactId>native-maven-plugin</artifactId>
            </plugin>
            <plugin>
                <groupId>org.springframework.boot</groupId>
                <artifactId>spring-boot-maven-plugin</artifactId>
                <configuration>
                    <excludes>
                        <exclude>
                            <groupId>org.projectlombok</groupId>
                            <artifactId>lombok</artifactId>
                        </exclude>
                    </excludes>
                </configuration>
            </plugin>
        </plugins>
    </build>

</project>
2. 创建数据库 payment_demo
/*
 杨不易呀: https://yby6.com
 Date: 21/05/2023 22:28:20
*/
DROP DATABASE payment_demo_blog;

create database payment_demo_blog;
SET NAMES utf8mb4;
SET FOREIGN_KEY_CHECKS = 0;
use payment_demo_blog;
-- ----------------------------
-- Table structure for t_order_info
-- ----------------------------
DROP TABLE IF EXISTS `t_order_info`;
CREATE TABLE `t_order_info` (
  `id` bigint(20) unsigned NOT NULL AUTO_INCREMENT COMMENT '订单id',
  `title` varchar(256) DEFAULT NULL COMMENT '订单标题',
  `order_no` varchar(50) DEFAULT NULL COMMENT '商户订单编号',
  `user_id` bigint(20) DEFAULT NULL COMMENT '用户id',
  `product_id` bigint(20) DEFAULT NULL COMMENT '支付产品id',
  `total_fee` int(11) DEFAULT NULL COMMENT '订单金额(分)',
  `code_url` varchar(50) DEFAULT NULL COMMENT '订单二维码连接',
  `order_status` varchar(10) DEFAULT NULL COMMENT '订单状态',
  `create_time` datetime DEFAULT NULL COMMENT '创建时间',
  `update_time` datetime DEFAULT NULL COMMENT '更新时间',
  PRIMARY KEY (`id`) USING BTREE
) ENGINE=InnoDB AUTO_INCREMENT=172 DEFAULT CHARSET=utf8mb4 ROW_FORMAT=DYNAMIC;

-- ----------------------------
-- Table structure for t_payment_info
-- ----------------------------
DROP TABLE IF EXISTS `t_payment_info`;
CREATE TABLE `t_payment_info` (
  `id` bigint(20) unsigned NOT NULL AUTO_INCREMENT COMMENT '支付记录id',
  `order_no` varchar(50) DEFAULT NULL COMMENT '商户订单编号',
  `transaction_id` varchar(50) DEFAULT NULL COMMENT '支付系统交易编号',
  `payment_type` varchar(20) DEFAULT NULL COMMENT '支付类型',
  `trade_type` varchar(20) DEFAULT NULL COMMENT '交易类型',
  `trade_state` varchar(50) DEFAULT NULL COMMENT '交易状态',
  `payer_total` int(11) DEFAULT NULL COMMENT '支付金额(分)',
  `content` text COMMENT '通知参数',
  `create_time` datetime DEFAULT CURRENT_TIMESTAMP COMMENT '创建时间',
  `update_time` datetime DEFAULT CURRENT_TIMESTAMP ON UPDATE CURRENT_TIMESTAMP COMMENT '更新时间',
  PRIMARY KEY (`id`) USING BTREE
) ENGINE=InnoDB AUTO_INCREMENT=62 DEFAULT CHARSET=utf8mb4 ROW_FORMAT=DYNAMIC;

-- ----------------------------
-- Table structure for t_product
-- ----------------------------
DROP TABLE IF EXISTS `t_product`;
CREATE TABLE `t_product` (
  `id` bigint(20) NOT NULL AUTO_INCREMENT COMMENT '商Bid',
  `title` varchar(20) DEFAULT NULL COMMENT '商品名称',
  `price` int(11) DEFAULT NULL COMMENT '价格(分)',
  `create_time` datetime DEFAULT CURRENT_TIMESTAMP COMMENT '创建时间',
  `update_time` datetime DEFAULT CURRENT_TIMESTAMP ON UPDATE CURRENT_TIMESTAMP COMMENT '更新时间',
  PRIMARY KEY (`id`) USING BTREE
) ENGINE=InnoDB AUTO_INCREMENT=17 DEFAULT CHARSET=utf8mb4 ROW_FORMAT=DYNAMIC;

-- ----------------------------
-- Table structure for t_refund_info
-- ----------------------------
DROP TABLE IF EXISTS `t_refund_info`;
CREATE TABLE `t_refund_info` (
  `id` bigint(20) unsigned NOT NULL AUTO_INCREMENT COMMENT '款单id',
  `order_no` varchar(50) DEFAULT NULL COMMENT '商户订单编号',
  `refund_no` varchar(50) DEFAULT NULL COMMENT '商户退款单编号',
  `refund_id` varchar(50) DEFAULT NULL COMMENT '支付系统退款单号',
  `total_fee` int(11) DEFAULT NULL COMMENT '原订单金额(分)',
  `refund` int(11) DEFAULT NULL COMMENT '退款金额(分)',
  `reason` varchar(50) DEFAULT NULL COMMENT '退款原因',
  `refund_status` varchar(10) DEFAULT NULL COMMENT '退款状态',
  `content_return` text COMMENT '申请退款返回参数',
  `content_notify` text COMMENT '退款结果通知参数',
  `create_time` datetime DEFAULT CURRENT_TIMESTAMP COMMENT '创建时间',
  `update_time` datetime DEFAULT CURRENT_TIMESTAMP ON UPDATE CURRENT_TIMESTAMP COMMENT '更新时间',
  PRIMARY KEY (`id`) USING BTREE
) ENGINE=InnoDB AUTO_INCREMENT=21 DEFAULT CHARSET=utf8mb4 ROW_FORMAT=DYNAMIC;

SET FOREIGN_KEY_CHECKS = 1;

INSERT INTO `payment_demo_blog`.`t_product` (`id`, `title`, `price`, `create_time`, `update_time`) VALUES (1, 'Java课程', 1, '2022-11-13 14:31:00', '2023-05-19 10:52:49');
INSERT INTO `payment_demo_blog`.`t_product` (`id`, `title`, `price`, `create_time`, `update_time`) VALUES (2, '大数据课程', 1, '2022-11-13 14:31:00', '2023-05-19 10:52:49');
INSERT INTO `payment_demo_blog`.`t_product` (`id`, `title`, `price`, `create_time`, `update_time`) VALUES (3, '前端课程', 1, '2022-11-13 14:31:00', '2023-05-19 10:52:49');
INSERT INTO `payment_demo_blog`.`t_product` (`id`, `title`, `price`, `create_time`, `update_time`) VALUES (4, 'UI程', 1, '2022-11-13 14:31:00', '2023-05-19 10:52:49');
INSERT INTO `payment_demo_blog`.`t_product` (`id`, `title`, `price`, `create_time`, `update_time`) VALUES (5, '随机课程', 1, '2022-11-17 04:22:35', '2023-05-19 10:52:49');
INSERT INTO `payment_demo_blog`.`t_product` (`id`, `title`, `price`, `create_time`, `update_time`) VALUES (6, '自定义课程', 1, '2022-11-17 04:23:54', '2023-05-19 10:52:49');
INSERT INTO `payment_demo_blog`.`t_product` (`id`, `title`, `price`, `create_time`, `update_time`) VALUES (7, '全网课程', 1, '2022-11-18 02:52:30', '2023-05-19 10:52:49');
INSERT INTO `payment_demo_blog`.`t_product` (`id`, `title`, `price`, `create_time`, `update_time`) VALUES (8, '测试支付', 1, '2023-05-19 10:52:05', '2023-05-19 10:52:05');
INSERT INTO `payment_demo_blog`.`t_product` (`id`, `title`, `price`, `create_time`, `update_time`) VALUES (9, 'Java课程', 10, '2023-05-19 10:52:56', '2023-05-19 10:53:09');
INSERT INTO `payment_demo_blog`.`t_product` (`id`, `title`, `price`, `create_time`, `update_time`) VALUES (10, '大数据课程', 20, '2023-05-19 10:52:56', '2023-05-19 10:53:11');
3.创建yml配置
server:
  port: 9080

spring:
  application:
    name: wx-play-demo-blog
  datasource:
    type: com.zaxxer.hikari.HikariDataSource
    driver-class-name: com.p6spy.engine.spy.P6SpyDriver
    url: jdbc:p6spy:mysql://127.0.0.1:3306/payment_demo?useUnicode=true&characterEncoding=utf8&zeroDateTimeBehavior=convertToNull&useSSL=true&serverTimezone=GMT%2B8&rewriteBatchedStatements=true
    username: xxxxxxxxxxxxx
    password: xxxxxxxxx
  servlet:
    multipart:
      max-file-size: 200MB  #设置单个文件的大小  因为springboot内置tomact的的文件传输默认为10MB
      max-request-size: 500MB   #设置单次请求的文件总大小
      enabled: true    #千万注意要设置该参数,否则不生效
  mvc:
    format:
      date-time: yyyy-MM-dd HH:mm:ss
  #jackson配置
  jackson:
    # 日期格式化
    date-format: yyyy-MM-dd HH:mm:ss
    serialization:
      # 格式化输出
      INDENT_OUTPUT: false
      # 忽略无法转换的对象
      fail_on_empty_beans: false
    deserialization:
      # 允许对象忽略json中不存在的属性
      fail_on_unknown_properties: false

mybatis-plus:
  configuration:
    map-underscore-to-camel-case: true
    auto-mapping-behavior: full
    log-impl: org.apache.ibatis.logging.stdout.StdOutImpl
  mapper-locations: classpath*:mapper/*.xml

logging:
  level:
    root: info
三、创建配置文件
1.项目当中创建config目录存放配置文件
创建数据填充配置
package com.yby6.config;

import com.baomidou.mybatisplus.core.handlers.MetaObjectHandler;
import lombok.extern.slf4j.Slf4j;
import org.apache.ibatis.reflection.MetaObject;
import org.springframework.stereotype.Component;

import java.util.Date;

/**
 * 自动填充
 * @author Yang Shuai
 **/
@Slf4j
public class MyMetaObjectHandler implements MetaObjectHandler {

    @Override
    public void insertFill(MetaObject metaObject) {
        log.info("start insert fill ....");
        this.strictInsertFill(metaObject, "createTime", Date::new, Date.class); // 起始版本 3.3.3(推荐)
        this.strictUpdateFill(metaObject, "updateTime", Date::new, Date.class); // 起始版本 3.3.3(推荐)
    }

    @Override
    public void updateFill(MetaObject metaObject) {
        log.info("start update fill ....");
        this.strictUpdateFill(metaObject, "updateTime", Date::new, Date.class); // 起始版本 3.3.3(推荐)
    }
}
创建MyBatisPlusConfig配置
package com.yby6.config;

import cn.hutool.core.net.NetUtil;
import com.baomidou.mybatisplus.core.handlers.MetaObjectHandler;
import com.baomidou.mybatisplus.core.incrementer.DefaultIdentifierGenerator;
import com.baomidou.mybatisplus.core.incrementer.IdentifierGenerator;
import com.baomidou.mybatisplus.extension.plugins.MybatisPlusInterceptor;
import com.baomidou.mybatisplus.extension.plugins.inner.BlockAttackInnerInterceptor;
import com.baomidou.mybatisplus.extension.plugins.inner.OptimisticLockerInnerInterceptor;
import com.baomidou.mybatisplus.extension.plugins.inner.PaginationInnerInterceptor;
import org.mybatis.spring.annotation.MapperScan;
import org.springframework.context.annotation.Bean;
import org.springframework.context.annotation.Configuration;
import org.springframework.context.annotation.Primary;
import org.springframework.transaction.annotation.EnableTransactionManagement;

@Configuration
@MapperScan("com.yby6.mapper")
@EnableTransactionManagement(proxyTargetClass = true)
public class MyBatisPlusConfig {


    @Bean
    public MybatisPlusInterceptor mybatisPlusInterceptor() {
        MybatisPlusInterceptor interceptor = new MybatisPlusInterceptor();
        // 分页插件
        interceptor.addInnerInterceptor(paginationInnerInterceptor());
        // 乐观锁插件
        interceptor.addInnerInterceptor(optimisticLockerInnerInterceptor());
        // 针对 update 和 delete 语句 作用: 阻止恶意的全表更新删除
        interceptor.addInnerInterceptor(new BlockAttackInnerInterceptor());
        return interceptor;
    }

    /**
     * 分页插件,自动识别数据库类型
     */
    public PaginationInnerInterceptor paginationInnerInterceptor() {
        PaginationInnerInterceptor paginationInnerInterceptor = new PaginationInnerInterceptor();
        // 设置最大单页限制数量,默认 500 条,-1 不受限制
        paginationInnerInterceptor.setMaxLimit(-1L);
        // 分页合理化
        paginationInnerInterceptor.setOverflow(true);
        return paginationInnerInterceptor;
    }

    /**
     * 乐观锁插件
     */
    public OptimisticLockerInnerInterceptor optimisticLockerInnerInterceptor() {
        return new OptimisticLockerInnerInterceptor();
    }

    /**
     * 元对象字段填充控制器
     */
    @Bean
    public MetaObjectHandler metaObjectHandler() {
        return new MyMetaObjectHandler();
    }

    /**
     * 使用网卡信息绑定雪花生成器
     * 防止集群雪花ID重复
     */
    @Primary
    @Bean
    public IdentifierGenerator idGenerator() {
        return new DefaultIdentifierGenerator(NetUtil.getLocalhost());
    }


}
创建 jackson配置序列化时间
package com.yby6.config;


import com.fasterxml.jackson.databind.ser.std.ToStringSerializer;
import com.fasterxml.jackson.datatype.jsr310.JavaTimeModule;
import com.fasterxml.jackson.datatype.jsr310.deser.LocalDateTimeDeserializer;
import com.fasterxml.jackson.datatype.jsr310.ser.LocalDateTimeSerializer;
import lombok.extern.slf4j.Slf4j;
import org.springframework.boot.autoconfigure.AutoConfiguration;
import org.springframework.boot.autoconfigure.jackson.Jackson2ObjectMapperBuilderCustomizer;
import org.springframework.boot.autoconfigure.jackson.JacksonAutoConfiguration;
import org.springframework.context.annotation.Bean;

import java.math.BigDecimal;
import java.math.BigInteger;
import java.time.LocalDateTime;
import java.time.format.DateTimeFormatter;
import java.util.TimeZone;

/**
 * jackson 配置
 *
 * @author Yang Shuai
 */
@Slf4j
@AutoConfiguration(before = JacksonAutoConfiguration.class)
public class JacksonConfig {

    @Bean
    public Jackson2ObjectMapperBuilderCustomizer customizer() {
        return builder -> {
            // 全局配置序列化返回 JSON 处理
            JavaTimeModule javaTimeModule = new JavaTimeModule();
            javaTimeModule.addSerializer(Long.class, BigNumberSerializer.INSTANCE);
            javaTimeModule.addSerializer(Long.TYPE, BigNumberSerializer.INSTANCE);
            javaTimeModule.addSerializer(BigInteger.class, BigNumberSerializer.INSTANCE);
            javaTimeModule.addSerializer(BigDecimal.class, ToStringSerializer.instance);
            DateTimeFormatter formatter = DateTimeFormatter.ofPattern("yyyy-MM-dd HH:mm:ss");
            javaTimeModule.addSerializer(LocalDateTime.class, new LocalDateTimeSerializer(formatter));
            javaTimeModule.addDeserializer(LocalDateTime.class, new LocalDateTimeDeserializer(formatter));
            builder.modules(javaTimeModule);
            builder.timeZone(TimeZone.getDefault());
            log.info("初始化 jackson 配置");
        };
    }

}
创建 JS精度配置
package com.yby6.config;

import com.fasterxml.jackson.core.JsonGenerator;
import com.fasterxml.jackson.databind.SerializerProvider;
import com.fasterxml.jackson.databind.annotation.JacksonStdImpl;
import com.fasterxml.jackson.databind.ser.std.NumberSerializer;

import java.io.IOException;

/**
 * 超出 JS 最大最小值 处理
 *
 * @author Yang Shuai
 */
@JacksonStdImpl
public class BigNumberSerializer extends NumberSerializer {

    /**
     * 根据 JS Number.MAX_SAFE_INTEGER 与 Number.MIN_SAFE_INTEGER 得来
     */
    private static final long MAX_SAFE_INTEGER = 9007199254740991L;
    private static final long MIN_SAFE_INTEGER = -9007199254740991L;

    /**
     * 提供实例
     */
    public static final BigNumberSerializer INSTANCE = new BigNumberSerializer(Number.class);

    public BigNumberSerializer(Class<? extends Number> rawType) {
        super(rawType);
    }

    @Override
    public void serialize(Number value, JsonGenerator gen, SerializerProvider provider) throws IOException {
        // 超出范围 序列化位字符串
        if (value.longValue() > MIN_SAFE_INTEGER && value.longValue() < MAX_SAFE_INTEGER) {
            super.serialize(value, gen, provider);
        } else {
            gen.writeString(value.toString());
        }
    }
}
创建枚举参数前往仓库下载吧我不想贴了累了兄弟们
https://gitee.com/yangbuyi/wxDemo/tree/master/src/main/java/com/yby6/enums
创建返回对象
package com.yby6.reponse;

import java.io.Serial;
import java.io.Serializable;

/**
 * 响应信息主体
 *
 * @author Yang Shuai
 */
public class R<T> implements Serializable {
    /**
     * 成功
     */
    public static final int SUCCESS = 200;
    /**
     * 失败
     */
    public static final int FAIL = 500;
    @Serial
    private static final long serialVersionUID = 1L;
    /**
     * 消息状态码
     */
    private int code;

    /**
     * 消息内容
     */
    private String msg;

    /**
     * 数据对象
     */
    private T data;

    public static <T> R<T> ok() {
        return restResult(null, SUCCESS, "操作成功");
    }

    public static <T> R<T> ok(T data) {
        return restResult(data, SUCCESS, "操作成功");
    }

    public static <T> R<T> ok(String msg) {
        return restResult(null, SUCCESS, msg);
    }

    public static <T> R<T> ok(String msg, T data) {
        return restResult(data, SUCCESS, msg);
    }

    public static <T> R<T> fail() {
        return restResult(null, FAIL, "操作失败");
    }

    public static <T> R<T> fail(String msg) {
        return restResult(null, FAIL, msg);
    }

    public static <T> R<T> fail(T data) {
        return restResult(data, FAIL, "操作失败");
    }

    public static <T> R<T> fail(String msg, T data) {
        return restResult(data, FAIL, msg);
    }

    public static <T> R<T> fail(int code, String msg) {
        return restResult(null, code, msg);
    }

    public static <T> R<T> check(int row) {
        return row > 0 ? ok() : fail();
    }

    public static <T> R<T> check(boolean isTure) {
        return isTure ? ok() : fail();
    }


    /**
     * 返回警告消息
     *
     * @param msg 返回内容
     * @return 警告消息
     */
    public static <T> R<T> warn(String msg) {
        return restResult(null, 601, msg);
    }

    /**
     * 返回警告消息
     *
     * @param msg  返回内容
     * @param data 数据对象
     * @return 警告消息
     */
    public static <T> R<T> warn(String msg, T data) {
        return restResult(data, 601, msg);
    }

    private static <T> R<T> restResult(T data, int code, String msg) {
        R<T> r = new R<>();
        r.setCode(code);
        r.setData(data);
        r.setMsg(msg);
        return r;
    }

    public static <T> Boolean isError(R<T> ret) {
        return !isSuccess(ret);
    }

    public static <T> Boolean isSuccess(R<T> ret) {
        return R.SUCCESS == ret.getCode();
    }

    public int getCode() {
        return code;
    }

    public void setCode(int code) {
        this.code = code;
    }

    public String getMsg() {
        return msg;
    }

    public void setMsg(String msg) {
        this.msg = msg;
    }

    public T getData() {
        return data;
    }

    public void setData(T data) {
        this.data = data;
    }
}
创建MybatisExceptionHandler
package com.yby6.handler;

import com.yby6.reponse.R;
import jakarta.servlet.http.HttpServletRequest;
import lombok.extern.slf4j.Slf4j;
import org.mybatis.spring.MyBatisSystemException;
import org.springframework.dao.DuplicateKeyException;
import org.springframework.web.bind.annotation.ExceptionHandler;
import org.springframework.web.bind.annotation.RestControllerAdvice;


/**
 * Mybatis异常处理器
 *
 * @author Yang Shuai
 */
@Slf4j
@RestControllerAdvice
public class MybatisExceptionHandler {

    /**
     * 主键或UNIQUE索引,数据重复异常
     */
    @ExceptionHandler(DuplicateKeyException.class)
    public R<Void> handleDuplicateKeyException(DuplicateKeyException e, HttpServletRequest request) {
        String requestURI = request.getRequestURI();
        log.error("请求地址'{}',数据库中已存在记录'{}'", requestURI, e.getMessage());
        return R.fail("数据库中已存在该记录,请联系管理员确认");
    }

    /**
     * Mybatis系统异常 通用处理
     */
    @ExceptionHandler(MyBatisSystemException.class)
    public R<Void> handleCannotFindDataSourceException(MyBatisSystemException e, HttpServletRequest request) {
        String requestURI = request.getRequestURI();
        String message = e.getMessage();
        if (message.contains("CannotFindDataSourceException")) {
            log.error("请求地址'{}', 未找到数据源", requestURI);
            return R.fail("未找到数据源,请联系管理员确认");
        }
        log.error("请求地址'{}', Mybatis系统异常", requestURI, e);
        return R.fail(message);
    }

}
创建 spy.properties
p6spy 性能分析插件配置文件 存放在resources目录下
# p6spy 性能分析插件配置文件
modulelist=com.baomidou.mybatisplus.extension.p6spy.MybatisPlusLogFactory,com.p6spy.engine.outage.P6OutageFactory
# 自定义日志打印
logMessageFormat=com.baomidou.mybatisplus.extension.p6spy.P6SpyLogger
#日志输出到控制台
appender=com.baomidou.mybatisplus.extension.p6spy.StdoutLogger
# 使用日志系统记录 sql
#appender=com.p6spy.engine.spy.appender.Slf4JLogger
# 设置 p6spy driver 代理
#deregisterdrivers=true
# 取消JDBC URL前缀
useprefix=true
# 配置记录 Log 例外,可去掉的结果集有error,info,batch,debug,statement,commit,rollback,result,resultset.
excludecategories=info,debug,result,commit,resultset
# 日期格式
dateformat=yyyy-MM-dd HH:mm:ss
# SQL语句打印时间格式
databaseDialectTimestampFormat=yyyy-MM-dd HH:mm:ss
# 实际驱动可多个
#driverlist=org.h2.Driver
# 是否开启慢SQL记录
outagedetection=true
# 慢SQL记录标准 2 秒
outagedetectioninterval=2
# 是否过滤 Log
filter=true
# 过滤 Log 时所排除的 sql 关键字,以逗号分隔
exclude=SELECT 1
最终目录结构 微信配置暂时忽略

4.idea链接mysql

⚠️ 推荐一个插件一键生成CRUD
💰 MyBatisCodeHelperPro (Marketplace Edition)

🔗 打开链接好的数据库管理选择到对应的表右击


🦐 下面的选项卡里面的配置
- lombok 勾选 @Data
- 定制默认方法可以全部去掉
- mybatisPlus配置勾选 mybatisPlus3 和 idType选择为 ASSIGN_ID
- 其他的你看着来吧....
✅ 直接确定生成了一个CRUD 接下来将后面的三个表也一样的操作吧

👌 最终如此

5. 微信配置-基础支付API V3
1.引入支付参数配置
- 在resources当中创建wechat文件夹
- 创建
wxpay.properties复制到wechat当中
# 商户ID
wxpay.mch-id=xxxxx
# 商户平台号
wxpay.mch-serial-no=xxxxx
# 商户证书
wxpay.private-key-path=wechat/apiclient_key.pem

# 微信平台证书
wxpay.platformCertPath=wechat/wechatpay_2694B2E0B2719A25EE1063EE02CFC78EE035E8CF.pem
# 下载地址参考: https://github.com/wechatpay-apiv3/CertificateDownloader

# 商户api v3
wxpay.api-v3-key=xxxxx

# 小程序appid
wxpay.appid=xxxxx

# 小程序密钥
wxpay.secret=xxxxx

wxpay.domain=https://api.mch.weixin.qq.com

# 本地使用内网穿透代理回调
wxpay.notify-domain=https://x x x x x x x x x x x x/wx-api

# 商户apiv2
wxpay.partner-key=xxxxxxxxxxxxx
下载微信平台证书
java -jar CertificateDownloader.jar -k ${apiV3key} -m ${mchId} -f ${mchPrivateKeyFilePath} -s ${mchSerialNo} -o ${outputFilePath}

示例:

java -jar CertificateDownloader-1.2.0-jar-with-dependencies.jar
-k=商户v3key
-m=商户ID
-f=/Users/yangbuyi/Documents/workPath/workPath/wx-play-demo/src/main/resources/apiclient_key.pem
-s=商户证书序列号
-o=/Users/yangbuyi/Documents/workPath/workPath/wx-play-demo/src/main/resources

解释:

java -jar CertificateDownloader-1.2.0-jar-with-dependencies.jar
-k=这是对应配置文件当中的 APIV3Key(wxpay.api-v3-key)商户APIV3Key
-m=这是对应配置文件当中的 mchID (wxpay.mch-id) 商户ID
-f=这是对应配置文件当中到 商户证书 apiclient_key.pem  (绝对路径地址)
-s=这是对应配置文件当中的 mchSerialNo(wxpay.mch-serial-no)商户平台证书序列号
-o=这是将生成的文件输出到哪个目录下面 (绝对路径地址)
这个文件定义了之前我们准备的微信支付相关的参数,例如商户号、APPID、API秘钥等等
完整

创建 WxPayConfig 类
存放在config目录
package com.yby6.config;

import com.wechat.pay.contrib.apache.httpclient.WechatPayHttpClientBuilder;
import com.wechat.pay.contrib.apache.httpclient.auth.PrivateKeySigner;
import com.wechat.pay.contrib.apache.httpclient.auth.ScheduledUpdateCertificatesVerifier;
import com.wechat.pay.contrib.apache.httpclient.auth.WechatPay2Credentials;
import com.wechat.pay.contrib.apache.httpclient.auth.WechatPay2Validator;
import com.wechat.pay.contrib.apache.httpclient.util.PemUtil;
import lombok.Data;
import lombok.extern.slf4j.Slf4j;
import org.apache.http.impl.client.CloseableHttpClient;
import org.springframework.boot.context.properties.ConfigurationProperties;
import org.springframework.context.annotation.Bean;
import org.springframework.context.annotation.Configuration;
import org.springframework.context.annotation.PropertySource;

import java.io.FileNotFoundException;
import java.io.InputStream;
import java.nio.charset.StandardCharsets;
import java.security.PrivateKey;


@Configuration
@PropertySource("classpath:wechat/wxpay.properties") //读取配置文件
@ConfigurationProperties(prefix = "wxpay") //读取wxpay节点
@Data //使用set方法将wxpay节点中的值填充到当前类的属性中
@Slf4j
public class WxPayConfig {

    // 商户号
    private String mchId;

    // 商户API证书序列号
    private String mchSerialNo;

    // 商户私钥文件
    private String privateKeyPath;

    // 微信平台证书
    private String platformCertPath;

    // APIv3密钥
    private String apiV3Key;

    // APPID
    private String appid;

    // app secret
    private String secret;

    // 微信服务器地址
    private String domain;

    // 接收结果通知地址
    private String notifyDomain;

    // APIv2密钥
    private String partnerKey;


    /**
     * 获取商户的私钥文件
     */
    public PrivateKey getPrivateKey(String filename) {

        try {
            InputStream inputStream = getClass().getClassLoader().getResourceAsStream(filename);
            if (inputStream == null) {
                throw new FileNotFoundException("私钥文件不存在");
            }
            return PemUtil.loadPrivateKey(inputStream);
        } catch (Exception e) {
            throw new RuntimeException("私钥文件不存在", e);
        }
    }

    /**
     * 获取签名验证器
     */
    @Bean
    public ScheduledUpdateCertificatesVerifier getVerifier() {

        log.info("构建签名验证器");
        log.info("mchId: {}", mchId);
        log.info("mchSerialNo: {}", mchSerialNo);
        log.info("privateKeyPath: {}", privateKeyPath);
        log.info("apiV3Key: {} , {}", apiV3Key , apiV3Key.length());
        log.info("appid: {}", appid);
        log.info("domain: {}", domain);
        log.info("notifyDomain: {}", notifyDomain);
        log.info("partnerKey: {} , {}", partnerKey , partnerKey.length());

        //获取商户私钥
        PrivateKey privateKey = getPrivateKey(privateKeyPath);

        //私钥签名对象
        PrivateKeySigner privateKeySigner = new PrivateKeySigner(mchSerialNo, privateKey);

        //身份认证对象
        WechatPay2Credentials wechatPay2Credentials = new WechatPay2Credentials(mchId, privateKeySigner);

        // 使用定时更新的签名验证器,不需要传入证书 -> 它会帮助我们下载最新的证书不会进行过期
        return new ScheduledUpdateCertificatesVerifier(wechatPay2Credentials, apiV3Key.getBytes(StandardCharsets.UTF_8));
    }


    /**
     * 获取http请求对象
     */
    @Bean(name = "wxPayClient")
    public CloseableHttpClient getWxPayClient(ScheduledUpdateCertificatesVerifier verifier) {

        log.info("获取httpClient");

        //获取商户私钥
        PrivateKey privateKey = getPrivateKey(privateKeyPath);

        WechatPayHttpClientBuilder builder = WechatPayHttpClientBuilder.create()
                // 设置商户信息
                .withMerchant(mchId, mchSerialNo, privateKey)
                // 设置验签器
                .withValidator(new WechatPay2Validator(verifier));
        // ... 接下来,你仍然可以通过builder设置各种参数,来配置你的HttpClient

        // 通过WechatPayHttpClientBuilder构造的HttpClient,会自动的处理签名和验签,并进行证书自动更新
        return builder.build();
    }

    /**
     * 获取HttpClient,无需进行应答签名验证,跳过验签的流程
     */
    @Bean(name = "wxPayNoSignClient")
    public CloseableHttpClient getWxPayNoSignClient() {

        //获取商户私钥
        PrivateKey privateKey = getPrivateKey(privateKeyPath);

        //用于构造HttpClient
        WechatPayHttpClientBuilder builder = WechatPayHttpClientBuilder.create()
                //设置商户信息
                .withMerchant(mchId, mchSerialNo, privateKey)
                //无需进行签名验证、通过withValidator((response) -> true)实现
                .withValidator((response) -> true);

        // 通过WechatPayHttpClientBuilder构造的HttpClient,会自动的处理签名和验签,并进行证书自动更新
        CloseableHttpClient httpClient = builder.build();

        log.info("== getWxPayNoSignClient END ==");

        return httpClient;
    }

}
最终如此

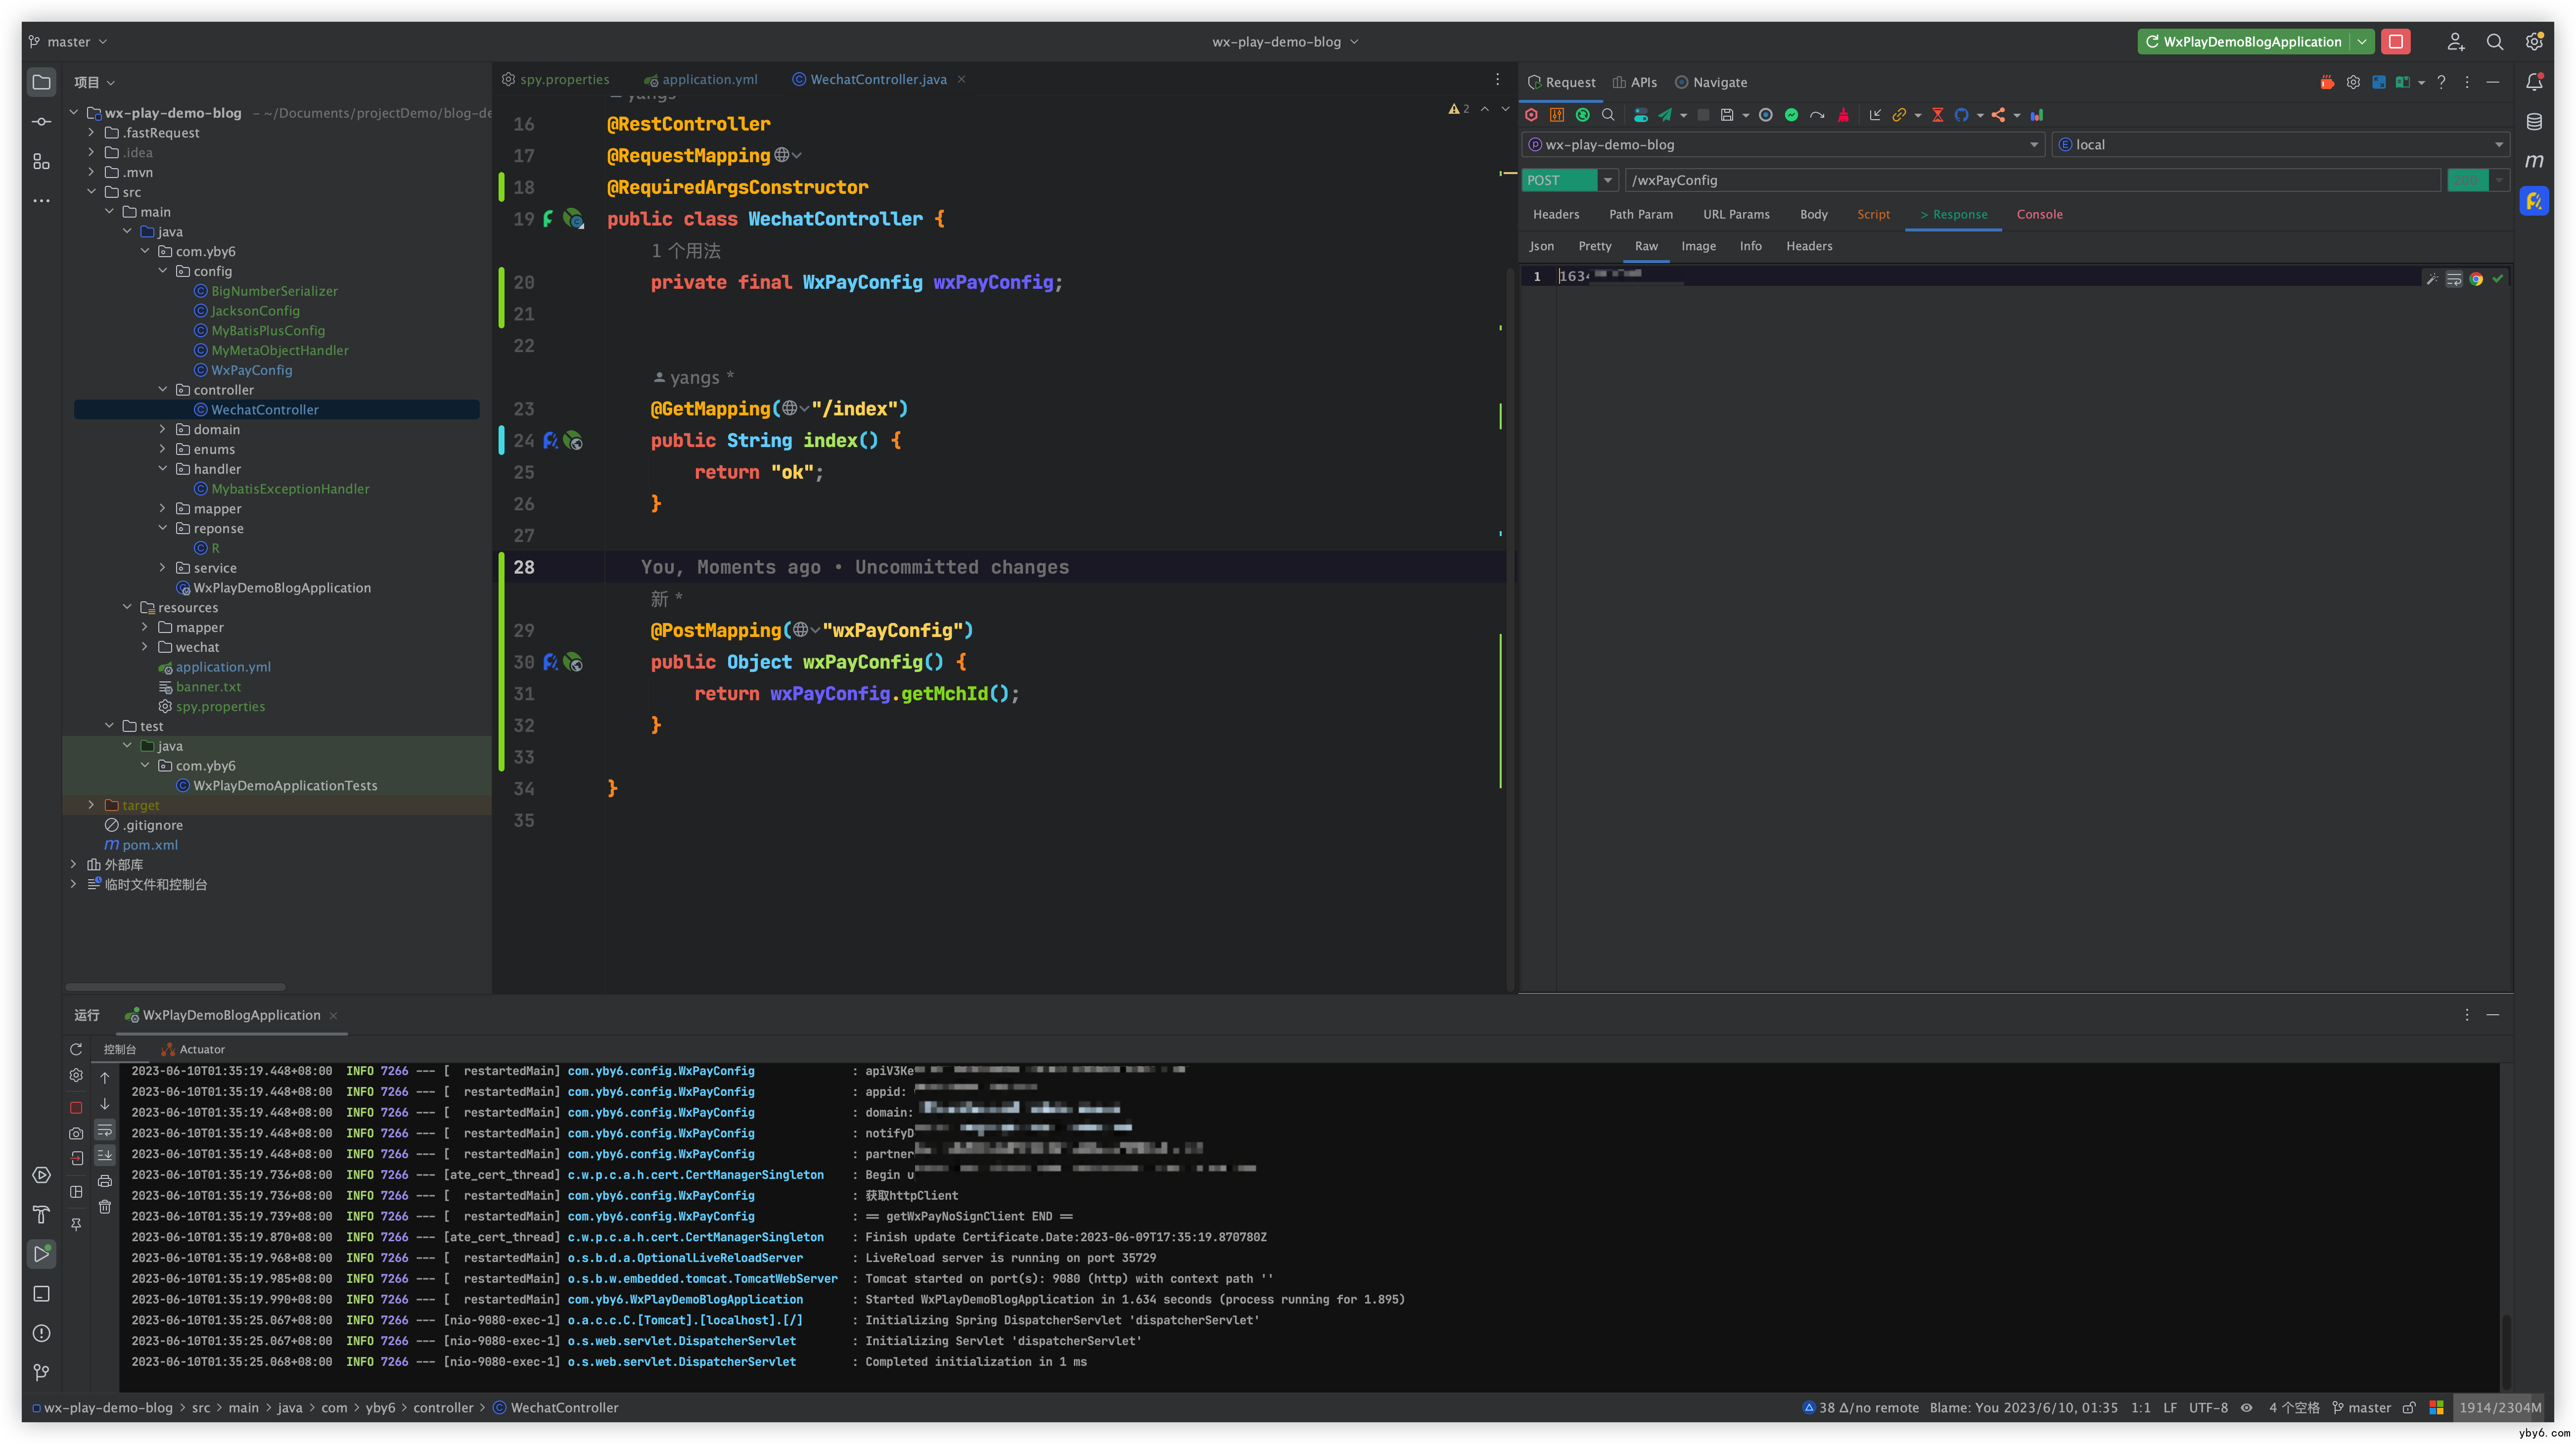
四、测试项目
🥬 创建Controller
package com.yby6.controller;

import cn.hutool.json.JSONUtil;
import com.yby6.config.WxPayConfig;
import com.yby6.service.WxPayService;
import lombok.RequiredArgsConstructor;
import org.springframework.web.bind.annotation.GetMapping;
import org.springframework.web.bind.annotation.PostMapping;
import org.springframework.web.bind.annotation.RequestMapping;
import org.springframework.web.bind.annotation.RestController;

/**
 * @author Yang Shuai
 * Create By 2023/6/8
 */
@RestController
@RequestMapping
@RequiredArgsConstructor
public class WechatController {
    private final WxPayConfig wxPayConfig;


    @GetMapping("/index")
    public String index() {
        return "ok";
    }


    @PostMapping("getMchId")
    public Object getMchId() {
        return wxPayConfig.getMchId();
    }

}
🔥 启动项目

🐑 IDEA插件对标PostMan
Restful Fast Request

🚗 测试