目录
1 一个爬图片pic的代码的例子
1.1 学习的原文章
1.2 原始代码的问题总结
问题1
问题2
问题3
其他问题
1.3 原始代码
2 直接在cmd里 python运行报错 和 处理
2.1 运行报错
2.2 报错原因: 没有提前安装这个bs4 模块
2.3 如何提前知道我的python环境下有没有安装bs4 或其他模块呢
2.3.1 查看所有python版本的命令
2.3.2 pip list 列表显示
2.3.3 pip show 模块 命令
2.3.4 pip 的其他常用命令,详细了解一下
2.3.5 不太好用的命令
2.3.6 安装好 bs4后,问题可以解决
3 如果选择在anaconda下 使用 bs4 (BeautifulSoup)
3.1 anaconda下运行python,跑这个脚本
3.2 遇到报错1:ImportError: cannot import name 'beautifulsoup' from 'bs4'
要注意BeautifulSoup 必须 首字母大写! beautifulsoup会导致报错
3.3 排除上面的报错后,运行后为空的问题
3.4 增加其他状态码,查找原因
3.5 尝试加headers伪装下看看,OK了!
3.5.1 加了headers可以正常访问了
3.5.2 把输出的内容修改为 规范输出
4 翻页处理
4.1 翻页和网页url 变化
4.2 从查找单页----变成查看并下载多页的pic
4.3 改进代码,存储到自己设定文件夹
发现问题所在
4.4 修正只能下载第1页图片的问题
4.5 优化代码: 本地路径用变量存起来,多次运行重复下载图片问题
5 再就是过程中,遇到的报错和改正方法
5.1 字符串 连接错误
TypeError: can only concatenate str (not “int“) to str
5.2 字符串 连接错误
SyntaxError: unterminated string literal
5.3 意外缩进 IndentationError: unexpected indent
5.4 语法错误 SyntaxError:
5.5 拼写错误 AttributeError: NameError: 等等
1 一个爬图片pic的代码的例子
1.1 学习的原文章
- 本文是根据这个文章基础上进行学习的
- 但是学习过程中,发现不少问题
- 下面就是遇到的问题,和解决问题的过程
https://cloud.tencent.com/developer/article/1706288前面我们一起完成了一个数据清洗的实战教程。现在,我们一起来学习数据采集的相关知识。![]() https://cloud.tencent.com/developer/article/1706288
https://cloud.tencent.com/developer/article/1706288
1.2 原始代码的问题总结
问题1
- from bs4 import beautifulsoup # 应该大写 BeautifulSoup
问题2
- 不应该随便吧文件pic下载在 默认的 系统用户的文件夹,而应该指定自己文件夹位置
- #存哪儿呢?当前目录?
#居然给存到这来了 C:\Users\Administrator\picture 这里是os的根目录? - if not os.path.exists(r'picture'):
- os.mkdir(r'picture')
- 而应该指定自己文件夹位置,并且我感觉最好每页单独一个文件夹
- 修改为
- if not os.path.exists(r'E:\work\FangCloudV2\personal_space\2learn\python3\picture\page'+str(page)):
问题3
- url="https://movie.douban.com/celebrity/1315477/photos/?type=C&start={}&sortby=like&size=a&subtype=a"
- 这里不应该是 {}
- 而应该是用参数 s% 代替
- url="https://movie.douban.com/celebrity/1315477/photos/?type=C&start=%s&sortby=like&size=a&subtype=a" %i
其他问题
- 小问题,应该从page=1 开始
- 我自己遇到很多BUG,语法不熟悉了
- 一些新的内容还只会照着写,需要学习下
1.3 原始代码
- 下面这段是爬一些图片pic的代码
- 最近学写了一段bs的代码,里面用到了bs
- 但是运行起来磕磕碰碰,各种报错
#E:\work\FangCloudV2\personal_space\2learn\python3\py0001.txt


import requests
from bs4 import beautifulsoup    # 应该大写 BeautifulSoup

url="https://movie.douban.com/celebrity/1315477/photos/"
res=requests.get(url)
content= BeautifulSoup(res.text, "html.parser")
data=content.find_all("div",attrs={'class':'cover'})
picture_list=[]

for d in data:
    plist=d.find("img")["src"]
    picture_list.append(plist)
print (picture_list)
万茜 Qian Wan 图片万茜最新图片![]() https://movie.douban.com/celebrity/1315477/photos/
https://movie.douban.com/celebrity/1315477/photos/

2 直接在cmd里 python运行报错 和 处理
2.1 运行报错
- 运行cmd
- python 文件 报错
- 报错内容: ModuleNotFoundError: No module named 'bs4'

2.2 报错原因: 没有提前安装这个bs4 模块
- 这个报错的原因,是因为在默认的python目录下并没有安装 bs4 (BeautifulSoup)这个模块,无法导入,当然会报错
- 但是如果是以下情况,就不会遇到这个报错
- 如果是,先在默认python下安装了 bs4 ,就不会遇到这种报错
- 如果是,直接使用 anaconda环境下的 cmd 或者 spygt ,pythoncharm 运行python就一般不会,因为anaconda里预装了bs4
2.3 如何提前知道我的python环境下有没有安装bs4 或其他模块呢
- 接下来的问题就是
- (因为使用的电脑环境并不一定是自己安装的环境,也可能很久后忘记了)我是否可以在安装前知道,已经安装了 bs4?
- 同样,我想知道是否已经安装过 pip ,requeset 等其他模块
- 这些模块装在哪儿呢?
2.3.1 查看所有python版本的命令
- py -0p
- 可以查看电脑中所有的 python版本
- 其中* 号是默认的版本
- 我这里显示1个是默认的,一个 anaconda里的
- 但是查看的是python的版本号等
2.3.2 pip list 列表显示
- pip list
- pip list --format=columns
- 可以查看pip下的已有各种模块
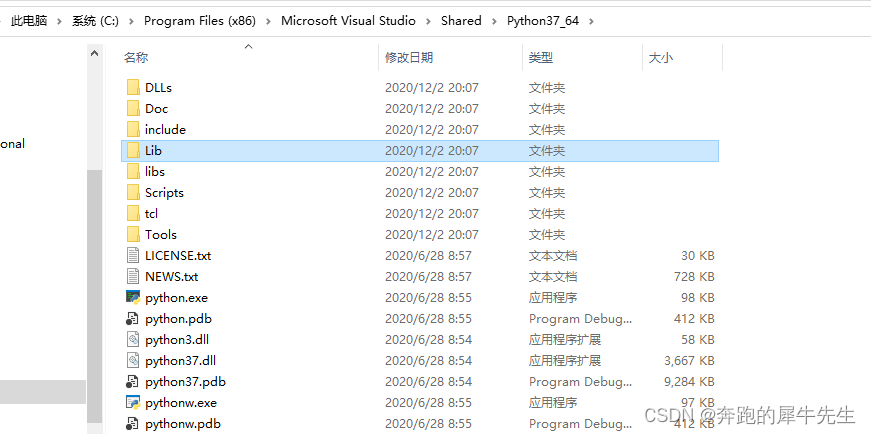
- 而这个pip list 显示的各个模块,实际对应硬盘上的哪个路径呢?--PC上可以实际找一下,可以对应上这个文件夹
- Python311\site-packages
- \Python37_64\Lib\site-packages\pip\_vendor
- C:\Program Files (x86)\Microsoft Visual Studio\Shared\Python37_64\Lib\site-packages\pip\_vendor


- \Python37_64\Lib\site-packages\pip\_vendor

2.3.3 pip show 模块 命令
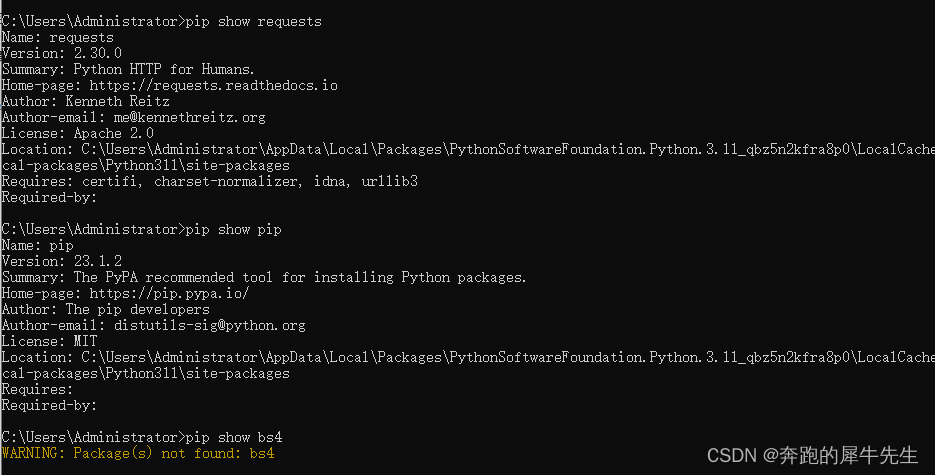
- pip show pip
- pip show requests
- 显示详细信息: name , version ,安装位置等
- 如果是没有安装的模块,就会找不到,比如这里的 bs4 就显示not found
2.3.4 pip 的其他常用命令,详细了解一下
从上面看出, pip 有很多命令是很有用,很方便的,那么详细了解一下
- pip --help # 可以查看帮助,全部命令
- pip help
- pip --version
- 列表
- pip list
- pip list -0
- 查看
- pip show XXX模块
- pip search XXX
- 安装等
- pip install
- pip install --upgrade XXX
- pip uninstall

Commands:
- install Install packages.
- download Download packages.
- uninstall Uninstall packages.
- freeze Output installed packages in requirements format.
- inspect Inspect the python environment.
- list List installed packages.
- show Show information about installed packages.
- check Verify installed packages have compatible dependencies.
- config Manage local and global configuration.
- search Search PyPI for packages.
- cache Inspect and manage pip's wheel cache.
- index Inspect information available from package indexes.
- wheel Build wheels from your requirements.
- hash Compute hashes of package archives.
- completion A helper command used for command completion.
- debug Show information useful for debugging.
- help Show help for commands.
General Options:
- -h, --help Show help.
- --debug Let unhandled exceptions propagate outside the main subroutine, instead of logging them
- to stderr.
- --isolated Run pip in an isolated mode, ignoring environment variables and user configuration.
- --require-virtualenv Allow pip to only run in a virtual environment; exit with an error otherwise.
- --python <python> Run pip with the specified Python interpreter.
- -v, --verbose Give more output. Option is additive, and can be used up to 3 times.
- -V, --version Show version and exit.
- -q, --quiet Give less output. Option is additive, and can be used up to 3 times (corresponding to
- WARNING, ERROR, and CRITICAL logging levels).
- --log <path> Path to a verbose appending log.
- --no-input Disable prompting for input.
- --keyring-provider <keyring_provider>
- Enable the credential lookup via the keyring library if user input is allowed. Specify
- which mechanism to use [disabled, import, subprocess]. (default: disabled)
- --proxy <proxy> Specify a proxy in the form scheme://[user:passwd@]proxy.server:port.
- --retries <retries> Maximum number of retries each connection should attempt (default 5 times).
- --timeout <sec> Set the socket timeout (default 15 seconds).
- --exists-action <action> Default action when a path already exists: (s)witch, (i)gnore, (w)ipe, (b)ackup,
- (a)bort.
- --trusted-host <hostname> Mark this host or host:port pair as trusted, even though it does not have valid or any
- HTTPS.
- --cert <path> Path to PEM-encoded CA certificate bundle. If provided, overrides the default. See 'SSL
- Certificate Verification' in pip documentation for more information.
- --client-cert <path> Path to SSL client certificate, a single file containing the private key and the
- certificate in PEM format.
- --cache-dir <dir> Store the cache data in <dir>.
- --no-cache-dir Disable the cache.
- --disable-pip-version-check
- Don't periodically check PyPI to determine whether a new version of pip is available for
- download. Implied with --no-index.
- --no-color Suppress colored output.
- --no-python-version-warning
- Silence deprecation warnings for upcoming unsupported Pythons.
- --use-feature <feature> Enable new functionality, that may be backward incompatible.
- --use-deprecated <feature> Enable deprecated functionality, that will be removed in the future.
2.3.5 不太好用的命令
- python -m site
- 显示的是 py3.7这一层目录的文件夹目录位置!!
- C:\Program Files (x86)\Microsoft Visual Studio\Shared\Python37_64
- 而不是pip 下安装模块的文件夹目录位置!!
- C:\Program Files (x86)\Microsoft Visual Studio\Shared\Python37_64\Lib\site-packages\pip\_vendor

2.3.6 安装好 bs4后,问题可以解决
3 如果选择在anaconda下 使用 bs4 (BeautifulSoup)
3.1 anaconda下运行python,跑这个脚本
- 我没有继续在python 默认路径下安装bs4
- 而是选择在 anaconda下,运行cmd,
- 因为这里是已经安装了 bs4的,不会因为找不到bs4模块而报错
可以找到BS4已经安装了

可以在这里运行python

- 注意这里是在 anaconda下启动的 cmd

3.2 遇到报错1:ImportError: cannot import name 'beautifulsoup' from 'bs4'
要注意BeautifulSoup 必须 首字母大写! beautifulsoup会导致报错
- ImportError: cannot import name 'beautifulsoup' from 'bs4' (e:\ProgramData\anaconda3\lib\site-packages\bs4\__init__.py)

- from bs4 import beautifulsoup 错误导致
- 修改首字母大写即可解决这个问题
- from bs4 import BeautifulSoup

3.3 排除上面的报错后,运行后为空的问题
- 修改import BeautifulSoup 大写首字母
- 排除了上面的错误拼写问题后,可以运行了
- 但是运行后,只返还了一个空列表 ,怀疑是没有加headers 被拒绝了。。。
- 下面是运行结果
#E:\work\FangCloudV2\personal_space\2learn\python3\py0001.txt


import requests
from bs4 import BeautifulSoup

url="https://movie.douban.com/celebrity/1315477/photos/"
res=requests.get(url)
content= BeautifulSoup(res.text, "html.parser")
data=content.find_all("div",attrs={'class':'cover'})
picture_list=[]

for d in data:
    plist=d.find("img")["src"]
    picture_list.append(plist)
print (picture_list)
![]()
3.4 增加其他状态码,查找原因
- 加了一些debug 代码
- 看返回的状态码,果然发现原因:是被豆瓣程序员鄙视了 - - ~
#E:\work\FangCloudV2\personal_space\2learn\python3\py0001.txt


import requests
from bs4 import BeautifulSoup

url="https://movie.douban.com/celebrity/1315477/photos/"
res=requests.get(url)
content= BeautifulSoup(res.text, "html.parser")
data=content.find_all("div",attrs={'class':'cover'})
picture_list=[]

for d in data:
    plist=d.find("img")["src"]
    picture_list.append(plist)
print (picture_list)

print (res)
print (res.status_code)
print (res.text)
print (res.content.decode())

3.5 尝试加headers伪装下看看,OK了!
3.5.1 加了headers可以正常访问了
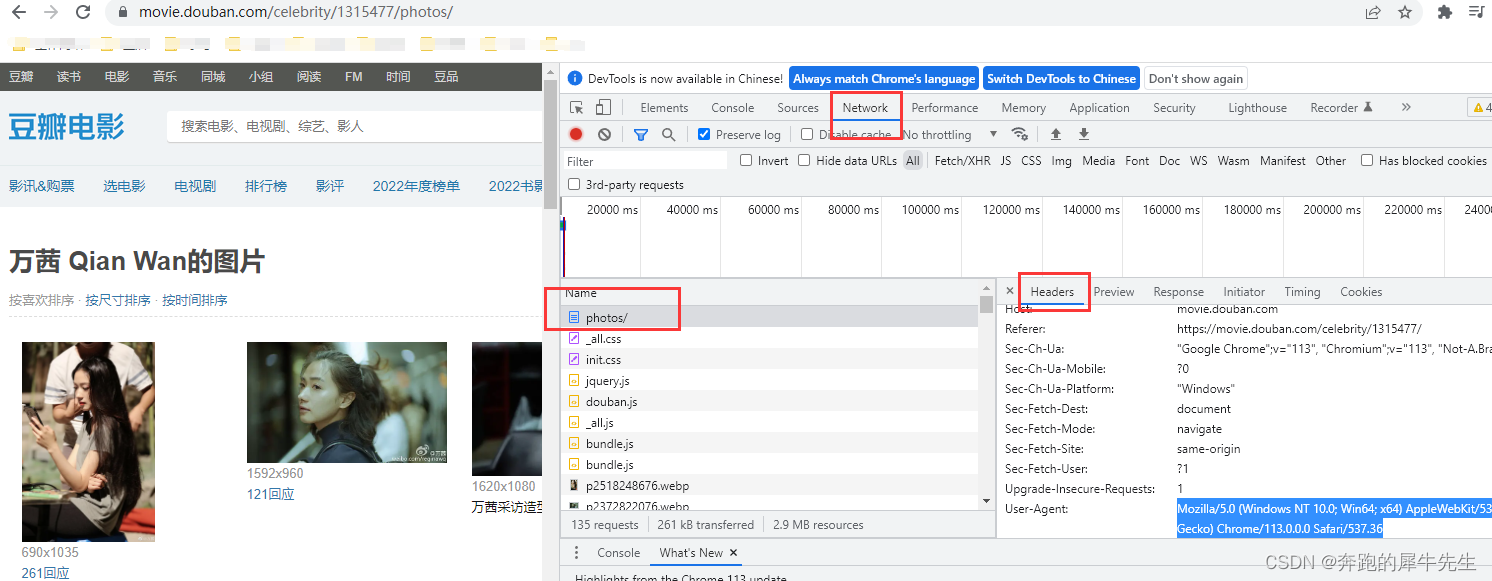
- 网站上检查
- 找到requesets.headers,找到 user-agent 信息
- 修改代码,增加 headers
- 可以正常返回信息了
import requests
from bs4 import BeautifulSoup

ua1="Mozilla/5.0 (Windows NT 10.0; Win64; x64) AppleWebKit/537.36 (KHTML, like Gecko) Chrome/113.0.0.0 Safari/537.36"
headers={"user-agent":ua1}

url="https://movie.douban.com/celebrity/1315477/photos/"
res=requests.get(url,headers=headers)
content= BeautifulSoup(res.text, "html.parser")
data=content.find_all("div",attrs={'class':'cover'})
picture_list=[]

for d in data:
    plist=d.find("img")["src"]
    picture_list.append(plist)
print (picture_list)

print (res)
print (res.status_code)
#print (res.text)
#print (res.content.decode())
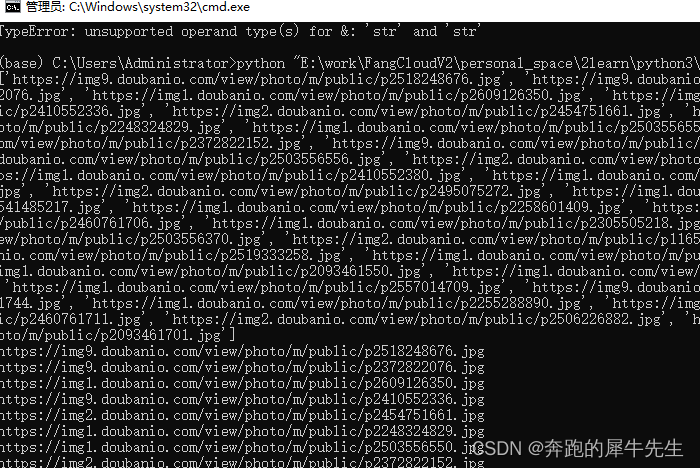
3.5.2 把输出的内容修改为 规范输出
- 每次print一个内容,都换行
- 见下面
#E:\work\FangCloudV2\personal_space\2learn\python3\py0001.txt


import requests
from bs4 import BeautifulSoup

ua1="Mozilla/5.0 (Windows NT 10.0; Win64; x64) AppleWebKit/537.36 (KHTML, like Gecko) Chrome/113.0.0.0 Safari/537.36"
headers={"user-agent":ua1}

url="https://movie.douban.com/celebrity/1315477/photos/"
res=requests.get(url,headers=headers)
content= BeautifulSoup(res.text, "html.parser")
data=content.find_all("div",attrs={'class':'cover'})
picture_list=[]

for d in data:
    plist=d.find("img")["src"]
    picture_list.append(plist)
print (picture_list)


for p1  in picture_list:
      print (p1,end="\n")   # 据说也可以 sep='\n'


print (res)
print (res.status_code)
#print (res.text)
#print (res.content.decode())
4 翻页处理
4.1 翻页和网页url 变化
- 点击翻页可以看到页面变化,URL也跟着变化
- 每页30张pic
- 所以url 变化的部分也是30,60.。。这样

- 第1页url :https://movie.douban.com/celebrity/1315477/photos/
- 第2页url :https://movie.douban.com/celebrity/1315477/photos/?type=C&start=30&sortby=like&size=a&subtype=a
- 第3页url :https://movie.douban.com/celebrity/1315477/photos/?type=C&start=60&sortby=like&size=a&subtype=a
- ....
- 最后1页url:https://movie.douban.com/celebrity/1315477/photos/?type=C&start=2160&sortby=like&size=a&subtype=a
4.2 从查找单页----变成查看并下载多页的pic
- page1() 是主函数,也是多页查询函数
- request1() 是单页内的查询函数
- download_picture() 是下载函数
#存哪儿呢?当前目录?
#居然给存到这来了 C:\Users\Administrator\picture 这里是os的根目录?
#文件夹里的pic次序不是按网页下载的次序,而是按文件名的排序。。。而且不好改
#但是只有第1页的pic下载了,而且页码也只是从1到71,而不是73?
#E:\work\FangCloudV2\personal_space\2learn\python3\py0001.txt


import requests
import os
import time
from bs4 import BeautifulSoup

def page1():
    ua1="Mozilla/5.0 (Windows NT 10.0; Win64; x64) AppleWebKit/537.36 (KHTML, like Gecko) Chrome/113.0.0.0 Safari/537.36"
    headers={"user-agent":ua1}
    #url="https://movie.douban.com/celebrity/1315477/photos/"
    #res=requests.get(url,headers=headers)
    page=0

    for i in range(0,2160,30):
        print("开始爬第%s页"%page)
        url="https://movie.douban.com/celebrity/1315477/photos/?type=C&start={}&sortby=like&size=a&subtype=a"
        res=requests.get(url,headers=headers)
        #调用函数1,单页查询
        data=request1(res)
        #调用函数2,图片下载
        download_picture(data)
        page=page+1
        time.sleep(3)    #我还是怂一点好

def request1(res):
    content= BeautifulSoup(res.text, "html.parser")
    data=content.find_all("div",attrs={'class':'cover'})
    picture_list=[]
    print (res.status_code)

    for d in data:
        plist=d.find("img")["src"]
        print (d,end="\n")
        picture_list.append(plist)

    return picture_list


def download_picture(pic_l):
    if not os.path.exists(r'picture'):
    #存哪儿呢?当前目录?
    #居然给存到这来了  C:\Users\Administrator\picture 这里是os的根目录?
    #文件夹里的pic次序不是按网页下载的次序,而是按文件名的排序。。。而且不好改
    #但是只有第1页的pic下载了,而且页码也只是从1到71,而不是73?
        os.mkdir(r'picture')
    for i in pic_l:
        pic=requests.get(i)
        p_name=i.split('/')[7]
        with open('picture\\'+p_name,'wb') as f:
            f.write(pic.content)


page1()
C:\Users\Administrator\picture


4.3 改进代码,存储到自己设定文件夹
改进内容
- 指定文件加位置,而不是下载默认的 系统用户的pic文件夹里去了
- 页数从1开始,因为网页的pic 也是第1页,而不是第0页
- 可以显示每次的实际url,而且地址里包含了 s%
- 但是还是只下载了第1页的内容
#E:\work\FangCloudV2\personal_space\2learn\python3\py0001.txt


import requests
import os
import time
from bs4 import BeautifulSoup

def page1():
    ua1="Mozilla/5.0 (Windows NT 10.0; Win64; x64) AppleWebKit/537.36 (KHTML, like Gecko) Chrome/113.0.0.0 Safari/537.36"
    headers={"user-agent":ua1}
    #url="https://movie.douban.com/celebrity/1315477/photos/"
    #res=requests.get(url,headers=headers)
    #网页页面从1开始,这里也应该从1开始
    page=1

    for i in range(0,90,30):
        print("开始爬第%s页"%page)
        url="https://movie.douban.com/celebrity/1315477/photos/?type=C&start={%s}&sortby=like&size=a&subtype=a" %i
        print (str(url))
        res=requests.get(url,headers=headers)
        #调用函数1,单页查询
        data=request1(res)
        #调用函数2,图片下载
        download_picture(data)
        page=page+1
        time.sleep(3)    #我还是怂一点好

def request1(res):
    content= BeautifulSoup(res.text, "html.parser")
    data=content.find_all("div",attrs={'class':'cover'})
    picture_list=[]
    print (res.status_code)

    for d in data:
        plist=d.find("img")["src"]
        print (d,end="\n")
        picture_list.append(plist)

    return picture_list


def download_picture(pic_l):
    if not os.path.exists(r'E:\work\FangCloudV2\personal_space\2learn\python3'+ '\picture'):
    #存哪儿呢?当前目录?
    #居然给存到这来了  C:\Users\Administrator\picture 这里是os的根目录?
    #文件夹里的pic次序不是按网页下载的次序,而是按文件名的排序。。。而且不好改
    #但是只有第1页的pic下载了,而且页码也只是从1到71,而不是73?
        os.mkdir(r'E:\work\FangCloudV2\personal_space\2learn\python3'+'\picture')
    for i in pic_l:
        pic=requests.get(i)
        p_name=i.split('/')[7]
       #注意路径包含特殊的符号\等,为了防止被解释为转义,要用原始数据r开头
        with open(r'E:\work\FangCloudV2\personal_space\2learn\python3\picture\\'+p_name, 'wb') as f:
            f.write(pic.content)


page1()


发现问题所在
- 每次遍历的图片,都是同一批,都是第一页的图片,从文件名能看出来
- 虽然3次的url确实不一样
- 我把3次的url贴到浏览器,居然都指向第1页。。。。这个URL应该有问题


4.4 修正只能下载第1页图片的问题
- 修改后
- 会根据页面创建不同的文件夹,把对应页面的pic放进去
- OK了
#E:\work\FangCloudV2\personal_space\2learn\python3\py0001.txt


import requests
import os
import time
from bs4 import BeautifulSoup

def page1():
    ua1="Mozilla/5.0 (Windows NT 10.0; Win64; x64) AppleWebKit/537.36 (KHTML, like Gecko) Chrome/113.0.0.0 Safari/537.36"
    headers={"user-agent":ua1}
    #url="https://movie.douban.com/celebrity/1315477/photos/"
    #res=requests.get(url,headers=headers)
    #网页页面从1开始,这里也应该从1开始
    page=1

    for i in range(0,90,30):
        print("开始爬第%s页"%page)
        url="https://movie.douban.com/celebrity/1315477/photos/?type=C&start=%s&sortby=like&size=a&subtype=a" %i
        print (str(url))
        res=requests.get(url,headers=headers)
        #调用函数1,单页查询
        data=request1(res)
        #调用函数2,图片下载
        download_picture(data,page)
        page=page+1
        time.sleep(3)    #我还是怂一点好

def request1(res):
    content= BeautifulSoup(res.text, "html.parser")
    data=content.find_all("div",attrs={'class':'cover'})
    picture_list=[]
    print (res.status_code)

    for d in data:
        plist=d.find("img")["src"]
        print (d,end="\n")
        picture_list.append(plist)

    return picture_list


def download_picture(pic_l,page):
    if not os.path.exists(r'E:\work\FangCloudV2\personal_space\2learn\python3\picture\page'+str(page)):
        #必须str(page) 而不是+page
        os.mkdir(r'E:\work\FangCloudV2\personal_space\2learn\python3\picture\page'+str(page))

    for i in pic_l:
        pic=requests.get(i)
        p_name=i.split('/')[7]
       #注意路径包含特殊的符号\等,为了防止被解释为转义,要用原始数据r开头
        with open(r'E:\work\FangCloudV2\personal_space\2learn\python3\picture\page'+str(page)+'\\'+p_name, 'wb') as f:
            f.write(pic.content)


page1()


4.5 优化代码: 本地路径用变量存起来,多次运行重复下载图片问题
前面代码里的问题
- 多次运行,会发现每个文件夹里的内容会重复下载多份?但是这次居然没有了?自己好了?
- 本地路径代码应该用变量存起来!而不是写在多句语句里!OK了
#E:\work\FangCloudV2\personal_space\2learn\python3\py0001.txt


import requests
import os
import time
from bs4 import BeautifulSoup

def page1():
    ua1="Mozilla/5.0 (Windows NT 10.0; Win64; x64) AppleWebKit/537.36 (KHTML, like Gecko) Chrome/113.0.0.0 Safari/537.36"
    headers={"user-agent":ua1}
    #url="https://movie.douban.com/celebrity/1315477/photos/"
    #res=requests.get(url,headers=headers)
    #网页页面从1开始,这里也应该从1开始
    page=1

    for i in range(0,90,30):
        print("开始爬第%s页"%page)
        url="https://movie.douban.com/celebrity/1315477/photos/?type=C&start=%s&sortby=like&size=a&subtype=a" %i
        print ("本次爬的地址是: "+str(url))
        res=requests.get(url,headers=headers)
        #调用函数1,单页查询
        data=request1(res)
        #调用函数2,图片下载
        download_picture(data,page)
        page=page+1
        time.sleep(3)    #我还是怂一点好

def request1(res):
    content= BeautifulSoup(res.text, "html.parser")
    data=content.find_all("div",attrs={'class':'cover'})
    picture_list=[]
    print ("本页返回状态码: "+str(res.status_code))

    for d in data:
        plist=d.find("img")["src"]
        print (d,end="\n")
        picture_list.append(plist)

    return picture_list


def download_picture(pic_l,page):
    loc1=r'E:\work\FangCloudV2\personal_space\2learn\python3\picture\page'
    if not os.path.exists(loc1+str(page)):
        #必须str(page) 而不是+page
        os.mkdir(loc1+str(page))

    for i in pic_l:
        pic=requests.get(i)
        p_name=i.split('/')[7]
       #注意路径包含特殊的符号\等,为了防止被解释为转义,要用原始数据r开头
        with open(loc1+str(page)+'\\'+p_name, 'wb') as f:
            f.write(pic.content)


page1()
5 再就是过程中,遇到的报错和改正方法
5.1 字符串 连接错误
TypeError: can only concatenate str (not “int“) to str
- 我原来代码有这么一句:
- print ("本页返回状态码: "+res.status_code)
- 运行会报错
- TypeError: can only concatenate str (not “int“) to str
- 因为res.status_code 返回的是数字,只有字符串可以 "" + "" , 所以用 str() 把 res.status_code 转化为string 就OK了
- 修改为
- print ("本页返回状态码: "+str(res.status_code))
5.2 字符串 连接错误
SyntaxError: unterminated string literal
- SyntaxError: unterminated string literal
- 未结束的字符串
- 造成这种错误的原因其实就是你运行的字符串有多义性
- 比如字符串的引号没有成对出现。
- 比如 转义序列 使用不正确
报错例子
错误:print(‘I'm a student')
正确:print(‘Im a student')
错误:with open(loc1+str(page)+'\'+p_name, 'wb') as f:
正确:with open(loc1+str(page)+'\\'+p_name, 'wb') as f:
5.3 意外缩进 IndentationError: unexpected indent
- IndentationError: unexpected indent
- 就是缩进不符合python 要求
5.4 语法错误 SyntaxError:
- SyntaxError: Missing parentheses in call to 'print'. Did you mean print(...)?
- python 还能给出修改意见
- print ()

5.5 拼写错误 AttributeError: NameError: 等等
- AttributeError: module 'requests' has no attribute 'gat'. Did you mean: 'get'?
- NameError: name 'priint' is not defined. Did you mean: 'print'?
- python 还能给出修改意见


#文件夹里的pic次序不是按网页下载的次序,而是按文件名的排序。。。而且不好改
#但是只有第1页的pic下载了,而且页码也只是从1到71,而不是73?
2
有两种解析内容
Beautiful soup
基本按着html结构解析,head body div p a li 等等
也可以选择按xml解析
Xpath就是按照xml解析
Node
Div等


