目录
前言:
盒子
1.内容区域
2. 边框
3. 内边距区域
4. 外边距区域(margin)
怪异盒模型
前言:
前面我们学习了CSS中的选择器的使用方法,那这一节我们就学习CSS中的盒模型,通过盒模型我们可以去更好的对界面进行排版处理。
盒子
CSS中我们可以将元素看出成一个个矩形盒子,对于页面的布局就是将不同盒子放在不同的位置。CSS中规定每个盒子分别由:内容区域、内边距区域、边框区域、外边距区域构成。实际上整一个网页我们都可以看做为一个盒子。

下面我就一一讲解盒子的这4个组成部分。
1.内容区域
内容区是整个盒子模型的中心,其中存放了盒子的主要内容,这些内容可以是文本、图像等资源。内容区有 width、height、overflow 三个属性,其中 width 和 height 属性用来指定盒子内容区域的宽度和高度,当内容信息过多,超出内容区所设置的范围时,则可以使用 overflow 属性设置溢出内容的处理方式,overflow 属性有四个可选值:
元素里面的所有子元素和文本内容都是在内容区域里面排列的,默认显示在左上角
hidden:表示隐藏溢出的部分;
visible:表示显示溢出的部分(溢出的部分将显示在盒子外部);
scroll:表示为内容区添加一个滚动条,您可以通过滑动这个滚动条来查看内容区的全部内容;
auto:表示由浏览器决定如何处理溢出部分。
内容区域实际上就是标签体内容,前面我们看过了很多示例了,比如下面这个CSS示例:
div {
    width: 100px;
    height: 100px;
    background-color: red; /*添加背景色以便于观察*/
}
注意:这里设置的宽度和高度实际上是指内容区域的宽度和高度,并不是等同于盒子的宽度和高度!
2. 边框
边框是环绕内容区和内边距的边界,你可以使用 border-style、border-width 和 border-color 以及它们的简写属性 border 来设置边框的样式。其中 border-style 属性为边框中最主要的属性,如果没有设置该属性的话,其它的边框属性也会被忽略。
边框的三要素:边框的粗细 边框的样式 边框的颜色
样式如下:
| 值 | 描述 |
|---|---|
| none | 默认:无边框。 |
| solid | 定义实线 |
| dotted | 点状边框 |
| dashed | 虚线 |
| double | 双线 |
示例:
<!DOCTYPE html>
<html lang="en">
<head>
    <meta charset="UTF-8">
    <meta http-equiv="X-UA-Compatible" content="IE=edge">
    <meta name="viewport" content="width=device-width, initial-scale=1.0">
    <title>Document</title>
    <link rel="stylesheet" href="./index.css">
</head>
<body>
  <!--边框  -->
<div style="height: 200px;width: 200px;
border: 4px dotted red;">
<strong>祝各位学弟学妹们高考加油!</strong>
</div>
</body>
</html>
效果:
还有,边框分为4部分,上下左右,我们可以对这四个部分分别设置,如下所示:
/* 设置上边框线 */
border-top: 样式 粗细 颜色;
/* 设置下边框线 */
border-bottom: 样式 粗细 颜色;
/* 设置左边框线 */
border-left: 样式 粗细 颜色;
/* 设置右边框线 */
border-right: 样式 粗细 颜色;
/* 再细分 */
border-bottom-color: blue;
border-bottom-style: dotted;
border-bottom-width: 3px;
border-left-color: red;
下面看个例子:
<!DOCTYPE html>
<html lang="en">
<head>
    <meta charset="UTF-8">
    <meta http-equiv="X-UA-Compatible" content="IE=edge">
    <meta name="viewport" content="width=device-width, initial-scale=1.0">
    <title>Document</title>
    <link rel="stylesheet" href="./index.css">
</head>
<body>
  <!--边框  -->
<div style="height: 200px;width: 200px;
border-top: 4px dotted red;
border-right: 10px blue double;
border-left: 2px greenyellow dashed;
border-bottom: 5px purple solid;">
<strong>祝各位学弟学妹们高考加油!</strong>
</div>
</body>
</html>
效果:
3. 内边距区域
内边距是内容区和边框之间的空间,你可以通过 padding-top、padding-right、padding-bottom、padding-left 以及它们的简写属性 padding 来设置内容区各个方向上与边框之间的距离。
下面这个视频就可以看到内边距的动态变化,padding.
1686038277875
| 取值 | 示例 | 含义 |
|---|---|---|
| 一个值 | padding: 10px | 上下左右都设置为10px |
| 两个值 | padding: 10px 20px | 上下设置为10px,左右设置为20px |
| 三个值 | padding: 10px 20px 30px | 上设置为10px,左右设置为20px,下设置为30px |
| 四个值 | padding: 10px 20px 30px 40px | 上设置为10px,右设置为20px,下设置为30px,左设置为40px |
4. 外边距区域(margin)
外边距位于盒子模型的最外围,是边框之外的空间,通过外边距可以使盒子与盒子之间不会紧凑的连接在一起,是CSS布局中的一种重要手段。我们可以使用 margin-top、margin-bottom、margin-left、margin-right 以及它们的简写属性 margin 来设置各个方向上外边距的宽度。 外边距的话,我们可以理解为一个空气墙,也就是盒子与盒子之间的距离。
示例:
<!DOCTYPE html>
<html lang="en">
<head>
    <meta charset="UTF-8">
    <meta http-equiv="X-UA-Compatible" content="IE=edge">
    <meta name="viewport" content="width=device-width, initial-scale=1.0">
    <title>Document</title>
    <link rel="stylesheet" href="./index.css">
</head>
<body>
  <!--边框  -->
<div style="height: 200px;width: 200px;
border: 4px dotted red;
padding: 20px;
color: aqua;
margin: 30px;">
<strong>祝各位学弟学妹们高考加油!</strong>
</div>
</body>
</html>
效果如下: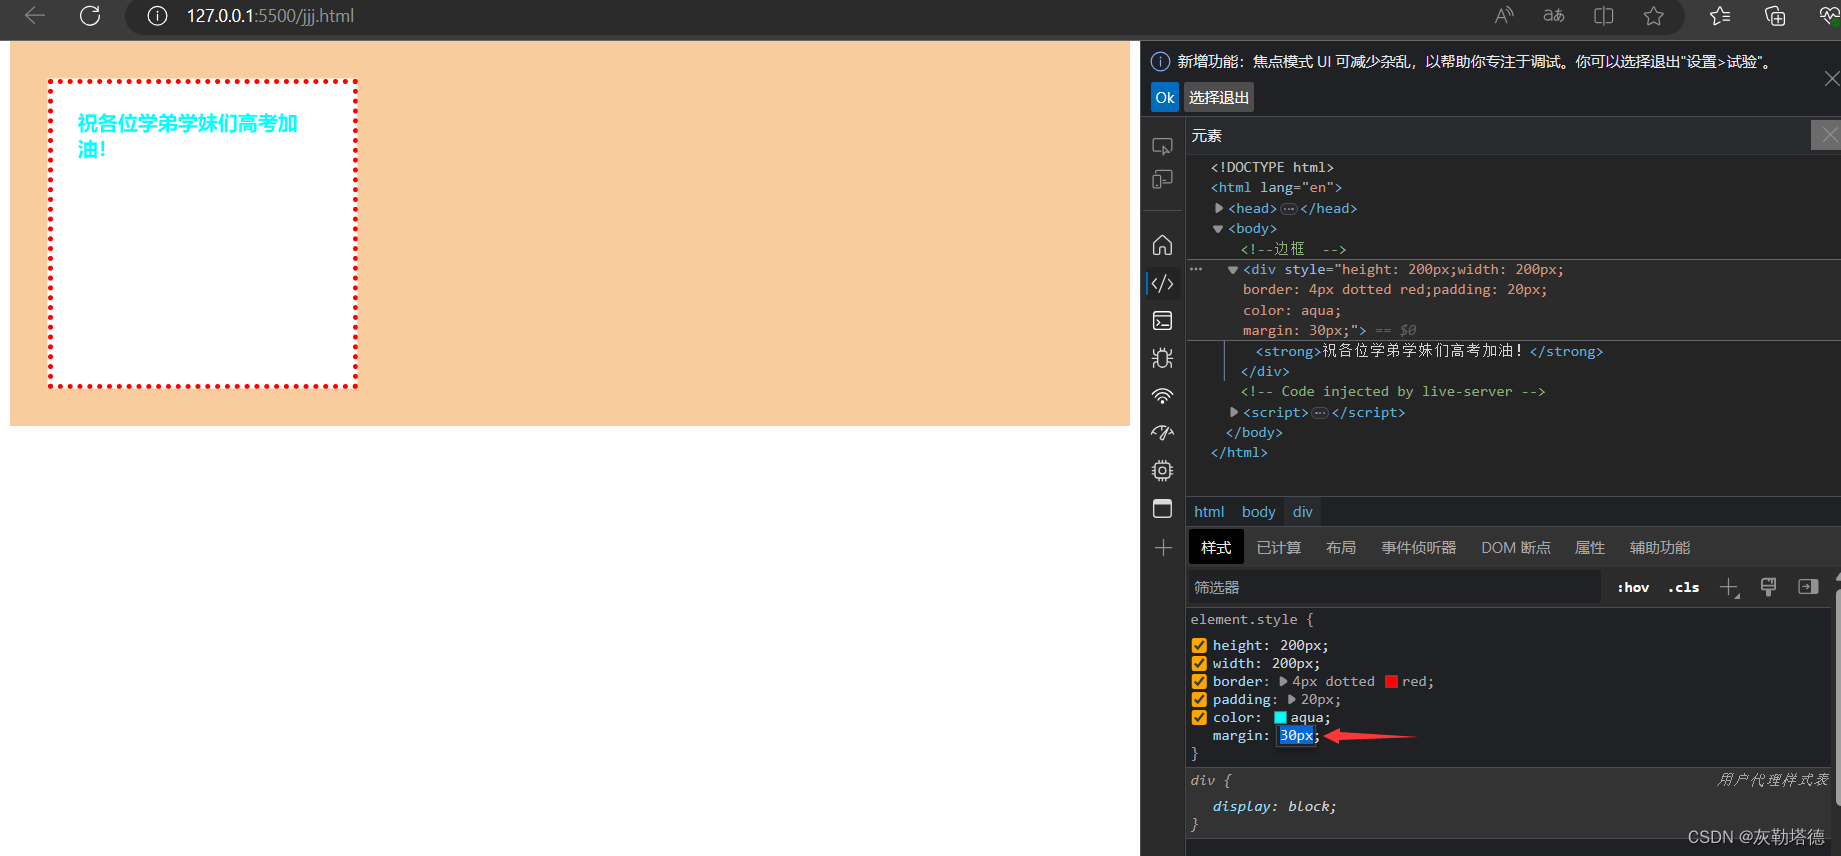
图片上面橙黄色部分就是margin的范围了。
怪异盒模型
与标准盒模型的不同的就是怪异盒模型,上面讲到的内容是标准盒模型的内容,而怪异盒模型不同的是盒子的计算方式。对于标准盒模型,当我们设置了宽度和高度的时候,这里的宽度和高度值的是内容区域的宽度和高度,如果我们去添加的padding或者border的时候内容区域的宽度和高度不会改变;而对于怪异盒模型的话,我们设置的宽度和高度是指定盒子的宽度和高度,当我们去添加的padding或者border的时候,内容区域的范围会被压缩。
示例:
这个是标准盒模型的代码:
<!DOCTYPE html>
<html lang="en">
<head>
    <meta charset="UTF-8">
    <meta http-equiv="X-UA-Compatible" content="IE=edge">
    <meta name="viewport" content="width=device-width, initial-scale=1.0">
    <title>Document</title>
    <link rel="stylesheet" href="./index.css">
</head>
<body>
  <div style="width: 200px;height: 200px;
  background-color: aquamarine;
  padding: 20px;
  border: 4px solid rebeccapurple;">
      长风破浪会有时,直挂云帆济沧海。
  </div>
</body>
</html>
效果如下:

这里我们可以看出长度和宽度都是248x248的,所以我内容区域设置的宽度和高度都是没有变化的 都是200x200。
下面是怪异盒模型的代码:
<!DOCTYPE html>
<html lang="en">
<head>
    <meta charset="UTF-8">
    <meta http-equiv="X-UA-Compatible" content="IE=edge">
    <meta name="viewport" content="width=device-width, initial-scale=1.0">
    <title>Document</title>
    <link rel="stylesheet" href="./index.css">
</head>
<body>
  <div style="width: 200px;height: 200px;
  background-color: aquamarine;
  padding: 20px;
  border: 4px solid rebeccapurple;
  box-sizing: border-box;">
  <!-- 上面跟标准盒模型不同的是添加了   box-sizing: border-box;-->
      长风破浪会有时,直挂云帆济沧海。
  </div>
</body>
</html>
效果如下:
这里我们可以看出当我们添加了box-sizing: border-box 的时候意思是盒子的大小就是当前设置的宽度和高度。此时就是一个怪异盒模型,当我们放入了padding或者border的时候,就会压缩内容区域的大小。
好了,以上就是今天的全部内容了,thanks~
分享一张壁纸: 


