Android系统的启动流程(二):SystemServer处理过程

摘要
在上篇文章中,我们已经将启动的进程推进到了ZygoteInit的main中,在ZygoteInit中我们已经知道它的main方法中的forkSystemServer方法将会启动系统服务,那么这篇文章里,我们将主要探讨SystemServer的处理过程。
- 上篇文章的连接:Android系统的启动流程(一):进入Zygote进程的初始化
ZygoteInit中处理SystemServer进程
那首先还是让我们回到ZygoteInit中,查看这个启动SystemServer的函数:
private static Runnable forkSystemServer(String abiList, String socketName,
            ZygoteServer zygoteServer) {
        long capabilities = posixCapabilitiesAsBits(
                OsConstants.CAP_IPC_LOCK,
                OsConstants.CAP_KILL,
                OsConstants.CAP_NET_ADMIN,
                OsConstants.CAP_NET_BIND_SERVICE,
                OsConstants.CAP_NET_BROADCAST,
                OsConstants.CAP_NET_RAW,
                OsConstants.CAP_SYS_MODULE,
                OsConstants.CAP_SYS_NICE,
                OsConstants.CAP_SYS_PTRACE,
                OsConstants.CAP_SYS_TIME,
                OsConstants.CAP_SYS_TTY_CONFIG,
                OsConstants.CAP_WAKE_ALARM,
                OsConstants.CAP_BLOCK_SUSPEND
        );
        /* Containers run without some capabilities, so drop any caps that are not available. */
        StructCapUserHeader header = new StructCapUserHeader(
                OsConstants._LINUX_CAPABILITY_VERSION_3, 0);
        StructCapUserData[] data;
        try {
            data = Os.capget(header);
        } catch (ErrnoException ex) {
            throw new RuntimeException("Failed to capget()", ex);
        }
        capabilities &= ((long) data[0].effective) | (((long) data[1].effective) << 32);

        /* Hardcoded command line to start the system server */
        String[] args = {
                "--setuid=1000",
                "--setgid=1000",
                "--setgroups=1001,1002,1003,1004,1005,1006,1007,1008,1009,1010,1018,1021,1023,"
                        + "1024,1032,1065,3001,3002,3003,3005,3006,3007,3009,3010,3011,3012",
                "--capabilities=" + capabilities + "," + capabilities,
                "--nice-name=system_server",
                "--runtime-args",
                "--target-sdk-version=" + VMRuntime.SDK_VERSION_CUR_DEVELOPMENT,
                "com.android.server.SystemServer",
        };
        ZygoteArguments parsedArgs;

        int pid;

        try {
            ZygoteCommandBuffer commandBuffer = new ZygoteCommandBuffer(args);
            try {
                parsedArgs = ZygoteArguments.getInstance(commandBuffer);
            } catch (EOFException e) {
                throw new AssertionError("Unexpected argument error for forking system server", e);
            }
            commandBuffer.close();
            Zygote.applyDebuggerSystemProperty(parsedArgs);
            Zygote.applyInvokeWithSystemProperty(parsedArgs);

            if (Zygote.nativeSupportsMemoryTagging()) {
                String mode = SystemProperties.get("arm64.memtag.process.system_server", "");
                if (mode.isEmpty()) {
                  /* The system server has ASYNC MTE by default, in order to allow
                   * system services to specify their own MTE level later, as you
                   * can't re-enable MTE once it's disabled. */
                  mode = SystemProperties.get("persist.arm64.memtag.default", "async");
                }
                if (mode.equals("async")) {
                    parsedArgs.mRuntimeFlags |= Zygote.MEMORY_TAG_LEVEL_ASYNC;
                } else if (mode.equals("sync")) {
                    parsedArgs.mRuntimeFlags |= Zygote.MEMORY_TAG_LEVEL_SYNC;
                } else if (!mode.equals("off")) {
                    /* When we have an invalid memory tag level, keep the current level. */
                    parsedArgs.mRuntimeFlags |= Zygote.nativeCurrentTaggingLevel();
                    Slog.e(TAG, "Unknown memory tag level for the system server: \"" + mode + "\"");
                }
            } else if (Zygote.nativeSupportsTaggedPointers()) {
                /* Enable pointer tagging in the system server. Hardware support for this is present
                 * in all ARMv8 CPUs. */
                parsedArgs.mRuntimeFlags |= Zygote.MEMORY_TAG_LEVEL_TBI;
            }

            /* Enable gwp-asan on the system server with a small probability. This is the same
             * policy as applied to native processes and system apps. */
            parsedArgs.mRuntimeFlags |= Zygote.GWP_ASAN_LEVEL_LOTTERY;

            if (shouldProfileSystemServer()) {
                parsedArgs.mRuntimeFlags |= Zygote.PROFILE_SYSTEM_SERVER;
            }

            /* Request to fork the system server process */
            pid = Zygote.forkSystemServer(
                    parsedArgs.mUid, parsedArgs.mGid,
                    parsedArgs.mGids,
                    parsedArgs.mRuntimeFlags,
                    null,
                    parsedArgs.mPermittedCapabilities,
                    parsedArgs.mEffectiveCapabilities);
        } catch (IllegalArgumentException ex) {
            throw new RuntimeException(ex);
        }

        /* For child process */
        if (pid == 0) {
            if (hasSecondZygote(abiList)) {
                waitForSecondaryZygote(socketName);
            }

            zygoteServer.closeServerSocket();
            return handleSystemServerProcess(parsedArgs);
        }

        return null;
    }
前面文章说到了Zygote进程是所有其他进程的孵化器,实际上就是说其他进程都是通过赋值Zygote进程来创建的,这个系统服务的进程也不例外,我们直接看最主要的一部分:
            /* Request to fork the system server process */
            pid = Zygote.forkSystemServer(
                    parsedArgs.mUid, parsedArgs.mGid,
                    parsedArgs.mGids,
                    parsedArgs.mRuntimeFlags,
                    null,
                    parsedArgs.mPermittedCapabilities,
                    parsedArgs.mEffectiveCapabilities);
        } catch (IllegalArgumentException ex) {
            throw new RuntimeException(ex);
        }

        /* For child process */
        if (pid == 0) {
            if (hasSecondZygote(abiList)) {
                waitForSecondaryZygote(socketName);
            }

            zygoteServer.closeServerSocket();
            return handleSystemServerProcess(parsedArgs);
        }

        return null;
第一行的pid就是Zygote进行进程复制后返回的新进程的id,当返回的pid为0时,说明运行在子进程中,在这里的语境中就是说当前运行在SystemServer进程中。既然是复制了zygote进程,那么就拥有其所有内容,前面说过zygote进程有它自己的socket,但是在SystemServer中这没有作用,所以如果是运行在SystemServer中,就将这个socket给关闭,然后调用handleSystemServerProcess函数来处理系统服务进程。显然,我们接下来就要看这个方法了。
handleSystemServerProcess:
    private static Runnable handleSystemServerProcess(ZygoteArguments parsedArgs) {
        // set umask to 0077 so new files and directories will default to owner-only permissions.
        Os.umask(S_IRWXG | S_IRWXO);

        if (parsedArgs.mNiceName != null) {
            Process.setArgV0(parsedArgs.mNiceName);
        }

        final String systemServerClasspath = Os.getenv("SYSTEMSERVERCLASSPATH");
        if (systemServerClasspath != null) {
            // Capturing profiles is only supported for debug or eng builds since selinux normally
            // prevents it.
            if (shouldProfileSystemServer() && (Build.IS_USERDEBUG || Build.IS_ENG)) {
                try {
                    Log.d(TAG, "Preparing system server profile");
                    prepareSystemServerProfile(systemServerClasspath);
                } catch (Exception e) {
                    Log.wtf(TAG, "Failed to set up system server profile", e);
                }
            }
        }

        if (parsedArgs.mInvokeWith != null) {
            String[] args = parsedArgs.mRemainingArgs;
            // If we have a non-null system server class path, we'll have to duplicate the
            // existing arguments and append the classpath to it. ART will handle the classpath
            // correctly when we exec a new process.
            if (systemServerClasspath != null) {
                String[] amendedArgs = new String[args.length + 2];
                amendedArgs[0] = "-cp";
                amendedArgs[1] = systemServerClasspath;
                System.arraycopy(args, 0, amendedArgs, 2, args.length);
                args = amendedArgs;
            }

            WrapperInit.execApplication(parsedArgs.mInvokeWith,
                    parsedArgs.mNiceName, parsedArgs.mTargetSdkVersion,
                    VMRuntime.getCurrentInstructionSet(), null, args);

            throw new IllegalStateException("Unexpected return from WrapperInit.execApplication");
        } else {
            ClassLoader cl = getOrCreateSystemServerClassLoader();
            if (cl != null) {
                Thread.currentThread().setContextClassLoader(cl);
            }

            /*
             * Pass the remaining arguments to SystemServer.
             */
            return ZygoteInit.zygoteInit(parsedArgs.mTargetSdkVersion,
                    parsedArgs.mDisabledCompatChanges,
                    parsedArgs.mRemainingArgs, cl);
        }

        /* should never reach here */
    }
这个方法的其他部分我们都不看,只看这最后一个方法ZygoteInit.zygoteInit(),接着进入这个zygoteInit方法:
	public static Runnable zygoteInit(int targetSdkVersion, long[] disabledCompatChanges,
            String[] argv, ClassLoader classLoader) {
        if (RuntimeInit.DEBUG) {
            Slog.d(RuntimeInit.TAG, "RuntimeInit: Starting application from zygote");
        }

        Trace.traceBegin(Trace.TRACE_TAG_ACTIVITY_MANAGER, "ZygoteInit");
        RuntimeInit.redirectLogStreams();

        RuntimeInit.commonInit();
        ZygoteInit.nativeZygoteInit();//1
        return RuntimeInit.applicationInit(targetSdkVersion, disabledCompatChanges, argv,
                classLoader);//2
    }
这次的方法就比较简短了,不过里面的内容还是比较重要的,上文注释一处的ZygoteInit.nativeZygoteInit()方法将会启动Binder线程池,注释二处的方法则是用于进入SystemServer的main方法的。Binder的内容我们在进程间通信的内容中有所提及。
接下来可以详细看一下这两处注释的分析。
启动Binder线程池
我们先看注释一处的方法,由于是native方法,我们还是到frameworks中查找,可以找到这个方法:
static void com_android_internal_os_ZygoteInit_nativeZygoteInit(JNIEnv* env, jobject clazz)
{
    gCurRuntime->onZygoteInit();
}
这里的方法又指向了onZygoteInit方法,我们进入frameworks/base/cmds/app_process/app_main.cpp可以看到这个方法:
    virtual void onZygoteInit()
    {
        sp<ProcessState> proc = ProcessState::self();
        ALOGV("App process: starting thread pool.\n");
        proc->startThreadPool();
    }
可以看到,这个方法最终会调用startThreadPool来启动线程池,具体启动的就是Binder线程池。
进入SystemServer的main方法
接下来看第二处的注释,这里是调用到了RuntimeInit的applicationInit方法,我们来看这个方法:
    protected static Runnable applicationInit(int targetSdkVersion, long[] disabledCompatChanges,
            String[] argv, ClassLoader classLoader) {

        nativeSetExitWithoutCleanup(true);

        VMRuntime.getRuntime().setTargetSdkVersion(targetSdkVersion);
        VMRuntime.getRuntime().setDisabledCompatChanges(disabledCompatChanges);

        final Arguments args = new Arguments(argv);

        Trace.traceEnd(Trace.TRACE_TAG_ACTIVITY_MANAGER);

        return findStaticMain(args.startClass, args.startArgs, classLoader);//1
    }
这里主要看最后一行的方法,我们可以看它的注解:
Invokes a static "main(argv[]) method on class “className”. Converts various failing exceptions into RuntimeExceptions, with the assumption that they will then cause the VM instance to exit.
翻译过来就是说这个方法将会调用名为className类的main方法,实际上就是传入的args.startClass的main方法,让我们继续点开这个findStaticMain方法:
protected static Runnable findStaticMain(String className, String[] argv,
            ClassLoader classLoader) {
        Class<?> cl;

        try {
            cl = Class.forName(className, true, classLoader);//1
        } catch (ClassNotFoundException ex) {
            throw new RuntimeException(
                    "Missing class when invoking static main " + className,
                    ex);
        }

        Method m;
        try {
            m = cl.getMethod("main", new Class[] { String[].class });//2
        } catch (NoSuchMethodException ex) {
            throw new RuntimeException(
                    "Missing static main on " + className, ex);
        } catch (SecurityException ex) {
            throw new RuntimeException(
                    "Problem getting static main on " + className, ex);
        }

        int modifiers = m.getModifiers();
        if (! (Modifier.isStatic(modifiers) && Modifier.isPublic(modifiers))) {
            throw new RuntimeException(
                    "Main method is not public and static on " + className);
        }

        return new MethodAndArgsCaller(m, argv);//3
    }
我们从上到下看这个函数,在注释一处通过反射查找到了具体的类,接着再注释二处又通过反射查找到了这个类的main方法,最后在注释三处返回了调用MethodAndArgsCaller的结果,这个方法是一个构造方法,MethodAndArgsCaller方法做的就是创建了一个RuntimeInit类的内部类,这个类也是一个实现了Runnable的类:
   static class MethodAndArgsCaller implements Runnable {
        /** method to call */
        private final Method mMethod;

        /** argument array */
        private final String[] mArgs;

        public MethodAndArgsCaller(Method method, String[] args) {
            mMethod = method;
            mArgs = args;
        }

        public void run() {
            try {
                mMethod.invoke(null, new Object[] { mArgs });
            } catch (IllegalAccessException ex) {
                throw new RuntimeException(ex);
            } catch (InvocationTargetException ex) {
                Throwable cause = ex.getCause();
                if (cause instanceof RuntimeException) {
                    throw (RuntimeException) cause;
                } else if (cause instanceof Error) {
                    throw (Error) cause;
                }
                throw new RuntimeException(ex);
            }
        }
    }
实际上最后返回回去就是返回到了ZygoteInit类的main方法中:
  if (startSystemServer) {
       Runnable r = forkSystemServer(abiList, zygoteSocketName, zygoteServer);

       // {@code r == null} in the parent (zygote) process, and {@code r != null} in the
       // child (system_server) process.
       if (r != null) {
           r.run();
           return;
       }
   }
这个里面的r就是返回的MethodAndArgsCaller,最终会调用它的run方法:
  public void run() {
      try {
          mMethod.invoke(null, new Object[] { mArgs });
      } catch (IllegalAccessException ex) {
          throw new RuntimeException(ex);
      } catch (InvocationTargetException ex) {
          Throwable cause = ex.getCause();
          if (cause instanceof RuntimeException) {
              throw (RuntimeException) cause;
          } else if (cause instanceof Error) {
              throw (Error) cause;
          }
          throw new RuntimeException(ex);
      }
  }
实际上也就是调用到了SystemServer类的main方法:
public static void main(String[] args) {
        new SystemServer().run();
    }
这个main方法做的就是新建了一个SystemServer的实例然后调用了它的run方法,这个run方法里就会做一系列工作,我们来截取部分重要的代码:
    private void run() {
       		.....
            android.os.Process.setThreadPriority(
                    android.os.Process.THREAD_PRIORITY_FOREGROUND);
            android.os.Process.setCanSelfBackground(false);
            Looper.prepareMainLooper();//1------------1
            Looper.getMainLooper().setSlowLogThresholdMs(
                    SLOW_DISPATCH_THRESHOLD_MS, SLOW_DELIVERY_THRESHOLD_MS);

            SystemServiceRegistry.sEnableServiceNotFoundWtf = true;

            System.loadLibrary("android_servers");//2----------------2

            initZygoteChildHeapProfiling();

            if (Build.IS_DEBUGGABLE) {
                spawnFdLeakCheckThread();
            }

            performPendingShutdown();

            createSystemContext();//3------------------3

            ActivityThread.initializeMainlineModules();

            ServiceManager.addService("system_server_dumper", mDumper);
            mDumper.addDumpable(this);

            mSystemServiceManager = new SystemServiceManager(mSystemContext);//4-----------------4
            mSystemServiceManager.setStartInfo(mRuntimeRestart,
                    mRuntimeStartElapsedTime, mRuntimeStartUptime);
            mDumper.addDumpable(mSystemServiceManager);

            LocalServices.addService(SystemServiceManager.class, mSystemServiceManager);

            SystemServerInitThreadPool tp = SystemServerInitThreadPool.start();
            mDumper.addDumpable(tp);

            if (Typeface.ENABLE_LAZY_TYPEFACE_INITIALIZATION) {
                Typeface.loadPreinstalledSystemFontMap();
            }


            if (Build.IS_DEBUGGABLE) {

                String jvmtiAgent = SystemProperties.get("persist.sys.dalvik.jvmtiagent");
                if (!jvmtiAgent.isEmpty()) {
                    int equalIndex = jvmtiAgent.indexOf('=');
                    String libraryPath = jvmtiAgent.substring(0, equalIndex);
                    String parameterList =
                            jvmtiAgent.substring(equalIndex + 1, jvmtiAgent.length());

                    try {
                        Debug.attachJvmtiAgent(libraryPath, parameterList, null);
                    } catch (Exception e) {
                        Slog.e("System", "*************************************************");
                        Slog.e("System", "********** Failed to load jvmti plugin: " + jvmtiAgent);
                    }
                }
            }
        } finally {
            t.traceEnd();
        }


        RuntimeInit.setDefaultApplicationWtfHandler(SystemServer::handleEarlySystemWtf);


        try {
            t.traceBegin("StartServices");
            startBootstrapServices(t);//5---------------5
            startCoreServices(t);//6------------------6
            startOtherServices(t);//7----------------7
            startApexServices(t);//8----------------8
        } catch (Throwable ex) {
            Slog.e("System", "******************************************");
            Slog.e("System", "************ Failure starting system services", ex);
            throw ex;
        } finally {
            t.traceEnd();
        }

 		.....
    }
这里为了简洁还是只截取一些相对重要的部分:
-
注释一处,调用了Looper.prepareMainLooper()方法,这个方法是用于准备主线程的消息循环器。具体来说,Looper.prepareMainLooper() 做了以下几件事情:
- 创建一个新的消息循环器(Looper)对象。
- 将该消息循环器对象与当前线程关联,使其成为当前线程的消息循环器。
- 将该消息循环器对象保存到 Looper 类的静态字段 sMainLooper 中,以便后续通过 Looper.getMainLooper() 方法获取主线程的消息循环器。
通过调用 Looper.prepareMainLooper(),主线程就准备好接收和处理消息了。在之后的代码中,可以使用 Looper.getMainLooper() 方法获取主线程的消息循环器,进而创建处理器(Handler)对象并将其绑定到主线程的消息循环器上,以实现消息的处理和线程间通信。
-
注释二处加载了名为android_servers的动态库。
-
注释三处创建了系统的Context上下文,然后紧接着在注释四处用这个上下文对象创建出了一个SystemServerManager对象,很显然这个对象是用来管理系统服务的。
-
注释五到注释八处分别启动了四种类型的服务,分别是引导服务,核心服务,其他服务和APEX服务。可以看出官方把这些服务分为了四种类型,其中其他服务是一些非紧要和不需要立即启动的服务。所有的系统服务大概有一百多个,可以通过查表看他们的具体意义:
引导服务 作用 Installer 系统安装APK时的一个服务类,启动完成Installer服务之后才能启动其他的系统服务 ActivityManagerService 负责四大组件的启动,切换,调度 PowerManagerService 计算系统中和Power相关的计算,然后决策系统应该如何反应 LightService 管理和显示背光LED DisplayManagerService 用来管理所有显示设备 UserManagerService 多用户模式管理 SenorService 为系统提供各种感应器服务 PackageManagerService 用来对APK进行安装,解析,删除,卸载等操作 … …
系统服务的启动逻辑
系统服务的启动逻辑都差不多,主要是通过SystemServiceManager来启动的,我们查看这个SystemServiceManager的startService方法:
    public void startService(@NonNull final SystemService service) {
        // Check if already started
        String className = service.getClass().getName();
        if (mServiceClassnames.contains(className)) {
            Slog.i(TAG, "Not starting an already started service " + className);
            return;
        }
        mServiceClassnames.add(className);

        // Register it.
        mServices.add(service);

        // Start it.
        long time = SystemClock.elapsedRealtime();
        try {
            service.onStart();
        } catch (RuntimeException ex) {
            throw new RuntimeException("Failed to start service " + service.getClass().getName()
                    + ": onStart threw an exception", ex);
        }
        warnIfTooLong(SystemClock.elapsedRealtime() - time, service, "onStart");
    }
实际上就是做了两步,先把要启动的service添加进入mServices的list中,这一步也就是完成注册,然后调用它的onStart回调方法就实现了启动;除此之外,还可以通过各种服务的main方法启动,以PackageManagerService为例,它的main方法就会先创建一个PackageManagerService,然后将其添加进入ServiceManager中,这样也能实现服务的启动。
ServiceManager用来管理系统中的各种Service,用于系统C/S架构中的Binder通信机制;Client端要使用某个Service时,就需要先到ServiceManager查询Service的相关信息,然后根据Service的相关信息与Service所在的Service进程建立通信通路,然后Client端就可以使用Service了。
SystemServer处理总结
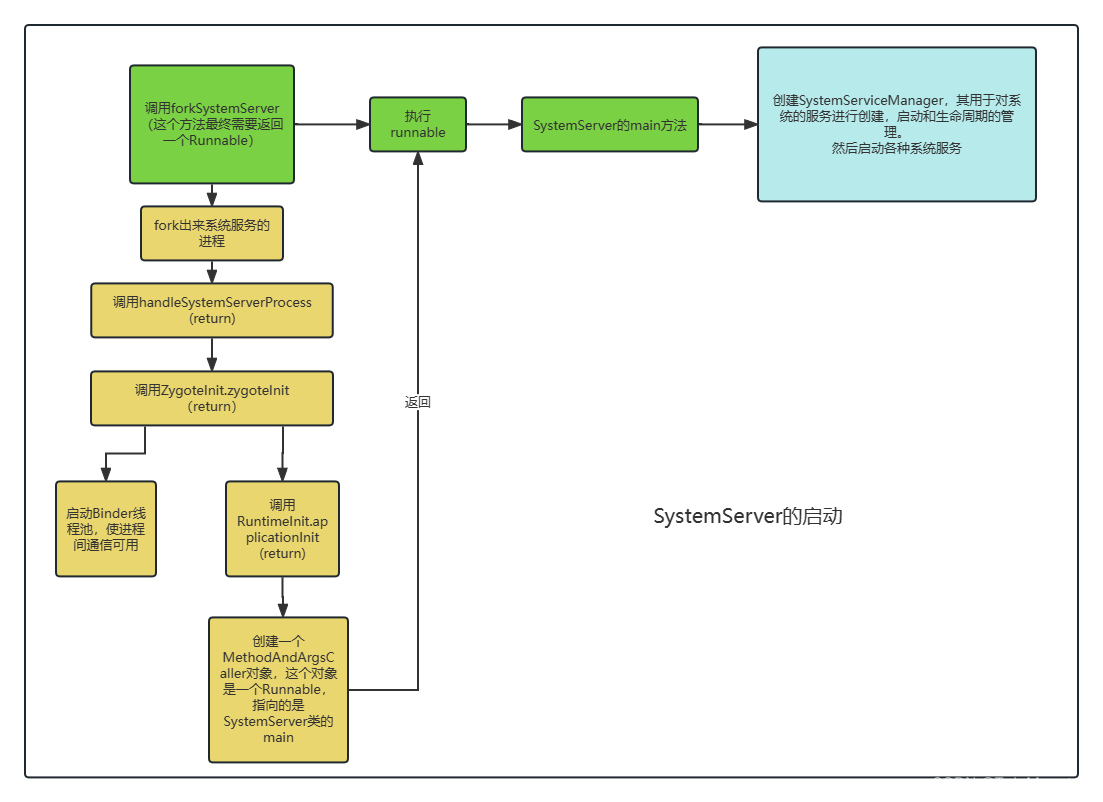
总的来说,这个启动系统服务的过程还是在ZygoteInit类的main方法中调用的,具体是调用了forkSystemServer方法。SystemServer进程被创建后,主要做了以下事情:
- 启动Binder线程池,这样就可以与其他进程进行通信
- 创建SystemServiceManager,其用于对系统的服务进行创建,启动和生命周期的管理
- 启动各种系统服务
下面是一张我总结的流程图:


![[操作系统]关于进程的管理](https://img-blog.csdnimg.cn/1fce57afe0c047dea6b0294264dbb5c9.png)


