一、下载安装
- 官网下载地址
https://www.elastic.co/cn/downloads/elasticsearch
-
解压
elasticsearch-8.2.3-windows-x86_64
- 修改配置
elasticsearch-8.2.3\config\elasticsearch.yml
# ======================== Elasticsearch Configuration =========================
#
# NOTE: Elasticsearch comes with reasonable defaults for most settings.
#       Before you set out to tweak and tune the configuration, make sure you
#       understand what are you trying to accomplish and the consequences.
#
# The primary way of configuring a node is via this file. This template lists
# the most important settings you may want to configure for a production cluster.
#
# Please consult the documentation for further information on configuration options:
# https://www.elastic.co/guide/en/elasticsearch/reference/index.html
#
# ---------------------------------- Cluster -----------------------------------
#
# Use a descriptive name for your cluster:
#
#cluster.name: my-application
#
# ------------------------------------ Node ------------------------------------
#
# Use a descriptive name for the node:
#
#node.name: node-1
#
# Add custom attributes to the node:
#
#node.attr.rack: r1
#
# ----------------------------------- Paths ------------------------------------
#
# Path to directory where to store the data (separate multiple locations by comma):
#
#path.data: /path/to/data
#
# Path to log files:
#
#path.logs: /path/to/logs
#
# ----------------------------------- Memory -----------------------------------
#
# Lock the memory on startup:
#
#bootstrap.memory_lock: true
#
# Make sure that the heap size is set to about half the memory available
# on the system and that the owner of the process is allowed to use this
# limit.
#
# Elasticsearch performs poorly when the system is swapping the memory.
#
# ---------------------------------- Network -----------------------------------
#
# By default Elasticsearch is only accessible on localhost. Set a different
# address here to expose this node on the network:
#
#network.host: 192.168.0.1
#
# By default Elasticsearch listens for HTTP traffic on the first free port it
# finds starting at 9200. Set a specific HTTP port here:
#
#http.port: 9200
#
# For more information, consult the network module documentation.
#
# --------------------------------- Discovery ----------------------------------
#
# Pass an initial list of hosts to perform discovery when this node is started:
# The default list of hosts is ["127.0.0.1", "[::1]"]
#
#discovery.seed_hosts: ["host1", "host2"]
#
# Bootstrap the cluster using an initial set of master-eligible nodes:
#
#cluster.initial_master_nodes: ["node-1", "node-2"]
#
# For more information, consult the discovery and cluster formation module documentation.
#
# --------------------------------- Readiness ----------------------------------
#
# Enable an unauthenticated TCP readiness endpoint on localhost
#
#readiness.port: 9399
#
# ---------------------------------- Various -----------------------------------
#
# Allow wildcard deletion of indices:
#
#action.destructive_requires_name: false

#----------------------- BEGIN SECURITY AUTO CONFIGURATION -----------------------
#
# The following settings, TLS certificates, and keys have been automatically
# generated to configure Elasticsearch security features on 21-06-2022 06:14:38
#
# --------------------------------------------------------------------------------

# Enable security features
#xpack.security.enabled: true

#xpack.security.enrollment.enabled: true

# Enable encryption for HTTP API client connections, such as Kibana, Logstash, and Agents
#xpack.security.http.ssl:
#  enabled: true
#  keystore.path: certs/http.p12

# Enable encryption and mutual authentication between cluster nodes
#xpack.security.transport.ssl:
  #enabled: true
  #verification_mode: certificate
  #keystore.path: certs/transport.p12
  #truststore.path: certs/transport.p12
# Create a new cluster with the current node only
# Additional nodes can still join the cluster later
#cluster.initial_master_nodes: ["DESKTOP-22BJ4SG"]

# Allow HTTP API connections from anywhere
# Connections are encrypted and require user authentication
http.host: 0.0.0.0

# Allow other nodes to join the cluster from anywhere
# Connections are encrypted and mutually authenticated
#transport.host: 0.0.0.0


# 集群的名字
cluster.name: es-cluster

# 节点名字
node.name: es_node1

# ES的监听地址
network.host: 0.0.0.0

#设置对外服务的http端口,默认为9200
http.port: 9200

#设置索引数据的存储路径
path.data: D:/99-tools/elasticsearch-8.2.3-windows-x86_64/elasticsearch-8.2.3/data
#设置日志文件的存储路径
path.logs: D:/99-tools/elasticsearch-8.2.3-windows-x86_64/elasticsearch-8.2.3/logs

# 关闭http访问限制
xpack.security.enabled: false

# 增加新的参数,head插件可以访问es
http.cors.enabled: true
http.cors.allow-origin: "*"

# Enable security features
#xpack.security.enabled: false
xpack.security.enrollment.enabled: true

# Enable encryption for HTTP API client connections, such as Kibana, Logstash, and Agents
xpack.security.http.ssl:
  enabled: false
  keystore.path: certs/http.p12

# Enable encryption and mutual authentication between cluster nodes
xpack.security.transport.ssl:
  enabled: true
  verification_mode: certificate
  keystore.path: certs/transport.p12
  truststore.path: certs/transport.p12
# Create a new cluster with the current node only
# Additional nodes can still join the cluster later
cluster.initial_master_nodes: ["es_node1"]  #注意,这个要与node.name填写一致

#屏蔽自动下载geopip
ingest.geoip.downloader.enabled: false
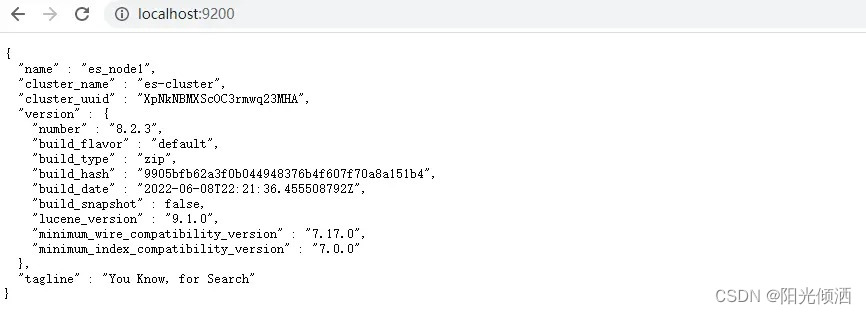
- 启动服务
双击elasticsearch-8.2.3\bin\elasticsearch.bat 运行
9300:Java程序访问的端口
9200:浏览器、HTTP访问的端口
http://localhost:9200/
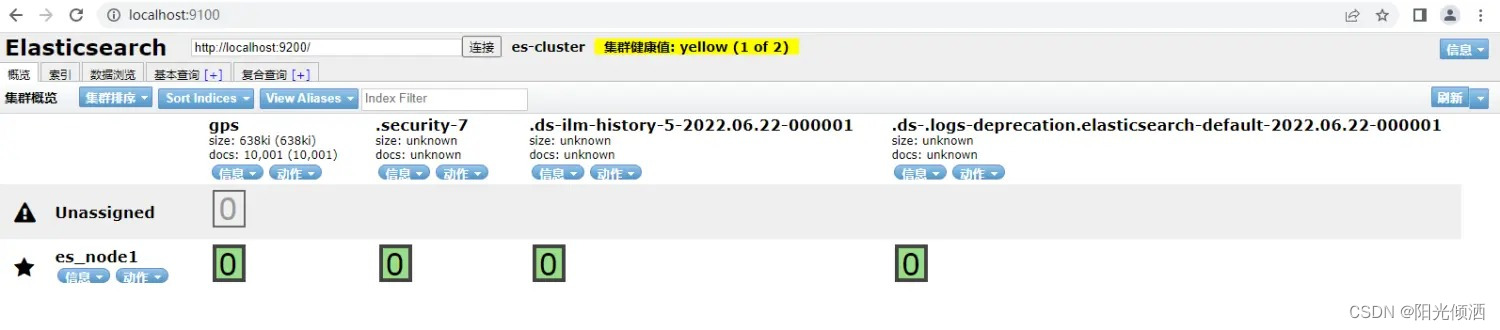
二、客户端elasticsearch-head安装
-
elasticsearch-head是一款专门针对于Elasticsearch的客户端工具
-
下载源码
https://github.com/mobz/elasticsearch-head](https://github.com/mobz/elasticsearch-head -
加压后,在elasticsearch-head目录下执行命令
需要先安装nodejs,下载地址:http://nodejs.cn/download/
npm install
npm run start
- 安装成功
http://localhost:9100/
三、springboot 集成
- 依赖
        <dependency>
            <groupId>com.fasterxml.jackson.core</groupId>
            <artifactId>jackson-databind</artifactId>
            <version>2.13.2</version>
        </dependency>
        <dependency>
            <groupId>org.glassfish</groupId>
            <artifactId>jakarta.json</artifactId>
            <version>2.0.1</version>
        </dependency>
        <!-- https://mvnrepository.com/artifact/co.elastic.clients/elasticsearch-java -->
        <dependency>
            <groupId>co.elastic.clients</groupId>
            <artifactId>elasticsearch-java</artifactId>
            <version>8.2.3</version>
        </dependency>
- 配置
import co.elastic.clients.elasticsearch.ElasticsearchClient;
import co.elastic.clients.json.jackson.JacksonJsonpMapper;
import co.elastic.clients.transport.ElasticsearchTransport;
import co.elastic.clients.transport.rest_client.RestClientTransport;
import org.apache.http.HttpHost;
import org.elasticsearch.client.RestClient;
import org.springframework.beans.factory.annotation.Value;
import org.springframework.context.annotation.Bean;
import org.springframework.context.annotation.Configuration;

@Configuration
public class ElasticSearchConfig {

    @Value("${elasticsearch.host-name}")
    private String hostName;

    @Value("${elasticsearch.port}")
    private int port;


    @Bean
    public ElasticsearchClient elasticsearchClient(){
        RestClient client = RestClient.builder(new HttpHost(hostName, port,"http")).build();
        ElasticsearchTransport transport = new RestClientTransport(client,new JacksonJsonpMapper());
        return new ElasticsearchClient(transport);
    }

}
- index操作类
import co.elastic.clients.elasticsearch.ElasticsearchClient;
import co.elastic.clients.elasticsearch.indices.CreateIndexResponse;
import co.elastic.clients.elasticsearch.indices.DeleteIndexResponse;
import co.elastic.clients.elasticsearch.indices.GetIndexResponse;
import co.elastic.clients.transport.endpoints.BooleanResponse;
import org.springframework.beans.factory.annotation.Autowired;
import org.springframework.stereotype.Service;

import java.io.IOException;

@Service
public class EsGpsIndexService {

    @Autowired
    private ElasticsearchClient client;

    public final static String INDEX_NAME = "gps";

    /**
     * 增加index
     * @throws IOException
     */
    public boolean create() throws IOException {
        CreateIndexResponse indexResponse = client.indices().create(c -> c.index(INDEX_NAME));
        System.out.println(indexResponse.toString());
        return indexResponse.acknowledged();
    }


    /**
     * 查询Index
     * @throws IOException
     */
    public void query() throws IOException {
        GetIndexResponse getIndexResponse = client.indices().get(i -> i.index(INDEX_NAME));
        System.out.println(getIndexResponse.toString());
    }

    /**
     * 判断index是否存在
     * @throws IOException
     */
    public boolean exists() throws IOException {
        BooleanResponse booleanResponse = client.indices().exists(e -> e.index(INDEX_NAME));
        System.out.println(booleanResponse.value());
        return booleanResponse.value();
    }


    /**
     * 删除index
     * @throws IOException
     */
    public void delete() throws IOException {
        DeleteIndexResponse deleteIndexResponse = client.indices().delete(d -> d.index(INDEX_NAME));
        System.out.println(deleteIndexResponse.toString());
    }

}
- document 操作类
import co.elastic.clients.elasticsearch.ElasticsearchClient;
import co.elastic.clients.elasticsearch._types.SortOrder;
import co.elastic.clients.elasticsearch._types.query_dsl.QueryBuilders;
import co.elastic.clients.elasticsearch._types.query_dsl.RangeQuery;
import co.elastic.clients.elasticsearch.core.*;
import co.elastic.clients.elasticsearch.core.bulk.BulkOperation;
import co.elastic.clients.elasticsearch.core.search.Hit;
import co.elastic.clients.json.JsonData;
import co.elastic.clients.transport.endpoints.BooleanResponse;
import org.springframework.beans.factory.annotation.Autowired;
import org.springframework.stereotype.Service;

import java.io.IOException;
import java.util.ArrayList;
import java.util.List;

@Service
public class EsGpsDocumentService {

    @Autowired
    private ElasticsearchClient client;


    /**
     * 插入document
     * @throws IOException
     */
    public void add(GpsInfo gps) throws IOException {
        IndexResponse indexResponse = client.index(i -> i
                .index(EsGpsIndexService.INDEX_NAME)
                //设置id
                .id(gps.getId())
                //
                .document(gps));

    }

    /**
     * 更新Document
     * @throws IOException
     */
    public void update(GpsInfo gps) throws IOException {
        UpdateResponse<GpsInfo> updateResponse = client.update(u -> u
                        .index(EsGpsIndexService.INDEX_NAME)
                        .id(gps.getId())
                        .doc(gps)
                , GpsInfo.class);
    }

    /**
     * 判断Document是否存在
     * @throws IOException
     */
    public void exist(String id) throws IOException {
        BooleanResponse indexResponse = client.exists(e -> e.index(EsGpsIndexService.INDEX_NAME).id(id));
        System.out.println(indexResponse.value());
    }

    /**
     * 查询Document
     * @throws IOException
     */
    public void get(String id) throws IOException {
        GetResponse<GpsInfo> getResponse = client.get(g -> g
                        .index(EsGpsIndexService.INDEX_NAME)
                        .id("1")
                , GpsInfo.class
        );
        System.out.println(getResponse.source());


    }

    /**
     * 删除Document
     * @throws IOException
     */
    public void delete(String id) throws IOException {
        DeleteResponse deleteResponse = client.delete(d -> d
                .index(EsGpsIndexService.INDEX_NAME)
                .id("1")
        );
        System.out.println(deleteResponse.id());
    }

    /**
     * 批量插入Document
     * @throws IOException
     */
    public void bulk(List<GpsInfo> gpsList) throws IOException {

        List<BulkOperation> bulkOperationArrayList = new ArrayList<>();
        //遍历添加到bulk中
        for(GpsInfo gps : gpsList){
            bulkOperationArrayList.add(BulkOperation.of(o->o.index(i->i.document(gps).id(gps.getId()))));
            //bulkOperationArrayList.add(BulkOperation.of(x->x.create(d->d.document(gps).id(gps.getId()).index(EsGpsIndexService.INDEX_NAME))));
        }

        BulkResponse bulkResponse = client.bulk(b -> b.index(EsGpsIndexService.INDEX_NAME).operations(bulkOperationArrayList));

    }

    /**
     * 查询
     * @throws IOException
     * https://wenku.baidu.com/view/a8954a68862458fb770bf78a6529647d27283439.html
     */
    public void search(String vehicleId,long startTime,long endTime,int page,int pageSize) throws IOException {

        SearchResponse<GpsInfo> search = client.search(s -> s
                .index(EsGpsIndexService.INDEX_NAME)
                .query(q -> q
                        .bool(b -> b
                                .filter(m -> m.term(t -> t.field("vehicleId").value(vehicleId)))
                                .filter(f -> f.range(x-> x.field("gpsTime").gte(JsonData.of(startTime)).lte(JsonData.of(endTime))))
                         ))

                //分页查询,从第0页开始查询20个document
                .from(page)
                .size(pageSize)
                //按时间降序排序
                //.sort(f->f.field(o->o.field("gpsTime").order(SortOrder.Desc)))
                , GpsInfo.class
        );
        for (Hit<GpsInfo> hit : search.hits().hits()) {
            System.out.println(hit.source());
        }
    }
}
- 实体
import lombok.AllArgsConstructor;
import lombok.Data;
import lombok.NoArgsConstructor;

import java.util.Date;

@Data
@AllArgsConstructor
@NoArgsConstructor
public class GpsInfo {

    private String id;
    private String vehicleId;
    private String deviceId;
    private String location;
    private Long gpsTime;
    private Long createTime;

}
- 测试例子
@RestController
@RequestMapping("/gps")
public class GpsController {

    @Autowired
    EsGpsIndexService esGpsIndexService;

    @Autowired
    EsGpsDocumentService esGpsDocumentService;

    @GetMapping("/test")
    public String test() throws IOException {

        boolean exist = esGpsIndexService.exists();
        if(!exist){
            esGpsIndexService.create();
        }

        esGpsIndexService.query();

        //
        /*GpsInfo gps = new GpsInfo();
        gps.setId("1");
        gps.setDeviceId("1111");
        gps.setVehicleId("123");
        gps.setLocation("12,33");
        gps.setCreateTime(System.currentTimeMillis());
        gps.setGpsTime(System.currentTimeMillis());
        esGpsDocumentService.add(gps);*/

        /*List<GpsInfo> gpsList =  new ArrayList<>();
        int i= 0;
        GpsInfo gps = null;
        long time = 1656041715000L;
        while (i < 10000){
            gps = new GpsInfo();
            gps.setId(String.valueOf(i*10000));
            gps.setDeviceId("1111");
            gps.setVehicleId("123456");
            gps.setLocation("12233.2232,33.2512235");
            gps.setCreateTime(time);
            gps.setGpsTime(time);
            gpsList.add(gps);
            //
            time += 1000;
            i += 1;
        }
        esGpsDocumentService.bulk(gpsList);*/


        long start = 1656041715000L;
        long end   = 1656041725000L;
        String v = "123456";
        esGpsDocumentService.search(v,start,end,0,20);


        return "elasticSearch test!!!!";
    }

}