文章目录
- Spring的注解开发
- 一、Bean 基本注解开发
- 1.1 @Component Bean的配置
- 1.2 其他注解配置Bean
- 1.3 @Component 衍生注解
- 二、Bean依赖注入注解开发
- 2.1 @Value
- 2.2 @Autowired
- 2.3 @Qualifier
- 2.4 @Resource
- 三、非自定义注解开发
- 3.1 无参非自定义注解开发
- 3.2 有参非自定义注解开发
- 四、Spring配置类的开发
- 4.1 @Configuration注解
- 4.2 @ComponentScan 组件扫描配置
- 4.3 @PropertySource
- 4.4 @Import注解
- 4.5 加载配置类
- 五、Spring配置其他注解
- 5.1 @Primary
- 5.2 @Profile
- 六、Spring注解的解析原理
- 6.1 xml方式组件扫描
- 6.2 注解方式组件扫描
- 6.3 总结
- 七、注解方式整合Mybatis
- 7.1 注解方式整合
- 7.2 原理
- 八、@Import 整合三方框架原理
- 8.1 实现ImportSelector接口的类
- 8.2 实现ImportBeanDefinitionRegistrar接口的类
- 8.3 @Import注解参数是注解时
Spring的注解开发
可以对照Spring Bean、XML方式Bean配置、Bean实例化配置、Bean注入进行学习
一、Bean 基本注解开发
注解方式慢慢成为xml配置的替代方案
基本Bean注解,主要是使用注解的方式替代原有xml的<bean> 标签及其标签属性的配置
<bean id="" name="" class="" scope="" lazy-init="" init-method="" destroy-method=""

abstract="" autowire="" factory-bean="" factory-method=""></bean>
使用@Component 注解替代<bean>标签
| XML 配置 | 注解 | 描述 |
|---|---|---|
| <bean id=“” class=“”> | @Component | 被该注解标识的类,会在指定扫描范围内被Spring加载并实例化 |
1.1 @Component Bean的配置
value属性指定当前Bean实例的beanName,也可以省略不写,不写的情况下为当前类名首字母小写
//获取方式:applicationContext.getBean("userDao");
@Component("userDao")
public class UserDaoImpl implements UserDao {
}

//获取方式:applicationContext.getBean("userDaoImpl");
@Component
public class UserDaoImpl implements UserDao {
}
这样配置还不算完,Spring还不知道我们要扫描这个注解,所以还需要配置扫描的范围
<beans xmlns="http://www.springframework.org/schema/beans"
       xmlns:xsi="http://www.w3.org/2001/XMLSchema-instance"
       xmlns:context="http://www.springframework.org/schema/context"
       xsi:schemaLocation="http://www.springframework.org/schema/beans
       http://www.springframework.org/schema/beans/spring-beans.xsd
       http://www.springframework.org/schema/context
       http://www.springframework.org/schema/context/spring-context.xsd">

    <!-- 告知Spring框架去com.zhangjngqi包及其子包下去扫描使用了注解的类 -->
    <context:component-scan base-package="com.zhangjingqi"/>
</beans>
此时就能获取到注解创建的UserServiceImpl对象
ClassPathXmlApplicationContext applicationContext = new ClassPathXmlApplicationContext("beans.xml");
Object userService = applicationContext.getBean("userDaoImpl");
System.out.println(userService);
1.2 其他注解配置Bean
@Component就单纯一个value属性,那么xml配置<bean> 时那些属性怎么进行配置呢?
Spring 是通过注解方式去配置的之前 <bean> 标签中的那些属性,例如:@Scope
<bean id="" name="" class="" scope="" lazy-init="" init-method="" destroy-method=""
abstract="" autowire="" factory-bean="" factory-method=""></bean>
记不得了可以看一下这篇文章Spring Bean、XML方式Bean配置、Bean实例化配置、Bean注入
| xml配置 | 注解 | 描述 |
|---|---|---|
| <bean scope=“”> | @Scope | 在类上或使用了@Bean标注的方法上,标注Bean的作用范围,取值为singleton或prototype |
| <bean lazy-init=“”> | @Lazy | 在类上或使用了@Bean标注的方法上,标注Bean是否延迟加载,取值为true和false |
| <bean init-method=“”> | @PostConstruct | 在方法上使用,标注Bean的实例化后执行的方法 |
| <bean destroy-method=“”> | @PreDestroy | 在方法上使用,标注Bean的销毁前执行方法 |
@Component("userDao")
@Scope("singleton")
@Lazy(true)
public class UserDaoImpl implements UserDao{
   @PostConstruct
   public void init(){}

   @PreDestroy
   public void destroy(){}
}
1.3 @Component 衍生注解
在这篇文章中也有对衍生注解的介绍,但是就是一点点而已SpringBoot——IOC与AOP
| 注解 | 说明 |
|---|---|
| @Controller | 标注在控制器 |
| @Service | 标注在业务类上 |
| @Repository | 标注在数据访问类上(由于与Mybatis整合,用的少) |
不属于上面三层的,大多数使用@Component就可以
@Repository("userDao")
public class UserDaoImpl implements UserDao{}

@Service("userService")
public class UserServiceImpl implements UserService{}

@Controller("userService")
public class UserController {}
二、Bean依赖注入注解开发
Bean依赖注入的注解,主要是使用注解的方式替代xml的 标签完成属性的注入操作
之前的注入方式
<bean id="" class="">
   <property name="" value=""/>
   <property name="" ref=""/>
</bean>
如今注解注入方式
| 属性注入注解 | 描述 |
|---|---|
| @Value | 使用在字段或方法上,用于注入普通数据 |
| @Autowired | 使用在字段或方法上,用于根据类型(byType)注入引用数据 |
| @Qualifier | 使用在字段或方法上,结合@Autowired,根据名称注入 |
| @Resource | 使用在字段或方法上,根据类型或名称进行注入 |
说明
@Resource注解是Java EE规范提供的,它在JDK中的javax.annotation.Resource包中定义。
在Spring中,可以使用@Resource注解来注入Bean,但它也支持其他注解,如@Autowired和@Inject。
这些注解提供了相同的功能,但有些微小的差异。
@Autowired注解是Spring提供的,而@Inject注解是JSR-330规范中定义的。
2.1 @Value
- 直接注入普通属性
@Value("haohao")
private String username;

@Value("haohao")
public void setUsername(String username){
    System.out.println(username);
}
基本上没这么做的,主要看第二点,注入注入properties文件中的属性
- 注入properties文件中的属性
SpringBoot读取方式 在SpringBoot中读取yaml配置文件中的数据、全部数据、部分数据_yaml 数组对象 读取_
下面来看一下Spring读取properties文件
@Value("${jdbc.username}")
private String username;

@Value("${jdbc.username}")
public void setUsername(String username){
    System.out.println(username);
}
加载properties文件
<context:property-placeholder location="classpath:jdbc.properties"/>
2.2 @Autowired
//使用在属性上直接注入
@Autowired
private UserDao userDao;

//使用在方法上直接注入
@Autowired
public void setUserDao(UserDao userDao){
      System.out.println(userDao);
}
当容器中同一类型的Bean实例有多个时,会尝试自动根据名字进行匹配(如果名字匹配不成狗就会报错)
//匹配当前Bean
@Repository("userDao")
public class UserDaoImpl implements UserDao{}

@Repository("userDao2")
public class UserDaoImpl2 implements UserDao{}
下面的这段话也能注入UserDao,但是只不过仅仅在此方法中使用
@Autowired
public void xxx(UserDao userDao){
    System.out.println(userDao);
}
下面这段自动注入的含义是,在Spring容器中找UserDao类型的对象,然后放入到userDaoList集合当中
@Autowired
public void yyy(List<UserDao> userDaoList){
    System.out.println(userDaoList);
}
2.3 @Qualifier
@Qualifier配合@Autowired可以完成根据名称注入Bean实例,使用@Qualifier指定名称
@Autowired
@Qualifier("userDao2")
  private UserDao userDao;

@Autowired
@Qualifier("userDao2")
public void setUserDao(UserDao userDao){
  System.out.println(userDao);
}
别的地方@Qualifier可以单独使用
2.4 @Resource
@Resource注解存在与 javax.annotation 包中,Spring对其进行了解析
说明
@Resource注解是Java EE规范提供的,它在JDK中的javax.annotation.Resource包中定义。
在Spring中,可以使用@Resource注解来注入Bean,但它也支持其他注解,如@Autowired和@Inject。
这些注解提供了相同的功能,但有些微小的差异。
@Autowired注解是Spring提供的,而@Inject注解是JSR-330规范中定义的。
@Resource注解既可以根据类型注入,也可以根据名称注入,无参就是根据类型注入,有参数就是根据名称注入
@Resource
private UserDao userDao;

@Resource(name = "userDao2")
public void setUserDao(UserDao userDao){
    System.out.println(userDao);
}
@Resource注解会首先根据name属性指定的名称去查找对应的Bean进行注入,如果找到了,则使用名称匹配的方式注入;
如果没有指定name属性或者找不到匹配的Bean,则根据类型进行注入。
如果有多个同类型的Bean,也会使用名称匹配的方式来确定要注入哪个Bean。需要注意的是,如果有多个同类型且同名称的Bean,那么@Resource注解会抛出NoUniqueBeanDefinitionException异常。
@Resource与@Autowired区别:
来源不同:@Resource是Java EE规范定义的注解,而@Autowired是Spring框架定义的注解。
注入方式不同:@Resource默认按照Bean的名称进行注入,如果找不到与名称相匹配的Bean,则按照类型进行注入。而@Autowired默认按照类型进行注入,如果出现多个相同类型的Bean,则再按照名称进行匹配。
属性名称不同:@Autowired没有name属性,而@Resource有name属性,可以指定要注入Bean的名称。
是否支持JSR-330:@Autowired支持JSR-330的@Inject注解,而@Resource不支持。
三、非自定义注解开发
@Bean注解必须被扫描到才可以完成下面的操作
@Bean所在的类必须加入到容器,可以加一个@Component注解,也可以添加@Configuration注解,一般是@Configuration注解
3.1 无参非自定义注解开发
非自定义Bean要通过工厂的方式进行实例化,使用@Bean标注方法即可
@Bean的属性为beanName,如不指定为当前工厂方法名称
@Bean(“dataSource”) 的含义
此注解的dataSource参数是方法dataSource()返回值的Bean的名字
测试一下
@Component
public class DataSourceTest {
    //将方法返回值Bean实例以@Bean注解指定的名称存储到Spring容器中
    @Bean("dataSource222")
    public DataSource dataSource(){
        DruidDataSource dataSource = new DruidDataSource();
        dataSource.setDriverClassName("com.mysql.jdbc.Driver");
        dataSource.setUrl("jdbc:mysql://localhost:3306/mybatis");
        dataSource.setUsername("root");
        dataSource.setPassword("root");
        return dataSource;
    }
}
很完美
ClassPathXmlApplicationContext applicationContext = new ClassPathXmlApplicationContext("beans.xml");
Object userService = applicationContext.getBean("dataSource222");
System.out.println(userService);
如果不给@Bean添加参数呢,默认是什么名字?
默认是方法名,如果是dataSource(),那Bean就叫dataSource,如果是DataSource(),那Bean就叫DataSource
@Bean
public DataSource dataSource(){
    DruidDataSource dataSource = new DruidDataSource();
    dataSource.setDriverClassName("com.mysql.jdbc.Driver");
    dataSource.setUrl("jdbc:mysql://localhost:3306/mybatis");
    dataSource.setUsername("root");
    dataSource.setPassword("root");
    return dataSource;
}
3.2 有参非自定义注解开发
注意! 下面方法所在的类是@Component注解修饰的,如果是@Configuration注解修饰的,部分方法会报错
如果@Bean工厂方法需要参数的话,则有如下几种注入方式
-
**使用@Autowired 根据类型自动进行Bean的匹配,@Autowired可以省略 **
不省略的形式
@Bean
public DataSource beanTest01(@Autowired UserDao userDao,@Autowired UserService userService){
    System.out.println(userDao);
    System.out.println(userService);
    DruidDataSource dataSource = new DruidDataSource();
    return dataSource;
}
省略的形式
@Bean
public DataSource beanTest01(UserDao userDao,UserService userService){
    System.out.println(userDao);
    System.out.println(userService);
    DruidDataSource dataSource = new DruidDataSource();
    return dataSource;
}
- 使用@Qualifier 根据名称进行Bean的匹配
以前是@Autowired+@Qualifier注解,在这个地方仅仅使用@Qualifier也可以
@Bean
public DataSource beanTest01(@Qualifier("userDaoImpl") UserDao userDao, UserService userService){
    System.out.println(userDao);
    System.out.println(userService);
    DruidDataSource dataSource = new DruidDataSource();
    return dataSource;
}
-
使用@Value 根据名称进行普通数据类型匹配
从properties文件中读取jdbc.driver开头的Key对应的Value
@Bean("dataSource")
public DataSource dataSource(@Value("${jdbc.driver}") String driverClassName){

    DruidDataSource dataSource = new DruidDataSource();
    dataSource.setDriverClassName(driverClassName);

}
四、Spring配置类的开发
@Component等注解替代了<bean>标签,但是像**<import>、<context:componentScan> 等非<bean> 标签怎样去使用注解替代呢?**
<!-- 加载properties文件 -->
<context:property-placeholder location="classpath:jdbc.properties"/>

<!-- 组件扫描 -->
<context:component-scan base-package="com.itheima"/>

<!-- 引入其他xml文件 -->
<import resource="classpath:beans.xml"/>
4.1 @Configuration注解
@Configuration注解标识的类为配置类,替代原有xml配置文件,该注解第一个作用是标识该类是一个配置类,第二个作用是具备@Component作用
//标注当前类是一个配置类(替代配置文件的)
//底层也封装了@Component注解
@Configuration
public class SpringConfig {
}
4.2 @ComponentScan 组件扫描配置
@ComponentScan 组件扫描配置,替代原有xml文件中的<context:component-scan base-package=“”/>
@Configuration
@ComponentScan({"com.zhangjingqi.service","com.zhangjingqi.dao"})
public class SpringConfig {}
- 指定一个或多个包名:扫描指定包及其子包下使用注解的类
- 不配置包名:扫描当前@componentScan注解配置类所在包及其子包下的类
4.3 @PropertySource
注解用于加载外部properties资源配置,替代原有xml中的 <context:property placeholder location=“”/> 配置
@Configuration
@ComponentScan
@PropertySource({"classpath:jdbc.properties","classpath:xxx.properties"})
public class SpringConfig {}
加载外部yaml文件在SpringBoot中读取yaml配置文件中的数据、全部数据、部分数据_yaml 数组对象 读取_
4.4 @Import注解
相当于<import resource=“”>配置
首先说明DataSourceTest类上没有任何注解
@Configuration
@ComponentScan("com.zhangjingqi")//一定要扫描到DataSourceTest所在的包
@Import(DataSourceTest.class)
public class SpringConfig {
}
此时就将DataSourceTest注入容器了,并且DataSourceTest的@Bean所修饰 的Bean也注入容器了
DataSourceTest类相当于一个小的配置类(类似分部)
SpringConfig类在这里相当于一个大的配置类(类似总部)
public class DataSourceTest {
    //将方法返回值Bean实例以@Bean注解指定的名称存储到Spring容器中
    @Bean("dataSource")
    public DataSource dataSource(@Value("${jdbc.driver}") String driverClassName, UserDaoImpl userDao){
        DruidDataSource dataSource = new DruidDataSource();
        dataSource.setDriverClassName(driverClassName);
        dataSource.setUrl("jdbc:mysql://localhost:3306/mybatis");
        dataSource.setUsername("root");
        dataSource.setPassword("root");
        return dataSource;
    }


    @Bean
    public DataSource beanTest01(@Qualifier("userDaoImpl") UserDao userDao, UserService userService){
        System.out.println(userDao);
        System.out.println(userService);
        DruidDataSource dataSource = new DruidDataSource();
        return dataSource;
    }
}
4.5 加载配置类
//        ClassPathXmlApplicationContext applicationContext = new ClassPathXmlApplicationContext("beans.xml");
//        注解方式加载Spring核心配置
        ApplicationContext applicationContext = new AnnotationConfigApplicationContext(SpringConfig.class);
        Object springConfig = applicationContext.getBean("springConfig");
        Object userDao = applicationContext.getBean("userDaoImpl");
        System.out.println(springConfig);
        System.out.println(userDao);
五、Spring配置其他注解
5.1 @Primary
@Primary注解用于标注相同类型的Bean优先被使用权
@Primary 是Spring3.0引入的,与@Component和@Bean一起使用,标注该Bean的优先级更高,则在通过类型获取Bean或通过@Autowired根据类型进行注入时,会选用优先级更高的
@Repository("userDao")
public class UserDaoImpl implements UserDao{}

@Repository("userDao2")
@Primary
public class UserDaoImpl2 implements UserDao{}
// 如果通过类型UserDao.class获取对象时,第二个Bean new UserDaoImpl2 会优先获取
@Bean
public UserDao userDao01(){
    return new UserDaoImpl();
}

@Bean
@Primary
public UserDao userDao02(){
    return new UserDaoImpl2();
}
5.2 @Profile
@Profile 注解的作用同于xml配置时学习profile属性,是进行环境切换使用的
<beans profile="test">
注解 @Profile 标注在类或方法上,标注当前产生的Bean从属于哪个环境,只有激活了当前环境,被标注的Bean才能被注册到Spring容器里
不指定环境的Bean,任何环境下都能注册到Spring容器里
@Repository("userDao")
@Profile("test")
public class UserDaoImpl implements UserDao{}

@Repository("userDao2")
public class UserDaoImpl2 implements UserDao{}
怎么激活环境
- 使用命令行动态参数,虚拟机参数位置加载
-Dspring.profiles.active=test
- 使用代码的方式设置环境变量
System.setProperty("spring.profiles.active","test");
六、Spring注解的解析原理
@Component在类上标注完,Spring扫描到后,会被实例化成对象,再存储到Spring容器之中,现在研究一下为什么能创建对象
依然是下面这张图
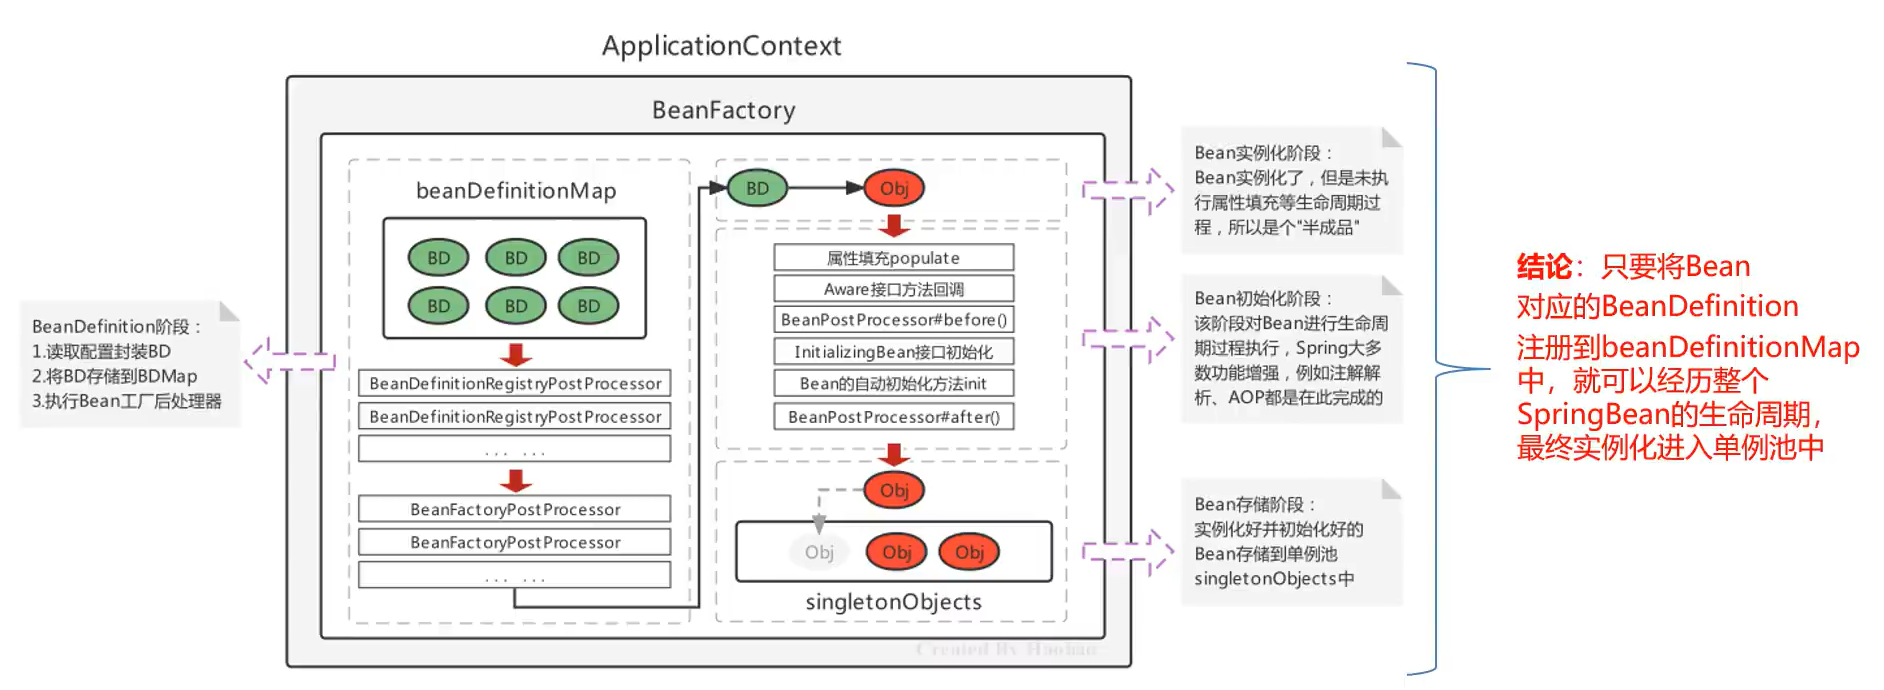
上面这张图详细过程会在Spring Bean、XML方式Bean配置、Bean实例化配置、Bean注入有详细讲解
使用@Component等注解配置完毕后,要配置组件扫描才能使注解生效
- xml配置组件扫描:
<context:component-scan base-package="com.zhangjingqi"/>
- 配置类配置组件扫描:
@Configuration
@ComponentScan("com.zhangjingqi")
public class AppConfig {
}
6.1 xml方式组件扫描
下面 xmlns:context 这种方式叫做自定义命名空间的方式
<beans xmlns="http://www.springframework.org/schema/beans"
       xmlns:xsi="http://www.w3.org/2001/XMLSchema-instance"
       xmlns:context="http://www.springframework.org/schema/context"
       xsi:schemaLocation="http://www.springframework.org/schema/beans
       http://www.springframework.org/schema/beans/spring-beans.xsd
       http://www.springframework.org/schema/context
       http://www.springframework.org/schema/context/spring-context.xsd">

    <context:component-scan base-package="com.zhangjingqi"/>
</beans>
http://www.springframework.org/schema/context 命名空间最终对应了一个命名空间处理器
在下面这个地方就是对应的命名空间与对应的命名空间处理器的映射关系
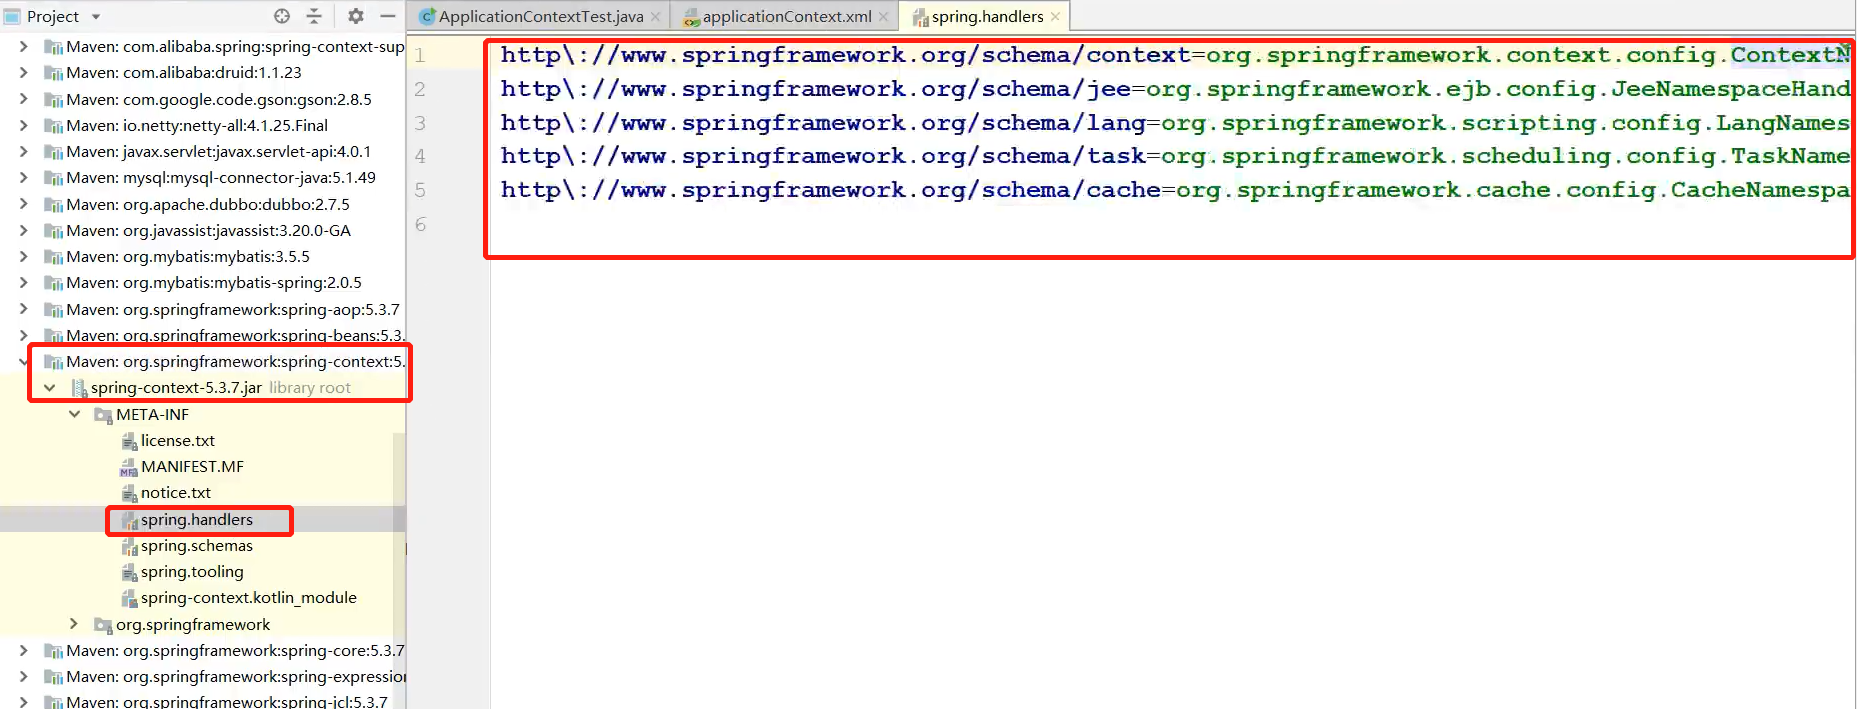
我们点进去之后,发现有“component-scan”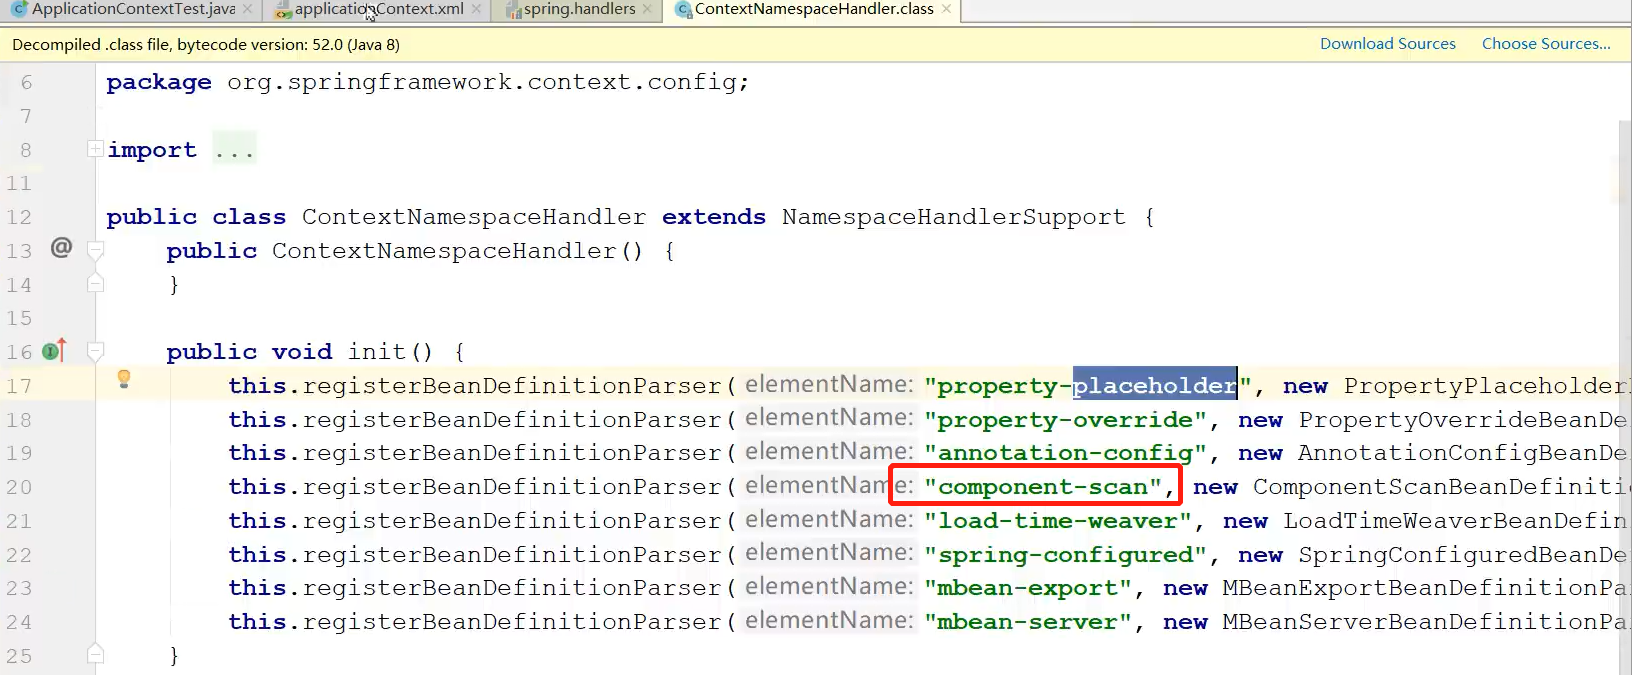
我们点进“component-scan”后面new的对象的类,此类中有一个parse方法

然后再进入doScan方法,在此的方法后面会注册BeanDefinition
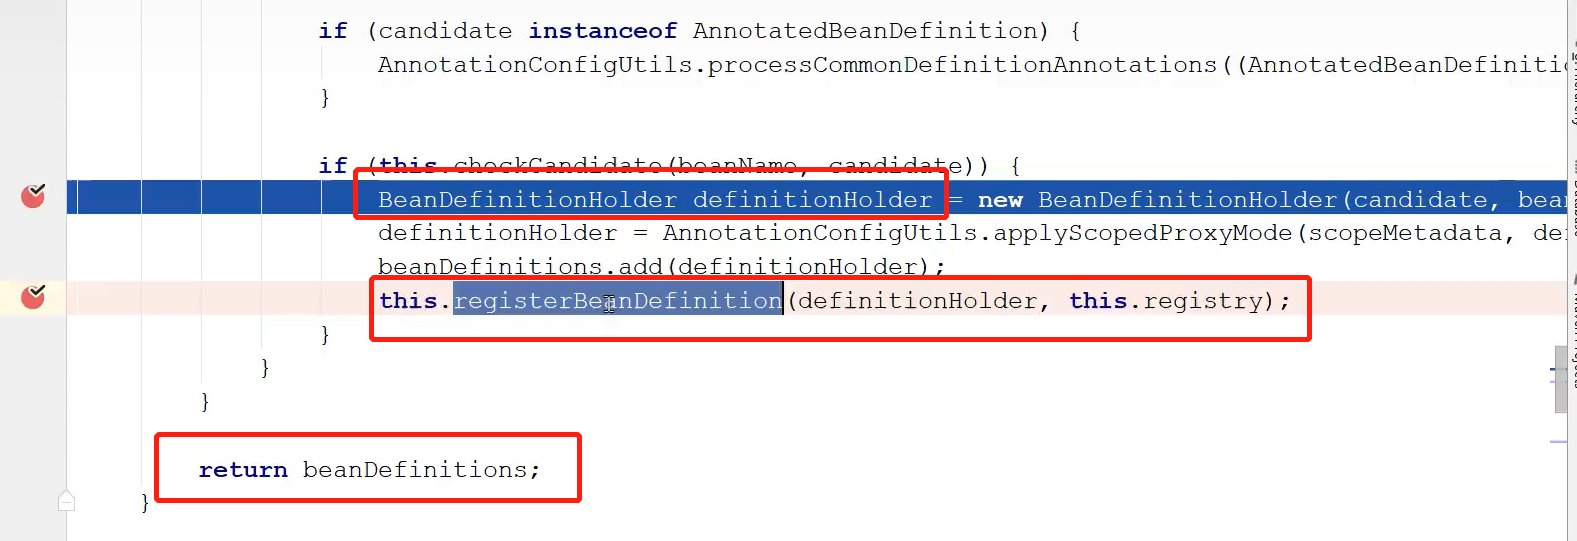
注册的BeanDefinition也会加入到BeanDefinitionMap之中
此时下图中并没有UserDao,但是我们把断点放过去之后就有了(下面两张图连起来看)


我们把BeanDefinition信息存储到BeanDefinitionMap之后,最后就会经过Bean的生命周期,创建出实例Bean并且进入到单例池之中
并没有用到BeanFactoryProcessor,而是在Spring容器创建时就去扫描,扫描到对应的类后将各种信息定义成BeanDefinition,放到BeanDefinitionMap之中
6.2 注解方式组件扫描
还是想办法把BeanDefinition放入到BeanDefinitionMap之中,就能创建实例化Bean
加载核心配置类
ApplicationContext applicationContext = new AnnotationConfigApplicationContext(SpringConfig.class);
配置类配置组件扫描(开发中这种方式比较多),此处有@ComponentScan
@Configuration
@ComponentScan("com.zhangjingqi")
public class SpringConfig {

}
点进容器本身AnnotationConfigApplicationContext

点击this() 无参构造,发现创建了一个AnnotatedBeanDefinitionReader,也就是读取器
xml形式时,Bean从配置文件到ApplicationContext也用到了读取器,是XMLBeanDefinitionReader,而这里是AnnotatedBeanDefinitionReader
不同的配置下有不同的读取器

进入AnnotatedBeanDefinitionReader注解BeanDefinition读取器看看

再点击去上面的方法,主要是看下面这个图的最后一段代码registerAnnotationConfigProcessors

点进registerAnnotationConfigProcessors去

再点进去registerAnnotationConfigProcessors,并且打几个断点,最终执行完此方法后,这些都会注入进去
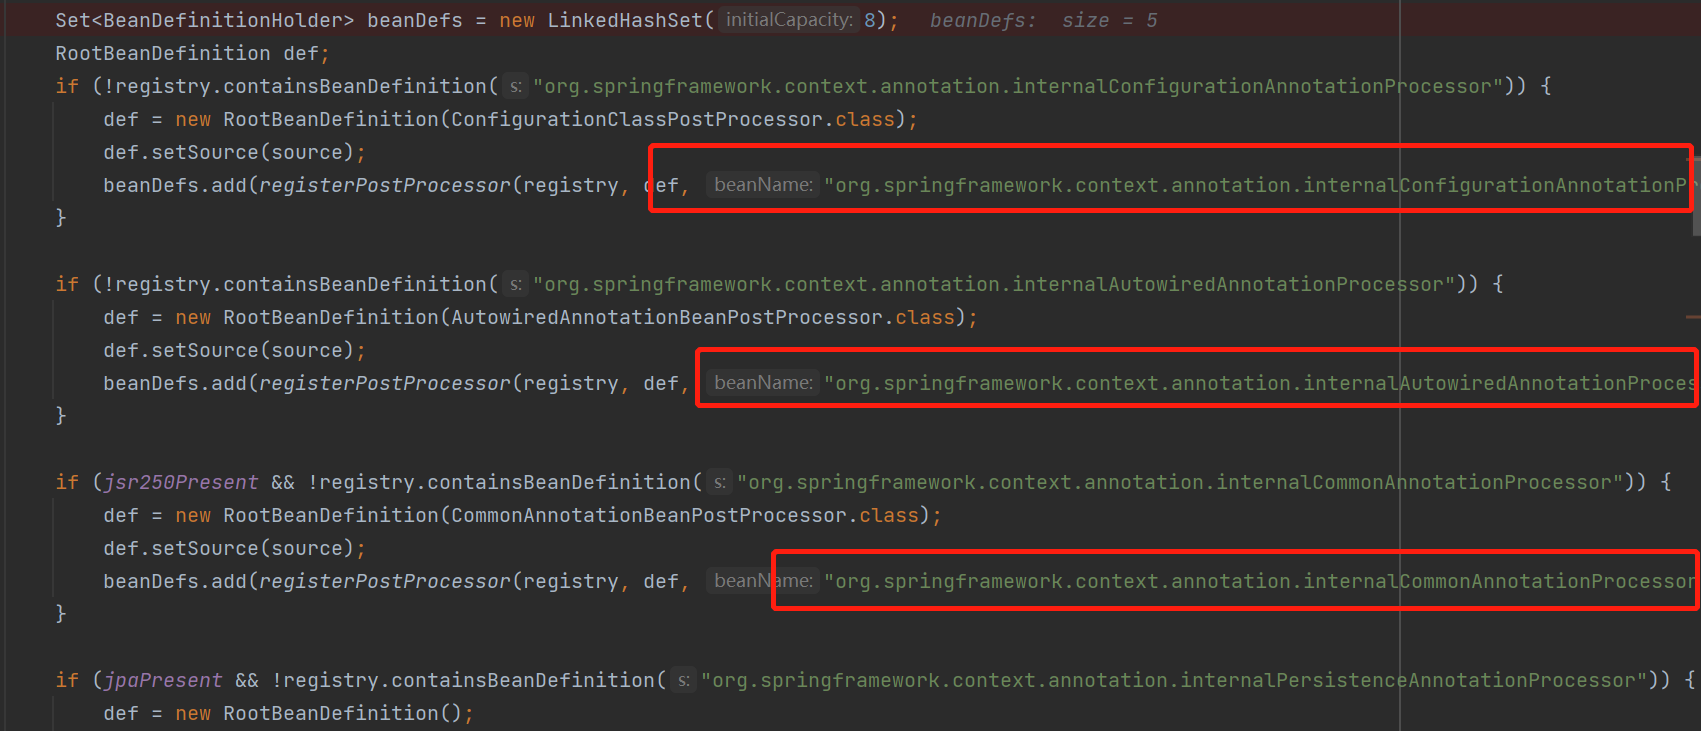

然后点击看一眼

特别好,发现上面有ConfigurationClassPostProcessor类上有BeanDefinitionRegistryPostProcessor接口
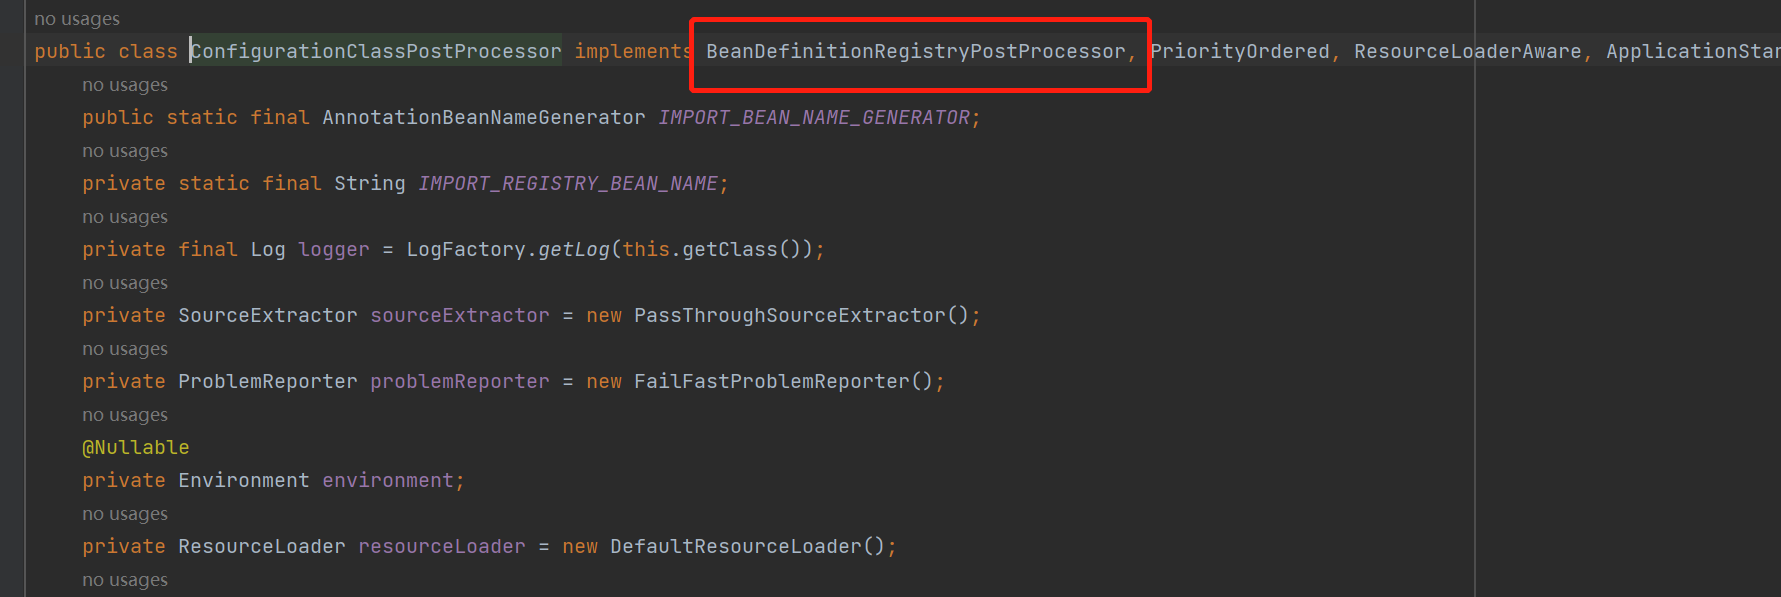
BeanDefinitionRegistryPostProcessor这个接口在下面图中的红色标记处见过,此接口就是注册BeanDefinition的
详细说明在Spring - Bean的实例化流程及生命周期_
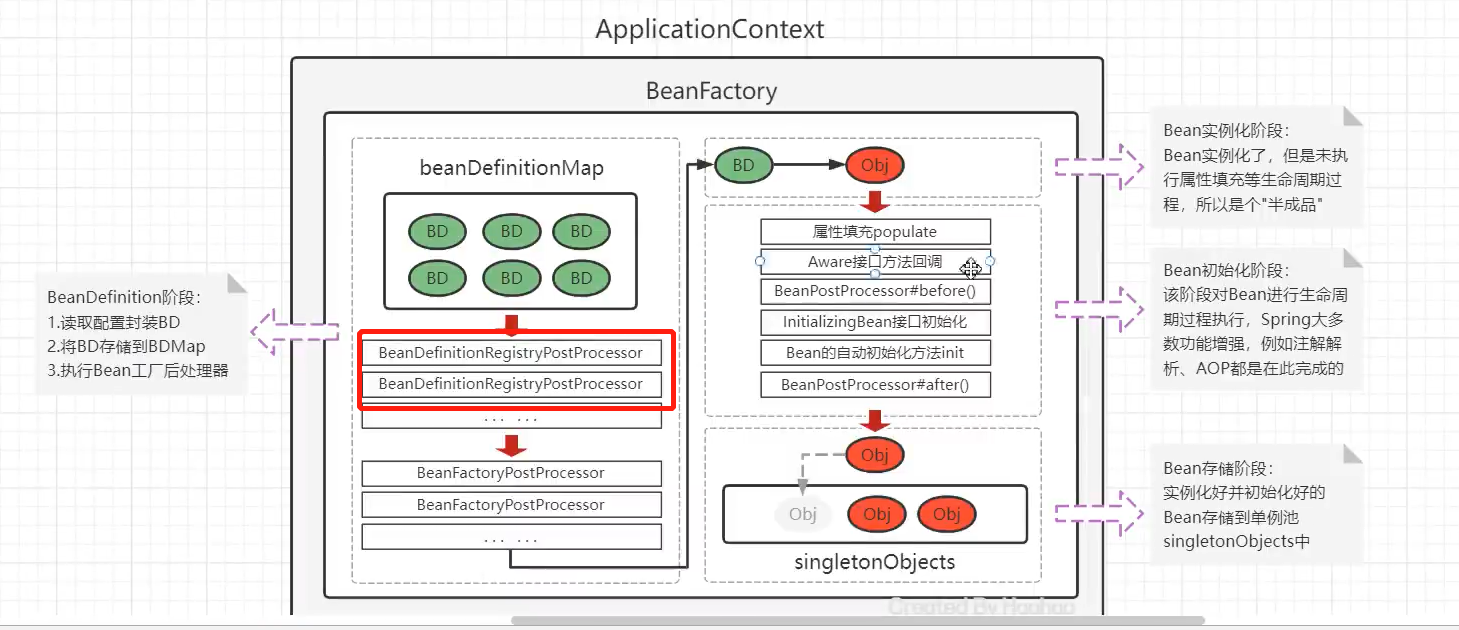
在类ConfigurationClassPostProcessor中搜postProcessBeanDefinitionRegistry方法,此方法就是向BeanDefinitionMap中注册BeanDefinition

在这个方法中调用了一个processConfigBeanDefinitions方法,点进去
在这个方法中创建了一个解析器,并且调用了parse方法
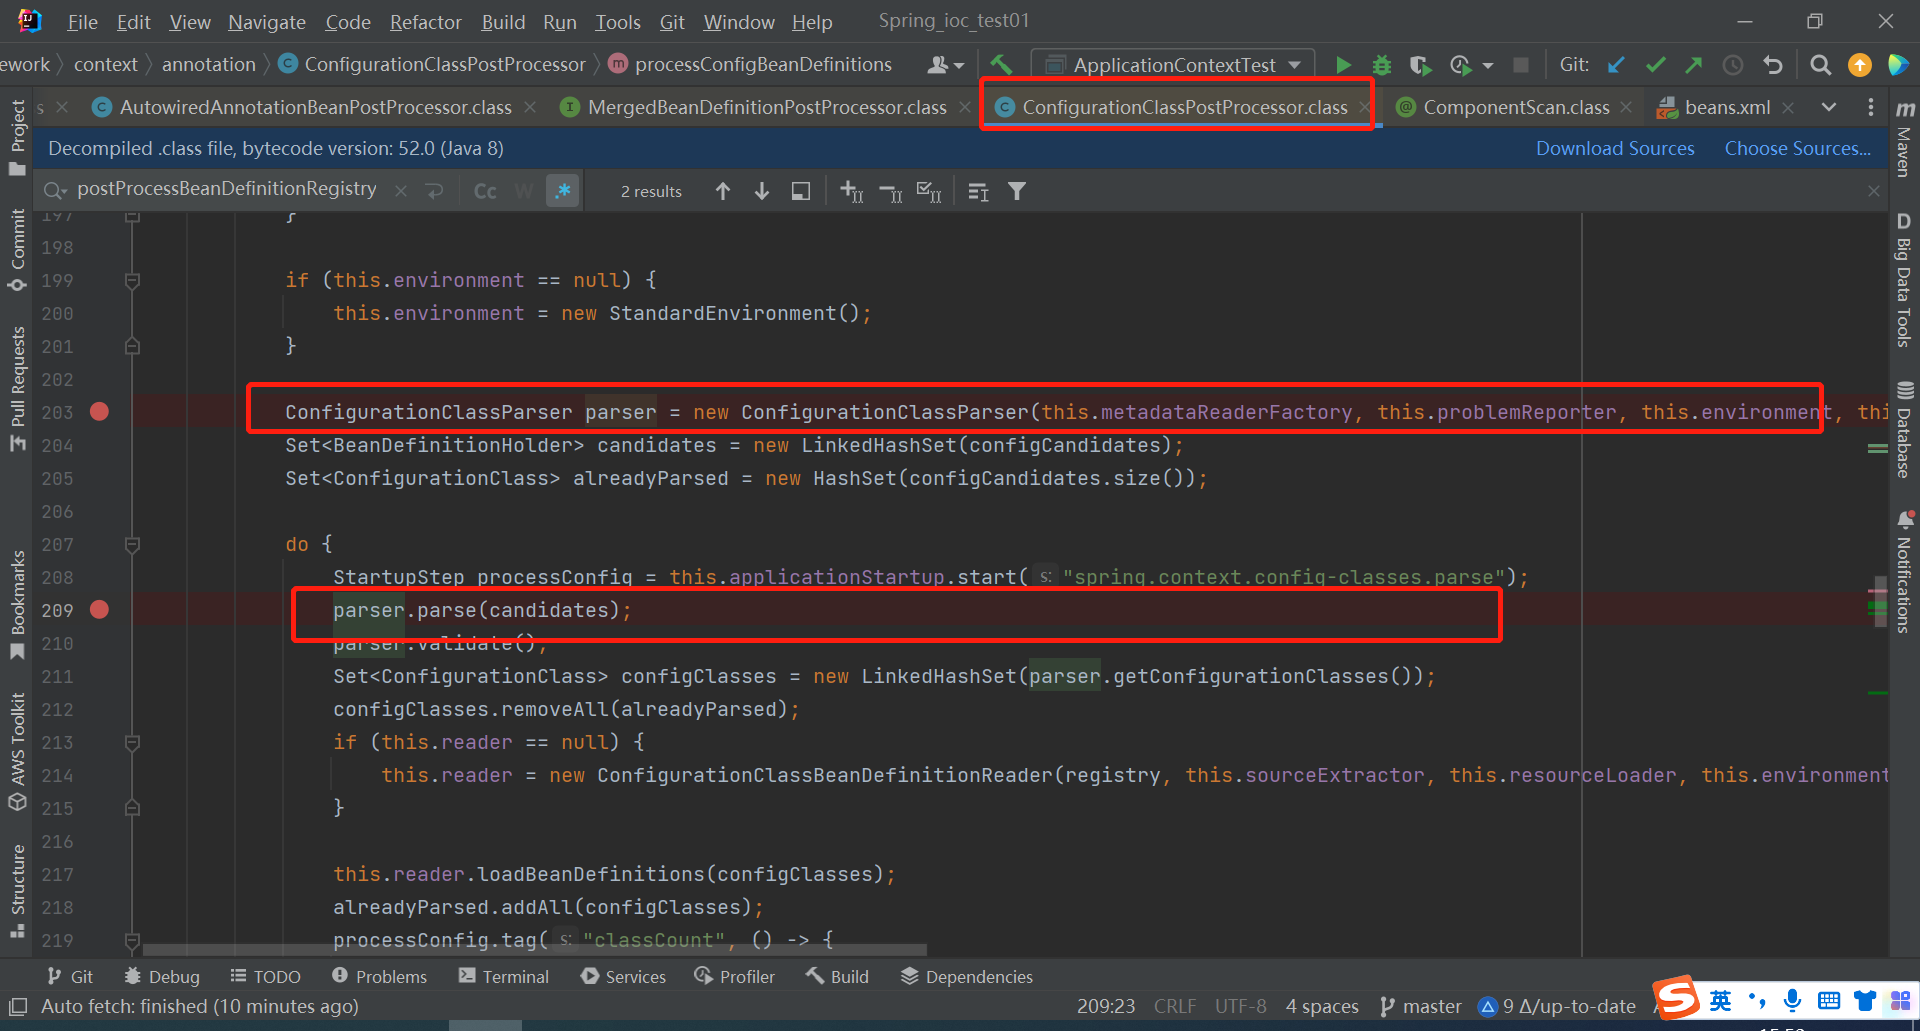
点进parse方法,然后发现又调用了一个重载的parse方法,点击去
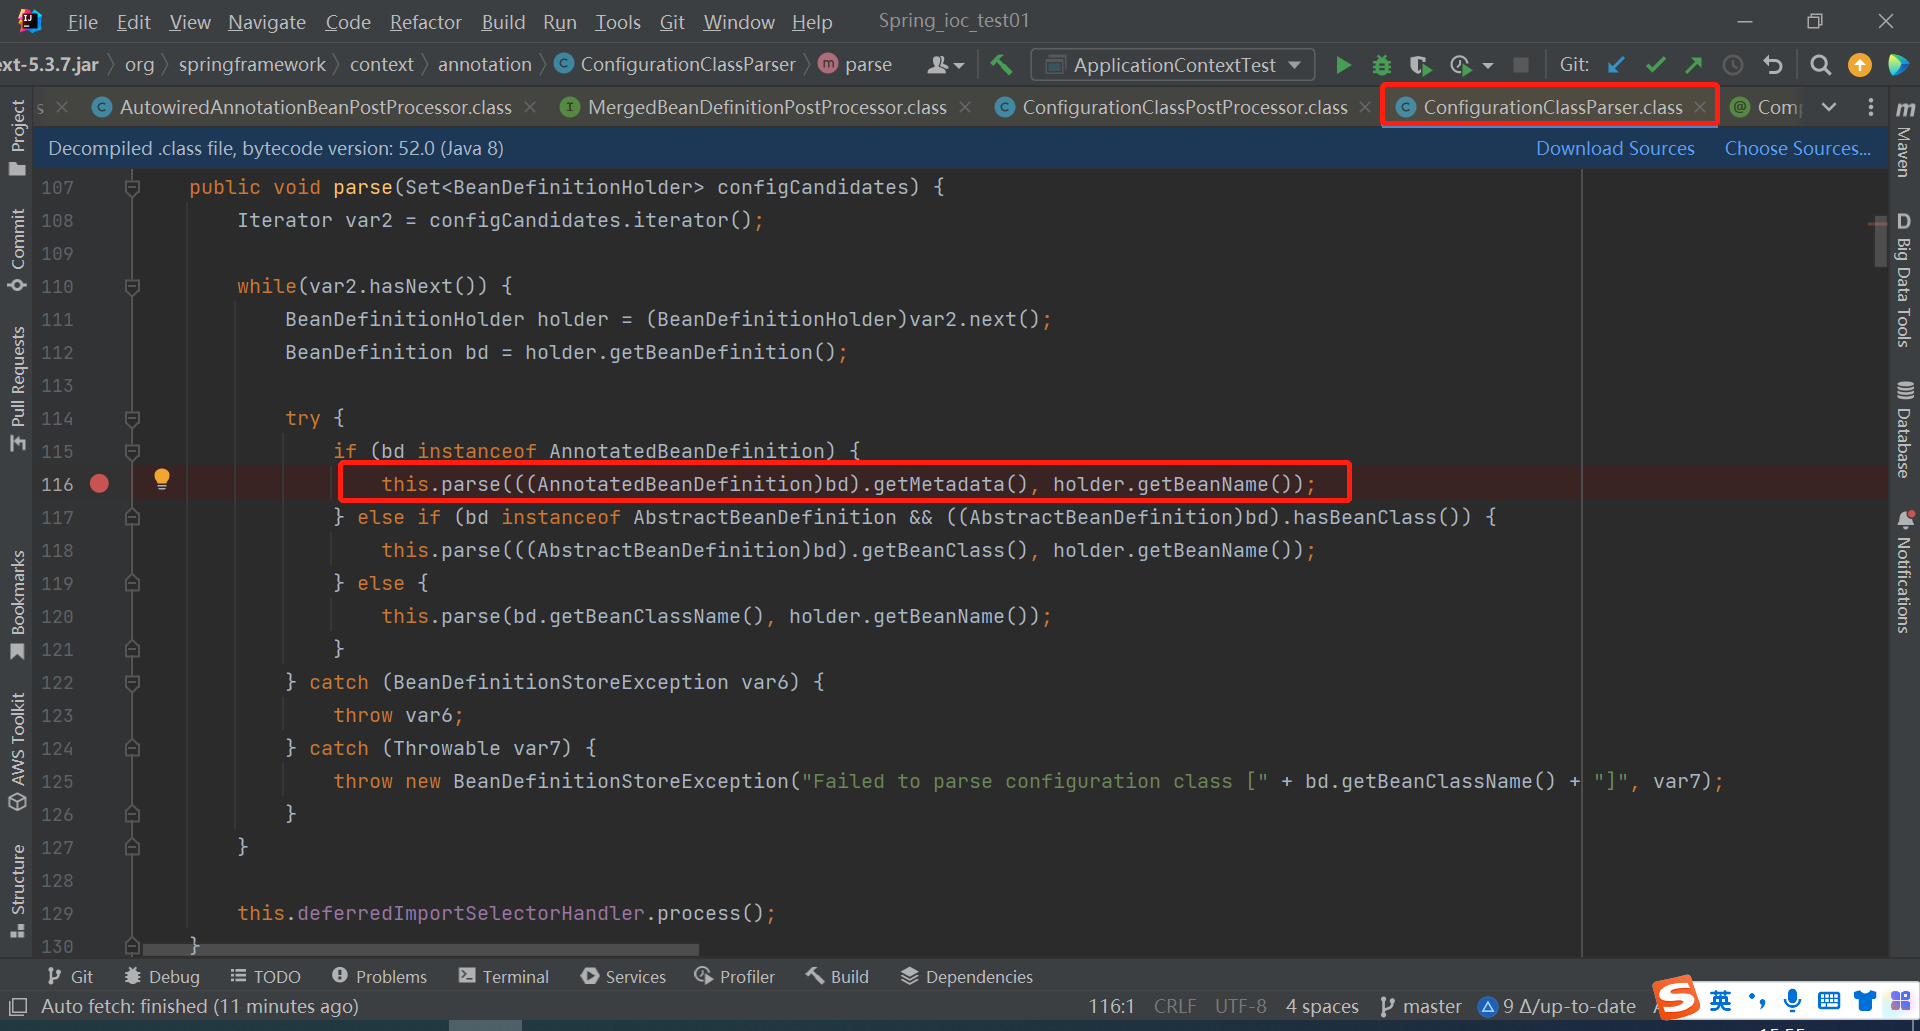
点进processConfigurationClass方法
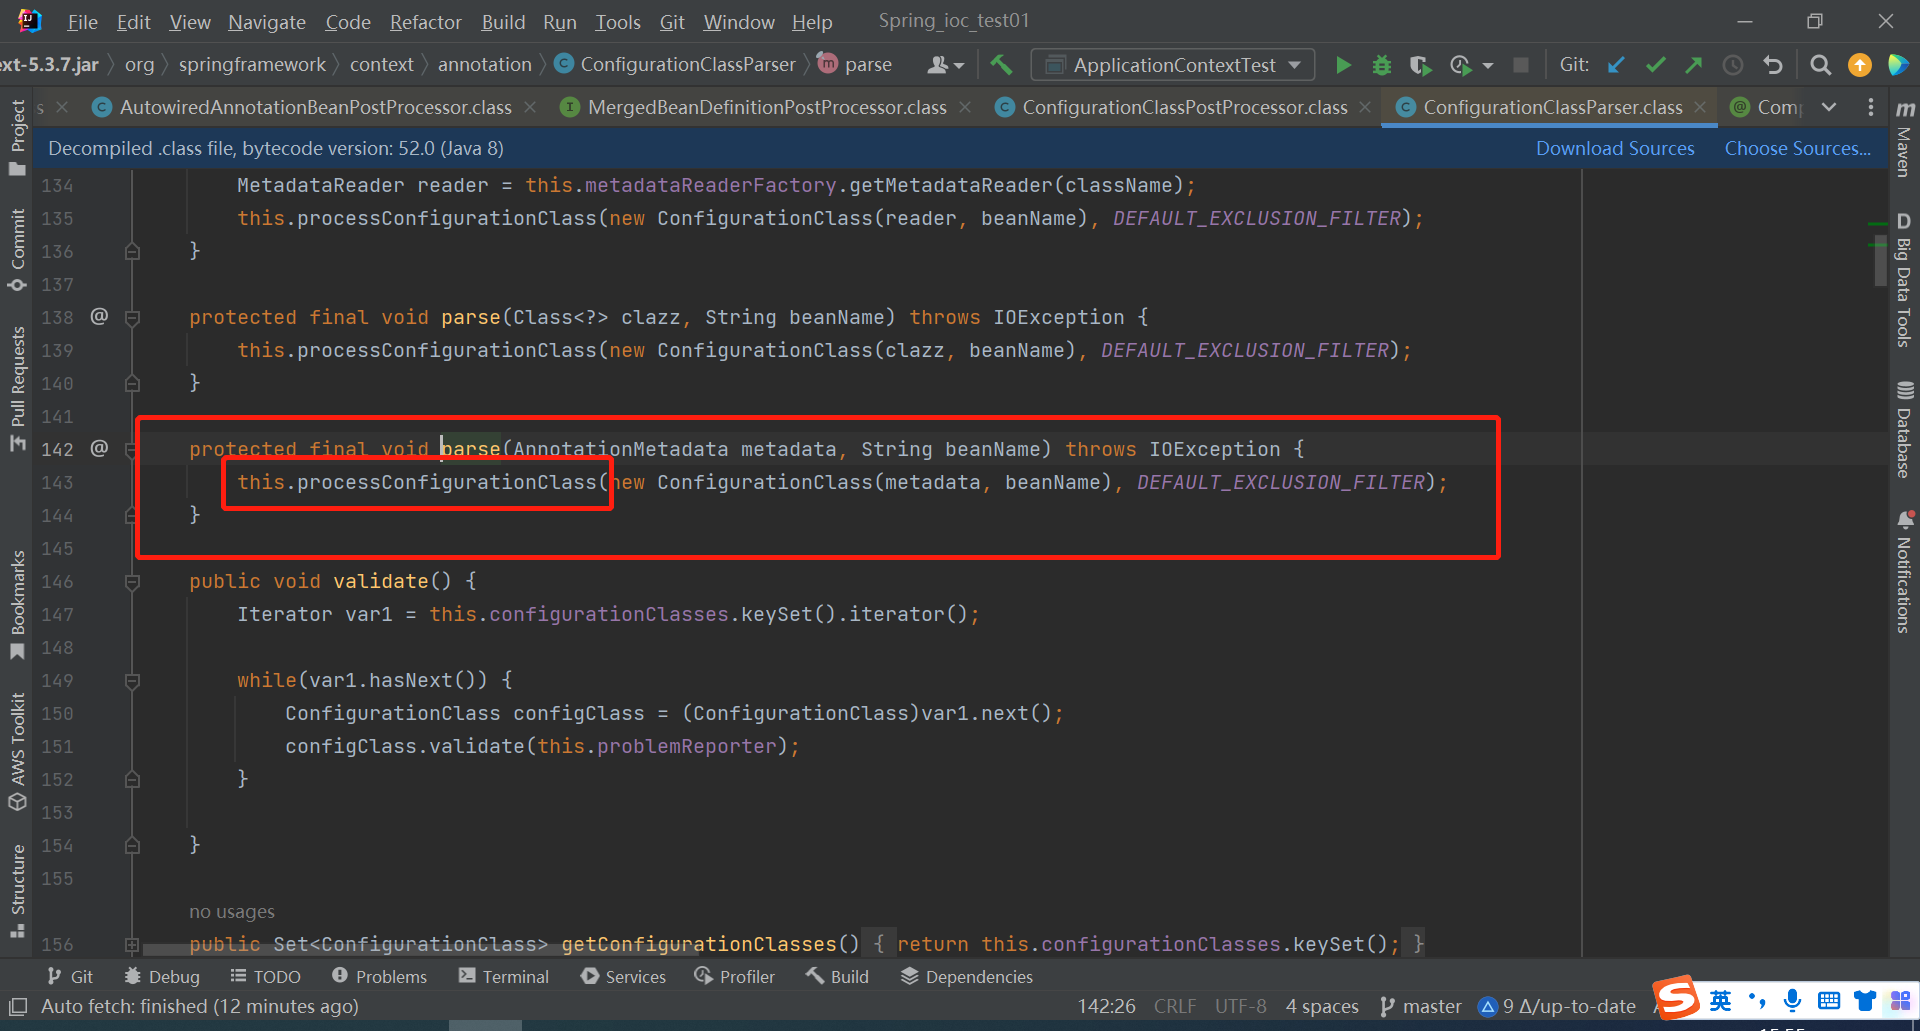
再点进下面这个方法
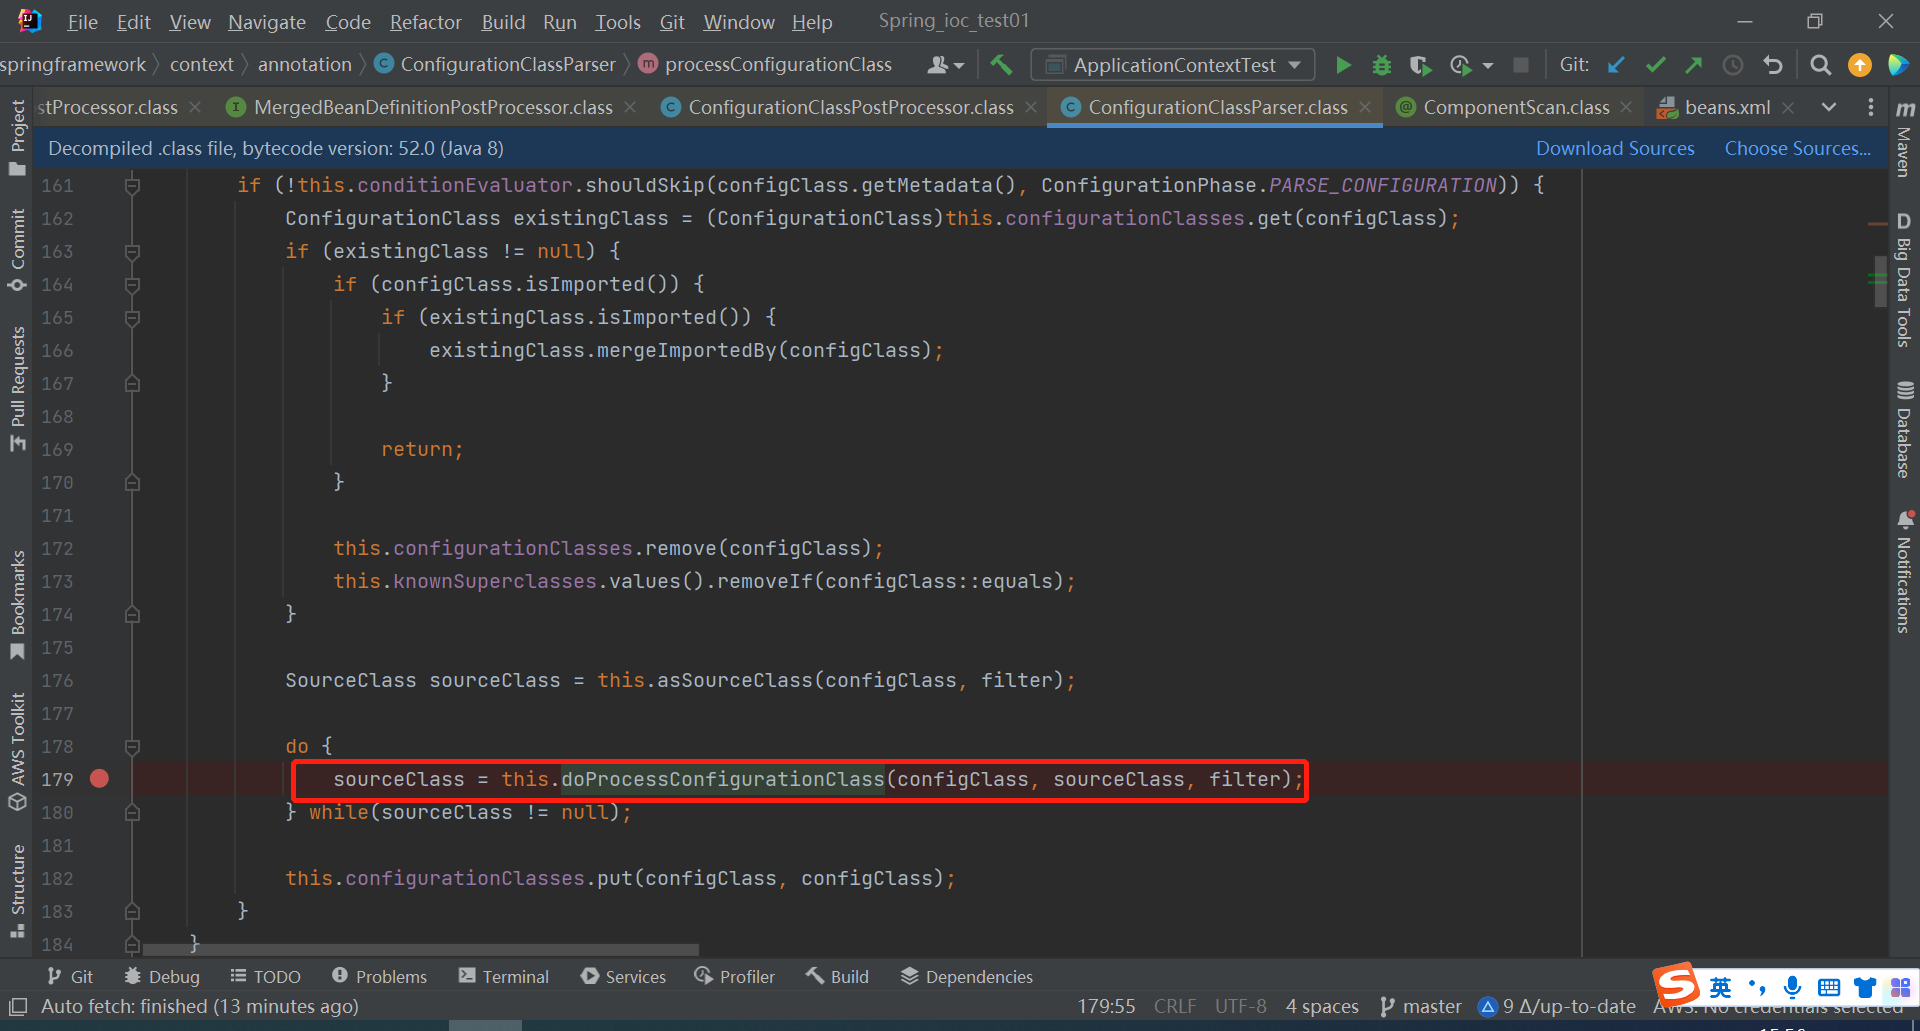
再点进下面parse方法
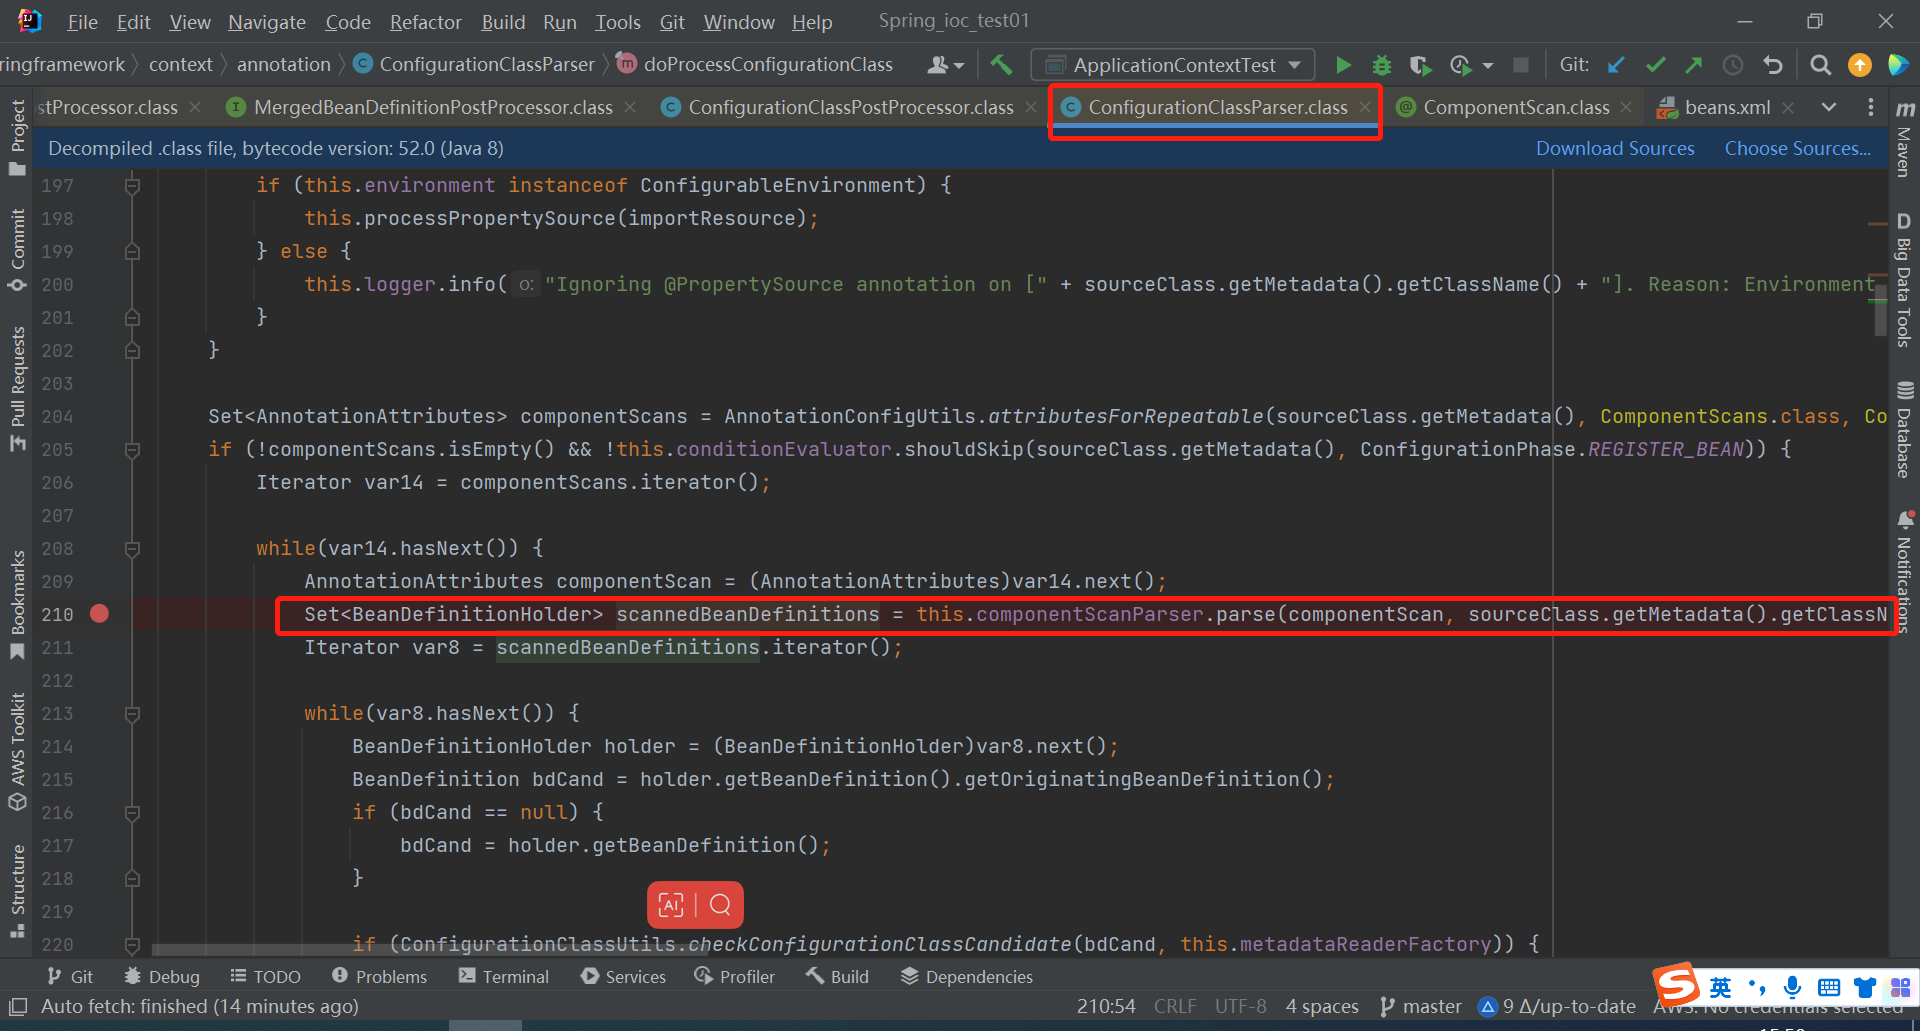
点进去下面的ClassPathBeanDefinitionScanner类doScan方法
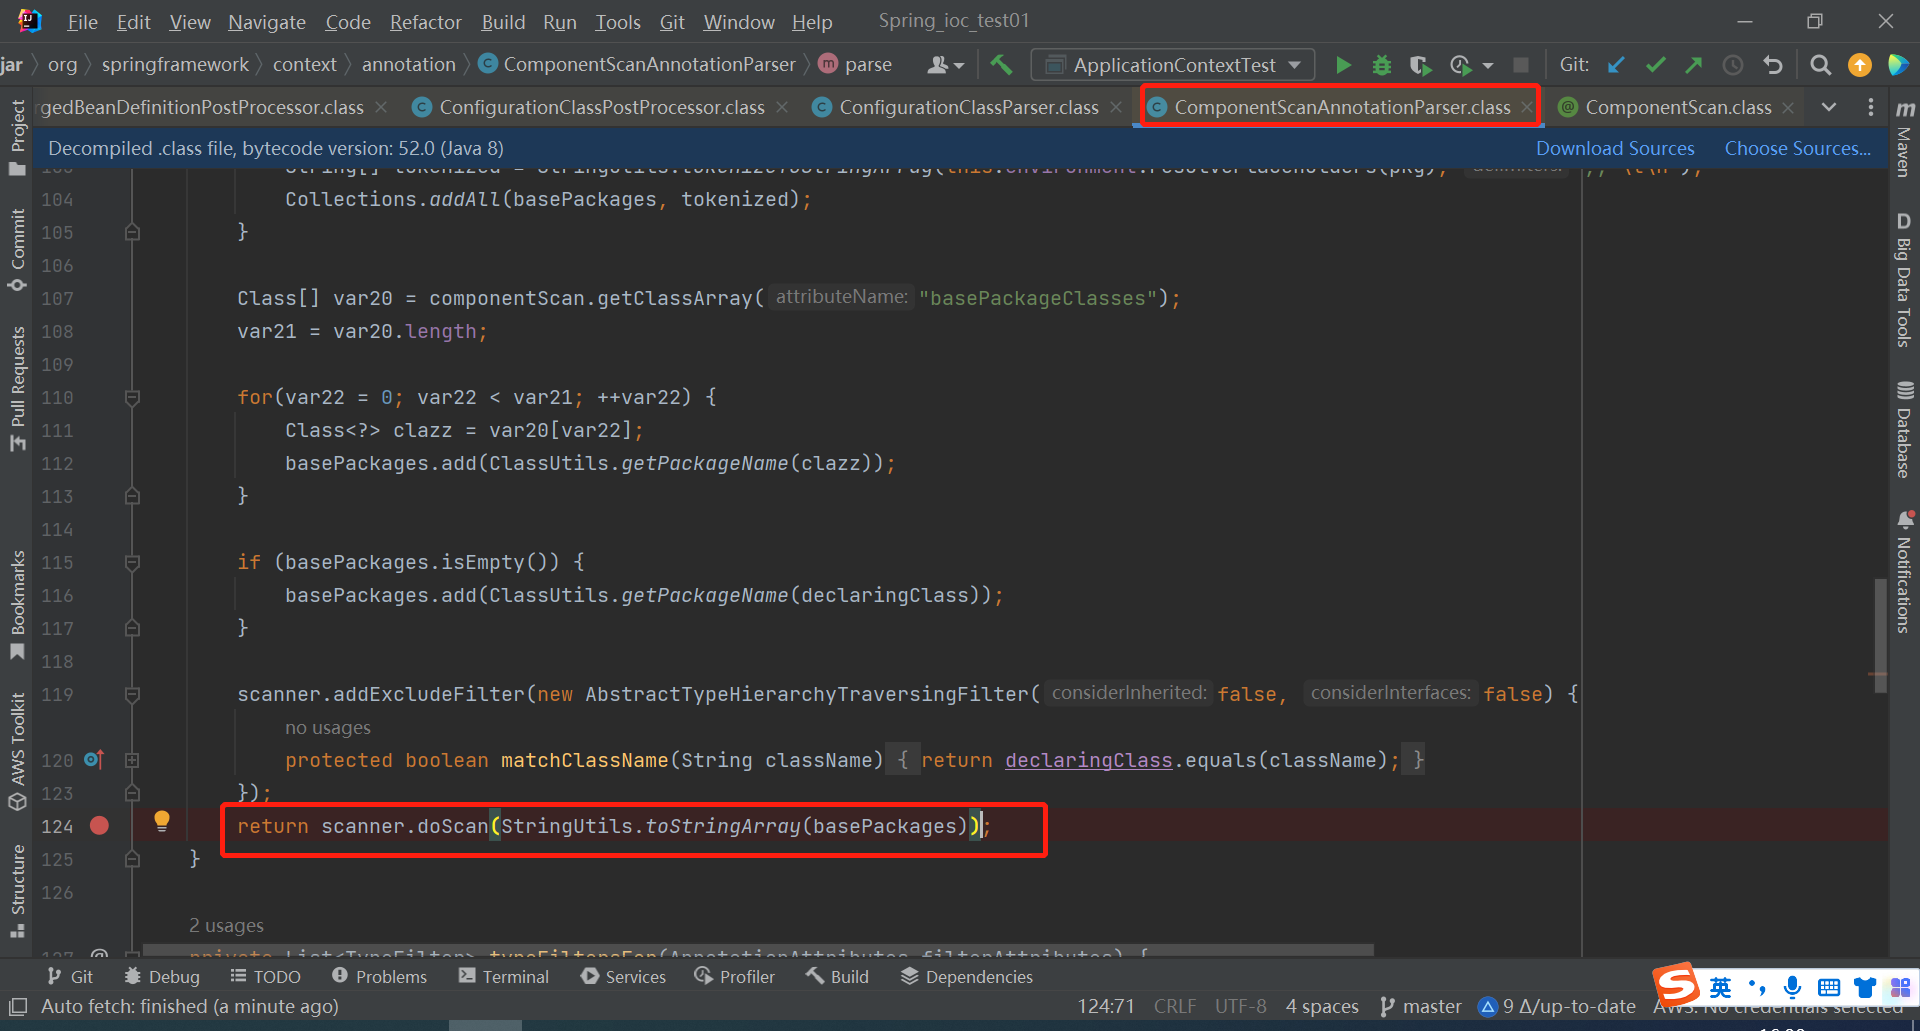
scanner就是ClassPathBeanDefinitionScanner
与xml方法中的是同一个扫描器
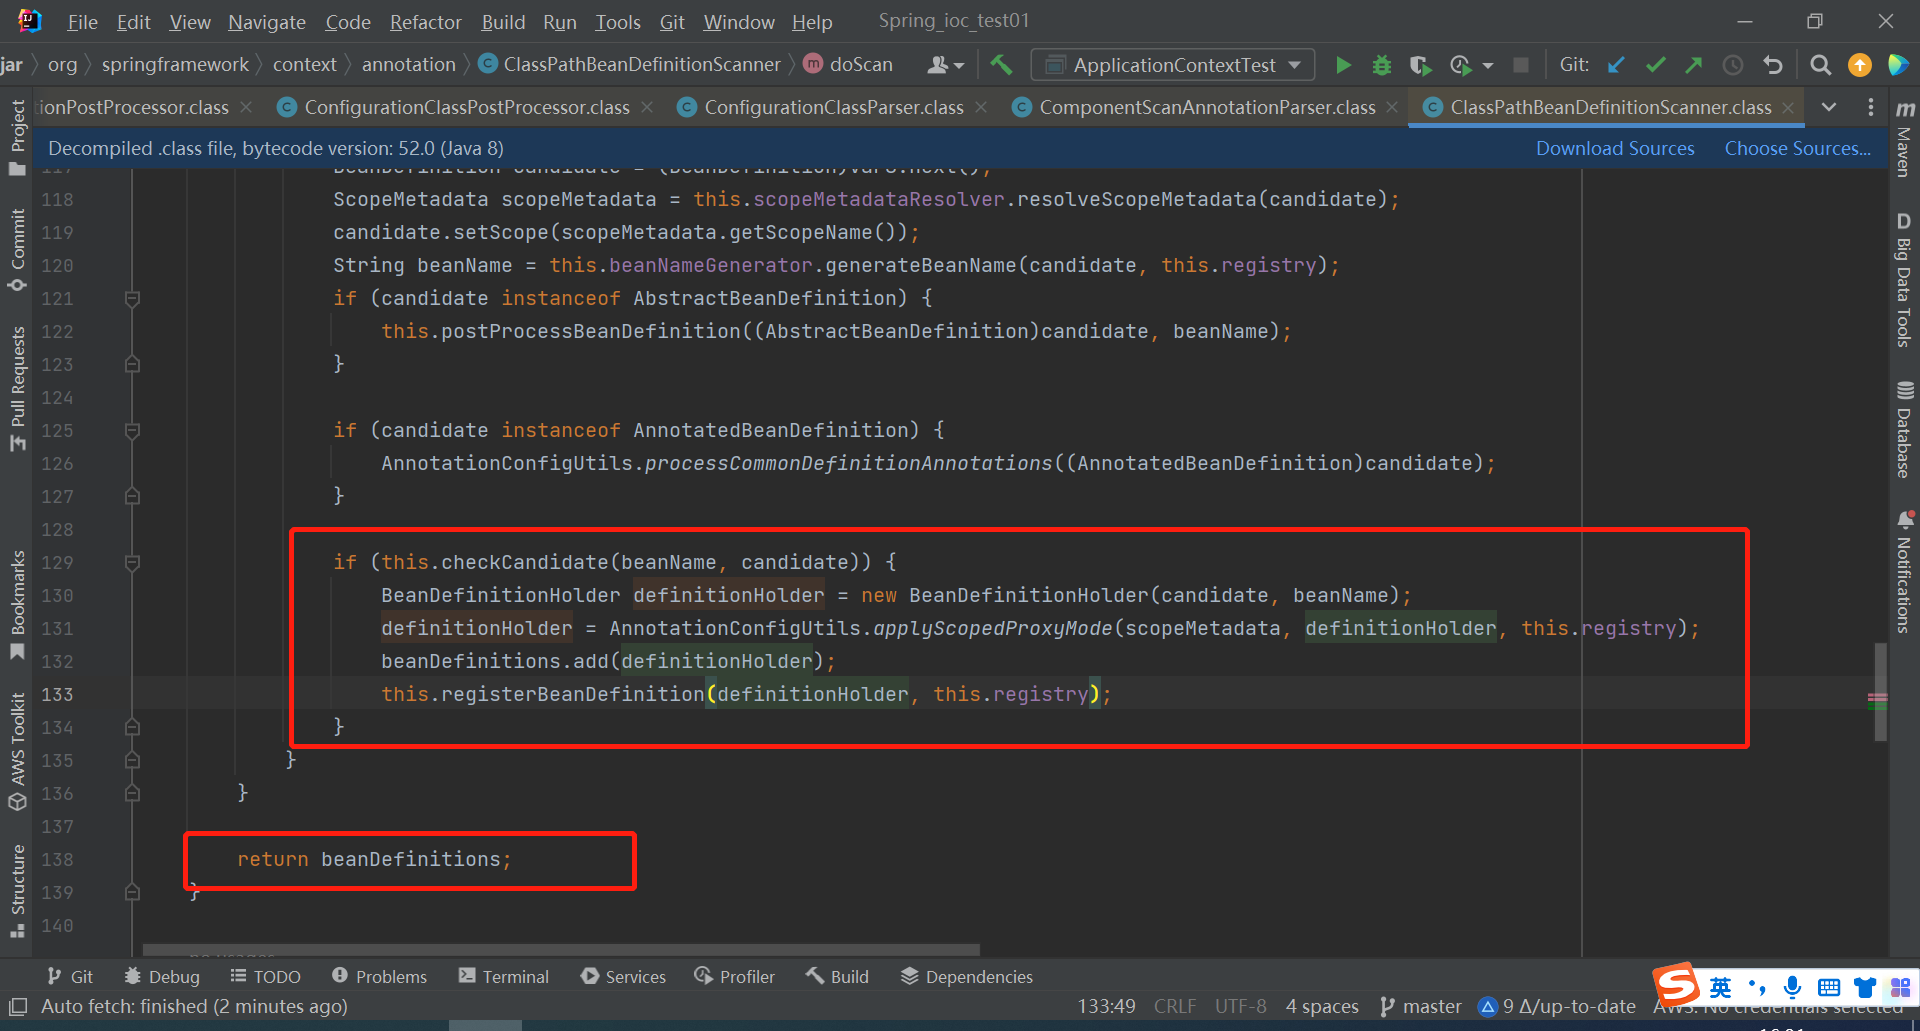
然后发现下面的这段代码与xml方式组件扫描时同一段代码
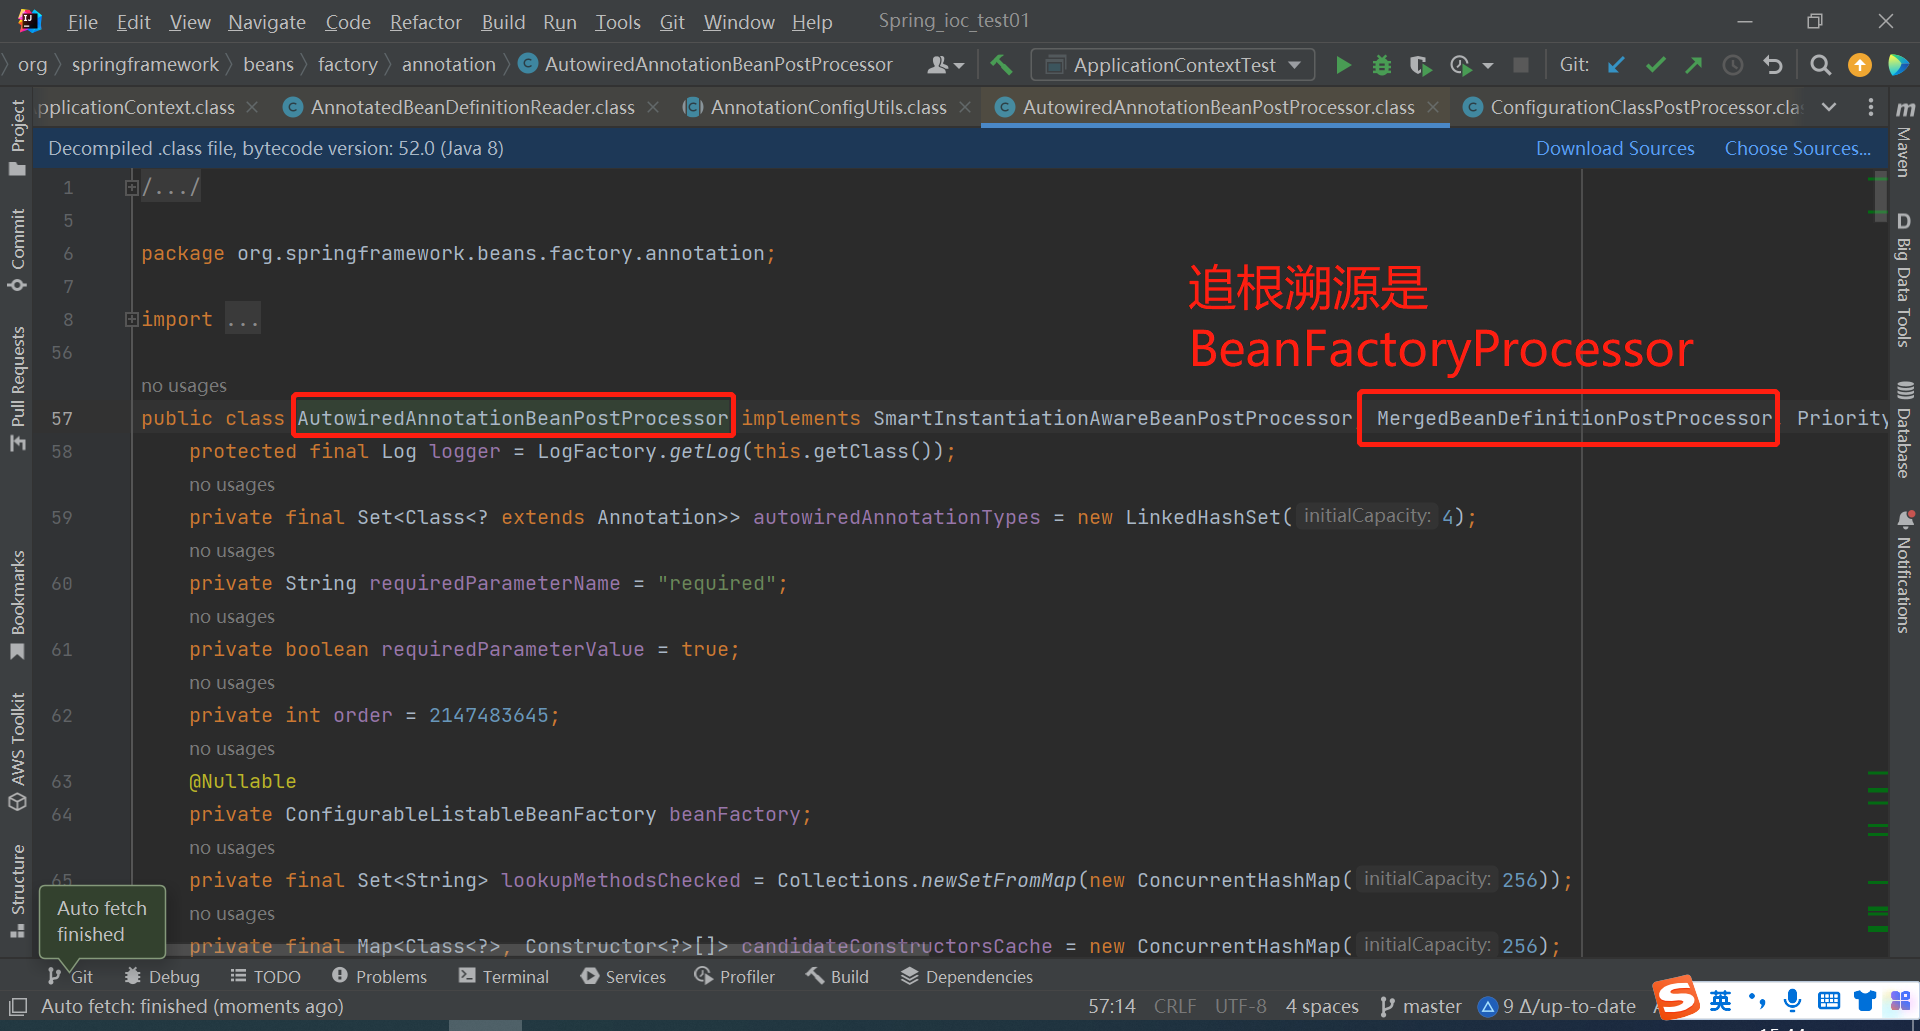
然后我们再回到AnnotationConfigUtils类中看AutowiredAnnotationBeanPostProcessor.class是什么东西,点击去看一看
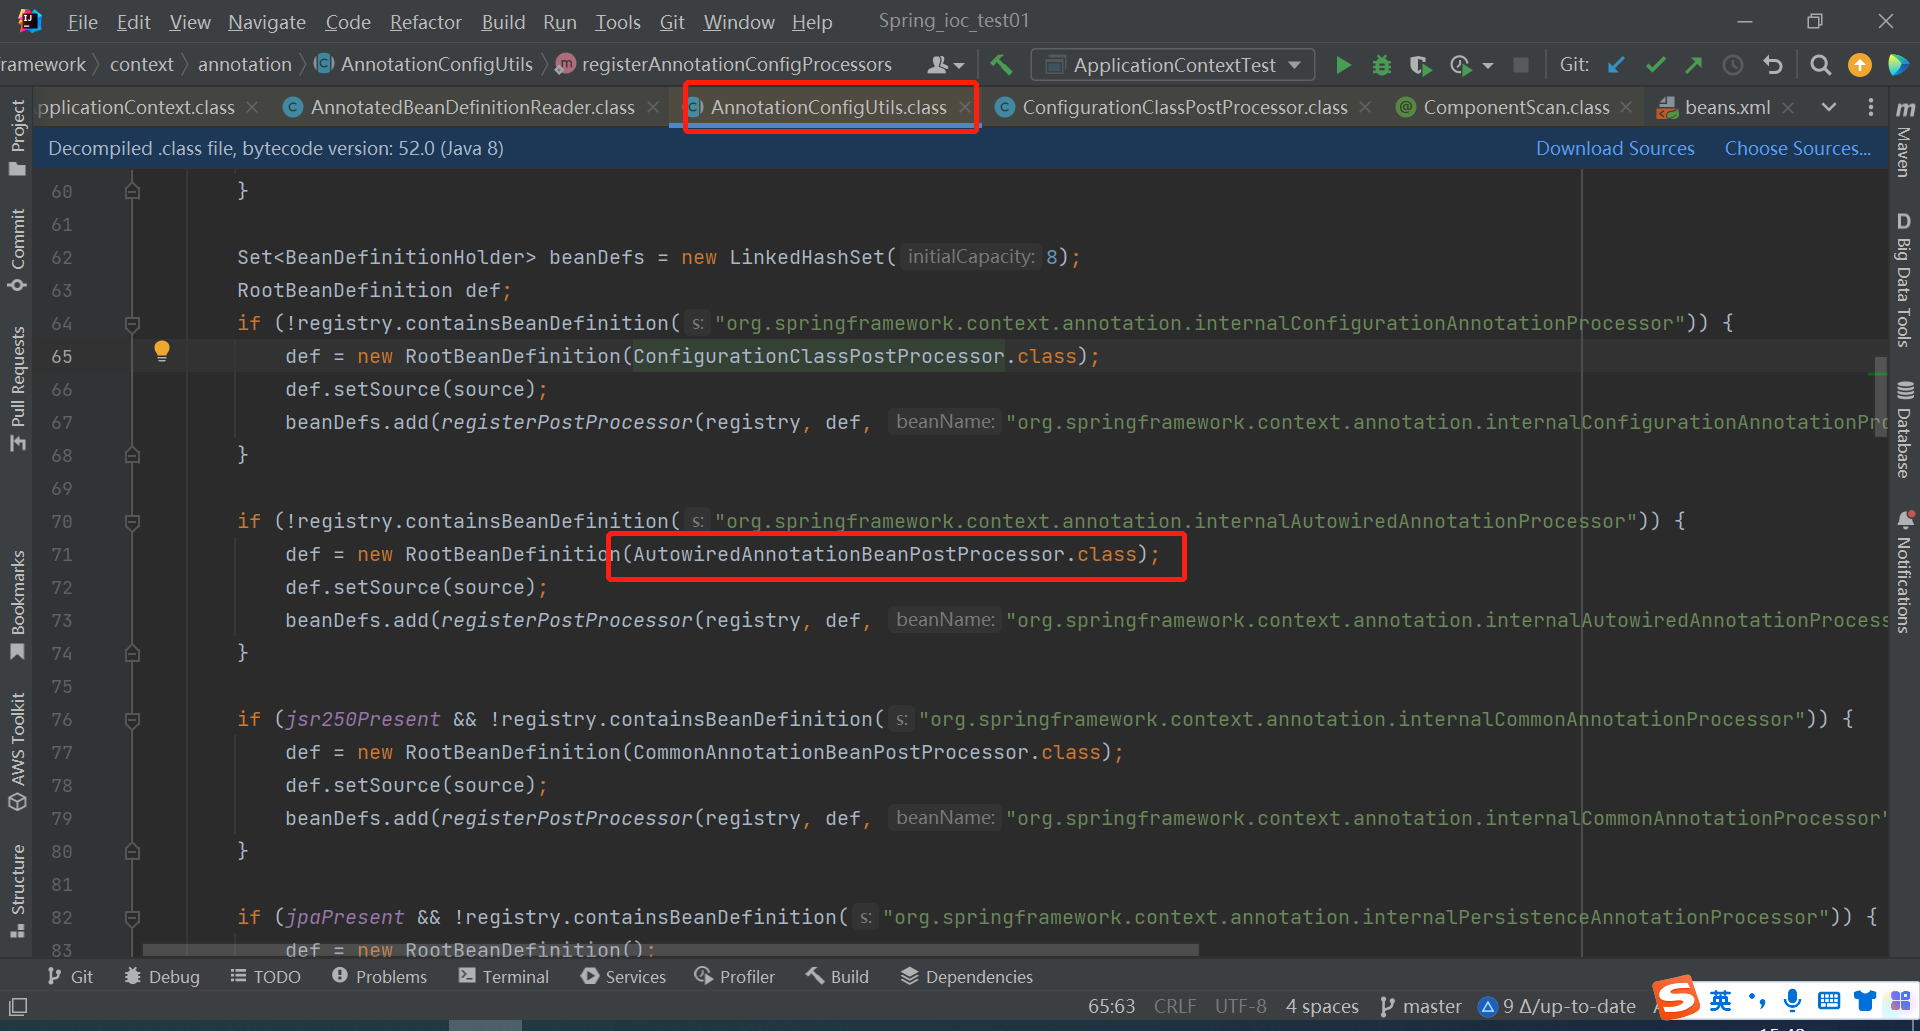
AutowiredAnnotationBeanPostProcessor类实现了一个接口MergedBeanDefinitionPostProcessor,MergedBeanDefinitionPostProcessor接口又实现了BeanPostProcessor接口
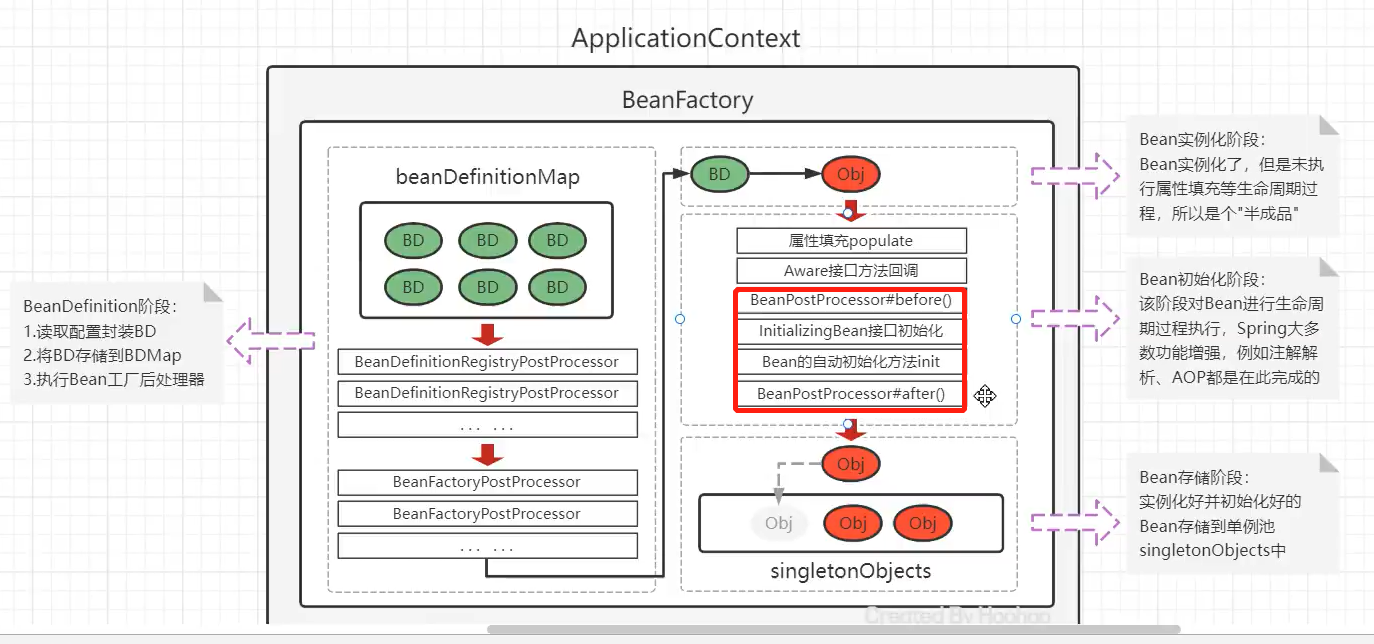
BeanPostProcessor接口在下图见过
AutowiredAnnotationBeanPostProcessor类是进行属性注入的,属性注入的过程就是在Bean生命周期的过程中
6.3 总结
看得我头疼,这部分二十分钟的课,我看了两个多小时
不管是xml方式组件扫描还是注解方式组件扫描,最终的扫描方式是一样的,都是使用ClassPathBeanDefinitionScanner扫描器的doScan方法
XML方式组件扫描直接在自定义命名空间的parse当中执行组件扫描最终解析
注解组件扫描是把BeanDefinitionRegistryPostProcessor注入容器之中最终内部再去执行ClassPathBeanDefinitionScanner扫描器的doScan方法,注册BeanDefinition

七、注解方式整合Mybatis
7.1 注解方式整合
之前的配置方式
<!--配置数据源-->
<bean id="dataSource" class="com.alibaba.druid.pool.DruidDataSource">
   <property name="url" value="jdbc:mysql://localhost:3306/mybatis"></property>
   <property name="username" value="root"></property>
   <property name="password" value="root"></property>
</bean>

<!--配置SqlSessionFactoryBean-->
<bean class="org.mybatis.spring.SqlSessionFactoryBean">
   <property name="dataSource" ref="dataSource"></property>
</bean>

<!--配置Mapper包扫描-->
<bean class="org.mybatis.spring.mapper.MapperScannerConfigurer">
    <property name="basePackage" value="com.itheima.dao"></property>
</bean>
如今的配置方式
@Configuration
@ComponentScan("com.zhangjingqi")
@MapperScan("com.zhangjingqi.mapper")
public class SpringConfig {
    @Bean
    public DataSource dataSource(){
        DruidDataSource dataSource = new DruidDataSource();
        dataSource.setDriverClassName("com.mysql.cj.jdbc.Driver");
        dataSource.setUrl("jdbc:mysql://localhost:3306/mybatis");
        dataSource.setUsername("root");
        dataSource.setPassword("root");

        return dataSource;
    }

    @Bean
    public SqlSessionFactoryBean sqlSessionFactoryBean(DataSource dataSource){
       SqlSessionFactoryBean sqlSessionFactoryBean = new SqlSessionFactoryBean();
       sqlSessionFactoryBean.setDataSource(dataSource);
       return sqlSessionFactoryBean;
     }

}
扫描
ApplicationContext applicationContext = new AnnotationConfigApplicationContext(SpringConfig.class);
7.2 原理
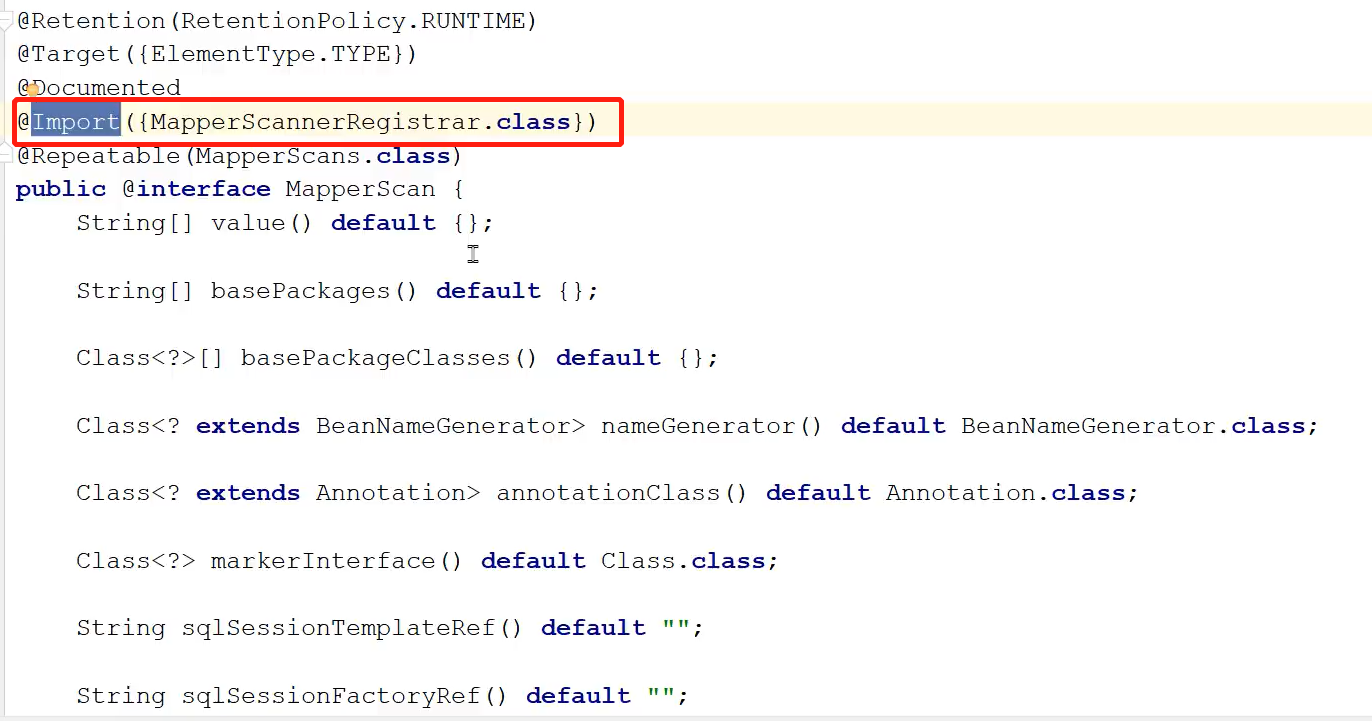
,Spring整合MyBatis的原理,关键在于@MapperScan,@MapperScan不是Spring提供的注解,是MyBatis为了整合Spring,在整合包org.mybatis.spring.annotation中提供的注解
@MapperScan注解内部有一个注解是@Import,然后导入了一个类MapperScannerRegister
点进MapperScannerRegister类,发现此类实现一个接口ImportBeanDefinitionRegister,一看就是一个BeanDefinition注册器
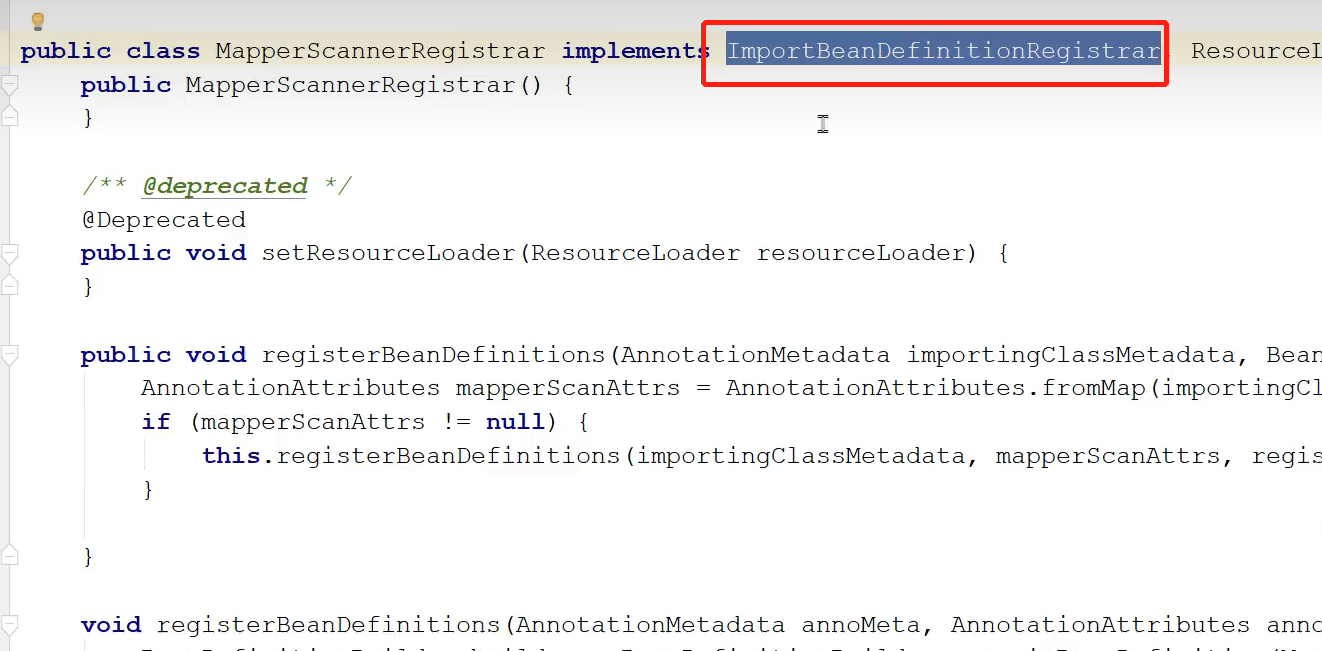
ImportBeanDefinitionRegister接口中有一个方法registerBeanDefinitions

再回到MapperScannerRegister类中,搜一下registerBeanDefinitions方法
然后发现类MapperScannerRegister中对registerBeanDefinitions方法重载了

看一下重载的registerBeanDefinitions方法,然后发现此方法中在构建BeanDefinition时传入了MapperScannerConfig类
<!--配置Mapper包扫描-->
<bean class="org.mybatis.spring.mapper.MapperScannerConfigurer">
    <property name="basePackage" value="com.itheima.dao"></property>
</bean>
这个类就是在xml配置文件中配置的类org.mybatis.spring.mapper.MapperScannerConfigurer

MapperScannerConfigurer实现了BeanDefinitionRegisterProcessor接口,这个接口我们见到了很多次了
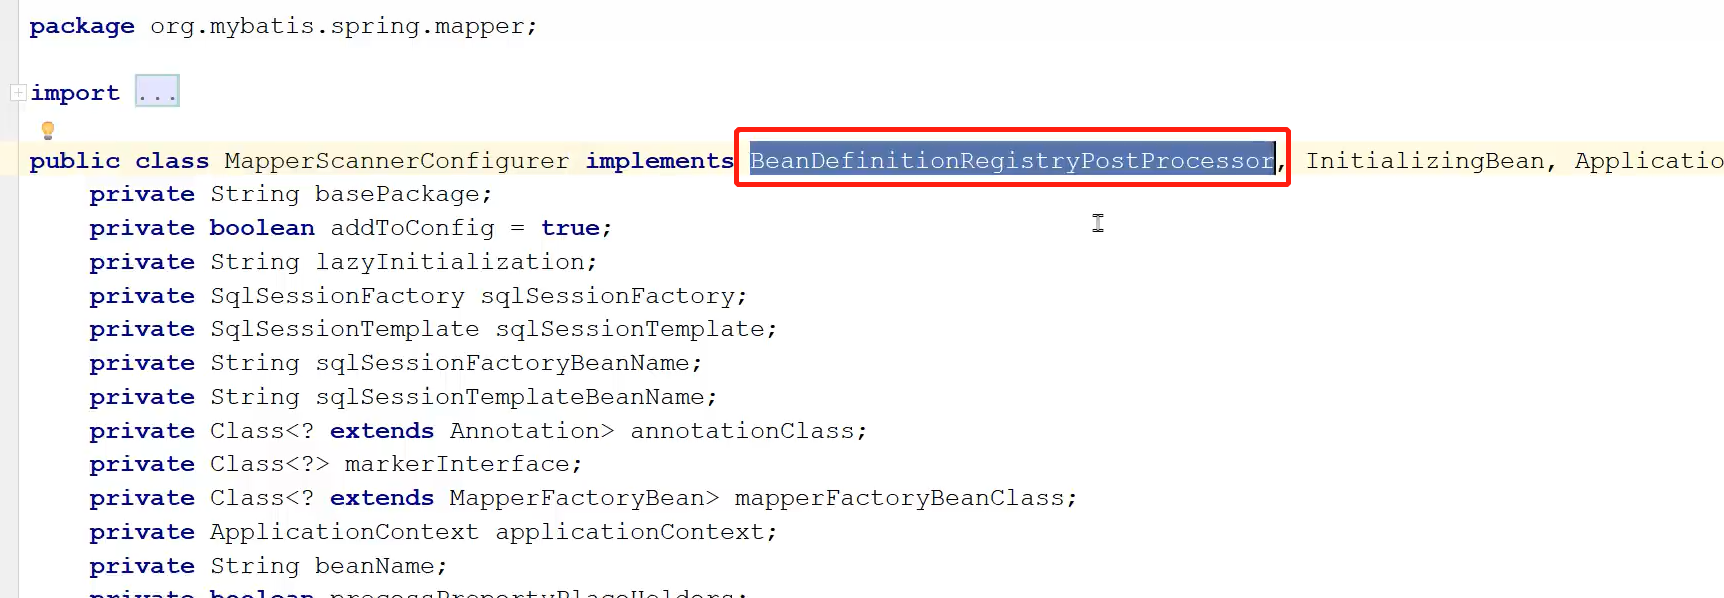
不管是注解方式还是xml方式,最终还会回到MapperScannerConfigurer
八、@Import 整合三方框架原理
自定义Springboot的Start会用到这个注解SpringBoot原理——起步依赖与自动装配以及自定义starter_
@Import可以导入如下三种类
- 普通的配置类
- 实现ImportSelector接口的类
- 实现ImportBeanDefinitionRegistrar接口的类
第一种在上面演示过了,演示第二种和第三种
8.1 实现ImportSelector接口的类
配置类
@Configuration
@ComponentScan("com.zhangjingqi")
@Import(MyImportSelector.class)
public class SpringConfig {...}
实现ImportSelector接口的类
public class MyImportSelector implements ImportSelector {
    public String[] selectImports(AnnotationMetadata annotationMetadata) {
        // 返回的是一个数组,封装的是需要被注册到Spring容器中的Bean的全限定名(全包名)
//        return new String[0];
        return new String[]{OtherBean2.class.getName()};
    }
}
我们这个类要注入容器当中
public class OtherBean2 {
}
测试一下
这里是根据类型获取,如果是根据beanName的话非常的长,是类的全限定名
ApplicationContext applicationContext = new AnnotationConfigApplicationContext(SpringConfig.class);
Object otherBean2 = applicationContext.getBean("otherBean2");
System.out.println(otherBean2);
参数annotationMetadata叫做注解媒体数组,该对象内部封装的是当前使用使用了@Import注解的类上的其他注解的元信息
比如MyImportSelector类是在SpringConfig类中导入的,则annotationMetadata参数就维护着SpringConfig类上其他注解的信息,比如说SpringConfig类上的@Configuration注解与@ComponentScan(“com.zhangjingqi”)注解。这些都是可以获取到的
尝一下
public class MyImportSelector implements ImportSelector {
    public String[] selectImports(AnnotationMetadata annotationMetadata) {
//       参数是一个注解的全限定名
//        annotationMetadata.getAnnotationAttributes("org.springframework.context.annotation.ComponentScan");
        Map<String, Object> annotationAttributes = annotationMetadata.getAnnotationAttributes(ComponentScan.class.getName());
        annotationAttributes.forEach((attrName,attrValue)->{
            System.out.println(attrName+"="+attrValue);
        });

        // 返回的是一个数组,封装的是需要被注册到Spring容器中的Bean的全限定名(全包名)
//        return new String[0];
        return new String[]{OtherBean2.class.getName()};
    }
}
控制台输出的内容,有一些看不太懂

8.2 实现ImportBeanDefinitionRegistrar接口的类
也是向容器当中注入BeanDefinition
ImportBeanDefinitionRegistrar接口类
public class MyImportBeanDefinitionRegistrar implements ImportBeanDefinitionRegistrar {
    @Override
    public void registerBeanDefinitions(AnnotationMetadata importingClassMetadata, BeanDefinitionRegistry registry, BeanNameGenerator importBeanNameGenerator) {
//      向容器当中注入BeanDefinition
        BeanDefinition beanDefinition = new RootBeanDefinition();
        beanDefinition.setBeanClassName(OtherBean2.class.getName());
        registry.registerBeanDefinition("otherBean2",beanDefinition);
    }
}
配置类
@Configuration
@ComponentScan("com.zhangjingqi")
@Import(MyImportBeanDefinitionRegistrar.class)
public class SpringConfig {...}
测试类
ApplicationContext applicationContext = new AnnotationConfigApplicationContext(SpringConfig.class);
Object otherBean2 = applicationContext.getBean("otherBean2");
System.out.println(otherBean2);
8.3 @Import注解参数是注解时
自定义注解
@Retention(RetentionPolicy.RUNTIME)
@Target(ElementType.TYPE)
@Import(MyImportBeanDefinitionRegistrar.class)
public @interface MyMapperScan {

}
在下面配置类添加MyMapper自定义注解,相当于把@Import(MyImportBeanDefinitionRegistrar.class)语句藏了一层
@Configuration
@ComponentScan("com.zhangjingqi")
//@Import(MyImportBeanDefinitionRegistrar.class)
@MyMapperScan
public class SpringConfig {.....}
MyImportBeanDefinitionRegistrar类中方法
public class MyImportBeanDefinitionRegistrar implements ImportBeanDefinitionRegistrar {
    @Override
    public void registerBeanDefinitions(AnnotationMetadata importingClassMetadata, BeanDefinitionRegistry registry, BeanNameGenerator importBeanNameGenerator) {
//      向容器当中注入BeanDefinition
        BeanDefinition beanDefinition = new RootBeanDefinition();
        beanDefinition.setBeanClassName(OtherBean2.class.getName());
        registry.registerBeanDefinition("otherBean2",beanDefinition);
    }
}





![设计模式-02.经典设计原则-第二节[必读]](https://img-blog.csdnimg.cn/990319dc459a4bdfa710d1bde387f84d.png)


![[SQL Server]数据库入门之多表查询](https://img-blog.csdnimg.cn/1eb3d97d33b44ab691a9728de479cfb9.gif)
