Mysql数据库--修改root密码的几种方法(忘记密码&知道密码)
- 🔻一、知道密码情况--修改root密码
- ⛳ 1.1 方式1:`alter` 命令修改
- ⛳ 1.2 方式2:`set password`命令修改
- 🔻二、忘记密码情况-修改root密码
- ⛳ 2.1 方式1:`--init-file`选项启动mysql
- 2.1.1 🎈 停止mysql服务
- 2.1.2 🎈 创建mysql-init-file.txt文件
- 2.1.3 🎈 init-file的权限(最好赋权一下)
- 2.1.3 🎈 使用--init-file选项启动mysql服务
- 2.1.4 🎈 新密码连接测试(密码:Zyl@123321)
- 2.1.5 🎈停止init-file启动的mysql进程并正常启动
- 2.1.5 🎈 登录之后即可在mysql命令行修改为其他常用密码(此时知道密码情况--修改root密码)
- ⛳ 2.2 方式2:使用`skip-grant-tables` 参数,跳过授权验证
- 2.2.1 🎈 停止mysql服务
- 2.2.2 🎈 通过`--skip-grant-tables` 参数启动mysql服务
- 2.2.3 🎈 或者通过my.cnf 文件配置`skip-grant-tables` 参数启动mysql服务
- 🔻三、总结—温故知新
🔻一、知道密码情况–修改root密码
⛳ 1.1 方式1:alter 命令修改
- 🍁 通过
alter user root identified by '新密码';
mysql> use mysql;

mysql>  alter user root@'localhost' identified by 'Zyl@123456';
Query OK, 0 rows affected (0.01 sec)

mysql>
⛳ 1.2 方式2:set password命令修改
- 🍁 通过
set password for 用户名@'用户地址' = '新密码';
mysql> use mysql;

mysql> set password for 'root'@'localhost' = 'Zyl@123456';
Query OK, 0 rows affected (0.01 sec)

mysql>
🔻二、忘记密码情况-修改root密码
⛳ 2.1 方式1:--init-file选项启动mysql
2.1.1 🎈 停止mysql服务
[root@db-server ~]# systemctl stop mysqld
[root@db-server ~]# systemctl status mysqld
● mysqld.service - MySQL Server
   Loaded: loaded (/usr/lib/systemd/system/mysqld.service; enabled; vendor preset: disabled)
   Active: failed (Result: exit-code) since Wed 2023-06-07 11:11:00 CST; 51min ago
     Docs: man:mysqld(8)
           http://dev.mysql.com/doc/refman/en/using-systemd.html
  Process: 2450 ExecStart=/usr/sbin/mysqld $MYSQLD_OPTS (code=exited, status=1/FAILURE)
  Process: 2426 ExecStartPre=/usr/bin/mysqld_pre_systemd (code=exited, status=0/SUCCESS)
 Main PID: 2450 (code=exited, status=1/FAILURE)
   Status: "Server shutdown complete"
    Error: 13 (Permission denied)

Jun 07 11:11:00 db-server systemd[1]: Starting MySQL Server...
Jun 07 11:11:00 db-server systemd[1]: mysqld.service: main process exited, code=exited, status=1/FAILURE
Jun 07 11:11:00 db-server systemd[1]: Failed to start MySQL Server.
Jun 07 11:11:00 db-server systemd[1]: Unit mysqld.service entered failed state.
Jun 07 11:11:00 db-server systemd[1]: mysqld.service failed.
[root@db-server ~]#
2.1.2 🎈 创建mysql-init-file.txt文件
[root@db-server home]# touch init-file
[root@db-server home]# vi init-file
[root@db-server home]# cat init-file

alter user 'root'@'localhost' identified by 'Zyl@123321';

[root@db-server home]# pwd
/home
[root@db-server home]#
2.1.3 🎈 init-file的权限(最好赋权一下)
[root@db-server home]# chmod 777 init-file
[root@db-server home]# chown mysql:mysql init-file
[root@db-server home]# ll
total 4
-rwxrwxrwx 1 mysql mysql 58 Jun  7 15:56 init-file
[root@db-server home]#
2.1.3 🎈 使用–init-file选项启动mysql服务
###启动命令####
mysqld --init-file=/home/init-file --user=mysql &

[root@db-server ~]# mysqld --init-file=/home/init-file --user=mysql &
[1] 1983
[root@db-server ~]#
2.1.4 🎈 新密码连接测试(密码:Zyl@123321)
mysql -u root -pZyl@123321

2.1.5 🎈停止init-file启动的mysql进程并正常启动
[root@db-server home]# ps -ef | grep mysql
mysql      1983      1  1 16:28 ?        00:00:13 mysqld --init-file=/home/init-file --user=mysql
root       2104   2048  0 16:50 pts/1    00:00:00 systemctl start mysqld
mysql      2134      1  1 16:50 ?        00:00:00 /usr/sbin/mysqld
root       2150   2048  0 16:50 pts/1    00:00:00 grep --color=auto mysql
[root@db-server home]# kill -9 1983

####正常启动mysql###
[root@db-server home]# systemctl start mysqld
[root@db-server home]# systemctl status mysqld

2.1.5 🎈 登录之后即可在mysql命令行修改为其他常用密码(此时知道密码情况–修改root密码)
- 🍁 通过
alter user root identified by '新密码';
mysql> use mysql;

mysql>  alter user root@'localhost' identified by 'Zyl@123456';
Query OK, 0 rows affected (0.01 sec)
mysql>


mysql>
- 🍁 通过
set password for 用户名@'用户地址' = '新密码';
mysql> use mysql;

mysql> set password for 'root'@'localhost' = 'Zyl@123456';
Query OK, 0 rows affected (0.01 sec)

mysql>
⛳ 2.2 方式2:使用skip-grant-tables 参数,跳过授权验证
--skip-grant-tables:跳过授权表认证--skip-networking:加了跳过授权表选项后所有的人都可以无密码登录,这是很不安全的,此选项不监听网络,防止恶意登录。
2.2.1 🎈 停止mysql服务
[root@db-server ~]# systemctl stop mysqld

2.2.2 🎈 通过--skip-grant-tables 参数启动mysql服务
[root@db-server ~]# sudo mysqld --skip-grant-tables --user=mysql &
[1] 2531
[root@db-server ~]# mysql
Welcome to the MySQL monitor.  Commands end with ; or \g.
Your MySQL connection id is 7
Server version: 8.0.32 MySQL Community Server - GPL

Copyright (c) 2000, 2023, Oracle and/or its affiliates.

Oracle is a registered trademark of Oracle Corporation and/or its
affiliates. Other names may be trademarks of their respective
owners.

Type 'help;' or '\h' for help. Type '\c' to clear the current input statement.

mysql>

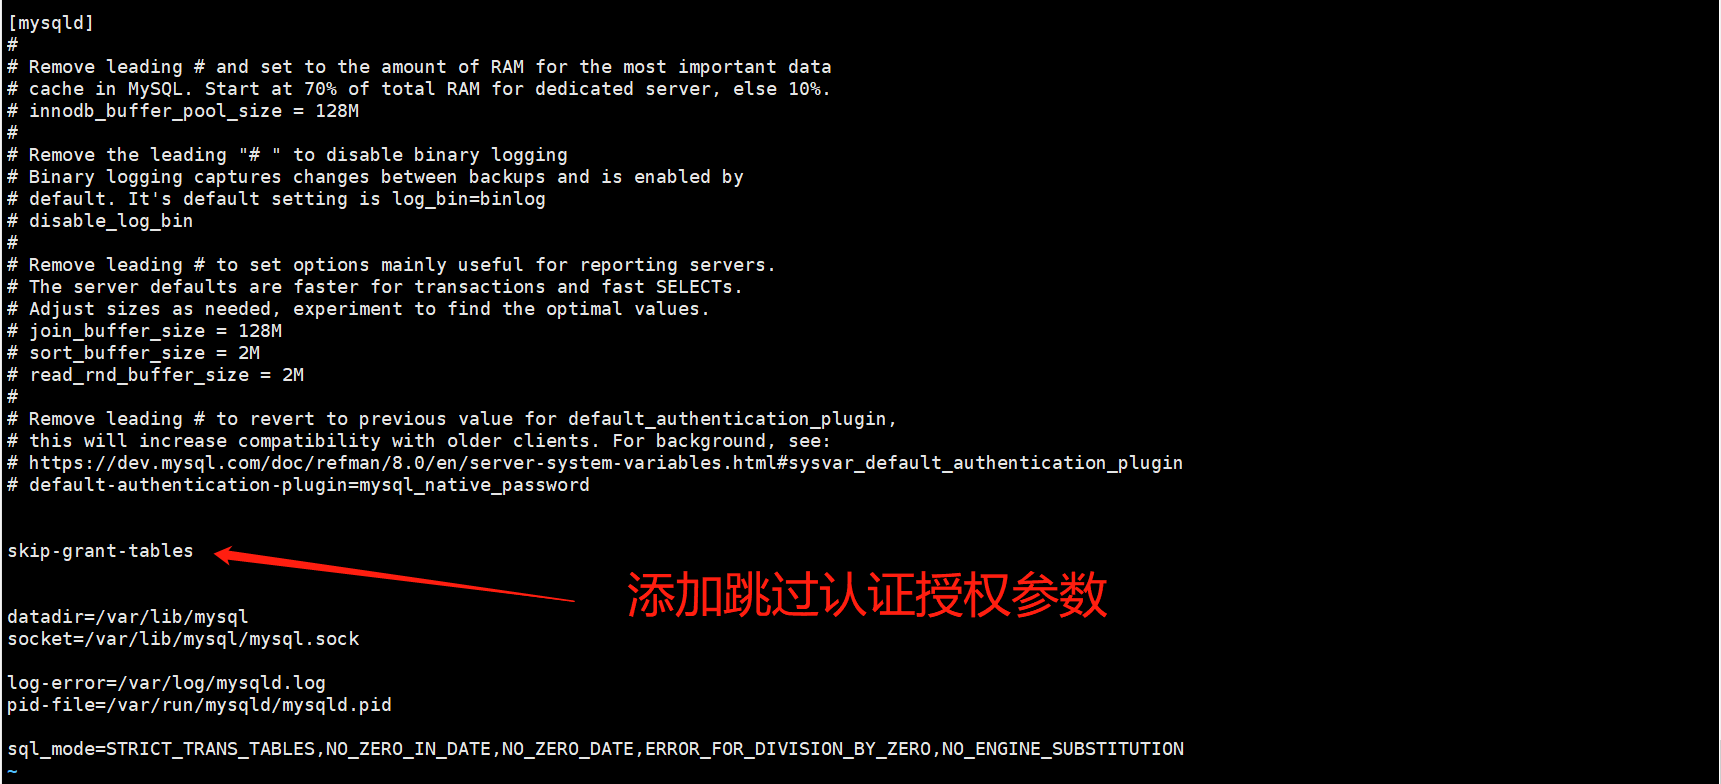
2.2.3 🎈 或者通过my.cnf 文件配置skip-grant-tables 参数启动mysql服务
注:修改完密码之后,去除该参数--以便保障数据库安全性。
[root@db-server ~]# vi /etc/my.cnf

####添加内容:
skip-grant-tables
- 启动mysql
[root@db-server home]# systemctl start mysqld

- 🍁 通过
alter user root identified by '新密码';
mysql> use mysql;

mysql>  alter user root@'localhost' identified by 'Zyl@123456';
Query OK, 0 rows affected (0.01 sec)
mysql>


mysql>
- 🍁 通过
set password for 用户名@'用户地址' = '新密码';
mysql> use mysql;

mysql> set password for 'root'@'localhost' = 'Zyl@123456';
Query OK, 0 rows affected (0.01 sec)

mysql>
注:修改完密码之后,去除 skip-grant-tables 参数--以便保障数据库安全性。
🔻三、总结—温故知新
❓ 本篇文章详细介绍了在linux中忘记mysql的root用户密码修改步骤。
❓ 温馨提示:不管是工作中,还是学习中,要养成备份的习惯,不要觉得太麻烦,或者觉得没必要,不要存在侥幸心理。
❓ 人有的时候总觉得很多事可以偷懒,但是有时候又要为自己的偷懒付出更大的代价。
| 👈【上一篇】 |
💖The End💖 点点关注,收藏不迷路💖
| 【下一篇】👉 |


